1
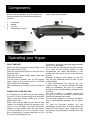
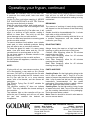
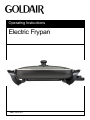
Operating Instructions
Electric Frypan
Item: FEP310
General care and safety guide
Thank you for choosing a Goldair Electric Fry Pan. This Goldair appliance
has been designed and manufactured to high standards of engineering
and with proper use and care, as described in this leaflet, will give you
years of useful service. Please read these instructions carefully and retain
for future reference.
ALWAYS
✔ Always ensure hands are dry before
handling the plug or the Electric Fry Pan.
✔ Always operate the Electric Fry Pan on a
secure, dry, level surface.
✔ Always allow adequate air space above and
on all sides for air circulation. Do not allow the
Electric Fry Pan to touch curtains, wall
coverings, clothing, dishtowels or other
flammable materials during use. Do not use
under cupboards or curtains.
✔ Caution is required on surfaces where heat
may cause a problem – an insulated pad is
recommended.
✔ Always be sure to unplug from the socket
when not in use and before cleaning.
✔ Always allow the Electric Fry Pan to cool
before cleaning and storing.
✔ Carry out regular checks of the supply cord
to ensure no damage is evident.
✔ Return the Electric Fry Pan after a
malfunction, or if it has been damaged in any
manner to an authorised electrician for
examination, repair or adjustment as special
purpose tools are required.
✔ Take care not to scratch the special coating
of the Electric Fry Pan. Use a wooden or heat
resistant plastic spatula.
CAUTION:
THE ELECTRIC FRYPAN GENERATES HEAT
AND STEAM DURING USE. PROPER
PRECAUTIONS MUST BE TAKEN TO
PREVENT THE RISK OF BURNS, SCALDS,
FIRES OR OTHER DAMAGE TO PERSONS.
THE CONNECTOR MUST BE REMOVED
BEFORE THE APPLIANCE IS CLEANED
AND THE APPLIANCE INLET MUST BE
DRIED BEFORE THE APPLIANCE IS USED
AGAIN.
THE ELECTRIC FRY PAN MUST ONLY BE
USED WITH THE CONNECTOR PROVIDED
NEVER
✘ Never touch hot surfaces.
✘ Never use this appliance outdoors.
✘ Never use this appliance for any purpose
other than its intended use. This appliance is
for household use only or in similar applications
such as:
•
Staff kitchen areas in shops, offices and
other working environments;
•
Farm houses
•
By clients in hotels, motels and other
residential type environments;
•
Bed and breakfast type environments.
✘ This appliance is not intended for use by
persons (including children) with reduced
physical, sensory or mental capabilities or lack
of experience and knowledge, unless they are
supervised or have been given instruction
concerning the use of the Electric Fry Pan by a
person responsible for their safety.
✘ Close supervision is necessary when the
appliance is near children.
✘ Never leave the appliance unattended when
in use.
✘ Never place this appliance on or near a hot
gas or electric burner or where it could touch a
heated oven or microwave oven.
✘ Exercise caution if using foodstuffs
containing sugar or products containing jam or
preserves, as the fillings may become very hot.
✘ Never immerse any part of the Electric Fry
Pan, or cord set and plug in water or any other
liquid to protect against electrical hazards.
✘ Never use harsh, abrasive or caustic
cleaners to clean this appliance.
✘ Never operate the appliance with a
damaged cord or plug, after it malfunctions, or
if it has been damaged in any manner.
✘ The Electric Fry Pan is not intended to be
operated by means of an external timer or
separate remote-control system.
TECHNICAL SPECIFICATION
Item:
FEP310
Power Supply:
230-240VAC, 50Hz
Power:
1750W-1850W
Components
Remove the components from the plastic bag.
Check to ensure all of the following parts are
included:
1.
2.
3.
4.
as you may crack the glass.
1
Lid & Knob
Handle
Fry Pan
Temperature Control
2
3
4
Operating your frypan
“Seasoning” should be performed approximately
every four to six weeks.
Make sure the temperature control probe is not Do not let the Fry Pan get too hot without either
connected to the Fry Pan.
oil or food on the cooking surface as high
Clean the outside and bottom of the pan with a temperatures can cause discoloration of the
soft damp cloth.
surface and will reduce the life of the non-stick
Wash the lid in warm soapy water, rinse with surface.
clean water and dry.
Normally, a medium heat setting on your Fry
You will need to “season” your Fry Pan before Pan will give adequate heat for most of your
using. Refer to the second point in CARING cooking needs.
FOR YOUR FRY PAN below.
If high temperatures are required for your
After conditioning, your new Fry Pan is ready for cooking needs, it is best to introduce the heat
use.
slowly by preheating the pan on a medium
setting for a few minutes before turning the heat
CARING FOR YOUR FRY PAN
up further.
The use of plastic or wooden utensils will
It is important to look after the non-stick coating prolong the life of the non-stick coating. Metal
on your Fry Pan to ensure trouble free operation. utensils will damage the surface.
Using a non-stick surface allows you to cook The non-stick coating is a non-toxic substance
without fats or oils.
and if unintentionally ingested, will not cause
Wash, rinse and dry both the pan and lid and harm.
“season” the cooking surface by applying a thin To clean the non-stick surface, turn the
coat of oil to the base and sides and gently temperature control to the “0” setting, switch the
rubbing it in with a paper towel. Turn the control power off at the power outlet, unplug the cord
on full and allow to run for 2-3 minutes. If you and remove the temperature controller from the
are not planning on cooking anything, turn off Fry Pan.
the control and unplug the unit.
FIRST TIME USE
Operating your frypan, continued
CAUTION: the controller may be hot after use,
in particular the metal probe, take care when
removing it.
Let the Fry Pan cool before washing it. NEVER
PUT COLD WATER INTO A HOT FRY PAN as
this may cause the body to buckle.
Wash the non-stick surface, both inside and out
in clean warm water and mild detergent after
each use.
If you do not clean the Fry Pan after use, it will
result in a build-up of food residue, making it
difficult to clean later. The build up will also
cause damage to the non-stick surface.
Do not use steel wool products or scouring pads
on the non-stick surface.
To remove stubborn food residue, use a plastic
mesh pad, or other available products stating
they are safe to use on non-stick surfaces.
To clean the glass lid, wash it in warm soapy
water, rinse with clean water and dry. Do not
use steel wool or scouring pads on the lid.
Do not leave plastic or wooden utensils in the
pan while it is hot.
Do not cut directly on the non-stick surface.
DO NOT place the appliance, controller or lid in
the dishwasher.
NOTE:
If frying with oil, etc. use extreme caution. If the
oil is over-heated, it may catch on fire. Should
this occur, DO NOT try to extinguish the fire with
water as this will spread the fire. Instead, cover
the Fry Pan with the lid, or in more extreme
cases, with a fire blanket, and the flames will
extinguish.
This Electric Frying Pan IS NOT suitable for
deep frying.
The controller marking “0” does not indicate
“OFF”. This only indicates the lowest setting of
the controller.
The indicator light on the controller will turn on
while the pan is heating and will turn off when
the pan has reached the desired set
temperature.
You will notice during cooking that the indicator
light will turn on and off at different intervals
which indicates the temperature setting is being
maintained.
BROWNING
The amount of cooking oil used during cooking
will depend on the fat content of the food being
cooked.
Steaks should be browned/sealed for 1 minute
each side on high, with the lid off.
After sealing continue cooking with the lid on at
a medium temperature until the steaks are
cooked to your liking.
ROASTING TIMES
Always brown the meat on a high heat before
roasting or grilling as this locks in the juices.
Chicken: After browning, allow for 35 minutes
roasting time per 500g.
Lamb: After browning, allow for 35 minutes
roasting time per 500g.
Pork: After browning, allow for 40 minutes
roasting time per 500g.
Beef: After browning, allow for 45 minutes
roasting time per 500g.
PASTA AND RICE
Cooking Pasta: On the high setting bring to the
boil 6 cups of water. Add 1 Tbsp of oil to the
water to prevent the pasta from sticking together.
Add 1 cup of pasta and boil as per the cooking
instructions recommended on the pasta
packaging. If the water boils too rapidly, reduce
the heat. Drain the water when cooked.
Cooking Rice: On the high setting, bring 6 cups
of water to the boil. Add 1 cup of rice and boil as
per the cooking instructions on the packaging.
Drain the water when cooked.
Note: Raw rice should be rinsed in cold water to
remove excess starch.
SUPPORT AND TECHNICAL ADVICE
Goldair – New Zealand
Monday – Friday 8am-5pm
Phone +64 (0)9 917 4000
Phone 0800 232 633
[email protected]
Goldair – Australia
Monday – Friday 8am-5pm
Phone +61 (0)3 9336 4423
Phone 1300 465 324
[email protected]
Two year warranty
Thank you for purchasing this Goldair product. Your product is warranted against faults and manufacture
when used in normal domestic use for a period of two years. In non-domestic use Goldair limits the
voluntary warranty to three months.
Goldair undertake to repair or replace this product at no charge if found to be defective due to a
manufacturing fault during the warranty period.
This warranty excludes damage caused by misuse, neglect, shipping accident, incorrect installation, or
work carried out by anyone other than a qualified electrical service technician.
PLEASE KEEP YOUR RECEIPT AS THIS WILL HELP VERIFY YOUR WARRANTY.
The benefits given to you by this warranty are in addition to other rights and remedies available to you
under law in relation to the goods or services to which this warranty relates.
In Australia, our goods come with guarantees that cannot be excluded under the Australian Consumer
Law. You are entitled to a replacement or refund for a major failure and compensation for any other
reasonably foreseeable loss or damage. You are also entitled to have the goods repaired or replaced if the
goods fail to be of acceptable quality and the failure does not amount to a major failure.
In New Zealand this warranty is additional to the conditions and guarantees of the Consumers Guarantee
Act (1993).
Goldair – New Zealand
CDB Goldair
PO Box 100-707
N.S.M.C
Auckland
Phone +64 (0)9 917 4000
Phone 0800 232 633
www.goldair.co.nz
Goldair – Australia
CDB Goldair Australia Pty
PO Box 574
South Morang
Victoria, 3752
Phone +61 (0)3 9336 4423
Phone 1300 GOLDAIR (1300 465 324)
www.goldair.com.au
IMPORTANT: Please complete and retain this warranty card
Name ……………………………………………… Purchased from …………………………………
Address …………………………………………… Date of purchase …………………………………
………………………………………………………. Name of product …………………………………
Suburb …………………………………………… Model no ……………………………………………
Attach a copy of the purchase receipt to this warranty card
Due to continual design improvements, the product illustrated in this User Manual may differ slightly from the actual product.