1
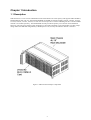
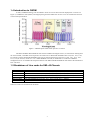
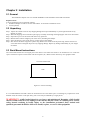
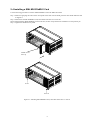
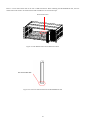
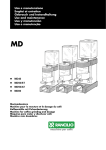
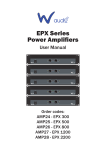
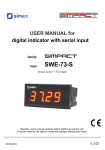
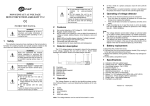
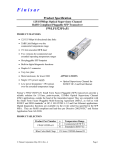
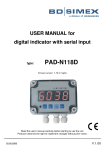
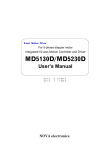
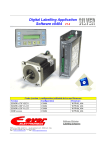
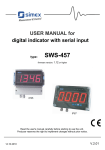
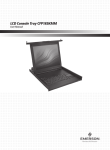
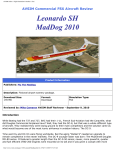
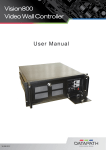
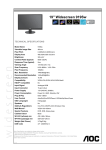
USER MANUAL
SML 40-Chassis
CWDM Passive 24 Slot Rack
The information in this publication has been carefully checked and is believed to be entirely accurate at the time of
publication. We assume no responsibility, however, for possible errors or omissions, or for any consequences resulting
from the use of the information contained herein. Our company reserves the right to make changes in its products or
product specifications with the intent to improve function or design at any time and without notice and is not required to
update this documentation to reflect such changes.
Our company makes no warranty, representation, or guarantee regarding the suitability of its products for any particular
purpose, nor do we assume any liability arising out of the application or use of any product and specifically disclaims
any and all liability, including without limitation any consequential or incidental damages.
This product are not designed, intended, or authorized for use in systems or applications intended to support or sustain
life, or for any other application in which the failure of the product could create a situation where personal injury or
death may occur. Should the Buyer purchase or use this product for any such unintended or unauthorized application,
the Buyer shall indemnify and hold our company and its officers, employees, subsidiaries, affiliates, and distributors
harmless against all claims, costs, damages, expenses, and reasonable attorney fees arising out of, either directly or
indirectly, any claim of personal injury or death that may be associated with such unintended or unauthorized use, even
if such claim alleges that we were negligent regarding the design or manufacture of said product.
SML-40-chassis
19" 4RU 24 Slot Passive Chassis for CWDM.
User Manual
Version 1.2 Jan 11, 2010
This manual supports the following models:
SML 40-Chassis
Chapter 1 Introduction ....................................................................................................................................................... 5
1.1 Description ............................................................................................................................................................... 5
1.2 General Chassis Specifications................................................................................................................................. 6
1.2.1 SML 40-Chassis ................................................................................................................................................ 6
1.3 Power Specifications ............................................................................................................................................... 6
1.4 Introduction to CWDM ............................................................................................................................................ 7
1.5 Breakdown of Line cards for SML-40-Chassis ........................................................................................................ 7
Chapter 2 Installation ........................................................................................................................................................ 8
2.1 General ..................................................................................................................................................................... 8
2.2 Unpacking ................................................................................................................................................................ 8
2.3 Rack Mount Instructions .......................................................................................................................................... 8
2.4 Installing a SML MUX/DeMUX Card ..................................................................................................................... 9
Chapter 1 Introduction
1.1 Description
SML40-Chassis is a 4U 19-inch CWDM Passive Rack that features 24 cards capacity and supports SML-40-MDxx,
MUX/DeMUX cards. The 8+1 channels MUX/DEMUX CWDM wavelength includes 1471nm, 1491nm, 1511nm,
1531nm, 1551nm, 1571nm, 1591nm, 1611nm and 1311nm per ITU-T G.694.2 CWDM grid. The 1311nm CWDM
channel is accessible separately. The MUX/DeMUX cards provide the primary wave division and combination
functions. Line side wave lengths require translation to client side equipment via the transponder card. The unique
design makes the SML4000 a high density CWDM passive rack, for easy and efficient network connection.
Figure 1. SML 40-Chassis Major Components
5
1.2 General Chassis Specifications
1.2.1 SML 40-Chassis
Format:
4RU, 19”
Dimensions:
277 mm (W) x 177mm (H) x 481mm (D)
Slot Capacity:
24 total
Net Weight : 3.4g (7.4 lb.)
1.3 Power Specifications
Passive Chassis requires no power
6
1.4 Introduction to CWDM
In 2001, CWDM technology was introduced to lower the cost of metro network deployments. As shown in
Figure 3, CWDM uses wide (20nm) wavelength spacing and this enables the use of low cost un-cooled lasers and low
cost thin film optical filters.
Figure 3. CWDM optical bands based upon ITU-T G.694.2
The SML-40-MDxx MUX/DeMUX cards use the CWDM wavelengths in the S, C and L bands. Starting from
the 1471nm band, 4 standard center frequencies are used in the 4 channel MUX/DeMUX line card (1551, 1571, 1591,
& 1611nm). In the 8 channel MUX/DeMUX line card, 8 center frequencies are used (1471, 1491, 1511, 1531, 1551,
1571, 1591, & 1611nm). In the 4+1 or 8+1 MUX/DeMUX line cards, an additional 1311 channel is added for
management use or as an additional transparent channel. The SML 4000 MUX/DeMUX cards follows the standards of
ITU-T G.694.2.
1.5 Breakdown of Line cards for SML-40-Chassis
Model name
SML-40-8181-L
SML-40-MD80
SML-40-MD81
SML-40-MD50
SML-40-MD51
SML-40-2MD40
Generic Description
8+1 channel MUX/DEMUX Line Card (1471, 1491, 1511, 1531, 1551, 1571, 1591, & 1611)
8 ch. MUX/DEMUX Card (1471, 1491, 1511, 1531, 1551, 1571, 1591, & 1611)
8 ch. MUX/DEMUX Card (1471, 1491, 1511, 1531, 1551, 1571, 1591, & 1611) + Monitor
5 ch. MUX/DEMUX Card (1491, 1511, 1571, 1591, & 1611)
5 ch. MUX/DEMUX Card (1491, 1511, 1571, 1591, & 1611) + Monitor
Dual 4 Ch. DeMux Card (1471, 1491, 1511, 1531)
Other line cards to be announced in the future.
7
Chapter 2 Installation
2.1 General
The Installation chapter will cover the MUX/DEMUX cards installation of the SML-40-Chassis.
Required Tools
You will need these tools to install the Chassis:
• Number 2 Phillips screwdriver for the 3mm and the 12-24 chassis installation screws.
• Level (optional)
2.2 Unpacking
Step 1. Inspect the outside carton for any shipping damage and report immediately to your freight forwarder if any
damage is visible.
Step 2. Place the shipping carton with the top facing up. Carefully cut through the shipping tape with a box cutter knife.
Step 3. Open the top cover of the carton and remove any pizza box.
Step 4. Pull the entire chassis straight up out of the carton, including the endcaps.
Step 5. Once the chassis is clear of the carton, you may remove the endcaps.
Step 6. The chassis should be wrapped in a plastic bag. Remove the chassis from the plastic bag. Set the chassis on a
secure flat surface and again inspect for any shipping damage. Report any damage immediately to your freight
forwarder.
2.3 Rack Mount Instructions
The rack mount brackets are an integral part of the chassis. This allows the chassis to be mounted in a 19" wide rack
space. The chassis requires a total of four rack mount spaces (4U). Please see the chassis top view graphics below.
19 inch forward mount
TOP
Figure 2-1 Chassis mounting
It is recommended that the SML chassis be mounted into the rack cabinet prior to installing any required line cards.
Without cards, the chassis is still quite heavy, but it can easily be installed by a single person.
WARNING!!: A fully loaded chassis is very heavy and unbalanced. Dropping a fully loaded
chassis would result in severe damage to the chassis and line cards, as well has pose a serious
safety hazard resulting in bodily injury to the installation personnel. Only trained and
qualified personnel should be allowed to install, replace, or service this equipment.
8
2.4 Installing a SML MUX/DeMUX Card
Use the following procedure to install a MUX/DEMUX Card in the SML-40-Chassis
Step 1. While still grasping the center of the front panel of the card with one hand, place the other hand under the card
to support it.
Step 3. When Insert the MUX/DEMUX card, Start either from first slot or last slot.
Stem4. When slide the MUX/DEMUX Card into the slot, the line card position hole should fix on rack position pin.
Step 5. Tighten the thumbscrew by hand.
Thumb screw
Face up
S1ot 1
S1ot 24
Figure 2.2 Installing MUX/DEMUX card, start either from Slot 1 or slot 24
9
There is a Line card Position Pin on the rear of SML-40-Chassis. When installing the MUX/DEMUX card, the Line
card Position hole needs to be fixed with the SML-40-MDxx Line card Position pin.
Rack Position Pin
Figure 2.3 The Rack Position Pin of SML-40-Chassis
Line card Position hole
Figure 2.4. The Line card Position hole of MUX/DEMUX card
10