1
The Tube Kit is comprised of a burette and flexible tubing fitted with luer locks for
connection to the ThoraCool* Probe.
The ThoraCool* Probe, ThoraCool* Introducer, and Tube Kit are ethylene oxide
sterilized and supplied sterile. The devices should be stored in a cool, dry
environment.
Note: Please contact Kimberly-Clark for a list of all model numbers and sizes.
Inspection Prior To Use
The sterile packaging should be visually inspected prior to use to detect any
compromise. Ensure that the packaging has not been opened or damaged. Do
not use the equipment if the packaging has been compromised.
Equipment Required
Procedures should be performed in a specialized clinical setting equipped with a
fluoroscopy unit. The equipment required to perform RF procedures include:
• ThoraCool* Cooled Radiofrequency Probe
• ThoraCool* Cooled Radiofrequency Introducer(s)
• Cooled Radiofrequency Peristaltic Pump Unit and Cable
• Cooled Radiofrequency Sterile Tube Kit
• Cooled RF Connector Cable
• Radiofrequency Dispersive Electrode
• Radiofrequency Generator (PMG-115-TD/PMG-230-TD)
Instructions For Use
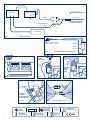
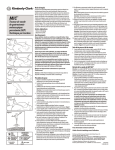
Monopolar System (Fig. 1)
Assemble all the equipment required for the procedure. Set up the
Radiofrequency Generator (PMG-115-TD/PMG-230-TD) and the Pump Unit
(pump), as directed in their Instructions for Use. Connect the Cooled RF Connector
Cable to the RF Generator as described in its Instructions for Use.
Open the package in the sterile field using appropriate sterile techniques. Inspect
the devices visually to make sure there is no damage to them. Do NOT perform
the procedure with any damaged equipment.
Kimberly-Clark* Cooled Radiofrequency Sterile Tube Kit (Fig. 2)
1. Place the burette into the burette holder on the side of the Pump Unit.
The side of the burette with 2 or 3 ports indicates the top of the burette.
(Fig. 3)
2. Fill the burette with room temperature sterile water. Use sterile handling
techniques. Fill the burette to the 70 mL mark. Burette can be filled
by injecting sterile water through a port in the lid, or by temporarily
removing the lid and pouring sterile water in.
Warning! BE SURE TO FILL THE BURETTE TO THE 70 mL MARK.
Not filling the burette to the 70 mL mark will result in an
inadequate supply of water for circulation.
Use ONLY sterile room temperature water.
Ensure the lid is snapped back onto the body of the burette
after filling. (Fig. 4-5)
Inject sterile water into burette OR remove lid and pour sterile water.
3. Place the thick-walled tubing coming out of the bottom of the burette
into the pumphead of the Pump Unit. Place the tubing in the channels
of the L-shaped bracket to ensure that the tubing is not obstructed while
closing the pumphead. Close the lid on the pumphead to clamp down
on the tubing.
4. Remove the caps on the male and female luer locks. Connect the
appropriate luer lock to the corresponding luer lock on the Probe. Do not
over tighten the connection. (Fig. 6)
Caution! Connect one Tube Kit to one ThoraCool* Probe. (Fig. 7)
5. At the end of the procedure, discard the Tube Kit appropriately.
Kimberly-Clark* ThoraCool* Cooled Radiofrequency Introducer
1. With the stylet in the Introducer, carefully insert the Introducer into
the patient using fluoroscopic guidance to place it at the desired lesion
location.
2. Once the Introducer is in the proper position, carefully remove the stylet
from the Introducer.
3. Repeat steps 1-2 with a second Introducer if necessary.
Kimberly-Clark* ThoraCool* Cooled Radiofrequency Probe
1. Insert the Probes into the tissue through the Introducer. Never force the
Probe in if significant resistance is felt.
2. Attach the Dispersive Electrode to the RF Generator and place the
Dispersive Electrode Pad on the patient as directed in the Instructions for
Use accompanying the package.
3. Connect the Probe to the Tube Kit.
4
4. Connect the 14-pin connector of the Cooled RF Connector Cable into the
RF Generator. Connect the Probe to the 7-pin connector on the Cooled
RF Connector Cable.
5. Select the Treatment mode in the RF Generator. Set advanced settings
and the parameters for RF delivery in the RF Generator as described in
the User’s Manual.
6. Perform the procedure as described in the RF Generator User’s Manual.
The procedure comprises pre-cooling, treatment and optional postcooling stages.
Note: Other than reproduction of their usual referred pain or irritation
due to probe introduction, monitor the patient for unexpected symptoms
that may indicate, for example, spinal cord or nerve root irritation. If these
indications are suspected, discontinue energy delivery.
7. After treatment remove the Probes and the Introducer and discard
as biohazards. Remove the Dispersive Electrode from the patient
and discard appropriately. Disconnect the Cooled RF Connector Cable
from the RF Generator. Follow standard hospital techniques to handle
reusable items.
Troubleshooting
The following table is provided to assist the user in diagnosing potential
problems.
PROBLEM
TROUBLESHOOTING
No temperature
measurement
or
Inaccurate,
erratic or sluggish
temperature
reading
Ensure all connections are made:
• Probe(s) to Cooled RF Connector Cable
• Cooled RF Connector Cable to the RF Generator.
• RF Generator to power outlet
Check for an error message on the RF Generator
Visually inspect the Probe or Cable for damage. Ensure
that devices are dry and at room temperature. If
problem persists, discontinue use.
Water does not
flow through
the Probe and
Tube Kit
• S top the procedure immediately.
• Check the luer lock connections to ensure the Tube
Kit is connected to the Probe.
• Check the Pump to ensure the lid is not open.
• Check RF Generator for any error messages.
Probe Connector
does not fit in
Probe Plug-in
Check that the connector’s keys are lined up in the
proper orientation.
Ensure that the Connectors are clean and unobstructed.
Damage to
Insulation
on Probe or
Introducer
Do not use. Discard immediately.
Water is not
circulating
through tubing
during ThoraCool*
pre-cooling, on
and post-cooling
states.
• Ensure the Tube Kit is correctly connected to
the Probe.
• Ensure the Tube Kit has been correctly placed in
the pumphead.
• Ensure the burette reservoir has been filled.
• Visually inspect the Tube Kit tubing and joints for
leaks and occlusions.
• Ensure that the float ball in the burette is floating
and not occluding the outflow of water from the
burette.
• Ensure the pump tubing (thick-walled tubing that
is coming directly out of the bottom port of the
burette) is placed in the pumphead.
Water is not
dripping into the
burette.
Check to see if water is running down the wall of the
burette.
Float is stuck on
bottom port of
the burette.
Close the pumphead lid. Gently shake the burette to try
and loosen the ball from the bottom of the burette.
The lid of the
burette cannot be
removed.
Inject sterile water through the port of the lid, rather
than removing the lid.