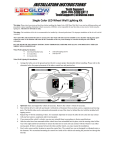
1
Perfekt Glide-24, Perfekt Glide-30
Built-in Range hood Instruction Manual
Thank you for the purchase of this product. Please read the
manual carefully before operating the appliance.
Contents
Safety Precautions
2-5
Accessories
5
Features
6
Installation Preparation
6
Selecting Venting Direction
7
Cabinet Preparation for Hood Support
Preparation for Duct Connection
8-9
9
Hood Installation
10
Controls
11
Specifications
11
Use and Care
12
Trouble Shooting
13-14
Installation Diagram
15
Warranty Information
16
1|Page
Safety Precautions
READ AND SAVE THESE INSTRUCTIONS
WARNING – to reduce risk of fire, electrical shock, or injury,
observe the following:
o
o
o
o
o
o
o
o
o
o
o
o
o
Read all instructions before using the appliance
Use this appliance only for its intended purpose as
described in this user manual
Do not use any accessories not recommended by the
manufacturer
This unit must be grounded
Do not use this appliance for commercial use
Do not use with any solid-state speed control device
Installation work and electrical wiring must be done by
qualified technicians in accordance with all applicable
codes and standards, including fire-rates construction
Sufficient air is needed for proper exhausting of gases of
fuel burning equipment through the chimney to prevent
back drafting. Follow the heating equipment
manufacturer’s guideline and safety standards
When replacing an existing range hood with your new
AEG Perfekt Glide range hood, turn OFF the electrical
power to the existing unit before removal
Unplug the unit before cleaning or servicing
Do not repair or replace any part of the appliance or
attempt servicing. Note: if for any reason this product
requires service, please contact Euro-Parts 1-800-6788352
When cutting or drilling into wall or ceiling, be careful
not to damage existing electrical wiring and other hidden
utilities
Ducted fans must always be vented to the outdoors
2|Page
WARNING – to reduce risk of cooktop grease fire:
o
o
o
o
Never leave cooking unattended at high settings. Boilovers cause smoking and greasy spillovers may ignite.
Heat oils slowly on low or medium settings
Always turn the hood on when cooking at high heat or
when cooking flaming food (i.e. Crepes Suzette, Cherries
Jubilee, Flambés)
Clean ventilation fans frequently. Do not allow grease to
accumulate on the fan or filter
Use proper sized pans that correspond to the size of the
stove and the amount of food being cooked
WARNING – to reduce risk of personal injury in the event of
a cooktop grease fire:
o
Smother flames with a close-fitting lid, metal tray, or
baking sheet. Then turn the burner OFF. BE CAREFUL TO
AVOID BURNS. If the flames are not put out
immediately, evacuate and call the fire department.
o NEVER pick-up a flaming pan
o DO NOT use water, including west dishcloths or towels
to put out a fire. A violent steam explosion may result
o Use a fire extinguisher only if:
a. You know that you have a Class ABC extinguisher and
know how to use it
b. The fire is small and contained in the area it started
c. The fire department is being called
d. You can use the extinguisher with your back to an exit
3|Page
CAUTION!
Important – observe all governing codes and ordinances.
o
o
o
o
o
For general ventilation use only. Do not use this
appliance to exhaust hazardous or explosive materials
and vapors
To reduce the risk of fire, use only metal duct work
To avoid damage to motor or other components, keep
drywall spray, construction dust, etc. off the power unit
Please read the specification label on product for further
information and requirements
To reduce risk of fire and exhaust air, be sure to duct air
outside. Do not vent exhaust air into space within wall or
ceiling, or into attic, crawl space or garage
CAUTION!
Grounding Instructions
o
o
This appliance must be grounded. In the event of an
electrical short circuit, grounding reduces the risk of
electrical shock by providing an escape wire for the
electrical current. This appliance is equipped with a cord
having a grounding wire with a grounding plug. The plug
must be plugged into an outlet that is properly installed
and grounded.
Improper grounding can result in a risk of electric shock.
Consult a qualified electrician if the grounding
instructions are not properly understood, or if doubt
exists as to whether the appliance is properly grounded.
Do not use an extension cord. If the power supply cord is
too short, have a qualified electrician install an outlet
near the appliance
4|Page
CAUTION!
o
o
Do not operate any fan with a damaged cord or plug.
Discard fan or return to an authorized service facility for
examination and/or repair
Do not run cord under carpeting. Do not cover cord with
throw rugs, runners, or similar coverings. Do not route
cord under furniture or appliances. Arrange cord away
from traffic area and where it will not be tripped over.
Accessories
Range hood accessories provided:
o 1 x Range hood
o 4 x Range hood screws
o 4 x Washers
o 2 x Filters
o 1 x User manual
Check to make sure that all parts and accessories are present
and in good condition. If you find that they are not in good
condition or missing, please contact Euro-Parts for assistance
1-800-678-8352
5|Page
Features
o
o
This appliance is manufactured from top quality
materials, and offers superb streamlined effects
With high suction power and low noise, it is designed to
remove cooking fumes from your kitchen quietly and
effectively
Installation Preparation
Note: this procedure will require 2 people for easier
installation
General Preparation
o Remove range from packaging and lay upside down on
table covered with cardboard or paper to prevent
scratching of the hood or table
o Be sure the power switch is set to OFF
Tools needed for installation:
o Drill
o 1/8” drill bit for pilot holes
o 1-1/4” wood bit for drilling electrical wiring access hole
o Phillips head screwdriver
o Flat-head screwdriver
o Pliers
o Pencil, ruler and level for marking range hood location
o Hand saw or jig saw for cutting the wall or cabinet
openings
o Duct tape
o Electrical tape
o Connector clamp
6|Page
Selecting the Venting Direction
The range hood can be used for either vertical or ductless air
discharge. It is set up for vertical discharge.
Vertical Discharge - Vertical discharge is
the most common method of hood
installation. If your kitchen has an attic
space above, the ducting may be run
through the cupboard and the attic to a
roof cap. Use a 7” round duct (not included).
Another option, if your kitchen has a soffit above the
cabinet, is to run the duct up into the soffit and then
discharge the air horizontally through the outside wall to a
wall cap.
Ductless – In ductless installations, air is
vented back into the kitchen through
the opening in the range hood grille. If
you do not anticipate heavy cooking, this method is
preferable. Ductless installation requires the use of charcoal
filters* to remove odors, which should be replaced at regular
intervals depending on use. Check with your local retailer or
dealer for replacements. Note: This filter is not dishwasher
safe!
*If hood is to be installed non-ducted, install a charcoal filter, purchased separately.
When venting ductless, you must remove
the vent cover from the slots on the front
of the range hood. Save the vent cover for
possible future use. Use the 70mm rail
instead of 40mm rail.
7|Page
Cabinet Preparation for Hood Support
The range hood should be mounted at a distance of 600mm
from an electric or induction cooktop, and 762mm above a
gas cooktop for safety and optimum performance.
If you install the hood with a duct,
you will need to provide a hole for
the duct. Please use the template
provided to locate the hole.
Use the diagram below for proper placement of ductwork
and electrical cutout in cabinet. For a non-ducted
installation, DO NOT cut a duct access hole.
Warning! When cutting or drilling into wall or cabinet, be
careful not to cut existing electrical wiring.
1. If the bottom of the cabinet is recessed above the
bottom of the cabinet door, then it is necessary to
install wood strips on each side of the recessed area
on the bottom of the cabinet where the range hood
will be mounted. The wood strips should line up with
the 4 keyhole slots on the top of the range hood.
8|Page
Fasten the wood strips with wood screws about 3” in
from each end.
NOTE: the thickness of the wood strips should be
slightly more than the recessed dimension. The
length should be cut to size.
2. Measure and mark the electrical wiring opening in
the wall or the cabinet. If the hood is to be vented,
also mark and measure the duct opening in the wall
or cabinet.
Preparation for Duct Connection
Remove the appropriate ducting knockout by inserting a
screwdriver under one end and prying it up. Then snip or
break the attachment points.
Before installing the range hood, please first fix the outlet on
the air duct hole of the hood.
9|Page
Hood Installation
Lift the hood to the
proper position in the
cabinet, fix the selftapping screw with
washers. Follow the
middle four holes on the
top shelf inside of the
hood.
Caution! Do not damage the parts inside the hood.
Duct connection
Connect the ductwork on
the hood, using duct
tape to make joints
secure and air tight.
Power cord (length 0.9-1.2m)
Your new range hood will operate at the highest efficient if
the number of elbows and the length of the duct are kept to
a minimum.
10 | P a g e
Controls
o The hood is turned on when you pull out the slide.
o The lamp switch is located on the left side of the hood
o The fan switch is located on the right side
o The fan has 3 settings: off, low speed and high speed
Specifications
Perfekt Glide-24
Power Supply
Rated Input Power
Lighting Power
Motor Power
Airflow
Outlet Diameter
115V, 60Hz
140W
1 x 2W
138W
300 CFM
150mm
Perfekt Glide-30
Power Supply
Rated Input Power
Lighting Power
Motor Power
Airflow
Outlet Diameter
115V, 60Hz
140W
1 x 2W
138W
300 CFM
150mm
11 | P a g e
Use and Care
Filter
For highest efficiency, this filter should be removed and
cleaned periodically. Soak the filter in hot water and mild
soap or detergent. Rinse thoroughly and repeat if necessary.
The filter may be cleaned in the dishwasher. Heavy grease
buildup may not be cleaned easily, thus the filter may need
to be replaced.
Charcoal Filter
Inspect this filter periodically. This filter cannot be cleaned
and must be replaced.
Light Bulb
This model specifies 2 x 1W LED light bulbs.
Exterior surface
Wipe the range hood exterior with a soft cloth and a mild
detergent suitable for painted surfaces. Do NOT use abrasive
materials such as steel wool pads or scouring pads.
Repair or Replacement Parts
Warning! Disconnect range hood from the electrical power
supply before servicing.
All parts may be obtained from Euro-Parts 1-800-678-8352.
When ordering parts, please specify the range hood model
number on the rating label, which is located on the inside of
the range hood.
12 | P a g e
Trouble Shooting
If any problem occurs, please detach the plug from the socket
and contact Euro-Parts or a similarly qualified person in order
to avoid a hazard.
Fan does not turn on (but light turns on).
This is probably due to either a defective fan switch or a
burned out fan motor. Both can be replaced without
removing the range hood from the wall or cabinet. Use an
ohm meter to determine which component is not working. If
the ohm meter reads that the fan switch has 0 ohms of
resistance, then it is the motor that needs to be replaced. If it
reads anything other than zero, then the switch must be
replaced.
Fan only runs at once speed.
Please see above instructions.
Fan circulates air, but does not vent outside.
If air is blowing through the front vent openings, then your
range has been installed for ductless operation. In order to
convert the system to vent outside, a technician must install
ductwork from the range hood through either an outside wall
or the roof.
If air is not blowing from the front vent openings, check inside
the cabinet about the range hood. If you see a duct leading
away from the vent hood, then you have a system that vents
to the outdoors. If you do not see a duct, your unit may be
venting through the back wall.
13 | P a g e
Light does not turn on (but fan turns on).
This could be because the bulb has burned out. Try replacing
the light bulb. If the light still does not work, either the light
switch or the lamp-holder socket is defective. Both can be
replaced without removing the range from the wall or
cabinet.
Range hood does not turn on at all.
Check for a tripped circuit breaker or a blown fuse, since the
range hood is wired directly to your household electrical
system.
NOTE: All work must be performed by a qualified licensed
technician.
14 | P a g e
Installation Diagram
Perfekt Glide-24
Perfekt Glide-30
15 | P a g e
Warranty Information
16 | P a g e