1
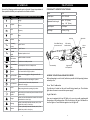
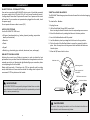
RS1200
OWNERS’
MANUAL
WARNING: Read, understand and follow all safety rules and
operating instructions in this manual before using this product.
SAVE THIS MANUAL FOR FUTURE REFERENCE
TABLE OF CONTENTS
Introduction ......................................................................................................... 1
Warranty .............................................................................................................. 1
Product Registration ............................................................................................ 2
General Safety Rules ............................................................................................ 2
Specific Safety Rules ............................................................................................ 5
Symbols ............................................................................................................... 8
Features ............................................................................................................. 9
Assembly ............................................................................................................ 11
Operation ........................................................................................................... 14
Maintenance ...................................................................................................... 19
Parts List .............................................................................................................. 20
Customer Service ............................................................................................... 22
INTRODUCTION
The DUALSAW® RS 1200 has many special features that make this tool different
from other reciprocating saws. Please read and understand this manual before
using this product.
WARRANTY
DUALSAW® – LIMITED ONE YEAR WARRANTY
This warranty covers all defects in workmanship or materials in your DUALSAW®
for a period of one year from the date of purchase. This warranty does not
cover blades.
HOW TO GET SERVICE
Return the DUALSAW® RS 1200, properly packaged and postage prepaid to our
Authorized Service Center. You can obtain the location of the Center by calling
1‑855‑382‑5729. When you request warranty service, you also must present proof
of purchase documentation, which includes the date of purchase (sales receipt).
We will repair any faulty workmanship, and either repair or replace any defective
part, at our option. We will do so without any charge to you. We will complete the
work within 90 days or less.
WHAT IS NOT COVERED
This warranty applies only to the original purchaser and may not be transferred.
This warranty only covers defects arising under normal usage and does not
cover any malfunction, failure, or defects resulting from misuse, abuse, neglect,
alteration, modification, or repairs by other than the Authorized Service Center.
Infusion Brands, Inc. makes no warranties, representation, or promises as to the
quality or performance of its power tools other than those specifically stated in
this warranty.
1
PRODUCT REGISTRATION
To get information on product updates, special offers, and warranty claims,
register your DUALSAW® RS 1200 on our website www.DualSaw.com
Here is what you will need:
• Sales Receipt
• Machine Serial Number (located on the underside of the saw body)
serial number
GENERAL SAFETY RULES
WARNING!
Read, understand, and follow all safety rules and operating instructions
in this manual before using this product. Failure to follow all rules and
instructions listed below may result in electric shock, fire, and/or serious
personal injury.
SAVE THESE INSTRUCTIONS
WORK AREA
•Always keep your work area clean and well lit. Cluttered benches and dark
areas invite accidents.
•Do not operate power tools in explosive atmospheres, such as in the presence
of flammable liquids, gases, or dust. Power tools create sparks, which may
ignite the dust or fumes.
•Keep bystanders, children, and visitors away while operating a power tool.
Distractions can cause you to lose control.
GENERAL SAFETY RULES
ELECTRICAL SAFETY
•Avoid body contact with grounded surfaces such as pipes, radiators, ranges,
and refrigerators. There is an increased risk of electric shock if your body is
grounded.
•Do not expose power tools to rain or wet conditions. Water entering a power
tool will increase the risk of electric shock. If operating the power tool in
damp locations is unavoidable, a Ground Fault Circuit Interrupter must be
used to supply the power to your tool. Use electrician’s rubber gloves and
footwear to further enhance your personal safety in damp conditions.
•Do not abuse the cord. Never use the cord to carry the tool or to pull the
plug. Keep cord away from heat, oil, sharp edges, or moving parts. Contact
Customer Service if cord is damaged and do not use the saw. Damaged cords
increase the risk of electric shock.
•Do not use tool if saw does not turn “ON” or “OFF”. Any tool that cannot be
controlled with the trigger switch is dangerous and must be repaired.
•When operating a power tool outside, always use an outdoor extension
cord with a minimum 13 amperes fuse. These cords are rated for outdoor
use and reduce the risk of electric shock. The use of any extension cord will
cause some loss of power. To keep the loss at a minimum and to prevent
overheating, use an extension cord that is heavy enough to carry the current
that the tool will draw. For recommended sizes of extension cords refer to the
following table.
Minimum Gauge Extension Cord (AWG)
Volts
Total Length of Cord
120v
0 to 25 ft
26 to 50 ft
51 to 100 ft
101 to 150 ft
240V
0 to 50 ft
51 to 100 ft
101 to 200 ft
201 to 300 ft
Ampere Rating
AWG
AWG
AWG
AWG
More than 0
Not more than 6
18
16
16
14
More than 6
Not more than 10
18
16
14
12
More than 10
Not more than 13
16
16
14
12
More than 13
Not more than 16
14
12
Not Recommended
Note: The extension cord must have adequate wire size AWG (American Wire Gauge)
for safe, efficient use. Smaller gauge wires have greater capacity (16 gauge wire has
more capacity than 18 gauge wire).
2
3
GENERAL SAFETY RULES
GENERAL SAFETY RULES
PERSONAL SAFETY
SERVICE
•Stay alert. Watch what you are doing and use common sense when operating
a power tool. Do not use the tool while tired or under the influence of drugs,
alcohol, or medication. A moment of inattention while operating power tools
may result in serious personal injury.
•Dress properly. Do not wear loose clothing or jewelry. Keep your hair, clothing,
and gloves away from moving parts. Loose clothes, jewelry, or long hair can be
caught in moving parts. Wear protective hair covering to contain long hair.
•Keep handles dry, clean and free from oil and grease. Rubber gloves and nonskid footwear are recommended when working outdoors.
•Avoid accidental starting. Carrying tools with your finger on the switch or
plugging in tools that have the switch in the “ON” position invites accidents.
•Do not overreach. Keep proper footing and balance at all times. Proper footing
and balance enables better control of the tool in unexpected situations.
•Use safety equipment. Always wear eye protection. Dust mask, non-skid
safety shoes, hard hat, or hearing protection must be used for appropriate
conditions.
•Tool service must be performed only by qualified repair personnel. Service
or maintenance performed by unqualified personnel could result in a risk of
injury. Contact Customer Service for information for repairs.
TOOL USE AND CARE
•Always use clamps or other practical ways to secure and support the
workpiece to a stable platform. Holding the material in your hand or against
your body is dangerous and may lead to loss of control. Hold the tool firmly to
prevent loss of control.
•Do not force the tool. Use the correct tool for your application. The correct
tool will do the job better.
•Disconnect the plug from the power source before making any inspections or
adjustments, changing blades, or storing the tool. Such preventative safety
measures reduce the risk of starting the tool accidentally.
•Store idle tools in a dry and secure place, out of reach of children and other
untrained persons. Tools are dangerous in the hands of untrained users.
• Maintain tools with care. Properly maintained tools with sharp cutting edges
are less likely to jam and are easier to control. Develop a periodic maintenance
schedule for your tool.
• Check for misalignment or binding of moving parts, breakage of parts, and
any other condition that may affect the tool’s operation. If damaged, contact
Customer Service before using. Any alteration or modification is a misuse and
may result in a dangerous condition.
4
•When servicing a tool, always use only identical replacement parts. Follow
instructions in the maintenance section of this manual. Use of unauthorized
parts or failure to follow maintenance instructions may create a risk of electric
shock or injury. Certain cleaning agents such as gasoline, carbon tetrachloride,
ammonia, etc. may damage plastic parts.
DO NOT TOUCH ANY MOVING PART WHEN THE SAW IS RUNNING
Blades may be hot after use. Use caution when changing blades
SPECIFIC SAFETY RULES
KEEP HANDS AWAY FROM CUTTING AREA AND BLADE
•Always keep both hands on the saw. When both hands are holding the saw,
they cannot be cut by the blade.
•Keep your body positioned to either side of the saw blade, but not in line with
the saw blade. Hold the saw firmly to prevent loss of control. Do not reach
underneath the material being cut.
•While operating, always keep the cord away from the cutting area.
•Never hold the workpiece being cut in your hands or across your leg. It is
important to support the material properly to minimize body exposure, blade
jamming, or loss of control.
•Always hold tool by the insulated gripping surfaces when performing an
operation where the cutting tool may contact hidden wiring or its own cord.
Contact with a “live” wire will make exposed metal parts of the tool “live” and
shock the operator.
•Do not turn the saw on while carrying it. Accidental contact with the saw
blade could result in serious personal injury.
•Periodically remove the blades, clean the saw with a cloth or blow it clean
with compressed air.
5
SPECIFIC SAFETY RULES
SPECIFIC SAFETY RULES
HOW TO AVOID KICKBACK
ADDITIONAL SAFETY RULES
Kickback is a sudden reaction to a pinched, bound, or misaligned saw blade,
causing the saw to lift up and out of the workpiece and toward the operator.
When the blade is pinched or bound tightly by the kerf closing down, the blade
stalls and the motor reaction drives the unit rapidly back toward the operator.
If the blade becomes twisted or misaligned in the cut, the teeth at the back edge
of the blade can dig into the workpiece causing the blade to kickback.
Kickback is the result of tool misuse and/or incorrect operating procedures or
conditions and can be avoided by taking proper precautions as given below:
• Maintain a firm grip with both hands on the saw and position your body
and arm to allow you to resist kickback forces. Kickback forces can be
controlled by the operator, if proper precautions are taken.
• Support large panels to minimize the risk of blade pinching and
kickback. Large panels tend to sag under their own weight. Supports must
be placed under the panel on both sides, near the line of cut and near the
edge of the panel.
•Do not use dull or damaged blades. Unsharpened or improperly set blades
produce a narrow kerf causing excessive friction, blade binding, and
kickback.
•Use extra caution when making a “plunge cut” into existing walls or other
blind areas. The protruding blade may cut objects that can cause kickback.
•Guard against kickback if the blade binds or the saw stalls and is rapidly
driven back towards the operator, release trigger switch immediately. Do
not force tool. Stay alert and exercise control.
•Be sure to read and understand all instructions. Failure to follow all
instructions listed below may result in electric shock, fire, and/or serious
personal injury.
•Know your power tool. Read operator’s manual carefully. Learn the
applications and limitations, as well as the specific potential hazards related to
this tool.
•Always wear safety glasses or eye shields when using this saw. Everyday
eyeglasses have only impact-resistant lenses; they are NOT safety glasses.
•Always protect your lungs. Wear a face mask and dust mask if the operation is
dusty.
•Always protect your hearing. Wear protection during extended periods of
operation.
•Inspect the tool’s cord periodically and if damaged, contact Customer Service.
•Check for damaged parts. Before using the tool, inspect all parts for damage to
determine if it will operate properly and perform its intended function. Check
for misalignment or binding of moving parts, breakage of parts, and any other
condition that may affect the tool’s operation. A guard or other part that is
damaged should be properly repaired or replaced. Contact Customer Service.
WARNING!
Some dust created by using power tools contains chemicals that may
cause cancer, birth defects, or reproductive harm. Some examples of
these chemicals are:
• Lead from lead-based paints
WARNING!
• Do not let familiarity with your saw make you careless. Remember that a
careless fraction of a second is sufficient to cause severe injury.
• Crystalline silica from bricks and cement and other masonry products,
• Only use blades specially designed for this saw. Other blades will not
operate safely and could result in serious personal injury.
To reduce your exposure to these chemicals: work in a well ventilated
area, and work with approved safety equipment, such as those dust mask
that are specially designed to filter out microscopic particles.
• If the blades come in contact with the workpiece before they reach
full speed, it could cause the saw to kickback toward you resulting in
serious injury.
6
• Arsenic and chromium from chemically treated lumber.
7
FEATURES
SYMBOLS
Some of the following symbols may be used on this tool. Proper interpretation of
these symbols will allow you to operate the tool better and safer.
SYMBOL
NAME
Volts
Amperes
Hertz
Watt
Minutes
DESIGNATION/EXPLANATION
Voltage
Current
Frequency
Power
12 A
Current Input
120 V, 60 Hz AC
Adjustable Stroke Length
Short: 3/4” (20mm)
Long: 1-1/4” (30mm)
Stroke Speed
0-2400 spm
Net Weight
10.4 lbs (4.7 kg)
Power
stroke key
Time
Alternating
Current
Type of Current
Direct Current
Type of Current
No Load
Speed
Rotational speed at no load
Class II
Construction
Double-insulated construction
Per Minute
Revolutions or strokes per minute
Wet Conditions
Alert
Do not expose to rain or use in damp areas.
Read User
Manual
To reduce the risk of injury, user must read and understand
user’s manual before using the product.
Eye Protection
Always wear safety goggles or safety glasses with side
shields.
Face Mask
Wear full-face mask when operating this product.
Ear Protection
To protect your ears from noise, always wear ear
protectors or ear plugs.
Gloves
PRODUCT SPECIFICATIONS
Always wear gloves when operating this product.
No Hands
Symbol
Failure to keep your hands away from the blades will result
in serious injury.
Danger
Indicates an immediate hazardous situation. Must avoid to
prevent death or serious injury.
Warning
Indicates a potentially hazardous situation, which, if not
avoided may result in serious injury.
Caution
Indicates a potentially hazardous situation, which, if not
avoided may result in minor injury.
8
Quick Blade Change
access area cover
180o rotating
handle release
light switch
lock-on
button
live tool
indicator
shoe assembly
trigger switch
with speed dial
KNOW YOUR DUALSAW RS 1200
Before attempting to use this tool, familiarize yourself with all operating features
and safety rules.
L i v e To o l I n d i c a t o r
The indicator is located on the saw’s handle facing toward you. The indicator
lights when the saw is connected to a power supply.
Light Switch
Your saw is equipped with two LED lights in its nose to provide supplemental
illumination on the cutting surface. Press the button on the top of the handle to
turn the lights on. Press the button again to turn the lights off.
9
FEATURES
Tr i g g e r S w i t c h w i t h Va r i a b l e S p e e d D i a l
ASSEMBLY
UNPACKING
The pressure switch in the handle turns the saw ON and OFF. To turn your
reciprocating saw ON, depress switch trigger. Release switch trigger to turn your
saw OFF. The speed of the reciprocating saw blade can be adjusted by turning
the variable speed dial on the trigger. Turn the dial clockwise (right) to increase
the speed; turn the dial counter-clockwise (left) to decrease the speed. The blade
stroke rate may be adjusted during cutting operation by presetting the dial on or
between any one of the six letters.
•Carefully remove the tool and any accessories from the box. Make sure that all
the items listed in the packing list are included.
•Inspect the tool carefully to make sure no damage occurred during shipping.
•Do not discard packaging material until you have carefully inspected and
satisfactorily operated the tool.
•If any parts are damaged or missing please call 1-888-760-4405 for assistance.
Setting SPM rating (strokes per minute)
PACKING LIST
A-B Low stroke | C-D Medium stroke | E-F High stroke
Higher speed settings are generally used for fast cutting or when cutting softer
materials such as wood, composite materials, and plastics. Slower speed settings
are generally used when precision is required or when cutting harder materials.
Materials typically cut using slower speeds include sheet metal, conduit, and pipe.
Lock-On Button
Your saw is equipped with a lock-on feature, which is convenient when continuous
cutting for extended periods is required. The lock-on button is located on the side
of the handle. To lock-on, depress the trigger switch, press and hold the lockon button, and then release the trigger switch and lock-on button. Your saw will
continue running. To release the lock, depress the trigger switch and release it.
Shoe Assembly
The shoe pivots up and down, allowing you to position the saw so that its blade
teeth are at different angles with respect to the cutting surface. In addition, the
shoe can be moved in or out to adjust the depth to which the saw blade cuts.
Quick Blade Change Access Area
The Quick Blade Change (QBC) lock eliminates the need for tools when changing
the blade. Lift the QBC access area cover to access the blade lock. Open the lock
to insert/release a blade; close the lock to hold the blade firmly in place.
180o Rotating Handle Release
The housing assembly can be rotated 180o with respect to the saw handle. Pull
back on the handle release latch to rotate the assembly; release the latch to lock
the housing assembly in place. The handle locks in place every 45o.
•DUALSAW® RS 1200
•Saw Blades (multi-purpose)
•Allen Wrench
•Saw Case
•Owner’s Manual
WARNING!
• If any parts are missing or damaged, do not operate the saw until missing
parts are replaced. Failure to do so could result in serious personal injury.
• Do not attempt to modify the saw or create accessories not recommended
for use with it. Any such alteration or modification is misuse and could
result in a hazardous condition and could result in serious personal injury.
• To prevent accidental starting that could cause serious personal injury,
always unplug the saw when assembling parts.
WARNING!
The operation of any power tool can result in foreign objects flying into
your eyes. Always wear safety goggles, safety glasses with side shields,
or a full face mask, as appropriate.
Stroke Key
The DUALSAW® RS1200provides two stroke length options: short (.75”, 20mm);
long (1.125”, 30mm). Use the stroke key on the top of the handle to select the
stroke length. Choose the stroke length that is most appropriate for the job
(e.g., short stroke for metal, tight space, plunge cuts; long stroke for wood).
10
11
ASSEMBLY
ASSEMBLY
ELECTRICAL CONNECTION
Your saw has a precision-built DUALSAW® electric motor. It should be connected
to a power supply that is 120 volts, 60 Hz, AC only (normal household current).
A voltage drop of more than 10 percent will cause a loss of power and the motor
will overheat. If your saw does not operate when plugged into the outlet, check
the power supply.
Do not operate this saw on direct current (DC).
APPLICATIONS
Use the DUALSAW® RS 1200 to cut:
•All types of wood products (e.g., lumber, plywood, paneling, composition
board, and hard wood)
•Masonite
•Plastic
•Drywall
•Metals (e.g., sheet steel, pipe, steel rods, aluminum, brass, and copper)
INSTALLING BLADES
The DUALSAW® blade change system eliminates the need for tools when changing
the blade.
To i n s t a l l a b l a d e :
1. Unplug the saw
2. Lift the Quick Blade Change (QBC) access hatch
Note: Inserting the blades is easiest when the reciprocating arms are even
3. Unlock the blade levers by rotating both levers to the down position
4. Insert the DualSaw blades until fully seated
5. Lock the blades in place by rotating both lock levers to the up position
6. Pull on the ends of the DualSaw blades to ensure they properly locked in
place Note: You may hear a clicking sound which indicates the blades are
locked in place
7. Allow the QBC access hatch to close
SELECTING BLADES
Selecting the correct type of blade is important in order to obtain the best
performance from your saw. Select the blade based on the application and on the
material you wish to cut. Selecting the right blade will give you a smoother, faster
cut and prolong the life of the blade.
Blades with fewer teeth, 10 teeth per inch (TPI) are typically used for cutting
wood, while blades with more teeth are better for cutting metal or plastic. We
recommend 12 TPI for plastics and soft metals.
blade lever lock
blade tang pocket
lever moves to lock/
unlock QBC
QBC access area cover
lock lever indicator
WARNING!
The DUALSAW® RS 1200 uses specially designed blades. Never use other
types of blades on this saw. Other blades will not operate safely and could
result in serious personal injury.
WARNING!
Be sure to first unplug the electric cord from the electrical outlet and
allow blades to cool before removing blades.
12
13
OPERATION
OPERATION
SETTING THE STROKE LENGTH
You can adjust the stroke length of your DUALSAW® RS 1200 — short: 3/4” (20mm)
or long: 1-1/4” (30mm). Move the stroke selection switch to the desired length.
WARNING!
Blades longer than 6” (15.2cm) can whip and should not be used for plunge
cutting. Failure to heed this warning can result in serious personal injury.
SETTING THE ANGLE OF THE BLADE HOUSING
For some workpieces, making a cut would be easier if the blade was at an angle
with respect to the handle. This position would allow you to hold the saw in a
comfortable position and cut at a diagonal. The DUALSAW® RS 1200 features a
housing that can rotate up to 180o to provide you with the best cutting orientation.
ADJUSTING THE SHOE ASSEMBLY
The DUALSAW® RS 1200 is equipped with an adjustable shoe to make it easier for
you to hold the saw and make a clean cut. The shoe can be rotated to adjust the
blade angle and/or extended to adjust the blade depth.
To a d j u s t t h e b l a d e a n g l e :
1. Push/pull on the end of the shoe
to set the desired angle.
2. Tilt the saw until the blade is
perpendicular to the workpiece.
3. Make sure the teeth of the blade
are at the correct position.
To r o t a t e t h e h o u s i n g :
1. Pull back on the DUALSAW® 180o
rotating handle release latch
with your thumb and hold it.
2. Hold the handle and rotate the housing
to the desired position (the housing
locks in place every 45o).
3. Release the latch to secure the housing
in the set position.
To a d j u s t t h e b l a d e d e p t h :
1. Set the stroke length – short or long
(see previous procedure).
2. Loosen the two Allen-head set screws
in the bottom of the saw nose.
3. Move the shoe assembly in/out
to set the desired depth of the cut.
4. Tighten the set screws.
Note: The dual-stroke feature of the DUALSAW RS 1200 blade almost entirely
eliminates the need to adjust the shoe.
14
15
OPERATION
OPERATION
TURNING THE SAW ON/OFF
Plunge Cutting Wood or Wall Board
• To turn the saw on: Depress the switch trigger.
• To turn the saw off: Release the switch trigger.
• To adjust stroke speed: The speed of the
reciprocating saw blade can be adjusted by
turning the speed dial on the trigger. Turn
the dial clockwise (right) to increase the
speed; turn the dial counter-clockwise (left) to
decrease the speed.
1. Clamp the workpiece so it will not move during the cut.
2. Mark the line of cut clearly on the workpiece.
3. Make sure the saw blade is clear of any foreign material and that the power
cord and extension cord are out of the blade path.
4. Hold the saw firmly in front of and clearly away from you.
5. Set a slow stroke speed and the stroke lengh to “short”. Depress the trigger
switch to start the cutting action. Move the blade into the workpiece and
move the saw to vertical with the shoe firmly against the workpiece.
Note: Once the plunge cut into the workpiece is complete, change the stroke
length to “long” and increase the stroke speed for a faster cut. The saw must come
to complete stop before the switching stroke length.
OPERATING THE SAW
General Cutting
1. Mark the line of cut clearly on the workpiece.
2. Hold your saw firmly in front of and clearly away from you.
3. Make sure saw blade is clear of any foreign material and that power cord and
extension cord are out of the blade path.
Note: Be sure material to be cut is held firmly. Small workpieces should be
securely clamped in a vise or with clamps to the work bench.
6. Set the shoe assembly against the workpiece and angle the blade tip to touch
the workpiece (approximately 45o ).
7. Apply steady and even pressure when making a cut.
Note: Do not force. Use only enough pressure to keep the saw cutting. Let the
blade and saw do the work. Forcing the saw causes rough cuts, shortens the life of
the saw, and could cause a kickback.
4. Place the shoe against the workpiece and the blade over the cut line.
5. Set the stroke speed and depress the trigger switch to start the cutting action.
Move the blade against the workpiece.
Note: Keep pressure on the shoe against the workpiece. Do not force. Use only
enough pressure to keep the saw cutting. Let the blade and saw do the work.
16
17
OPERATION
MAINTENANCE
GENERAL MAINTENANCE
WARNING!
Cutting into electrical wiring can cause the blade and saw housing to
become electrically live. Do not touch metal parts when cutting into a
wall; grasp only the insulated surfaces on the saw. Make sure hidden
electrical wiring, water pipes, and mechanical hazards are not in the
blade path when cutting into a wall.
Metal Cutting
You can cut metals such as sheet steel, pipe, steel rods, aluminum, brass, and
copper with your DUALSAW® RS 1200.
1. Mark the line of cut clearly.
2. Clamp the workpiece so it will not move during the cut. Cut close to the
clamping point to eliminate any vibration of the work.
Note: When cutting conduit pipe or angle iron, clamp the workpiece in a vise,
if possible, and cut close to the vise. To cut thin sheet material, “sandwich”
the material between hardboard or plywood and clamp the layers to eliminate
vibration and material tearing.
3. Make sure the saw blade is clear of any foreign material and that the power
cord and extension cord are out of the blade path.
4. Hold the saw firmly in front of and clearly away from you.
5. Depress the switch trigger to start the cutting action.
6. Apply steady and even pressure when making a cut.
18
•Tool service must be performed by qualified repair personnel. Service or
maintenance performed by unqualified personnel could result in a risk of
injury. Contact Customer Service for information on repairs.
•When servicing a tool, always use only identical replacement parts. Use of
unauthorized parts or failure to follow maintenance instructions may create a
risk of electric shock or injury.
•Use a clean cloth to remove dirt, dust, etc. Avoid using solvents when cleaning
plastic parts. Most plastics are susceptible to damage from various types of
commercial solvents and may be damaged by their use.
•Electric tools are subject to accelerated wear and possible premature failure
when they are used to work on fiber glass, wallboard, spackling compounds,
or plaster. The chips and grindings from these materials are highly abrasive
for electrical tool parts, such as bearings, brushes, commutators, etc.
Consequently, clean the tool even more intensely after working these
materials.
LUBRICATION
All of the bearings in this tool are lubricated with a sufficient amount of high grade
lubricant for the life of the tool under normal operating conditions. Therefore, no
further lubrication is required.
BLADE MAINTENANCE
•Do not use any blades other than the DUALSAW® RS 1200 blades which are
specially designed for this tool.
•Keep the blades sharp and properly set. Using a dull or damaged blade places
a heavy load on your saw and causes excessive friction, blade binding, and
kickback. Keep extra blades on hand, so sharp blades are always available.
•Resin and other materials may become attached to the sides of the blade and
cause the blade to overheat. This means that it can buckle or even split. Keep
the blade clean. Wash it with a solvent. Never try to scrape the blade clean
with a hard object.
19
PARTS LIST
PARTS LIST
WARNING!
When servicing, use only identical replacement parts. Use of other parts
may create a hazard or cause product damage.
Contact customer service at 1‑855‑382‑5729 for information on how to
obtain replacement parts from an authorized service facility.
Subject to change
20
no. Description
qty
no. Description
qty
no. Description
qty
1
Gear box
1
39 Isolation washer 2
Bearing 1
40 Left LED cover
4
77 LED switch 1
1
78 Handle right
3
Gear unit
1
1
41 Pan head tap screw ST3x10F14
79 Indicator cover
4
Connecting rod
1
2
42 Housing torsional spring
1
80 Power on indicator 5
1
Bearing 2
43 Access cap
1
81 Pantap screw ST4x16F
4
6
Cam Pin
2
44 Right LED cover
1
82 Cord Clamp
1
7
Lower Cam 1
45 Right housing
1
83 Cord sheath
1
8
Cam coat
2
46Bearing
1
84 Pan tap screw ST3.5x19F 2
9
Cam bracket
1
47 Big gear clamp
3
85Cord
1
10 Upper cam
1
48 Hex socket screw M4x8
3
86 4.8 mother terminal
2
11 Bearing base
1
49 Shoe unit
1
87 Bearing seat
2
12Bearing
1
50 Hex socket screw M4x16
2
88 Brush lead(Blue)
1
13 Bearing clamp 2
51 Pan tap screw ST4x20F
9
89 Brush lead(White)
1
14 Hex socket screw M5x20
4
52 External circlip
1
90 Brass ferrule
2
15 Junction Plate
1
53Bearing
1
91 lead (red)
1
16 Cam clamp
1
54 Rotor bearing clamp
1
92 Antifriction mat
1
17 Hex socket screw M5x6
1
55Rotor
1
93Battery
3
18 Hex socket screw M5x10
2
56 Wind ring
1
94 Saw blade A
1
19 Slide way
1
57Bearing
1
95 Saw blade B
1
20 Hex socket screw M4X35
4
58 Rubber Bearing seat
1
96 Name label
1
21 Oval head rivets3x22
2
59 Pan tap screw ST4.2x58F 2
97 Parameter lable
1
22 Arm liner 2
60Stator
1
98 Long stroke lable
1
23 Arm rail
1
61 Motor housing
1
99 Short stroke lable
1
24 Hex socket screw M4X30
4
62 Carbon Brush 2
100LED Switch lable
2
25 Left knob
1
63 Brush holder 2
101Warning lable
1
26 Fast holder Left
1
64 Wire collector
1
102Isolation plate
1
27Spring
2
65 Handle left 1
103Brass ferrule
6
28 Lock pin
2
66 Lead wire clamp
2
104Pan tap screw M4x6
4
29 Quick clamp shell
2
67 Pan tap screw ST3.5x10F 3
105Allen Key
1
30 Fast holder Right 1
68 Battery box cap
1
106Hex socket tap screw M4x101
31 Right knob
1
69 Handle lock pin
1
107Battery box 1
32 Pan head tap screw ST4x25 4
70 Handle lock button
1
108Isolation cap
1
33 Pan head screw M3X6
2
71 Pan tap screw ST3x14F
1
109Seal ring
1
34 Hex socket screw M4X6
4
72 Handle lock spring
1
110Seal ring clamp
1
35 Needle bearing 2
73 Reversing switch
1
111 Hex socket tap screw M4x10 2
36 flat washer 4
2
74 LED switch button
1
37 Left housing
1
75 Main switch
1
38 LED board
2
76 battery shell
2
21
CUSTOMER SERVICE
WARNING!
If the replacement of the supply cord is necessary, this has to be done by
the manufacturer or his agent in order to avoid a safety hazard.
Should your DUALSAW® RS 1200 need repair parts or service, simply contact our
Customer Service at 1‑855‑382‑5729.
Be sure to provide all pertinent facts when you call. Also, you can check our
website www.dualsaw.com for a list of frequently asked questions or e-mail us at
[email protected].
The model and serial number of this saw will be found on the bottom of the
saw housing. Please record the model number and serial number in the space
provided below.
When calling customer service, always give the following information:
• Model Number: RS 1200
• Serial Number: ______________
Infusion Brands, Inc.
Clearwater, Florida 33760
Phone: 1-855-382-5729
www.InfusionBrands.com
DUALSAW ® is a registered trademark of Infusion Brands, Inc.
22
The DUALSAW range of revolutionary tools boast unique and
patented dual blade technology, setting new standards in power
cutting tools worldwide. The DUALSAW range of tools also
includes counter rotating circular saw blade technology, allowing
you to cut virtually any material without changing blades!
PRECISION
CS 300
Just the facts
MOTOR POWER ......................4.5A/550W
VOLTAGE ...................................120V / 60HZ
BLADE DIAMETER .....................3 1/4”
SPINDLE SPEED .........................8800RPM
MAX CUTTING DEPTH ............3/4”
WEIGHT ....................................4 lbs
EVERYDAY
CS 450
Just the facts
MOTOR POWER ......................7.5A/1050W
VOLTAGE ...................................120V / 60HZ
BLADE DIAMETER .....................4 1/2”
SPINDLE SPEED .........................5500RPM
MAX CUTTING DEPTH ............1”
WEIGHT ....................................61/2 lbs
DESTROYER
CS 650
Just the facts
MOTOR POWER ......................13A/1550W
VOLTAGE ...................................120V / 60HZ
BLADE DIAMETER .....................6 1/4”
SPINDLE SPEED .........................4200RPM
MAX CUTTING DEPTH ............13/4”
WEIGHT ....................................9 lbs
For more information and to see the Dualsaw in action go to:
www.DUALSAW.com