1
TROUBLESHOOTING GUIDE
If your LTS1 works except for the relay output in the break-away configuration,
check the following:
•
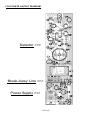
Verify integrity of the ground plane near the break-away line (see PC
board layout diagram). Scrape away the solder mask and bridge potential
cracks with solder if needed. Those darn holes are awful close!
If your LTS1 does not work at all, recheck the following:
•
correct orientation of all transistors (see PC board layout diagram)
•
correct polarity of all electrolytic capacitors.
•
correct orientation of diodes D1, D2, and D3
•
all solder connections
•
Jumper wires at all JMP locations.
•
P3 (+) to P4 (-) test voltage is about 9.0 VDC +/- 1.5 VDC.
•
Verify the orientation of the laser power supply wires (P1/RED & P2/Black)
and their connection to the laser (center spring is negative - Black).
•
P1 (+) to P2 (-) test voltage is about 4.3 VDC +/- 0.2 VDC.
•
Make sure the laser’s on switch is pushed in far enough by the nylon tie.
•
Avoid pointing the detector directly at any light source other than your
intended illumination source. If your LTS1 seems to be too sensitive to
ambient light, reduce the value of R3 from the default 1 Meg value down
to the optionally provided 470K ohm resistor value (or less if needed).
Covering the front end of the PVC pipe with a slightly opaque lens (a
piece of lightweight colored paper works well) will also help improve the
trip sensor’s ambient light rejection, should you have problems.
Still having trouble?
Use a methodical, logical troubleshooting technique. Most problems can be
solved using common sense. A volt-ohm meter and a clear head are usually
all that are needed to correct any problem. Most problems are due to
misplaced parts and/or bad solder connections. Working backwards through
the assembly steps will often lead you to the problem. Revisit the extensive
theory of operation include in this manual, and try to apply to your specific
problem.
Have another set of eyes look through your work. Here at the shop we have
often run into a “stone wall” of a problem only to have a fellow technician see
our obvious error. Also, make sure that you have “checked” all the assembly
steps boxes. You may have forgotten one or two of them.
LTS1 • 21