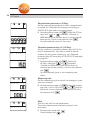
1
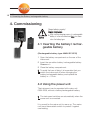
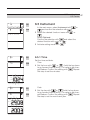
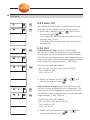
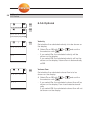
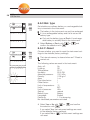
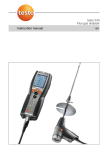
testo 521 · testo 526
Instruction Manual
en
2 Foreword / Copyright
Foreword / Copyright
Foreword
Dear Testo Customer,
We are delighted that you have chosen a product from Testo. We hope that the product
will give you a long period of satisfaction and will aid you in your work.
If problems should occur which you cannot rectify yourself, please consult our service
department or your dealer. We will endeavour to provide fast and competent assistance
to avoid lengthy down times.
Copyright
This documentation is subject to the copyright of testo AG. Reproduction and use contrary to the legitimate interests of Testo AG are prohibited without the prior, written consent of the company.
We reserve the right to modify technical details from the descriptions, specifications and
illustrations contained in this documentation.
testo AG
Postfach 11 40
79849 Lenzkirch
Germany
General notes 3
General notes
This documentation contains important information about the features and use of the
product. Please read this document through carefully and familiarise yourself with the
operation of the product before putting it to use. Keep this documentation to hand so
that you can refer to it when necessary.
Pictograms
This product could be dangerous if operated incorrectly. Information that requires particular attention is identified in these Operating Instructions by pictograms:
Warnings are identified by means of a warning triangle. The relevant signal word! indicates the degree of risk:
Warning! means: Serious physical injury could occur if you do not take the
precautionary measures indicated.
Signal word
Caution! means: Slight physical injury or material damage could occur if
you do not take the precautionary measures indicated.
Pay particular attention to warnings and take the precautionary measures
indicated in order to avoid danger.
Notes on special cases and peculiarities in the handling of your unit are indicated by
an exclamation mark.
521
Indicates with which instrument variant a menu can be executed.
526
Content
The content of this documentation relates to the German version of the instrument.
Standards / Tests
As declared in the certificate of conformity, this product fulfils the guidelines of
89/336/EEC.
4 Content
Content
Foreword / Copyright ..................................................2
General notes ............................................................3
Content ....................................................................4
1. Fundamental safety instructions ................................6
2. Intended purpose ......................................................7
3. Product description ..................................................8
3.1
3.2
3.3
Power supply............................................................8
Controls....................................................................8
Menu overview........................................................10
4. Commissioning........................................................12
4.1
4.2
4.3
Inserting the battery/rechargeable battery ..............12
Connecting the mains unit ......................................12
Connecting probes/sensors ..................................13
5. Basic operating steps ..............................................14
5.1
5.2
Switching on / off ....................................................14
Menu navigation ....................................................15
6. Menu functions ..........................................................16
6.1
6.2
Measurement site ..................................................16
Memory ..................................................................17
6.2.1
6.2.2
6.2.3
6.2.4
6.2.5
6.3
Probes....................................................................21
6.3.1
6.3.2
6.3.3
6.4
Man. / Auto./ Fast ................................................................17
Configuration ....................................................................18
Printing ............................................................................18
6.2.3.1 Data transfer ........................................................19
Status ............................................................................20
Clearing ............................................................................20
Surface increment ............................................................21
Scaling U/I ........................................................................21
F-Reset ............................................................................23
Input ......................................................................24
6.4.1
6.4.2
6.4.3
6.4.4
6.4.5
6.4.6
6.4.6
Temperature ....................................................................25
Relative humidity ..............................................................25
Absolute pressure ............................................................25
Density ............................................................................25
Cross-section ..................................................................26
Offset factor (O factor) ......................................................26
Pitot tube factor (P factor)..................................................26
Contents 5
6.5
Instrument ..............................................................27
6.5.1
6.5.2
6.5.3
6.5.4
6.5.5
6.5.6
6.6
Time ................................................................................27
Auto. Off ..........................................................................28
Unit ..................................................................................28
Display lighting ................................................................29
Damping............................................................................29
Optional ............................................................................30
Velocity ........................................................................30
Volume flow ................................................................30
Delta P ........................................................................31
Leakage rate................................................................31
Tightness test ..............................................................31
Slowdown time ......................................................32
Test time ................................................................33
Nominal test pressure ............................................34
Permitted pressure loss ........................................34
Measuring rate ......................................................34
Start ......................................................................34
Service ..................................................................37
6.6.1
6.6.2
6.6.3
6.6.4
Data ................................................................................37
Language ........................................................................37
Battery type ......................................................................38
W-Reset ..........................................................................38
7. Measuring................................................................39
7.1
7.2
7.3
Zeroing the display..................................................39
Selecting readings ..................................................39
Activating measuring functions................................39
7.4
7.5
Saving readings ......................................................41
Printing readings ....................................................42
Hold, Max., Min., Mean ..................................................................39
8. Care and maintenance ............................................43
9. Troubleshooting ......................................................45
10. Technical data..........................................................46
10.1 Measuring ranges and accuracies ..........................46
10.2 Other instrument data ............................................47
11. Accessories / spare parts ........................................48
6 1. Fundamental safety instructions
1. Fundamental safety instructions
Avoid electrical hazards:
Never make measurements with the instrument and its probes on or near live components unless the instrument is expressly approved for current/voltage
measurements!
Protect the instrument:
Never store the instrument together with solvents (e.g. acetone).
Product safety/preserving warranty claims:
Operate the instrument only within the parameters specified in the technical data.
Handle the instrument properly and according to its intended purpose.
Never apply force!
Temperatures given on probes/sensors relate only to the measuring range of the sensors. Do not expose handles and feeders to any temperatures in excess of 70 °C
unless they are expressly permitted for higher temperatures.
Open the instrument only when this is expressly described in the Instruction Manual
for maintenance purposes.
Carry out only the maintenance and repair work that is described in the Instruction
Manual. Follow the prescribed steps exactly. For safety reasons, use only original
spare parts from Testo.
Any further or additional work must only be carried out by authorised personnel.
Testo will otherwise refuse to accept responsibility for the proper functioning of the
instrument after repair and for the validity of certifications.
Ensure correct disposal:
Dispose of defective rechargeable batteries and spent batteries at the provided collection points.
Send the instrument directly to us at the end of its life cycle. We will ensure that it is
disposed of in an environmentally friendly manner.
2. Intended purpose 7
2. Intended purpose
Employ the instruments for the following applications only:
The testo 521 and testo 526 instruments are handheld pressure-measuring instruments
that were developed specifically for use in air conditioning / ventilation equipment, thermal engineering, automotive engineering and industrial plant engineering. The main
areas of use and measuring applications are:
testo 521
Air conditioning/ventilation, clean rooms and OPs:
Pressure ranges 0 to 100 hPa/0...2,5hPa, Pitot tube measurement, volume flow calculation, pressure drop on filters, fans, ...
testo 526
Industrial pressure measurement:
Pressure ranges 0 to 2000 hPa, pressure in compressed air systems, leaks in pipes &
lines, pressure drop, vacuum
Both instruments offer the following features:
- Measurement location management
- Data management via testo ComSoft software (from Version 3)
- “on-site” printout of the measured results via the testo printer
- Temperature measurement
- Wide range of probes and sensors can be connected so that one instrument covers
as many measuring tasks as possible
Location conditions
Changes in the location and temperature of the instrument and pressure probes have an
effect on the measurement results. Bring the instrument and probes into a stable position before any measurement.
Do not change this position during measurement.
Do not subject the housing to mechanical strains during measurement.
Media compatibility
testo 521/526:
Permitted medium: air and non-aggressive gases
External low pressure probes 0638 1347, 0638 1447, 0638 1547, 0638 1647, 0638
1747: Permitted medium: air and non-aggressive gases
External high-pressure probes 0638 1741, 0638 1841, 0638 1941, 0638 2041, 0638
2141: Permitted medium: refrigerant, oil, water, air and non-corrosive gases
8
3. Product description
3.1 Power supply
3. Product description
3.1 Power supply
Power is supplied to the testo 521/526 optionally via:
- 9 V monobloc battery, type: IEC 6LR61 (included)
- 9 V monobloc rechargeable battery, type:
NiMH IEC 6F22 (0515 0025)
- Mains connection and battery charging via mains
unit 0554 0088, see also page 38 6.6.3 Battery
type)
3.2 Controls
Keyboard
Print
Select reading 1 (top line), select menu item
Switch on / off
Save data
Open menu level, confirm selection, execute function
Zero pressure probes
Cancel process, menu level back, in measuring
menu: Light on
Select reading 2 (bottom line), select menu item
Hold reading value, display maximum / minimum /
mean value
Connections
Socket “1” and
socket “2”:
Thermocouple probe (type K), NTC probe, pressure probe, power supply cable
“RS232”: PC connection
12 V DC mains unit (0554 0088)
Pressure nipple p+ with quick-release connection
(M8 x 0.5) (only for testo 526)
Pressure nipple p- with quick-release connection
(M8 x 0.5) (only for testo 526)
3. Product description
9
3.2 Controls
Display
Header (see detailed explanation of icons below:
Icons in the header)
Designation of internal sensor or input socket 1
with selected channel and parameter unit
Reading 1
Designation of input socket 1 or 2 with selected
channel and parameter unit
Reading 2
Measuring functions
Icons in the header:
M. Counter for identifying the stored logs in the case of
manual, automatic and fast storage of the measurement series.
N 0000 Counter for identifying the measurements in a measurement series in the case of automatic and fast storage.
Appears: manual saving set.
Flashes: current readings saved.
Appears: automatic saving set.
Flashes: automatic saving running.
The memory content will be cleared.
Appears: printing possible.
Flashes: print function activated.
Battery / rechargeable batter capacity:
All segments dark: rechargeable battery/battery full.
All segments light, flashing: Battery / rechargeable battery empty. The instrument switches off automatically
after 1 min.
10
3. Product description
3.3 Menu overview
3.3 Menu overview
: Open menu,
: Select menu,
: Back
The menu numbers appear in the topmost line of the display. Example: testo 521
Memory menu
1 Manual /
Automatic/
Fast
2 Configuration
3 Print
4 Status
5 Delete
Measurement
menu
Main menu
testo 521
1 Location
2 Memory
3 Probes
4 Input
5 Device
6 Service
testo 526
1 Location
2 Memory
3 Probes
Probe menu
1 Socket 1
2 Socket 2
4 Device
5 Service
Input menu
1 Temperature
2 Humidity
3 Pressure
4 Density
5 Section
6 Offset factor
7 Pitot tube factor
Instrument menu
1 Date/Time
2 Auto. off
3 Unit
4 Light
5 Damping
6 Optional
Service menu
1 Data
2 Language
3 Battery Type
4 Factory Reset
53
=
2
5 Instrument —> 3 Unit
—> 2 P High
Channel menu
1 Surface
increment
2 Scaling U/I
3 Reset
Surface menu
1 Circle 1
2 Circle 2
3 Rectangle 1
4 Rectangle 2
5 Area 1
Units menu
1 Pressure low
2 Pressure high
3 ISO/US
4 °C/°F
Option menu
testo 521
1 Velocity
2 Volume Flow
3 P1-P2
testo 526
1 P1-P2
2 Leak Rate
3 Tightness
test
3. Product description
11
3.3 Menu overview
MUF menu
1 Input
2 Unit
3 Resolution
4 Output
MUF word menu
1 Voltage/current
2 Temperature
3 Humidity
4 Velocity
5 Pressure
6 Analysis
7 Other
Units
Pa (ISO/US)
hPa (ISO/US)
mbar (ISO/US)
kPa (ISO/US)
bar (ISO/US)
psi (ISO/US)
mmWs (ISO)
Torr (ISO)
"HG (US)
"H2O (US)
Test menu
1 Slowdown time
2 Test time
3 Nominal
pressure
4 dP Required
5 Measuring Rate
6 Start test
Units
hPa (ISO/US)
mbar (ISO/US)
kPa (ISO/US)
bar (ISO/US)
psi (ISO/US)
mmWs (ISO)
Torr (ISO)
"HG (US)
"H2O (US)
12
4. Commissioning
4.1 Inserting the battery / rechargeable battery
4. Commissioning
Charge batteries properly!
Danger of explosion!
Caution
Only start the charging process if a rechargeable
battery is in the instrument and Rech. has been
set as the battery type.
4.1 Inserting the battery / rechargeable battery
(Rechargeable battery type: NiMH IEC 6F22)
1 Open the battery compartment on the rear of the
instrument.
2 Insert the monobloc battery / rechargeable battery.
Observe +/-.
3 Close the battery compartment.
To avoid the loss of data, it is imperative that you
switch the instrument off when changing the
battery/rechargeable battery and replace the
battery in < 10 min.
4.2 Using the power unit
The instrument can be operated with mains unit
0554 0088, without a battery/rechargeable battery.
The instrument switches on automatically when the
power unit is connected.
It is normal for the mains unit to warm up. The mains
unit has a thermostatic switch to protect it against
overheating.
4. Commissioning
13
4.3 Connecting probes / sensors
4.3 Connecting probes/sensors
Connect the probes / sensors before switching the
instrument on. Probe-specific characteristics are only
read in when the instrument is switched on. Make
sure the connections are secure, but do not use force!
Connect the plug/hoses of the probes/sensors to
the corresponding connections of the instrument:
1 Pressure hoses at p+ and pMake sure the pressure hose does not jump away
from the connection socket!
Risk of injury!
Caution
Always use the screw locking device to secure
the pressure hose at pressures above 700 hPa.
2 Socket "1" and socket "2":
Thermocouple probe (type K), NTC probe, pressure probe, power supply cable
14
5. Basic operating steps
5.1 Switching on / off
5. Basic operating steps
5.1 Switching on/off
Switching on
Connect the required probes/sensors before switching on.
1 Switch the instrument on with
.
A display test will follow: all segments of the display
will light up for approx. 1 sec.
Automatic probe detection will be carried out. The
supply voltage and the actual time will be displayed.
Set the language in which the menus are to be
displayed.
You must set the language before the instrument is
used for the first time or after a factory reset.
L a n g u a g e
Select the language with
or
and confirm
with
. The selection is stored and will be
displayed automatically the next time the
instrument is switched on.
You can change a menu setting later via the menu
item Service->Language.
E n g l i s h
M. 00
MAN.
i . 1
h P a
10.08
1 . 1
° C
24.8
The current readings are displayed. The instrument
is now operational.
The reading of the internal sensor is displayed in
the upper line.
The reading of an externally connected probe
appears in the lower line.
If two probes are connected externally, the measurement of the internal sensor is deactivated.
-Left probe socket: upper line
-Right probe socket: lower line
5. Basic operating steps
15
5.2 Menu navigation
Switching off
Readings which are not saved will be lost when the
instrument is switched off!
Switch the instrument off with
.
5.2 Menu navigation
Operation is organised into 3 levels:
- Measurement menu
- Main and submenus
- Configuration menus
1 Open the main menu with
measurement menu with
2 Select the menu with
with
.
and return to the
.
or
and confirm
3 Repeat step 2 until you reach the function level.
4 You can make entries with
or
, depending on the menu item. Confirm the entry with
.
- The current value will be displayed.
Details about the setting and adjustment options for
the individual functions can be found under 6. Menu
functions.
Go back one menu level with
.
16
6. Menu functions
6.1 Measurement location
6. Menu functions
521 526
6.1 Measurement site
1 Choose the measurement location In the main
menu with
or
.
- The location that is currently set will be displayed.
If a measurement location was allocated via the
testo ComSoft software, this is displayed as well.
- If data is already stored for the chosen location,
illuminates.
1
L o c a t i o n
2 Activate setting mode with
.
- The measurement location that is currently set flashes.
0 1
1
L o c a t i o n
- A location is created when the unit is first commissioned. Up to 98 additional locations can be
added. Press the
key until NEW appears in the
lower line. Confirm with
. A new
measurement location has been created.
3 Select the desired measurement location with
or
and confirm the selection with
.
- Adjustable values flash.
N E W
6. Menu functions
17
6.1 Measurement location
MAN.
2
521 526
6.2 Memory
In the main menu, choose the measurement location
with
or
.
M e m o r y
Select required location with
and confirm with
or
.
1 In the main menu, select Memory with
and confirm the selection with
2 Select the desired function with
3 Activate setting mode with
or
or
.
.
.
- Adjustable values flash.
21
521 526
6.2.1 Man./Auto./Fast
Man./Auto.
Press
or
to select Manual, Automatic or
Fast and confirm the selection with
.
M a n u a l
A u t o .
F a s t
- Fast
save 25 measurements per second automatically
MAN.
- Manual
save current readings
- Automatic
start a measurement program that will be saved
Only 1 channel can be analysed during a fast measurement. Fast measurement only possible
with pressure probes or internal pressure sensor.
The following order applies during the fast
measurement:
- External pressure sensor before internal pressure
sensor
- Channel 2 before Channel 1.
Start the required save with the
key. The save
process is indicated by a flashing memory icon in the
display. Cancel saving with the
key.
18
6. Menu functions
6.2 Memory
521 526
6.2.2 Configuration
(only available in the Fast/Automatic measurement
program)
22
M e a s R .h r s .
m i n.
Set how the measurement program is to function.
00
22
Measurement program Auto.
sec.
h m i n .
02:38020
Q u a n t i t y
200
4 Set the measuring rate in hrs., min. and sec. with
or
. Hold the key down to go
forward/back quickly. Every time 60:00 min. is passed, the hour value increases. Confirm the selection with
.
5 Select the number of measurements with
or
(hold the key down to go forward/back
quickly) and confirm the selection with
. The
duration of the measurement series is displayed in
the upper line for your information.
Measurement program Fast (20 measurements
per sec.)
4 Select the number of measurements with
(hold the key down to go forward/back
quickly) and confirm the selection with
.
or
521 526
23
6.2.3 Printing
P r i n t
The logs stored for a measurement location, e.g. the
reading and other available parameters (density, temperature, humidity, pressure, cross-section, offset factor, Pitot tube factor) are printed.
L o g
03
4 Select the log with
or
(hold the key
down to go forward/back quickly) and confirm the
selection with
.
5 Printout starts
- The data is sent to the printer via the infrared interface.
flashes during data transmission.
If the
key in the measurement menu is
pressed, the reading currently stored is printed out.
If no log is stored the display shows “Error”.
6. Menu functions
19
6.2 Memory
Date: 27.08.2003
Time: 10:15:35
Testo AG
Location: 01
Printout of current reading in the measurement menu
Meas. from: 27.08.2003
Time: 10:15:35
1.1: 918 hPa
2.1: 27.0 °C
Date: 27.08.2003
Time: 10:15:35
Testo AG
Location: 01
Date
from: 27.08.2003
to: 27.08.2003
Time
10:15:35
10:25:35
hh:mm:ss
Meas. rate : 00:01:00
Printout after measurement has finished
1.1: hPa 2.1: °C
00001 27.08.2003 10:15:35
01
917
26.8
02
918
26.8
03
917
26.8
04
917
26.8
05
917
26.8
06
917
6.2.3.1 Data transfer
The transmission path should not be obstructed by
obstacles of any kind.
20°
60°
max. 2 m
60°
10°
20
6. Menu functions
6.2 Memory
24
521 526
6.2.4 Status
Indicates the available memory space as a %.
S t a t u s
F r e e
%
65.5
25
C l e a r
521 526
6.2.5 Clearing
The Clear menu item allows the entire memory to be
cleared.
- It is not possible to clear individual logs or
measurement locations.
Y e s
4 Select Yes or No with
the selection with
.
or
and confirm
- If you select Yes: the memory content will be cleared.
- If you select No or
celled.
: the process will be can-
21
32
521 526
S o c k e t
6.3 Probes
Menu is activated only if external probes are
connected.
2
1 In the main menu, select Probes with
and confirm the selection with
2 Select the desired socket with
confirm the selection with
.
or
3 Select the desired function with
4 Activate setting mode with
or
.
or
and
.
.
The following control operations for the functions Surface increment, Scaling U/I and Probe reset apply
equally for the Socket 1 and Socket 2 menus.
Different units are available, depending on which
standard was chosen (ISO or US). See 6.6.3 Unit
32
1
521 526
S I
%
2.00
6.3.1 Surface increment (SI)
This function is only visible if a temperature probe is
connected.
Set which surface increment (SI) is to be calculated in
addition to a surface increment stored in the probe.
The surface increment is the percentage increment
for the measured thermocouple voltage of surface
probes.
5 Select the increment (0 - 30 %) with
or
.
Hold the key down to move forward/back quickly.
Confirm the selection with
.
22
6. Menu functions
6.3 Probes
31
2
Scal.
521 526
U/I
6.3.2 Scaling U/I
This function is only visible if the 4 - 20 mA interface
(0554 0528) or the power supply cable (0554 0007) is
connected.
Select the scaling factors for the transmitter.
%
5 Select Scal. U/I with
selection with
.
or
and confirm the
6 Activate the "Input", "Unit", "Resolution" or
"Output" menus with
.
7 Select parameters with
the selection with
.
521 526
Input
- 0 V - 10 V
521 526
Units
Menu
U/I
Temp.
Humidity
Velocity
Pressure
Analysis
Other
or
and confirm
(for power supply cable
0554 0007)
- 0 V - 1 V (for power supply cable
0554 0007)
- 4 mA - 20 mA (for power supply cable
0554 0007 or 4 - 20 mA interface
0554 0528)
- 0 mA - 20 mA (for power supply cable
0554 0007 or 4 - 20 mA interface
0554 0528)
Units
V
°C
%
m/sec
Pa
mS
1/m
mA
A
mV
°F
°Ctd g/m3 g/kg °Ftd
m3/hr fpm cfm
psi Torr mmWS kPa mbar bar hPa
mg/l pH
µS
User % ppm kHz
"H2O
"HG
6. Menu functions
23
6.3 Probes
521 526
521 526
Resolution
Selecting decimal places
Place Min. value
Max. value
0
-9999
to 99999
1
-999.9
to 9999.9
2
-99.99
to 999.99
Setting the output
Scaling takes place when the unit has been selected.
Example: 4 - 20 mA should correspond to
0 - 100 % in the subsequent display.
Entering the min. value
Set the 4 mA value (corresponds to 0%) with
or
= 0 % (hold the key down to move
forward/back quickly) and confirm the selection
with
.
Entering the max. value
Set e.g. the 20 mA value (corresponds to 100 %)
with
or
(hold the key down to move forward/back quickly) and confirm the selection with
.
521 526
6.3.3 F-Reset
Select whether you want to reset the probe / sensor
data to the standard values (factory setting).
5 Select Yes or No with
the selection with
.
or
and confirm
- If you select Yes: probe / sensor data will be reset.
If you select No or
: the process will be cancelled.
24
6. Menu functions
6.4 Input
521
6.4 Input
For velocity measurement with the Pitot tube, the
internal pressure sensor 0 - 100 hPa is the best for
velocities from 5 - 100 m/s. For measurements in the
range of 1 - 12 m/sec., use the external differential
pressure probe 0638 1347 with measuring range 0 100 Pa. The velocity v is calculated in the instrument
from the pressure difference ∆p in the Pitot tube
according to the following formula:
v [m/sec.] = S x
200000 x ∆p [hPa]
rho [g/m3]
To activate the velocity rate measurement and volume
flow rate calculation, please refer to chapter 6.5.6.
Alternatively, it is possible to enter the variables which
influence the air density at the measuring location:
- temperature (see point 6.4.1)
- relative humidity (see point 6.4.2)
- absolute pressure (see point 6.4.3)
Additional input options for calculating the velocity or
volume flow rate are the
- cross-section (see point 6.4.5)
- offset factor (see point 6.4.6)
Calculation formula:
.
V [m3/h] = K x v [m/s] x A [m2] x 3600
- Pitot tube factor (see point 6.4.7)
4
I n p u t
1 In the main menu, select Input with
and confirm the selection with
.
2 Select the required function with
3 Activate setting mode with
or
or
.
.
6. Menu functions
25
6.4 Input
521
41
6.4.1 Temperature
Set the temperature which is to be used to calculate
the density.
T e m p .
4 Select the temperature with
or
.
(-100 °C - 800 °C) (hold the key down to go
forward / back quickly) and confirm the selection
with
.
° C
20.0
42
521
H u m i d i t y
6.4.2 Relative humidity
Set the humidity which is to be used to calculate the
density.
4 Select the humidity (0 - 100 %) with
or
(hold the key down to go forward / back quickly)
and confirm the selection with
.
%
48.5
521
43
P r e s s u r e
6.4.3 Absolute pressure
Set the absolute pressure which is to be used to calculate the density.
4 Select the pressure (400 - 4000 hPa) with
or
(hold the key down to go forward / back
quickly) and confirm the selection with
.
h P a
1013
44
521
D e n s i t y
g / m 3
11993
6.4.4 Density
The density is calculated automatically after the factors of temperature, humidity and absolute pressure
have been entered. If you set the value for the density
directly, no values are displayed for temperature,
humidity and pressure (display: - - - - -).
4 Select the density (1 - 9999.9g/m3) with
or
(hold the key down to go forward / back
quickly) and confirm the selection with
.
26
6. Menu functions
6.4 Input
521
45
1
Set the cross-section for
- circle 1
(Ø in mm)
- circle 2
(Ø in mm)
- rectangle 1
(a x b/height x width in mm or inch)
- rectangle 2
(a x b/height x width in mm or inch)
- area
(m2)
that is to be used to calculate the volume flow rate.
The shapes listed are contained in the instrument as
standard. The shapes can be changed using the software (e.g. five circles).
1
4 Select the desired function with
S e c t i o n
C i r c l e
45
1
C i r c l e
6.4.5 Cross-section
5 Activate setting mode with
50
O
7 Enter the next cross-section. To set the next
values, repeat steps 2 - 6 .
521
1.00
P
4 Select the O factor (0.01 - 10) with
or
(hold the key down to go forward / back quickly)
and confirm the selection with
.
521
f a c t o r
1.00
6.4.6 Offset factor (O factor)
Set the offset factor that will be used to calculate readings. The factor is stored with the cross-section. The
factor changes when another cross-section is activated. The O factor depends on the outlet. The K factor
affects the calculated volume flow directly. For standard applications the factor should be 1.
f a c t o r
47
.
6 Select the value with
or
(hold the key
down to go forward / back quickly) and confirm the
selection with
.
m m
46
or
.
6.4.7 Pitot tube factor (P factor)
Set the Pitot tube factor that will be used to calculate
readings.
- Testo standard Pitot tube (Prandl), factor 1
- Straight Pitot tubes, factor 0.67
4 Select the P factor (0.01 - 500) with
or
(hold the key down to go forward / back quickly)
and confirm the selection with
.
6. Menu functions
27
6.5 Device
5
521
4
526
6.5 Instrument
In the main menu, select Instrument with
and confirm the selection with
.
or
2 Select the desired function / menu with
or
.
Select Optional:
Confirm the selection with
and select the
desired function with
or
.
D e v i c e
3 Activate setting mode with
51
521
41
526
.
6.5.1 Time
Set the time and date.
Time
4 Set the hour with
or
(hold the key down
to go forward / back quickly). The value to be changed flashes. Confirm the setting with
. Repeat
this step to set the minutes.
h h : m m
10:24
51
521
41
526
D D . M M
29.08
Y Y Y Y
2003
Date
5 Set the day with
or
(hold the key down
to go forward / back quickly). The value to be changed flashes. Confirm the setting with
. Repeat
the step to set the month and year.
28
6. Menu functions
6.5 Device
52
521
42
526
Auto.
off
53
521
U n i t
P
P
1
L o w
43
1
526
L o w
53
2
521
43
2
526
H i g h
b a r
4 Select On or Off with
the selection with
or
and confirm
.
6.5.3 Unit
Low pressure (P low) (probe up to 2000 hPa)
Set the unit in which the pressure is to be displayed.
The selected unit will be displayed in measurements
with the internal pressure sensor and all external pressure probes (differential and absolute pressure probes)
with a measuring range between 0 - 2000 hPa.
The following units are available:
- hPa, Pa, psi, Torr, kPa, mbar, bar for ISO/US
- Torr, mmWs for ISO
- "H2O, "HG for US
4 Select the desired unit with
confirm the selection with
h P a
P
Set whether the instrument is to switch off automatically after 10 min. without any key being pressed.
- If you select On: the instrument will switch off automatically after 10 min.
If you select Off: the instrument will not switch off
automatically.
O f f
53
6.5.2 Auto. Off
or
and
.
High-pressure (P high) (probe from 2000 hPa). Set
the unit in which the pressure is to be displayed. The
selected unit will be displayed in measurements with
the external relative pressure probes with a measuring
range between -1 and +400 bar.
The following units are available:
- hPa, psi, kPa, mbar, bar for ISO/US
- Torr, mmWs for ISO
- "H2O, "HG for US
4 Select the required unit with
confirm the selection with
or
.
and
6. Menu functions
29
6.5 Device
53
3
43
3
521
526
I S O / U S
53
4
521
43
4
526
ISO/ US
Set whether European (metric) or US units are to be
displayed.
The following units will be converted:
- m2 - ft2, mm - inch, g/m3 - gr/ft3, m/sec. - fpm,
m3/h - cfm, units of pressure
4 Select ISO or US with
or
and confirm
the selection with
.
°C /°F
Set whether temperatures are to be displayed in units
of °C or °F.
4 Select °C or °F with
selection with
.
° C / ° F
or
and confirm the
° C
54
521
6.5.4 Display lighting
44
526
Set whether the display light is to go on for 30 sec.
when any key is pressed.
4 Select On or Off with
the selection with
.
L i g h t
or
and confirm
If Off is selected, the light will not go on when the key
is pressed.
O n
55
521
45
526
D a m p i n g
1
6.5.5 Damping
If the readings fluctuate widely, it is advisable to damp
the readings.
Set the damping which is to be used to calculate readings.
Damping is the sliding mean calculation over n
values (n can be set in instrument).
4 Set damping (1 - 20) with
or
(hold the
key down to go forward / back quickly) and confirm
the selection with
.
30
6. Menu functions
6.5 Device
56
521
46
526
6.5.6 Optional
O p t i o n a l
56
1
521
V e l o c i t y
Velocity
Set whether the calculated velocity is to be shown on
the display.
4 Select On or Off with
the selection with
.
2
V o l F l o w
521
Volume flow
Set whether the calculated volume flow is to be
shown on the display.
4 Select On or Off with
the selection with
O f f
and confirm
- If you select On: the calculated velocity will be
shown on the display.
If you select Off: the calculated velocity will not be
shown on the display. Volume flow is automatically
at Off.
O n
56
or
or
and confirm
.
- If you select On: the calculated volume flow will be
shown on the display. Flow is activated automatically.
If you select Off: the calculated volume flow will not
be shown on the display.
6. Menu functions
31
6.5 Device
56
3
521
46
1
526
P 1 - P 2
O n
Delta P
Set whether the differential pressure of two pressure
probes is to be shown on the display.
Calculating the differential pressure (P1-P2):
If one external pressure probe is connected, the differential pressure is calculated from the internal pressure
sensor (P1) and external pressure probe (P2). If two
external pressure probes are connected, the internal
pressure sensor is deactivated. The differential pressure is calculated from the external pressure probes.
4 Select On or Off with
or
and confirm
the selection with
.
- If you select On: the differential pressure will be
shown on the display.
If you select Off: the differential pressure will not be
shown on the display.
46
2
526
L e a k R a t e
L e a k R a t e
909
4 Select ∆p/hr. or ∆p/min. with
confirm the selection with
d P / m i n .
T e s t
3
or
and
.
Measurement starts and the pressure reading is
displayed immediately. After about 10 sec. the first
pressure difference will be displayed and updated
continuously. Measurement can be restarted at any
time by pressing the key
. Press
or
to
end measurement.
-2
46
Leakage rate
Set whether the leakage rate (∆p/hr. or ∆p/min.) is to
be calculated and shown on the display. The leakage
rate is always calculated for just one channel. The
channel to be measured is selected automatically
according to the following rule:
- external probe before internal probe
- measuring channel 1 before measuring channel 2
526
Tightness test
The tightness test menu is used in order to analyse
the pressure loss of the vessel, pipes, lines etc.
The steps for performing the tightness test “ The
tightness test menu is used in order to analyse the
pressure loss of the vessel, pipes, lines etc.
32
6. Menu functions
6.5 Device
The steps for performing the tightness test “Test with
air”, based on the standard DIN EN1610 “Construction and testing of drains and sewers”, are outlined in
the instrument menu:
- Enter the set slowdown time (tSlDoReq)
- Enter the set test time (tTestReq)
- Enter the set test pressure at which the
measurement is to take place (P Req.)
- Enter the permitted pressure drop ∆p in hPa
that is critical in order to assess whether the pipeline
is leaking or not (∆P Req.)
The test can start once the required values according
to the standard have been entered. It is divided into
5 areas:
Time zone areas:
- Pre-fill time
Build-up of the pressure in the pipe system and the
actual duration.
- Slowdown time
Measurement of the pressure, which should
exceed the test pressure required by the standard
by about
10 % over 5 min. and which records the actual duration.
- Test time
Record of the actual test duration.
- Drop time
Record of the duration of the pressure drop in the
line.
When the test has come to an end the individual
required and actual test data can be printed out on
the printer or automatically imported into a test log via
the ComSoft software.
46
31
tSlDoReq.
min.
sec.
05:00
Slowdown time (tSlDoReq)
Set the required time. According to DIN EN1610, it
should be about 5 min.:
A starting pressure that exceeds the necessary test
pressure po by about 10 %. po must first be maintained for 5 min.
4 Select tSlDoReq (0 sec. to 99 min., 59 sec.) with
or
(hold the key down to move forward /
back quickly. Confirm the selection with
. You
automatically return to the tTestReq menu.
6. Menu functions
33
6.5 Device
46
32
tTestReq.
hr.
min.
00:10
Test time (tTestReq)
Set the test time during which the pressure drop is
monitored. The test time is taken from DIN EN 1610
(see table below).
5 Activate setting mode with
. Select tTestReq
(1 min. to 99 hr., 59 min.) with
or
(hold
the key down to more forward / back quickly) Confirm the selection with
.
You automatically return to the P Req. menu.
Test pressure, pressure drop and test times for testing with air
Material
Method
Po*
∆p
in mbar
DN
(kPa)
100
Dry concrete pipes
10
2.5
LA
5
(1) (0.25)
50
10
LB
4
(5)
(1)
100
15
LC
3
(10) (1.5)
200
15
LD
1.5
(20) (1.5)
Kp x value**
0.058
Moist concrete pipes
10
2.5
LA
5
and all other
(1) (0.25)
materials
50
10
LB
4
(5)
(1)
100
15
LC
3
(10) (1.5)
200
15
LC
1.5
(20) (1.5)
Kp x value**
0.058
Test time (min.) for
DN DN DN DN DN DN
300 400 600 800 1000 1200
DN
150
DN
200
5
5
5
7
11
14
18
22
4
4
4
6
8
11
14
17
3
3
3
4
6
8
10
12
1.5
1.5
1.5
2
3
4
5
6
0.016
0.013
0.058 0.053 0.040 0.0267 0.020
5
5
7
10
14
19
24
29
4
4
6
7
11
15
19
22
3
3
4
5
8
11
14
16
1.5
1.5
2
2.5
4
5
7
8
0.058 0.040 0.030 0.020 0.015 0.0012 0.010
* Pressure above atmospheric pressure
** t = 1 x ln Po
Kp
Po-∆p
Kp = 16 with a maximum value of 0.058.
DN
Kp = 12
For moist concrete pipes and all other materials
DN with a maximum value of 0.058, where t < 5 min. rounded
to the nearest 0.5 minutes and t > 5 min. rounded to the nearest minute.
For dry concrete pipes
ln = log0
34
6. Menu functions
6.5 Device
46
P
33
R e q .
m b a r
9999.9
46
d P
34
R e q .
m b a r
150
Required test pressure po (P Req.)
Set the required test pressure at which measurement
is carried out. Required test pressure according to
DIN EN1610 (see table on previous page).
6 Activate setting mode with
Select the P Req.
value with
or
(example: 0.0mbar to
9999.9mbar) (hold the key down to move forward /
back quickly. Confirm the selection with
.
You automatically return to the menu.
Permitted pressure drop ∆P (∆P Req.)
Set the maximum permitted pressure drop ∆P. At the
end of measurement, this value is used to decide
whether the test piece is leaking or not. Required
pressure drop ∆P according to DIN EN1610 (see table
on page 33).
7 Activate setting mode with
. Select the
∆P Req. value with
or
(example:
0.0mbar to 9999mbar) (hold the key down to
move forward / back quickly). Confirm the selection
with
.
You automatically jump to the measuring rate
menu.
46
35
measR. hr.
00
min.
sec.
00:01
46
36
S t a r t ?
Measuring rate
Set the measuring cycle at which the changes in pressure are recorded.
8 Activate setting mode with
Select the measuring rate (1 sec to 24h) with
or
(hold the
key down to move forward/ back quickly. Confirm
the selection with
.
Start
Start the test with the set parameters.
The entire measurement process is stored in the
instrument.
9 Activate start mode with
Cancel testing with
.
.
6. Menu functions
35
6.5 Device
Graphic overview of the measurement process
P
2
4
3
5
1
Pre-fill
time
010
: 5
1 . 1
h P a
926
Slowdown
time
Test time
Drop
time
t
Phase 1: Pre-fill time
Build-up of the pressure in the pipe system and the
actual duration.
Jump to the slowdown time menu automatically with
.
P r e - f i l l
010
: 5
i . 1
h P a
926
S l o w D o w n
Phase 2: Slowdown time
Measurement of the pressure, which should exceed
the test pressure required by the standard by about
10 % over 5 min. and which records the actual duration.
Jump to the test time time menu automatically with
.
36
6. Menu functions
6.5 Device
0030
1 . 1
h P a
Phase 3: Test time
Recording of the actual test duration.
Jump to the drop time menu automatically with
.
926
∆P
3
0030
1 . 1
h P a
926
Phase 4: Drop time
Record of the duration of the pressure drop in the line.
Jump to the end of measurement menu automatically
with
.
D r o p
0030
L e a k
∆P
h P a
2
Phase 5: End of measurement
At the end of measurement, the full pressure difference
is displayed and the readings are analysed in order to
determine whether or not the system is to be classed
as leaking.
Press the
key to print out the measurement
result. All values are given in bar to enable
comparison.
Return to the measurement menu with
log to be saved is displayed.
. The last
6. Menu functions
37
6.6 Service
6
521
5
526
S e r v i c e
61
521
51
526
D a t a
V e r s i o n
0.10
B A T
6.6 Service
1 In the main menu, select Service with
or
and confirm the selection with
.
2 Select the required function / menu with
or
.
Confirm the selection with
and select the
required function with
or
.
3 Activate setting mode with
.
6.6.1 Data
Indicates the battery
voltage and firmware
version. When the
key is pressed
all information stored
in the instrument will
be printed out.
V
8.4
62
52
L a n g u a g e
6.6.2 Language
521
526
Set the language in
which the menus are
to be displayed.
The following languages are available:
German, English, Italian, Spanish, Portuguese, French, Dutch,
Swedish
E n g l i s h
4 Select the language required with
or
and
confirm the selection with
.
Printout data
Date: 27.08.2003
Time: 10:15:35
Testo AG
Location: 01
Data
Mustermann
Max
Testo Str. 1
Testo AG
07653/681-0
InstrumentType
Version
Serial number
Battery
Memory:
Measr.:
Free :
:
:
:
:
Manual
hh:mm:ss
00:01:00
78%
U/I 1:
Input :
Output:
Unit :
0mA - 20mA
0.0 - 20.0
U/I 2:
Input :
Output:
Unit:
0mA - 20mA
0.0 - 20.0
Temp.
Humidity
Pressure
Density
P factor
Section.
O factor
:
:
:
:
:
:
:
20.0 °C
50.0 %
1013 hPa
1199.0 g/m3
1.00
0.002 m2
1.00
t521
0.14
00000021
8.5V
38
6. Menu functions
6.6 Service
63
521
53
526
B a t . t y p e
B a t t e r y
6.6.3 Bat. type
Set whether an ordinary battery or a rechargeable battery is inserted in the instrument.
The battery in the instrument can only be recharged
if it is a rechargeable battery and this is set as the
battery type.
Only set the battery type as Rech. if a rechargeable battery is actually fitted in the instrument.
4 Select Battery or Rech. with
or
and
confirm the selection with
.
6.6.4 F-Reset
64
521
54
526
Choose whether you want to reset the instrument settings to the defaults (factory settings).
The internal memory is cleared when an F-Reset is
carried out.
F - R e s e t
F - R e s e t
Y e s
The following values are reset in the instrument:
Auto. off:
On
Lighting:
Off
Temperature:
20 °C
Humidity:
50 % RH
Absolute pressure:
1013 hPa
Density:
1199 g/m3
Area:
1 m2
Pitot tube factor:
1
Offset factor:
1
Unit of temperature:
°C
Units:
ISO
Unit of pressure:
hPa
Saving:
manual
Battery type:
Battery
Language:
English
Damping:
1 = no damping
No calculated parameters activated
4 Select Yes or No with
or
and confirm
the selection with
.
- If you select Yes: the instrument settings are reset
to the defaults (factory settings).
If you select No or
the instrument settings are
not reset.
7. Measuring
39
7.1 Zeroing the display
7. Measuring
M. 00
521 526
MAN.
i . 1
For the display of the internal pressure to be zeroed,
the instrument must be in the measurement menu and
there must be a differential pressure of < 2.5 % of the
full-scale value (at testo 5213 reset <20% of the full
scale value). Please refer to the Instruction manual for
the pressure probe to find out which part of the external pressure probes can be zeroed.
h P a
10.08
1 . 1
° C
24.8
M. 02
i.3
Zero the display values of all connected (zeroable)
pressure probes with
.
521
MAN
Zeroing is lost when the instrument is switched off.
7.2 Selecting readings
m3/h
23
2 . 1
7.1 Zeroing the display
If velocity or volume flow is activated, these values are
displayed in the upper line by pressing the
key.
Select required reading 2 (bottom line) with
° C
.
22.6
M. 00
MAN.
i . 1
521 526
h P a
10.08
1 . 1
? C
24.8
Hold Max. Min. Mean
Mean
521 526
Hold
24.8
7.3 Activating measuring
functions
The instrument has the following measuring functions:
- Hold value (Hold)
- Display maximum value (Max.)
- Display minimum value (Min.)
- Calculate spot mean value (Mean)
- Calculate chronological mean (Mean
)
For the measuring functions to be called up, the
instrument must be in the measurement menu.
Select the measuring functions one after the other
with
:
Hold
The last readings are held in the display.
40
7. Measuring
7.3 Activating measuring functions
30.5
521 526
15.7
521 526
Max
Min
N 0011
i . 1
521 526
h P a
Min.
The lowest readings since the start of measurement
are displayed.
Mean
1 Activate calculation of the spot mean value with
.
- Mean flashes.
10.08
1 . 1
Max.
The highest readings since the start of measurement
are displayed.
2 Record the reading for the calculation with
.
3 Repeat step 2 as required.
° C
- The number of recorded readings is shown in the
topmost line in the display.
24.8
Mean•
4 Calculate the spot mean value with
.
- The calculated mean value is displayed and can be
stored or printed out.
- Save readings with
- Print readings with
Reactivate calculation of the mean value with
and record additional readings with
.
Cancel the process with
521
521 526
003
: 7
i . 1
h P a
10.08
1 . 1
° C
24.8
Mean
.
Mean
1 Activate calculation of the chronological mean
value with
.
2 Start recording readings with
- Mean
.
flashes.
- A reading is recorded every second. The duration
since the readings started being recorded is shown
in the topmost line of the display.
3 Stop calculation of the mean values with
4 Calculate the chronological mean values with
.
.
- The calculated mean value is displayed and can be
stored or printed out.
- Save readings with
.
- Print readings with
.
7. Measuring
41
7.4 Saving readings
Reactivate calculation of the mean value with
and continue recording the measurement readings
with
.
Cancel the process with
521 526
.
7.4 Saving readings
For the readings to be saved, the instrument must be
in the measurement menu.
Before you save the readings, you must select the
measurement location under which the data is to
be saved (see 6.1 Measurement location).
M. 05
MAN
i . 1
h P a
10.08
2 . 1
° C
24.8
M. 05 N. 0005
AUTO
i . 1
h P a
10.08
2 . 1
° C
24.8
Manual save mode set (see 6.2.1 Man./Auto.):
4 Press
to save the current readings with the
date, time, measurement location and other available parameters.
-
flashes briefly.
.
Automatic save mode set (see 6.2.1 Man./Auto.):
4 Press
-
to start the set measurement program.
flashes for as long as the measurement
program is running. The save program can be
ended early by pressing
. Press again to save
a new series of measurements.
M. 05 N. 0005
AUTO
i . 1
h P a
10.08
Fast save mode set (see 6.2.1 Man./Auto.):
4 Press
to start the set measurement program.
- 25 measurements are saved per sec. automatically.
42
7. Measuring
7.5 Printing readings
M. 03 N. 0005
MAN
i . 1
521 526
To print all readings stored for a measurement location
(see 6.2.3 Printing)
h P a
10.08
1 . 1
7.5 Printing readings
To print individual readings, the instrument must be in
the measurement menu.
° C
4 Press
to print out the current readings with
the date, time, measurement location and other
available parameters.
24.8
- The data is sent to the printer via the infrared interface.
flashes during data transmission.
Data transfer
The transmission path should not be obstructed by
obstacles of any kind.
20°
60°
max. 2 m
60°
10°
8. Care and maintenance 43
8. Care and maintenance
8.1 Changing the battery /
rechargeable battery
(Rechargeable battery type: NiMH IEC 6F22)
To avoid the loss of data, it is imperative that you
switch the instrument off when changing the battery/rechargeable battery and replace the battery
in < 10 min.
1 Open the battery compartment on the rear of the
instrument.
2 Remove the empty monobloc battery / rechargeable battery.
3 Insert the new monobloc battery / rechargeable battery. Observe +/-.
4 Close the battery compartment.
Instrument will start automatically.
8.2 Charging the battery
Charge batteries properly!
Danger of explosion!
Only start the charging process if a rechargeable
battery is in the instrument and Rech. has been
set as the battery type.
The battery in the instrument can only be recharged if it is a rechargeable battery and Rech. is set
as the battery type.
1 Make sure a rechargeable battery is in the instrument.
2 Make sure that Rech. is set as the battery type
(see 6.6.3 Bat. type).
3 Connect the connector of the mains unit to the
12 V jack of the instrument.
44 8. Care and maintenance
4 Connect the mains plug to the mains socket.
c h a r g e
n o
5 Question as to whether rechargeable battery
should be charged. Select Yes with
and confirm with
.
The charging process will start automatically.
flashes during the charging process and the
actual battery voltage is displayed.
- Automatically go to measurement menu.
8.3 Cleaning the instrument
If the housing of the instrument is dirty, clean it with
a damp cloth. Do not use any corrosive cleaning
agents or solvents! Weak household cleaning
agents and detergents may be used.
9. Troubleshooting 45
9. Troubleshooting
Fault
Instrument switches off after printing
Display cannot be zeroed.
Saved settings and readings
are no longer held in the instrument.
Velocity value is calculated incorrectly
Velocity value is calculated incorrectly
Velocity value is calculated incorrectly
Volume flow is calculated incorrectly
Possible causes
Battery voltage too low
The differential pressure is outside
the zeroable range.
Factory reset was carried out or
battery was removed.
Density input incorrect
Pitot tube factor incorrect
Pressure probe not zeroed before
measurement
Offset factor or cross-section input incorrect
Remedy
Replace battery
Make the differential pressure < 2.5%
of full-scale value and zero the probes again.
No remedy possible! Keep readings
regularly in the software or on paper.
Enter correct density
Enter correct Pitot tube factor.
Zero pressure probe (without applying
pressure)
Enter correct offset or cross-section
If we were unable to answer your question, please contact your distributor or Testo
Customer Service. You will find contact details in the Warranty booklet or in Internet at
www.testo.com.
46
10. Technical data
10.1 Measuring ranges and accuracies
10. Technical data
10.1 Measuring ranges and accuracies
Instruments
Sensor
Measuring range
Overload limit
Static pressure
Accuracy ±1 digit at
at nom. temp. 22 °C
and meas. cycle>1 s
Resolution
testo 521-1, integrated differential
pressure sensor
0560 5210
testo 521-2 integrated differential
pressure sensor
0560 5211
testo 521-3, integrated differential
pressure sensor
0560 5213
testo 526-1 integrated differential
pressure sensor
0560 5280
testo 526-2 integrated differential
pressure sensor
0560 5281
0 - 100 hPa
300 hPa
2000 hPa
±0.2 % of fullscale value
0 - 100 hPa
300 hPa
2000 hPa
±0.1 % of fullscale value
0 - 2000 hPa
3000 hPa
2000 hPa
±0.1 % of fullscale value
0 - 2000 hPa
3000 hPa
2000 hPa
±0.05% of full
scale value
0.01 hPa
(0 to 100 hPa)
0.01 hPa
(0 to 100 hPa)
0...250Pa
50hPa
100hPa
±0,5 Pa
(0...20Pa)
±(0,5Pa + 0,5%
of reading)
(20...250Pa)
0.1 Pa
0.1 hPa
(0 to 2000 hPa)
0.1 hPa
(0 to 2000 hPa)
Pressure probes
to 2000 hPa
±0.1% of reading for
Probe 0638 1347
Probe 0638 1447
Probe 0638 1547
Probe 0638 1647
Probe 0638 1747
Probe 0638 1847
0.1 Pa (0638 1347)
0.001 hPa (0638 1447)
0.01 hPa (0638 1547)
0.1 hPa (0638 1647)
0.1 hPa (0638 1747)
0.1 hPa (0638 1847)
Pressure probes
to 400bar
±0.2% of reading for
Probe 0638 1741
Probe 0638 1841
Probe 0638 1941
Probe 0638 2041
Probe 0638 2141
NTC
-40 - +150 °C
Type K (NiCr-Ni)
-200 - +1370 °C
±0.2 °C (-10 - +50 °C)
±0.4 °C (-40 - 10.1 °C)
±0.4 °C (+50.1 - +150 °C)
±0.4 °C (-100 - +200 °C)
±1 °C (-200 - 100.1 °C)
±1 °C (+200.1 - +1370 °C)
0.01 bar (0638 1741)
0.01 bar (0638 1841)
0.01 bar (0638 1941)
0.01 bar (0638 2041)
0.01 bar (0638 2141)
0.1 °C (-40 - +150 °C)
0.1 °C (-200 - +1370 °C)
Probe
Current measurement
Current/voltage
measurement
Current/voltage
measurement
Measuring range
Accuracy**
±1 digit
Resolution
0...20 mA
Probe 0554 0528
0.01 mA (0...20 mA)
0 - 20 mA
0554 0007*
±0.04 mA (0 - 20 mA)
0.01 mA (0 - 20 mA)
0 - 10 V
0554 0007*
±0.01 V (0 - 10 V)
0.01 V (0 - 10 V)
Measuring range
Accuracy**
±1 digit
Resolution
* Power supply cable
** Instrument accuracy data apply only to instrument (without connected probe)
10. Technical data
47
10.2 Other instrument data
10.2 Other instrument data
Power supply
Probe interface
PC interface
PC
Printer interface
Measuring data memory
Battery life in continuous use with
internal pressure sensor
Battery life with connected
4 to 20 mA interface
Sensor
Storage/transport temperature
Operating temperature (temperature-compensated)
Intrinsic leakage
Display
Weight inc. TopSafe and battery
Housing material
Dimensions
Measuring rate
Refresh rate of display
Other
Warranty
9 V monobloc (6LR61), alkaline manganese or mains unit 12 V DC
Round 8-pin plug
ComSoft V3.4; connecting lead 0409 0178
RS232 interface
Infrared
approx. 25000 readings
30h with alkaline manganese, 10 hrs. with rechargeable battery, 18 hrs. with zinc
carbon at 25 °C and without lighting
Dependent on transmitter connected
Recommendation: Use mains unit
Piezoresistive
-20 - +70 °C
0 - +50 °C
0.3 % pressure drop from test pressure over a period of 1 minute
LCD display with symbol, 7-segment display and dot matrix part
approx. 600 g
ABS
(L x W x H) 219 x 68 x 50
Auto 1s to 24h, fast 0.04s
2 x per sec., with fast measurement 4 x per sec.
Automatic detection of all connected probes
24 Months
48 11. Accessories / Spare parts
11. Accessories / spare parts
Article
Instruments
Differential pressure meter testo 521-1, accuracy ±0.2 % of full scale value
Differential pressure meter testo 521-2, accuracy ±0.1 % of full scale value
Differential pressure meter testo 521-3, accuracy ±0.5Pa (0 to 20Pa); ±(0.5Pa + 0.5% of reading) (20...250Pa)
Differential pressure meter testo 526-1, accuracy ±0.1 % of full scale value
Differential pressure meter testo 526-2, accuracy ±0.05 % of full scale value
Order no.
0560 5210
0560 5211
0560 5213
0560 5280
0560 5281
Differential and absolute pressure probes
Differential pressure probe 100 Pa
Differential pressure probe 10 hPa
Differential pressure probe 100 hPa
Differential pressure probe 1000 hPa
Differential pressure probe 2000 hPa
Absolute pressure probe 2000 hPa abs
0638 1347
0638 1447
0638 1547
0638 1647
0638 1747
0638 1847
Relative pressure probes
Pressure probe 10 bar
Pressure probe 30 bar
Pressure probe 40 bar
Pressure probe 100 bar
Pressure probe 400 bar
0638 1741
0638 1841
0638 1941
0638 2041
0638 2141
Current/Voltage probes
Scalable probe for 4 - 20 mA
Power supply cable (±1 V; ±10 V, 20 mA)
Replacement terminal
0554 0528
0554 0007
0205 0026
Temperature probes
Globe thermometer for measuring radiant heat
IR surface probe for fast non-contact temperature measurement
Quick-action surface probe with sprung thermocouple strip, measurement range short-term to +500 °C
Quick-action surface probe with sprung thermocouple strip, measurement range short-term to +500 °C
Super quick-action surface probe, bent (probe tip at 90° angle), with sprung thermocouple strip
Super quick-action surface probe, bent (probe tip at 90° angle), with sprung thermocouple strip
Robust surface probe
Robust surface probe
Robust surface probe, bent (probe tip at 90° angle), suitable for confined spaces
Robust surface probe (probe tip at 90° angle), suitable for confined spaces
Robust surface probe with sprung thermocouple strip for high temperature range up to +700 °C
Pipe wrap probe for pipes with diameter of up to 2”, for flow/return temperature measurement in hydronic systems
Magnetic probe, adhesive power approx. 20 N, with magnets, for measurements on metal surfaces
Magnetic probe, adhesive power approx. 10 N, with magnets, for higher temperatures, for measurements on metal surfaces
Miniature surface probe for measurements on electronic components, small motors
Roller surface probe
Fast response immersion/penetration probe
Fast response immersion/penetration probe
Super quick-action immersion/penetration probe for measurements in liquids
Super quick-action immersion/penetration probe for measurements in liquids
Super quick-action immersion/penetration probe for high temperatures
Super quick-action immersion/penetration probe for high temperatures
0554 0670
0600 0750
0604 0194
0614 0194
0604 0994
0614 0994
0604 9993
0614 9993
0604 9893
0614 9893
0600 0394
0600 4593
0600 4793
0600 4893
0600 1494
0600 5093
0604 0293
0614 0293
0604 0493
0614 0493
0604 0593
0614 0593
11. Accessories / spare parts 49
Article
Temperature probes
Super quick-action immersion/penetration probe for measurements in gases and liquids with a thin, low-mass tip
Super quick-action immersion/penetration probe for measurements in gases and liquids with a thin, low-mass tip
Robust immersion/penetration probe made of V4A stainless steel, waterproof and oven-proof, e.g. for the food sector
Smelting probe for measurements in non-ferrous melting baths, with exchangeable measuring tips
Adapter to connect NiCr-Ni thermocouples and probes with open wire ends
Highly accurate air probe for air and gas temperature measurements with bare, mechanically protected probe
Order no.
0604 9794
0614 9794
0600 2593
0600 5993
0600 1693
0610 9714
Pitot tubes
Pitot tube, 300 mm long, stainless steel, measures flow velocity
Pitot tube, 350 mm long, stainless steel, measures flow velocity
Pitot tube, 500 mm long, stainless steel, measures flow velocity
Pitot tube, 1000 mm long, stainless steel, measures flow velocity
Pitot tube, stainless steel, 360 mm long, measures flow velocity incl. temperature
Pitot tube, stainless steel, 500 mm long, measures flow velocity incl. temperature
Pitot tube, stainless steel, 1000 mm long, measures flow velocity incl. temperature
0635 2245
0635 2145
0635 2045
0635 2345
0635 2040
0635 2140
0635 2240
Accessories
Plug-in mains unit 230 V
Mains unit 120 V
9 V rechargeable battery for measuring instrument
Lead, 1.5 m long, connects probe with plug-in head to measuring instrument
Lead, 1.5 m long, connects probe with plug-in head to measuring instrument
Lead, 5 m long, connects probe with plug-in head to measuring instrument, PUR coating material
Lead, 2.5m long, for pressure probes 0638 1741, 0638 1841, 0638 1941, 0638 2041, 0638 2141
RS232 cable, connecting lead from PC to instrument (1.8 m) for data transfer
testo printer with 1 roll of thermal paper and 4 mignon batteries
Charger for printer (with 4 standard rechargeable batteries)
Spare thermal paper for printer (6 rolls)
Spare thermal paper for printer (6 rolls), measuring data documentation can be read for up to 10 years
TopSafe with magnet holder and carry belt
Magnetic holder for TopSafe
Connecting hose, silicone, 5 m long
Connecting hose set, 2 x 1 m, coiled, inc. 1/8” screw fitting
Quick release connection
System case (plastic) for instrument and accessories, enables safe and reliable storage
Transport case (plastic) for instrument and accessories, enables safe and reliable storage
0554 0088
0554 0077
0515 0025
0409 1745
0430 0143
0430 0145
0409 0202
0409 0178
0554 0545
0554 0110
0554 0569
0554 0568
0516 0446
0554 0225
0554 0440
0554 0441
0440 0525
0516 0526
0516 0527
Software
ComSoft 3 Professional with measuring data management incl. database, evaluation and graphics function, data analysis, trend curve
0554 0830
50 11. Accessories / Spare parts
Article
Temperature calibration certificates
ISO temperature calibration certificate, for air/immersion probes, calibration points -18 °C, 0 °C, 60 °C
ISO temperature calibration certificate, instruments with air/immersion probes, calibration points 0 °C, 150 °C, 300 °C
ISO temperature calibration certificate, instruments with surface probes, calibration points 60 °C, 120 °C, 180 °C
DKD temperature calibration certificate, for air/immersion probes, calibration points -20 °C, 0 °C, 60 °C
DKD temperature calibration certificate, for air/immersion probes, calibration points 0 °C, 100 °C, 200 °C
DKD temperature calibration certificate, surface temperature probe, contact, calibration points 100 °C, 200 °C, 300 °C
Order no.
0520 0001
0520 0021
0520 0071
0520 0211
0520 0221
0520 0271
Pressure calibration certificates
ISO pressure calibration certificate, absolute pressure, 5 measuring points across the range (for 0638 1847)
0520 0125
ISO pressure calibration certificate, absolute pressure, 5 measuring points across the range 5/10/15/20/25Pa
(for 0560 5213, 0638 1347)
0520 0405
ISO pressure calibration certificate, differential and relative pressure, 5 measuring points across the range (for 0638 1347,
0638 1741, 0638 1841, 0638 1941, 0638 2041, 0638 2141, 0560 5213)
0520 0005
ISO pressure calibration certificate, differential and relative pressure, 5 measuring points across the range (for 0560 5210,
0560 5211, 0560 5280, 0560 5281, 0638 1447, 0638 1547, 0638 1647, 0638 1747)
0520 0025
ISO pressure calibration certificate, differential and relative pressure, 5 measuring points across the range for 0560 5281
0520 0035
DKD pressure calibration certificate, diff. and relative pressure, 11 meas. points across the range (<0.1% of fsv.) for 0560 5281 0520 0205
DKD pressure calibration certificate, differential and relative pressure, 6 measuring points across the range (> 0.6 % of full scale value)
(for 0638 1347, 0638 1741, 0638 1841, 0638 1941, 0638 2041, 0638 2141)
0520 0225
DKD pressure calibration certificate, absolute pressure, 11 measuring points across the range (0.1 - 0.6 % of full scale value)
(for 0638 1847)
0520 0212
DKD pressure calibration certificate, differential and relative pressure, 11 measuring points across the range (0.1 - 0.6 % of full scale value)
(for 0560 5210, 0560 5211, 0560 5280, 0560 5281,0638 1447, 0638 1547, 0638 1647, 0638 1747)
0520 0215
Scalable probe calibration certificates
ISO scalable probe calibration certificate
0520 1000
51
testo AG
Postfach 11 40, 79849 Lenzkirch
Testo-Strasse 1, D-79853 Lenzkirch
Telephone: (07653) 681-0
Fax: (07653) 681-100
E-mail: [email protected]
Internet: http://www.testo.com
0971.5210/05/wh/T/08.10.2004