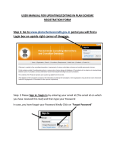
1
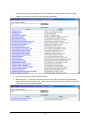
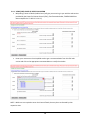
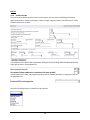
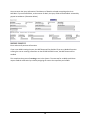
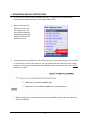
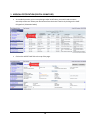
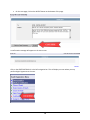
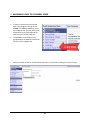
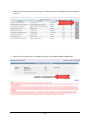
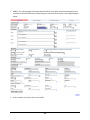
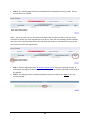
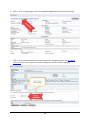
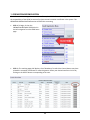
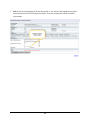
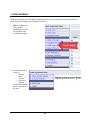
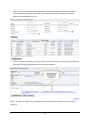
VIRGINIA DEPARTMENT OF HEALTH DIVISION OF VITAL RECORDS ELECTRONIC DEATH REGISTRATION SYSTEM (EDRS) USER MANUAL FOR THE OFFICE OF THE CHIEF MEDICAL EXAMINER (OCME) & LOCAL MEDICAL EXAMINERS Contents 1. GETTING INTO THE EDRS ...................................................................................................................... 2 2. THE BASICS ............................................................................................................................................ 4 2.1. THE NAVIGATION BAR - ................................................................................................................ 4 2.2. SETTING USER PREFERENCES – ..................................................................................................... 5 3. HOW TO CREATE A CASE? ..................................................................................................................... 6 3.1. BEGIN CREATION ........................................................................................................................... 6 3.2. PLACE OF DEATH. – ...................................................................................................................... 9 3.3. DETERMINATION OF DEATH ....................................................................................................... 12 3.4. CAUSE OF DEATH ........................................................................................................................ 13 3.4.1. VIEWS (CDC) CAUSE OF DEATH VALIDATION ...................................................................... 14 3.4.2. OTHER FACTORS.................................................................................................................. 15 4. REQUESTING MEDICAL CERTIFICATION .............................................................................................. 17 5. MEDICAL CERTIFICATION (DIGITAL SIGNATURE) ................................................................................ 18 5.1. ACCEPTING A CASE...................................................................................................................... 18 5.2. DIGITAL SIGNATURES .................................................................................................................. 20 6. ASSIGNING A CASE TO A FUNERAL HOME .......................................................................................... 21 7. RELEASE DECEDENT ............................................................................................................................ 23 8. DROP TO PAPER .................................................................................................................................. 25 9. E-AMENDMENTS ................................................................................................................................. 26 10. CREMATION APPROVAL .................................................................................................................. 31 11. CREMATION RECONCILIATION ........................................................................................................ 33 12. OCME REFERRALS ........................................................................................................................... 35 13. LOCAL MEDICAL EXAMINERS .......................................................................................................... 37 1 1. GETTING INTO THE EDRS STEP 1. Once you have launched the EDRS using the URL provided to you, you will see a pop-up box to enter your username and password to log in to the application. (See illustration below) Enter your username and password and click OK. STEP 2. You may view your messages in the inbox displayed on the resulting screen. Click continue to navigate to the next screen. 2 STEP 3. The resulting screen is the Virginia Vital Events and Screenings Tracking System Screen and may include various modules. Based on your role, you will only have access to the EDRS. Click on the EDRS link to continue. The resulting screen is the EDRS Home screen. 3 2. THE BASICS 2.1. THE NAVIGATION BAR To the left of the screen is the Navigation Bar which houses various links allowing you to move around in the system. This Navigation Bar is very dynamic in nature and will change from user to user based on what roles a user has. (The illustration below depicts a typical navigation bar in the home screen for a MLDI.) 4 2.2. SETTING USER PREFERENCES – Click on the user preferences link in the navigation bar. On the resulting page, you may enter up to three e-mail addresses to receive notifications pertaining to cases in your facility. Also, you may choose the type of notifications you wish to receive. 5 3. HOW TO CREATE A CASE? STEP 1. 3.1. BEGIN CREATION All Red Border Death Certificates shall be created by Medico Legal Death Investigators (MLDIs) or Medical Examiners in the EDRS. To begin creating a case, click on the “create case” link in the left navigation bar. STEP 2. All case creations must begin with a search for the decedent in the system. In order to do so, enter all information known about the decedent and click on query on the page resulting from the last step. 6 STEP 3. If no case was found matching your search criteria, click on the new case button at the bottom of the page. STEP 4. Select the appropriate options to indicate who you are creating the case for. 7 STEP 5. The decedent’s demographic information is the responsibility of the Funeral Homes. Enter as much of the decedent’s demographic information as you can, at a minimum you must enter the decedent’s First Name, Last Name, Gender, and the Date of Death. Enter this information and click on the save button at the bottom of the page. STEP 6. Click on the MEDICAL CERTIFICATION Link in the left navigation bar. This action will collapse the Demographic Grouping of links and expand the Medical Certification Grouping of links. (See illustration on Right) NOTE – If you have created the case as a Medical Examiner, and wish to perform medical certification on that case, you must first assign the case to the medical examiner’s pool, and then accept it from that pool. 8 STEP 7. Click on the Place of Death link in the left navigation bar. (See Illustration to the right) This action will navigate you to the PLACE OF DEATH screen shown below. 3.2. PLACE OF DEATH. – Begin by selecting the Place of Death from the dropdown list activated by clicking on the little arrow in the gray box. Now, click on the “L” at the end of the Facility of Death field. 9 This will generate a pop-up window with a list of all facilities which match the place of death category you selected in the prior step. (See Illustration below) Click a facility name to select the desired facility Wild card search - To perform a voluminous search, enter the first few letters of the desired facility name before the % sign in the “FIND” text box and click on find. For example – searching by BO% will return the following results 10 Once you have selected the desired facility, the corresponding address of the selected facility will be pre-populated in the address fields and these fields will be disabled for editing (denoted by grey text). Click on the save button at the bottom of the screen. Once saved, navigate to the next screen by clicking on NEXT at the bottom of the page or by using the link in the left navigation bar. 11 STEP 8. 3.3. DETERMINATION OF DEATH Enter all information in the Determination of Death Screen. This screen will allow you to enter the date and time of death as well as choose whether the date and time of death were - actual, approximate, presumed, or found on. (See illustrations below) Save the information and navigate to the next screen. This will navigate you to the CAUSE OF DEATH SCREEN 12 STEP 9 3.4. CAUSE OF DEATH Below is an illustration of the cause of death screen. For pending cause of death, check the pending checkbox. This will populate all cause of death lines with the word “PENDING” unchecking the checkbox will remove the word PENDING. 13 3.4.1. VIEWS (CDC) CAUSE OF DEATH VALIDATION Misspelling a cause of death (medical term) will give you a warning in sync with the web service provided by the Center for Disease Control (CDC). (See illustration below, TUBERCULOSIS has been misspelled as T.U.B.E.R.C.L.O.S.I.S) Hover your mouse over the misspelled word to get a recommendation from this CDC web service and click on the appropriate recommendation to rectify the mistake. NOTE – MLDIs are not required to enter the Cause of Death, but may do so as directed by their respective sites. 14 STEP 10 3.4.2. OTHER FACTORS The next screen would be the other factors screen where you may enter the following information about the decedent – Autopsy information, tobacco usage, pregnancy status, external factors to cause of death and manner of death. If an autopsy was not performed, the question relating to autopsy findings will be disabled (denoted by a light gray arrow for the dropdown list). If the decedent was a male, the pregnancy question will be disabled (denoted by a light gray arrow for the dropdown list). One of the following manners of death must be selected 15 You must enter the injury information if the Manner of Death is selected as anything other than NATURAL. If you select NATURAL, as the manner of death, the injury fields will be disabled – denoted by grayed out textboxes. (illustration below) Enter and save all pertinent information. If you are an MLDI creating the case, the NEXT Button will be disabled. If you are a Medical Examiner creating the case or entering information on the OTHER FACTORS screen, the NEXT button will be enabled. This completes the process of creating a case in the System. The next step for an MLDI would be to request medical certification by an ME by assigning the case to the respective pool of MEs 16 4. REQUESTING MEDICAL CERTIFICATION Once a user has created a case in the EDRS, you may, as a MLDI or an ME request Medical Certification by a Medical Examiner / Pathologist / LME / Fellow. Begin by clicking on the REQUEST MC link in the left navigation bar. You may need to expand the demographics grouping in case you cannot see the REQUEST MC Link. The following screen will appear for you to select whether you are transferring the case to an ME or an LME. Also, by clicking the check box, you may indicate that which district this case is being assigned to. These options will be enabled or disabled based on the selection you made in STEP 4 during case creation. Make the appropriate / desired selection Click on the SUBMIT Button to continue requesting medical certification. 17 5. MEDICAL CERTIFICATION (DIGITAL SIGNATURE) 5.1. ACCEPTING A CASE As a medical examiner, prior to completing medical certification, you would need to assume ownership of the case. Select your desired case from the Active Cases list by clicking on the CASE ID hyperlink. (illustration below) Click on the ACCEPT CASE link at the top of the page. 18 On the next page, click on the ACCEPT button at the bottom of the page. A confirmation message will appear on the next screen. Click on the CERTIFICATION link in the left navigation bar. This will display a screen where you may perform digital signatures to the case. 19 5.2. DIGITAL SIGNATURES Below is an illustration of the Digital Signature screen. Check the acknowledgement checkbox, Enter & Re-Enter your PIN, then click on SUBMIT. A confirmation message will indicate that the case was successfully certified. 20 6. ASSIGNING A CASE TO A FUNERAL HOME In order to associate a funeral home with a case, begin by clicking on the ASSIGN TO FUNERAL HOME link in the left navigation bar. This link will only be activated once you have selected the case from your ACTIVE CASES list. The ASSIGN to funeral home link is grouped under the Medical Certification link in the left navigation bar. Perform a simple search for the desired funeral home on the screen resulting from the prior step. 21 Select the desired funeral home by clicking on the SELECT button corresponding to the funeral home in the list. Confirm this association on the next page by clicking on the ASSIGN FUNERAL HOME button 22 7. RELEASE DECEDENT This process ensures that the Death Certificate is not released to a funeral home prior to them having taken possession of the decedent’s body. STEP 1 - To begin, click on the RELEASE DECEDENT link in the left navigation bar STEP 2 -The Resulting screen would be a searchable list of cases where the death certificates are awaiting release to a funeral home. STEP 3 -Select your case by clicking on the CASE ID hyperlink. 23 STEP 4 – Click on the TRANSFER CASE button to transfer the case to the Funeral home The name and address of the Funeral Home will be pre-populated based on the Assign to Funeral Home step performed earlier. You may select a different facility by clicking on the blue “L” A confirmation message will indicate successful transfer to the funeral home. 24 8. DROP TO PAPER Once a case has been certified by the medical examiner and needs to be transferred to the funeral home, you may realize that the funeral home is not a participant in the EDRS. The DROP to PAPER function will enable you to print a copy of the electronically created Death Certificate and provide the certificate to the funeral home. STEP 1- To begin, navigate to the desired record’s CASE SUMMARY by clicking on the link in the left navigation bar. STEP 2- Click on the DROP to PAPER link at the top of the page to print the Death Certificate. The EDRS will guide you through two more pages where you would be required to SUBMIT. 25 9. E-AMENDMENTS Amendments may be created and requested electronically by the Medical Examiners. If any Medical Examiner wishes their administrative staff to perform this function, they may request that person be given a role to perform E-Amendments. STEP 1 – begin by clicking on the EAMENDMENTS link in the left navigation bar. The resulting screen will be a list of Active amendments. NOTE – if you are a ME trying to sign an amendment created by your office, this amendment would appear in the ACTIVE CASES list for you to select and sign. STEP 2 - To create a new amendment, click on the NEW link in the left navigation bar STEP 3 – Perform a search for the desired case. 26 STEP 4 – From the search results, select the desired case by clicking on the respective certificate number hyperlink. Make sure that the status of the case says, “READY TO AMEND”. 27 STEP 5 – The resulting page will display editable fields for some basic decedent Demographics and also fields for Medical Information. Make changes to the desired information on the page displayed below. Save the above information then click on NEXT. 28 STEP 6 – The resulting page will show a consolidated list of Amendments that you made. Click on the next button to proceed NOTE – The next screen is for you to review the changes made. You do not need to click save. If you would like to remove any of the amendments from this list, check the corresponding remove checkbox, and click on save. (See Illustration below) This will delete the respective amendment from the list and revert the item back to the original value. STEP 7 – Perform digital signatures (as shown in section 5.2) on the case and submit the case. A confirmation message will indicate that the amendment was successfully submitted to Vital Records for approval. STEP 8 – You may generate a printable amendment report by clicking on the “here “ link in the success message. 29 Below is a sample of what the Additional Information report would look like 30 10.CREMATION APPROVAL A funeral home may request approval of a cremation certificate from the Medical Examiners. These requests shall be consolidated under the CREMATION APPROVALS list. STEP 1- To begin, click on the CREMATION APPROVAL Link in the left navigation from the EDRS home page. STEP 2 - The resulting screen will consist of a list of cremation clearance requests. You may search for a desired case if the list is long enough to extend further than one page. Click on the CASE ID of the desired case to continue. 31 STEP 3 – On the resulting page, click on the APPROVE CREMATION link at the top of the page. STEP 4 – Enter the date viewed by the medical examiner, and digitally sign the case (as seen in section 5.2) then click on approve. A success message will indicate successful approval. 32 11.CREMATION RECONCILIATION If a LME has MANUALLY signed a cremation certificate, the OCME will receive a copy of the same. It is the responsibility of the OCME to account for these manual cremation certificates in the system. The CREMATION RECONCILIATION function will fulfill this accounting. STEP 1- To begin, click on the CREMATION RECONCILITATION Link in the left navigation from the EDRS home page. STEP 2 – The resulting page shall display a list of decedents, for which the Funeral Homes may have printed the cremation certificates for manual signature. Select your desired case from this list by clicking on the SELECT button corresponding to the case. 33 STEP 3 – On the resulting page, enter the date signed, i.e. the date the LME signed the cremation certificate and click on the verify signature button. A success message will indicate successful reconciliation. 34 12.OCME REFERRALS Green border death certificates may get referred to the OCME when a physician attempts to sign the death certificate with a cause of death, which indicates that it may need to be a red border certificate. These cases get compiled under the OCME referrals list. STEP 1- To begin, click on the OCME REFERRALS Link in the left navigation from the EDRS home page. OCME Referrals may consist of o Cause of death referrals o Cremation referrals The process to handle either of the above is the same 35 STEP 3 – Click on the Cause of Death Referrals link. The resulting page will display a list of cases which the EDRS has referred to the OCME. Select the desired case by clicking on the CASE ID hyperlink corresponding to the case. STEP 4 – On the resulting page, enter the reason to reject if rejecting or simply accept the referral by selecting the ACCEPT REFERRAL button and clicking on SUBMIT. NOTE – To make any changes, an E-amendment would need to be submitted for this case as seen in Section 8. 36 13. LOCAL MEDICAL EXAMINERS All Local Medical Examiners enrolled in the EDRS shall have the ability to o Complete Medical Certification (Section 5) Accept a case Complete Medical Certification on a case o Approve Cremation Certificates (Section 10) o Assign a case to a Funeral Home. (Section 6) If you are an LME, please refer to the appropriate sections to see how to perform each function. 37