1
FA260RF Programming
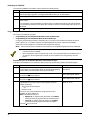
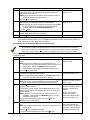
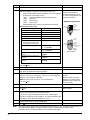
The FA260RF is shipped with pre-programmed default values. Below is a chart showing these values. Later in
these instructions are diagrams showing the wireless keys' loops and their default functions. Regardless of
which wireless key you use (even if it is one not shown), loops 1-4 are defaulted for all 8 devices as shown.
These values may be changed to suit the installation.
Entering Program Mode
Press the [1] and [3] keys simultaneously for a few seconds within 30 seconds after applying power or within 30
seconds after removing the case back. The keypad beeps 3 times, and two dashes and two zeroes flash
alternately in the upper left-hand corner of the display. If any other numbers or letters flash in the display,
press the [✳] key.
Pressing the [1] and [3] keys 30 seconds or more after applying power allows you to enter the User mode.
This mode provides a means to enable and disable individual local wireless keys (useful if, e.g., a user
accidentally loses a wireless key). See the User Guide for procedure instructions.
Programming Operations
Once you have entered the Program mode, you may move to any program address simply by entering the
program address number. The FA260RF will automatically exit the Program mode if no keys are pressed for 30
seconds. While in the Program mode:
•
Pressing the [✳] key stores the information displayed, then moves you to the next prompt, and the keypad
beeps twice.
•
Pressing the [#] key erases the current information and moves you back so you may enter the correct
information.
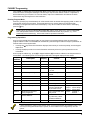
Enter a program address (e.g., press [1] for Keypad Address; [2] for Receiver Address) to set the parameters in
the FA260RF. The following chart lists the program addresses, the keypad display and the choices.
Program
Address
Description
Display
Choices
Default
1
Keypad Address
cA
01-31
31
2
Receiver Address
rA
00-30
00
3
House ID
hI
01-31
4
House ID Source
hS
5
Wireless Key Editing
d-
6
Receiver Enable
r-
1 = System
0 = Local
Enter Existing Device
Number
1 = On 0 = Off
1 Enable
Transmitter Module Enable
tE
1 = On 0 = Off
1 Enable
8
Wireless Key Auto Enroll
d-
Enter Serial Number
8 then 2
Wireless Key User Code
u4
Enter 4-Digit User Code
8 then 4
Wireless Key Loop Function
Ln
Enter Loop Number then
Function (See Wireless
Key Function Chart)
8 then 5
Wireless Key On-Board
Relay Assignment
o-
Enter Loop Number then
Relay Action
9
Restore Defaults
EE
0
*High-Security Mode
En
1 = Restores Defaults
Any Other Key = Does
Not Restore Defaults
1 = Enable; 0 = Disable
7
1 System
Loop 2
Loop 3
Loop 4
Loop 1
1 (Disarm)
2 (Arm Away)
3 (Arm Stay)
Close for 2
Seconds
0 Disable
* When operating the system in High-Security mode, non-encrypted wireless keys will still function. If you
want only the encrypted wireless keys to operate, be sure to delete all non-encrypted keys from the
system.
3