1
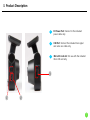
USER’S Manual DRIVE ALERT This product is only a driving assistance system. Any accident while using Drive Alert shall not be the responsibility of the manufacturer. Please drive safely and follow all traffic laws for your area. TABLE OF CONTENTS 1. Safety Precautions----------------------------------------- 2~4 2. Product Introduction------------------------------------------ 5 3. Product Descriptions--------------------------------------- 6~7 4. Components--------------------------------------------------- 8 5. Installation Instructions----------------------------------- 9~14 6. Installation positions by car----------------------------- 15~16 7. Features-------------------------------------------------- 17~20 8. Settings--------------------------------------------------- 21~26 9. Function description-------------------------------------- 27~33 10. Viewer program------------------------------------------ 34~35 11. FAQ------------------------------------------------------- 36~37 12. Technical specifications--------------------------------------- 38 13. Warranty------------------------------------------------------- 39 2 1. Safety Precautions Please read the entire manual to understand how to use this product appropriately and safely to help prevent possible accidents or risks. Make sure to follow all safety advice. We will not be held responsibility for the incorrect installation or misuse of this product. Warning : Incorrect or misuse of the product can lead to serious damage or accidents. If the product gets wet, never put in a thermal device (e.g. a stove or a microwave). It may cause an explosion or malfunction of the product. Do not dismantle the product. If any indication of tampering is evident, the warranty will be voided. Avoid contact with most chemicals (benzene, thinner, alcohol) and detergents, which can cause fire or damage to the product. Make sure to correctly follow the user’s manual. If not, the product may perform poorly or not work at all. Keep the front windshield of the vehicle clean or the system may not function correctly. Use the Video-out function only for installation purposes. Driving while watching any screen can be dangerous. Any accident or damage shall be the driver’s responsibility solely. Attach the product to the windshield with the included double-sided tape. The vibration of the vehicle can shift the position of the product over time, which can cause performance degradation. 3 1. Safety Precautions Cautions prior to use In the conditions below, the product may not operate correctly. Make sure to follow the user’s manual. If not, the manufacturer shall not be held responsible for any accident or malfunction. — On roads without lines or with lines that are difficult to recognize — On roads where lines are partially erased — When the GPS signal reception is low — When the field of vision is poor due to bad weather (e.g. heavy rain, snow, or fog) — At night, on the entrance or exit of a tunnel, or poor lighting — At night, the Forward Collision Warning System (FCWS) may not function correctly according to the brightness of the headlights or whether street lamps exist or not. — No light or sudden change in external lighting — Sudden interruption of other cars or sudden change in lane — On a sharp curve with the radius of curvature of less than 800 ft — When any debris on the windshield degrades the camera’s performance — When the field of vision is bad due to thick coating, stickers, or accessories on the front windshield of the car — When the car is driving on a line so the camera does not recognize the line. 4 2. Product Introduction This product is an artificial intelligence driving assistance device that includes many cutting-edge features based on widely-recognized technologies: (1) Forward Collision Warning System (FCWS), that gives a warning when a collision is expected by automatically calculating the speed of the car in front and the distance to it; (2) Lane Departure Warning System (LDWS), that sounds an alarm when you cross a line without using the turn signals; (3) and automatic recording of camera images in the case of a sudden stop or accident. Drive Alert can save your operating speed, time and location of an accident through a GPS signal. In places where the GPS signal reception is not possible or degraded (underground, tunnels, skyscrapers, or forests), the GPS function may not operate correctly. This product is a driving assistance system designed to help prevent vehicle accidents. Any accident or fine caused by speeding or breaches of local traffic laws shall not be the manufacturer’s responsibility. Make sure to observe all local traffic laws. All intellectual rights regarding both hardware and software of this product are reserved by manufacturer. Reproduction, processing, or dissemination of the product will be subject to criminal penalties under the intellectual property law as well as civil and criminal damages. The content in this manual is subject to change without prior notice. 5 3. Product Description 1 2 3 4 6 5 6 7 1 Bracket: Holds the Drive Alert after being attached to the front windshield of the car. 2 Angle adjusting bolt: Adjusts the angle between the main body and the bracket. 3 Camera Lens 4 Security Warning LED: Blinks when the system detects motion while in parking mode, giving a visual warning sign that the system is recording. 5 REC: Press the button to enable image recording. During recording, the red LED will blink. 6 Remote Eye 7 Reset button: Press and hold for 3 seconds to reset the unit to factory settings. 3. Product Description 1 DC Power Port: Connect to the included power cable only. 2 USB Port: Connect the included turn signal and video out cable only. 3 Micro SD card slot: For use with the included Micro SD card only. 3 1 2 7 4. Components Check if the components shown in the pictures below are included in the package. If any item is missing or incorrect, please contact the retailer where the item was purchased. Device Micro-SD Card/ Adapter/ 3M double-sided tape Remote (3) Cable Mounts 12v Power Cable Manual Turn Signal, Video Out cable 12v Power Cable for always ON connection ※ Specifications of included components subject to change without prior notice. 8 5. Cautions for installation Caution ■ Make sure to keep the following in mind before and during installation. • Installation should be made on level ground with the vehicle engine turned off. • Please check to ensure all components are included in the packaging and follow all installation instructions step by step. • This manual describes how to install Drive Alert in most vehicle types: passenger car, SUV, bus and truck. For buses and trucks, except for the installation position, the procedures are similar with those for passenger cars. • After the successful installation of the system, drive on an even, straight road with lines on both sides of the vehicle to receive a GPS signal (this may take up to 5 minutes). Drive between 25 and 30 MPH. You will hear a recorded voice ―The system has been calibrated‖ when the calibration is complete. • If Drive Alert performs incorrectly, please reinstall it according to the installation instructions. 9 5. Installation instructions Installation for passenger cars and SUVs For perfect installation of Drive Alert , please make sure to follow all details of this manual step by step. Install this product with the vehicles engine turned off. 10 1. Clean the inside of the front windshield. 2. Apply the included double-sided tape to the bracket. 3. Attach the bracket firmly to the center of the front windshield behind the rear view mirror. 4. Using the angle adjusting bolt, temporarily and lightly secure the Drive Alert vertically, from a side view. 5. Installation instructions 5. Peel back the door trim and remove the A-Pillar. Use the provided wire clips to secure the Power and Signal wires behind the A-Pillar if needed. 7. Connect the Power and Signal cables to the main body. 6. Arrange the Power and Signal cords neatly under the headliner. Use the provided wire clips if needed. 8. Connect the 12v Power adapter to the cigarette lighter or 12v power plug. 11 5. Installation instructions Installation instruction for the turn signal cable and video out cable 9. Connect the Red wire to the Right turn signal wire. Connect the White wire to the Left turn signal wire. Connect the Black wire to a Ground. Connect the RCA cable to a monitor (not included) for the video out function. Connect the USB cable to the unit itself. You will typically find the signal wires in the steering column at the turn signal lever. If not, you will possibly find them at the flash relay, typically under the drivers side dashboard. The unit is looking for a 12v Positive signal only. 12 5. Installation instructions 10. Park the vehicle on an even, open road. Position Drive Alert so that the blue line on the monitor is placed on the horizon (the point where the virtual red lines cross), as shown in the picture. Tighten the angle adjusting bolt. 11. Drive on a straight, level road where the lane you are driving in has continuous lines (dashed or not), at a speed between 20-30 MPH until you hear the system announce ―Calibration Complete‖. Once you hear the message, all of the functions should operate normally. 13 5. Installation instruction and calibration 12. If there is no monitor available , install Drive Alert with the vertical and horizontal balance as shown in the picture below vertical horizontal Fix the main body with the angle adjusting bolt horizontally with the ground. Horizontal Fix the bracket horizontally with the front windshield. 14 6. Installation position by vehicle type Passenger car: Attach the bracket on the front windshield behind the rear view mirror horizontally with the windshield. SUV & VAN : Attach the bracket on the front windshield behind the rear view mirror horizontally with the windshield. Installation Position 15 6. Installation position by vehicle type Bus : Attach the bracket to the windshield 6‖ from the bottom of the window frame. Arrange the cables across the dash using the provided wire clips, if needed. Truck : Attach the bracket to the windshield within 6‖ from the bottom or top, depending on model, of the window frame. Arrange the cables across the dash using the provided wire clips, if needed. Caution! For some buses and trucks, you may need to install a power stabilization cable (a 24V to 12V adapter). Drive Alert can operate in the voltage ranges of DC 12-24V, but it does not necessarily mean that the product can operate in all vehicle types. Please ask the retailer where you purchased your Drive Alert from for use in you vehicle type. Any damage or malfunction caused by power differences to the product installed in a truck or bus shall not be the responsibility of the manufacturer. 16 7. Features of the Drive Alert FCWS(Forward Collision Warning System) Drive Alert is a driving assistance device that detects forward collision and lane deviation risks by obtaining an image of the road in front of the vehicle through its internal camera. It analyzes the data real time, and will give an audible warning to help prevent any possible accident. Time To Collision (TTC) function: With the TTC function on, the Drive Alert can provide an audible alarm to alert you to a possible front end collision. This function will only work above speeds of 10 MPH. FCW(Forward Collision Warning) function: The Drive Alert gives a warning when a sudden collision risk occurs. This function will only work above speeds of 10 MPH. 17 7. Features of the Drive Alert LDWS(Lane Departure Warning System) Drive Alert will audible alert the driver if the vehicle begins to leave the lane they are in without signaling. Drive Alert can also give warnings in the case of continuous lane departures (when the car deviates from its lane repeatedly without indication). The driver can set his/her own timing of an alarm (five levels for left and right lines, respectively) If the vehicle’s turn signal lever is used, Drive Alert will not sound the alarm. This function will only work above speeds of 35 MPH. 18 7. Features of the Drive Alert Black box(Video Recording) Drive Alert features a Black Box function. An internal G-sensor (a shock-detection sensor) can detect an event which will trigger the Drive Alert to record an image from the camera for 40 seconds. It will also record the time, date and location of said event. While driving, Drive Alert will record a video image before, during, and after an event. Drive Alert includes a 4GB Micro SD (expandable to 32GB) card the files will be stored on. Drive Alert includes a PC viewer program that allows you can check the recorded images on a desktop or laptop computer. 19 7. Features of the Drive Alert Black box(Video Recording) Approximately 7 minutes after the vehicle is turned off, Drive Alert will automatically start a surveillance mode. If Drive Alert detects motion (an event such as a collision from another vehicle or theft attempt), Drive Alert will record the event using the camera image for 40 seconds. A security warning LED will blink if Drive Alert detects motion, providing a visual warning that an image is being recorded. For this feature to operate as stated, Drive Alert needs to be provided with constant power. Your vehicles battery may discharge to a point where the vehicle will not start if connected this way. Drive Alert features a battery monitoring function that can help to prevent the battery from discharging below approximately 10.5V. If this happens, we will not be held responsible. 20 8. Settings You can set all of the functions and modes of Drive Alert with the included remote. CT(Car Type): Type of vehicle Drive Alert is installed in 1. Press this button 1 4 to select the vehicle type. 2. Press the arrow buttons. 2 Keep pressing the arrow buttons until you hear the system state your vehicle type. Once your vehicle type is announced, it will be automatically set. MUTE: Mutes all sounds 1. Press this button instruction. 3 1 3 2 2 to activate/deactivate alarm sounds and voice VOL: Volume control 1. Press this button 4 to select the volume level. 2. Press the arrow buttons 2 to adjust the volume up or down. 21 8. Settings FCWS TTC: Time to collision 1. This feature is for the predicted time to a front end collision. this button 1 to select the desired time. Press 2. Press the arrow buttons. 2 Keep pressing the arrow buttons until you hear the system state your desired time. Once the time is announced, it will be automatically set. If you set the time at 1.5 seconds, the collision alarm will sound at a relatively longer distance. A predicted distance to a collision can vary according to the car’s speed. WS: Working speed 1. This feature is to set the working speed of the Forward Collision Warning. Press this button 3 to select the vehicle speed mode. 2. 22 Press the arrow buttons. 2 Keep pressing the arrow buttons until you hear the system state your desired speed. Once the desired speed is announced, it will be automatically set. 2 1 3 2 8. Settings LDWS LWT(Left side Warning Time): Alarm timing for left line deviation 1. This is to set the timing of an alarm for a left line deviation. If you feel that the timing of the alarm is too fast or slow, you can change the alarm timing for every 4‖. 2. Press this button 1 to select the left side warning time. 3. Press the arrow buttons. 2 Keep pressing the arrow buttons until you hear the system state your desired time. Once the desired time is announced, it will be automatically set. 2 1 23 8. Settings LDWS RWT(Right side Warning Time): Alarm timing for right line deviation 1. This is to set the timing of an alarm for a right line deviation. If you feel that the timing of the alarm is too fast or slow, you can change the alarm timing for every 4‖. 2. Press this button 1 to select the right side warning time. 3. Press the arrow buttons. 2 Keep pressing the arrow buttons until you hear the system state your desired time. Once the desired time is announced, it will be automatically set. 24 2 1 8. Settings LDWS CR: Calibration Reset 1. If the system operates incorrectly, press this button 1 to reset the calibration. Follow the instructions for calibration on page 12. WS: Working Speed 2 1. This feature is to set the working speed of the Lane Departure Warning. Press this button 3 to select the vehicle speed mode. 2. Press the arrow buttons. 2 Keep pressing the arrow buttons until you hear the system state your desired speed. Once the desired speed is announced, it will be automatically set. 1 3 25 8. Settings BlackBox G: G-sensor shock 1. Press this button 1 to select the impact sensor level. 2. Press the arrow buttons. 4 Keep pressing the arrow buttons until you hear the system state your desired setting. Once the desired setting is announced, it will be automatically set. 3. If you feel the system records impacts too often, set the mode to ―insensitive level‖. VS(Video Size): Resolution of the recorded video. 1. Press this button 2 4 to select the recorded video resolution. 2. Press the arrow buttons. 4 Keep pressing the arrow buttons until you hear the system state your desired setting. Once the desired setting is announced, it will be automatically set. QVGA(320x240), VGA(640x480), D1(720x480) TZ: Time Zone 1. Press this button 3 to set your area for the GPS. Press the arrow button 4 to select your area. Once the desired area is announced, it will be automatically set. 26 1 3 2 9. Function description (1) Function description ① Once the car engine started, Drive Alert is provided with power and red and blue LEDs are on. Make sure that Drive Alert is connected to the cigar jack via the provided power cable. ② After booting, Drive Alert starts operating with the recorded message ―Hello. Please fasten your seat belt. Voice instruction starts.‖ ③ Use the remote control to turn Drive Alert on or off once power is supplied. Or you can unplug the power cable from the product. (2) Motion detection while the car is parked ① This surveillance mode automatically starts when the car stands still for 7 minutes. ② This surveillance function automatically changes into a normal mode(constant recording/manual recording/event recording) once the car moves again. ③ During this mode, video images for 20 seconds both before and after a detection are recorded and stored in the ―Motion‖ folder. Recording time can be reset through the remote control. ④ During the surveillance mode, constant/manual/event recording doesn’t work. ⑤ To use this motion detection function, Drive Alert must be connected to constant power supply. Note. For a constant power cable and its connection, ask advice from a store near you. Car battery discharge due to constant power supply to this product shall not be the responsibility of the manufacturer. 27 9. Function description (3) Manual recording ① Briefly press the REC button to start manual recording. The red LED will keep blinking until the recorded video file is stored. ② The file is stored in the ―EVENT‖ folder in the Micro SD card. ③ The 40-second video file is stored as ―*.MP4‖ format. ④ If you want to extend manual recording time, briefly press the REC button after the previous recorded file is stored. Then another 40-second video will be stored continuously. (4) Event recording ① Event recording records the images of an impact (for 40 seconds) that the internal G-sensor detects and stores the recorded file as ―*.MP4‖ format. ② The file is stored in the ―EVENT‖ folder in the Micro SD card. ③ In event recording, sensitivity of the G-sensor can be set as three levels – sensitive, normal, and insensitive. Every time the G button is pressed, the voice message changes as follows: ―sensitive detection‖ -> ―normal detection‖ -> ―insensitive detection‖. Stop pressing the button when you hear the mode you want and wait until it is automatically set. Caution! Even in a same mode, the sensitivity can vary according to the car type, car conditions, and the car’s ability to absorb an impact. Since event detection relates to a physical amount of an impact that the product can detects, the sensitivity cannot be set according to the driver’s feeling. When event recording doesn’t operate correctly, the manufacturer does not hold any responsibility except for repair. 28 9. Function description (5) Constant recording ① In this mode, once power on, Drive Alert keeps recording and the files are stored in the ―INFINITE‖ folder in the Micro SD card. (6) Video-out and turn signal connection With the Video-out function, you can check video images real time on a screen device by connecting Drive Alert USB port and the import port of the screen via the Video-out cable. 1.The provided Video-out cable is RCA type (male). It can be connected to a AV-IN RCA port of a monitor. 2.The turn signal connection cable is all-in-one with Video-out cable. The turn signal cable comprises three lines. Connect them with the signal lines (12V), which are normally placed under the driver’s seat. Connect the black line with Ground and the rest two lines with the signal lines, respectively. 3.Once the turn signal cable is connected, in the LDWS mode when you change the lane with the direction indicator on, an alarm does not sound. (7) Security LED ① The front LED blinks when Drive Alert detects a motion, giving a warning sign that the black box is being recording. 29 9. Function description (8) LED operation and emergency measure ① Both red and blue LEDs on: After booting, all functions (constant/event/manual recording) are normally operable. ② Blue LED on and re LED blinking: Storing of an event (during constant/event/manual recording mode). The red LED keeps blinking until the storing is completed. After that, both blue and red LEDs are turned on. ③ Red LED on and blue LED blinking: First, if the power cable is connected without the Micro SD card inserted, blue LED is blinking. Please make sure insert the SD card before connecting the poser cable. Second, if the Micro SD card is removed from Drive Alert , intentionally or by an impact, while power on, blue LED is blinking. Unplug the power cable and insert the SD card. Then reconnect the cable. ④ Blue LED on and red LED continuously blinking First, if there are other files in the SD card recorded in other devices than Drive Alert , recording doesn’t work. In this case, format the Micro SD card before use. Second, when there are other problems with the SD card, blue LED keeps blinking. Please format the memory card before use. 30 9. Function description (8) LED operation and emergency measure ⑤ Red LED is on but Drive Alert does not work: First, reset the product by pressing the reset button. Second, if it still doesn’t work after format, please upgrade firmware. Third, get Drive Alert repaired if the first and second steps don’t work. ⑥ Both red and blue LED off: First, check if the power cable is well connected. Second, check the cigar jack fuse. ⑦ Blue LED on and red LED off: First, Drive Alert is upgrading firmware. If it is successfully completed, both red and blue LEDs are turned on. 31 9. Function description (9) File format ① The format of recorded video files is ―*.MP4‖. Files are stored in the ―INFINITE‖ folder for constant recording, the ―EVENT‖ folder for manual/event recording, and the ―Motion‖ folder for surveillance recording. ② Do not store other files in the ―EVENT‖ and ―Motion‖ folders. In this case, Drive Alert cannot automatically delete files. Therefore, it cannot record any more if the folder is full. Caution! Do not use the provided Micro SD card as memory storage of other devices. Those files can cause malfunction or abnormalities to the SD card. ③ For normal recording operation, Drive Alert automatically maintain at least 80MB empty. If the user stores other files on another device, Drive Alert may not be able to secure the spare memory. Please make sure not to store other files than Drive Alert recording file and PC Viewer files in the Micro SD card. Please store the PC Viewer exe file initially contained in the provided Micro SD card in your desktop computer. During constant recording, if there is less than 80MB remained in the memory card, Drive Alert automatically starts deleting previous files. For event recording, up to 100 files are stored and then the earliest recorded files start to be deleted. If you need to format the SD card, do it on your personal PC. 32 9. Function description (10) Insert/eject of the Micro SD card ① Insert the Micro SD card with its logo side toward the rear case of Drive Alert. ② To eject the SD card, slightly press it. ③ For details, see the picture below. Caution! Never insert/eject the Micro SD card while the power is on. Since Drive Alert operates once power is supplied, inserting or ejecting the Micro SD card while powered can cause damage to the system and/or the memory card. Micro-SD Drive Alert Drive Alert receives GPS time data in regular interval and synchronize its time with the received time in order to record exact time of any event. Therefore, once time is set, the RTC function makes Drive Alert work in accordance real time. 1.Automatic time setting: After booting, when the car is in a place where GPS reception is possible (for at least 5 minutes for the first use), Drive Alert automatically synchronizes its system time to the received GPS time data. 2.Since then, time will be automatically set once every day. 33 10. Use for Viewer program (1) Use for Viewer Program 1. Remove SD card from the product. 2. Insert SD card with card adapter or card reader into your computer. 3. Open your SD card and Copy the Viewer program ―PCViewer.exe” into your computer screen. And Click ―PCViewer.exe” Main Screen of Viewer Press “Folder Open” button Select folder that include the file you want to look at it Make double click the file like right photo Screen for file list Cautions!) If there is no video playing after click the file, it might be “CODEC” problem. You should install a right CODEC(Z-codec pack) (2) Explanations for buttons first into your computer. Press this button 34 Play button Stop button CODEC down load button Folder open button in your Viewer. 10. Viewer program 1 Close Viewer 2 Minimize Viewer 3 Open the map 3 4 Open file list 4 5 File name that is playing 5 6 Codec download web link button 7 Folder selection button 8 Information from GPS 9 Google map screen 10 Speed data 11 Play & Stop button 1 2 6 7 8 9 10 11 35 11. Q&A – frequently asked questions FCWS 1. How long it will take to boot? The FCWS function will start as soon as the system receives a GPS signal. 2. Alarms sound too often. Change alarm conditions by pressing the TTC button. You can adjust it to o.5 seconds. 3. What happens if it rains? During rain, most of the functions may not work properly. Please drive safely. 4. What happens while driving at night? At night some functions may be limited according to the condition of headlights, street lamps, etc. Please drive safely. LDWS 1. How long it will take to boot? The LDWS function will start after the system receives a GPS signal and the vehicle is driving over 35 MPH. 2. Alarms sound too often. Adjust the alarm timing for left and right lines by pressing LWT and RWT buttons, respectively. Refer to pages 22 and 23. 3. What happens if it rains? During rain, most of the functions may not work properly. Please drive safely. 4. What happens while driving at night? At night some functions may be limited according to the condition of headlights, street lamps, etc. Please drive safely. 36 11. Q&A – frequently asked questions BLACKBOX 1. Does recording also start after GPS reception? It starts as soon as the system is powered up. 2. How can I view the recorded videos? Install the Viewer program included on the SD card. 3. What happens if the memory of the SD card is full? When the memory is full, the first recorded files will be overwritten. 4. How can I eject the Micro SD card? Remove power from the unit and then remove the memory card. 5. Event recording is too often. Change the sensitivity of the G-sensor to ―insensitive level‖ by following the steps outlined on page 25. 37 12. Technical specifications Camera Color CMOS View angle 60° Resolution 720*480 Operating Temp. 0℃ ~ 60℃ Storage Temp. -10℃ ~ 70℃ 38 Input Voltage DC12V ~ DC24V Current consumption 150mAh ~ 200mAh Size 67 x 89 x 41 mm Weight 110g ※ Design and specifications of this product may change without prior notice. Warranty Warranty contents 1) Warranty period for this product is 1 year. Damage caused during normal use within the period is subject to free repair service. But accessories (e.g. the power cable) are covered for 6 months. 2) Repairs for the following cases will cause costs for technicians and components * Damage caused by the user’s reckless use * Damage caused by misuse of power * Damage caused by a bad connection * Damage caused by repair or modification made by someone else other than our technicians. * When this warranty is lost. 3) Components for repair of this product will be available for three years. 39 MEMO 40