1
INSTALLATION
USAGE
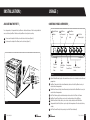
ADJUSTING THE FEET
CONTROL PANEL OVERVIEW
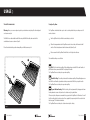
For safe operation, it is important that your Oven is stable and balanced. The four adjustable feet
are used to level your Oven. Make sure that your Oven is level prior to cooking.
1 To increase the height of the Oven, turn the feet anti-clockwise (Figure 5).
2 To decrease the height of the Oven, turn the clockwise (Figure 5).
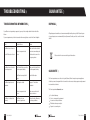
1 Digital Minute
Minder
5
Top Oven
Control
Knob
2 Top Oven
Thermostat
Light
6
Main Oven
Control
Knob
3 Main Oven
Thermostat
Light
4 Hot Plate
Warning Light
7
Temperature
Control Knob
8
Hot Plate Control
Knobs
Figure 6
Figure 5
11
T: 0800 0124 382
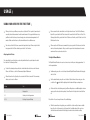
1 Digital Minute Minder; displays the current time and can act as a timer to assist with meal
preparation.
2 Top Oven Thermostat Light; when illuminated, indicates that the Top Oven has not yet
reached the set temperature.
3 Main Oven Thermostat Light; when illuminated, indicates that the Main Oven has not yet
reached the set temperature.
4 Hot Plate Warning Light; when illuminated, indicates that a Hot Plate is still warm.
5 Top Oven Control Knob; allows you to select cooking settings for the Top Oven.
6 Main Oven Control Knob; allows you to select cooking settings for the Main Oven.
7 Temperature Control Knob; allows you to adjust the temperature of the selected cooking
setting.
8 Hot Plate Control Knobs; allow you adjust each Hot Plate individually.
T: 0800 0124 382
12