1
PLEASE READ CAREFULLY BEFORE ATTEMPTING TO OPERATE
>> SHOULDER STOCK INSTRUCTIONS
The stock that you have just purchased is designed specifically for use with the Retriev-R-Trainer hand-held launcher. It
will improve the distance and accuracy of your shots and with practice can provide for single hand cocking and firing—not
possible without this accessory while using your hand held launcher.
The stock is designed to work with RRT hand held launchers that were manufactured from 1990 to the present. The grips
used during this period will require slight trimming to work properly with the stock. The only trimming required will be at the
base of the grip nearest the pull knob on the launcher. This can be achieved by using a sharp utility knife or by turning the
base of the grip on a sander. The RRT Launcher should fit snuggly into the stock. If you are unsure of any of the steps or
procedures in these instructions please contact us for further instructions and assistance.
>> INSTALLATION OF THE TRIGGER
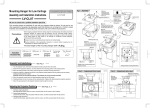
If your Retriev-R-Trainer does not already have the trigger installed, Figure A, you must do so before using your new stock.
The tools that you will need are: Vice grips or a vise, pliers and a hammer. Release the thumb latch on your Retriev-RTrainer and place it in the open position.
Retain this position during the installation to guard against accidental release of the firing pin into an empty chamber
causing damage to it.
1. Pull the firing pin back to the “fire” position and secure it there with either vice grips or a vise.
2. Remove the old pull knob by placing a pair of pliers under the PAL NUT and tap off with a hammer. (The PAL
NUT looks like a chrome top hat).
3. Remove the old knob and spring.
4. Place the new pull knob on the firing pin. Then, slide the new spring onto the firing pin. It will rest inside the
knob.
5. Tap the new PAL NUT on the end of the firing pin securing the knob assembly in place. Make sure the teeth
of the PAL NUT catch in the groove on the firing pin.
6. Release the firing pin from the “fire” position. You are now ready to install the pin in your new pull knob which
will allow it to work with the new shoulder stock. Please note that one end of the pin is smooth while the other
end has a knurl. While laying the pull knob on a flat surface with the hole
side hanging just off the end, push the pull knob against the PAL NUT
Figure A
compressing the spring inside.
This will allow you to gently tap the SMOOTH end of the pin through both
holes at the back end of the knob.
Once you have the pin in that position, drive the knurled end flush with
the top hole. Trim your grip as instructed above. Your Retriev-R-Trainer is
now ready to use with your new Shoulder Stock.
1
SHOULDER STOCK INSTRUCTIONS