1
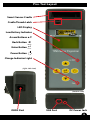
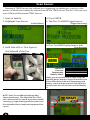
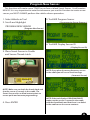
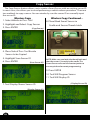
Smart Sensor Pro+ User Guide Technical Support: 800.438.3302 - www.smartsensorupdate.com Important Information FCC Notice This device complies with part 15 of the FCC Rules. Operation is subject to the following two conditions: 1. This device may not cause harmful interference. 2. This device must accept any interference received, including interference that may cause undesired operation. This device has been tested and found to comply with the limits for a Class B digital device, pursuant to Part 15 of the FCC Rules. These limits are designed to provide reasonable protection against harmful interference in a residential installation. This device generates, uses, and can radiate radio frequency energy and, if not installed and used in accordance with the instructions, may cause harmful interference to radio communications. However, there is no guarantee that interference will not occur in a particular installation. If this device causes harmful interference to radio or television reception, which can be determined by turning the equipment off and on, the user is encouraged to try to correct the interference by one or more of the factoring measures: • Reorient or relocate the receiving antenna. • Increase the separation distance between the device and receiver. Connect the device into an outlet on a circuit different from that to which the receiver is connected. Caution: Any changes or modifications in construction of this device which are not expressly approved by the party responsible for compliance could void the user’s authority to operate the device. To comply with FCC RF exposure compliance requirements, this device and its antenna must not be co-located or operating in conjunction with any other antenna or transmitter. Scope of Use and Warnings This X-tra Seal Smart Sensor™ is a sensing device designed to measure and display tire operation and/or to alert the driver when air pressure and temperature irregularities are detected. It is the responsibility of the driver to react promptly. Abnormal tire inflation pressure should be corrected at the earliest time possible. Reacting to Alerts When an alert or warning is displayed or sounded, reduce the vehicle’s speed and proceed slowly to a safe location to have the tire inspected and serviced. The low/high pressure alert indicates the tire pressure is not within the factory’s set limits and the high temperature alert indicates that the tire’s temperature has surpassed the factory’s set limits. Use of Chemicals During tire inflation, any use of internal sealants and propellants may affect the operation of the sensor/ transmitter. The use of such chemicals is not recommended and the product’s warranty will be void if the sensor comes in contact with them. Battery Information o If the Pro+ Tool has not been used for a prolonged period, it may be necessary to connect the charger then disconnect it to begin charging the battery. o If the battery is completely discharged, it may take several minutes to charge before the “MAIN MENU“ appears on the Pro+ display. o Do not short-circuit the battery. Accidental short-circuiting can occur when a metallic object such as a coin, paper clip, or pen comes in direct contact with the positive (+) and negative (-) terminals on the battery. Do not dispose of batteries in a fire as they may explode. Batteries may also explode if damaged. Dispose of batteries according to local regulations. Please recycle when possible. Do not dispose as common waste. o Do not dismantle or shred batteries. In the event of a battery leak, do not allow the liquid to come in contact with the skin or eyes. In the event of such a leak, flush skin or eyes immediately with water and seek medical help immediately. 2 Table Of Contents Charging Pro+ Tool ........................................... 4 Tool Buttons and Layout ............................... 4-5 Settings / Options ............................................. 6 Main Menu .........................................................7 Vehicle Selection ...............................................7 Scan Sensor ....................................................... 8 Program New Sensor ........................................ 9 Copy Sensor (Wireless) ................................... 10 Copy Sensor (Manual) .....................................11 OBDII ...........................................................12-13 OBDII Errors .....................................................13 Warranty Information .....................................14 3 Charging the Pro+ Tool The Pro+ Tool has a rechargeable battery. The tool takes approximately 2 hours to charge from a fully depleted battery. Only use a DC Adapter that has the exact power rating as the factory supplied charger. (15V / 1A). Any other Voltage rating could permanently damage the tool and void the warranty. When the Pro+ Tool battery is very low, the Low Bat Indicator light will illuminate. When this happens you should plug into a power source soon. You can continue to use the tool while it is charging. If the tool is powered on and charging, the battery life status icon will animate. The Charging Indicator Light will also illuminate when the tool is charging. Note that once the tool is fully charged the charge indicator light will no longer illuminate. Always be sure to fully charge the Pro+ Tool before updating. Be sure to fully charge the Pro+ Tool the first time you use it. Tool Buttons and Layout Powering On / Off Press and hold the power button for approximately 1 second to power ON or OFF the Pro+ Tool. When powering the tool on you will see the Smart Sensor Pro+ Logo briefly, then the software version briefly before seeing the main menu. (powering on) (software version) Back Button Cancels certain operations or goes back 1 level in the tool menu. Arrow Buttons Move Selection or in between options. Enter Button Selects the highlighted option. Performs the function. Smart Sensor Cradle Hard contact point for programming Smart Sensor TPMS Sensors. 4 Pro+ Tool Layout Smart Sensor Cradle Cradle Thumb Latch LED Display Low Battery Indicator Arrow Buttons pq Back Button Back Enter Button Enter Power Button Charge Indicator Light (right side view) (bottom view) OBDII Port USB Port DC Power Jack 5 Settings Options Setting SERIAL#: Serial Number Unique to This Pro+ Tool TEMPERATURE: F, C Toggles Display Format for Temperature PRESSURE: PSI, kPa, Bar Toggles Display Format for Pressure ID FORMAT: Toggles Display Format for ID Number Auto, Hexadecimal, Decimal Sensor ID’s can be converted from one format to another. Auto allows the tool to decide based on the sensor it is scanning. Most of the time this is desired. AUTO OFF: Toggles Tool Inactivity Shut Off Time 1min, 2min, 3min, 5min, 10min, DISABLED DISPLAY CONTRAST: 1-30 Helpful to improve screen readability. BUZZER: On, Off Toggles Tool Sound LANGUAGE: Menu Language Options English, Deutsch, Spanish, French VERSION: Displays Software Version on Tool Pro+ Updates are FREE visit http://www.smartsensorupdate.com for update instructions. 6 Main Menu Vehicle Selection Select a vehicle to diagnose and service. (Main Menu) Last Vehicle Shortcut The second option on the main menu allows you to quickly select the last vehicle you performed an operation on. Settings Customizable options for Units of Measure, ID Format, Language and Power Settings. Vehicle Selection 1. Power on Pro+ Tool 6. Select Year Range 2. Highlight Vehicle Selection on (Year Range) Main Menu 3. Press ENTER 4. Select Make (Makes) NOTE: Year Ranges end with (315) or (433). This denotes which MHz the protocol uses and which Smart Sensor to use. 5. Select Model (Models) There also may be more than one option or overlapping years. Be careful to select the correct protocol. Sometimes the tool menu header will display OEM part numbers that differenciate between the protocols. More research may be required. (Overlapping Year Range) NOTE: Some vehicle models have more than one choice. Carefully select the correct model and watch for multiple models. (ie: Honda Odyssey vs Honda Odyssey Touring, Ford 150 vs Ford F150HD) 7 Scan Sensor Scanning a TPMS Sensor, also referred to as triggering, or waking up a sensor, is the process of wirelessly reading the information off of a TPMS Sensor. The Pro+ Tool can scan most OEM and Aftermarket TPMS Sensors. 1. Select a Vehicle 2. Highlight Scan Sensor 4. Press ENTER (Vehicle Menu) 3. Hold Side of Pro+ Tool Against 5. The Pro+ Tool Will Trigger Sensor (Trigger Processing) 6. Pro+ Tool Will Display Sensor Info (Scan Readout) the Sidewall of the Tire Sensor ID Pressure Temperature Battery Status When you successfully scan a TPMS sensor the tool will always display a Sensor ID and Pressure Some OEM sensors transmit Temperature and battery status and some do not. If the OEM sensor transmits this info the Pro+ tool will display it. NOTE: Some Tire and Wheel Packages May Cause Interference. The Side of the Pro+ Tool has 2 Arrows with Tire noted. If you have trouble scanning, try repositioning with the arrows over the sidewall of the tire and pointing towards the sensor. 8 Program New Sensor This function will create a new TPMS Sensor from a blank Smart Sensor. It will create a NEW ID. It is very important to note that whenever you use this function to create a new sensor you MUST ALWAYS perform the vehicle relearn procedure. 1. Select Vehicle in Tool 2. Scroll and Highlight 5. Tool Will Program Sensor ( Programming Sensor Progress) PROGRAM NEW SENSOR ( Program New Sensor) 6. Tool Will Display Sensor ID ( Display Sensor ID) 3. Place Smart Sensor in Cradle and Secure Thumb Latch. NOTE: If you place the wrong frequency sensor in the cradle you will see an error message. ( Incorrect Sensor) NOTE: Make sure you latch the thumb latch and that the sensor is securely in the cradle. The Smart Sensor relies on hard contact points to ensure quick and accurate programming. 4. Press ENTER NOTE: If the tool displays PROGRAM FAILED make sure the sensor is secured in the cradle with the thumblatch and that there is no debris in the cradle or on the sensor contacts. 9 Copy Sensor The Copy Sensor feature allows you to create a Smart Sensor with an existing sensor ID. In most cases, this allows you to avoid performing a vehicle relearn procedure. There are two methods to copy a sensor. You can wirelessly scan the sensor ID or manually input the sensor ID. Wireless Copy 1. Select Vehicle in Pro+ Tool 2. Highlight and Select Copy Sensor 3. Press ENTER Wireless Copy Continued... 8. Place Blank Smart Sensor in Cradle and Secure Thumb Latch (Copy Sensor) 4. Place Side of Pro+ Tool Beside Sensor to be Copied 5. Highlight Scan Sensor ID 6. Press ENTER (Scan Sensor ID) NOTE: Make sure you latch the thumb latch and that the sensor is securely in the cradle. The Smart Sensor relies on hard contact points to ensure quick and accurate programming. 9. Press ENTER 10. Tool Will Program Sensor 11. Tool Will Display ID 7. Tool Display Shows Sensor ID ( Display Sensor ID) 10 ( Display Sensor ID) Copy Sensor Many OEM Sensors have the Sensor ID printed on the sensor housing. The ID may be formatted differently depending on the sensor. The ID will contain between 7 and 10 digits and will either contain all numeric characters or alphanumeric characters [0-9 A-F]. Manual Input Manual Input Continued... 1. Select Vehicle in Pro+ Tool 6. Use ARROW Buttons to Select 2. Highlight and Select Copy Sensor Characters and Press ENTER to 3. Press ENTER Select Each Character ( Manual ID Input) 4. Highlight INPUT SENSOR ID and Press ENTER (Input Sensor ID) 7. Place Blank Smart Sensor in 5. Select Input ID and Press ENTER (Input ID) Cradle and Secure Thumb Latch 8. Press ENTER 9. Tool Will Program Sensor 10. Tool Will Display ID ( Display Sensor ID) OE ID LOCATOR: This feature may assist you in finding the Sensor ID on the sensor housing. There are many numbers on the sensor and it can be challanging to find the correct one. The ID will contain between 7 and 10 digits and will either contain all numeric characters or alphanumeric characters [0-9 A-F]. It will NOT be the FCC-ID, IC or contain dashes. 11 OBDII Many Asian vehicles require an OBDII connection in order to perform the vehicle’s relearn procedure. The OBDII menu option is only displayed for vehicles that support an OBDII connection. These steps will show the basic OBDII tool operation. You perform the OBDII relearn after all sensors are installed on vehicle and are working. 1. Select Vehicle in Tool 7. Turn Ignition ON / Engine Off 2. Scroll and Highlight OBDII 8. Connect OBDII Module to Tool ( OBDII Menu Option) (OBDII Screen) 3. Scan First Sensor by Pressing ENTER 4. Use Up Arrow To Select Next Wheel 5. Repeat Step 3 For Each Sensor Some vehicles have a TPMS Sensor in the spare tire. 6. After All ID’s Are Stored Use Arrows To Select OBD 12 ( OBD Highlighted) 9. Connect OBDII Module to Vehicle OBDII Continued 10. Select UPLOAD CAR IDs ( OBDII Prompt) OBDII Errors If you see an error on the screen while performing an OBDII Relearn. Check to make sure that the vehicle is in the ON position not ACC. Also make sure all the connections are secure. E1, E2 Reading Communication Error 11. Successful Write Display ( OBDII Success) Make sure vehicle is ON and not ACC Check for secure connection. E3, E6 Writing Communication Error Make sure vehicle is ON and not ACC Check for secure connection. E4 Wrong Set Error NOTE: Some vehicles require additional steps after the OBDII portion of the relearn is complete. You may have to drive or scan sensors after you receive the RELEARN COMPLETE message. The OBDII Module is sold separately as it is not required for all situations, and many service facilities already have a tool capable of performing this function. 17-144-2 OBDII Module Many Lexus vehicles can store more than one set of TPMS ID’s in ECU. Toggle the vehicles selected set to the MAIN set. Then retry OBDII Relearn. E5 Spare Tire Error If you receive this error and you did not upload a sensor ID for the spare, this vehicle requires a spare. If you did upload a spare but you received this error, then the vehicle does not store the ID in the ECU for the spare tire. Toyota Loop If you receive E1, E2, E3, or E4 on Toyota / Lexus vehicles after verifying a good connection, the vehicle may be stuck in a loop. This happens when the “SET” button is pressed after introducing new sensors to the vehicle. This may require a special tool to remove the vehicle from the loop. 13 Warranty Information 1. LIMITED WARRANTY Pro+ Tools are guaranteed for a period of 1 year from original ship date to the original purchaser from the manufacturer or an authorized dealer, to be free from defects in material and workmanship when properly used and maintained by the Purchaser. The manufacturer will, at its sole option, provide a replacement or repair in-house, products found to have been defective as outlined in this warranty. Claims of all defects must be submitted within 30 days of the occurrence of such defect and substantiated by a representative. Any claim not filed in this manner within such period shall conclusively be deemed waived. If requested by the manufacturer, the product shall be returned to same, at its direction and expense, for examination. NO PRODUCTS MAY BE RETURNED WITHOUT PRIOR AUTHORIZATION The manufacturer shall not be liable for any expenses incurred by the purchaser in order to remedy any defect, which is not authorized. This warranty does not apply to damage or loss by any or all of the following circumstances or conditions: - Decal, overlays or decorative materials - Misapplication, misuse/or failure to correctly follow the directions, or observe cautions and warnings on product, operation, application, inspection or maintenance specified in any specification sheet, service guides, user guides, etc. - Minor stress cracks in surfaces deemed as cosmetic and do not affect performance or safe operational use of product. - Any damage related to fire, accident, misuse, abuse, acts of war, natural/environmental disaster, or Act of god. NO WARRANTY, EXPRESSED OR IMPLIED, IS EXTENDED ON COMPONENT PARTS WHICH ARE NOT PROVIDED BY SHANGHAI VEI SHENG MANUFACTURING CO.,LTD. THIS WARRANTY IS EXCLUSIVE. MANUFACTURER DISCLAIMS ANY AND ALL OTHER WARRANTIES, WHETHER EXPRESSED OR IMPLIED, INCLUDING ANY IMPLIED WARRANTY OF MERCHANTABILITY OR FITNESS FOR A PARTICULAR PURPOSE. Under no circumstances shall the manufacturer be liable for any special, consequential or incidental damage arising from any defect in products manufactured or sold by Shanghai Vei Sheng Manufacturing Co., Ltd. outside of the responsibilities expressed by this warranty. No person, distributor or representative of the manufacturer is authorized to make any representations on behalf of the manufacturer beyond those expressly stated in applicable literature, or to assume for the manufacturer or any obligation or duties not contained in this limited warranty. The manufacturer reserves the right to make design and other changes, modifications, or improvements without any obligation to install the same on previously sold or delivered products. 2. LIMITATION OF LIABILITY It is expressly agreed that the liability of the manufacturer is limited, and manufacturer does not function as an insurer. The remedies set forth in this warranty shall continue the exclusive remedies available to the purchaser or user and are in lieu of all other remedies expressed or implied. The liability of the manufacturer, whether in contract, or in tort, under any warranty or otherwise, shall not exceed the selling price by the manufacturer of the manufacture of the particular product manufactured, sold, or supplied by the manufacturer. 3. INFORMATION NECESSARY TO OBTAIN ASSISTANCE To enable the Manufacturer or its authorized representatives to respond to a request for assistance, please provide at a minimum the following information your request for assistance. a. Model number and product serial number alleged to be involved in the difficulty. This information can be found on the product label located on the back of the product. b. The name of the supplier and the date in which the product was purchased. c. State your difficulty, being sure to mention at least the following: 1. Statement of problem. 2. Description of how and when problem occurred. 3. Description of your request or recommendation to solve the problem. EFFECTIVE April 7, 2015 THIS WARRANTY SUPERSEDES ALL WARRANTIES HERETOFORE WRITTEN OR IMPLIED. 14 For Technical Support Call: 1.800.438.3302 rev 5.21.15