1
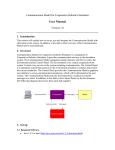
Leaders in Foam & Level Control
User Manual
SONARFLEX
Sonar System
Sludge and Settling Level Interface Monitoring
iFor more information, please visit >
Iwww.hycontrol.com
Table of Contents
HYCONTROL Sonarflex System
CONTENTS
Powering The Unit
Quickset
Typical High & Low Level
App Type
Interface Table
App Type2
Interface Table
Clarity
Output Adjustment
Comms Type
18
19
19
20
20
21
21
21
22
23
Comms Type (Menu)
Modbus
HART
Claning Menu
23
23
23
24
Cleaning
Actuator
Setup Procedure
24
24
25
Advanced
(1) Gain4 default settings
(2) Gain-Over-Distance bias
Relay Actions
Operating Diagnostics
25
25
25
26
27
Operating State
Application Calibration
27
28
How to set up the unit Bed Level + Hindered / settling layer measurement
How to set up the unit - Bed Level + Clarity
How to set up the unit - Hindered Layer + Clarity
Troubleshooting
28
29
30
31
12
12
12
12
13
Unit is measuring incorrect depth or height
PLC indication does not match measurement
Error Codes
Unit Specs & Health Checks
Sonarflex Electric Actuator Troubleshooting
Part Numbering
31
31
32
33
34
35
13
13
14
14
16
17
18
Remote Electronics
Remote Sonar Transducer
Automatic Scum Cleaner
Accessories
Specifications
Warranty and Liability
35
36
37
37
38
39
Overview
3
Principle of Operation
Function
Benefits
Features
System Components
3
3
3
3
4
Auto Scum Cleaner
Sonarflex Transducer
Sonarflex Amplifier
Dimensions
4
4
4
5
Sonarflex Remote Amplifier
SONARFLEXMELx* - Mounting Pole
SONARFLEXSCE - Impact Plate
SONARFLEXSCE Impact Plate
SONARFLEXT302S4 Transducer
SONARFLEXSCA Actuator
SONARFLEXT302SH Transducer
SONARFLEXSCD Floating Sonar
Mounting Bracket
Assembly
5
5
5
6
6
6
6
6
7
8
Mounting Bracket / Pole assembly
Mounting Bracket / Pole assembly
Dimensions & Mounting Connection
8
9
10
Impact Plate Mounting Connection
Mounting & Hardware Assembly
10
11
Impact Plate Assembly
*A: Important Cabling Steps to Follow
Installation Guide
11
11
12
Round Tanks – Centre Feedwell
Rectangular Tanks – End Feed
Ball float
Impact Plates
Wiring
Wiring - Remote Transmitter
Wiring Extension
Actuator Cable Specification
Profibus PA - Foundation Fieldbus (PA/FF)
DeviceNet
Profibus DP
Setup Procedure
Overview
HYCONTROL Sonarflex System
Principle of Operation
The Sonarflex transducer emits a high powered low frequency sonar pulse, which is reflected from the interface
density selected. The reflected signal is processed using specially developed software algorithms that eliminate
unwanted densities and stratified layers, allowing measurement of Bed or RAS levels. It can be calibrated to
measure lighter densities such as the hindered / free settling layer & floc or one of the outputs could be used for a
“Clarity” output, similar to a basic turbidity transmitter measuring solids in suspension. The unit can include two
outputs to measure two different interfaces simultaneously.
Function
The Hycontrol Sonarflex, sludge blanket and interface controller, consists of a microprocessor based transmitter,
with easy menu driven programming via keypad, PC or 3G modem. The Sonarflex controller works together with
appropriate sonar transducer and transducer cleaning mechanism.
Benefits
• Improved efficiency and control of the thickener process
• Fully automated plant systems with reliable interface level monitoring
• Advanced warning of process upset or hydraulic in-balance
• Reduced maintenance with automatic cleaning mechanism warranty (no blades to replace)
• Reduced site operational costs significantly with improved process & extraction control
• Improved health and safety on site (no manual dips required).
Features
• Dual independent analogue outputs to track two
different interfaces, or clarity simultaneously, with
the one sonar sensor
• Control room graphics of tanks and interfaces via
Vision System II software
• Easy to use pre-set calibrations to track specific
density interfaces, eg: floc / fluff layer, Bed
• Wide range of communications: Modbus, HART,
Foundation Fieldbus, DeviceNet, Profibus DP and
Profibus PA
• Industrial scum cleaning mechanisms that do not
require maintenance
• 3G remote support capability for calibration,
commissioning or technical back-up
• 3 programmable relays
System Components
HYCONTROL Sonarflex System
Auto Scum Cleaner
Sonarflex Amplifier
SONARFLEXSCA Pictured with Mounting Pole
Sonarflex Transducer
Dimensions
HYCONTROL Sonarflex System
Sonarflex Remote Amplifier
SONARFLEXMELx* - Mounting Pole
SONARFLEXSCE - Impact Plate
Dimensions
HYCONTROL Sonarflex System
SONARFLEXSCE Impact Plate
SONARFLEXSCA Actuator
SONARFLEXT302S4 Transducer
SONARFLEXSCD Floating Sonar
SONARFLEXT302SH Transducer
Dimensions
HYCONTROL Sonarflex System
Mounting Bracket
Assembley
HYCONTROL Sonarflex System
Mounting Bracket / Pole assembley
SONARFLEXSCA Pictured
Assembley
HYCONTROL Sonarflex System
Mounting Bracket / Pole assembley
Item Part Number
No.
Description
Qty
Dimensions & Mounting Connection
HYCONTROL Sonarflex System
Impact Plate Mounting Connection
The top of the Impact Plate has 3 x 7mm
bolt holes which can be secured to an angle
iron or equivalent bracket. There is also a
M25 (1.5”) threaded connection for a
mounting pole connection. The Impact Plate
is designed to swing parallel with the
counter weights. The surface sweeper must
come in contact with the legs of the Impact
Plate which swings the bracket lifting the
transducer out of the liquid. When the
sweeper has cleared, it will drop back in and
use the counter weights to re center. The
force of the movement will clear the sensor
face of any build up.
Impact Plate Connection Point
Mounting & Hardware Assembly
HYCONTROL Sonarflex System
Impact Plate Assembly
*A
*A: Important Cabling Steps to Follow
Installation Guide
HYCONTROL Sonarflex System
Installation Guide
SONARFLEX Transmitter – Mounting
Requirements
Select a suitable mounting position, preferably not in
direct sunlight. If necessary utilize a sunshade.
Observe the maximum and minimum temperature
Specification.
Do not mount the sonar transmitter near high
sources of EMF, such as motor starters, variable speed
drives or 3 phase cables. Avoid mounting in high
vibration areas, or use rubber absorption mounts.
Be careful when removing the cable and compression
glands.
Sonar Transducer – Mounting Requirements
The transducer should be half submerged in the
liquid and the transducer face must always be
submerged.
Wrap cable entry and lower connection cable with
Teflon tape.
Round Tanks – Centre Feedwell
Mount the sonar transducer and cleaning mechanism,
approximately one third radius between the outside
tank wall and the feedwell. This is the same whether
it is a moving or fixed bridge installation.
Do not mount near high infeed turbulence.
Choose a site installation where the infeed is least
disturbed.
Rectangular Tanks – End Feed
Rectangular Tanks – End Feed
Mount the sonar transducer and cleaning mechanism
away from high infeed turbulence. A clearance of
700mm from the side wall.
Do not mount directly over scraper, chain
mechanisms. Choose a site installation where the
infeed is least disturbed.
Mount the floating sonar transducer and cleaning
mechanism as close as practicable to the launders.
Mount at least 1.00 metres from side walls. Ensure
alignment guides are installed on the mounting
bracket for decanter ranges above 500mm.
Rectangular Tanks – End Feed
Mount the floating sonar transducer and cleaning
mechanism as close as practicable to the launders.
Mount at least 1.00 metres from side walls. Ensure
alignment guides are installed on the mounting
bracket for decanter ranges above 500mm.
Wiring
HYCONTROL Sonarflex System
Wiring - Remote Transmitter
Wiring Extension
Actuator Cable Specification
HYCONTROL Sonarflex System
Actuator Cable Specification
Note 1: Calculations based on:
4.0 Amps max actuator current and;
4.0 Volts drop across max cable length ( 2 wires)
Note 2: Note 2: Maximum terminal capacity is 1.5mm, which limits 16AWG cable to35m.
Note 3: For long cable runs, use 16 AWG to local junction box, then extend using 10-14 AWG.
Note 4: Also required: 3-wire cable for feedback potentiometer, 0.5mm - 1.0mm.
Gauge AWG Nom OD mm Resist Ohm/1000ft Resist Ohm/m Loss V/m Max Res Ohm Max Dist m
10
2.9201
0.8
0.0035
0.028
1
141.1
12
2.4401
0.71
0.0056
0.045
1
89.1
14
1.9302
0.73
0.009
0.072
1
55.8
16
1.5204
0.35
0.0143
0.114
1
35
18
1.2206
0.92
0.0227
0.182
1
22
20
0.965
0.9
0.0358
0.286
1
14
Profibus PA
HYCONTROL Sonarflex System
Profibus PA
See dedicated manual for Profibus PA available from http://www.hycontrol.com
DeviceNet
HYCONTROL Sonarflex System
DeviceNet
Set the BaudRate and the DeviceNet Address in
Sultan
5. Use the Down push button to reach the BaudRate
Parameter
Factory defaults of baudrate and FBusAdds are
125kbps and 63 in a Sonarflex unit with DeviceNet
CommType. To modify these values follow the
instructions below.
6. The default value for the BaudRate is 125kpbs.
Press CAL button and use the Up and Down push
buttons to modify this value
1. Go to the Output Adjustment menu
2. Use the Up and Down push buttons to reach the
CommType parameter
3. Make sure that the CommType is set to DeviceNet
4. Press the CAL button twice. If you see DeviceID do
not modify this parameter.
7. Press CAL button when finished
8. Use the Down push button to reach the FBusAdds.
The default value of the Fieldbus Address is 63.
Press CAL button and use the Up and Down push
buttons to modify this value
9. Press CAL button again when finished
Output Data
Profibus DP and DeviceNet now transmit 18 bytes/9
words, description of the words is as follows (For
firmware version 5.54 and above)
4. Low Level (Lower Range)
5. Status Flags
6. Displayed Distance2 (Second Variable)
1. Displayed Distance
(Space Distance is the Primary Variable)
7. Percentage2 (Second Percent of Range)
2. Percentage (Percent of Range)
8. Displayed Distance3 (Third Variable)+
3. Hi Level (Upper Range)
9. Percentage3 (Third Percent of Range)+
Bit F
Bit E
Bit 3
Bit 1
Bit 0
Bit0 = Echo was received inside the span.
Bit1 = Echo is Confirmed.
Bit3 = Searching is searching for an Echo.
BitF = Unit has Failed to detect an Echo.
+Only used for HYCONTROL Sonar Clarity output.
Profibus DP
HYCONTROL Sonarflex System
Profibus DP
Set the Profibus Address in Sonarflex
Factory defaults of FBusAdds is 126 in a Sonarflex
unit with Profibus CommType. To modify this value
follow the instruction below:
1. Go to the Output Adjustment menu
2. Use the Up and Down push buttons to reach the
CommType parameter
3. Make sure that the CommType is set to Profibus DP
5. Press the CAL button twice - If you see DeviceID
do not modify this parameter
6. Use the Down push button to reach the BaudRate
parameter. Note this cannot be modified
7. Use the Down push button to reach the FBusAdds.
The default value of the Fieldbus Address is 126.
Press CAL button and use the Up and Down push
buttons to modify this value
8. Press CAL button again when finished
Output Data
Profibus/DeviceNet now transmit 18 bytes/9 words,
description of the words is as follows (For firmware
version 5.54 and above).
4. Low Level (Lower Range)
5. Status Flags
6. Displayed Distance2 (Second Variable)
1. Displayed Distance
(Space Distance is the Primary Variable)
7. Percentage2 (Second Percent of Range)
2. Percentage (Percent of Range)
8. Displayed Distance3 (Third Variable)+
3. Hi Level (Upper Range)
9. Percentage3 (Third Percent of Range)+
Bit F
Bit E
Bit 3
Bit 1
Bit 0
Bit0 = Echo was received inside the span.
Bit1 = Echo is Confirmed.
Bit3 = Searching is searching for an Echo.
BitF = Unit has Failed to detect an Echo.
+Only used for HYCONTROL Sonar Clarity output.
Setup Procedure
HYCONTROL Sonarflex System
Powering The Unit
When power is applied the unit will start up automatically. It will scroll through its boot diagnostics and display
the serial numbers, software version and model types for the amplifier and transducer.
The unit will display its default operating screen depending on the App Type selected (default: Bed) on the
top line and a distance or % on the bottom line. The distance will be the programmed display mode (Default:
Level).
The unit will re-scan for the measurement whenever it is powered up.
The sensor face must be submerged in liquid in order to operate correctly.
Setup Procedure
HYCONTROL Sonarflex System
Quickset
The Quickset menu contains the basic parameters required to get the unit up and running.
It is one of the three main menu options in the internal software.
Parameter
Description
Options
Rectangular Tanks – End Feed
Typical installation - Set ‘Low Level’ (4mA)
to be the distance from the transducer face
to the bottom of the tank. High Level should
be 0.600m for most accurate and reliable
measurement.
Setup Procedure
HYCONTROL Sonarflex System
App Type
App Type is the first output and should be considered the primary measurement. If monitoring Bed level this
should be selected here. App Type has three pre-set application types.
• Bed (dense/heavy blanket layer).
• RAS (return activated sludge)
• Floc (Flocculent/hindered settling layer).
Parameter
Description
Options
*For most applications the unit is pre-calibrated with appropriate tracking speeds. You will not need to adjust
these settings.
Wiring - Remote Transmitter
Density
Selected (g/l)
Typical Applications
Wiring Extension
Bed Depth should be programmed to 1m (3ft) higher
than the application expected maximum depth
Setup Procedure
HYCONTROL Sonarflex System
App Type2
App Type is the second output and should be considered the secondary measurement. This output is sampled
and updated at programmed intervals
• Bed (dense/heavy blanket layer).
• RAS (return activated sludge)
• Floc (Flocculent/hindered settling layer)
.
• Clarity (indication of signal lost due to liquid conditions, 0% poor conditions, 100% clean conditions)
Parameter
Description
Options
** See ‘Clarity’ for important information
Interface Table
Density
Selected (g/l)
Clarity
Typical Applications
Clarity is a representation of how clear the liquid is
between the interface measured by App Type
(output 1) and the transducer face.
The unit monitors the number and quality of return
echoes and uses an algorithm to convert this to a
percentage. The percentage is a rolling average of
approximately 5 minutes of measurement.
Setup Procedure
HYCONTROL Sonarflex System
Output Adjustment
The Output Adj menu contains parameters related to adjusting analogue, switch & communication protocol
relayed settings.
Parameter
Description
Options
Comms Type
HYCONTROL Sonarflex System
Comms Type (Menu)
Sub-Menu
Description
HART
Options
Description
Byte No.
Modbus
Protocol: Modbus RTU (2 wire)
Speed: 19200 Baud
Data bits: 8
Parity: None
Stop Bits: 1
Hycontrol Sonarflex units act as ‘slave’ devices on a Modbus network. Units are shipped from the factory with a
default Modbus address of 1. The Modbus address of any unit can be changed individually if units are to be
connected in a multi-drop network. Each address number must only be used once on any network (possible
addresses are 1-255).
Primary Measurement Modbus Registers
Description
Options
Cleaning Menu
HYCONTROL Sonarflex System
Cleaning
Sub-Menu
Description
Options
Actuator
Sub-Menu
Description
Options
*If testing with these parameters you must follow this sequence for the Actuator to function correctly
• Select 'Actua Out'
• Select 'Actua In'
• Select 'Actuator’
The Actuator must be returned to 'In' mode before activating the auto cleaning function for standard operation.
Setup Procedure
HYCONTROL Sonarflex System
Advanced
The Advanced menu contains parameters for Gain control, manually adjustment of speed of sound, offset and
restoring the amplifier and transducer to their default state.
These settings typically do not require adjustment unless there are special circumstances. Do not adjust
Advanced settings without expert knowledge or consulting your local representation.
Parameter
Description
Options
Gain4 default settings
Interface Selected (g/l)
Gain-Over-Distance bias
Default Value
The Sonarflex system uses automatic Gain control
to enhance signal tracking during difficult process
conditions. Increasing SlopeInc% from 1.5% to 2%4% will assist the unit to place emphasis on deeper
measurement (bed level).
If the unit is locking to a
higher interface during sliming or difficult
conditions, try increasing this value. Do not exceed
4%. See 'Troubleshooting' for more information.
Relay Actions
HYCONTROL Sonarflex System
Relay Actions
Sub-Menu
Description
Options
Set Relay Parameters in Output Adjustment menu
The two relay levels are RlyL1 and RlyL2
The display will show RlyL1 1, the last 1 indicated the
Relay number (eg 1 to 5)
L1 and L2 distances are measured from the
transducer face
L1 must be equal to or less than L2.
Operating Diagnostics
HYCONTROL Sonarflex System
Operating State
In this operational state you can use the
measurements.
Diagnostic
Typical Reading
buttons to navigate through and view unit diagnostics and other
Description
Application Calibration
HYCONTROL Sonarflex System
How to set up the unit - Bed Level + Hindered / settling layer measurement
Parameters for standard setups are located in the
'Quickset' menu.
You will need to program the following parameters:
- App Type - High & Low Level, Density, Bed
Depth
- App Type2, High & Low Level2, Density
A) High and Low Level should be the same for
Both App Types. High Level should not be less
than 0.600m (2ft).
B) Set App Type to 'Bed' with Density 10+g/l. This
applies our pre-set parameters to measure the
Bed level with the first output.
Set Bed Depth - see Bed Depth(1)
Set App Type2 to 'Floc' with Density 0.6-1.2g/l.
This applies our pre-set parameters to measure
the hindered/settling layer to target with Floc
Control.
App Type Notes
App Type is the primary measurement. If
measuring Bed level it should always be set to Bed
level. Density of 10+g/l is the optimum setting to
penetrate suspended material to the Bed.
Bed Depth
Bed Depth should be programmed to 1m (3ft) higher
than the application expected maximum depth
App Type2: Additional Settings
SmplRate - App Type2 is measured at a time
based interval. This can be reduced as low as
0.5mins (30 seconds)
Damping2 - Along with reducing SmplRate time,
Increasing Damping2 will provide a smoother
output trend.
Calibr% - To see a lighter interface increase the
Calibr% parameter. Use 1% intervals and press
CAL to fire test pulses. This will return the depth
of the measured interface and signal size. Target
1V+ signal at preferred depth. Higher% makes the
unit more sensitive to lighter material. Fire several
pulses with each adjustment.
Application Calibration
HYCONTROL Sonarflex System
How to set up the unit - Bed Level + Clarity
Parameters for standard setups are located in the
'Quickset' menu.
You will need to program the following parameters:
- App Type - High & Low Level, Density
- App Type2, High & Low Level2
A) High Level for App Type should not be less
than 0.600m (2ft). High and Low level for Clarity
is represented as a %. 0% poor Clarity, 100%
optimal Clarity.
B) Set App Type to 'Bed' with Density 10+g/l. This
applies our pre-set parameters to measure the
Bed level with the first output.
Set Bed Depth - see Bed Depth(1)
Set App Type2 to 'Clarity'. This programs output
2 for a proportional 0-100% representation of
Clarity.
Bed Depth
Bed Depth should be programmed to 1m (3ft) higher
than the application expected maximum depth
Application Calibration
HYCONTROL Sonarflex System
How to set up the unit - Hindered Layer + Clarity
Parameters for standard setups are located in the
'Quickset' menu.
You will need to program the following parameters:
- App Type - High & Low Level, Density
- App Type2, High & Low Level2
A) High Level for App Type should not be less
than 0.600m (2ft). High and Low level for Clarity
is represented as a %. 0% poor Clarity, 100%
optimal Clarity.
B) Set App Type to 'Floc' with Density 0.6-1.2g/l.
This applies our pre-set parameters to measure
the Bed level with the first output.
Set App Type2 to 'Clarity'. This programs output
2 for a proportional 0-100% representation of
Clarity.
Troubleshooting
HYCONTROL Sonarflex System
Unit is measuring incorrect Bed or Space
• Confirm display mode is correct
• Space is measured from sensor face to target.
Bed is measured from low level to target.
• Confirm High Level, Low Level and Bed Depth (if
applicable) match application requirement.
• Increase or decrease 'Gain4'. Increasing this value
makes the unit more sensitive to interfaces within
the tank and vice versa. Programming 'Bed Depth'
sets Gain4 to a recommended value based on the
expected depth of the Bed level
• The Parameter Slope Inc% (Advanced Menu
software rev 5.81) can be used to put more
emphasis on deeper measurement - increase this to
3%.
• High volumes of poor settling or suspended
material with attenuate the Sonar pulse. The unit
may read higher tracking suspended material if
process conditions in the tank fail.
PLC indication does not match measurement
• Disconnect the analogue wires from the amplifier.
Use a multimeter on the 4-20mA terminals labeled
IS and + to read the direct mA from the unit.
Reconnected analogue wires and compare this value
with the reading from the control system.
• Confirm High Level and Low Level are set to the
same values in amplifier and control system.
Unit is measuring incorrect Bed or Space
• Hycontrol is constantly updating and improving
the design and accessibility of its products and as a
result older units may have different software.
Contact your local representation for information on
Updating to the latest software.
Troubleshooting
HYCONTROL Sonarflex System
Error Codes
Error 01:
Error 03:
Amplifier/Transmitter can not communicate
with Transducer.
• Specific comms mode is selected (eg Profibus, FF)
but comms module is not connected or responding
• Wiring: Check the terminals for a loose or
incorrect connection (including junction box/cable
Extensions)
• Check your unit part number to ensure it has
correct comms
• Check the cables for any signs of damage
• Ensure any customer supplied cable meets
Hycontrol specifications
• If using junction box extension trace the 8-10VDC
from the red/black amplifier terminals to
the transducer to ensure wires are correct
• If using a junction box ensure you follow
Hycontrol’s specification for extending cable
• ‘Unit Specs & Checks’ has additional checks for
causes of Error 01.
Error 02:
Communication data corruption between
Transmitter and Transducer.
• It can be a result of noise in data lines or one of
data lines (white or blue) being open circuit.
• Make sure wiring is correct especially look to the
screen (earth).
• Ensure you are using quality shielded
instrument cable.
• ‘Unit Specs & Checks’ has additional checks for
causes of Error 02.
• If you do not have additional comms
(part number option X) then select Modbus.
Error 04:
Amplifier is programmed with incorrect
software or has wrong hardware connected.
• Contact your local support.
ActuatorErr
Before the Actuator sweeps the Sonarflex will check
the incoming voltage to confirm it is not less than
the VoltCutOff parameter value. If it does detect the
error it will display ActuatorErr for a few seconds
on the LCD. Confirm 24VDC power supply is per
spec (min 5A at the terminal)
ActuatorVsErr
If the voltage drops below the VoltCutOff parameter
value during an attempted Actuator swing the
Sonarflex will display ActuatorVsErr for a few
seconds on the LCD. Confirm 24VDC power supply is
per spec (min 5A at the terminal).