1
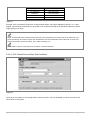
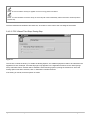
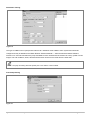
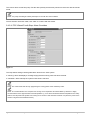
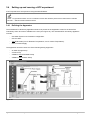
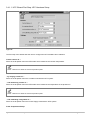
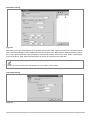
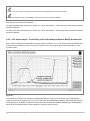
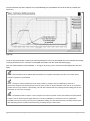
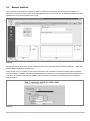
Batch Reactor Manual 2 Atlas Calorimetry Syrris Ltd Version: 1.0 Author: SV Date: 26/12/2013 P/N: 2000256 Disclosure This document is confidential and is the property of Syrris Ltd. No attempt should be made to copy this document in any way without prior consent. © 2013 Syrris Ltd all rights reserved Contents 1 2 Introduction to Calorimetry....................................................................................................................................4 1.1 Introduction to Power Compensation Calorimetry (PCC) .............................................................................5 1.2 Introduction to Heat Flow Calorimetry (HFC) ...............................................................................................6 Power Compensation Calorimetry (PCC) .............................................................................................................7 2.1 PCC Hardware Overview ..............................................................................................................................7 2.2 PCC Software Overview ...............................................................................................................................8 2.3 Setting up the system ...................................................................................................................................9 2.3.1 Assemble the Atlas System ..................................................................................................................9 2.3.2 Setup the TTi Power Supply with the Heater Rod ................................................................................9 2.3.3 Setup the reagent feed .......................................................................................................................10 2.4 3 2.4.1 Defining the Apparatus .......................................................................................................................11 2.4.2 Defining the PCC action......................................................................................................................12 2.4.3 Running the PCC recipe .....................................................................................................................19 Heat Flow Calorimetry (HFC) .............................................................................................................................21 3.1 3.1.1 HFC Hardware Overview ............................................................................................................................21 Requirements ......................................................................................................................................21 3.2 HFC Software Overview .............................................................................................................................22 3.3 Setting up the system .................................................................................................................................23 3.3.1 Assemble the Atlas System ................................................................................................................23 3.3.2 Setup the TTi Power Supply with the Heater Rod ..............................................................................23 3.3.3 Setup the reagent feed .......................................................................................................................24 3.4 4 Setting up and running a PCC experiment .................................................................................................11 Setting up and running a HFC experiment .................................................................................................25 3.4.1 Defining the Apparatus .......................................................................................................................25 3.4.2 Running the HFC recipe .....................................................................................................................33 Calorimetry Data Analysis ..................................................................................................................................34 4.1 Loading data into Atlas Reporting Software ...............................................................................................35 4.2 Data Analysis Wizard ..................................................................................................................................37 4.2.1 First Step of the Data Analysis Wizard: Map the columns and specify the units................................37 4.2.2 Second Step of the Data Analysis Wizard: Review data ....................................................................37 4.2.3 Third Step of Data Analysis Wizard: specify the addition details. ......................................................38 4.2.4 PCC data analysis - Fourth Step of the Data Analysis Wizard: Modify the baseline. ........................40 Syrris Ltd: Atlas Calorimetry Guide Page 2 of 56 4.2.5 5 HFC data analysis – Fourth Step of the Data Analysis Wizard: Modify the baseline. ........................42 4.3 Manual Addition ..........................................................................................................................................44 4.4 Calorimetry report .......................................................................................................................................46 4.4.1 Summary details .................................................................................................................................46 4.4.2 Calorimetry graphs ..............................................................................................................................46 4.4.3 Thermodynamic information obtained from the calorimetry experiment ............................................48 Troubleshooting ..................................................................................................................................................50 5.1 Atlas Potassium System troubleshooting ...................................................................................................50 5.2 Contacting Syrris.........................................................................................................................................50 6 Appendix 1: Editing capabilities for graphs generated in Atlas Reporting ..........................................................51 7 Appendix 2: Installing Atlas 2 Software ..............................................................................................................53 7.1 PC Specifications and Configuration ..........................................................................................................53 7.1.1 PC Specification ..................................................................................................................................53 7.1.2 Administrator Rights............................................................................................................................53 7.1.3 Language Settings ..............................................................................................................................53 7.2 Installing Atlas 2 software ...........................................................................................................................55 Syrris Ltd: Atlas Calorimetry Guide Page 3 of 56 1 Introduction to Calorimetry Reaction calorimetry is the general practice of measuring heat evolution during a chemical reaction. This provides valuable information about the reaction itself that can be used for process optimisation, scale-up, plant design and hazard analysis. When considering scaling up a reaction to large scale from lab scale, it is important to understand how much heat is released. At a small scale heat released may not cause a concern, however when scaling up, that heat can build up and be extremely dangerous. The Atlas Calorimetry system is an Atlas Potassium system modified to allow fully automated calorimetry. The additional requirements include a Heater Rod, a programmable Power Supply and appropriate control and analysis software. The software allows simple wizard based configuration of the entire PCC or HFC step including dosing (gravimetric or volumetric). A real time measure of approximate reaction power and enthalpy is provided and post run data processing gives an accurate measure of the reaction enthalpy. Before using this user guide, it is strongly advised that the ‘Batch Reactor Software Manual 1 – Atlas and Reactor Master Software’ is read to become familiar with the use of the control software. Syrris Ltd: Atlas Calorimetry Guide Page 4 of 56 1.1 Introduction to Power Compensation Calorimetry (PCC) Power compensation calorimetry provides a direct measurement of the power generated by a chemical reaction. From that measurement, a chemist can access further calorimetry data such as the Enthalpy of Reaction. The PCC method uses conjointly a circulator and a power supply to maintain the reaction temperature of the system at a fixed value. The circulator is set to a running temperature for the whole length of the experiment (for example 10°C less than the reaction temperature). The reaction temperature control is achieved by varying the power dispensed to the reaction medium by the power supply via the heater rod. As the process heat load changes, the electrical power is varied (in real time) in order to maintain the desired process temperature. The heat generated by the reaction is simply obtained from the difference between the heater power during the reaction and the baseline heater power. This can be integrated to give the enthalpy of reaction. The power compensation calorimetry method is easy to set up and requires less running time than other calorimetry methods. It is however limited by the baseline power provided by the Power Supply: if the power generated by the reaction exceeds the baseline power maintained by the system, the system cannot compensate for the reaction power anymore, the reaction temperature will increase and the system will not be isothermal anymore. A PCC experiment is broken down into four phases (Figure 1 page 6). • “Warming”: The system is warmed/cooled as quickly as possible until close to the desired reaction temperature using the circulator and the Power Supply. • “Settling”: The Power Supply provides a fixed amount of power while the circulator is controlling the jacket temperature in order to achieve the target reaction temperature. • “Zeroing”: The system has now fixed the jacket temperature and the Power Supply controls the temperature by varying the power supplied to the reaction mixture. The jacket temperature will remain fixed for the rest of the PCC run. • “Running”: The reaction happens during this phase, triggered by the addition of a reagent (either in manually or in an automated fashion). During the run, the system reports approximate reaction power and enthalpy. Figure 1 Syrris Ltd: Atlas Calorimetry Guide Page 5 of 56 1.2 Introduction to Heat Flow Calorimetry (HFC) Heat flow calorimetry is the most common method to establish the enthalpy of reaction. In HFC, the reactor temperature is controlled isothermally at all times by modulating the jacket temperature and the difference between the reactor temperature (Tr) and the jacket temperature (Tj) is monitored. This temperature difference (Tr-Tj) is directly proportional to the power generated by the reaction. The proportion factor is obtained by calibrating with a known power applied to the reaction mixture prior to and after the reaction. The calibration is done before and after the reaction to account for reactor content changes in volume (reagent added) and heat transfer coefficient (mixture of reagents). It is critical to mitigate heat losses due to the environment as much as possible to ensure that the temperature difference Tr-Tj is only caused by the reaction. A HFC experiment is broken down into four phases (Figure 2). • “Heating”: The system is warmed/cooled as quickly as possible by varying the jacket temperature until reaching the desired reaction temperature. • “Pre-Calibration”: The Power Supply provides a fixed amount of power and the jacket temperature is adjusted to maintain the target reaction temperature. • “Experiment”: The reaction happens during this phase, triggered by the addition of a reagent (either in manually or in an automated fashion). During the experiment, the jacket temperature is adjusted to maintain the target reaction temperature. • “Post-Calibration”: The Power Supply provides a fixed amount of power and the jacket temperature is adjusted to maintain the target reaction temperature. Figure 2 Syrris Ltd: Atlas Calorimetry Guide Page 6 of 56 2 Power Compensation Calorimetry (PCC) 2.1 PCC Hardware Overview The following items are essential for performing a PCC experiment: Atlas Potassium Vacuum Jacketed Vessel System Quick Response Hastelloy or TTi Power Supply with 25W coated SS RTD Probe (with Atlas or 50W Heater Rod RTD Node and Node Extension) Figure 3 The following items are highly recommended in order to achieve the best performances: Atlas Syringe Pump Gravimetric Dosing Option Volumetric Dosing Option Velcro Insulators Figure 4 Syrris Ltd: Atlas Calorimetry Guide Page 7 of 56 2.2 PCC Software Overview The following items are essential for running a PCC experiment: Control Computer Atlas PC Control Software Calorimetry Software Upgrade Part Number: 2300102 Part Number: 2600003 Please consult the Syrris PC Specification document for details or contact your local Syrris representative. Figure 5 Syrris Ltd: Atlas Calorimetry Guide Page 8 of 56 2.3 Setting up the system The Syrris Atlas system and associated hardware should be arranged, for example, as shown in Figure 6 (Atlas Potassium Power Compensation Calorimetry System with Atlas Syringe Pump option). Figure 6 2.3.1 Assemble the Atlas System For assembling the Atlas System in its Potassium configuration, please refer to the Batch Reactor Manual 1 – Atlas Systems. It is necessary that the Atlas System includes one probe measuring the reaction temperature. 2.3.2 Setup the TTi Power Supply with the Heater Rod The Heater Rod needs to be plugged into the TTi Power Supply by inserting the connectors in the matching socket. The Heater Rod must be suitably immersed in the reaction medium and fulfil the following requirements: - The hot end of the Heater Rod (1 inch for a 25 watt heater and 2 inches for a 50 watt) must be totally immersed in the reaction medium., - The Heater Rod must not come into contact with the inner wall of the reactor vessel, with the overhead stirrer or with other probes immersed in the reaction medium. NOTE: Not immersing the hot end of the Heater Rod enough during use will result in unrepairable damage to the rod. NOTE: During use, the stirring may form a vortex in the reactor resulting in the Heater Rod not immersed in liquid anymore. It is essential to ensure the Heater Rod is fully immersed while stirring is on before starting the calorimetry experiment. Syrris Ltd: Atlas Calorimetry Guide Page 9 of 56 2.3.3 Setup the reagent feed The Atlas Calorimeter System can be used with the three following addition types: - Volumetric addition using an Atlas Syringe Pump. - Gravimetric addition using a balance and a pump. - Manual addition. Volumetric addition using an Atlas Syringe Pump: For setting up and using the Atlas Syringe Pump, please refer to the Atlas Syringe Pump User Manual. Ensure that the feed lines from the Atlas Syringe Pump do not touch the inner wall of the jacketed reactor. The stream of reagent should drop in the middle of the reactor. The feel lines must be primed before the calorimetry experiment starts. Gravimetric addition using a balance and a pump: Both balance and pump must be connected to the control computer. The connection can be done either via UBS cables, Atlas Ports and communication cables or directly into COM Ports via communications cables (a COM Port Software licence is required). See the Batch Reactor Software Manual 1 – Atlas and Reactor Master Software for more information Ensure that the feed lines from the pump do not touch the inner wall of the jacketed reactor. The stream of reagent should drop in the middle of the reactor. The feel lines must be primed before the calorimetry experiment starts. Manual addition: Manual addition can be done in any way suitable to the user e.g. via an addition funnel added to one of the lid ports. Syrris Ltd: Atlas Calorimetry Guide Page 10 of 56 2.4 Setting up and running a PCC experiment A PCC experiment is set up and run using the Atlas Software. NOTE: For general information on how to install and use the Atlas Software please refer to Batch Reactor Software Manual 1 – Atlas and Reactor Master Software. 2.4.1 Defining the Apparatus The essential PCC calorimetry apparatus needs to be present in the Apparatus screen for the Power Compensation Calorimetry action to become available to the user. This essential PCC calorimetry apparatus includes: - One Atlas System in its Potassium configuration. - One circulator - One RTD Node - One TTi Power Supply The apparatus can also include one of the following dosing equipment: - An Atlas Syringe Pump - A Flow Pump - A Balance and a Peristaltic Pump - A Balance and a Piston Pump Fig 4. A typical PCC apparatus setup including the Atlas Syringe Pump as a dosing option. NOTE: Ensure that the apparatus configuration is set to ‘Potassium’ and not ‘Potassium (Base)’. Figure 7 Syrris Ltd: Atlas Calorimetry Guide Page 11 of 56 2.4.2 Defining the PCC action The PCC calorimetry experiment is controlled by a single Atlas Software action called “Power Compensation Calorimetry” and represented by the following icon (see Figure 8). Figure 8 This action is configured by a simple wizard system that sets temperature, starting heater power, control parameters, limits and dosing into the reaction. NOTE: Multiple PCC actions can be run consecutively. Drag and drop this action into the recipe to start the wizard (see Figure 9). Drag and drop to configure the PCC experimental conditions Figure 9 NOTE: The PCC action does not include a stirring action. If stirring is required during the reaction, the “Set Stirrer Speed” action must be added in parallel to the PCC action. 2.4.2.1 PCC Wizard First Step: PCC Hardware Setup The first step asks the user to configure the PCC hardware and conditions (Figure 10). Syrris Ltd: Atlas Calorimetry Guide Page 12 of 56 Figure 10 Control celsius of...: Select in the dropdown menu the temperature probe which measures the reaction temperature. NOTE: Make sure to select the correct temperature probe if more than one is present and defined on the system. ...by varying celsius of...: Select in the dropdown menu the circulator used with the PCC system. ...and varying watts of...: Select in the dropdown menu the Power Supply used with the PCC system. Fixed Temperature Setup: Set the desired reaction temperature. This is the temperature which will be maintained during the addition step of the PCC experiment. NOTE: The PCC experiment can only be run in isothermal conditions. Expected Heat Flux Set the baseline power applied by the Power Supply based on your knowledge of the reaction. This is the power supplied to the system by the Power Supply when no heat of reaction is being generated. These values are shown below: Syrris Ltd: Atlas Calorimetry Guide Page 13 of 56 Expected Heat Flux Baseline Power Set at Very Exothermic 80% PSU Power Exothermic 70% PSU Power Unknown 50% PSU Power Endothermic 30% PSU Power Figure 11 Example: If the user selects “Exothermic” and has a 50W heater, the system stabilises using 50 x 0.7 = 35W applied. This will allow the detection of up to 35W of an exotherm and 15W of an endotherm without the power supply going out of range. NOTE: The Baseline Power will determine the maximum power generated by the reaction that can be measured. If the power generated by the reaction is higher than the Baseline Power then the Baseline Power will remain at 0W and the reaction temperature will start increasing. This is called “bottoming out”. NOTE: Select “Unknown” if the heat flux of the reaction cannot be estimated. 2.4.2.2 PCC Wizard Second Step: End Conditions Figure 12 Select an end condition for the running phase of the PCC action. This can be based on time or the state of any other sensor in the system. Syrris Ltd: Atlas Calorimetry Guide Page 14 of 56 NOTE: The End Condition will only be applied once the ‘running’ phase has started. NOTE: If no End Conditions has been setup, the PCC step will continue indefinitely. Manual interaction will be required to end the step. Once the desired end conditions have been set, click ‘Next’ to move onto to the next stage of the wizard. 2.4.2.3 PCC Wizard Third Step: Dosing Step Figure 13 This section controls the dosing. To enable the Dosing Options, the suitable equipment needs to be selected in the Apparatus Screen. Example: if an Atlas Syringe Pump appears in the Apparatus Screen then the “Atlas Syringe Pump Volumetric Dose” selection will be available. Select a dosing option by ticking the relevant box. Once the Dosing Options has been selected, click on “Edit Dose” to define the dose. If the dosing is manual, leave all options un-ticked. Syrris Ltd: Atlas Calorimetry Guide Page 15 of 56 Atlas Syringe Pump Volumetric Dose Figure 14 Further details about the Atlas Syringe Pump Action step can be found in section 3.7.2.1 of the Atlas Syringe Pump User manual. NOTE: The pump and tubing should be primed prior to use with the correct material. NOTE: Check the configuration setting in the pump to ensure the correct syringe size and valve type have been selected. Syrris Ltd: Atlas Calorimetry Guide Page 16 of 56 Gravimetric Dosing Figure 15 This type of addition uses a pump and a balance via a standard “Control Mass” action system and should be configured exactly as detailed in the Batch Reactor Software Manual 1 – Atlas and Reactor Master Software, section 8.5.3. Users should select the pump and balance to be used and set the amount as a ramp, profile or fixed weight. The end conditions, limits, alarms and PID terms can be set as normal from the other tabs. NOTE: The pump and tubing should be primed prior to use with the correct material. Flow Pump Dosing Figure 16 Syrris Ltd: Atlas Calorimetry Guide Page 17 of 56 This uses a direct control flow pump. Set the dose quantity and the time period over which the dose should be made. NOTE: the pump and tubing should be primed prior to use with the correct material . Once a selection has been made, click “Next” to continue with the wizard. 2.4.2.4 PCC Wizard Fourth Step: Alarm Overrides Figure 17 This step allows setting override global alarm levels for the PCC system. A “warning” alarm will display a message saying that the warning value has been reached. A “shutdown” alarm will stop the system if that value is reached. NOTE: The values used here will only apply during the running phase of the calorimetry action. NOTE: The override alarms are not required for running a PCC experiment and remain blank by default. It is highly recommended to set a High Shutdown Level temperature e.g. 10°C above the desired reaction temperature as a safety feature. This will prevent the system from running out of control in case the heater “bottoms out” (when the power of the reaction is higher than the Baseline Power). Syrris Ltd: Atlas Calorimetry Guide Page 18 of 56 2.4.2.5 PCC Wizard Fifth Step: Control Parameters Figure 18 The control parameters for the PCC action can be adjusted from here. Click the buttons to configure the control of the corresponding hardware. The Circulator PID parameters control the circulator behaviour during the settling phase, before the circulator temperature is fixed and the action moves into the running phase. These values will seldom need to be altered. NOTE: It may be necessary to decrease Proportional value if the temperature over/undershoots significantly or increase it if the reactor doesn’t reach its set point. The Power Supply PID parameters control how the power supply responds to temperature changes. These terms generally need to be quite large as we need aggressive control of the Power Supply to cope with sudden temperature changes generated by the reaction. Again, these values will seldom need to be changed. NOTE: For further information about adjusting these PID values, please contact [email protected] or your local Syrris representative. Once these parameters have been set, click ‘Finish’ to complete the PCC wizard and to add the calorimetry step to the recipe. If desired, double click the existing step to restart the wizard and make any changes. 2.4.3 Running the PCC recipe To run the PCC experiment, go to the Run View tab and click on “Run”. Syrris Ltd: Atlas Calorimetry Guide Page 19 of 56 NOTE: the PCC action doesn’t include a stirring action. It is highly recommended to have a “Set Stirrer Speed” action running in parallel of the “Power Compensation Calorimetry” action. The system will successively run the four phases of a PCC experiment: - Warming - Settling - Zeroing - Running Transition between these phases is automatic and the running phase can be ended after a fixed time, on other sensor condition or on an alarm condition as normal. Current phase and other messages relating to the state of the PCC action can be monitored in the Report Log. User can skip the full PCC action but cannot skip specific phases. If the reagent is added manually, this is done during the “Running” phase. To ensure that the PCC has entered the Running phase, check that the Reaction Log displays “PCC Start running” log. When the reagent is added manually, the PCC run will not stop automatically at the end of the feed but instead will end after the “End after...” time (see Section 2.4.2.1 PCC Wizard First Step: PCC Hardware Setup for further details). NOTE: If a manual addition is being carried out, it is important for the user to try and maintain the isothermal conditions as best as possible i.e. minimise any changes to the system that have to be made in order to carry out the manual addition. Syrris Ltd: Atlas Calorimetry Guide Page 20 of 56 3 Heat Flow Calorimetry (HFC) 3.1 HFC Hardware Overview 3.1.1 Requirements The following items are essential for performing a HFC experiment: Atlas Potassium System Vacuum Jacketed Vessel Quick Response Hastelloy or coated SS TTi Power Supply RTD Probe (with Atlas RTD Node and with 25W or 50W Node Extension) Heater Rod 100x3mm Stainless Steel RTD Probe (with Atlas RTD Node and Node Extension) Figure 19 The following items are highly recommended in order to achieve the best performances: Atlas Syringe Pump Gravimetric Dosing Option Volumetric Dosing Option Velcro Insulators Figure 20 Syrris Ltd: Atlas Calorimetry Guide Page 21 of 56 3.2 HFC Software Overview The following items are essential for running a PCC experiment: Control Computer Atlas PC Control Software Calorimetry Software Upgrade Part Number: 2300102 Part Number: 2600003 Please consult the Syrris PC Specification document for details or contact your local Syrris representative. Figure 21 Syrris Ltd: Atlas Calorimetry Guide Page 22 of 56 3.3 Setting up the system The Atlas system and associated hardware should be arranged as shown below. The system shown in Figure 22 is an example of a typical Atlas HFC system. This example shows the optional gravimetric dosing provided by the peristaltic pump and balance combination. Figure 22 3.3.1 Assemble the Atlas System For assembling the Atlas System in its Potassium configuration, please refer to the Batch Reactor Manual 1 – Atlas Systems. It is essential that the Atlas System has one temperature probe measuring the reaction temperature and another temperature probe measuring the reactor jacket temperature. NOTE: in order to measure the jacket temperature accurately, it is recommended to drip a little circulator oil in the thermal well before inserting the stainless steel temperature probe. 3.3.2 Setup the TTi Power Supply with the Heater Rod The Heater Rod needs to be plugged into the TTi Power Supply by inserting the connectors in the matching coloured sockets. The Heater Rod must be suitably immersed in the reaction medium and fulfil the following requirements: - The hot end for the Heater Rod (1 inch for a 25 watt heater and 2 inches for a 50 watt) must be totally immersed in the reaction medium., - The Heater Rod must not come into contact with the inner wall of the reactor vessel, with the overhead stirrer or with other probes immersed in the reaction medium. Syrris Ltd: Atlas Calorimetry Guide Page 23 of 56 NOTE: Not immersing the hot end of the Heater Rod enough during use will result in unrepairable damage to the rod. NOTE: During use, the stirring may form a vortex in the reactor resulting in the Heater Rod not immersed in liquid anymore. It is recommended to ensure the Heater Rod is fully immersed while stirring is on before starting the calorimetry experiment. 3.3.3 Setup the reagent feed The Atlas Calorimeter System can be used with the three following addition types: - Volumetric addition using an Atlas Syringe Pump. - Gravimetric addition using a balance and a pump. - Manual addition. Volumetric addition using an Atlas Syringe Pump For setting up and using the Atlas Syringe Pump, please refer to the Atlas Syringe Pump User Manual. Ensure that the feed lines from the Atlas Syringe Pump do not touch the inner wall of the jacketed reactor. The stream of reagent should drop in the middle of the reactor. The feel lines must be primed before the calorimetry experiment starts. Gravimetric addition using a balance and a pump: Both balance and pump must be connected to the control computer. The connection can be done either via UBS cables, Atlas Ports and communication cables or directly into COM Ports via communications cables (a COM Port Software licence is required). Ensure that the feed lines from the Atlas Syringe Pump do not touch the inner wall of the jacketed reactor. The stream of reagent should drop in the middle of the reactor. The feel lines must be primed before the calorimetry experiment starts. Manual addition: Manual addition can be done in any way suitable to the user. Syrris Ltd: Atlas Calorimetry Guide Page 24 of 56 3.4 Setting up and running a HFC experiment A HFC experiment is set up and run using the Atlas Software. NOTE: For general information on how to install and use the Atlas Software please refer to Batch Reactor Software Manual 1 – Atlas and Reactor Master Software. 3.4.1 Defining the Apparatus The essential HFC calorimetry apparatus needs to be present in the Apparatus screen for the Heat Flow Calorimetry action to become available to the user (see Figure 23). This essential HFC calorimetry apparatus includes: - One Atlas System in its Potassium configuration. - One circulator - Two RTD Nodes (one for Reaction Temperature, one for Jacket Temperature). - One TTi Power Supply The apparatus can also include one of the following dosing equipment: - An Atlas Syringe Pump - A Flow Pump - A Balance and a Peristaltic Pump - A Balance and a Piston Pump Figure 23 Syrris Ltd: Atlas Calorimetry Guide Page 25 of 56 NOTE: Ensure that the apparatus configuration is set to ‘Potassium’ and not ‘Potassium (Base)’. The HFC calorimetry experiment is controlled by a single Atlas Software action called “Heat Flow Calorimetry” and represented by the icon shown in Figure 24. Figure 24 This action is configured by a simple wizard system that sets temperature, calibration power, control parameters, limits and dosing into the reaction. NOTE: Multiple HFC actions can be run consecutively. Drag and drop this action into the recipe to start the wizard (see Figure 25). Drag and drop to configure the HFC experimental conditions Figure 25 NOTE: The HFC action does not include a stirring action. If stirring is required during the reaction, the “Set Stirrer Speed” action must be added in parallel to the HFC action. Syrris Ltd: Atlas Calorimetry Guide Page 26 of 56 3.4.1.1 HFC Wizard First Step: HFC Hardware Setup Figure 26 The first step of the wizard asks the user to configure the HFC hardware and conditions. Control celsius of...: Select in the dropdown menu the RTD Node which measures the reaction temperature. NOTE: Make sure to select the correct temperature probe. ...by varying celsius of...: Select in the dropdown menu the circulator used with the HFC system. ...and monitoring celsius of...: Select in the dropdown menu the RTD Node which measures the temperature of the jacket oil in. NOTE: Make sure to select the correct temperature probe. ...and calibrating using watts of...: Select in the dropdown menu the Power Supply used with the HFC system. Fixed Temperature Setup: Syrris Ltd: Atlas Calorimetry Guide Page 27 of 56 Set the desired reaction temperature. This is the temperature which will be maintained during the addition step of the HFC experiment. NOTE: The HFC experiment can only be run in isothermal conditions. End After: Set an expected reaction time to prevent the system for running indefinitely. NOTE: Users can set a very long reaction time and manually complete the step if they are unsure how long the reaction will take. Include pre run calibration and Include post run calibration: At least one calibration point must be set. Default is using both pre- and post-calibrations as this allows full correction for changing heat transfer properties during reaction. Having both calibrations enabled allow access to real-time calorimetry data and full post run data analysis. NOTE: If only a pre-calibration option is selected, the users will still get real-time calorimetry data whilst running but won’t be able to perform a complete post run analysis. If only a post-calibration option is selected, the user will not see real-time calorimetry readings or be able to perform a complete post run analysis. Once these values have been set, click next to move onto the next step of the wizard. 3.4.1.2 HFC Wizard Second Step: Dosing Setup Figure 27 This section controls the dosing. To enable the Dosing Options, the suitable equipment needs to be selected in the Apparatus Screen. Example: if an Atlas Syringe Pump appears in the Apparatus Screen then the “Atlas Syringe Pump Volumetric Dose” selection will be available. Select a dosing option by ticking the relevant box. Once the Dosing Options has been selected, click on “Edit Dose” to define the dose. If the dosing is manual, leave all options un-ticked. Syrris Ltd: Atlas Calorimetry Guide Page 28 of 56 Atlas Syringe Pump Volumetric Dose Figure 28 Further details about the Atlas Syringe Pump Action step can be found in section 3.7.2.1 of the Atlas Syringe Pump User manual. NOTE: The pump and tubing should be primed prior to use with the correct material. NOTE: Check the configuration setting in the pump to ensure the correct syringe size and valve type have been selected. Syrris Ltd: Atlas Calorimetry Guide Page 29 of 56 Gravimetric Dosing Figure 29 This action uses a pump and balance via a standard control mass action system and should be configured exactly as a normal Atlas addition. Further details about this can be found in the Batch Reactor Software Manual, section 8.5.3. Users should select the pump and balance to be used and set the amount as a ramp, profile or fixed weight. The end conditions, limits, alarms and PID terms can be set as normal from the other tabs. NOTE: The pump and tubing should be primed prior to use with the correct material. Flow Pump Dosing Figure 30 Syrris Ltd: Atlas Calorimetry Guide Page 30 of 56 This uses a direct control flow pump. Simple set the dose quantity and the time period over which the dose should be made. NOTE: The pump and tubing should be primed prior to use with the correct material. If the manual addition of the reactant is to be measure, leave all dosing option unchecked. Once a selection has been made, click next to continue with the wizard. 3.4.1.3 HFC Wizard Third Step: Alarm Overrides Figure 31 This step allows setting override global alarm levels for the HFC system. . A “warning” alarm will display a message saying that the warning value has been reached. A “shutdown” alarm will stop the system if that value is reached. NOTE: The values used here will only apply during the running phase of the calorimetry action. NOTE: The override alarms are not required for running a PCC experiment and remain blank by default. Syrris Ltd: Atlas Calorimetry Guide Page 31 of 56 3.4.1.4 HFC Wizard Fourth Step: Control Parameters Figure 32 The control parameters for the HFC action can be adjusted from here. Calibration Power (% of max power) The Calibration Power setting defines how much power is applied to the system during the Pre Run and Post Run Calibration step. The Calibration Power can be set to 30%, 60% or 90% of maximum power, which is governed by the Power Supply and Heater Rod chosen. It should be set to the highest value that the system can control. By default, the Calibration Power is set to 90% of maximum power. Record Base Line for... The Record Baseline parameter controls the short period of flat baseline before the running - phase. By default, the Base Line is recorded for 600s. This time length is suitable for most of the HFC runs however it should be extended if the reactor volume is large or the circulator is slow in controlling the temperature. Edit Control Parameters for Circulator The Circulator PID parameters control the circulator behaviour during the settling phase, before the circulator temperature is fixed and the action moves into the running phase. These values will seldom need to be altered. NOTE: It may be necessary to decrease Proportional value if the temperature over/undershoots significantly or increase it if the reactor doesn’t reach its set point. NOTE: For further information about adjusting these PID values, please contact [email protected] or your local Syrris representative. Once these parameters have been set, click ‘Finish’ to complete the HFC wizard and to add the HFC step to the recipe. Double click the existing step to restart the wizard and make any changes. Syrris Ltd: Atlas Calorimetry Guide Page 32 of 56 3.4.2 Running the HFC recipe To Run the HFC recipe, go to the Run View tab and click on “Run”. NOTE: the HFC action doesn’t include a stirring action. It is highly recommended to have a “Set Stirrer Speed” action running in parallel of the “Heat Flow Calorimetry” action. The system will successively run the four phases of a HFC experiment: - Heating - Pre-calibration - Experiment - Post-calibration. Transition between these phases is automatic and the running phase can be ended after a fixed time, on other sensor condition or on an alarm condition as normal. Current phase and other messages relating to the state of the HFC action can be monitored in the Report Log. User can skip the full HFC action but cannot skip specific phases. If the reagent is added manually, this is done during the Experiment phase. To ensure that the HFC has entered the Experiment phase, check that the Reaction Log displays “HFC Start running” log. When the reagent is added manually, the HFC run will not stop automatically at the end of the feed but instead will end after the “End after...” time (see Section 3.4.1.1 HFC Wizard First Step: HFC Hardware Setup for further details). NOTE: If a manual addition is being carried out, it is important for the user to try and maintain the isothermal conditions as best as possible. I.e. minimise any changes to the system that have to be made in order to carry out the manual addition. Syrris Ltd: Atlas Calorimetry Guide Page 33 of 56 4 Calorimetry Data Analysis Once a PCC or HFC experiment has run to completion, all the data is saved into a log file. These data files are of a ‘comma separated variable’ (CSV) format and are automatically saved on the computer’s hard drive. NOTE: By default the log file are saved in C:\Program Files\Atlas 1.4\Logs. The destination folder can be changed by the end-user. Please refer to the Batch Reactor Software Manual 1 – Atlas Systems for further instructions. The calorimetry data is processed using Syrris Atlas Reporting Software (part number 2600002). For installation instructions for Atlas Reporting Software, please refer to Appendix 2. NOTE: Atlas Reporting Software use is not restricted to calorimetry data and can be used to process any logs generated by Atlas Control Software or the Atlas Base. It provides a framework for the easy opening, displaying, exporting and analysis of the data files outputted by Atlas hardware. Syrris Ltd: Atlas Calorimetry Guide Page 34 of 56 4.1 Loading data into Atlas Reporting Software To open the Atlas Reporting Software, double click on the desktop icon named ‘Atlas 2’ (see Figure 33). This is automatically added to the desktop upon installation. Figure 33 Upon opening, the software asks if you want to run Atlas Reporting or Atlas Parallel (see Figure 34). Figure 34 NOTICE: If the intention is to carry out data analysis whilst the Atlas Control Software is running a recipe the user must disable the automatic hardware detection in the Atlas Reporting Software using the toggle button located at the top left of the program main screen. Failure to do so will result in conflicting communications and experiment aborting. Click on the ‘Reporting’ link in the ‘Getting started’ section of the software. This is located towards the top left of the Atlas 2 windows (see Figure 34). Syrris Ltd: Atlas Calorimetry Guide Page 35 of 56 NOTE: Atlas 2 is also used for running several Atlas systems in parallel. This functionality needs to be enabled by purchasing the Atlas Parallel licence key. For further information, please contact [email protected]. Once Atlas Reporting starts, click on the button (circled in Figure 35) in Item 1 ‘Select a CSV File’ to browse for the data file on which the analysis is to be performed. Figure 35 Once a data file is selected, check that the date/time format in item 2 ‘Select date/time format’ matches that of the system on which the data file was created. This feature allows the opening of data files from systems with different regional settings. In most cases, this will not need to be changed as the data file is usually created on the computer carrying out the analysis. In item 3 ‘Set the file name’, the software will allocate default file names. These can be changed to suit the user requirements. If the selected data has been generated by an Atlas Calorimeter System, the Atlas Reporting Software will automatically detect this and display the log type in this section (“Atlas PCC log” or “Atlas HFC log”). Click the ‘Import’ button. This will create a new tab on the left hand side of the Atlas Reporting screen and start the data analysis wizard. Syrris Ltd: Atlas Calorimetry Guide Page 36 of 56 4.2 Data Analysis Wizard 4.2.1 First Step of the Data Analysis Wizard: Map the columns and specify the units. In the first step, users have the possibility to select the data of interest to be processed in the following steps of the analysis (see Figure 36). By default all the recorded data for the experiment is selected and users can just click “Next” to progress with the data analysis. Figure 36 4.2.2 Second Step of the Data Analysis Wizard: Review data The selected data from step 1 is now displayed is its raw format (see Figure 37). For continuation of the calorimetry data analysis, click ‘Next’ to continue. Syrris Ltd: Atlas Calorimetry Guide Page 37 of 56 Figure 37 Please see section 4.2.4 for PCC data for PCC data analysis wizard or 4.2.5 for HFC data analysis wizard. NOTE: It is recommended to check that the calorimetry experiment has run to completion by looking through the “Comments” column for the comment “PCC End running” or “HFC End running”. NOTE: At this stage, the user can chose to export the data into another CSV file by clicking the ‘Export’ button (circled in red in Fig 29). The export feature will also reduce the size of very large data files so that it does not exceed 65536 lines in the exported file. This will allow the file to be compatible versions of Microsoft Excel before 2007 NOTE: If the data is not a calorimetry run, the data analysis wizard will finish and display the graphing section. 4.2.3 Third Step of Data Analysis Wizard: specify the addition details. Step 3 enables to enter all experimental parameters in order to provide all the information required for the enthalpy calculation. Syrris Ltd: Atlas Calorimetry Guide Page 38 of 56 Figure 38 Fill in the fields as follows. 1. Enter the initial reactor volume before the calorimetry step was activated in the recipe. The reactor volume is used by Atlas Reporting Software to calculate the reactor contents sensible heat. 2. Enter the reactor contents from the dropdown menu. There is a wide selection of solvents in this dropdown menu. If the user is unsure or the reactor content is not in the list, please select the closest chemical in terms of heat capacity. The specific heat capacity and density of the selected fluid are automatically used by Atlas Reporting Software to calculate the reactor contents sensible heat. NOTE: New fluids can be added to the list by going to Tools Options… Fluids New. To add a new fluid you will need at least the following information: - Specific Heat of the fluid at a given temperature. - Density of the fluid at a given temperature. 3. Select the substance added from this dropdown menu. If the user is unsure or the reactor content is not in the list, please select the closest chemical in terms of heat capacity. The specific heat capacity and density of the selected fluid are automatically used by Atlas Reporting Software to calculate the heat of addition. 4. Enter the temperature of the substance added. This is usually the room temperature. This temperature is used by Atlas Reporting Software to calculate the heat of addition. Syrris Ltd: Atlas Calorimetry Guide Page 39 of 56 NOTE: The “Info” section on the Step 3 screen provides some explanation on how to fill the fields. NOTE: For experiment with manual addition please refer to section 4.3 Manual Addition. Click ”Next” to proceed to the calculation. For PCC experiment data, please go to section 4.2.4 PCC data analysis - Fourth Step of the Data Analysis Wizard: Modify the baseline. For HFC experiment data, please go to section 4.2.5 HFC data analysis – Fourth Step of the Data Analysis Wizard: Modify the baseline. 4.2.4 PCC data analysis - Fourth Step of the Data Analysis Wizard: Modify the baseline. Step 4 involves setting the initial baseline before and after the reaction occurs. The software will automatically give a good starting calculation for this, but it may be required for the user to adjust these values manually for more accurate results. Figure 39 The adjustment is made via a drag and drop graphical interface. Click on the red square of the Initial Baseline graph on the left of the addition and move it up or down until the Initial Baseline Graph is aligned with the Nominal Power graph prior to addition. Repeat the same step for the baseline after addition. Modifying the Initial Baseline will result in the Overall Enthalpy graph adjusting in real-time (see Figure 39). Syrris Ltd: Atlas Calorimetry Guide Page 40 of 56 Once the Baseline has been adjusted, the Overall Enthalpy line post addition should be as flat as possible (see Figure 40). Figure 40 Avoid moving the point left or right as the point represents the end of the automated feed. The software has already correctly placed this on the x-axis due to the digital information from the automated feed logging. Click the ‘Reset baseline’ button (labelled “1” on Figure 40) at any point to reset the manual adjustment and start again. NOTE: Ensure sufficient data is collected after the addition has completed. Generally 30 minutes to 90 minutes will be sufficient to generate a good baseline. NOTE: Changes in ambient conditions (local air drafts caused by changes in fume hood/laboratory air flow and temperature changes in the laboratory/fume hood) may have an effect on the final baseline value. This can be a particular problem with very long reactions of low enthalpy. This will often manifest itself as an enthalpy line that initially goes flat and then begins to curve up or down again. NOTE: Crystallisations after a reaction or in the final part of the reaction will often result in the baseline point being difficult to adjust. One can either repeat at higher dilution (to avoid the crystallisation) or measure the heat of crystallisation separately and correct for this by removing the crystallisation enthalpy from the calculated reaction enthalpy derived by the Atlas Reporting Software. Solids that dissolve during processing will give a similar issue. Syrris Ltd: Atlas Calorimetry Guide Page 41 of 56 Once the baseline criteria have been satisfied, click the ‘Finish’ button to allow the software to complete the enthalpy calculations and display the summary details and graphs. 4.2.5 HFC data analysis – Fourth Step of the Data Analysis Wizard: Modify the baseline. Step 4 requires the user to select a zero power baseline first and then a high power baseline. The objective is to correlate the measured change in the temperature difference between the reactor and the oil in temperature (Tr–Tj) with the known power supplied during the calibration step. This is then used to derive the real reaction power from measured ΔT values. The two pairs of zero power and high power values are provided by two discrete calibration power pulses: one before the reaction and one after. The two baselines must be set for both pre-calibration and post-calibration pulses and Atlas Reporting Software then interpolates the calibration between the two pulses. The baseline adjustment is done in two steps: 1) First, drag either of the two drag-and-drop points of the Zero Power Baseline graph up and down until the Zero Power Baseline is centred and level with the base of the Tr-Tj line (point circled and labelled ‘1’ in Figure 41) before the pulsation. When correctly placed, this should result in a level flat part of the ‘Overall Enthalpy’ graph before and after the addition. Figure 41 2) Secondly, set the High Power Baseline by dragging either of the two points up and down until the High Power Baseline just rests on the high flat part of the Tr-Tj line (shown in Figure 41 in the circled area labelled ‘3’). This corresponds to a position in the experiment when the power input from the heater is at a known high level and circulator and reactor temperatures are stable. Click the ‘Reset baseline’ button at any point to reset the manual adjustment and start again. Syrris Ltd: Atlas Calorimetry Guide Page 42 of 56 NOTE: Changes in ambient conditions (local air drafts caused by changes in fume hood/laboratory air flow and temperature changes in the laboratory/fume hood) may have an effect on the final baseline value. This can be a particular problem with very long reactions of low enthalpy. This will often manifest itself as an enthalpy line that initially goes flat and then begins to curve up or down again. NOTE: Crystallisations after a reaction or in the final part of the reaction will often result in the baseline point being difficult to adjust. One can either repeat at higher dilution (to avoid the crystallisation) or measure the heat of crystallisation separately and correct for this by removing the crystallisation enthalpy from the calculated reaction enthalpy derived by the Atlas Reporting Software. Solids that dissolve during processing will give a similar issue. Once the baseline criteria have been satisfied, click the ‘Finish’ button to allow the software to complete the enthalpy calculations and display the summary details and graphs. Syrris Ltd: Atlas Calorimetry Guide Page 43 of 56 4.3 Manual Addition When carrying out a calorimetry experiment which is utilising a manual dose of a reactant into the vessel, it is advisable to use the ‘Log Note’ button in the Atlas Software Run View to enter into the data file when the dose was started and when it was completed. See Fig 48. Figure 41 Further information about the ‘Log note’ feature can be found in the Batch Reactor Software Manual 1 – Atlas and Reactor Master Software in section 8.6.6. Using the log note, it is possible to see exactly what time in the experiment the dose was started and completed. This information is needed in the Atlas Reporting Software in order for it to successfully calculate the sensible heat of addition and therefore the reaction enthalpy. This information is required in the Step 3 part of the calorimetry analysis wizard. Figure 41 Syrris Ltd: Atlas Calorimetry Guide Page 44 of 56 This step is identical to that of an automated addition except that the software requires the user to enter the start time of the manual addition and the duration of the addition. The remainder of the analysis wizard will continue as it would for an automated addition. During the Manual Addition, ensure that heat losses are minimised and the calorimetry experiment is not perturbed: - Do not keep lid ports open for too long for the addition. - Ensure that the stirring is maintained during the whole addition time. - Ensure that the reagent added manually falls in the centre of the reactor and does not stick to the reactor wall or probes. - Ensure that the addition is done at a reasonable speed: not too quickly so that the system can efficiently control the generated heat and not too slowly so that the addition is done within the time of the experiment. Syrris Ltd: Atlas Calorimetry Guide Page 45 of 56 4.4 Calorimetry report Once the data analysis wizard has been completed, the software provides a summary screen and creates new tabs that provide calorimetry data. 4.4.1 Summary details Figure 42 The first section of the ‘Summary Details’ screen is labelled as ‘General’. It gives details obtained from the raw data file regarding when the experiment was carried out, the file location from where the data came from and the name given by the user for this process of analysing the data. The ‘User details’ section of the summary screen allows the user to enter specific information regarding the experiment that was carried out. The ‘Note’ section allows the user to enter notes and comments about the specific experiment. 4.4.2 Calorimetry graphs The ‘Calorimetry graphs’ section automatically displays two graphs. Syrris Ltd: Atlas Calorimetry Guide Page 46 of 56 Figure 43 It is important to check the top graph of Overall Power to ensure the sections before and after the addition (circled on Figure 43) begin and start at the same value. The information given by the Calorimetry Graphs is the following: Overall Power (W): this is the overall process power measured during the experiment. Cumulative Volume (ml): the rolling total volume of added reagent. Overall Enthalpy (kJ): obtained by integrating the overall power over time. This is the total enthalpy measured for this experiment and is the sum of the reaction, reactor contents and additions enthalpies. Reactor Contents (kJ): this is the sensible heat stored in the reactor content due to changes in the fluid temperature. This should always start and end at 0kJ. Additions (kJ): This is the sensible heat added or removed due to the temperature difference between the added reagent and the reaction mixture. Example: cooling effect due to addition of a reagent at room temperature into a reactor at 100C. Reaction Enthalpy (kJ): this is the pure chemical reaction enthalpy. It is obtained by deducing the Reactor Content and Additions sensible heats from the Overall Enthalpy. The value of the Reaction Enthalpy is obtained by clicking on the Reaction Enthalpy graph at the plateau end of the graph. The Reaction Enthalpy value will be displayed below the mouse cursor. Use the zoom facility if required. Syrris Ltd: Atlas Calorimetry Guide Page 47 of 56 4.4.3 Thermodynamic information obtained from the calorimetry experiment Effective management of the heat released from a chemical process is critical for the safe, successful scale-up of chemical processes. Once the calorimetry data has been processed, reaction thermodynamic information can be obtained for the studied reaction. This information is critical for predicting the reaction behaviour. 4.4.3.1 Reaction Enthalpy By clicking on the Reaction Enthalpy graph at the plateau end of the graph, the value of the heat released from the chemical reaction Qrxn is displayed below the mouse cursor (see circled area on Figure 44). Use the zoom facility if required. Figure 44 The Reaction Enthalpy is the opposite of the heat released from the chemical reaction: ΔH = - Qrxn NOTE: An exothermic reaction has a negative enthalpy. An endothermic reaction has a positive enthalpy. 4.4.3.2 Molar Reaction Enthalpy The molar reaction enthalpy ΔHn (also called molar heat of reaction) is obtained by dividing the reaction enthalpy obtained from the graphs (see section 4.4.3.1 Reaction Enthalpy) by the number of moles of the limiting reactant. ΔHn = ΔH / n Where ΔH: reaction enthalpy n: number of moles of the limiting reactant. NOTE: The molar reaction enthalpy is a fixed reaction property and is not dependant on the experimental conditions. 4.4.3.3 Adiabatic Temperature Rise Syrris Ltd: Atlas Calorimetry Guide Page 48 of 56 The adiabatic temperature rise is the temperature change in the system when no heat is removed from it. This is key to determining the heat removal capacity required for a process. ΔTad = (-ΔHn x n) / (Cp x m) Where ΔHn: molar reaction enthalpy n: number of moles of the limiting reactant Cp: average heat capacity for whole system m: total system mass 4.4.3.4 Maximum Temperature Attainable by the Synthesis Reaction The maximum temperature attainable by the synthesis reaction MSTR is the maximum temperature that a given system can reach if no heat is removed from the system. MSTR = Tprocess + ΔTad Where Tprocess: temperature at which the process is run ΔTad : adiabatic temperature rise Syrris Ltd: Atlas Calorimetry Guide Page 49 of 56 5 Troubleshooting Number Issue Cause Solution 1 Heater Rod coating is The Heater Rod was not fully immerged Ensure the Heater Rod is fully charred/damaged. in the reaction liquid. immerged at all time in reaction mixture. Ensure the vortex creating by the stirring is not exposing the Heater Rod during the run. 2 During a PCC experiment, the Power The heat generated by the reaction is Set the “Expected Heat” to Baseline is bottoming out and the bigger than the Power Baseline applied “Very Exothermic”. reaction temperature increases. by the system. Lower the amount of heat generated during the experiment by slowing down the addition and/or using a lower concentration of reagents. 3 The addition of reagent does not The temperature control is not stable Ensure the heat loss of the automatically start. enough to start the addition. system are minimised. Adjust PIDs to improve temperature control. 4 The calorimetry experiment does not The temperature control is not stable Ensure the heat loss of the go past the Settling phase. enough to start the addition. system are minimised. Adjust PIDs to improve temperature control. 5 Atlas Reporting shows error message The format date/time of the computer on Change the date/time format “Data format does not match selected which the calorimetry log files has been on the “Select file to import” country format”. created is not the same as the format screen. date/time of the computer on which the The two most commonly used calorimetry data is processed. date/time format are “English (United Kingdom)” and “English (United States)”. 5.1 Atlas Potassium System troubleshooting For troubleshooting of the Atlas Potassium System, please refer to Section 8 – Troubleshooting of the Batch Reactor Manual 1 – Atlas Systems. 5.2 Contacting Syrris For any queries regarding the Atlas software, please contact the Syrris Technical Support team (email [email protected]) Syrris Ltd: Atlas Calorimetry Guide Page 50 of 56 6 Appendix 1: Editing capabilities for graphs generated in Atlas Reporting The Atlas Reporting Software allows the user to toggle the display of different graphed data. By clicking on a legend on the top right of the graph, the software will omit it from the plot and rescale the axis automatically allowing focusing on different data. Clicking on the legend again will return the data to the plot. This is a useful tool that can help focusing on a specific data type and its relationship with others. Figure 45 To zoom into a section of the graph, click on the ‘Edit’ button located on top of the graph legend. Figure 46 Click on the ‘Time Axis’ button on the right hand side and select the x-axis time axis range that is on interest. See red circled area in Fig 40. The ‘Reset’ button can be clicked on to revert back to the software auto scaled values. Figure 47 Syrris Ltd: Atlas Calorimetry Guide Page 51 of 56 The same process can be repeated for the left hand y axis and right hand y axis. Figure 48 Syrris Ltd: Atlas Calorimetry Guide Page 52 of 56 7 Appendix 2: Installing Atlas 2 Software 7.1 PC Specifications and Configuration Before installing the software, ensure that the PC meets the minimum specifications as shown below. 7.1.1 PC Specification PC Components CPU Memory Operating System Minimum Recommended Requirements Requirements 1.8GHz Intel Pentium 1.8GHz+ Intel Pentium Dual compatible Core compatible 1GB+ 2GB+ Windows XP Windows 7 Professional or Professional Service better (32 bit only) Pack 2/3 (32 bit only) Display Resolution Super VGA: 800 x 600 Super VGA: 1024 x 768 or better Native USB Ports We recommend all Syrris hardware is connected directly to the PC. Additional USB ports can be added to a PC using only Syrris approved powered USB hubs. 7.1.2 Administrator Rights Ensure that the PC is logged in under administrative rights during the installation process of all Syrris software. This will allow full access to the software installers in order to place necessary files in the correct location. These files are needed to run and control the hardware and software. It is strongly recommended that the software is then run from the same administrative account. 7.1.3 Language Settings Set the Regional and Language Options to “English (United Kingdom)”. To do this, press the windows key and the letter ‘r’ to open the ‘Run…’ box. In the box, type ‘intl.cpl’ and press enter/click ‘OK’. 7.1.3.1 For Windows XP The first tab (named Regional Options) in the ‘Regional and Language Options’ window is regarding the way the user interacts with the Windows OS. In most cases, there is no need to change anything here (Figure 49). 1. Click the ‘Advanced’ tab Syrris Ltd: Atlas Calorimetry Guide Page 53 of 56 Figure 19 2. Ensure ‘English (United Kingdom)’ is selected from the drop-down menu. 3. Click ‘Apply’ to make the changes Windows will then prompt the user for the required files. Click ‘Yes’. The computer will then prompt for a restart and the regional and language setting will be set correctly upon reboot. 7.1.3.2 For Windows 7 1. Click on the ‘Administrative’ tab (Figure 50). 2. Click on ‘Change system locale’. 3. Set the ‘Current system locale’ to English. 4. Click OK to apply the changes. Syrris Ltd: Atlas Calorimetry Guide Page 54 of 56 Figure 20 7.2 Installing Atlas 2 software This instruction applies to Atlas 2 version 2.5.0 onwards. - Copy the full installation folder on the computer desktop. - Launch the AccessDatabaseEngine.exe installer from the installation folder. - Launch the Atlas 2 msi installer from the installation folder. Syrris Ltd: Atlas Calorimetry Guide Page 55 of 56 For the quickest response for all technical enquiries please email [email protected] Syrris Group Offices Syrris Ltd. (Europe and Rest of World) 27 Jarman Way, Royston, Hertfordshire, SG8 5HW, United Kingdom T: +44 (0) 1763 242555 E: [email protected] W: www.syrris.com Syrris Inc. (North America) 29 Albion Place, Charlestown, MA 02129 T: 617 848 2997 E: [email protected] W: www.syrris.com Syrris Japan, Inc. (Japan) SOHO Station 202, 24-8, Yamashita-cho, Naka-ku, Yokohama, Kanagawa T: 045 263 8211 E: [email protected] W: www.syrris.co.jp Syrris Scientific Pvt. Ltd. (India) 420/421 Corporate Avenue, Sonawala Road, Goregaon (East), Mumbai, 400063 T: +91 22 2686 4410 E: [email protected] W: www.syrris.com Syrris do Brasil Ltda. (Brazil) Rua Dr. Bacelar 231 – cj 47 Vila Clementino 04026-000 Sao Paulo – SP T: +55 11 5083 4963 E: [email protected] W: www.syrris.com.br Syrris Ltd: Atlas Calorimetry Guide Page 56 of 56