1
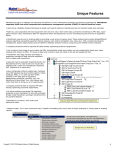
eCoachPro
PERFORMANCE MANAGEMENT
User Manual
July, 2006
Copyright © 2006, Employee Screening Services. All rights reserved.
07/06
1
INTRODUCTION
Whether an organization has a formal or informal "performance measurement"
process, the evaluation of employees, although often subjective, is ongoing.
Imagine if you had access to a tool that would enable you to eliminate much of the subjectivity inherent in
the process by benchmarking your work force against the performance of your most productive
employees.
Some of the advantages of having such a tool include:
•
the ability to measure the performance of all employees against your best
•
the identification of attributes needed by an employee to increase productivity - focused training
•
a way to assess whether a new employee will be successful
•
a necessary step to controlling the high cost of turnover and recruitment
eCoachPro has developed a technology based tool that will provide you with a method for achieving all
this and more!
Our "Performance Benchmarking" tool is an internet delivered assessment that can be easily integrated
into your current performance measurement process or serve as the basis for the development of such a
process.
How It Works
After combining extensive research with over fifteen years of professional experience, we have
successfully developed an Internet-delivered "Performance Benchmarking" tool to help organizations
decode and leverage their human capital. Whether profiling the potential of an existing sales force,
evaluating an existing management team, or assessing the abilities of an entire work force, the
"Performance Benchmarking" tool will assist you in measuring performance against a high standard, and
aid in the ability to deploy competencies required for optimal performance.
All participants complete an online assessment to evaluate each individual's unique personality
characteristics, motivations, and behavior that otherwise may have taken months, or even years of
association to learn. Utilizing a combination of proprietary software with state-of-the-art data analysis
techniques, all assessment responses are analyzed to generate a detailed overview of an organization's
human capital and performance potential. The analysis is then condensed into an executive summary
snapshot revealing an organization's human capital assets and liabilities.
About eCoachPro
Since 1991, eCoachpro has been pioneering the research and development of Advanced Expert Systems
(EXS) designed to help organizations improve their work force potential. Along with technological
competence and product superiority, one of the key factors differentiating organizations that survive and
thrive is the ability to deploy human capital with increased focus and efficiency. This discipline, while
certainly not new, has taken on significant strategic importance as organizations strive to achieve and
sustain a competitive advantage.
07/06
2
Table of Contents
1.
2.
3.
4.
5.
6.
7.
8.
9.
10.
11.
12.
13.
14.
15.
16.
17.
18.
19.
20.
System Requirements
Membership Signup
Taking the Profile Survey
Login On to the Database
Navigating the Database
The Profile Register
Manipulating Folders and Profile Records
Changing Personal Data for Profiles
Searching for Personal Data Records
Sending Profile Results via E-Mail
Sending Profile Results to Another Company
Comparing Profile Scores
Generating Reports
Changing Benchmarks
Development Focus
Requesting Background Checks
Displaying Account Information
Changing Your Member Data
Changing Your Password
Linking from Your Web Site
1. System Requirements
To access the eCoachPro database, you will need a PC with internet capability.
You should have either Internet Explorer 5 (or later) or Netscape Navigator 5 (or
later). While the database may work with other browsers, it has been tested with
the two mentioned.
For best results, your monitor resolution should be set to 1024x768 or higher.
Lower resolutions will cause some of the screens to be clipped.
Your browser should be configured to run JavaScript and to accept cookies.
These are usually the default settings of the browser. Consult the user help
information for your browser to confirm or change these settings.
While eCoachPro makes every attempt to make the database web pages
concise and fast loading, a higher speed access to the internet will make your
use of the database more productive. Contact your Internet Service Provider
(ISP) for information on the available access speeds.
07/06
3
2. Membership Signup
You may register your company for membership in the eCoachPro database by
visiting the site http://www.essusa.com/signup .
Once at the site, fill out the membership data form and the sign-up questionnaire.
You will be registered as a "trial" member, with access rights and a number of
free profile surveys.
When the database has accepted your membership data, you will be sent an email containing a company code and an initial password. These are your keys to
access the information contained in the database. Keep them safe, don't lose
them.
An eCoachPro representative will contact you to explain the membership options,
and to assist with the conversion of your account from "trial" to "permanent"
status.
3. Taking the Profile Survey
Once you have set up your eCoachPro membership account, you may direct
your employees and prospects to take the profile survey by visiting the web site
at http://www.essusa.com/ .
At this site, the survey taker must first complete a short form of personal data
including the company code that identifies your account. A valid e-mail address
is also required.
The profile survey will be evaluated in one of five categories:
Executive
Manager
Sales
Support
Technical
The survey taker selects which one should apply to his responses. You should
indicate the appropriate choice to the survey taker, based on the position being
applied for, at the time you give the company code to him.
The survey consists of 132 questions with multiple choice selections. For the
first 120 questions, the survey taker will indicate the response that is most like
him or her, and the response that is least like him or her. The last twelve
questions require only a single response. It is important that the survey taker
answer all of the questions, with both a positive and negative selection. To do
07/06
4
otherwise will only lower his or her score.
If the survey taker is already in the database with a profile completed in the last
twelve months, then he will be offered the option of sending the same responses
to your account without retaking the survey. Note, it is not necessary to re-enter
the survey data in order to evaluate the responses under a different profile type.
This will be explained later.
When someone takes a survey, you will be sent an e-mail to inform you of that
the new information is available in your membership account.
4. Logging On to the Database
Access to the data stored under your eCoachpro membership account is gained
by logging on to the site http://www.essusa.com/member . To log on, you must
enter your company code (or user id) and password exactly as shown in the email that was sent to you. Upper and lower case is important.
You should always end your data viewing session by selecting the "Logout"
button. This protects against unauthorized access to the personal data
contained in the database.
If your session is inactive for fifteen minutes (no new web pages are selected)
you will be automatically logged off. To regain access, you will have to re-enter
your company code (or user id) and password.
Once logged on, you will notice several "action" buttons on the left side of the
page. These change depending on where you are in the database. They are
used to select the various actions you can take to manipulate the data.
Additional "action" buttons will appear with the data, as appropriate.
5. Navigating the eCoachPro Database Website
Figure 1 shows the site map for the eCoachPro Database. When you log on, you
will be placed at the top page, which is called the Profile Register. You can
return to this page from anywhere within the site by selecting the “Profile
Register” action button at the top of the button set on the left of the screen.
Navigating to different web pages will be done in one of three ways, depending
on the context and the action you wish to perform. A set of action buttons is
found at the left hand side of each page. This set changes depending on your
location in the site map. The portion of the screen to the right of these action
buttons is called the “field” and will display the data or forms. In some cases,
action buttons will be located within the field. These will be explained later.
07/06
5
Finally, in some cases the data itself is highlighted and underlined. These are
active links to other pages. An example is the folder names in the Profile
Registry. Clicking on one of these names will open that folder to display the list
of people it contains. These also will be explained in more detail later in the
manual.
In some cases, the field may contain more data than can be displayed on a
single screen. In such cases, scroll bars will be displayed, either to the right or
bottom of the screen, or both. Use your mouse to click on these scroll bars to
move around the screen display.
Profile
Register
Edit
Member
Data
Account
Information
Change
User
Password
Compare
Profile
Scores
Folder
Content List
Change
Benchmark
Subject
Profile Data
View
Background
Results
Edit Subject
Data
Request
Background
Check
Report
Generator
Report
List
Figure 1 – eCoachPro Database Site Map
6. The Profile Register
Once you log on, the main screen you will see is the Profile Register. You can
return to the Profile Register from other places in the database by clicking on the
"Profile Register" action button.
The register is organized as a number of folders that contain the profile results
data. When your account was set up, three permanent folders were created.
These are the "Inbox", the "Pending" and the "Archive" folders. These cannot be
changed, however, you can create as many new folders as you like to manage
your data.
When new survey data is submitted by someone taking the profile survey, it
arrives in the "Inbox". The "Pending" folder may be used to hold those people
you are considering for hire. The "Archive" is intended to hold those people you
07/06
6
are no longer interested in. Data is never deleted from your account; you may
always retrieve it from the archive.
7. Manipulating Folders and Profile Records
Three action buttons above the folder list allow you to manipulate the folders.
Create a new folder by clicking on the "Create Folder" action button. You will be
prompted to enter a folder name. You can rename an existing folder by first
clicking the radio button to the left of the folder name, then clicking on the
"Rename Folder" action button. Again, you will be prompted to enter the new
name. Finally, you may delete a folder by clicking on the "Delete Folder" action
button. Data is never lost when you delete a folder, rather it is sent to the "Inbox"
folder, where you can distribute it to other folders.
Clicking on a folder name will display a list of the contents (profile records) in that
folder. Initially this list is sorted alphabetically, but you may change the sort order
to be by the profile score (grouped by profile type). The list is displayed ten
entries at a time. You can call up additional entries by clicking on the "Next" and
"Previous" labels below the list. Above the list is a quick locator feature. By
clicking of the first letter (of the last name) you will jump to that point in the folder
list. From there you can move forward or backward in groups of ten.
Clicking on a person's name will display the details of the profile for that person.
Along with the individual's personal data that was entered, the results for key
characteristics are indicated, with check marks showing which characteristics are
above average (A), average (B) or below (C). A letter ranking is also shown for
some "power traits". The "ActivityWorkBench" score is an indication of the
person's organizational and time management skills. The characteristics
displayed vary according to the profile type that was entered by the person. The
person’s scoring percentile is shown in the lower right corner of the page along
with the benchmark used. This percentile indicates how the person is ranked
against the others who have taken the survey. A percentile of 85 %ile means
that the person has scored higher than 85 % of the people who have taken the
test.
To move people records between folders, follow a three step process. First, click
on the check box to the left of the person's name in the list of folder contents.
You may click multiple entries, even in different groups of ten. Next, select the
destination folder at the bottom of the page (click on the down arrow to the right
of the folder names, then pick the name of the one where the records should go).
Finally, click on the "Move Records" action button.
07/06
7
8. Changing Personal Data for Profiles
When you are viewing the detailed data for a profile (by clicking on an entry in
the folder content list), you may change the personal data by clicking on the "Edit
Subject Data" action button (on the left side of the screen). This will cause the
data to be displayed in a data entry form. Make any changes you wish, then click
on the "Save Changes" action button. Clicking the "Cancel" button will return
without making changes.
You may change the profile type, in which case, the survey results will be reevaluated using the new profile. The new results are immediately available in the
profile register folders.
9. Searching for Personal Data Records
If you do not remember what folder you put a specific data record in, you may
search your entire database (all folders) by clicking on the “Locate Name” action
button. Enter the Last Name and, optionally, the First Name you are looking for.
Then click on the “Search” button. The display will open to the folder containing
that record, with the one being sought at the top of the page. From here,
navigation within the folder is just like before.
If you don’t get the spelling of the name exactly correct, the program will search
for similar names. If more than one are found, a list is presented for you to select
the one you are looking for.
10. Sending Profile Results via E-Mail
You can send a copy of the Profile Results to someone via e-mail by selecting
the “E-Mail This Record” button while viewing the Individual Profile screen for the
person you have selected from a folder. An e-mail message is sent to your
account (i.e. to the e-mail address registered for your membership). You may
then, by using your e-mail viewing program (e.g. Outlook, etc.) retrieve the
message and forward it to whoever you would like after editing the message to
add an explanatory note.
11. Sending a Profile Record to Another Company
If your company has multiple membership accounts with eCoachpro, you can
send a duplicate of any Profile Record to another account by selecting the “Send
record to another company” button while viewing the Individual Profile screen for
the person you have selected from a folder. You will be prompted to enter the
Company Code for the account that is to receive the duplicate record. Then
press the “Submit Query” button. The duplicated record will count against both of
the companies’ test limit.
07/06
8
12. Comparing Profile Scores
You can compare an individual profile to the rest of the profiles stored in your
database to determine who is most like this individual. To do this, first display
the page containing the profile data for the person you want to compare, then
click on the “Compare Scores” action button (on the left side of the screen). The
display will switch to show up to five people who are close matches to this
person. A match score of 100 means that the two people scored the same in
each one of the 24 basic characteristics that are measured by the profile survey
(note that this does not necessarily mean that they answered all of the questions
the same). You may select the Folder containing the profile records against
which you want to compare. You may also select to compare to Employees or
Job Seekers.
For example, a promising candidate for hiring has submitted a profile. You would
like to know which of your employees is most like this person so that you can
have a better feel for his personality. Simply bring up the candidates profile data
display, click on “Compare Scores” and select Employees and the folder
containing the group of employees that you want to compare against.
Another example, a star employee is about to retire. You have several promising
candidates in the Pending folder, but would like to know which of them is most
like the person you are trying to replace. Pull up the profile data display for the
employee, click on “Compare Scores” then select “Job Seekers” and the
“Pending” folder. Click on the “Execute” button to display the results.
13. Generating Reports
From the top level “Profile Register” page, click on the “Prepare Report” action
button. Using the form entry boxes select the criteria that will determine which
profile records will appear in the report. You may select a date range, folder,
employment status and profile type to narrow the selection of records. Then click
on the check boxes on the right hand side of the form to pick which fields will be
printed in the report. Finally, select the sort order (alphabetical, date or score)
and then click on the “Generate Report” button. The requested report is then
displayed
You may use your browser Print button to send the report to the printer.
14. Changing Benchmarks
The profile results are made significant by comparing those of someone you are
evaluating against people you know to be good performers. To help you do this,
07/06
9
population benchmarks are used. When your account was established, a set of
"standard" benchmarks were selected. These may be changed to make the
comparison specific to your company's needs. Also, you may have several sets
of benchmarks that you use for different purposes.
A set of benchmarks consists of a pair of score thresholds for each of the five
profile types. The pair of numbers is selected from the set according to the type
of profile entered for the survey. Scores that are higher than the upper threshold
are graded as "A" while those less than the lower threshold are graded as "C".
Grade "A" indicates the top 30% of the population while grade "C" indicates the
bottom 10%. Obviously, winners are those at the top.
Another way of looking at the benchmarks is that the majority of people are
average (grade "B"). "A"s are above average and "C"s are below.
The "standard" benchmarks are based on the total population as determined by
the experience of eCoachPro. Each of your folders may use a different set of
benchmarks. The benchmark used is indicated in the Profile Register list of
folders. To change the benchmark used for a folder, click on the benchmark
name to the right of the folder name.
You will now see a table of the threshold numbers for each of the five profile
types. These may be changed according to your needs. Two action buttons
above the table allow you to create a new named set of benchmarks or to select
a set used for one of your other folders. Once a named set of benchmarks has
been created for one folder, it can be used on any of the other folders in your
account.
Two additional action buttons are displayed below the table. The one on the right
saves the new numbers and returns to the folder content list. Actually, you can't
change the "standard" set, but must first create a new named set of benchmarks.
The action button on the left performs a statistical analysis of the contents of the
folder, and calculates benchmark numbers according to the 30-60-10% rule.
These calculated numbers may be used as is, or adjusted according to your
needs. In order to have meaningful statistics, the number of entries in the folder
should be as large as possible.
As an example, suppose that your western sales office sets the standard for
performance. You want to use them as the basis for evaluation of new
applicants. You have everyone in the western sales office complete the online
survey, entering your company code in the proper field. It is important that you
get the whole population, not just your best performers. As the survey results
come in, you move them to a newly created folder name "Western Sales". When
all of the results are in, you open the "Western Sales" folder and click on the "Set
Benchmark" action button. Click on the "Create New Benchmark" button, and
name the new set "Western Office". Now, click on the "Calculate Statistics"
07/06
10
button in the lower left hand corner, and see the new thresholds that represent
your new yardstick for comparison. Click on the "Save & Return" button to go
back to the folder list. Then go up to the Profile Register and select the "Inbox"
folder. Click on the "Set Benchmark" action button, then in the selection box
above the table, pick the "Western Office" set and click on the "Select" button
next to it. Click on the "Save & Return". Now, all new entries in "Inbox" will be
compared against the benchmark set by your own company's performance. Of
course, if you don't have a western sales office, you can use any names in the
above example. You may have any number of benchmark sets store in your
account. Once they have been created, benchmark sets can be selected for use
on any particular folder at will.
15. Development Focus
A powerful feature of eCoachPro is the ability to determine development
objectives for an individual that would allow him or her to be a better performer.
From the display of the persons profile data, click on the “Development Focus”
action button. The display will change to show three characteristics that could be
improved in order for the person to score higher on the profile survey. They are
listed in order of potential for improvement, i.e. #1 offers the largest possibility for
change in the rating.
This list of development objectives is sensitive to the profile type selected for the
person. Therefore, for instance, if you have someone who is effective in “Sales”
and you want to know how to develop this person into an effective “Manager”,
first change the profile type (see Section 8) and then click on the “Development
Focus” button. The display will list those areas that could most effectively be
improved to enable the person to be an effective “Manager”.
16. Requesting Background Checks
The eCoachPro profile database helps you to refine the selection of applicants to
fill positions in your company. When you have identified promising candidates
based on their profile, and want to find out more about these people, you can
request background checks to be done from within the database.
When you are looking at the person's detail profile results, a "Request
Background" action button will appear on the left hand side of the screen.
Clicking this button will pull up a form that allows you to select the specific types
of background information you need. Select all that apply and click on the
"Submit" button. This will initiate several actions. First, an e-mail will be sent to
the applicant requesting his permission for the background search and for some
additional personal information. A request will be sent to Employee Screening
Services to do the background checks. If the person's record is in the "Inbox"
07/06
11
folder, it will be moved automatically to "Pending". Finally, a background status
page will be created for the person.
The background status page is accessed by clicking on the entry in the
"Background" column of the folder content list on the row for the person. This
status page contains an entry for each of the possible types of backgrounds that
you requested. The status shown for each entry is:
No - this category was not requested
Pending - the results of this check are not yet available
Clear - the check perform revealed no anomalies
Note - the check revealed something that may be disregarded
Refused – the applicant refused to sign the release for background check
Red Flag - the check revealed a serious issue
Requested – the background check has been ordered, but hasn’t been
started yet
In the case of "Note" or "Red Flag", Employee Screening Services will inform you
of the details by separate communication.
A summary of the individual statuses is displayed in the folder content list.
17. Displaying Account Information
From the “Profile Register” display (top) click on the “Account Info” action button
to display your membership type, expiration date, the number of profiles that you
may have in your database and the number of profiles that you have used thus
far.
Call Employee Screening Services at (800)544-7735 to order additional profiles
or to renew your membership.
18. Changing Your Member Data
Your membership data includes the contact information that the eCoachpro.com
staff will use to get in touch with you. You should be sure to keep it up to date.
To review and change your membership data, select the "Edit Member Data"
action button. Once the changes have been made, click on the "Save Changes"
button to record the new information in the database.
19. Changing Your Password
The password used to log on to your account can be changed. You should do
07/06
12
this, as a minimum, to change the initial one assigned to you when your account
was first set up. It is also a good idea to change your password on a regular
basis, or if you suspect that someone may be gaining unauthorized access to
your data.
To change your password, first bring up the member data screen, then click on
the “Change Password” action button.
Your password may be any combination of letters, numbers and symbols up to
24 characters in length. Upper and lower case is significant. It must be entered
in exactly the same way every time it is used.
Pick a password that you can remember, but make it something that others will
not be able to easily guess. Once you enter your password, it is not possible for
anyone, including the eCoachPro staff, to determine what it is. It is your
responsibility to remember it.
You will be asked to enter the new password twice to be sure that you haven't
made a mistake in typing it.
20. Linking from Your Web Site
If you would like to provide a convenient way for job applicants or employees to
locate the web site to take the profile survey, consider placing a link to the survey
site on your own web page. Your company code can be passed as an argument
and will automatically be filled in on the form when it opens. For instance, if the
client code assigned to your company when you signed up was XZ6789, then the
link would look like:
<a href=”http://www.essusa.com?code=XZ6789”>Take the eCoachPro
survey</a>
07/06
13