1
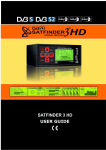
FINDER
SAT Finder
OPERATING INSTRUCTIONS
SAT finder HD for 18 satellite positions
SF9002
CONTENT
1.
1.1
1.2
1.3
1.4
Getting started
Package content . . . . . . . . . . . . . . . . . . . . . . . . . . . . . . . . . . . . . . 3
Safety instructions. . . . . . . . . . . . . . . . . . . . . . . . . . . . . . . . . . . . . 4
Connecting the SAT-Finder HD. . . . . . . . . . . . . . . . . . . . . . . . . . . . .5
Start-up process . . . . . . . . . . . . . . . . . . . . . . . . . . . . . . . . . . . . . . 5
2. Searching and finding
2.1 Automatic satellite search. . . . . . . . . . . . . . . . . . . . . . . . . . . . . . . . 6
2.2 Manual search / satellite preselection. . . . . . . . . . . . . . . . . . . . . . . . 7
2.3 Select DiSEqC position. . . . . . . . . . . . . . . . . . . . . . . . . . . . . . . . . . 7
2.4 Switchable Signal Attenuation. . . . . . . . . . . . . . . . . . . . . . . . . . . . . 8
2.5Reset . . . . . . . . . . . . . . . . . . . . . . . . . . . . . . . . . . . . . . . . . . . . . 8
3.
3.1
3.2
3.3
3.4
Indicator LED’s
Level (signal strength). . . . . . . . . . . . . . . . . . . . . . . . . . . . . . . . . . 8
Quality (signal quality). . . . . . . . . . . . . . . . . . . . . . . . . . . . . . . . . . 8
Mode (mode of operation) . . . . . . . . . . . . . . . . . . . . . . . . . . . . . . . 8
Satellite position display. . . . . . . . . . . . . . . . . . . . . . . . . . . . . . . . . 9
4.Appendix
4.1 Updating the SAT-Finder HD. . . . . . . . . . . . . . . . . . . . . . . . . . . . . 10
4.2 Guarantee conditions. . . . . . . . . . . . . . . . . . . . . . . . . . . . . . . . . . 10
4.3Service-Information. . . . . . . . . . . . . . . . . . . . . . . . . . . . . . . . . . . 11
4.4 Elevation table for Europe. . . . . . . . . . . . . . . . . . . . . . . . . . . . . . . 12
Update
ate
Upd
Connection
example
2
1. GETTING STARTED
1.1 Package content
»» SAT-Finder HD
»» Connection cable 1 m
»» Power Supply 12V DC / 2A
»» Car charging cable 12V DC
»» BNC Adaptor
»» Mini USB cable 1 m
»» Carrying strap
»» Quick reference guide (14 languages)
»» Operating instructions
3
1.2 Safety instructions
Before you use the unit the first time, read and follow the safety instructions
carefully! Be sure to think of your own safety when setting up your system
(slippery roof, risk of falling). Do not use the SAT-Finder HD if there is visible
damage to the unit or the connecting cables. Be careful that the cables do not
pose a risk of tripping.
Make sure that you don’t trap or crush the connecting cables.
The used antenna must be earthed. The SAT-Finder HD is only designed for
the short-term set up of a satellite system. Continuous use can damage the
unit. The unit must not be used in the immediate vicinity of inflammable
materials.
Only have repairs carried out by our qualified service personal. Attempts to
open or repair the unit yourself will void the warranty.
WARNING
Li-Po batteries must be handled with the utmost of care. Li-PO batteries can
generate a large amount of heat when not used properly and can damage the
unit and its surroundings. The enclosed battery instructions must be read in
full. Treat the unit with care! Do not throw it or drop it! The unit must not be
operated when it has been damaged.
The rechargeable battery pack’s nominal voltage or nominal current values
must not be exceeded. The unit may only be used with the designated
charging equipment „Car Charger Adapter″ and the „230V Charge Adapter”.
The rechargeable battery pack must not be shorted when it is connected to
the SAT-Finder HD. This would damage the SAT-Finder HD. Damaged cables
are to be immediately replaced by new intact cables. Do not place the unit
in water! The unit must not be operated when water has entered the unit’s
interior.
When the unit is not going to be used for a long time, pull the connecting cable
out of the charging socket. As the battery is a modern Li-ion rechargeable
battery, the self-discharge rate is approx. 5% per month. The operating
instructions are a part of the product and must always be passed onto future
owners in case the product is sold!
4
1.3 Connecting the SAT-Finder HD
Please connect the „LNB” marked socket of the Sat-Finder HD through the
supplied coaxial cable and BNC adapter directly to the LNB.
Suitable LNB types:
• Single-LNB
• Twin-LNB
• Quad-LNB
• Quattro-LNB
• Monoblock LNBs
• Unicable-LNB (legacy-port)
If the SAT-Finder HD is to be connected directly to a Quattro-LNB, use the
following table to connect it to one of the four LNB outputs so that the desired
satellite can be identified. For other satellite positions you will see the current
setting on www.schwaiger.de
1.4 Start-up process
Please charge before the first using the Sat-Finder HD completely. After the
complete charging, the red LED will disable. Now you can use the Sat-Finder.
Please put the „On” Button for booting.
The Red LED flashes when the battery capacity is too low. In this level the
battery still has a capacity of approximately 35% of their total capacity.
Please recharge the Sat-Finder HD.
After approx. 3-5 seconds the unit’s firmware has been loaded into its RAM
memory and component initialisation will begin. Subsequently, all LEDs will
light up briefly and the SAT-Finder HD is ready for use.
The entire start-up process takes around 7 seconds.
5
2. SEARCHING AND FINDING
2.1 Automatic satellite search
When the red Power-LED is on, the SAT-Finder is ready for use and you can
align the satellite dish. It should be turned or adjusted in small steps otherwise
you might easily miss a satellite, just like with analogue SAT-finders.
Vertical prepositioning of the dish makes searching easier.
Turn the satellite dish vertically until the LEVEL LEDs light up.
When a sufficiently strong signal is received (when 3 LEDs are „on”), the
SAT-Finder HD will analyse the transponder found – this is shown by the
MODE-LED flashing.
If the gauge of the signal is very low (up to 3 LEDs ″on”), continue to turn the
satellite dish further until sufficient signal level, approx. 4-6 LEDs, is shown. As
soon as the SAT-Finder HD has recognised the satellite, this will be indicated
by a green LED on the satellite summary and the quality of the signal will be
shown by the QUALITY-LEDs lighting up.
If due to discrepancies in the data the satellite cannot be precisely identified,
the LED for the satellite assumed to be the correct one based on the data
received so far will continue to flash.
The SAT-Finder HD will then switch to wait mode, and if it is the satellite you
were searching for you can start with the fine tuning of the satellite dish.
If a satellite has been identified, but it is not the one you were looking for, then
you now know which orbit position/direction the satellite dish is pointing in,
making it possible to target the desired satellite. To do this, turn the satellite
dish in the corresponding direction until the SAT-Finder HD switches back to
automatic search mode and starts to search for a satellite signal again.
Repeat this procedure until you have found the desired satellite.
6
2.2 Manual search / satellite preselection
Manual search allows a preselection of satellites that are located close to each
other.
By pressing the left ″A” button once the currently active LED will move on one
step, thus selecting the next satellite. The satellites you can select are: 8°W,
7°W, 5°W and 4°W.
Turn the satellite dish vertically until the LEVEL LEDs light up.
When a sufficiently strong signal is received (when 3 LEDs are „on”), the
SAT-Finder HD will analyse the transponder found – that is shown by the
MODE-LED flashing.
If the quality of the signal is very low (up to 3 LEDs ″on”), continue to turn
the satellite dish further until sufficient signal quality, approx. 4-6 LEDs, is
shown. As soon as the SAT-Finder HD has recognised the satellite, this will
be indicated by a green LED on the satellite summary and the quality of the
signal will be shown by the QUALITY-LEDs lighting up.
If due to discrepancies in the data the satellite cannot be precisely identified,
the LED for the satellite assumed to be the correct one based on the data
received so far will continue to flash.
The SAT-Finder HD will then switch to wait mode, and if it is the satellite you
were searching for you can start with the fine tuning of the Satellite dish.
If you press the ″B” button the SF9002 will switch back to automatic search.
2.3 Select the DiSEqC position
The manual search has been supplemented by the transmission of the DiSEqC
switching sequences A, B, C, or D for the control of the monoblock LNBs.
Pressing the left button „A″ once puts the SF9002 into the manual search
mode in which the closely positioned 8°W, 7°W, 5°W and 4°W satellites can
be selected. This is followed by again pressing the button as needed to send
the DiSEqC signals for positions A, B, C, or D and the satellite search starts as
is described under „Automatic search″.
7
2.4 Switchable Signal Attenuation
With strong satellite signal all LED‘s are switched on for the level and quality
function of the Satfinder display. Please use the attenuator function. You can
reduce the signal by -5dB or-10dB to improve the fine tunning by using the
level and quality display of the Satfinder HD. Pressing the B button for 2
seconds you can reduce the attenuation of the signal by -5dB and when you
press the button for 4 seconds, you can reduce the attenuation of the signal
by -10dB.
2.5 Reset
If you press both buttons together and hold them down for approx. 5 seconds,
this will reset the SAT-Finder HD.
3. INDICATOR LED’S
3.1 Level (signal strength)
Signal strength is displayed to the user via 8 LEDs. Each LED can either be
″off”, ″flashing slowly”, ″flashing quickly” or ″on”.
3.2 Quality (signal quality)
Signal quality is displayed to the user via 8 LEDs.
3.3 Mode (mode of operation)
This LED shows the conditions of the attenuation of the signal. In -5dB, the
LED lights green at -10dB, the LED lights up red
8
3.4 Satellite position display
Satellite display works similarly to the display of operating/search mode,
using the status ″off”, ″flashing” and ″on”, with meanings as shown in the
following table:
MODE-LED
LED
for the
respective
satellite
Meaning
„off″
„off″
The SAT-Finder HD hasn’t locked on to a
transponder.
„flashing″
„off″
The SAT-Finder HD has locked onto a transponder, but no satellite has been identified
yet or not enough data/information has been
received.
„flashing″
„flashing″
The SAT-Finder HD has locked onto a transponder and is analysing its data.
Based on the data analysed so far the
SAT-Finder HD assumes that the satellite dish
is aligned with the satellite shown by the LED.
„on″
„on″
The SAT-Finder HD has locked onto a transponder, all necessary data has been received
and processed.
Based on the information received the satellite
will by shown by its corresponding LED.
„on″
„flashing″
Special case:
The SAT-Finder HD has locked onto a transponder and analysed all the data received.
However, either not all the necessary data
could be received or there were discrepancies
in the received information.
The SAT-Finder HD will show by LED what it
assumes to be the correct satellite based on
the data received.
„on″
„off″
Special case:
The SAT-Finder HD has, as in the previous
case, completed analysed of the data. Based
on the data, either no satellite could be
identified or the satellite is one that is not
included on the SAT-Finder HD display.
In this case the unit will try to tune to other
transponders in order to start a new attempt at
identifying the satellite.
9
4. APPENDIX
4.1 Updating the SAT-Finder HD
The SAT-Finder HD identifies satellites using a range of data, which includes
satellite tables. Because satellite operators and media organisations may
make changes, the SAT-Finder HD is updateable. The SAT-Finder HD updater
is a piece of software for Windows that carries out this task, enabling you to
keep both the firmware and the satellite tables up to date at all times (or go
to www.schwaiger.de).
4.2 Guarantee conditions
There is a statutory guarantee of 2 years. During this period, any damage
caused by manufacturing or material faults will be repaired free of charge. Our
guarantee does not apply to natural wear and tear, expendable parts, shipping
damage and, furthermore, any damage caused by not following the operating
instructions or by unqualified installation.
The protective elements that are destroyed when triggered by a power surge
and damage caused by connecting unsuitable devices to the unit are also
excluded from the guarantee. When claiming under guarantee, the date of
purchase must be confirmed by enclosing the invoice, delivery receipt or
similar documentation.
CE- mark
The unit is labelled with the C mark and complies with the European Directive
requirements 2004/108/EC for EMC and 2006/95/EC for LVD. UN regulation
requirements have been likewise fulfilled.
10
Disposal
Never dismantle SF9002. The dismantling of Li-Po batteries can cause
internal short-circuiting. This can result in the generation of gas, fire, and
explosions or other problems that can be harmful to health Rechargeable
batteries do not belong in the household rubbish. As a consumer, you are
obligated by law to return used rechargeable batteries. You are by no means
allowed to dispose of rechargeable batteries in an open fire, in a rubbish
container, in a recycling container not suitable for batteries, or in any other
way that could be damaging to the environment. Outer and inner packaging is
recyclable and should always be recycled. Packaging, such as plastic bags, do
not belong in children’s hands. Consumer information regarding the disposal
of electric and electronic devices in private households. This symbol, found on
products and/or accompanying documents, means that electric and electronic
products must be disposed of separately to household rubbish when they
have reached the end of their service life. Please take these products to the
municipal collection points or recycling stations for treatment, retrieval of raw
materials and recycling. These devices will be accepted there free of charge.
The orderly disposal of this product serves to protect the environment. It
prevents possible damage to humans and the environment which can occur
when units are handled improperly at the end of their service life. More explicit
information regarding from your nearest collection point or recycling station
are available
4.3 Service-Information
At SCHWAIGER, customer satisfaction has the highest priority.
Should you have any questions, suggestions or problems regarding your
SCHWAIGER product, please use the contact address below.
Service-Hotline: +49 (0)9101 702-299
Service-Fax: +49 (0)9101 702-121
[email protected]
www.schwaiger.de
11
4.4 ELEVATION TABLE FOR EUROPE
Scale (C)
Central
Europe
www.schwaiger.de
South
Europe
BDA_SF9002_GB
Northern
Europe