1
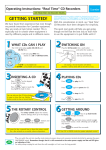
Table of Contents
Table of contents _____________________________________________________ 1
Safety Precautions ____________________________________________________ 2 Safety Information ____________________________________________________ 3 Package Contents _____________________________________________________ 4 Front Overview ___________________________________________________________ 5 Remote control ___________________________________________________________ 6 Connection _______________________________________________________________ 7 Listen to FM Radio ____________________________________________________ 8 Saving (storing) station ____________________________________________________ 8 Compatible iPod _____________________________________________________ 8 Listening to external source ____________________________________________ 8 Listening to iPod _____________________________________________________ 9 Battery Caution ___________________________________________________ 10 Remote control __________________________________________________________ 10 Battery installation _______________________________________________________ 10 battery replacement ______________________________________________________ 10 Trouble shooting ____________________________________________________ 11 Specification ________________________________________________________ 11 1
Safety Precautions
To achieve the utmost in enjoyment and performance, and in order to become familiar with its
features, please read this manual carefully before attempting to operate this product, this will
assure you years of trouble free performance and listening pleasure.
•
•
•
•
•
•
Important Notes
This safety and operating instruction should be retained for future reference.
The apparatus should not be exposed to dripping or splashing or placed in a humid
atmosphere such as a bathroom.
Do not install the product in the following areas:
o Places exposed to direct sunlight or close to radiators
o On top of other stereo equipment that radiate too much heat
o Blocking ventilation or in a dusty area
o Areas where there is constant vibration
o Humid or moist places.
Do not place near candles or other naked flames
Operate the product only as instructed in this manual
Before turning on the power for the first time, make sure the power adaptor is properly
connected.
For safety reasons, do not remove any covers or attempt to gain access to the inside of the
product. Refer any servicing to qualified personnel.
Do not attempt to remove any screws, or open the casing of the unit; there are no user
serviceable parts inside, refer all servicing to qualified service personnel.
CAUTION: TO REDUCE THE RISK OF ELECTRIC SHOCK DO NOT REMOVE COVER (OR
BACK), NO USER SERVICEABLE PARTS INSIDE, REFER SERVICING TO QUALIFIED SERVICE
PERSONNEL.
DANGEROUS VOLTAGE
Dangerous Voltages that may be of sufficient magnitude to constitute a risk
of electric shock to persons are present within this product’s enclosure.
ATTENTION
The owner’s manual contains important operating and maintenance
instructions, for your safety, it is necessary to refer to the manual.
WARNING: TO PREVENT FIRE OR SHOCK HAZARD, DO NOT EXPOSE THIS APPLIANCE TO
DRIPPING OR SPLASHING.
Note: This unit will become warm when used for a long period of time. This is normal and
does not indicate a problem with the unit.
2
Safety Information
Some Do’s and Don’ts on the Safe Use of Equipment
This equipment has been designed and manufactured to meet international safety standards
but, like any electrical equipment, care must be taken if you are to obtain the best results and
safety is to be assured.
DO read the operating instructions before you attempt to use the equipment.
DO ensure that all electrical connections (including the mains plug, extension leads and interconnections between the pieces of equipment) are properly made and in accordance with the
manufacturer’s instructions. Switch off and unplug the power before making or changing
connections.
DO consult your dealer if you are ever in doubt about the installation, operation or safety of
your equipment.
DON’T remove any fixed cover as this may expose dangerous voltages.
Overheating will cause damage and shorten the life of the equipment.
DON’T allow electrical equipment to be exposed to dripping or splashing, or objects filled with
liquids, such as vases, to be placed on/near the equipment.
DON’T place hot objects or naked flame sources such as lighted candles or nightlights on, or
close to equipment. High temperatures can melt plastic and lead to fires.
DON’T use equipment such as personal stereos or radios so that you are distracted from the
requirements of traffic safety.
DON’T leave equipment switched on when it is unattended unless it is specifically stated that it
is designed for unattended operation. Switch off using the switch on the equipment and make
sure that your family knows how to do this. Special arrangements may need to be made for
infirm or handicapped people.
DON’T continue to operate the equipment if you are in any doubt about if it’s working normally
or if it’s damaged in any way. Switch it off, unplug the mains power and consult your dealer.
ESD Remark: In case of malfunction due to electrostatic discharge just reset the product
(reconnection of mains power maybe required) to resume normal operation.
3
Package Contents
Main unit
AC/DC
Adapter,
AC power cord
Photo only for reference the actual adaptor may be differ from picture show
(To prolong your radio’s lifespan, please use the adapter we provided only.)
Remote
control,
User manual,
Contact card
4
Front view
q
Control
All mode
LCD Display
Rotate to browse menu options, press to
TUNING/
MULTI JOG
STANDBY/ON
Press to turn on/off
Press to enter main menu, rotate and select other menus
MENU
VOLUME
TONE
Turning to adjust volume level
-
Press to enter first level MENU,
-
Rotate to select TONE then
-
Press to enter and rotate to select TREB or BASS
5
confirm
INPUT
Select
-
Rotate to adjust
-
Press to enter first level MENU,
-
Rotate to select INPUT then
-
Press to enter and rotate to select AUX, FM and iPod.
Remote
control
operation
Multi
function
control
Press to access MENU
Return to previous MENU
Press to select or adjust setting
Press to turn ON/OFF Alarm
Press to Mute or un-mute sound
6
Connection
Socket
Remark
Connect the provided DC power adaptor (21V) to this socket, and then connect
the AC plug to the AC wall outlet.
DC IN
Antenna
3.5mm AUX IN
socket
Component
Video output
Do not use any AC adaptors other than the one included with this unit to
avoid fire, electric shock, etc.
Be sure that only connect to an AC outlet that match the AC adaptor.
Extend the aerial to ensure best reception for FM Radio.
. Connects to external audio device.
. When connect the 3.5mm PHONES jack from your MP3 player, you must
adjust the volume of the MP3 player or you may not hear sound from your
SR60iP.
. Turning up volume too high on your MP3 player may cause sound
distortion from your SR60iP. If this is the case, reduce the volume on the
MP3 player until the distortion stops and then adjust the volume level on
the SR60iP to a comfortable listening level.
This terminal outputs the video signal from a Connected iPod/iPhone to a
TV monitor component video input.
Note: Make the following settings on your iPod/ iPhone’s menu to output
video to a TV via the Dock.
In the [Video] menu, select [Video Settings], and then set [TV OUT] to [On]
or [Ask].
¾ When you have set [TV OUT] to [Ask], each time you play a video
your iPod/iPhone prompts you to specify whether to output it to a
TV.
¾ When you output video to a TV from your iPod/ iPhone, the video
is not displayed on the iPod/ iPhone’s screen.
iPod touch* and iPhone models do not have this menu. You must specify
whether to output video to a TV each time you play it.
* iPod touch 1st generation: Software ver. 2.2 or later
7
Listening to FM Radio
-
Press "input" and select FM mode; the LCD display will display the current tuned
station.
Press the tune+/_ to tune in a station (you can also tune by turn the "Multi
function" knob.
Saving (store) a station manually
Using the remote key pad (1~10) you can save up to 10 channels.
- Tune in a station you want to store
- Press and hold one of the number keys from the remote control for more than 2
seconds to storing the station.
- To select and listen to a saved channel, just press the desire channel number key.
AUX- Listening to external source
See page 7 “Connections”.
-
To listen to an external source connected to the AUX IN jack, select AUX.
Press "input" and select AUX mode.
Play the source, and adjust the volume using the volume button on remote and the connected
portable audio player.
Compatible iPod
Supported iPod/iPhone/iPad
8
Listening to iPod/iPhone/iPad
Control
All mode
In iPod mode, use this button to start or pause playback.
In iPod mode, use these buttons to skip to songs.
,
Hold down these buttons to search for a part of a song.
,
,
In iPod mode, use these buttons to scroll up and down in a
menu. These buttons have the same functions as the Click Wheel
on an iPod.
In iPod mode, use this button to go back to the previous menu.
This button has the same functions as its iPod counterpart.
Press to start playback a highlighted track.
In iPod mode, use this button to set the repeat function.
In iPod mode, use this button to start shuffle playback.
Press to switch between TV display and iPod/iPhone/iPad.
9
Battery Precautions
¾
¾
¾
¾
¾
¾
¾
Be sure to insert the batteries with correct positive “+” and negative “_” polarities.
When the remote control unit is not to be used for a long time (more than a month), remove the
battery from the remote control unit to prevent it from leaking.
If the batteries leak, wipe away the leakage inside the battery compartment and replace the
batteries with new ones.
Do not use any batteries other than those specified. Do not mix new batteries with old ones.
Do not heat or disassemble batteries. Never throw them in fire or water.
Do not carry or store batteries with other metallic objects. Doing so could cause batteries to
short circuit, leak or explode.
Never recharge a battery unless it is confirmed to be a rechargeable type.
Remote Control
The included remote control allows the unit to be operated from a distance.
When using the remote control, point it towards the remote sensor on the front of the unit.
¾
¾
Even if the remote control is used within its effective operation range (5 m), the unit might not
respond to the remote if there are any obstacles between them.
The remote control might function incorrectly if it is operated near other products that generate
infrared rays or if other remote control devices that use infrared rays are operated near the unit.
Likewise, the other products might also function incorrectly.
Battery installation
123-
Remove the battery compartment cover.
Put in the lithium battery (CR2025, 3 V).
Close the cover.
Battery replacement
If the distance to the unit from which the remote control can be used decreases, the battery is losing its
charge. In this case replace the battery with a new one.
¾ For information about the collection of batteries, please contact your local municipality, your
waste disposal service or the place where you purchased them.
10
Trouble Shooting
If you have problems with your system, read this page and try to solve the problem yourself before
calling your dealer or a TEAC service Centre.
Problem
General
No power
No sound from
speakers
Sound but noisy.
Remote control
unit does not work
iPod/iPhone
Cannot insert the
iPod/iPhone
iPod will not play
Remark
Check the connection to the AC power supply. Check whether or not the AC
source is a switched socket. If it is, confirm that the switch is turned on. Confirm
that there is power to the AC socket by plugging another item such as a lamp or
fan into it.
¾ Select the source by pressing the FUNCTION button.
¾ Adjust the volume.
¾ If “MUTING” appears on the display, press the MUTING button.
¾ The external audio device attached to the AUX IN is not turned on.
¾
The unit is too close to a TV or similar device. Relocate it away from the
interfering device or turn it off.
¾
¾
¾
Press the STANDBY/ON button to turn the unit on.
If the battery is exhausted, replace it with a new one.
Use the remote control unit within the operation range (5 m) and point it
at the remote sensor on the front panel.
Remove obstacles between the remote control unit and the main unit.
If a bright light is near the unit, turn it off.
¾
¾
¾
Remove dust or obstacles from the dock connectors of the SR-2DAB and
the iPod/iPhone, and insert the iPod/iPhone again.
¾
Remove the iPod/iPhone from the Dock, wait a few seconds, and insert it
again.
A software update might solve the problem. Visit the Apple website and
download the latest iPod/iPhone software
¾
If normal operation cannot be restored, unplug the power cord from the socket and plug it in again.
Specifications
TUNER
FM Frequency Range. . . . 87.5 MHz to 108 MHz
SPEAKER SYSTEM
Output power . . . . . . . . . . . . . . . . . . . . . . . . . . . 25 W + 25W
Frequency response . . . . . . . . . . . . . . . . . . . . . 50 Hz – 20 kHz
Driver unit . . . . . . . . . . . . . . . . . . . . . . . . . . . . . . 5 inch
Signal to Noise S/N . . . . . . . . . . . . . . . . . . . . . . 85dB
THD . . . . . . . . . . . . . . . . . . . . . . . . . . . . . . . . . . . 0.1%
INPUT . . . . . . . . . . . . . . . . . . . . . . . . . . . . . . . . . iPod/iPhone/iPad, FM, AUX in 3.5mm
Power Requirement . . . . . . . . . . . . . . . . . . . . . . AC 230 V, 50 Hz
Power supply . . . . . . . . . . . . . . . . . . . . . . . . . . . 60W
Power Consumption . . . . . . . . . . . . . . . . . . . . . 5.5 W
Operating Temperature . . . . . . . . . . . . . . . . . . . -40’C ~ 60’C
Dimension (W x H x D). . . . . . . . . . . . . . . . . . . . 485 x 225 x 210 mm
Weight (Net) . . . . . . . . . . . . . . . . . . . . . . . . . . . . 4.25 kg
•
•
•
Design and specifications are subject to change without notice.
Weight and dimensions are approximate.
Illustrations may differ slightly from production models.
11