1
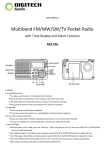
WORLD BAND RADIO
AR 1946
AM/FM RDS/SW/LW/ DAB radio with LCD backlight
display and keypad direct entry
OWNER’S MANUAL
Distributed by:
Electus Distribution Pty Ltd
320 Victoria Rd
Rydalmere NSW 2116 Australia
Ph: 1300 738 555
Fax: 1300 738 500
www.electusdistribution.com.au
WARNING
Do not expose this appliance to rain or moisture
Do not submerge or expose to water.
Protect from high humidity and rain.
Only operate within specified temperature range(0 ℃to 40 ℃).
Unplug immediately if liquid has been spilled or object have fallen
into the apparatus.
Clean only with a dry cloth. Do not use detergents or chemical
solvents as this might damage the finish.
Unplug and disconnect external antennas during lightning storms.
Do not remove cover [or back].
Refer servicing to qualified service personnel.
3
Radio Identification
- Front View
20
22
21
15
16
17
18
19
12
13
14
4
23
26
5
1
6
7
25
11
3 10
3
9 8 24
3
2
1 Tuning knob
14
Info/Light button
2 Tone button
15
FM band button
3 Dial Speed selection
16
LW band button
4 UP button
17
MW band button
5 Down button
18
SW band button
6 Volume up button
19
DAB band button
7 Volume down button
20
Charge/Air Squelch/Mute button
8 Numeric key button
21
AM Bandwidth/FM Stereo/Alarm button
9 Frequency button
22
Menu/Time set button
10
Page/Enter button
23
Speaker grill
11
Reset button
24
9/10kHz step button
12
Power/Sleep button
25
Beep button
13
Lock button
26
12/24 Hour button
4
Radio Identification
- Side Views
Rear
Right
31
37
24
32
27
33
34
28
35
29
36
30
24
27
DAB/FM/SW External Antenna
32
Line out jack
28
Antenna Sens Ext./Int. switch
33
Line in jack
29
AM External Antenna
34
Earphone jack (3.5mm)
30
Battery Compartment
35
DC In jack (5.5mm)
31
DAB/FM Whip Antenna
36
Fine Tuning Knob
37
Carry handle
5
4
6
6
ff
r
12
9
‘
When the alarm is activated, press ‘POWER’ button to shut off alarm
and snooze function.
7
LOCK SETTING
Quickly press the button to lock out the operations of all buttons
except back light. The “lock” icon will be displayed.
Press and release the “LOCK” button for 2 seconds unlock the
operations for all buttons, the “lock” icon will disappear.
SETTING TIME
When the radio is off, quick press “TIME” button, LCD displays ” AUTO” or
“MANUAL”, use “ UP” or “DOWN” button to select “AUTO” or “MANUAL”.
NOTE:
“AUTO” indicates LCD displays RDS icon, the local time can be updated
through local FM RDS or DAB station automatically.
“MANUAL” indicates the user can set time manually, the local time will
not be updated automatically.
When the radio is off, hold “TIME” button down for 2 seconds ,”TIME” will
flash and release to enter time setting. Directly enter hour and minute
digits to complete setting. For 12 hour format, also enter 4 digits directly
like 0-8-3-0.
SETTING THE ALARM CLOCK
There are two different alarm modes to choose from, You can choose to
wake up the radio or to buzzer tone.
1) Quickly press “ALARM” button,” ALARM” will display ,then press UP or
or DOWN button to select wake up to radio or to buzzer bone, the
and
will flash.
Note:
icon indicates wake up to buzzer tone;
icon indicates wake up to radio;
If there is no icon display, it indicates alarm is off
2) When the radio is off, hold “ALARM” button down for 2 seconds
till “ALARM” flash and release to enter alarm setting . Directly enter hour
and minute digits to set alarm. For 12 hour format, just enter 4 digits also
like 0-7-3-0.
8
SETTING 12/24H FORMAT
When the radio is off, hold 1# button (i.e. 12/24H button) down for 2
seconds, the LCD will display “12H” or “24H” by turn.
SHUT DOWN ALARM OR SNOOZE FUNCTION
When the alarm is activated, quick press “POWER” button to shut down alarm.
When the alarm is on, press any button except POWER & SLEEP button to enter
snooze status, after 5 minutes, the alarm will turn on again.
ACTIVATE OR DEACTIVATE BEEP SOUND
When the radio is off, hold 5# button (i.e. BEEP button) down for 2
seconds, the LCD will display “BEEP ON” or “BEEP OFF” by turn.
NOTE:
BEEP ON indicates BEEP sound is activated, so pressing any button, the user
will hear beep sound; “BEEP” icon will be displayed all the time;
BEEP OFF indicates BEEP sound is deactivated, so there is no beep sound when
pressing any button; “BEEP” icon will disappear.
USING THE NUMERIC KEYPAD (0-9)
With the radio ‘off’,there are used to directly enter a frequency or
memory channel. See TIME or ALARM SETTING to direct enter digits
to set time and alarm.
With the radio ‘on’, quickly press numeric buttons (0-9) to recall presets;
hold the buttons down for 2 seconds to preset stations. Quickly press
“PAGE” button then select the desired numeric key (0-9) to set page.
BAND SELECTION
When the radio is on, press FM, LW. MW, SW and DAB button to select your
desired band.
9
TUNING IN STATION
When the radio ON, user has five ways of tuning into desired station.
MANUAL TUNING
Select your desired band, short press UP or DOWN button, the frequency
will be changed as per the following step:
FM step : 100kHz, LW step: 3kHz, SW step: 5kHz , AM step: 9kHz or 10kHz
AUTO TUNE TUNING
Select your desired band, hold down UP or DOWN button for 2 seconds,
the frequency will be changed per same step as manual tuning. The radio
will stop automatically when tuning in station.
AUTOMATIC TUNING SYSTEM(ATS)
Select your desired band ,hold down FM, LW, MW or SW band button for 2
seconds until you hear a ‘beep’ sound then release the button, “ATS , , ,”
will be displayed; when the radio receive a real station, the LCD displays
“P00 SAVE”,”P01 SAVE”..... by turn. When ATS process is completed, the LCD
displays “P00 LOAD” .
USING TUNING KNOB
Select your desired band, rotate tuning knob to tune in frequency. At the
same time, the user can press “STEP” button to select tuning frequency
speed as STOP/FAST/SLOW.
Set “STOP”, when rotate the tuning knob, the frequency will not change;
Set “FAST”, when rotate the tuning knob, the frequency will change as per
specified step: FM 100kHz, LW: 3kHz,SW: 5kHz, AM:9k/10kHz
Set “SLOW”,when rotate the tuning knob, the frequency will change as per
specified step: FM 10kHz, LW/MW/SW;1kHz
The user also can rotate “FINE Tuning knob” up or down on the lower right
sight of unit to tune in accurate frequency per 1kHz step as a subsidiary help.
USING 0~9 numeric keypad
Select your desired band, quickly press “FREQ” button to key in desired frequency,
When input completed frequency, the system will confirm automatically. e.g. FM
98.55MHz, when key in 9-8-5-5, the LCD will display 98.55MHz automatically.
If the frequency isn’t completed, e.g. FM 98.50MHz,the user needs to key in 9-8-5-0
to confirm it.
Note: If the user keys in incorrect frequency out of FM, LW, MW or SW specified range,
the system will display “Error”.
10
Preset/Recall Memory - FM/LW/MW/SW
Each band can save 100 memories(P0~P99),total 10 pages (Page-00~
Page-09),each page can save 10 channels (PX0~PX9),”X” means page,
for example, if this station is in page-01, then 10 channels mean
P10~P19.
Preset Station
There are two methods to preset station as under:
1)ATS - Automatic Tuning System, please see ‘TUNING IN STATION’
on Page 9;
2)Manual preset - select your desired band, quickly press “PAGE” button,
LCD displays “PAGE--00",then quickly press numeric button (0~9) to
select your desired preset page, hold down this numeric button for 2
seconds to save this station to one channel on this page, LCD displays
“PXX SAVE”. For example, If you want to save 107.5MHz to 1st channel
on 3rd page. Quickly press ‘PAGE’ button then #3 button, thereafter
hold down 1# button for 2 seconds. Then LCD displays “ P31 SAVE”.
Recall Memory
Quickly press “PAGE” button, LCD displays “PAGE-XX”,then quickly
press numeric button (0~9) to select saved page, then continue
to press numeric button (0~9) to select saved channel on selected
page, so the LCD displays “PXX LOAD”,and so on.
STEREO/ MONO/BANDWIDTH SELECTION
When the radio is on,
FM Stereo/Mono
Quickly press “AM BW/FM ST” button, LCD will display “--AUTO--” or”--MONO--”.
“--AUTO--” indicates FM Stereo mode; when tuning in a stereo station, STEREO
icon will be displayed.
“--MONO--” indicates FM Mono mode.
LW/MW/SW bandwidth selection
Quickly press “ AM BW/FM ST” button in sequence and LCD displays
“BW 6K, BW 4K, BW 3K,BW 2.5K,BW 2K,BW 1.8K,BW1K”.
11
SQUELCH FUNCTION
When the radio is on, hold down “SQUELCH “ button for 2 seconds.
LCD displays “SQUELCH OFF or 1~9", then rotate tuning knob to select
your desired squelch level (1~9) or “OFF” to shut down squelch function.
Quickly press “SQUELCH” button again to exit SQUELCH function.
When the strength of signal is lower than selected squelch level, the radio
will be mute automatically and LCD displays “SQUELCH”. VS “SQUELCH” will
not be mute
SW METER Band
When the radio is on, select SW band, quickly press “SW/METER” button
to select different meter band as 120--90--75--60--49--41--31--25--22
--19--16--15--13--11" , LCD displays” MET XXM” corresponding.
MW 9/10kHz Selection
When the radio is off, hold down “0" button for 2 seconds, LCD displays,
“MW –-9K” then quickly press this button again to “MW --10K”. The factory
default is “MW--9K”.
FM FREQUENCY RANGE SELECTION
When the radio is off, hold down “FM” button for 2 seconds to enter selection,
Then quickly press this button to select FM range, The LCD displays as follows
by turn:
“FM--64,0M” indicates FM Range is 64~108MHz
“FM--87.5M” indicates FM Range is 87,5-108MHz
“FM--76.0M” indicates FM Range is 76~108MHz
Quickly press this button again to exit.
12
FM RDS/INFO FUNCTION
Turn on the radio and select “FM” band, this radio supports RDS streaming
while tune in FM station with RDS data,
1) If the radio tunes in FM station with RDS,
the left lower side;
icon will be displayed in
2) Quickly press “INFO” button to look through RDS information (PS/RT/DATE/PTY);
PS: Station name , if no PS, just displays “NO PS”;
RT: Radio text, if no RT, just displays “NO RT”;
DATE: time, date, weekly information, if no, just displays “NO DATE”;
PTY: Programm category, if no PTY, just displays “PTY”.
3) If the DATE information is available, the display information is:
“Station call Weekly MM-DD-YY Hour:Minute”
Weekly format : “MON”,”TUE”,”WED”,”THU”,”FRI”,”SAT”,”SUN”, for
example, the LCD will roll to display “WGSS 06-15-2015 2:15"
DAB/DAB+ STATION SCAN
Quick press “DAB” button to enter DAB band. If the radio is operated in
the first time, hold down UP or DOWN button to fully scan DAB stations.
LCD displays” SCAN 5A,5B,.....13F”, then LCD display “ Found XX”, “XX” indicates
available stations, fox example,”FOUND 30" means the radio finds 30 programs.
“FOUND 0" indicates no available station, then display “NO SERV”.
DAB STATION TUNING
There are two tuning methods: manual and autoscan>
Hold down “STEP” button for 2 seconds and release till LCD displays “ AUTO ON”
or “AUTO OFF”;
1) Select “AUTO ON”, hold down UP or DOWN button, Or rotate tuning knob to go
through station then enter playing station automatically;
2)Select “AUTO OFF”,hold down UP or DOWN button, Or rotate tuning knob to go
through station then return back playing station; Quickly press “ENTER” button
to switch scanned station.
13
SAVE/RECALL/DELETE DAB PRESETS
There are total 20 presets for DAB band, saved at 2 pages,10 presets for
each page (P00~P19).
When the radio is on, in DAB mode, quickly press “PAGE” button to switch
“PAGE 00" and “PAGE 01";
Select your desired station, quickly press “PAGE” button to select one page,
then long press numeric button (0~9) then LCD displays “PXX SAVE”.
“PXX SAVE” indicates DAB station saving is successful;
“NO SAVE” indicates DAB station saving is not successful.
Select your desired station, quickly press “PAGE” button to select one page,
quickly press numeric button (0~9) then LCD displays “PXX LOAD”, if no preset
station, LCD displays “ EMPTY”.
DAB/DAB+ INFO
In DAB mode, quickly press “INFO” button each time to display the following
information:
1.Station Name: display the station name being played;
2.Station Information indicates that the scrolling text message such as song title,
artist name, traffic report, website address etc.;
3.Program type indicates types of program being played;
4.Ensemble name indicates the name of station broadcasting on the same frequency
the number of ensembles you can receive depends on your location;
5.Time and Date indicates that time and date obtained automatically from a DAB
transmission in your country or region.
6.Frequency and channel indicates the frequency and channel number for the current
DAB broadcasts.
SECONDARY SERVICE - DAB/DAB+
Certain radio stations have one or more secondary services associate with them,
If a station has a secondary service with it, the display will show “>>”, next to
the station name on the station list. The secondary service will then appear
immediately after the primary service as your rotate the tuning control knob.
Rotate the tuning knob to select the station.
14
MANUAL TUNING -DAB/DAB+
Manual tuning allows you to tune in various Band III channel from 5A to 13F:
1) In DAB mode, quickly press “MENU” button then rotate tuning knob or press
“UP” button to select “MANUAL”;
2) Quickly press “ENTER” button to enter channel selection ;
3) Rotate tuning knob or short press UP or DOWN button to select the channel range
from ”174.9 5A,....239.2 13F”;
4) Quickly press “ENTER” button again to enter channel tuning. after tuning completion,
the system will display “FOUND XX”, “XX” indicates found the quantity of available
stations;
5) Quickly press “MENU” button again to exit current operation;
STATION SORTING - DAB/DAB+
You can sort the stations in the main list either by alphanumeric or
by type of “ensemble”.
Quickly press “MENU” button to enter menu selection, then short press UP or
DOWN button or rotate tuning knob to select “STA SORT”, then short
press “ENTER” button to enter sorting method selection. Select “
ALPHANUMERIC” or “ENSEMBLE” by short press UP or DOWN button or
rotate tuning knob. Quickly press “MENU” button again to exit operation.
RESET - DAB/DAB+
If you radio fails to operate or erase your setting on radio, including
presets, alarm & sleep timer settings. After a system reset, all settings
will be back to factory default.
Quickly press MENU button, rotate tuning knob and short press UP or
DOWN button to select “RESET”,quickly press “ENTER” reset mode.
After the reset is completed, the system starts auto scan DAB stations,
the LCD display “SCAN 5A,...,13F”, short press “MENU” again to exit
current operation.
15
SOFTWARE VERSION
The user can check software version and also the software may vary:
1) In DAB mode, quickly press “MENU” button then rotate tuning knob or press
“UP” button to select “VERSION”;
2) Quickly press “ENTER” button to display software version ;
3) Quickly press “MENU” button again to exit current operation;
LINE IN/LINE OUT OUTPUT
In radio on, connect external audio source to LINE IN JACK(right side of unit),
LCD displays “AUX IN”, the audio output from speaker is an external source.
The Line-out socket can be used to feed audio from the radio to amplified external
speakers. The internal speaker will still be functional when a device is connected
to the Line-out socket.
USING EARPHONE JACK
The earphone jack can be used with stereo headphones using an 1/8 inch
(3.5mm)plug. FM sound is in stereo if the signal is sent in stereo and the ST
position is selected with the “AM BW/FM ST” switch. The internal speaker
will be muted when a device is connected to the Earphone jack.
USING VOLUME UP/DOWN
Quickly press volume (V+/V-) button to adjust volume UP or volume
DOWN step by step. Press and hold down volume (V+/V-) button to
adjust volume UP or DOWN continuously.
16
ADJUST AUDIO TONE - TREBLE/BASS
Quickly press “TONE” button, select Treble setting, LCD displays “TREB: XX”,
rotate the FINE Tuning knob on the right side of unit to adjust treble volume;
Quickly press “TONE” button, select Bass setting, LCD displays “BASS: XX”,
rotate the FINE Tuning knob on the right side of unit to adjust bass volume;
MUTE ON/OFF
When the radio is playing, quickly press “MUTE”, LCD displays “MUTE ON”
or “MUTE OFF”.
Note:
MUTE ON: indicates the radio is mute, no audio ouput;
MUTE OFF: indicates the radio can play sound normally.
INT./EXT. ANTENNA - FM/SW/DAB
Use this switch to enable the use of FM/SW/DAB internal or external
antennas. When the signal is weak, use external antenna to improve
the reception,
CHARGING
Plug AC adapter into the wall socket, when the radio is off, quickly press
“CHARGE” button, the battery icon will be displayed, which indicates
the system is charging rechargeable batteries. When the battery is charged
fully or charging time countdown is over, it means the charging is over.
During the charging, quickly press this button to stop charging.
Caution: Do not charge non-rechargeable battery.
17
FM/SW/DAB EXTERNAL ANTENNAS
This socket locates on the back of the radio is primarily for antennas
designed to be fed with 50 or 70 ohm coaxial cable, such as dipoles
or comparable antennas, It can also be used for long wire antennas.
Use PAL type connector for feeding this socket.
MW(AM) EXTERNAL ANTENNA/GND Jack
If you are in a brick or metal building, AM can be greatly improved
with the addition of a simple antenna. A small diameter insulated
stranded wire, about 60" in length is a good place to start. Antenna
wire can be attached by pressing the spring loaded lever and
inserting the wire.
The “GND” jack is used with the “MW(AM) EXT. ANT.”. Attached one end
of a length of wire to be Ground jack and the other end to a good
earth ground.
Caution: Do not use external antenna when it is in thunder storm.
BACKLIGHT ON/OFF OPERATION
Press and hold down INFO/LIGHT button to select light on all the time or off.
Press this button for 2 or 3 seconds, the backlight will flash one time, which
indicates the backlight keeps on all the time. If the backlight is off, which
indicates it will be on when pressing this button. If no operation, the backlight
will be off after 10 seconds.
18
SPECIFICATIONS:
FREQUENCY COVERAGE
FM Band:
AM(MW) Band:
SW Band:
LW Band:
Band III:
87.5 - 108 MHZ (default)
522 - 1620 kHz (9kHz step)
520 - 1710 kHz (10kHz step)
1711 - 29999 kHz
150 - 450 kHz
5A - 13F
MEMORY PRESETS
FM/MW/SW/LW : 400 total ( 100 Per Band)
Band III: 20 total
SPEAKER
5 Watt 4 ohm
INPUT POWER
4 “D” size batteries (not included)
6V DC 600mA tip negative
EARPHONE JACK
3.5mm 32 ohm
DIMENSIONS
W 295mm x H 175mm x D 76mm
WEIGHT
1.65 kg without batteries
ACCESSORIES
Owner’s manual
AC/DC adapter
D size battery adapter x4
*
Specifications subject to change without notice.
19