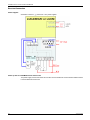
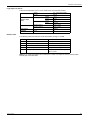
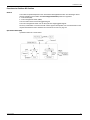
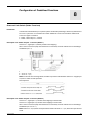
1
1672610 03/2009 ® TeSys U LULC07 Profibus DP Communication Module User’s Manual 1672610 03/2009 www.schneider-electric.com Schneider Electric assumes no responsibility for any errors that may appear in this document. If you have any suggestions for improvements or amendments or have found errors in this publication, please notify us. No part of this document may be reproduced in any form or by any means, electronic or mechanical, including photocopying, without express written permission of Schneider Electric. All pertinent state, regional, and local safety regulations must be observed when installing and using this product. For reasons of safety and to help ensure compliance with documented system data, only the manufacturer should perform repairs to components. When devices are used for applications with technical safety requirements, the relevant instructions must be followed. Failure to use Schneider Electric software or approved software with our hardware products may result in injury, harm, or improper operating results. Failure to observe this information can result in injury or equipment damage. © 2009 Schneider Electric. All rights reserved. 2 1672610 03/2009 Table of Contents Safety Information . . . . . . . . . . . . . . . . . . . . . . . . . . . . . . . . . . . . . . . . . . . . About the Book . . . . . . . . . . . . . . . . . . . . . . . . . . . . . . . . . . . . . . . . . . . . . . . 5 7 Part I Hardware Implementation . . . . . . . . . . . . . . . . . . . . . . . . . . . . . . . . . 9 Chapter 1 Installation of the LULC07 Profibus DP Module . . . . . . . . . . . . . . . . . . . . 11 Safety Instructions. . . . . . . . . . . . . . . . . . . . . . . . . . . . . . . . . . . . . . . . . . . . . . . . . . . . . . . . . . . Presentation of the LULC07 Profibus DP Communication Module . . . . . . . . . . . . . . . . . . . . . . Description and Installation of the Module . . . . . . . . . . . . . . . . . . . . . . . . . . . . . . . . . . . . . . . . Addressing with DIP Switches. . . . . . . . . . . . . . . . . . . . . . . . . . . . . . . . . . . . . . . . . . . . . . . . . . Components Assembly on a Power Base . . . . . . . . . . . . . . . . . . . . . . . . . . . . . . . . . . . . . . . . . Electrical Connection. . . . . . . . . . . . . . . . . . . . . . . . . . . . . . . . . . . . . . . . . . . . . . . . . . . . . . . . . Connection to the Profibus DP . . . . . . . . . . . . . . . . . . . . . . . . . . . . . . . . . . . . . . . . . . . . . . . . . Features of the Profibus DP . . . . . . . . . . . . . . . . . . . . . . . . . . . . . . . . . . . . . . . . . . . . . . . . . . . 12 13 14 16 17 18 21 25 Chapter 2 Technical Characteristics . . . . . . . . . . . . . . . . . . . . . . . . . . . . . . . . . . . . . . 27 Conditions of Use and Technical Characteristics . . . . . . . . . . . . . . . . . . . . . . . . . . . . . . . . . . . 27 Part II Software Implementation. . . . . . . . . . . . . . . . . . . . . . . . . . . . . . . . . . 31 Chapter 3 TeSys U Specific Profibus Information . . . . . . . . . . . . . . . . . . . . . . . . . . . 33 General Information on Implementation via Profibus DP . . . . . . . . . . . . . . . . . . . . . . . . . . . . . Modules as Presented in the GS*-File . . . . . . . . . . . . . . . . . . . . . . . . . . . . . . . . . . . . . . . . . . . 34 35 Chapter 4 Implementation via Profibus DP . . . . . . . . . . . . . . . . . . . . . . . . . . . . . . . . . 37 Initialization . . . . . . . . . . . . . . . . . . . . . . . . . . . . . . . . . . . . . . . . . . . . . . . . . . . . . . . . . . . . . . . . Profibus DP Application Parameter Settings. . . . . . . . . . . . . . . . . . . . . . . . . . . . . . . . . . . . . . . Profibus DP Configuration via the SyCon Configuration Tool . . . . . . . . . . . . . . . . . . . . . . . . . . Factory Configuration . . . . . . . . . . . . . . . . . . . . . . . . . . . . . . . . . . . . . . . . . . . . . . . . . . . . . . . . Customizing your Configuration . . . . . . . . . . . . . . . . . . . . . . . . . . . . . . . . . . . . . . . . . . . . . . . . 38 39 42 43 44 Chapter 5 Functions to Set . . . . . . . . . . . . . . . . . . . . . . . . . . . . . . . . . . . . . . . . . . . . . . 49 Functions in General . . . . . . . . . . . . . . . . . . . . . . . . . . . . . . . . . . . . . . . . . . . . . . . . . . . . . . . . . Functions for Profibus DP Profiles . . . . . . . . . . . . . . . . . . . . . . . . . . . . . . . . . . . . . . . . . . . . . . Diagnostic Telegram for Profibus DP . . . . . . . . . . . . . . . . . . . . . . . . . . . . . . . . . . . . . . . . . . . . 50 51 66 Chapter 6 Managing Faults and Warnings. . . . . . . . . . . . . . . . . . . . . . . . . . . . . . . . . . 69 Viewing a Fault . . . . . . . . . . . . . . . . . . . . . . . . . . . . . . . . . . . . . . . . . . . . . . . . . . . . . . . . . . . . . Fault Reset . . . . . . . . . . . . . . . . . . . . . . . . . . . . . . . . . . . . . . . . . . . . . . . . . . . . . . . . . . . . . . . . Application Faults . . . . . . . . . . . . . . . . . . . . . . . . . . . . . . . . . . . . . . . . . . . . . . . . . . . . . . . . . . . Warnings - Communication Loss . . . . . . . . . . . . . . . . . . . . . . . . . . . . . . . . . . . . . . . . . . . . . . . Internal Faults . . . . . . . . . . . . . . . . . . . . . . . . . . . . . . . . . . . . . . . . . . . . . . . . . . . . . . . . . . . . . . 70 71 72 73 74 Chapter 7 Acyclic Data Read/Write via DP V1 and the PKW Feature . . . . . . . . . . . . 75 Acyclic Data Read/Write via Profibus DP V1 . . . . . . . . . . . . . . . . . . . . . . . . . . . . . . . . . . . . . . PKW: Encapsulated Acyclic Accesses in DP V0. . . . . . . . . . . . . . . . . . . . . . . . . . . . . . . . . . . . Registers Written by the Profibus Parameter Frame. . . . . . . . . . . . . . . . . . . . . . . . . . . . . . . . . 76 78 81 Chapter 8 Configuration of Predefined Functions . . . . . . . . . . . . . . . . . . . . . . . . . . . 83 Overtravel Limit Switch (Reflex Functions) . . . . . . . . . . . . . . . . . . . . . . . . . . . . . . . . . . . . . . . . 83 Index . . . . . . . . . . . . . . . . . . . . . . . . . . . . . . . . . . . . . . . . . . . . . . . . . . . . . . . 85 1672610 03/2009 3 4 1672610 03/2009 Safety Information § Important Information NOTICE Read these instructions carefully, and look at the equipment to become familiar with the device before trying to install, operate, or maintain it. The following special messages may appear throughout this documentation or on the equipment to warn of potential hazards or to call attention to information that clarifies or simplifies a procedure. PLEASE NOTE Electrical equipment should be installed, operated, serviced, and maintained only by qualified personnel. No responsibility is assumed by Schneider Electric for any consequences arising out of the use of this material. A qualified person is one who has skills and knowledge related to the construction and operation of electrical equipment and the installation, and has received safety training to recognize and avoid the hazards involved. 1672610 03/2009 5 6 1672610 03/2009 About the Book At a Glance Document Scope This documentation describes the installation, functions and operation of the LULC07 Profibus DP communication module. The TeSys U system uses internal registers, that are mapped to Profibus DP parameters, Profibus DP cyclic data and Profibus DP acyclic data. Thus, there will often be a reference to registers for detailed information about TeSys U specifics. Area of application: mainly control system applications in the Industry and Building sectors. Validity Note This manual is valid for LULC07 V1.2 and later versions. LULC07 can be used with TeSys U power bases (LUB/2B, LUS/2S) only. LULC07 is not compatible with the TeSys U controller bases (LUTM). Related Documents Title of Documentation Reference Number LULC07 Profibus DP Module - Instruction Sheet 1639544 LU9GC7 Profibus DP Tap Module - Instruction Sheet 1639559 LU9AD7 Profibus DP Connector - Instruction Sheet 1639560 LULC07 Profibus DP Module - Beginner's Guide 1672611 LULC07 Profibus DP Module - Acyclic Data Read/Write with Siemens, Application Note 1672612 TeSys U Communication Variables - User’s Manual 1744082 LU•B/LU•S• TeSys U Starters - Instruction Sheet 1629984 LUCM/LUCMT Multifunction Control Units - User’s Manual 1743237 LUCM/LUCMT/LUCBT/LUCDT Control Units - Instruction Sheet AAV40504 LUCA/LUCB/LUCC/LUCD Control Units - Instruction Sheet AAV40503 Electromagnetic Compatibility - Practical Installation Guidelines DEG999 You can download these technical publications and other technical information from our website at www.schneider-electric.com. Product Related Information Up-to-date information about Profibus DP is available from the Profibus Website http://www.profibus.com as well as from the Profibus user organization: Profibus Nutzerorganisation e.V., Haid- und Neu-Straße 7, D-76131 Karlsruhe, Germany, or from the Profibus user organisation in your country. User Comments We welcome your comments about this document. You can reach us by e-mail at [email protected]. 1672610 03/2009 7 8 1672610 03/2009 Hardware Implementation 1672610 03/2009 Hardware Implementation I Overview This chapter comprises information concerning the hardware implementation of the LULC07 Profibus DP communication module. What's in this Part? This part contains the following chapters: Chapter 1672610 03/2009 Chapter Name Page 1 Installation of the LULC07 Profibus DP Module 11 2 Technical Characteristics 27 9 Hardware Implementation 10 1672610 03/2009 Installation of the LULC07 Profibus DP Module 1672610 03/2009 Installation of the LULC07 Profibus DP Module 1 Foreword This chapter introduces the LULC07 Profibus DP communication module and describes the various steps involved in the hardware installation of the product. What's in this Chapter? This chapter contains the following topics: Topic 1672610 03/2009 Page Safety Instructions 12 Presentation of the LULC07 Profibus DP Communication Module 13 Description and Installation of the Module 14 Addressing with DIP Switches 16 Components Assembly on a Power Base 17 Electrical Connection 18 Connection to the Profibus DP 21 Features of the Profibus DP 25 11 Installation of the LULC07 Profibus DP Module Safety Instructions General Instructions WARNING UNINTENDED EQUIPMENT OPERATION Do not modify the GS*-file in any way. Modifying the GS*-file can cause unpredictable behavior of the devices. Failure to follow these instructions can result in death, serious injury, or equipment damage. NOTE: If the GS*-file is modified in any way, the warranty of Schneider Electric will expire immediately. WARNING UNINTENDED EQUIPMENT OPERATION Do not use communication variables in the management of safety devices and emergency stops. Only use the serial link for transmitting data that is not critical to the application as there is some delay in the transmission of data relating to motor-starter states and load-current values. Data such as Forward, Reverse and Stop must not be used in safety and emergency-stop circuits. Failure to follow these instructions can result in death, serious injury, or equipment damage. WARNING UNINTENDED EQUIPMENT OPERATION These devices must be installed, configured and used by qualified staff only. You must follow all current instructions, standards and regulations. Check the function settings before starting the motor. Do not downgrade or modify these devices. Incorrect configuration can cause unpredictable behavior of the devices. Failure to follow these instructions can result in death, serious injury, or equipment damage. 12 1672610 03/2009 Installation of the LULC07 Profibus DP Module Presentation of the LULC07 Profibus DP Communication Module Receiving the Product On opening the box containing the LULC07 Profibus DP communication module, you should find the following items: An Instruction Sheet (IS), providing brief pictorial information on standard installation of the module. A LULC07 Profibus DP communication module equipped with connectors, except Sub-D9 Profibus DP connector. NOTE: Check that you actually have all the items described above. Make sure that the Instruction Sheet (IS) is included, along with the correctly inserted connectors. Functions Offered The communication module is used to control a motor-starter remotely, via Profibus DP, from TeSys U Starter LUS••/LU2S•• The control offered by the LULC07 Profibus DP communication module is used to read the motor-starter states control the motor-starter (reversing or not reversing) adjust the protection functions read the data processed in the advanced and multifunction control units read the input and output states of the I/O (power base) DANGER IMPROPER CONTROL VOLTAGE Do not connect voltage in excess of 24 VDC. Only use 24 VDC to power the LULC07 Profibus DP communication module. Failure to follow these instructions will result in death or serious injury. Data Available The available protection and control data depend on the control unit with which the LULC07 Profibus DP communication module is used. There are 3 types of control unit: standard (reference LUCA) advanced (reference LUCB/C/D) multifunction (reference LUCM) The table below can be used to check the data and commands you can access with each type of control unit: Control Unit 1672610 03/2009 Data - Commands Standard (LUCA) Advanced (LUCB/C/D) Multifunction (LUCM) Start and Stop Commands X X X Status (Ready, Running, Faulty) X X X Warning X X Automatic Reset and Remote Reset via the Bus X X Indication of the Motor Load X X Differentiation of Faults X X Remote Parameter Setting and Viewing of all Functions X "Log" Function X "Monitoring" Function X 13 Installation of the LULC07 Profibus DP Module Description and Installation of the Module Description of the LULC07 Connectors and LEDs on the LULC07 Profibus DP communication module. 1 2 3 4 5 6 7 8 9 Red "BF" Profibus DP communication status LED Red "ERR" Profibus DP communication module fault indication LED Green "24 V " LED indicating voltage presence at outputs OA1, OA3, LO1 Sub-D9 connector for the Profibus DP RS485 link and the 24V Aux Connection of the 24 V power supply for outputs OA1, OA3, LO1 Discrete input 2 Discrete input 1 Discrete output 1, assignable depending on the configuration register (685) 24 V pre-wired coil connector for the power base The assignment of OA1 depends on the configuration register (686 LSB). The assignment of OA3 depends on the configuration register (686 MSB). 10 Connector for communication with the advanced or multifunction control unit. 14 1672610 03/2009 Installation of the LULC07 Profibus DP Module BF LED The red (BF) LED has 3 different states: On communication fault Off communication OK LED Blinks On = 2500 ms, Off = 500 ms invalid Profibus DP address Error (ERR) LED The red error (ERR) LED has 3 different states: On 24V internal fault Off OK LED Blinks Repeatedly On = 500 ms Off = 500 ms. Profibus DP bus connection is faulty. LED The green 24 V 1672610 03/2009 LED has 2 different states: On outputs are supplied Off outputs are not supplied 15 Installation of the LULC07 Profibus DP Module Addressing with DIP Switches Addressing The Profibus DP communication module address is defined by the DIP switches which can be accessed on the underside of the module. The address code is in binary. The least significant bit is on the right., indicated by Values from 1 to 125 are accepted. The module is factory-supplied with address 1. . Address 1: 0000001 = 01H = 1dec Invalid addresses are not taken into account by the module. The module remains in state of error. NOTE: Addressing is only taken into account when the communication module is powered up. Example Example of configuration for address 48. 0110000 = 30H = 48dec 16 1672610 03/2009 Installation of the LULC07 Profibus DP Module Components Assembly on a Power Base Order of Mounting on a Base The LULC07 Profibus DP communication module is installed in a power base on the underside of the control unit which locks it in position. To install the module in the power base Step Action 1 Choose the prewired coil connection terminals. 2 Insert the LULC07 Profibus DP communication module. 3 Insert the control unit which locks the module. Location of the LULC07 Location of the LULC07 Profibus DP communication module 1672610 03/2009 17 Installation of the LULC07 Profibus DP Module Electrical Connection Power Supplies Schematic of the 24 V and the 24 V Aux power supplies Power Up with an LUCM Multifunction Control Unit The power supply source must be the same for the LULC07 Profibus DP communication module and the LUCM multifunction control unit. 18 1672610 03/2009 Installation of the LULC07 Profibus DP Module Power Supply for the LULC07 and Outputs OA1, OA3 and LO1 In order to operate, the LULC07 Profibus DP communication module must be powered by a 24 VDC source. 24 V supply of the LULC07 communication module is provided via the Profibus DP network cable. LUB••/LUS••/LU2B••/LU2S•• power bases 1 Link for connecting outputs OA1 and OA3 to terminals A1/A3/A2 on the starter. Power Base Connection of Terminals A1, A2 You have 2 options for connecting the power base terminals A1, A2: with a pre-wired link with a wire-to-wire link Wire-to-wire Link The wire-to-wire link is a connection between outputs OA1, OA3 and Power base terminals A1 and A2. This type of link is compulsory in the case of a reversing starter-controller created from an LU6M reversing unit for separate assembly. The wire-to-wire link is also used to insert for example a local control or an external stop command. 1672610 03/2009 19 Installation of the LULC07 Profibus DP Module Connection Capacities of the LULC07 Terminals The table below shows the conductor cross-sections to be used: Connection 1 conductor Type of Conductor Cross-Section (min. - max.) solid conductor stranded conductor 0.14 ... 1 mm2 Stranded conductor with cable end 0.25 ... 1 mm2 0.14 ... 1 mm not insulated insulated 20 AWG 24 ... AWG 18 AWG 24 ... AWG 20 0.25 ... 0.5 mm2 2 solid conductors 2 stranded conductors 2 conductors (same cross-section) AWG 26 ... AWG 18 AWG 26 ... AWG 18 2 0.14 ... 0.5 mm2 0.14 ... 0.75 mm 2 2 stranded conductors with cable end 0.25 ... 0.34 mm2 not insulated 0.75 mm2 insulated AWG 26 ... AWG 20 AWG 26 ... AWG 18 AWG 24 ... AWG 22 AWG 18 Connectors 3 and 6 pts Pitch 3.81 mm 0.15 in Tightening Torque 0.2/0.25 N.m. 1.77/2.21 in-lb Flat Screwdriver 2.5 mm 0.10 in 1672610 03/2009 Installation of the LULC07 Profibus DP Module Connection to the Profibus DP At a Glance Profibus DP is a linear bus, designed for transfers of high speed data. The PLC communicates with its peripheral devices via a high-speed serial link. Data exchange is mainly cyclic. Hints and Recommendation NOTE: Hints and recommendations need to be followed for wiring (Bus segment installation, wiring in and outside of buildings) constructing the Profibus DP cable (LU9RBnnn) constructing the Profibus DP connectors (LU9AD7) EMC measures, grounding and shielding For more details please refer to the Profibus DP for TeSys U Beginner's Guide. WARNING UNINTENDED EQUIPMENT OPERATION These devices must be installed, configured and used by qualified staff only. You must follow all current instructions, standards and regulations. Check the function settings before starting the motor. Do not downgrade or modify these devices. Incorrect configuration can cause unpredictable behavior of the devices. Failure to follow these instructions can result in death, serious injury, or equipment damage. Types of Connection to the Bus You need to connect the LULC07 communication module to the Profibus DP via a power TAP. It is possible to connect several TeSys U modules (belonging to e.g. the same electrical cabinet) via 1 single power TAP. The number of TeSys U modules that can be supplied by a single power TAP is only limited by the maximum current that can be delivered by 1 power TAP. The maximum current is 1.5 A. 1672610 03/2009 21 Installation of the LULC07 Profibus DP Module General Architecture with TeSys U 1 2 3 4 5 6 Master PLC DP slave not powered via the bus Profibus DP cable 2 wires (TSX PBS CA100 = 100 m, TSX PBS CA400 = 400 m) TeSys U power TAP (LU9GC7) Profibus DP cable 4 wires (LU9 RPB100 = 100 m, LU9 RPB400 = 400 m) TeSys U with Profibus DP communication module (communication module: LULC07, dedicated bus connector LU9AD7) NOTE: For detailed informations on installing the connector please refer to the respectice connector 's instruction sheet. 22 1672610 03/2009 Installation of the LULC07 Profibus DP Module Use of the LU9GC7 TeSys U Power TAP The minimum distance between 2 TeSys U Profibus DP is 0,30 m. NOTE: Profibus connector connected to the LU9GC7 TeSys U power TAP must not support line termination. The maximum length between the LU9GC7 where is applied the 24V SELV/PELV voltage and the last TeSys U supplied by this voltage is given in the tables below.(L2 and L3 sub-segment in the example of architecture). Number of the TeSys U Maximum Length Between LU9GC7 and the Last TeSys U Supplied 1 800 m (2,624 ft) 2 444m (1,456 ft) 3 278m (912 ft) 4 202m (662 ft) 5 158m (518 ft) 6 130m (426 ft) 7 110 m (360 ft) 8 96m (315 ft) 9 85m (278 ft) 10 76m (249 ft) 11 68m ( ft) 12 62m (223 ft) 13 57m (187 ft) 14 53m (173 ft) 15 49m (160 ft) 16 46m (150 ft) 17 43m (141 ft) 18 40m (131 ft) 19 38m (124 ft) 20 35m (114 ft) 21 34m (111 ft) 22 32m (105 ft) 23 30m (98 ft) 24 29m (95 ft) 25 27m (88 ft) 26 26m (85 ft) 27 25m (82 ft) 28 24m (78 ft) 29 23m (75 ft) 30 22m (72 ft) 31 21m (68 ft) NOTE: Baudrate limitations depend on the total length of the bus (L total = L1+L2+L3+L4). 1672610 03/2009 23 Installation of the LULC07 Profibus DP Module Transmission Features This table describes the transmission features of the Profibus DP bus: Topology Linear bus with line terminations Transmission Mode half duplex Transmission Rate 9.6 / 19.2 / 45.5 / 93.75 / 187.5 / 500 / 1500 Kbits/s, 3 / 6 / 12 Mbit/s Possible Transmission Media twisted pair line (standard version, type RS 485) fiber optic link waveguide Connector Sub-D9 Max. bus length without / with 3 repeaters Baud Rates 800 / 3200 m (2,624 / 10,498 ft) 9.6/19.2/45.5/93.75 kbit/sec 650 / 2,600 m (2,132 / 8,530 ft) 187.5 kbit/sec 300 / 1,200 m (984 / 3,936 ft) 500 kbit/sec 160 / 640 m (524 / 2,099 ft) 1.5 Mbit/sec 80 / 320 m (262 / 1,049 ft) 3/6/12 Mbit/sec Without repeater, maximum baudrate applies to the total length of a segment (L total = L1+L2+L3+L4 in the example of general architecture above.) Connecting the Profibus DP Bus Female 9 point SUB-D9 connector RS 485 Description 24 Number Signal Description 1 (Shield): not used 2 M24 24 V output voltage ground 3 RxD/TxD-P positive data transmission (RD+ / TD+) 4 CNTR-P positive repeater monitoring signal (direction monitoring) 5 DGND data transmission ground 6 VP line termination bias voltage 7 P24 input voltage 24 V, power supply circuit of the communication module 8 RxD/TxD-N negative data transmission (RD- / TD-) 9 CNTR-N (negative repeater monitoring signal, direction monitoring) not used 1672610 03/2009 Installation of the LULC07 Profibus DP Module Features of the Profibus DP Introduction Profibus DP is an open industrial standard for integrated communication. It is a serial fieldbus, which provides a decentralized connection between sensors, actuators and I/O modules produced by various manufacturers, and connects them to the superset control level. Profibus DP Profibus DP (Distributed Periphery - Master/Slave Network) is a Profibus communication profile which is optimized for performance. It is optimized for speed, efficiency and inexpensive hook-up cost and is designed especially for communication between automation systems and distributed peripheral equipment. The Profibus DP network supports multiple master systems with several slaves. Profibus DP Features The following table contains the most important features of Profibus DP: 1672610 03/2009 Standard EN 501 70 DIN 19245 Transmission Equipment (Physical Profile) EIA RS-485 Transfer Procedure half-duplex Bus Topology linear bus with active bus termination Bus Cable Type shielded twisted pair conductors Connector 9-pin D-Sub Number of Nodes on the Bus max. 32 with no repeaters max. 125 with 3 repeaters in 4 segments 25 Installation of the LULC07 Profibus DP Module 26 1672610 03/2009 Technical Characteristics 1672610 03/2009 Technical Characteristics 2 Conditions of Use and Technical Characteristics Characteristics The characteristics of the LULC07 Profibus DP communication module are as follows: conditions of use 24 V power supply for the outputs of the communication module 24 V Aux power supply for the internal logic of the communication module logic outputs OA1, OA3 and LO1 logic inputs LI1 and LI2 Conditions of Use The conditions of use for the LULC07 Profibus DP communication module are as follows: Certification UL, CSA Conformity to Standards IEC/EN 255-6, UL 508, CSA C22-2 No. 14 European Community Directives marking. In conformity with the essential requirements of low voltage (LV) equipment and electromagnetic compatibility (EMC) directives. Ambient Air Temperature Around the Device storage - 40 + 85 C (-40 +185 F) operation - 25 + 55 C (-13 +131 F) This is a class A product. In a residential environment this product may cause radio interference in which case you may be required to take adequate measures. 24 V Power Supply Circuit, Outputs Technical characteristics of the LULC07 Profibus DP communication module Supply Voltage 1672610 03/2009 Un 24 V operating range 20 ... 28 V Maximum Current Drawn - 1.5 A Resistance to Microbreaks compatible with Phaseo power supply 3 ms Protection against overvoltage yes against reverse polarity yes 27 Technical Characteristics 24 V Aux Power Supply Circuit, Logic Technical characteristics of the LULC07 Profibus DP communication module Supply Voltage Un 24 V Note: To keep a SELV Profibus connector, all the Profibus participants connected on the Profibus network must have a SELV Profibus connector. operating range 20 ... 28 V Maximum Current Drawn recorded 0.08 A Resistance to Microbreaks compatible with Phaseo power supply 3 ms NOTE: It is recommended to use Schneider Electric power supplies from the Phaseo product family such as e.g. ABL-7RE2402 or ABL-7CEM24. 24V power supplies must be equipped with a surge suppressor, in order to limit the transitory spreading. Keep the 24V cables away from the power cables, at least 30 cm (11.8 in.) and create crossovers at rightangles, if necessary. Logic Outputs OA1, OA3 and LO1 Technical characteristics of the LULC07 Profibus DP communication module Nominal Output Values voltage current 500 mA Maximum Output Values voltage 20 ... 28 V current 500 mA Coincidence Factor of the 3 Outputs 100% Output Response Time (Register 704) (Time between the request start bit and the change in the output state) <33,5 ms (OA1, OA3) for LUCA/B/C/D <35 ms (OA1, OA3) for LUCM against overvoltage yes against reverse polarity yes against short-circuits and overloads electronic circuit-breaker with automatic reset Number of Operating Cycles in millions of operating cycles 15 Maximum Rate in operating cycles per hour 3600 Protection 28 24 V 1672610 03/2009 Technical Characteristics Logic Inputs LI1 and LI2 Technical characteristics of the LULC07 Profibus DP communication module Nominal Input Values voltage 20 ... 28 V (positive logic) current 5.8 mA at state 1 Maximum Input Values at state 0 Response Time voltage >15 V current >2 mA voltage <5 V current <0.5 mA change to state 1 10 ms +/-30% change to state 0 10 ms +/-30% Type of Input Protection resistive gl fuse 1A Reaction Time The following measurements were made with Profibus running at 1.5 MBd Time/ms Action Comment 0 Output command RUN FWD Output_0.2 = internal register 704.2 <35 Output OA1 switching 42.6 Feedback on AO1 switching Input_5.0 = internal register 458.0 114 Feedback on poles closed Input_3.2 = internal register 457.2 762.7 Feedback on poles closed+Ready Input_0.0 and 0.1 = internal register 455.0 and 455.1 NOTE: If you need fast feedback do not use Input 0.1 (455.1) but Input 3.2 (457.2) which provides basically the same information. 1672610 03/2009 29 Technical Characteristics 30 1672610 03/2009 Software Implementation 1672610 03/2009 Software Implementation II Overview This chapter comprises information concerning the Software implementation of the LULC07 Profibus DP communication module. What's in this Part? This part contains the following chapters: Chapter 1672610 03/2009 Chapter Name Page 3 TeSys U Specific Profibus Information 33 4 Implementation via Profibus DP 37 5 Functions to Set 49 6 Managing Faults and Warnings 69 7 Acyclic Data Read/Write via DP V1 and the PKW Feature 75 8 Configuration of Predefined Functions 83 31 Software Implementation 32 1672610 03/2009 TeSys U Specific Profibus Information 1672610 03/2009 TeSys U Specific Profibus Information 3 Foreword This chapter comprises general information concerning the implementation via Profibus DP. What's in this Chapter? This chapter contains the following topics: Topic 1672610 03/2009 Page General Information on Implementation via Profibus DP 34 Modules as Presented in the GS*-File 35 33 TeSys U Specific Profibus Information General Information on Implementation via Profibus DP Overview The TeSys U communication module supports 2 Profibus application profiles based on DP V0 and DP V1 services: motor starter (MS) motor management starter (MMS) Cyclic/ Acyclic Services In general, data is exchanged via cyclic services and via acyclic services. The application profiles define for the cyclic data manufacturer independent data manufacturer specific data The fixed set and defined use of manufacturer independent data shall allow to replace a module from vendor A by a module from vendor B. DP V1 Read/ Write Services DP V1 read and write services allow to access all data that cannot be accessed by cyclic data exchange. PKW Feature In order to make this data accessible also for DP V0 masters, a special feature, called PKW (Periodically Kept in acyclic Words), is implemented. In cyclically exchanged data, there are encapsulated request and response frames. It will then be possible to access TeSys U system´s internal registers. See PKW: Encapsulated Acyclic Accesses in DP V0, page 78. NOTE: This feature can be selected/ deselected by picking the according item (module) from the list of offered choices during configuration with any Profibus configuration tool. 34 1672610 03/2009 TeSys U Specific Profibus Information Modules as Presented in the GS*-File Overview The TeSys U system is presented as a "modular device" on Profibus DP. The TeSys U system is described by a GS*-file. This file will be used by any Profibus configuration tool to get information about the device. There are several possible TeSys U variants depending on: Control Units: advanced, multifunction, standard configuration mode: remote or local (only for multifunction Control Unit) and communication profile: motor starter or motor management starter and support of PKW You have to pick one out of the following tables during the configuration. GSD Download Procedure The following table describes the steps to follow to download the GSD and icon files associated to Tesys U from the www.schneider-electric.com website: Step Action 1 Open the Schneider Electric website: www.schneider-electric.com. 2 Click Products and Services and then click Automation and Control. 3 In the Downloads section of the left menu bar, click Current offers. 4 In the Choose a function drop-down list, select Motor Control. In the Choose a range drop-down list, select TeSys U. In the Choose a type of document drop-down list, select Software/Firmware. 5 Select Communication Module Tesys U PROFIBUS LULC07 and download LULC07_GSD_DIB_FILES_V100.exe file. 6 Double-click LULC07_GSD_DIB_FILES_V100.exe on your hard disk. Click Accept in the ‘Licence for software downloaded from Schneider-Electric web sites’ window which opens, then browse for a destination folder and click Install. Click >Find. DANGER UNINTENDED EQUIPMENT OPERATION Do not modify the GS*-.file in any way. Modifying the GS*-file can cause unpredictable behavior of the devices. Failure to follow these instructions will result in death or serious injury. NOTE: If the GS*-file is modified in any way, the Schneider Electric guarantee is immediately voided. 1672610 03/2009 35 TeSys U Specific Profibus Information TeSys U Variants Short and long description of TeSys U variants without PKW Short Description as Shown in the GSD Long Description (Control Unit, Local/Remote Configuration, Profibus application profile) Sc Ad R MS V1.X advanced control unit remote configuration via Profibus application parameters motor starter Sc Mu L MS V1.X multifunction control unit local configuration motor starter Sc Mu L MMS V1.X multifunction control unit local configuration motor management starter Sc Mu R MS V1.X multifunction control unit remote configuration via Profibus application parameters motor starter Sc Mu R MMS V1.X multifunction control unit remote configuration via Profibus application parameters motor management starter Sc St R MS V1.X standard control unit remote configuration via Profibus application parameters motor starter Short and long description of TeSys U variants with PKW Short Description as Shown in the GSD Long Description (Control Unit, Local/Remote Configuration, Profibus application profile) Sc Ad R MS PKW V1.X advanced control unit remote configuration via Profibus application parameters motor starter Sc Mu L MS PKW V1.X multifunction control unit local configuration motor starter Sc Mu L MMS PKW V1.X multifunction control unit local configuration motor management starter Sc Mu R MS PKW V1.X multifunction control unit remote configuration via Profibus application parameters motor starter Sc Mu R MMS PKW V1.X multifunction control unit remote configuration via Profibus application parameters motor management starter Sc St R MS PKW V1.X standard control unit remote configuration via Profibus application parameters motor starter Local (L)/ Remote (R) configuration modes refer to configuration register 601 (read/ write with motor off), supported by Multifunction Control Unit V3.x. If in a local configuration mode... it means that 601.7 = 1. this mode preserves the local configuration made with the embedded HMI of the Multifunction Control Unit. it forbids any configuration management by PLC application through the network, thus preserving your local configuration. Therefore it is mandatory to select one of those TeSys U variants with the L for local configuration. If not the LULC07 will not enter data exchange! If in a remote configuration mode... it means that 601.7 = 0 this mode enables the PLC application to remotely configure the TeSys U device. Note: The parameters overwritten by the PLC application will be lost. this mode is useful in case of faulty device replacement. By default, the TeSys U device equipped with a Multifunction Control Unit V3.x is in remote configuration mode. 36 1672610 03/2009 Implementation via Profibus DP 1672610 03/2009 Implementation via Profibus DP 4 Overview This chapter comprises information concerning the implementation of the LULC07 Profibus DP communication module via Profibus DP. What's in this Chapter? This chapter contains the following topics: Topic 1672610 03/2009 Page Initialization 38 Profibus DP Application Parameter Settings 39 Profibus DP Configuration via the SyCon Configuration Tool 42 Factory Configuration 43 Customizing your Configuration 44 37 Implementation via Profibus DP Initialization Details of Initialization When the 24 VDC supply is powered up, the LULC07 Profibus DP communication module is initialized. Addressing is taken into account. The type of control unit and base is taken into account. During the initialization of the Profibus DP communication link the LULC07 Profibus DP communication module automatically activates the configuration parameters for TeSys U system as received via the Profibus DP parameter frame. NOTE: For more details about Profibus DP communication programming refer to the documentation of the PLC or Profibus DP master used. 38 1672610 03/2009 Implementation via Profibus DP Profibus DP Application Parameter Settings General You must configure the TeSys U system, via Profibus application parameters, before you can use it. You can use the factory settings (Factory Configuration, page 43) or customize your configuration (Customizing your Configuration, page 44). List of Parameters Depending of TeSys U variants you have access to the following list of parameters. List of parameters for ScAd: 1672610 03/2009 Parameter Description 682 comm loss fallback strategy 684.0 invert output OA1 684.1 invert output OA3 684.2 invert output LO1 685.0 - 685.7 Output LO1 assignment 686.8 - 686.15 Output OA3 assignment 688.0 recovery mode after a stop 602.0 - 602.2 reset mode 39 Implementation via Profibus DP List of parameters for ScMu: 40 Parameter Description 682 comm loss fallback strategy 684.0 invert output OA1 684.1 invert output OA3 684.2 invert output LO1 685.0 - 685.7 Output LO1 assignment 686.0 - 686.7 Output OA1 assignment 686.8 - 686.15 Output OA3 assignment 688.0 recovery mode after a stop 650.0 - 650.4 control unit language 651.0 display of average current 651.1 display of thermal level 651.2 display of L1 current 651.3 display of L2 current 651.4 display of L3 current 651.5 display of ground current 651.6 display of last trip 651.7 display of phase imbalance 651.8 display of operating time 652 full load Amps setting 602.0 - 602.2 reset mode 602.3 control Unit comm. parity 602.4 comm control enable/disable 603 CU comm. on LUCM port address 604 CU comm. on LUCM port bd rate 605 overcurrent trip threshold 606 load class 607 thermal reset time (s) 608 thermal reset threshold 609 thermal warning threshold 610 ground fault trip timeout 611 ground fault trip threshold 612 ground fault warning threshold 613 phase imb. trip time starting 614 phase imb. trip time running 615 phase imb. trip threshold 616 phase imb. warning threshold 617 jam trip timeout (s) 618 jam trip threshold (%FLA) 619 jam warning threshold (%FLA) 620 undercurrent trip timeout 621 undercurrent trip threshold 622 undercurrent warn. threshold 623 long start trip timeout (s) 624 long start trip threshold 625 long start warning threshold 1672610 03/2009 Implementation via Profibus DP List of parameters for ScSt: Parameter Description 682 comm loss fallback strategy 684.0 invert output OA1 684.1 invert output OA3 684.2 invert output LO1 685.0 - 685.7 Output LO1 assignment 686.0 - 686.7 Output OA1 assignment 686.8 - 686.15 Output OA3 assignment 688.0 recovery mode after a stop NOTE: For more details refer to the TeSys U Communication Variables User’s Manual. 1672610 03/2009 41 Implementation via Profibus DP Profibus DP Configuration via the SyCon Configuration Tool Introduction With SyCon you can configure the Profibus DP network and generate an ASCII file to import into the PLC configuration in Unity Pro (or PL7 or Concept). The following chapter illustrates the configuration with a Premium PLC. The starting point for this example is an existing configuration with a Premium TSX PBY 100 as the Profibus DP master and a slave in a Profibus DP network. Configuration of TeSys U System Example of how to add a TeSys U with a Multifunction Control Unit in remote configuration mode in the network at node address 35 as "Motorstarter 17" with the Motor Starter profile (MS) as DP V0 slave. Step Action 1 Click Insert Slave to open the Insert Slave window. 2 Select TeSys U Profibus as a new slave out of the Available Slaves list , press the Add>> button and confirm with OK. 3 Select slave x (TeSys U Profibus) and double click to open the Slave Configuration window. 4 Set Station address to e.g. 35. 5 Change the default Description slave x to e.g. Motorstarter 17. 6 Select the correct combination of base and control unit (profile: motor starter SC Mu R MS V1.x). Note: Refer to Functions for Profibus DP Profiles, page 51. 7 Click the Common button to open the tab for the common parameters and deselect DP V1. 8 Click the Parameter Data... button to open the All Parameter Data in hex description window. 9 Click the Module button to open the Index Parameter Data window to set the application parameter values (= TeSys U remote configuration). 10 Double click on a single parameter to open an additional selection table. Here you can pick one of the offered values for e.g. the Fallback strategy. 11 Confirm the selected values with OK and close all dialog windows via their OK buttons. Save and Export the Network Configuration Save and export the configuration for import into the PLC configuration (PL7, Concept or Unity Pro). Step 42 Action 1 Click File Save as to open the Save as window. 2 Choose the project path and a file name and press the Save button. 3 Export, via File Export ASCII, the configuration as an ASCII file. 4 Now you can import the Profibus DP configuration into PLC configuration (PL7, Concept or Unity Pro).) 1672610 03/2009 Implementation via Profibus DP Factory Configuration Setting communication module parameters allows you to determine the operating mode the reset mode on thermal overload fault The configuration registers (600-630) and setting registers (650-688) are in a read/write access. Factory default values are Subject Register Factory value Meaning Reset Mode After Thermal Overload Fault 602.0 1 Manual mode Validate the Communication Between LUCM and LULC07 602.4 1 Forced to 0 (zero), this bit forbids any communication between LUCM multifunction control unit and LULC07 communication module. Fallback Mode of Control Outputs on Communication Loss 682 2 Forced stop power base: OA1 and OA3 to 0 LULC07 Outputs Inversion 684 0 outputs status reflects control bits 685 LSB 686 LSB 686 MSB 2 12 13 LO1 reflects control bit 700.0 OA1 reflects control bit 704.0 OA3 reflects control bit 704.1 Recovery Mode After Power-Off 688 0 The outputs recover the status they had before power-off. Identification of the Control Unit 690 0 The control unit is identified automatically. Assignment of: - output LO1 - output OA1 - output OA3 NOTE: For more details refer to the "TeSys U Communication Variables User’s Manual. 1672610 03/2009 43 Implementation via Profibus DP Customizing your Configuration General You can use the factory settings (see Factory Configuration, page 43) or customize your configuration. The following parameters can be set control unit configuration control unit ID fallback mode inversion of the output states assignment of outputs LO1, OA1, OA3. restart after a power cut control unit forcing Access to Parameters The communication module I/O parameters are set by the module Profibus DP port via the application PLC the multifunction control unit terminal port Fallback Mode (Reg. 682) Register 682 (read/write access) is used to adjust the fallback mode in case of a communication loss with the PLC. Register 682 is part of the Profibus DP module parameter frame. Register 682 Value Fallback Mode 0 Ignored 1 Freeze outputs 2 Stop 3 Signal comm loss warning 4 Force run forward 5 Force run reverse WARNING AUTOMATIC RESTART OF THE MOTOR If communication is stopped, the outputs OA1-OA3 take the status corresponding to the selected fallback mode (register 682), but the control bits 704.0 and 704.1 are not modified. When a loss of communication warning is acknowledged (register 703 or pushbutton on the controller), if profile MS (Motor Starter) is selected, the motor will automatically restart if the control bits 704.0 or 704.1 were not previously overwritten to zero by the PLC application. Failure to follow these instructions can result in death, serious injury, or equipment damage. Description of the different fallback modes: Fallback Mode Ignored (reg 682 = 0) 44 Loss of Communication Communication Recover No detection of the loss of communication No detection of the loss of communication OA1 and OA3 keep their status OA1 and OA3 keep their status Loss of Communication Acknowledgement No acknowledgement of the loss of communication 1672610 03/2009 Implementation via Profibus DP Fallback Mode Freeze outputs (reg 682 = 1) Stop (reg 682 = 2) Signal comm loss warning (reg 682 = 3) Force run forward (reg 682 = 4) Force run reverse (reg 682 = 5) Loss of Communication Communication Recover Loss of Communication Acknowledgement OA1 and OA3 keep their status OA1 and OA3 keep their status On rising edge by bit 703.3 (do not leave set to 1) (703.3 = output MS 1.6 and output MMS 1.6) ERR LED blinking on the front face ERR LED blinking on the front face Once the acknowledgement is done, the last command stored in register 704 is enabled Every new On/Off command is stored but with no impact on OA1 and OA3 ERR LED switches off OA1 and OA3 are forced to 0 OA1 and OA3 are forced to 0 On rising edge by bit 703.3 (do not leave set to 1) (703.3 = output MS 1.6 and output MMS 1.6) ERR LED blinking on the front face ERR LED blinking on the front face Once the acknowledgement is done, the last command stored in register 704 is enabled Every new On/Off command is stored but with no impact on OA1 and OA3 ERR LED switches off OA1 and OA3 keep their status OA1 and OA3 keep their status On rising edge by bit 703.3 (do not leave set to 1) (703.3 = output MS 1.6 and output MMS 1.6) ERR LED blinking on the front face ERR LED blinking on the front face Every new On/Off command is considered and has an impact on OA1 and OA3 ERR LED switches off OA1 is forced to 1 OA3 is forced to 0 OA1 is forced to 1 OA3 is forced to 0 On rising edge by bit 703.3 (do not leave set to 1) (703.3 = output MS 1.6 and output MMS 1.6) ERR LED blinking on the front face ERR LED blinking on the front face Once the acknowledgement is done, the last command stored in register 704 is enabled Every new On/Off command is stored but with no impact on OA1 and OA3 ERR LED switches off OA1 is forced to 0 OA3 is forced to 1 OA1 is forced to 0 OA3 is forced to 1 On rising edge by bit 703.3 (do not leave set to 1) (703.3 = output MS 1.6 and output MMS 1.6) ERR LED blinking on the front face ERR LED blinking on the front face Once the acknowledgement is done, the last command stored in register 704 is enabled Every new On/Off command is stored but with no impact on OA1 and OA3 ERR LED switches off NOTE: The red ERR LED flashes to indicate a loss of communication (fault on Time Out). NOTE: You can configure a fallback behavior via Reg. 682 only for the outputs controlled via Run Forward or Run Reverse (OA1 and OA3 via Reg. 704). The application parameter settings are Result of Forward direction and Result of Reverse direction. Any output controlled via reg. 700 (application parameter setting output forced by 700.x) will be driven to 0 (zero) as fallback value. This is always the case for LO1. 1672610 03/2009 45 Implementation via Profibus DP Inverting the Output Relays (NO <==> NC) (Reg 684) Depending on requirements (signaling, run, stop, etc.), it is possible to assign NO or NC behavior to outputs OA1, OA3 and LO1 by configuring register 684. Register 684 is part of the Profibus DP module parameter frame. To do this, follow the procedure below Action Comment 1 Define the output concerned ==> register 684 Output inverter: power base invert output OA1 ------------------------------------------- invert output OA3 ------------------------------------------- invert output LO1 -------------------------------------------- bit Define the assignment or control for the output concerned power base output LO1 (Reg 685 LSB Profibus DP parameter byte 13) output OA1 (Reg 686 LSB Profibus DP parameter byte 16) output OA3 (Reg 686 MSB Profibus DP parameter byte 15) value 0 - 45 2 _.0 - 1 _.1 - 1 _.2 - 1 NOTE: To modify the assignment (factory value), write another value (0 to 45), referring to the list of registers. Configuring Output LO1 (Reg 685 LSB) Assignment/control (factory value) of output LO1 of the LULC07 Profibus DP communication module Reg• Bit Value Factory Setting 685 0-7 0 - 45 2 Comment output LO1 = image of register 700.0 (control of output LO1) Reg. 685 LSB is part of the Profibus DP module parameter frame. Configuring Output OA1 (Reg 686 LSB) Assignment/control (factory value) of output OA1 of the LULC07 Profibus DP communication module Reg• Bit Value Factory Setting 686 0-7 0 - 45 12 Comment output OA1 = image of register 704.0 (control of output OA1) Reg. 686 LSB is part of the Profibus DP module parameter frame. Configuring Output OA3 (Reg 686 MSB) Assignment/control (factory value) of output OA3 of the LULC07 Profibus DP communication module Reg• Bit Value Factory Setting 686 8 - 15 0 - 45 13 Comment Output OA3 = image of register 704.1 (control of output OA3) Reg. 686 MSB is part of the Profibus DP module parameter frame 46 1672610 03/2009 Implementation via Profibus DP Recovery Mode After Stopping (Reg 688) If you use register 704 to control outputs OA1-OA3, writing value 1 to register 688 locks the motor and prevents it from restarting after the occurrence of certain events: Loss followed by restoration of 24 VDC (outputs OA1-OA3). Change in position of rotary knob on power base followed by return to Ready position. When one of these events occurs, the control bits 704.0 and 704.1 (outputs OA1-OA3) are forced to 0 automatically. Once these conditions have disappeared, control of the motor can be restored by sending a new run command. WARNING AUTOMATIC RESTART OF THE MOTOR In case of a cyclic writing to register 704 (e.g., an LUFP• gateway in its predefined configuration), this monitoring function must be used with caution. The application program must take this state into account and request that bits 704.0 or 704.1 are written to 0. Otherwise, when this event disappears, the motor will restart automatically. Failure to follow these instructions can result in death, serious injury, or equipment damage. Control Unit Forcing (Reg 690) The control unit is identified automatically, but identification can be forced. Value Comment 0 Default value. The system automatically identifies the type of control unit connected (standard, advanced, multifunction). 1 If the value is set to 1, this deactivates automatic identification and forces identification of a standard or advanced control unit. This value can be set when replacing temporary standard or advanced control unit by a multifunction in spy mode, displaying faults, currents etc. 2 If the value is set to 2, this deactivates automatic identification and forces identification of a multifunction control unit. When this value is set, standard and advanced control units are not accepted. NOTE: This change in value is only taken into account after the communication module has been powered down and then powered up again. NOTE: The register 690 is not included in the Profibus DP module parameter frame. The value can be changed remotely by PKW or acyclic mechanism, but this value is not updated automatically when Profibus network starts. 1672610 03/2009 47 Implementation via Profibus DP 48 1672610 03/2009 Functions to Set 1672610 03/2009 Functions to Set 5 Overview This chapter comprises information concerning the functions of the LULC07 Profibus DP communication module. What's in this Chapter? This chapter contains the following topics: Topic 1672610 03/2009 Page Functions in General 50 Functions for Profibus DP Profiles 51 Diagnostic Telegram for Profibus DP 66 49 Functions to Set Functions in General Customizing Control 1 output LO1 which is configured by register 685. 2 free inputs LI1 and LI2. Status Display All the I/O managed by this module are read via the Profibus DP port. The logic inputs (LI1 and LI2) can be used with a power base. For details, refer to the tables in chapter Functions for Profibus DP Profiles, page 51. 50 1672610 03/2009 Functions to Set Functions for Profibus DP Profiles General The modes of operation depend on the used Profibus DP Application Profile. The following 2 device classes according to the Profibus DP Low Voltage Switch Gear profile are supported: motor starter (MS) motor management starter (MMS) The usual motor starter uses level triggered signal. The motor management starter uses for the cyclic data edge triggered signals. Not every combination of a control unit with a base supports both profiles. For more information on the required combinations refer to Modules as Presented in the GS*-File, page 35. Operational States (MS) Operational states of a motor starter 1672610 03/2009 51 Functions to Set Operational States (MMS) Example of operational states of a motor management starter (normal operation) NOTE: The pulse width has to be more than 1 sec. Sequence Description 0 device switched off (no current, no internal stored switch-on command) 1 user: button REVERSE/FORWARD activated 1.1 - actual or internal stored switch-on command activated 1.2 - after a delay time (e.g. relay,...) current will be measured 1.3 - a measured current together with an actual or internal stored switch-on command (RUN REVERSE/FORWARD) effects the confirmation signal RUN FORWARD/REVERSE 2 user: button OFF activated 2.1 - the confirmation signal RUN FORWARD/REVERSE will be set back 2.2 - after stop of the motor no current will be measured 2.3 - no current and no (internal) stored switch-on command effects the OFF signal Motor Starter - Data in Byte Format Input data in byte format: Input 0 to Input 7 Position Description LUCA LUCB LUCC LUCD LUCM Input 0.0 Ready All the conditions that will permit the operation of a switching device by the remote host controller have been fulfilled. (455.0) + + + Input 0.1 On The main circuit contacts are closed. (455.1) + + + Input 0.2 Fault A fault condition exists. (455.2) + + + Input 0.3 Warning A warning condition exists. (455.3) + + + Input 0.4 Manufacturer Specific status register (455.4) TeSys U trip status 0 = not tripped 1 = tripped + + + Input 0.5 Manufacturer Specific status register (455.5) reset authorized 0 = no fault or fault with reset inhibited 1 = reset is authorized now - + + Input 0.6 Manufacturer Specific status register (455.6) control unit supplied by A1-A2 0 = control unit not supplied by A1-A2 1 = control unit supplied by A1-A2 - - + 52 1672610 03/2009 Functions to Set Position Description LUCA LUCB LUCC LUCD LUCM Input 0.7 Manufacturer Specific status register (455.7) motor running 0 = motor not running 1 = motor running - + + Input 1.0 - 1.5 Motor Current The motor current expressed as a percentage of the motor rated current, Ie. (455.8 - 455.13) - + + Input 1.6 Reserved reserved for future extensions + + + Input 1.7 Ramping start in progress (455.15): 1 = ascending current is greater than 10% FLA 0 = descending current is lower than 150% FLA - + + Input 2 Mechanical and power status MSB mechanical and power status high byte (457.8 - 457.15) not significant + + + Input 3 Mechanical and power status LSB mechanical and power status low byte (457.0 - 457.7) significant bits (0 - 3) of register 457: bit 0 = button position On(0 = Off) bit 1 = button position Trip (0 = Not tripped) bit 2 = contactor state On bit 3 = 24Vdc power supply present on outputs bits 4 to 7 not significant + + + Input 4 I/O module status MSB I/O module status high byte (458.8 - 458.15) significant bits (8 - 9) of register 458: bit 8 = LI1 status bit 9 = LI2 status bits 10 to 15 not significant + + + Input 5 I/O module status LSB I/O module status low byte (458.0 - 458.7) significant bits (0 - 2) of register 458: bit 0 =OA1 status bit 1 = OA3 status bit 2 = LO1 status bits 3 to 7 not significant + + + Input 6 Reserved reserved for future extensions - - - Input 7 Reserved reserved for future extensions - - - + available - not available WARNING AUTOMATIC RESTART OF THE MOTOR The motor will automatically restart if the Run forward (Output 0.0) and Run backward (Output 0.1) control bits were not previously overwritten to zero by the PLC application on the occurrence of one of the following events: Loss followed by restoration of the outputs power supply 24 VDC Change in position of rotary knob on power base followed by return to Ready position. Communication break followed by restoration. Failure to follow these instructions can result in death, serious injury, or equipment damage. 1672610 03/2009 53 Functions to Set Output data in byte format: Output 0 to Output 3 Position Description LUCA LUCB LUCC LUCD LUCM Output 0.0 Run Forward Instructs the starter to energize the motor in the forward direction. (704.0) + + + Output 0.1 Run Reverse Instructs the starter to energize the motor in the reverse direction. (704.1) + + + Output 0.2 Reserved (reserved, must be 0) - - - Output 0.3 Trip Reset Instructs the starter to reset all re-settable trips (one + of the precondition for READY). (704.3) + + Output 0.4 Emergency Start Instructs the starter to override any fault condition and allows starting. (reset thermal memory) (705.2) - - + Output 0.5 Reserved (reserved, must be 0) - - - Output 0.6 Reserved (reserved, must be 0) - - - Output 0.7 Reserved (reserved, must be 0) - - - Output 1.0 Reserved (reserved, must be 0) - - - Output 1.1 Reserved (reserved, must be 0) - - - Output 1.2 Manufacturer Specific 1 (reserved, must be 0) - - - Output 1.3 Manufacturer Specific 2 (reserved, must be 0) - - - Output 1.4 Manufacturer Specific 3 initiate shunt trip (704.12) - - + Output 1.5 Manufacturer Specific 4 (reserved, must be 0) - - - Output 1.6 Manufacturer Specific 5 reset warning (703.3) + + + Output 1.7 Manufacturer Specific 6 (reserved, must be 0) - - - Output 2 Output control MSB output control high byte (700.8 - 700.15) reserved - - - Output 3 Output control LSB output control low byte (700.0 - 700.7) significant bits (0 - 2) of register 700: bit 0 = control of output LO1 (if 685=2) bit 1 = control of output OA1 (if 686 LSB=2) bit 2 = control of output OA3 (if 686 MSB=2) bit 3 to 7 reserved + + + + available - not available 54 1672610 03/2009 Functions to Set Profile Motor Starter - Data in Word Little Endian Format These tables give a description of words arrangement when the motor starter TeSys U is connected to a PLC using little endian format (example: Premium PLC). Input data in word little endian format: Word m to Word m+3 Word Arrangement Word m MSB LSB Word m+1 Word m+2 MSB 1672610 03/2009 bit 15 ramping = start in progress bit 14 not significant bit 8 - 13 average motor current % FLA bit 7 motor running bit 6 A1/A2 terminals powered up bit 5 fault reset authorized bit 4 tripped bit 3 warning bit 2 fault bit 1 on bit 0 ready bit 12 - 15 not significant MS standard byte 1 Manufacturer specific (455.8 - 455.15) Input 1 MS standard byte 0 (455.0 - 455.7) Input 0 mechanical & power status LSB (457.0 - 457.7) Input 3 bit 11 24Vdc power supply present on outputs bit 10 contactor state On bit 9 button position Trip (0 = Not tripped) bit 8 button position On (0 = Off) LSB bit 0 - 7 not significant mechanical & power status MSB (457.8 - 457.15) Input 2 MSB bit 11 - 15 not significant LO1 status I/O Module status LSB (458.0 - 458.7) Input 5 bit 10 bit 9 OA3 status bit 8 OA1 status I/O Module status MSB (458.8 - 458.15) Input 4 MSB not significant (reserved for future extension) Input 7 LSB not significant (reserved for future extension) Input 6 LSB Word m+3 Byte N bit 2 - 7 not significant bit 1 LI2 status bit 0 LI1 status 55 Functions to Set Output data in word little endian format: Word n to Word n+1 Word Arrangement Word n MSB LSB Word n+1 MSB LSB 56 Byte N bit 15 reserved bit 14 reset warning bit 13 reserved bit 12 shunt trip bit 8 - 11 reserved bit 7 reserved bit 6 reserved bit 5 reserved bit 4 emergency start (705.2) bit 3 trip reset bit 2 reserved bit 1 run reverse (704.1) bit 0 run forward (704.0) bit 11 - 15 reserved bit 10 control of output OA3 (if 686 MSB=2) bit 9 control of output OA1 (if 686 LSB=2) bit 8 control of output LO1 (if 685=2) bit 0 - 7 reserved MS standard byte 1 Manufacturer specific Output 1 MS standard byte 0 Output 0 outputs control LSB 700.7) (700.0 - Output 3 outputs control MSB 700.15) (700.8 - Output 2 1672610 03/2009 Functions to Set Profile Motor Starter - Data in Word Big Endian Format These tables give a description of words arrangement when the motor starter TeSys U is connected to a PLC using big endian format (Example: Siemens PLC) Input data in word big endian format: Word m to Word m+6 Word Arrangement Word m MSB LSB Word m+2 Word m+4 1672610 03/2009 bit 15 motor running bit 14 A1/A2 terminals powered up bit 13 fault reset authorized bit 12 tripped bit 11 warning bit 10 fault bit 9 on bit 8 ready bit 7 ramping = start in progress bit 6 not significant MS standard byte 0 (455.0 - 455.7) Input 0 MS standard byte 1 manufacturer specific (455.8 - 455.15) Input 1 bit 0 - 5 average motor current % FLA MSB bit 8 - 15 not significant mechanical & power status MSB (457.8 - 457.15) Input 2 LSB bit 4 - 7 not significant 24Vdc power supply present on outputs mechanical & power status LSB (457.0 - 457.7) Input 3 bit 3 bit 2 contactor state On bit 1 button position Trip (0 =Not tripped) bit 0 button position On (0 =Off) bit 10 - 15 not significant LI2 status I/O Module status MSB (458.8 - 458.15) Input 4 bit 9 bit 8 LI1 status bit 3 - 7 not significant I/O Module status LSB (458.0 - 458.7) Input 5 MSB LSB Word m+6 Byte N bit 2 LO1 status bit 1 OA3 status bit 0 OA1 status MSB bit 8 - 15 not significant (reserved for future extension) Input 6 LSB bit 0 - 7 not significant (reserved for future extension) Input 7 57 Functions to Set Output data in word big endian format: Word n to Word n+2 Word Arrangement Word n MSB LSB Word n+2 58 Byte N bit 15 reserved bit 14 reserved bit 13 reserved bit 12 emergency start bit 11 trip reserved bit 10 reserved bit 9 run reverse bit 8 run forward bit 7 reserved bit 6 reset warning bit 5 reserved bit 4 initiate shunt trip MS standard byte 0 Output 0 MS standard byte 1 Manufacturer specific Output 1 bit 3 reserved bit2 reserved bit1 reserved bit 0 reserved MSB bit 8 - 15 reserved outputs control MSB (700.8 - 700.15) Output 2 LSB bit 3 - 7 reserved Output 3 bit 2 control of output OA3 (if 686 MSB=2) outputs control LSB (700.0 - 700.7) bit 1 control of output OA1 (if 686 LSB=2) bit 0 control of output LO1 (if 685=2) 1672610 03/2009 Functions to Set Motor Management Starter - Cyclic Data in Byte Format These tables give a description of Profile motor management starter cyclic input and output data. Input data in byte format (only supported with multifunction Control Unit LUCM••BL): Input 0 to Input 9 1672610 03/2009 Position Description LUCA LUCB LUCC LUCD LUCM Input 0.0 Run Reverse The main circuit contacts are closed. - + + Input 0.1 Off Indication that the device is in the OFF-State. - + + Input 0.2 Run Forward The main circuit contacts are closed. - + + Input 0.3 Overload Warning A overload warning condition exists. (461.3) - + + Input 0.4 Lockout Time not significant - - - Input 0.5 Auto Mode Indication to a remote host controller that the commands RUN FORWARD,RUN REVERSE and STOP will / will not be accepted. 0 = LOCAL CONTROL 1 = AUTO MODE + + + Input 0.6 Fault A fault condition exists. (455.2) + + + Input 0.7 Warning A warning condition exists. (455.3) + + + Input 1.0 not significant - - - Input 1.1 not significant - - - Input 1.2 not significant - - - Input 1.3 not significant - - - Input 1.4 Manufacturer Specific ready (455.0) + + + Input 1.5 Manufacturer Specific motor ramping start in progress (455.15): 1 = ascending current is greater than 10% FLA 0 = descending current is lower than 150% FLA - + + Input 1.6 Manufacturer Specific motor running (455.7) - + + Input 1.7 Manufacturer Specific tripped (455.4) + + + Input 2 IAV average current %FLA MSB IAV average current %FLA (466.8 - 466.15) - + + Input 3 IAV average current %FLA LSB IAV average current %FLA (466.0 - 466.7) - + + Input 4 Mechanical and power status MSB mechanical and power status high byte (457.8 - 457.15) not significant + + + Input 5 Mechanic and power status LSB mechanical and power status low byte (457.0 - 457.7) significant bits (0 - 3) of register 457: bit 0 = button position On (0 = Off) bit 1 = button position Trip (0 = Not tripped) bit 2 = contactor state On bit 3 = 24Vdc power supply present on outputs bits 4 to 7 not significant + + + 59 Functions to Set 60 Position Description LUCA LUCB LUCC LUCD LUCM Input 6 I/O module status MSB I/O module status high byte (458.8 - 458.15) significant bits (8 and 9) of register 458: bit 8 = LI1 status bit 9 = LI2 status bits 10 to 15 not significant + + + Input 7 I/O module status LSB I/O module status low byte (458.0 - 458.7) significant bits (0 - 2) of register 458: bit 0 = OA1 status bit 1 = OA3 status bit 2 = LO1 status bits 3 to 7 not significant + + + Input 8 Reserved reserved for future extensions - - - Input 9 Reserved reserved for future extensions - - - 1672610 03/2009 Functions to Set Output data in byte format (LUCM••BL): Output 0 to Output 5 Position Description LUCA LUCB LUCC LUCD LUCM Output 0.0 Run Reverse Instructs the starter to energize the motor in the reverse direction. + + + Output 0.1 Off Instructs the device to go to the OFF-State. 0 = ENABLE RUN FORWARD/ RUN REVERSE 1 = OFF + + + Output 0.2 Run Forward Instructs the starter to energize the motor in the forward direction. + + + Output 0.3 Self Test Launch automatic thermal overload fault test (704.5) - - + Output 0.4 Emergency Start reset thermal memory Instructs the starter to override any fault condition and allows starting. (705.2) Note: This command is required in process and other industries where sacrificial demands can be made on motors and associated equipment in order to achieve an orderly outcome in emergency circumstances. By setting this bit to 1, the thermal state of the motor is lost: The thermal protection will no longer protect an already warm motor. - + Output 0.5 Auto Mode Instructs the starter not to accept the commands Run reverse, Run Forward and Off received form the remote host. 0 = LOCAL CONTROL 1 = AUTO MODE + + + Output 0.6 Trip Reset trip reset + Instructs the starter to reset all re-settable trips (one of the precondition for READY). (704.3) + + Output 0.7 Reserved reserved, must be 0 - - - Output 1.0 to 1.5 Reserved reserved, must be 0 - - - Output 1.6 Manufacturer Specific reset warning (703.3) + + + Output 1.7 Manufacturer Specific reserved, must be 0 - - - Output 2 Manufacturer Specific reserved, must be 0 - - - Output 3 Manufacturer Specific reserved, must be 0 - - - Output 4 Reserved reserved, must be 0 - - - Output 5 Output control LSB output control low byte (700.0 - 700.7) significant bits (0 - 2) of register 700: bit 0 = control of output LO1 (if 685=2) bit 1 = control of output OA1 (if 686 LSB=2) bit 2 = control of output OA3 (if 686 MSB=2) bit 3 to 7 reserved + + + + available - not available 1672610 03/2009 61 Functions to Set Profile Motor Management Starter - Data in Word Little Endian Format These tables give a description of words arrangement when the motor starter TeSys U is connected to a PLC using little endian format (example: Premium PLC). Input data in word little endian format: Word m to Word m+4 Word Arrangement Word m MSB LSB Word m+1 Word m+2 Word m+3 tripped (455.4) bit 14 motor running (455.7) bit 13 motor ramping (455.15) bit 12 ready (455.0) bit 8 - 11 not significant bit 7 warning (455.3) bit 6 fault bit 5 auto mode bit 4 not significant bit 3 overload warning bit 2 run forward bit 1 off MMS standard byte 1 Manufacturer specific Input 1 MMS standard byte 0 Input 0 bit 0 run reverse bit 8 - 15 IAV average current % FLA LSB (466.0 - 466.7) IAV average current % FLA LSB Input 3 LSB bit 0 - 7 IAV average current % FLA MSB (466.8 - 466.15) IAV average current % FLA MSB Input2 MSB bit 12 - 15 not significant bit 11 24Vdc power supply present on outputs mechanical & power status LSB Input 5 (457.0 - 457.7) bit 10 contactor state On bit 9 button position Trip (0 = Not tripped) bit 8 button position On LSB bit 0 - 7 not significant mechanical & power status MSB (457.8 - 457.15) Input 4 MSB bit 11 - 15 not significant I/O Module status LSB (458.0 458. 7) Input 7 I/O Module status MSB (458.8 - 458.15) Input6 not significant Input 9 not significant Input 8 MSB LSB 62 bit 15 MSB LSB Word m+4 Byte N bit 10 LO1 status bit 9 OA3 status bit 8 OA1 status bit 2 - 7 not significant bit 1 LI2 status bit 0 LI1 status (0 = Off) not significant (reserved for future extension) 1672610 03/2009 Functions to Set Output data in word little endian format: Word n to Word n+2 Word Arrangement Word n MSB LSB Word n+1 MSB Byte N bit 15 reserved bit 14 reset warning (703.3) bit 8 - 13 reserved bit 7 reserved bit 6 trip reset bit 5 auto mode bit 4 emergency start (705.2) bit 3 self test bit 2 run forward bit 1 off bit 0 run reverse Reserved LSB Word n+2 MSB LSB 1672610 03/2009 bit 11 - 15 reserved bit 10 control of output OA3 (if 686 MSB=2) bit 9 control of output OA1 (if 686 LSB=2) bit 8 control of output LO1 (if 685=2) bit 0 - 7 reserved MMS standard byte 1 Manufacturer specific Output 1 MMS standard byte 0 Output 0 reserved Output 3 reserved Output 2 outputs control LSB (700.0 - 700.7) Output 5 outputs control MSB (700.8 - 700.15) Output 4 63 Functions to Set Profile Motor Management Starter - Data in Big Endian Format These tables give a description of words arrangement when the motor starter TeSys U is connected to a PLC using big endian format (Example: Siemens PLC). Input data in word big endian format: Word m to Word m+8 Word arrangement Word m MSB LSB Word m+2 Word m+4 Word m+6 64 bit 15 warning bit 14 fault bit 13 auto mode bit 12 not significant bit 11 overload warning bit 10 run forward bit 9 off bit 8 run reverse bit 7 tripped bit 6 motor running bit 5 motor ramping bit 4 ready MMS standard byte 0 Input 0 MMS standard byte 1 manufacturer specific Input 1 bit 0 - 3 not significant MSB bit 8 - 15 IAV average current % FLA MSB (466.8 - 466.15) IAV average current % FLA MSB Input 2 LSB bit 0 - 7 IAV average current % FLA LSB (466.0 - 466.7) IAV average current % FLA LSB Input 3 MSB bit 8 - 15 not significant mechanical and power status MSB (457.8 - 457.15) Input 4 LSB bit 4 - 7 not significant 24Vdc power supply present on outputs mechanical and power status LSB (457.0 - 457.7) Input 5 bit 3 bit 2 contactor state On bit 1 button position Trip (0 =Not tripped) bit 0 button position On bit 10 - 15 not significant LI2 status I/O Module status MSB (458.8 - 458.15) Input 6 bit 9 bit 8 LI1 status bit 3 - 7 not significant I/O Module status LSB (458.0 - 458.7) Input 7 MSB LSB Word m+8 Byte N bit 2 LO1 status bit 1 OA3 status (0 =Off) bit 0 OA1 status MSB bit 8 - 15 not significant (reserved for future extension) Input 8 LSB bit 0 - 7 not significant (reserved for future extension) Input 9 1672610 03/2009 Functions to Set Output data in word big endian format: Word n to Word n+4 Word arrangement Word n MSB LSB 1672610 03/2009 Byte N bit 15 reserved bit 14 trip reset bit 13 auto mode bit 12 emergency start (705.2) bit 11 self test bit 10 run forward bit 9 off bit 8 run reverse bit 7 reserved bit 6 reset warning bit 0 - 5 reserved bit 8 - 15 MMS standard byte 0 Output 0 MMS standard byte 1 Manufacturer specific Output 1 reserved Output 2 Word n+2 MSB LSB bit 0 - 7 reserved Output 3 Word n+4 MSB bit 8 - 15 reserved outputs control MSB (700.8 - 700.15) Output 4 LSB bit 3 - 7 reserved control of output OA3 (if 686 MSB=2) outputs control LSB (700.0 - 700.7) Output 5 bit 2 bit 1 control of output OA1 (if 686 LSB=2) bit 0 control of output LO1 (if 685=2) 65 Functions to Set Diagnostic Telegram for Profibus DP Diagnostic Telegram for Profibus DP Structure of the diagnostic telegram for Profibus DP Byte 0-9 DP V1 Byte Byte Name Description 0 stations_status_1 1 stations_status_2 2 stations_status_3 Profibus DP standard diagnostic data. Mandatory for each Profibus DP slave. This data gives an overview of the Profibus DP communication. 3 diag.master_add 4 ident number high 5 ident number low 6 Header Byte Device related diagnostic which length includes the header 7 - DPV1: 0x81 = status, type: diagnostic Warning 8 - DPV1: slot number e.g. 0x01 9 - DPV1: warning specifier e.g. 0x00 = not specified DP V0/V1 Byte Byte Name Description 10 Manufacture Specific ID identifier control unit, base Byte 10-13 11 Profibus DP Device Status 10.0 - 10.3 Control unit: 1 = LUCA••BL 2 = LUCB••BL, LUCC••BL, LUCD••BL 3 = LUCM••BL 10.4 - 10.7 Base: 1 = LU2B••, LU2S•S, LUB••, LUS•• state of the Profibus DP fieldbus handler 11.0 Local/ remote: 0 = Profibus DP parameters have priority 1 = Parameters set locally are not overwritten by Profibus DP parameter frame. 11.1 - 11.6 are reserved for further use 11.7 Profibus DP application profile: 0 = motor starter 1 = motor management starter 12 Internal info HB used only for development internal use (call back return value) 13 Internal info LB Report errors with internal communication handler. 13.0 1, if setting registers have tried to be written from a Profibus parameter frame received when the motor was running 13.1 1, if writing values from the Profibus parameter frame failed even when the motor was not running] 13.2 - 13.7 for development internal use only 66 13.2 1, if an internal error occurred during generation of the Profibus diagnostic frame 13.3 1, if the internal cyclic data exchange (callback) failed 1672610 03/2009 Functions to Set Byte 14-15 DP V0/V1 Byte Byte Name Description 14 (455.8 - 455.15) TeSys U status register 15 (455.0 - 455.7) TeSys U status register DP V0/V1 Byte Byte Name Description 16 (456.8 - 456.15) spare 17 (456.0 - 456.7) 17.0 - 17.1 not significant 17.3 - 17.7 spare 18 (457.8 - 457.15) spare 19 (457.0 - 457.7) 19.0 - 19.7 Byte 16-19 not significant Byte 20-35 DP V0/V1 Byte Byte Name Description 20 (460.8 - 460.15) warning number 21 (460.0 - 460.7) warning number 22 (461.8 - 15) warning register (bit = 1 when warning) 23 (461.0 - 461.7) warning register (bit = 1 when warning) 24 (462.8 - 462.15) 2nd warning register, always 0 25 (462.0 - 462.7) 2nd warning register, always 0 26 (463.8 - 463.15) 3rd warning register, always 0 27 (463.0 - 463.7) 3rd warning register, always 0 28 (451.8 - 451.15) fault number register 29 (451.0 - 451.7) fault number register 30 (452.8 - 452.15) fault register 1 31 (452.0 - 452.7) fault register 1 32 (453.8 - 453.15) fault register 2, always 0 33 (453.0 - 453.7) fault register 2, always 0 34 (454.8 - 454.15) 3rd fault register, always 0 35 (454.0 - 454.7) 3rd fault register, always 0 NOTE: The transmission of the diagnostic frame is caused only by changes in the registers 451 and 460. Nevertheless more information is provided by the diagnostic frame. Attention: Changes in registers other than 451 or 460 do not cause the transmission of the diagnostic frame! 1672610 03/2009 67 Functions to Set 68 1672610 03/2009 Managing Faults and Warnings 1672610 03/2009 Managing Faults and Warnings 6 Overview This chapter explains how to manage the different types of faults and warnings that may occur. What's in this Chapter? This chapter contains the following topics: Topic 1672610 03/2009 Page Viewing a Fault 70 Fault Reset 71 Application Faults 72 Warnings - Communication Loss 73 Internal Faults 74 69 Managing Faults and Warnings Viewing a Fault Fault Indicators A fault is being signalled by different indicators: status of LULC07 Profibus DP communication module’s LEDs, with a power base: status of rotary button on the power base (0 or "trip"), status of outputs, with a standard or advanced control unit: internal signals sent to LULC07 Profibus DP communication module, with a multifunction control unit: warning, message(s) displayed on screen, internal communication with the LULC07 Profibus DP communication module, presence of an exception code (PLC report). NOTE: Warnings and faults are being considered in specific registers. Refer to TeSys U Communication Variables User’s Manual: fault monitoring registers (450 - 452) and warning monitoring registers (460 461). 70 1672610 03/2009 Managing Faults and Warnings Fault Reset Fault Resets with an LU•B•/LU•S• Power Base After a thermal overload fault, the rotary switch on the front can be used, whatever reset mode was set. Modbus Reset Configuratio Method (Acknowledgment) n Register local "manual" with the rotary switch on LU•B• with the blue push-button on LU•S• remote "manual" with the LU9 AP•• kit on LU•B• with the LU9 •• kit on LU•S• 602.1 = 1 "remote" acknowledged by bit 704.3 (bit 704.3 = Profibus DP output MS 0.3 or MMS 0.6) This bit is active on rising edge and must be reset to 0 by programming 602.2 = 1 "automatic" managed by the control unit 602.0 = 1 1672610 03/2009 71 Managing Faults and Warnings Application Faults Acknowledgment of Application Faults Possible application faults are listed hereunder. They can be reset (acknowledged): manually / automatically / remotely. Registers LULC07 LUCM• Application Faults 451 Fault Number (Profibus DP Diagnostic Byte 28+29) 452 Fault Bit (Profibus DP Diagnostic Byte 30+31) Short-circuit Fault 1 31.0 = 1 SC Over-current Fault 2 31.1 = 1 I>> Fault Acknowledgment "ERR" (Line 2) off 72 overload manual reset depending on reset mode set in register 602 (Reg 602 Profibus DP parameter byte 52) Thermal Overload Fault 4 31.3 = 1 Application Fault in the LUCM• Multifunction Control Unit 3, and 5 - 12 See LUCM Multifunction Control Unit User’s Manual. 1672610 03/2009 Managing Faults and Warnings Warnings - Communication Loss Warning Acknowledgment Possible warnings are listed hereunder: Registers Warnings Thermal Overload Warning 460 Warning Number 4 LULC07 LUCM• 461 Warning Bit 452.3 = 1 Fault Acknowledgment "ERR" (Line 1) - overload warning automatic when the overload is less than 85% comm loss acknowledged by bit 703.3 (bit 703.3 = Profibus DP output MS 1.6 or MMS 1.6) This bit is active on rising edge and must be reset to 0 by programming Loss of Communication with the LULC07 Profibus DP Communication Module Warning 109 (not applicable) LUCM• Multifunction Control Unit Warning 1 - 3, 5 - 13 See LUCM Multifunction Control Unit User’s Manual. Flashing Recovery After Loss of Communication With MS profile, after acknowledgment by rising edge on bit 703.3, recovery occurs depending on the status of control bits 704.0 and 704.1 (bit 704.0 - 704.3 = Profibus DP output MS 0.0 to MS 0.3). 1672610 03/2009 73 Managing Faults and Warnings Internal Faults Acknowledgment of internal Faults Possible internal faults are listed hereunder: Registers Internal Faults 451 Fault Number (Profibus DP Diagnostic Byte 28+29) LULC07 LUCM• 452 Fault Bit (Profibus DP Diagnostic Byte 30+31) Fault Acknowledgment "ERR" (line 2) LULC07 Profibus DP Communication Module Fault 14 - LULC07 Profibus DP Communication Module Not Installed or Not Supplied With Power 15 - LUC•• control Unit Internal Fault 54 452.11 = 1 LUCM• Multifunction Control Unit Fault 51 - 53, 55 - 63 See LUCM Multifunction Control Unit User’s Manual. Write to EEPROM Fault 100 452.13 = 1 on M100 power the LULC07 off and then on Communication Fault with the LUCM• Multifunction Control Unit 101 30.2 = 1 on M101 power the LULC07 off and then on Checksum-on-EEPROM Fault 102 452.13 = 1 on M102 EEPROM Configuration Fault 104 452.13 = 1 on M104 M14 off M15 power the LULC07 and the LUCM• off and then on M54 acknowledged by bit 704.3 (bit 704.3 = Profibus DP output MS 0.3 or MMS 0.6) This bit is active on rising edge and must be reset to 0 by programming Remark: "MSm.n." stands for "Motorstarter, byte m, bit n". 74 1672610 03/2009 Acyclic Data Read/Write via DP V1 and the PKW Feature 1672610 03/2009 Acyclic Data Read/Write via DP V1 and the PKW Feature 7 Overview The TeSys U system provides much more data than is exchanged cyclically. Only data, that is necessary and defined in the application profiles, is exchanged. All other data is provided on demand via acyclic DP V1 (Profibus Decentral Periphery Version 1) read and write services. Using slot/index and length addressing, blocks of TeSys U system internal registers can be mapped into acyclic frames on Profibus DP. These services are available only via Profibus DP masters providing those DP V1 services. As there are Profibus DP masters that do not provide DP V1 services the PKW feature is implemented to allow acyclic read or write accesses being encapsulated through DP V0. Any register setting that had been modified via not cyclic DP V1 or PKW write accesses might be overwritten by the Profibus parameter frame during node initialization. Please find a list of registers written by the Profibus parameter frame at the end of this chapter (see page 81). Do not use acyclic write via DP V1 or the PKW feature to write registers which are written cyclically (see Functions to Set, page 49 to have the list of registers exchanged cyclically), they will be overwritten immediately. What's in this Chapter? This chapter contains the following topics: Topic Acyclic Data Read/Write via Profibus DP V1 1672610 03/2009 Page 76 PKW: Encapsulated Acyclic Accesses in DP V0 78 Registers Written by the Profibus Parameter Frame 81 75 Acyclic Data Read/Write via DP V1 and the PKW Feature Acyclic Data Read/Write via Profibus DP V1 Overview For acyclic DP V1 accesses a mechanism, based on slot/index and length-addressing, is implemented in LULC07. Please note that the data exchanged via acyclic DP V1 read or write accesses are word oriented, even if the length is counted in bytes. Calculation Rule Calculation of slot/index and length Address Calculation Slot constant value (always 1) Index register / 10 Length (number of registers) x 2 [bytes] Index The index is always a rounded down integer. The highest supported index is 223. Length The maximum length is 20 registers (40 bytes). NOTE: Basically the internal registers can be accessed in steps of 10 registers. The length, matching to this stepping, will be 10 registers (20 bytes). Nevertheless any length between 2 and 40 bytes is possible, but should be chosen according to the TeSys U internal registers. Examples Reading the communication Modbus identification (Reg. 050-063) Address Calculation Value Slot constant value (always 1) 1 Index 050 / 10 5 Length [14 Reg. (050-063)] x 2 28 bytes Reading the Reg. 060-063) Address Calculation Value Slot constant value (always 1) 1 Index 060 / 10 6 Length [4 Reg. (060-063)] x 2 8 bytes Reading Acyclic Data (DS_Read) With the function DS_Read the Profibus DP master can read data from the slave. The data is addressed via slot/index and length. 76 Byte Name Meaning 0 function number = 0x5F DS_Read function 1 slot number (1) 2 index (2..223) 3 length 20 registers (40 bytes) 4.. length +3 data read data bytes 1672610 03/2009 Acyclic Data Read/Write via DP V1 and the PKW Feature Sending Acyclic Data (DS_Write) With the function DS_Write the Profibus DP master can send data to the slave. The data is addressed via slot/index and length. Byte Name Meaning 0 function number = 0x5F DS_Write function 1 slot number (1) 2 index (2..223) 3 length 20 registers (40 bytes) 4.. length +3 data to be written data bytes Feedback in Case Of Error If the access is not possible, none register is accessed and an error value will be returned via DP V1. The four first bytes of the response on DP in the case of an error are as follows: Byte Value Meaning 0 0xDE/ 0xDF for DS_Read/ DS_Write 1 0x80 indicating DP V1 2 0xB6 error class + error code1 = access denied 3 0x?? error code 2, LULC07 specific (see following table) Error Code2, LULC07 Specific Error Code 2 Meaning 01 internal stack request full 03 register not managed or super user access rights needed 06 register defined but not written 07 not all registers found 08 registers not authorized to be written 10 written value not in the range of the register, word value too big (too high) 11 written value not in the range of the register, word value too small (too low) 12 written value not in the range of the register, (MSB value too big) 13 written value not in the range of the register, (MSB value too small) 14 written value not in the range of the register, (LSB value too big) 15 written value not in the range of the register, (LSB value too small) 16 written value not a valid value 20 multifunction Control Unit rejects, sends back an error frame 255 internal error Presentation of error code and error class to the user logic depends on the master implementation (for example the PLC). As the mechanism can access only blocks of parameters starting at a dedicated parameter (MB address) also not existing parameters (MB addresses) will be accessed. The data value read will be 0x00, but in case of writing it is necessary to write the value 0x00. If not, the complete write access will be rejected. Updating the Display of a Multifunction Control unit In case the modification of a register should affect the display at the multifunction control unit, take care that the change will be effective only after a user inter action at the display. (For example select another line by the up/down arrow). TeSys U Internal Registers NOTE: For more details about the TeSys U internal registers please refer to the TeSys U Communication Variables User’s Manual. 1672610 03/2009 77 Acyclic Data Read/Write via DP V1 and the PKW Feature PKW: Encapsulated Acyclic Accesses in DP V0 Overview Some Profibus DP masters do not provide DP V1 services. The PKW feature is implemented to allow acyclic read or write accesses to be encapsulated in DP V0. This feature is enabled in the Profibus DP configuration tool by selecting the appropriate module. For each module, a second entry with PKW exists. The PKW data is added to the cyclic data. Read/Write Registers With the PKW data, you can read or write any register. The 8 bytes are interpreted as a request telegram or a response telegram encapsulated in IN data and OUT data. PKW OUT Data PKW OUT Data request (Profibus DP Master LULC07) are mapped in modules supporting PKW. To access a register, you must select 1 of the following function codes: R_REG_16 = 0x25 to read 1 register R_REG_32 = 0x26 to read 2 registers W_REG_16 = 0x2A to write 1 register W_REG_32 = 0x2B to write 2 registers. Register numbers are given in TeSys U Communication Variables User’s Manual. Word 1 Word 2 Word 3 Word 4 Register address Toggle bit (bit 15) Function bits (bits 8 - 14) Not used (bits 0 - 7) Data to write Register number 0/1 R_REG_16 Code 0x25 0x00 _ _ R_REG_32 Code 0x26 _ _ W_REG_16 Code 0x2A Data to write in register _ W_REG_32 Code 0x2B Data to write in register 1 Data to write in register 2 Depending on the PLC platform used, refer to the PKW OUT description in Little and Big endian formats to know the positioning of each field inside each word. Any changes in the function field will trigger the handling of the request (except if Function code = 0x00). Toggle bit must change at each consecutive request. This mechanism allows the request initiator to detect that a response is ready by polling the toggle bit in response. When this bit in the OUT data becomes equal to the response emitted toggle bit in the IN data, then the response is ready. 78 1672610 03/2009 Acyclic Data Read/Write via DP V1 and the PKW Feature PKW IN Data PKW IN Data Response (LULC07 Profibus DP Master) are mapped in modules supporting PKW. The LULC07 communication module echoes the same register address and function code or eventually an error code: Word 1 Word 2 Register address Toggle bit (bit 15) Same register Same as request number as in request Word 3 Function bits (bits 8 - 14) Not used (bits 0 - 7) Data to write ERROR Code 0x4E 0x00 Error code Word 4 R_REG_16 Code 0x25 Data read in register _ R_REG_32 Code 0x26 Data read in register Data read in register 1 2 W_REG_16 Code 0x2A _ _ W_REG_32 Code 0x2B _ _ Depending on the PLC platform used, refer to the PKW IN description in Little and Big endian formats to know the positioning of each field inside each word. If the initiator tries to write a TeSys U object or register to an unauthorized value, or tries to access an inaccessible register, an error code is answered (Function code = toggle bit + 0x4E). The exact error code can be found in words 3 and 4. The request is not accepted and the object or register remains at the old value. If you want to re-trigger exactly the same command, you must: reset the Function code to 0x00, wait for the response frame with the function code equal to 0x00, then set it again to its previous value. This is useful for a limited master like an HMI. Another way of re-triggering exactly the same command is to: invert the toggle bit in the function code byte. The response is valid when the toggle bit of the response is equal to the toggle bit written in the answer (this is a more efficient method, but it requires higher programming capabilities). 1672610 03/2009 79 Acyclic Data Read/Write via DP V1 and the PKW Feature PKW Error Codes Case of a write error: Error Code Error Name Explanation 1 FGP_ERR_REQ_STACK_FULL external request: sends back an error frame 3 FGP_ERR_REGISTER_NOT_FOUND register not managed (or the request needs super user access rights) 4 FGP_ERR_ANSWER_DELAYED external request: answer postponed 7 FGP_ERR_NOT_ALL_REGISTER_FOUND one or both registers cannot be found 8 FGP_ERR_READ_ONLY register not authorized to be written 10 FGP_ERR_VAL_1WORD_TOOHIGH written value not in the range of the register (word value is too high) 11 FGP_ERR_VAL_1WORD_TOOLOW written value not in the range of the register (word value is too low) 12 FGP_ERR_VAL_2BYTES_INF_TOOHIGH written value not in the range of the register (MSB value is too high) 13 FGP_ERR_VAL_2BYTES_INF_TOOLOW written value not in the range of the register (MSB value is too low) 16 FGP_ERR_VAL_INVALID written value not a valid value 20 FGP_ERR_BAD_ANSWER external request: sends back an error frame Case of a read error: Error Code Error Name 1 FGP_ERR_REQ_STACK_FULL external request: sends back an error frame 3 FGP_ERR_REGISTER_NOT_FOUND register not managed (or the request needs super user access rights) 4 FGP_ERR_ANSWER_DELAYED external request: answer postponed 7 FGP_ERR_NOT_ALL_REGISTER_FOUND one or both registers cannot be found 80 Explanation 1672610 03/2009 Acyclic Data Read/Write via DP V1 and the PKW Feature Registers Written by the Profibus Parameter Frame Register List Following registers are written by the Profibus parameter frame during the establishing of the cyclic data exchange in case a module with R for remote parameterization has been chosen: TeSysU registers written during Profibus DP startup per TeSysU Variant SCMu R MS ScMu R MS PKW ScMu R MMS ScMu R ScAD R MMS PKW MS SCAD R MS PKW ScSt R MS ScSt R MS PKW Control unit configuration 602 602 602 602 602 602 602 602 Control Unit communication on LUCM port address 603 603 603 603 - - - - Control Unit communication on LUCM baud rate 604 604 604 604 - - - - Overcurrent trip threshold 605 605 605 605 - - - - Loas class 606 606 606 606 - - - - Thermal reset time 607 607 607 607 - - - - Thermal reset threshold 608 608 608 608 - - - - Thermal warniong threshold 609 609 609 609 - - - - Ground fault trip timeout 610 610 610 610 - - - - Ground fault trip threshold 611 611 611 611 - - - - Ground fault warning threshold 612 612 612 612 - - - - Phase imbalance trip timeout at 613 start-up 613 613 613 - - - - Phase imbalance trip timeoutwhile running 614 614 614 614 - - - - Phase imbalance trip threshold 615 615 615 615 - - - - Phase imbalance warning threshold 616 616 616 616 - - - - Jam trip timeout 617 617 617 617 - - - - Jam trip threshold 618 618 618 618 - - - - Jam warning threshold 619 619 619 619 - - - - Undercurrent trip timeout 620 620 620 620 - - - - Undercurrent trip threshold 621 621 621 621 - - - - Undercurrent warning threshold 622 622 622 622 - - - - Long start trip timeout 623 623 623 623 - - - - Long start trip threshold 624 624 624 624 - - - - Long start warning threshold 625 625 625 625 - - - - Control Unit display language 650 650 650 650 - - - - Control Unit display of running items 651 651 651 651 - - - - Control Unit full load amps setting 652 652 652 652 - - - - Communication loss fallback strategy 682 682 682 682 682 682 682 682 Inversion of output configuration 684 684 684 684 684 684 684 684 Output LO1 configuration 685 685 685 685 685 685 685 685 Output OA1 and OA3 configuration 686 686 686 686 686 686 686 686 Recovery Mode 688 688 688 688 688 688 688 688 NOTE: In case a module with "L" for local parameterization had been chosen the parameter frame on Profibus does not contain any application parameter at all. 1672610 03/2009 81 Acyclic Data Read/Write via DP V1 and the PKW Feature 82 1672610 03/2009 Configuration of Predefined Functions 1672610 03/2009 Configuration of Predefined Functions 8 Overtravel Limit Switch (Reflex Functions) Introduction Overtravel limit switch allows you to perform precise and iterative positionings, without any interaction of bus or PLC cycle time. It is a Profibus DP function initiated at LULC07 communication module level. There are 2 types of functions: reflex1: "reflex stop no. 1" function reflex2: "reflex stop no. 2" function Description of the "Reflex Stop No. 1" Function (Reflex1) Sensor no. 1 (logic input LI1) directly controls motor stopping. After a new run command (stop command then run command), the motor restarts even if something is still detected (LI1=1). 1 2 3 Bus Sensor no. 2 (LI2) Sensor no. 1 (LI1) NOTE: In the case of a reversing starter, the reflex stop works in both directions. Sensor no. 2 (logic input LI2) has no effect on reflex operation. Data sequence Description of the "Reflex Stop No. 2" Function (Reflex2) Sensor no. 1 (logic input LI1) controls motor stopping in forward mode. Sensor no. 2 (logic input LI2) controls motor stopping in reverse mode. After a new run command (stop command then run command), the motor restarts even if something is still detected (LI1 or LI2 = 1). NOTE: Sensor no. 2 (LI2) does not impact forward mode and sensor no. 1 (LI1) does not impact reverse mode. 1672610 03/2009 83 Configuration of Predefined Functions Using a "Reflex Stop" Function To use a "reflex stop" function, it must be selected in the register of the output to be monitored. LUB••/S•• - LU2B••/2S•• Base Reflex Function Reflex1 Direction of Motor Rotation Reflex1.Fw = forward Reflex1.Rev = reverse Reflex2.Fw = forward Reflex2 Reflex2.Rev = reverse Output LO1 Outputs OA1 OA3 Value of Reg• Reg685 (LSB) is part of the Profibus module parameter frame Reg686 (LSB) (MSB) is part of the Profibus module parameter frame 8 9 10 11 NOTE: Before using the "reflex stop" functions, outputs OA1/OA3 must first be assigned to the forward/reverse directions. This selection is made in register 686 (Register 686 is part of the Profibus DP module parameter frame). By default, OA1 is assigned to forward and OA3 to reverse. Reflex1.Fw This function is active on a rising edge (register 689.0 = 1) and not on the level. LI1 = 1, stops the motor irrespective of the chosen direction of operation After a new run command (stop command followed by a run command) even if logic input LI1 = 1 the motor restarts in the chosen direction Register 689 is part of the Profibus DP module parameter frame. NOTE: Logic input LI2 is not used. Reflex1.Rev This function is active on a rising edge (register 689.0 = 1) and not on the level. LI1 = 1, stops the motor irrespective of the chosen direction of operation after a new run command (stop command followed by a run command even if logic input LI1 = 1 the motor restarts in the chosen direction Register 689 is part of the Profibus DP module parameter frame. NOTE: Logic input LI2 is not used. Reflex2.Fw This function is active on a rising edge (register 689.0 = 1) and not on the level. logic input LI1 = 1, stops the motor in forward mode logic input LI2 = 1, stops the motor in reverse mode after a new run command (stop command followed by a run command) even if logic input LI1 = 1 the motor restarts Register 689 is part of the Profibus DP module parameter frame. NOTE: Logic input LI2 does not impact forward mode and logic input LI1 does not impact reverse mode. Reflex2.Rev This function is active on a rising edge (register 689.0 = 1) and not on the level. logic input LI2 = 1, stops the motor in reverse mode Logic input LI1 = 1, stops the motor in forward mode After a new run command (stop command followed by a run command) even if logic input LI2 = 1 the motor restarts Register 689 is part of the Profibus DP module parameter frame. NOTE: Logic input LI2 does not impact forward mode and logic input LI1 does not impact reverse mode. Usability of Reflex with Profibus DP The values described are transmitted only once via parameter frame at module startup. To use this functionality use acyclic services to access these registers when the slave is in data exchange mode. For details about acyclic services, see Acyclic Data Read/Write via DP V1 and the PKW Feature, page 75. 84 1672610 03/2009 Index 1672610 03/2009 B AC Index A E access to parameters, 44 acknowledgment, 72 acyclic accesses DP V0 PKW encapsulated, 78 acyclic data read/write via DP V1, 75 addressing, 16 addressing with dip switches, 16 application faults, 72 application parameter settings, 39 electrical connection, 18 ERR LED, 15 error codes PKW, 80 B BF LED, 15 C characteristics, 27 combinations of bases and control units, 35 communication loss, 44 restart, 73 warnings, 73 components assembly on a power base, 17 conditions of use, 27, 27 conductor, 20 configuration customizing, 44 factory, 43 configuration via SyCon, 42 configuring output LO1, 46 output OA1, 46 output OA3, 46 connecting the bus, 24 connection, 18 connection to the Profibus DP, 21, 21 connector, 20 connectors, 14 control Unit forcing, 47 customizing control, 50 customizing your configuration, 44 cyclic/acyclic services, 34 D description and installation of the module, 14 diagnostic telegram, 66 dip switches addressing, 16 DP V1 acyclic data read/write , 75 DP V1 services, 34 1672610 03/2009 F factory configuration, 43 fallback mode, 44 fault indicators, 70 fault reset, 71 faults application, 72 internal, 74 reset, 71 viewing, 70 faults and warnings managing, 69 features of Profibus DP, 25 forcing control unit, 47 functions reflex stop function, 83 functions in general, 50 functions offered, 13 functions to set, 49 G general information implementation via Profibus DP, 34 GS*-file modules presented, 35 H hardware implementation, 9 I implementation via Profibus DP, 37 general information, 34 information TeSys U specific Profibus, 33 initialization, 38 input, 14 inputs, 29 installation and description of the module, 14 installation of the module, 11 internal faults, 74 invert output relays, 46 85 Index L R LED, 14, 15 LED 24V, 15 light emitting diodes, 15 limit switch overtravel, 83 link wire-to-wire, 19 loss of communication, 44 read/write via DP V1 acyclic data, 75 receiving the product, 13 recovery after loss of communication, 73 reflex stop function, 83 registers written by the Profibus parameter frame, 81 reset faults, 71 M managing faults and warnings, 69 mode fallback, 44 module functions, 13 O order of mounting, 17 output, 14 output LO1 configuring, 46 output OA1 configuring, 46 output OA3 configuring, 46 outputs, 28 overtravel limit switch, 83 P parameter settings application, 39, 44 parameters access to, 44 PKW data, 78 PKW error codes, 80 PKW feature, 34, 78 power base, 17 power base connection of terminals A1, A2, 19 power supplies, 18 power supply, 19, 28 power up, 18 presentation of the module, 13 Profibus DB, 21 Profibus DP application parameter settings, 39 Profibus DP general information on implementation, 33 Profibus DP implementation via, 37 Profibus DP configuration via the SyCon tool, 42 Profibus DP features, 25 Profibus DP implementation general information, 34 Profibus information TeSys U specific, 33 profiles functions for Profibus DP , 51 motor management starter, 51 motor starter, 51 86 S services cyclic/acyclic, 34 DP V1, 34 software implementation, 31 specific information TeSys U Profibus, 33 status display, 50 SyCon configuration tool, 42 T technical characteristics, 27 TeSys U specific Profibus information, 33 transmission features, 24 V viewing a fault, 70 W warning acknowledgment, 73 warnings communication loss, 73 warnings and faults managing, 69 wire-to-wire link, 19 write/read via DP V1 acyclic data, 75 1672610 03/2009