1
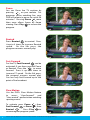
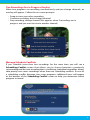
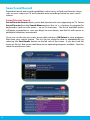
DVR GUIDE DVR Guide Using Your DVR / Multi-Room DVR connect happily 1-800-4-ASTOUND | astound.net Table of Contents Control Live TV........................................................................................................................ 4 Playback Controls.................................................................................................................. 5 Remote Control Arrow Buttons...................................................................................... 5 Status Bar.................................................................................................................................. 5 Pause .................................................................................................................................. 6 Rewind ............................................................................................................................... 6 Fast-Forward ................................................................................................................... 6 Slow Motion .................................................................................................................... 6 Instant Replay ................................................................................................................. 7 Return to Live TV ........................................................................................................... 7 SWAP Between Two Programs................................................................................. 7 Recording Programs............................................................................................................. 7 One-Touch Recording.................................................................................................. 7 From Program Information ....................................................................................... 8 Manual Recording ......................................................................................................... 8 Record Two Programs at Once................................................................................. 8 Two Recordings Are in Progress Overlay.............................................................. 9 Manage Schedule Conflicts....................................................................................... 9 Search and Record..............................................................................................................10 Actor/Director Search ................................................................................................10 Keyword Search ........................................................................................................... 11 Saving Searches............................................................................................................ 11 Recording Series................................................................................................................... 11 Modify Series.................................................................................................................12 Modify the Series Priority List.................................................................................12 Manage Series Priorities............................................................................................13 View Recorded Programs................................................................................................14 Future Recordings...............................................................................................................15 Manage Your Recordings.................................................................................................15 DVR Setup.......................................................................................................................15 DVR Folders ...................................................................................................................16 Live Program Notice - Default “On” .....................................................................16 DVR Clipping .................................................................................................................16 Manage Series Priorities............................................................................................16 DVR Cleanup ................................................................................................................. 17 DVR History .................................................................................................................... 17 Modify Recording Options.............................................................................................. 17 Recording Notices...............................................................................................................19 2 Multi-Room DVR...................................................................................................................20 Accessing Your DVR Content Using Multi-Room DVR.......................................20 My Recordings Screen.......................................................................................................21 Playback Details Screen Watch a recording from where you left off...................................................21 Watch a recording from the beginning..........................................................21 Delete a recording...................................................................................................21 Resume Playback From.....................................................................................................22 Watch a Recording..............................................................................................................22 Main Menu/Main Menu Options..................................................................................23 Pause Live-TV.........................................................................................................................24 Set a Follow-me Bookmark.............................................................................................24 Schedule a Recording........................................................................................................25 Delete a Recording..............................................................................................................25 Cancel a Future Recording..............................................................................................26 View DVR Hubs/Change DVR Hub Name.................................................................26 Helpful Hints - Resuming Playback Using Bookmarks......................................27 Resuming playback from the same room.....................................................27 Resuming playback on a connected non-DVR set-top that was previously playing on your DVR...............................................................................................28 Resuming playback on a connected non-DVR set-top that was previously playing on another non-DVR set-top..............................................................29 Pausing live TV on your non-DVR set-top.....................................................30 Troubleshooting...................................................................................................................31 3 Digital Video Recorder (DVR) Pause live television! Rewind and replay programs so you don’t miss a beat. Imagine…coming home to your own personal library of television programs, movies and sports that you can watch whenever it’s convenient for you. It’s TV on your schedule. Record your favorite programs and view them as many times as you want, whenever you want. Control Live TV With a Digital Video Recorder (DVR) from Astound, you have the opportunity to control live TV. When you tune to a channel, the DVR automatically begins making a temporary recording of the program. Once the temporary recording begins, you can Pause, Rewind and Fast-Forward through the recording. Your DVR will record up to two hours of live TV*. This recording is not permanent, unless you save it to the DVR’s hard drive. For live TV recordings, the temporary recording will be erased if you: • Turn off the DVR • Change channels • Watch more than 2 hours of the same channel – after 2 hours the DVR will buffer only the most recent 2 hours 4 * Recording capacity varies by DCT model Playback Controls You can play back your video recordings using the Video Control Buttons. Play Rewind These buttons function like VCR controls. Plus, you have new DVR control features, like Instant Replay and SWAP. Fast-Forward Stop Record Replay Go back to live TV Pause Go to DVR Menu Remote Control Arrow Buttons Thebuttons on your remote control will control playback when you are watching a recording in progress or while watching a recorded program. Play / Pause Fast-Forward Slow-Forward (From Pause) Rewind Slow-Rewind (From Pause) Go to live TV Status Bar The Status Bar appears whenever you Pause, Rewind or Fast-Forward a live program. The Status Bar shows title, channel and duration of time. Green indicates the length of program in the buffer. Red indicates you are watching a DVR recording in progress. White indicates the length of multiple programs that have been recorded in the buffer.** ** Recording buffer (temporary storage) for each tuner will record as long as you stay tuned to the same channel. 5 Pause You can Pause live TV anytime by pressing on your remote. For programs you’re watching live, your DVR will remain in pause for up to 90 more minutes.* Pressing Pause than once allows frame by frame viewing. Press Play to resume the program. LIVE LIVE Rewind LIVE Press Rewind to rewind. Press it up to 4 times to increase Rewind speed. On the 5th press, the program resumes normal play. LIVE Fast-Forward For live TV, Fast Forward can be activated if you have pressed Pause LIVEto move or Rewind. Press the forward. Press it up to 4 times to LIVE increase FF speed. On the 5th press, the program resumes normal play. You can only Fast-Forward up to the point of live broadcast. Slow Motion Use the DVR’s Slow Motion feature to access “slow-forward” and “slow-rewind” –perfect when watching sporting events. To activate, press Pause , then Fast Forward or Pause then Rewind . Press Play to resume regular LIVE program speed. 6 LIVE LIVE *Pause capacity depends on video format; less than 90 minutes for HD programming. LIVE Instant Replay With Instant Replay,** you can replay the last 15 seconds of a program. Press Replay or Page on the remote. LIVE Press repeatedly to continue skipping back in 15-second increments. Return to Live TV When you pause or rewind a live program, the program continues to broadcast in real time. To return to live programming, press the Live** button LIVE or on your remote. SWAP Between Two Programs If your DVR has two tuners, it can buffer (temporarily record) two programs at the same time – one on each tuner. The SWAP feature allows you toggle back and forth between two live shows while giving you control of both. If you change channels any other way than using the SWAP button, you will lose the buffer recording. • • • • While tuned to a program, press SWAP on your remote to change tuners Select a second program by changing channels or using the guide Press SWAP again to toggle between the two programs When recording two programs at the same time, on-screen prompts will ask if you wish to swap tuners. Select your desired recording preference Recording Programs Astound’s on-screen guide makes it easy to schedule recordings on your DVR and build your own personal library. You can record programs in several ways: LIVE • One-touch right from the your remote • From any Program Info screen • Set a manual recording on One-touch Recording LIVE Press the RECORD on your remote any time while you’re watching a program to begin recording. From the Listings grid, just highlight the show you want to record and press the record button on your remote. **Not all remotes have Replay and Live buttons. 7 From Program Information From any Program Information screen, highlight the button and press OK/ Select to schedule a recording. Follow the on-screen prompts for additional recording options. Manual Recording You can set a Manual Recording for a specific time or channel: • Select DVR from the Quick Menu or Main Menu, or My DVR button on your remote • Select Set a Recording • Select start and end times and day, then press Confirm • Select channel to record from channel list • Select Record to confirm settings or select Recording Options for additional options Record Two Programs at Once A Dual Tuner DVR allows you to set recordings for two different programs that air at the same time. While recording two programs, you can watch and control either program up to the point of live TV by using the SWAP button on your remote. While Watching a Show Currently Airing • Press RECORD to record the program you are watching • Press SWAP to switch to the other tuner and find the second program you want to record • Press RECORD when you locate the second program you want to record From the Guide • Highlight a program you want to record from any listings screen • Press RECORD to set up the first recording • Highlight the second program • Press RECORD to set up the second recording 8 Two Recordings Are in Progress Overlay When two programs are recording simultaneously and you change channels, an overlay will appear. Follow the on screen prompts: • Swap to view your other recording • Continue recording, don’t change channel • Stop recording, change channel (this appears when 2 recordings are in progress and you want to tune to another channel) Manage Schedule Conflicts If you schedule more than two recordings for the same time, you will see a Scheduling Conflict screen that allows you to choose between a previously set recording and the new recording that is conflicting. Individual recordings always take priority over series recordings when there are scheduling conflicts. In case of a scheduling conflict between two series programs, additional icons will appear at the bottom of the Scheduling Conflict screen to help you determine which program to record. 9 Search and Record Expanded search and record capabilities make it easy to find your favorite shows, stars or even subject on TV and schedule auto-recordings based on your search criteria. Actor/Director Search Actor/Director Search allows you to find your favorite stars appearing on TV. Select Actor/Director from the Search Menu and use thebuttons to navigate the keyboard to spell out the name – up to 25 characters. The list of available actors will begin to populate as soon you begin to enter letters, and the list will narrow as additional characters are entered. Once you see the one you want, arrow right and press OK/Select to view programs that meet your search criteria. The list can be sorted by date or alphabetically by selecting the Sort Results button on the left side of the screen. If you don’t see the name on the list, that means that there are no upcoming programs available. Save this search for quick access later. 10 Keyword Search Select Keyword from the Search Menu and use the buttons to navigate the keyboard to spell out your keyword. Select Search Now to begin the search and the list of matching results will appear and can be sorted by date or alphabetically by selecting Sort Results. Save the search criteria or set up an autorecording. Saving Searches Save your search by selecting Save Search on any results screen. Simply select Saved Searches from the Search Menu to access your list of saved searches to restart or delete the search. You can save up to 16 searches at one time. From any Search Results screen you can sort results by title or date, save your searches for future reference, or set an auto-recording of your results. Recording Series Your DVR allows you to record multiple episodes of a program (series) according to your preferences. To set up a Series Recording, begin by selecting the program from the Listings grid or from a Search results list: • Select Record from the Program Info screen • Select Set Up a Series Recording • Select the type of episode to record, such as only new episodes • Specify how many recordings to save • Specify how long to save the recording • To access advanced series set-up features, like to add minutes to the start and end times and specify which channels to record, select the Recording Options to review all options 11 Your Series Recordings will appear in the My Recordings list with the show title as its label. Multiple recordings of the same show will have the same label and will be listed beginning with the most recent recordings first as default. If you have the DVR Folder option turned on, multiple recordings of the same show may be grouped into a folder. To change your view use thebuttons on your remote to View By Date, View By Channel, or View By Title. You may also modify the priority assigned to a series using the Series Priority List. Modify Series From the DVR Menu select Series Recordings for a list of scheduled Series or keyword Series. From here you can change the priority of your series, or modify Series recording. To modify: • Use thearrows to highlight the series, press OK/Select to view a summary of recording settings for that series including the number of episodes scheduled to record in the next 14 days • Highlight the to modify settings. Select the again to view and modify all settings • Highlight the to confirm Modify the Series Priority List If you have multiple series set to record, your DVR automatically creates a Series Priority List. The first series you set to record has the highest priority and will be the one recorded if there is a conflict. You can easily change the recording priority of the series so that the series of your choice is recorded when a conflict exists. • Select DVR from the Quick Menu or Main Menu • Choose Series Recordings • Highlight a program and use the Page Arrows to modify priority Note: If you want to record two series recordings instead of an individual recording that airs at the same time, you must delete the individual recording from the Scheduled Recordings List (See View List of Scheduled Recordings section to cancel a recording). 12 Manage Series Priorities • To give your new recording the highest scheduling priority and to capture the most number of episodes for your new recording, select High. The screen will show you how many episodes of the new series will be recorded and which episodes of the old series will not be recorded because of the conflict. • To move the new series back to the bottom of the scheduling priority list, select LIVE Low and the screen will refresh and give you revised results. • Select the Record Icon to confirm your new settings. Guide Symbols to Know – Recorded Program Information Screens Go back to the previous screen Play the recording Start the recording from the beginning Delete the program from My Recordings Change the Delete Priority Place a Lock on the program to restrict viewing 13 View Recorded Programs From the DVR menu, select My Recordings to view your programs: • Press My DVR on the remote (if available) • Select from the Quick Menu • Select DVR from the Main Menu Use thearrows on your remote to sort recordings by Title, Date or Channel. Use thearrows to scroll through the list and press OK/Select or INFO for program description and use the action icons to begin playback. You can control playback of a recording by using the video control buttons or arrow buttons on your remote to fast-forward, rewind and pause your program. Guide Symbols to Know – Manage Series Priority List Return to previous screen Record new program or series as shown Show conflicts when the new series is a high priority Show conflicts when the new series is a low priority Don’t record new program or series 14 Future Recordings View List of Scheduled Recordings From the Main Menu or Quick Menu, • Select DVR* • Select Future Recordings • See a list by day of all the programs you have scheduled to record; usearrows to advance by day • Select a title to cancel the Scheduled Recording or modify Recording Options • To give your new recording the highest scheduling Manage Your Recordings A recorded program remains in your My Recordings list until you decide to delete it or have set it to delete when space is needed. Your DVR will record and store standard definition programming and High Definition programming up to its maximum capacity.** There are several options you can choose to make the most efficient use of your storage space: Astound’s DVR gives you easy ways to manage your recordings. DVR Setup From the Quick Menu or Main Menu, select DVR to access DVR Setup to manage: • DVR Folders • Live Program Notice • DVR Clipping The default setting is “On” for these options. You can also access DVR Setup from the Setup Menu. * Menu label may vary. ** Recording capacity varies by DCT model. Recording HD programming requires a DVR connection to an HD television. 15 DVR Folders Helps to keep recorded series organized by automatically grouping like titles into folders. Highlight the DVR Folders to open and scroll down to select a specific episode to watch. Press LAST to return to your recordings list. Live Program Notice – Default “On” The notice overlay will appear when a DVR recording is scheduled for a live program, such as sports or awards shows. You can choose to extend the recording time of live programs in the event the program runs longer than scheduled. DVR Clipping The Astound DVR provides a feature to accommodate recording two overlapping programs. With DVR Clipping, the DVR will automatically clip the beginning of a program if there is a recording overlap when both tuners are in use. For example, while watching live TV, a scheduled recorded program ends at 9:05, but your second recorded program is scheduled to begin at 9:00; the second program will be “clipped” so that your first program is recorded in full. Clipping happens when both tuners are in use during the recording time. If this occurs, a “clipped” notice will appear next to those programs in the My Recordings listings. Manage Series Priorities From the DVR Menu select Series Recordings to view a list of Series and Keyword Series. Use the up/down arrows () on your remote to highlight a series. To change a priority, use the page up/down keys on your remote to move the series up or down your list. Select Confirm to accept your changes. The first series has the highest priority and will be the one recorded if there is a conflict. 16 DVR Cleanup From the Main Menu, select DVR Menu to access DVR Cleanup. DVR Cleanup allows you to delete multiple recordings with a simple check box. When you select DVR Cleanup, a DVR Cleanup screen appears, with a list of all of your recordings. To check what recordings to delete, simply highlight the corresponding box(es), then arrow left to highlight the Delete button and press OK/Select, and confirm your deletion. DVR History DVR History provides you with a list of recent DVR deletions or missed recordings. If a program did not record, DVR History will provide a reason why the program didn’t record or when a program was deleted. Modify Recording Options Astound’s DVR gives you flexibility to manage your personal video library. You can modify your Recording Options at any time, as often as you like. From Scheduled Recordings From the Quick Menu or Main Menu (or from My DVR on the remote), select DVR, then select Future Recordings to see a list. Highlight a program title and press OK/Select or INFO. You can also select Series Recordings to see a list of just scheduled series. Select from the Program Information Screen. Select to change the Recording Options or select to delete the program from your list of Future Recordings. 17 Use the buttons on your remote to change the Recording Options: • Change the frequency of the recording, such as every day or once a week • Specify how many recordings to save • Set a Save Until parameter, either until you delete or delete automatically when space is needed • Change the start and end times in order to catch every minute of a program, even if it runs over From Listings Select your Scheduled Recording in the listings; it will be indicated by the red dot in the Instant Info. Press OK/Select or INFO and select Scheduled Recording. From here, you can select Recording Options. 18 to change your options or delete the to cancel the recording, or select to see all the Recording Notices Recording Starting Notice If you are currently watching TV, before a Scheduled Recording begins, a notice will appear giving you the opportunity to confirm or cancel the recording. If you don’t do anything, the DVR will automatically tune to the channel and begin recording. Live TV programming that was temporarily recorded in the buffer will be erased. Changing Channels While Recording If two recordings are in progress, and you attempt to change channels, a notice will appear. (Two Recordings in Progress screen). • Select the to view the other recording • Select the to continue recording as scheduled • Select to cancel the current recording and change the channel Recording Low and Full Notices Your Astound DVR will advise you with an on-screen notice when available memory on the DVR is low or full. If recording space becomes full during a recording, the recording will stop. When you schedule a recording and recording space is low, a notice will prompt you to review your DVR Recordings to delete recordings. 19 Multi-Room DVR With Astound’s Multi-Room DVR you’ll be able to watch, record, and delete programs on your Digital Video Recorder (DVR) from any connected nonDVR set-top in your home. You can also use the powerful new bookmarking capabilities, which allow you to resume watching the same program in another room from exactly where you left off. The remaining pages of this guide gives you a quick overview of how to get started enjoying this exciting new addition to your home entertainment system*. * Operation of your Digital Video Recorder set-top remains unchanged. The following details how to operate your home’s non-DVR set-tops in order to enjoy the Multi-Room DVR features such as playback, recording, and bookmarking of programs from any room in your house. For details on how to operate your Digital Video Recorder, please refer to the earlier sections within this guide. non-DVR non-DVR non-DVR DVR Accessing Your DVR Content Using Multi-Room DVR Press the B button or the LIST button on your cable remote to launch the Multi-Room DVR feature and display the MY RECORDINGS screen.* * Button selections may vary depending on the specific style of remote you have. 20 Press B or List Button to launch Multi-Room DVR My Recordings Screen The My Recordings screen provides a listing of all your existing recorded programs and in-progress recordings. The program series recordings are automatically placed in folders, quickly allowing you to find your favorite episodes. Select the folder to view one or more series recordings on your DVR. Use the left and right arrow keys on the remote to sort the list by time, channel, or date. Use the up and down arrow keys to scroll through the list. When the recording you want to watch is highlighted, press the OK button on the remote to see the recording details on the Playback Details screen. Playback Details Screen The Playback Details screen gives you a description of the recorded program and offers the following playback options: • Watch a recording from where you left off Select the Resume Playback icon on the screen to see a menu of playback options • Watch a recording from the beginning Select the Play from beginning icon on the screen to start watching the recording from the beginning. • Delete a recording Select the Delete recording icon on the screen to erase the recording from your DVR. 21 Resume Playback From: The Resume Playback From: menu offers you the following playback options: Choose This room’s latest position to watch from where playback was stopped on this room’s non-DVR set-top. Choose Master Bedroom’s latest position to watch from where playback was stopped in the room where your DVR is located. (Master Bedroom in this example is the custom name you assigned to your home’s master DVR.) Choose Follow-me bookmark position to watch from where playback was bookmarked on another room’s non-DVR set-top. Watch a Recording A progress Status Bar is displayed during playback of a recording that shows the program name, program duration, as well as how far you are currently into the playback. While watching a recording, you can also use your remote to fast forward, rewind, pause, or stop the program. 22 Main Menu You can access the Main Menu by pressing the MENU button on the remote at any time the MR-DVR application is running. The options presented will vary depending on the screen or function the user is interacting with. The image on the right shows the options available from the My Recordings screen. Additional options (see list below) are available when accessing the Main Menu during playback. Use the left and right arrow keys on the remote to navigate the Main Menu options. Press the OK or Select button on your remote to select the menu option. Menu Options Pause – Pause live TV on a non-DVR set-top. This feature enables you to pause the live TV content you were viewing prior to launching the DVR application on the remote cable box. View Playback Details – Takes you to the Playback Details screen. Delete Recording – Deletes the selected recording. Schedule New Recording – Takes you to the Schedule a Recording screen where you can set up future recordings. View Scheduled Recordings – Opens the Future Recording screen that displays a list of programs you have already scheduled to record. Set Follow-me Bookmark – Bookmarks the recording you are currently watching for playback at the same place from any other connected settop in the home. Note: This function is available by pressing the MENU button during the playback of a recording. View Hub List – Takes you to the Hub screen, which displays all the Digital Video Recorders (Hubs) you have in your home. You can also assign a custom name to the DVR(s) in your home from this screen. 23 Pause Live-TV This function is only available from the My Recordings screen (see page 21 for more information). Use one of the following options: Press PAUSE button on the menu bar. Press PAUSE button on the remote. Please note that the PAUSE function on your non-DVR set-top is slightly different than on your DVR. In some instances, the PAUSE function will not work if other settops in your home are already performing a record function. Set a Follow-me Bookmark The Follow-me Bookmark option allows you to set a bookmark during playback of a recording and resume that recording from that same bookmark in another location in your home. While watching a recorded program, press the MENU button on your remote. Select the Set Follow-me Bookmark icon on the menu. Press the OK button on your remote to bookmark the current viewing location. You will see a Follow-me Bookmark Successfully Set confirmation message. You can now retrieve this bookmark to resume playback of the recording from this point at any other connected non-DVR set-top in your home. 24 Schedule a Recording Press the MENU button on your remote. Select the Schedule Recording icon on the menu and press the OK button on your remote. On the Schedule a Recording screen, use the up and down and arrows on the remote to select the Channel, Date, Adjust Time By, and What’s InProgress at fields. Use the left and right arrow keys to scroll through these fields to locate and select the program you want to record. The title and a description of the show you select will appear in the Program field. Record Icon Delete Icon Once you have set up your recording, select the Rec Program icon and press the OK button on your remote to schedule the recording. A Record Request Succeeded message will display. You can also select the Rec Series icon to schedule multiple episodes of a program to be recorded. Delete a Recording In the My Recordings screen, use the up and down arrow keys on the remote to select and highlight the recording you want to delete. Press the MENU button on your remote to display the Main Menu. Use your arrow key to select the Delete Recording icon. Press the OK or Select button on the remote to delete the recording. At the Press “OK” to Confirm Delete… confirmation message, press the OK button on the remote. The recording is now deleted. Recordings can also be deleted from the Playback Details screen. 25 Cancel a Future Recording Select View Scheduled Recordings from the Main Menu. In the Future Recording screen, use the up and down arrow keys on your remote to select and highlight the future recording you want to delete. Press the MENU button on your remote to display the Main Menu. Use your arrow key to select the Cancel Recording icon. Press the OK or Select button on your remote to delete the future recording. At the Press “OK” to Confirm Cancel… confirmation message, press the OK button on your remote. The recording is now deleted. View DVR Hubs/Change DVR Hub Name Select View Hub List from the Main Menu to view the Digital Video Recorder(s) in your home. All the DVRs that are part of the multi-room network will display on this screen. You can also use this screen to change the names of the DVR Hub(s) to match the various locations in your home. Press the MENU button on your remote from this screen and then enter the new name. 26 Helpful Hints — Resuming Playback Using Bookmarks MR-DVR bookmarks your DVR content letting you to resume playback of the video content (movies, television shows, etc.) at a later time from the same, or different room of your home. Let’s look at a few examples: Resuming playback from the same room. Let’s assume you want to finish watching a movie in your upstairs bedroom. Previously, you stopped playback by pressing the STOP button on your remote. To resume playback you: 1. 2. 3. 4. Press the B button on your remote to display the My Recordings screen. Use the arrow keys to select the content you want to resume. Select the Resume Playback icon. Select This room’s latest position and press OK. The playback will resume right where you left off. 27 Resuming playback on a connected non-DVR set-top that was previously playing on your DVR. Let’s assume you are watching a movie in your living room (where the DVR is located) and you decide you want to continue watching it in the Den (where one of your connected non-DVR set-top’s is located). Here is what you would do: 1. Press the PAUSE or STOP button to stop/pause playback on the DVR. 2. In the Den, press the B button on the remote to display the My Recordings screen. Select the content you were previously watching in the living room and select the Resume Playback icon. 3. Select the Living Room’s latest position option*. The playback will resume right where you left off. *Note: In this example, Living Room is the custom name you assigned to your home’s master DVR. 28 Resuming playback on a connected non-DVR set-top that was previously playing on another non-DVR set-top. Let’s assume you are watching a movie on a non-DVR set-top in your bedroom and you decide you want to continue watching it in the den (where another non-DVR set-top is located). Here is what you would do: 1. While watching the content in the bedroom, press the MENU button on the remote control. Select the Set Follow-me bookmark icon and press OK. 2. In the den, press the B (or List) key to display the My Recordings screen. 3. Use the arrow keys on your remote control to highlight the content you were previously watching in the bedroom and press OK. 4. Select the Resume Playback icon from the Playback Details Screen. 5. Select the Follow-me bookmark position icon and press OK. 6. The playback will resume right where you left off. 29 Pausing live TV on your non-DVR set-top. Let’s assume you are viewing live TV and decide to resume watching at a later time. Here is what you would do: Press the B (or List) key on your remote to display the My Recordings screen. Press the PAUSE button on your remote. To resume watching press the PLAY button on the remote. Note: If your DVR is busy with other record functions, a confirmation screen will appear when you try to pause live TV or set-up a recording from a connected non-DVR set-top. Should you chose to continue (by pressing OK), a viewer watching TV at the DVR will experience an interruption in program viewing. Enjoy your Multi-Room DVR! We hope you enjoy using this great new addition to your home entertainment system. Should you have any questions, please contact us at 1-800-4-ASTOUND or visit us online at astound.net. 30 DVR Troubleshooting Q. Why doesn’t the set-top box respond when I press the keys on my remote? A. If power is on, make sure your remote is in the Cable mode. Press the CABLE button on the remote. Q. If the power goes out, do I need to reset my Parental Controls and Purchase PINs, Favorites and Reminders? A. No. These features will not be lost if the terminal loses its power. However, the guide information will need to reload into the box. Q. Nothing happens when the MENU button is pushed, but I can change the channel up and down. A. If the set-top box was just installed, it takes approximately 5-15 minutes for guide information to be downloaded. If after 5-15 minutes nothing happens, unplug the box, plug it back in and wait another 5-15 minutes. If the guide still does not appear, call Astound at 1-800-4-ASTOUND (1-800-427-8686). Q. I can’t see the edges of the guide screens. A. Select the Adjust Screen Position option from the Setup screen. Press the buttons until the arrows on the screen are centered. If image is centered and still cut off, check your TV’s user manual. Q. The guide has locked up. Neither the buttons on the remote, nor the buttons on the set-top box itself work. A. Try unplugging the set-top box and then plugging it back in. This will reset the terminal and allow for data to be downloaded. It will take some time for the information to appear. If there is still a problem after the information has appeared, call Astound at 1-800-4-ASTOUND (1-800-427-8686). Q. I have no video, a snowy picture or I cannot tune to any of the digital channels. A. Make sure that all of the cable connections are secure and that the TV is tuned to the correct input or channel (3 or 4) if connecting through VCR or DVR recorder. Also, make sure you are actually controlling the cable terminal (press the CABLE button on the remote). Q. Why won’t my remote control respond when I press a button? A. Go through this quick checklist to determine the problem: 1. Press the CABLE button on the remote to make sure it is in Cable mode. Try using the remote again. 2. If the remote is still not functioning correctly, press the CHANGE button on the front of the set-top box. If the channel changes, there is a problem with the remote control. The batteries or the remote control itself may need to be replaced. 3. Unplug the terminal and plug it back in. 4. Call Astound at 1-800-4-ASTOUND (1-800-427-8686). 31 Troubleshooting (Continued) Q. There are no listings in the guide, or the words “To Be Announced” appear in the listings screens. A. This can happen if there has been a power failure or if the set-top box was unplugged. Make sure everything is plugged in and running. Wait 5-15 minutes for the channels and program data to load. Q. I have a message on my screen that says “This feature is currently being restored”. What does this mean? A. This screen appears if you try to access a feature that is not available because the set-top box has not received all the necessary data. This most commonly happens following a power loss. Q. I have a message on the screen that says “This channel should be available shortly”. What does this mean? A. This screen will appear when you tune to a channel that is currently not available. If the channel is not available after 15-30 minutes, call Astound at 1-800-4-ASTOUND (1-800-427-8686). Q. What do I do if I am stuck in a screen or menu I do not understand and want to get out? A. You can always press the EXIT button on the remote to immediately return to watching TV. You can also press the LAST button to back up one screen at a time. Q. What happens to my DVR recordings if my digital cable box temporarily loses power? A. All recordings that were saved prior to the power loss are preserved, as well as future recording schedules. You miss only the recordings in progress while the power was out. Note: If you experience continued problems with your cable box, remote control or interactive program guide, please contact Astound Technical Support 24 hours a day at 1-800-4-ASTOUND (1-800-427-8686), or visit astound.net. 1-800-4-ASTOUND | astound.net ©2011 WaveDivision Holdings, LLC AST.004.0113