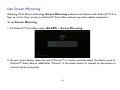
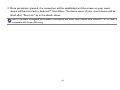
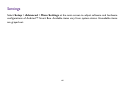
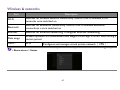
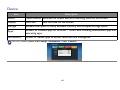
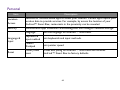
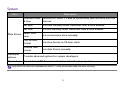
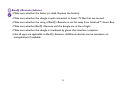
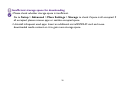
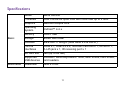
1
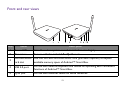
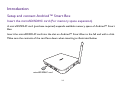
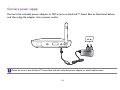
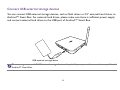
JM-250
Andriod™ Smart Box
User Manual
Copyright and trademark
Copyright 2014 by BenQ Corporation. All rights reserved. No part of this publication may be
reproduced, transmitted, transcribed, stored in a retrieval system or translated into any language or
computer language, in any form or by means of electronic, mechanical, magnetic, optical, chemical,
manual or otherwise, without the prior written permission of this company.
All other logos, products, or company names mentioned in this manual may be the registered
trademarks or copyrights of their respective companies, and are used for informational purposes
only.
Google Play™ and Android™ are trademarks of Google Inc.
Disclaimer
BenQ Corporation makes no representations or warranties, either expressed or implied, with
respect to the contents hereof and specifically disclaims any warranties, merchantability, or fitness
for any particular purpose. Further, BenQ Corporation reserves the right to revise this publication
and to make changes from time to time in the contents hereof without obligation of this company to
notify any person of such revision or changes.
2
The object of this manual is to provide the most updated and accurate information to users, and, for
that reason, all contents may be edited without a fixed schedule and a prior notice. For the latest
version of the user manual, please visit www.BenQ.com or select All APPs > BenQ TV Box user
manual at the main screen of Andriod™ Smart Box. If you have not installed any app as a PDF
reader on your Andriod™ Smart Box, go to BenQ recommended or apps store and look for
OfficeSuite 7 + PDF&HD
and install it. Display effects and available functions on PDFs vary
from applicable PDF readers.
BenQ is not responsible for the content of the websites or of similar resources, which are
maintained and controlled by third parties, that may be linked from this product. Providing links to
those websites or to similar resources does not mean that BenQ makes any warranty or
representation to their content by expression or by implication.
Any third party content or service preinstalled in this product is provided “as is”. BenQ does not, by
expression or by implication, make any warrant to the content or to the services provided by third
parties. BenQ does not warrant or guarantee that the content or services provided by third parties
are accurate, effective, most up-to-date, legal, or complete. Under no circumstances shall BenQ be
liable for the content or services provided by third parties including their negligence.
Services provided by third parties may be terminated temporarily or permanently. BenQ does not
warrant or guarantee that any content or services provided by third parties are in good condition at
any time, and is not liable for the termination of the said content and services.
3
In addition, BenQ is not involved in any transactions you conduct in the websites or similar
resources maintained by third parties.
You should contact the content or service providers for any questions, concerns, or disputes.
It is the sole responsibility of the user if problems (such as data loss and system failure) occurred due
to non-factory installed software, parts, and/or non-original accessories.
4
Table of Content
Copyright and trademark .................................................................................................2
Preface .................................................................................................................................8
About this book ............................................................................................................................................................... 8
Legends .............................................................................................................................................................................. 8
Touring the product ........................................................................................................10
Introduction .................................................................................................................................................................... 10
Package contents ........................................................................................................................................................... 11
Front and rear views ..................................................................................................................................................... 12
Introduction ......................................................................................................................14
Setup and connect Andriod™ Smart Box ............................................................................................................... 14
Insert the microSD/SDHC card (For memory space expansion) .................................................................................. 14
Connect to HDMI port equipped televisions or monitors.............................................................................................. 16
Connect USB keyboard and mouse ...................................................................................................................................... 17
Connect power supply ............................................................................................................................................................. 18
Connect USB external storage devices ................................................................................................................................ 19
Use BenQ i-Remote ...................................................................................................................................................... 20
BenQ i-Remote functions ........................................................................................................................................................ 20
Notice on BenQ i-Remote operations ................................................................................................................................. 23
Notice on battery usage........................................................................................................................................................... 24
5
Basic operations ...............................................................................................................25
Initial setup ...................................................................................................................................................................... 25
Switch modes of Andriod™ Smart Box ................................................................................................................... 31
Take shortcuts ................................................................................................................................................................ 31
Adjust system volume ................................................................................................................................................... 32
Update Andriod™ Smart Box software .................................................................................................................. 32
Manually check and update...................................................................................................................................................... 32
Update from downloaded software file................................................................................................................................ 33
Restore to factory defaults .......................................................................................................................................... 33
Use apps ............................................................................................................................35
Main screen ..................................................................................................................................................................... 35
Use smartphones or tablets as a mini touch panel of Andriod™ Smart Box (Screen Link) .................... 37
Use smartphones or tablets as the remote controller (BenQ Smart Remote) ....................................... 40
BenQ Smart Remote operation modes ......................................................................................................................... 42
Stream videos on the Internet to Andriod™ Smart Box for playback (PlayToGo) .................................... 48
Stream multimedia files to Andriod™ Smart Box for playback ......................................................................... 53
Stream from smartphones/tablets (applicable to iOS™ devices as AirPlay™)........................................................... 54
Stream from smartphones/tablets (applicable to Android™ devices) .......................................................................... 55
Play files from external devices on Andriod™ Smart Box .................................................................................. 57
Play files from smartphones/tables on Andriod™ Smart Box ........................................................................................ 57
Play files from computers on Andriod™ Smart Box ........................................................................................................ 59
Rename device name of Andriod™ Smart Box ..................................................................................................... 59
6
Use Screen Mirroring ................................................................................................................................................... 60
Pre-installed apps guide ................................................................................................................................................ 62
Settings ..............................................................................................................................66
Wireless & networks .................................................................................................................................................... 67
Device ............................................................................................................................................................................... 68
Personal ............................................................................................................................................................................ 69
Accounts .......................................................................................................................................................................... 70
System .............................................................................................................................................................................. 71
Frequently asked questions and resolutions .................................................................72
Specifications ....................................................................................................................77
Safety warning & notice ...................................................................................................79
11/6/14
7
Preface
About this book
This book contains important information of Andriod™ Smart Box as well as functionality
demonstrations of Andriod™ Smart Box. Please keep this book in a safe place for immediate
reference when required.
This book simplifies steps into menu selections such as All Apps > Settings > Display.
Software functionality and hardware appearances in this book are described as contemporaneous as
the product is first released, which may be differed from software revisions or hardware
improvements of the product. Please pardon for without prior notices.
Legends
Notes, tips, warnings in this book are designed by means of purposes with descriptions as below.
Icon
Item
Description
Note
Supplement instructions.
Tip
Handy advice to complete certain jobs.
8
Icon
Item
Warning
Description
Knowledge of avoiding misusages, false operation, or improper behavior leading
component corruption, data loss, or injury.
9
Touring the product
Introduction
Thank you for purchasing BenQ JM-250 Andriod™ Smart Box. With this tiny but mighty device and
a few simple steps, you can make any display smarter than ever. Not only can it bring you enjoyments
of versatile cloud content services by BenQ, but also provides all-around multimedia playback ability
in videos, photos, music, and so forth; moreover, you can use it for web browsing and emails.
BenQ JM-250 Andriod™ Smart Box comes with Android™ operating system, and you can
download and install a variety of apps to expand its functionality, such as social networking,
communication, or online games, to fit your demand.
10
Package contents
Please make sure below items are available while unpacking. Please contact dealers immediately if
any item missing or damaged.
Andriod™ Smart Box x 1
Power adapter x 1
HDMI cable x 1
BenQ i-Remote x 1
Quick start guide x 1
Warranty card x 1
(AA battery x 2 required)
Purchase is required for excluded cables/parts from the package.
• Product appearances and images in this book may be differ from the actual products rolled out in your region.
• Please use BenQ genuine parts to ensure compatibility and safety.
• Please keep the product and its accessories out of children.
11
Front and rear views
1
Item
2
3
Name
4
5 6 78
Description
1
Power LED
Lit in blue when system on and in red when standing by.
2
IR receiver
For use with the included BenQ i-Remote .
3
microSD/SDHC Use this slot with microSD/SDHC card (purchase required) to expand
card slot
available memory space of Andriod™ Smart Box.
4
USB 2.0 port
For use with external keyboard and mouse on operating each convenient
functions of Andriod™ Smart Box.
5
RJ-45 jack
For use with ethernet cables on wired networks.
12
Item
Name
Description
6
AV-out
To be used to connect Andriod™ Smart Box to AV-in jacks on display
terminals.
7
HDMI
connector
To be used to connect Andriod™ Smart Box to the HDMI port on display
terminals.
8
DC-in
To be used as the power input of Andriod™ Smart Box. Use the included
USB power cable to connect the power adapter.
13
Introduction
Setup and connect Andriod™ Smart Box
Insert the microSD/SDHC card (For memory space expansion)
A microSD/SDHC card (purchase required) expands available memory space of Andriod™ Smart
Box.
Insert the microSD/SDHC card into the slot on Andriod™ Smart Box to the full end with a click.
Make sure the contacts of the card face down when inserting as illustrated below.
microSD/SDHC card
14
You may access folders and files on the card by selecting All Apps > DocQman
• Please insert the microSD/SDHC card as directed. Incorrectly squeeze the card into the slot may cause damage.
• Andriod™ Smart Box supports microSD/SDHC cards with the capacity up to 64 GB.
Remove the microSD/SDHC card
1. Dismount the microSD/SDHC card firstly by clicking Setup > Advanced > More Settings >
Device > Storage > Unmount SD card > OK.
2. Push the card to release it from the slot.
Please remove the card as directed. Failed to remove the card correctly may cause data loss.
15
Connect to HDMI port equipped televisions or monitors
You have to connect Andriod™ Smart Box to the HDMI port on televisions or monitors to bring it
into full play.
HDMI port on
television or
monitors
HDMI cable
16
Connect USB keyboard and mouse
You can use USB keyboard and mouse for text input and operating each convenient functions of
Andriod™ Smart Box. Please connect your USB keyboard and mouse to USB (Type A) port of
Andriod™ Smart Box.
USB (Type A) port
on Andriod™
Smart Box
Wireless keyboard &
mouse
USB keyboard & mouse
There is no guarantee of all USB keyboards and mice by every manufacturer to be compatible with Andriod™
Smart Box.
17
Connect power supply
Connect the included power adapter to DC-in jack on Andriod™ Smart Box as illustrated below,
and then plug the adapter into a power outlet.
Please be sure to use Andriod™ Smart Box with the included power adapter to avoid malfunctions.
18
Connect USB external storage devices
You can connect USB external storage devices, such as flash drives or 2.5” external hard drives, to
Andriod™ Smart Box. For external hard drives, please make sure there is sufficient power supply
and connect external hard drives to the USB port of Andriod™ Smart Box.
USB external storage device
There is no guarantee of all USB external storage devices of any kind by every manufacturer to be compatible with
Andriod™ Smart Box.
19
Use BenQ i-Remote
BenQ i-Remote functions
• Press MODE button and hold for 5 seconds to
switch mode between Andriod™ Smart Box
and TV.
1
6
• LED indicator blinks in green once when
switched to Andriod™ Smart Box mode.
2
3
• LED indicator blinks in red once when switched
to TV mode, and blinks in red once afterward
with any button pressed.
4
5
7
8
9
10
11
When switched to TV mode, BenQ i-Remote
can be operated as an exclusive BenQ TV
remote control.
Item
1
Button name
Power
Mode
Description
Andriod™
Smart Box
Press to have Andriod™ Smart Box enter standby mode or
back to normal mode.
TV
Press to turn TV on or off.
20
Item
2
Button name
Left
Mode
Andriod™
Smart Box
Description
Work as the left button of mouse.
Andriod™
Press to confirm.
Smart Box/TV
Scroll wheel
Andriod™
Smart Box
4-way control
Andriod™
Push scroll wheel up, down, left, or right to select items on
Smart Box/TV the screen. Press scroll wheel to confirm.
4
Mode
Andriod™
Press and hold for 5 seconds to switch mode between
Smart Box/TV Andriod™ Smart Box and TV.
5
Volume
up/down
Andriod™
Press to increase/decrease volume.
Smart Box/TV
3
6
LED indicator
Scroll the wheel to move display area upward or
downward.
Andriod™
Smart Box
LED indicator blinks in green once when switched over.
TV
LED indicator blinks in rec once when switched over, and
blinks in red once afterward with any button pressed.
21
Item
7
8
9
10
11
Button name
Right
Mode
Description
Andriod™
Smart Box
Work as the right button of mouse.
TV
Press to return to previous level of menu.
Home
Andriod™
Press to back to the main screen.
Smart Box/TV
Voice
Andriod™
Smart Box
Press to activate voice input in Google search or supported
apps.
Menu
TV
Press to display available items in the menu.
Mute
Andriod™
Press to mute the sound, and press again to resume.
Smart Box/TV
Enlarge/shrink
Andriod™
Smart Box
Press to enlarge/shrink display area if supported by apps.
(Ex. Photo browsing apps)
Channel
up/down
TV
Press to switch channels.
Due to limited button functionality on the included BenQ i-Remote of Andriod™ Smart Box and various
operations in apps, there is no guarantee to the included BenQ i-Remote well suited to all apps. You may choose
external wired or wireless keyboard and mouse for assistance.
22
Notice on BenQ i-Remote operations
• Make sure the dongle accompanied with BenQ i-Remote is well inserted into Andriod™ Smart
Box.
• Please contact BenQ service representatives if the dongle lost.
• Use BenQ i-Remote with top end directed to the dongle on Andriod™ Smart Box and press
buttons.
• Use BenQ i-Remote with the dongle within 30 degrees of angle and less than 5 meters long.
• Do not cover the dongle or block with obstacles to let BenQ i-Remote and the dongle be in line of
sight.
• Do not strike or drop BenQ i-Remote. Do not wet BenQ i-Remote or put it in damp. Do not
expose BenQ i-Remote to direct sunlight. Scorching heat may damage BenQ i-Remote.
• The dongle may be malfunctioned when exposed to direct sunlight or the glare of the sun. Please
change the light source or the angle, or please use BenQ i-Remote with the dongle
approximatively.
• To wake up Andriod™ Smart Box in sleep mode, use BenQ i-Remote with top end directed to the
dongle and press buttons.
• The LED indicator on BenQ i-Remote flashes in red when the battery power is running out, and
stops flashing when drained.
23
Notice on battery usage
Battery misapplications may lead to chemical leakages or explosions. Please be noted with
followings.
• Please make sure electrodes are placed correctly as marked when install battery.
• Replace a new battery immediately when the old one exhausted.
• Remove battery from BenQ i-Remote if not using BenQ i-Remote for a long time.
• Chemicals leaked from battery may cause skin irritation and corrode metal contacts. Use a dry
cloth to clean up and change the battery immediately if any leakage from the battery.
• Please check or change the battery in BenQ i-Remote regularly to avoid battery leaks resulted in
damage.
24
Basic operations
Initial setup
Before using your Andriod™ Smart Box for the very first time, you will have to configure settings
such as language, display, network, and so on. Confirm items below before proceed.
• You have correctly connected power supply, BenQ i-Remote, and HDMI of Andriod™ Smart Box
to display.
• If you wish to use Andriod™ Smart Box with wireless network, please make sure your have an
SSID and its password in hand.
1. Turn on your display and switch input signal to
the HDMI port that Andriod™ Smart Box
occupied. Refer to manuals of display for
switching signals.
2. Andriod™ Smart Box should be self-started
up when power supplied. A welcome screen
appears when done starting up. Please select
preferred language and then select Next.
25
3. You will be directed to TV display layout
setting then. Please use BenQ i-Remote to
adjust the ratio of display area. Please select
Next when finished.
4. You will be directed to time zone setting then.
Please use BenQ i-Remote to select your time
zone. Please select Next when finished.
26
5. You will be directed to network settings.
Following setting exemplifies Wi-Fi networking
on Andriod™ Smart Box. Please make sure
you have available and operative SSIDs in hand.
6. Please select Wi-Fi, and select Next.
27
7. Andriod™ Smart Box should begin to scan for
SSIDs.
8. Discovered SSIDs with signal strength and
availability will be listed on the screen when
done scanning. Password required SSids are
presented with a lock icon by signal strength.
Please select your SSID.
Please make sure you have selected an SSID with a good
signal strength for effortless file transmission.
28
9. If your SSID requires password, you will be
asked for the password. You may tick Show
password to reveal for verifications.
10. Select Connect. Andriod™ Smart Box will
attempt to connect to the selected SSID. If
succeeded, the selected SSID should be
designated by Connected in the list.
29
11. You have completed the initial setup so far.
Please select Finish.
12. After initial setup, you will be directed to the
main screen as illustrated.
You may directly perform desired apps or
functions here. At the bottom are favorite apps
for quick pick.
Not all apps are good for use with LCD displays in large
size.
30
Switch modes of Andriod™ Smart Box
Press power button on BenQ i-Remote again to have Andriod™ Smart Box enter power saving
mode.
Press power button again on BenQ i-Remote to have Andriod™ Smart Box enter normal initiation
mode. Once normal initiation mode completed, the main screen appears.
Take shortcuts
To enable shortcuts, select Setup > Display and set Hide Status Bar off.
There are several icons of auxiliary shortcuts at the bottom of the screen (the main screen
excluded) available for your convenience to save time.
These auxiliary shortcuts are available for use with external mouse only.
• Click on
to back to previous page or quit the current app. (Not applicable to all apps.)
• Click on
to back to the main screen immediately.
• Click on
apps.
to display a list of recent used apps. You may click on thumbnails in the list to use
31
• Click on
to capture current screen and store in storage >> sdcard0 >> Pictures >>
Screenshots.
• Click on
or
to increase or decrease sound volume.
• Click on
for available items of the current screen or app.
• Click on
to shut virtual keyboard. (If virtual keyboard appears on screen.)
Adjust system volume
You may adjust system sound volume by following methods:
1. Press volume up/down button on BenQ i-Remote.
2. Click on auxiliary icons
or
at the bottom of the screen.
Update Andriod™ Smart Box software
System software of your Andriod™ Smart Box will be updated from time to time to provide the
latest and versatile features. By default, once connected to the Internet, if available, Andriod™
Smart Box will automatically download the latest software from the server and proceed installation.
If you want to manually check, download, and install the software, please follow the steps below.
Manually check and update
1. Make sure Andriod™ Smart Box is connected to the Internet.
32
2. Select All APPs > Upgrade and tick off Automatic update.
3. Select Manual update now and proceed with instructions on the screen.
Update from downloaded software file
1. Store downloaded software file on the root directory of memory card and insert the card into
the slot of Andriod™ Smart Box
2. Select Local update and select the downloaded file in the next page.
3. Proceed with instructions on the screen.
• Automatic update, Local update, and Manual update now will erase all self-installed apps. Be sure to
back up all self-installed apps beforehand.
• If you choose to update from self-downloaded software file, please be noted to keep from power outages while
update in progress; otherwise it will result in update failure and booting errors.
• You can install software files released by BenQ only. Users are responsible for data loss and system failures
resulted from unauthorized software files.
Restore to factory defaults
Restoring to factory defaults brings back each default configuration to Andriod™ Smart Box.
1. To restore to factory defaults, please select Setup > Advanced > More Settings > Personal >
Reset > Factory data reset.
33
2. Andriod™ Smart Box will begin to restore to factory defaults. Initial setup screen appears when
restoring completed. Refer to Initial setup (page 25) to proceed initial setup.
It is strongly recommended to backup everything important on your Andriod™ Smart Box before restoring to
factory defaults.
34
Use apps
Main screen
After finished initial setup or every time you turned on Andriod™ Smart Box, the main screen
appears as below. You may press home button on BenQ i-Remote to return the main screen at once
while using other apps.
Use scroll wheel on BenQ i-Remote to select a desired app or function and press OK button to
confirm.
1
2
3
4
5
6
7
35
Item
Name
Description
1
BenQ Zone
Select to choose a variety of apps by BenQ for your Andriod™ Smart
Box.
2
BenQ Suggest
Select to choose a variety of apps by BenQ for your smart devices.
3
Google
Select to launch Google apps.
4
All APPs
Select to launch the list of all installed apps.
5
Browser
Select to browse the Internet as if with a computer.
6
Media Player
Select to manipulate media files playback and management via Video
Player, PiQture, QissMusic, and Media center.
7
Favorite apps
Select to choose from listed favorite apps for quick pick.
36
Use smartphones or tablets as a mini touch panel of Andriod™ Smart
Box (Screen Link)
Not only can Screen Link work as a remote control for media playing, but also as a pad controller
for superior gaming experience especially when applicable to the accelerometer or the gyro.
Screen Link supports smart devices with Android™ 4.0 / iOS™ 6.0 or later, and you can
download it via Google Play™ or App Store to turn your smart device to a mini touch panel of
Andriod™ Smart Box.
1. Make sure your smartphone or tablet and
Andriod™ Smart Box are in the same subnet of
local area network.
IP=192.168.1.X
IP=192.168.1.X
IP=192.168.1.X
37
2. Click on the icon of Screen Link on your
smartphone or tablet.
3. You should be able to see everything on your
smartphone or tablet exactly the same as on your
TV screen, and you can use your smartphone or
tablet as a mini touch panel to operate your
Andriod™ Smart Box by now.
38
4. Only at a time can one smart device with Screen
Link remotely manipulate one Andriod™ Smart
Box. You have to drop the current connection
between the smart device and Andriod™ Smart
Box to establish another if you wish to remotely
manipulate another Andriod™ Smart Box in hand.
To do so, simply press
on your smart device to
pick a Andriod™ Smart Box from the list.
• Screen Link streams contents of Andriod™ Smart Box in 480p resolution to the smart device. If the native
screen resolution of the smart device is higher than 480p, characters or graphics may be looked fragmented.
• Your smart device and Andriod™ Smart Box must be in the same local network such as connecting to the same
wireless access point before establishing connection.
39
Use smartphones or tablets as the remote controller (BenQ Smart
Remote)
Other than BenQ i-Remote, external keyboard, and mouse, if you own a smart device such as a
smartphone or a tablet, you may install BenQ Smart Remote on your smart device to manipulate
each function of Andriod™ Smart Box conveniently and intuitively.
1. Make sure you have Andriod™ Smart Box connect to the Internet.
2. At the main screen of Andriod™ Smart Box, select BenQ Suggest > BenQ Smart Remote
and choose from the operating system icon respective to your smart device to download the
app.
3. A QR code will be revealed on the display with a text field for e-mail address input. Use your
smart device to scan the QR code and directly download the app or input an e-mail address to
send the link to download BenQ Smart Remote to your e-mail account. Open the mail and
click on the link to proceed installation.
4. Launch BenQ Smart Remote on your smart device.
5. You will be requested for the IP address of Andriod™ Smart Box. Please check the IP address of
Andriod™ Smart Box, at the main screen, by selecting Setup > Network. The actual IP
address varies from your network environment.
40
6. Input Andriod™ Smart Box’s IP address to your smart device and select OK. If connection
established, the layout of BenQ Smart Remote will appear on your smart device.
• Your smart device and Andriod™ Smart Box must be in the same local network such as connecting to the same
wireless access point before establishing connection.
• Only at a time can one smart device with BenQ Smart Remote remotely control Andriod™ Smart Box. You
have to drop the current connection between the smart drive and Andriod™ Smart Box to establish another if
you wish user the other smart device to remotely control Andriod™ Smart Box.
• BenQ Smart Remote for smart device supports Android™ 4.0 / iOS™ 6.0 or later.
41
BenQ Smart Remote operation modes
BenQ Smart Remote provides 3 operation modes: remote controller mode, cursor mode, and
text mode. You may switch to the mode suits you best depending on features and the necessity of
each app for your handy operation.
Remote controller mode
Tap to launch BenQ Smart Remote. Once connected, the app enters remote controller mode by
default. The layout in remote controller mode is illustrated as below.
1
2
8
9
3
10
4
5
11
6
7
42
Item
Description
1
Tap this button and swipe right to reveal BenQ Smart Remote properties and
information as well as set cursor speed.
2
Tap this button to switch modes among remote controller, cursor, and text.
3
Tap this button to decrease system volume.
4
Tap 4-way control (up, down, left, right) to select items on the screen. Tap OK to confirm.
5
Tap this button to back to previous page or previous level of menu.
6
Tap these 4 color buttons for certain functions where available in apps.
7
Tap these buttons for photo or video playback where available in apps.
8
Tap this button to have Andriod™ Smart Box enter standby mode.
9
Tap this button to mute. Tap again to resume.
10
Tap this button to increase system volume
11
Tap this button to back to the main screen.
43
Cursor mode
Cursor mode enables you to use Andriod™ Smart Box intuitively just like manipulation with putting
fingers on a touch panel for. The layout in cursor mode is illustrated as below.
5
6
1
2
3
4
Item
7
Description
1
Tap this button and swipe right to reveal BenQ Smart Remote properties and
information as well as set cursor speed.
2
Tap this button to switch between modes in remote controller, cursor, and text.
44
Item
Description
3
This area is a simulated touch panel. You can put your fingers on this area to tap, drag, swipe,
stretch, or pinch items on Andriod™ Smart Box just like using touch panels on smart
devices.
Use both fingers simultaneously swiping up and down on this area for scrolling web pages.
4
Tap this button to back to previous page or previous level of menu.
5
Tap this button to have Andriod™ Smart Box enter standby mode.
6
Tap this button to mute. Tap again to resume.
7
Tap this button to back to the main screen.
45
Text mode
Text mode enables you to input characaters quickly and conveniently. For text input, please move
cursor to the text field before switching to text mode. The layout in text mode is illustrated as
below.
5
6
1
2
3
4
7
Item
Description
1
Tap this button and swipe right to reveal BenQ Smart Remote properties and information
as well as set cursor speed.
2
Tap this button to switch between modes in remote controller, cursor, and text.
3
Tap this rectangle to input characters.
46
Item
Description
4
Tap this button to insert characters in the rectangle into the text field.
5
Tap this button to have Andriod™ Smart Box enter standby mode.
6
Tap this button to mute. Tap again to resume.
7
Given selected characters in the text field, tap this button to replace selected characters with
characters in the rectangle.
47
Stream videos on the Internet to Andriod™ Smart Box for playback
(PlayToGo)
With PlayToGo app, you can stream videos on smart devices with touch panels to your Andriod™
Smart Box to watch your family together.
1. Make sure your Andriod™ Smart Box has
connected to the Internet.
2. At the main screen of Andriod™ Smart Box,
select All APPs > PlayToGo settings.
48
3. Select PlayToGo service to enable the
function. Once the status changed to enabled,
the function is now working.
4. Default name is Playtogo + (the last 4
characters of your Andriod™ Smart Box’s
MAC address). If you wish to rename, select
PlayToGo device name to rename it. You
smart device will use the function by
discovering the name.
49
5. Make sure you have downloaded and installed
PlayToGo app from online app store to your
smart device.
6. Please make sure your Andriod™ Smart Box
and smart device are in the same local
network such as connecting to the same
wireless access point and networking is
available.
50
7. Launch PlayToGo app on your smart device.
The help screen appears if first launch. Shut
the help screen to proceed to channel list of
PlayToGo.
The layout varies from operating systems respective to
the smart devices.
Channels on the list update occasionally.
8. Select a channel on your smart device and tap
to play the video and transfer the content to
the playback device.
Select Send to for the playback device name,
which is the name you set in step 4, at top of
the screen if first stream.
Tap
to stop video playing.
51
9. To change playback content, use the back
function on smart devices to back to the
channel list, pick the video to be played, and
tap
at the top side to start video streaming.
It is recommended to control playback via BenQ
Smart Remote. Launching BenQ Smart Remote at
PlayToGo varies from operating systems. If iOS™, tap
BenQ Smart Remote at bottom right, whereas, if
Android™, tap
> BenQ Smart Remoteat top
right. Please refer to Use smartphones or tablets as the
remote controller (BenQ Smart Remote) (page 40) for
more details.
Once video streaming begins, your smart device can be
manipulated as usual and unaffectedly.
52
Stream multimedia files to Andriod™ Smart Box for playback
Your Andriod™ Smart Box is a DLNA compatible playback device of multimedia contents including
videos, audios, and photos on DLNA devices such as smartphones, tablets, or computers in the local
network.
It is recommended to utilize BenQ Smart Remote for playback when media transmitted to Andriod™ Smart
Box. Please refer to Use smartphones or tablets as the remote controller (BenQ Smart Remote) (page 40) for
details.
53
Stream from smartphones/tablets (applicable to iOS™ devices as AirPlay™)
1. Please make sure both your Andriod™ Smart Box and iOS™ device are turned on.
2. Please make sure both Andriod™ Smart Box and the iOS™ device are in the same local
network such as connecting to the same wireless access point and networking is available.
3. Please make sure you have turned on the function by selecting Media Player > Media center
> Airplayer.
4. Select the media file to be played in the app on the iOS™ device and tap
device.
to pick a playback
5. Tap Andriod™ Smart Box as the playback device and the selected media file will be streamed
and started playing on Andriod™ Smart Box.
54
Stream from smartphones/tablets (applicable to Android™ devices)
1. Please make sure your Andriod™ Smart Box and Android™ device are turned on.
2. Please make sure both Andriod™ Smart Box and the Android™ device are in the same local
network such as connecting to the same wireless access point and networking is available.
3. Please make sure you have turned on the function by selecting Media Player > Media center
> DLNA_DMR.
4. Please make sure you have downloaded and installed the applicable DLNA app such as
BubleUPnP from online app store to your Android™ device.
55
5. Tap and open the DLNA app on your Android™ device, and make sure your Android™ device is
capable of identifying the playback device, Andriod™ Smart Box. Select the media file to be
played on your Android™ device. The graphic user interface layout varies from Android™
devices. The selected media file will be streamed and started playing on Andriod™ Smart Box.
The default name of Andriod™ Smart Box is set as “W-Fi MAC address + JM-250”. If there are many Andriod™
Smart Boxs coexisting, and you wish to confirm the one to transmit, you may check Wi-Fi MAC address of the
Andriod™ Smart Box at Main Screen > Settings > Advanced > More Settings > SYSTEM > About
device > Status.
56
Play files from external devices on Andriod™ Smart Box
With an appropriate DLNA app, your Andriod™ Smart Box will be able to serach and play media
files stored on other devices.
It is recommended to utilize BenQ Smart Remote for playback when media transmitted to Andriod™ Smart
Box. Please refer to Use smartphones or tablets as the remote controller (BenQ Smart Remote) (page 40) for
details.
Play files from smartphones/tables on Andriod™ Smart Box
1. Please make sure your Andriod™ Smart Box and smartphone/tablet are turned on.
2. Please make sure your Andriod™ Smart Box and smartphone/tablet are in the same local
network such as connecting to the same wireless access point and networking is available.
3. Please make sure you have downloaded and installed the applicable DLNA app such as
BubleUPnP from online app store to your smartphone or tablet to share files.
57
4. Tap and open the DLNA app on your smartphone/tablet, select Andriod™ Smart Box as the
playback device, and grant permission to Andriod™ Smart Box to access files in your
smartphone/tablet by selecting Media Player > Media center > DLNA_DMP.
5. On your Andriod™ Smart Box, tap the name of your smartphone/tablet in Media Player >
Media center > Media Player.
You have setup the connection between your smartphone/tablet and Andriod™ Smart Box for
media files on smartphone/tablet playback via Andriod™ Smart Box. Manipulation differs from
apps. Please refer to the user guide of the app for details.
58
Play files from computers on Andriod™ Smart Box
1. Please make sure your Andriod™ Smart Box and computer are turned on.
2. Please make sure your Andriod™ Smart Box and computer are in the same local network such
as connecting to the same wireless access point and networking is available.
3. Please make sure you have downloaded and installed the applicable DLNA app such as PS3 Media
Server to your computer to share files.
Launch the installed DLNA application on your computer, and make sure the computer has
discovered the playback device, Andriod™ Smart Box. For further settings on browsing and
sharing, if required, please carry out at the time being. Please refer to the user guide of the
application for details.
4. Select Media Player > Media center > DLNA_DMP at the main screen of Andriod™ Smart
Box, and make sure your computer name is in the device list.
You have setup the connection between your computer and Andriod™ Smart Box for media
files on the computer playback via Andriod™ Smart Box. Manipulation differs from apps. Please
refer to the user guide of the app for details.
Rename device name of Andriod™ Smart Box
The default name of Andriod™ Smart Box is set to JM-250. If you wish to rename it, please set the
new name by selecting Main Screen> Media Player > Media center > Settings > Target
name。
59
Use Screen Mirroring
Adopting Wi-Fi Direct technology, Screen Mirroring enables smart devices with Android™ 4.2 or
later to mirror their screens to Andriod™ Smart Box without any intermediate equipment.
To use Screen Mirroring:
1. At Andriod™ Smart Box, select All APPs > Screen Mirroring.
2. At your smart device, select the term Miracast™ or similar, and then select the device name of
Andriod™ Smart Box as labled after “Device:” in the sketch above. A request for permission to
connect will be prompted.
60
3. Once permission granted, the connection will be established and the screen on your smart
device will be mirrored to Andriod™ Smart Box. The device name of your smart device will be
listed after “Peer List:” as in the sketch above.
Due to hardware divengence and software discrepancy, not every smart device with Andriod™ 4.2 or later is
compatible with Screen Mirroring.
61
Pre-installed apps guide
Andriod™ Smart Box contains pre-installed apps. You can launch some of them at the main screen,
or select All APPs to launch the list of all installed apps.
Pre-installed apps in Andriod™ Smart Box vary from your region. You may obtain more apps from
online app stores. Sample pre-installed apps in Andriod™ Smart Box are listed as below.
Item
Description
APP Installer
Select to directly install apk files in internal memory of Andriod™ Smart Box,
the memory card, or the external USB storage device.
BenQ Suggest
Select to view apps recommended by BenQ.
Browser
Select to browse the Internet as if with a computer.
Calculator
Select to engage calculations.
Calender
Select to set calendars synchronized with google accounts.
CEC VSC Test
For service personnel only.
Chrome
Select to browse the Internet by Google.
Clock
Select to display time and set alarms.
DocQman
Select to browse, manage, or open files in internal memory of Andriod™ Smart
Box, the memory card, or the external USB storage device.
62
Item
Description
Downloads
Select to browse and access downloaded files from the Internet.
Drive
Select to use the file storage and synchronization service provided by Google.
Education
Select to enjoy entertainment news and the latest knowledge in videos for the
family.
Email
Select to send and receive e-mails once configured. Suppoted protocols are
POP3, IMAP, and Exchange.
Entertainment
Select to catch the latest entertainment news in videos.
Gmail
Select to send and receive e-mails by Google.
Google
Select to use the intelligent personal assistant developed by Google
Google Setting
Select to configure service settings of Google.
Google+
Select to use the social networking operated by Google.
Handouts
Select to use instant messaging and video chat platform developed by Google.
Initial Setup
Select to engage initial settings of the device.
iperf
For service personnel only.
Maps
Select to use the web mapping service application and technology provided by
Google.
63
Item
Description
Media Center
(Airplay inside)
Select to play media files on other DLNA servers, or allow other DLNA devices
to play media files in Smart Stick.
Refer to Stream multimedia files to Andriod™ Smart Box for playback (see page
53) for more details.
Photos
Select to use the photo service by Google.
PiQture
Select to play photo files in internal memory of Andriod™ Smart Box, the
memory card, or the external USB storage device.
Play Books
Select to search or purchase books in Google Play™.
Play Games
Select to search or purchase games in Google Play™.
Play Movies &
TV
Select to search or purchase movies or TV programs in Google Play™.
Play Music
Select to search or purchase music in Google Play™.
Play Newsstand Select to search or purchase books in Google Play™.
Play Store
Select to search, install, or purchase apps in Google Play™.
Playtogo setting Select to setup playing videos from smartphones or tablets.
QissMusic
(Music Player)
Select to play music files in internal memory of Andriod™ Smart Box, the
memory card, or the external USB storage device.
64
Item
Description
Screen Mirroring Select to enable smart devices with Android™ 4.2 or later to mirror their
screens to Andriod™ Smart Box without any intermediate equipment.
Search
Select to search for webpages and pictures over the Internet via Google search
engine with keywords.
Settings
Select to set software and hardware configurations. Refer to Settings (page 66)
for more details.
Upgrade
Select to download and install the most updated apps for Andriod™ Smart Box.
Refer to Update Andriod™ Smart Box software (page 32) for more details.
Voice Search
Select to search for webpages and pictures over the Internet via Google search
engine with keywords via voice input.
YouTube
Select to search and watch online videos in YouTube.
• You can install or uninstall apps, but you cannot erase or uninstall pre-installed apps in Andriod™ Smart Box.
• To uninstall apps, select Setup > Advanced > More Settings > Device > Apps or select apps to be
uninstalled in Downloaded tag, and select Uninstall.
• Not all apps of smartphones or smart devices are good for use with LCD displays in large size.
• Apps in the app list is sorted in alphabetic order and restored when new apps installed.
65
Settings
Select Setup > Advanced > More Settings at the main screen to adjust software and hardware
configurations of Andriod™ Smart Box. Available items vary from system status. Unavailable items
are grayed out.
66
Wireless & networks
Item
Description
Wi-Fi
Switches for wireless network connectivity. Informs a list of available Wi-Fi
networks once switched on.
Bluetooth
Switches for Bluetooth connectivity. Informs a list of available Bluetooth
connections s once switched on.
Ethernet
Switches for Ethernet networking. Configures Ethernet networking.
Data usage
Reveals uploaded and downloaded data usages of each app in Smart Stack during a
certain period.
More...
VPN
Configures and manages virtual private network (VPN)。
For MAC address and other network informtion, please select Setup > Advanced > More Settings > System
> About device > Status.
67
Device
Item
Description
Sound
Touch sounds Switches for sound effects of selecting items on the screen.
Display
Font size
Storage
Reveals total space of every available memory and occupied storage space.
Apps
Reveals all installed apps on Andriod™ Smart Box including downloaded apps and
executing apps.
Permissions
Grants or denies apps to access resources and intelligence.
Sets font size on the screen.
For CEC control, please select Setup > Advanced > CEC Control.
68
Personal
Item
Description
Location
Access
Switches for location-based apps to access your location. Certain apps require your
location data to provide services. For example, by access the location of your
Andriod™ Smart Box, restaurants in the proximity can be revealed.
Security
Administrates apps installation acknowledgment and manages credential storage.
Language &
input
Reset
Language
Sets the language for Andriod™ Smart Box.
Keyboard &
input method
Sets keyboards and input methods.
Mouse /
Trackpad
Sets pointer speed.
Factory data
reset
Erases everything on Andriod™ Smart Box and restores
Andriod™ Smart Box to factory defaults.
69
Accounts
Item
Add account
Description
Manages accounts and available services on Andriod™ Smart Box. You can
administer accounts associated with Google, Facebook, and e-mail as well as
decide information synchronization types of each account.
70
System
Item
Description
Automatic date Switches for Smart TV Box to synchronize date and time over the
& time
Internet.
Set date
Sets date manually when Automatic date & time disables.
Set time
Set time manually when Automatic date & time disables
Date & time Select time
zone
Developer
options
Sets current time zone manually.
Use 24-hour
format
Sets time format to 24-hour clock.
Choose date
format
Sets date format manually.
Provides advanced options for system developers.
About device Reveals Smart TV Box network status and software properties.
Only when the Internet is available can Smart TV Box synchronize date and time correctly.
71
Frequently asked questions and resolutions
If you have problems on installations and using Andriod™ Smart Box, please refer to the frequent
asked questions as listed below for resolutions. If the problem still exists, pleaese contact BenQ
customer service for help.
Network unavailable
• Please check validity of SSID signal strength and Wi-Fi settings.
• If unable to discover 5GHz SSID, please make sure your Wi-Fi access point supports 5GHz
frequency band and its wireless channal settings.
• If connecte to Wi-Fi but unable to browse web pages, it is possible there’s a problem with
your broadband modem such as powered off, malfunctioned, or incorrectly configured with
firewall, user ID, or password. Please contact your Internet service provider for assistance.
72
BenQ i-Remote failures
• Make sure whether the battery is dead. Replace the battery.
• Make sure whether the dongle is well connected to Smart TV Box but not loosed.
• Make sure whether the using of BenQ i-Remote is not far away from Andriod™ Smart Box.
• Make sure whether BenQ i-Remote and the dongle are in line of sight.
• Make sure whether the dongle is irradiated by glares that interfere reception.
• Not all apps are applicable to BenQ i-Remote. Additional devices can be assistance on
manipulations if available.
73
Audio or video failures
• Make sure whether you have switched the input signal of display to the corresponding HDMI
port that Andriod™ Smart Box connected to. You may press “Input”, “Video Source”, or
similar buttons on the remote controller of display to switch to HDMI input.
• Make sure whether you have turned on the power of Andriod™ Smart Box. Press power
button on BenQ i-Remote to turn on Andriod™ Smart Box.
• Make sure whether the volumes of Andriod™ Smart Box and display have been turned all the
way down or muted. If connected to an amplifier, please make sure whetehr the amplifier
turned on and the volume is set correctly.
• Make sure whether the display has been connected with power supply. If there is a switch on
the power plug, is the the swtich turned on?
• Make sure whether Smart TV Box is properly connected with power cord. To get Smart TV
Box to work, the power supply has to match with the standard of 5V 2A.
• Make sure whether Smart TV Box does not start up regularly. Please disconnect the power
supply and reconnect.
• Make sure whether Smart TV Box’s default display resolution is set to 1080p. Please confirm
the connected display supports 1080p video signal input.
74
App failures
• Please make sure apps are adapted for Andriod™ Smart Box. For example, camera and wired
network required apps are not adapted to Andriod™ Smart Box. If the app is not applicable,
please select Setup > Advanced > More Settings > Apps > Downloaded to remove the
app.
• Market Place contains apps adapted for LCD displays in large size, and Apps from other
sources depende on their designs. Not all apps of smartphones or smart devices are for use
with the LCD displays in large size.
Smart TV Box not responding
If Smart TV Box does not respond to any of your operations or its audio/video fails, please
disconnect the power supply for few seconds and reconnect.
Screen lagging, frozen, or distorted
• Make sure whether Andriod™ Smart Box’s Wi-Fi signal reception is OK, Wi-Fi is not
interfered by other applicances, or wireless bandwidth is hogged by other devices.
• If not the problem with Wi-Fi bandwidth or reception, it may be the problem of insufficient
Internet bandwidth. It is recommanded to apply at least 8Mbps subscribed bandwidth to keep
screen easy and smooth especially for watching online hight definition videos.
75
Insufficient storage space for downloading
• Please check whether storage space is insufficient.
Go to Setup > Advanced > More Settings > Storage to check if space is all occupied. If
all occupied, please remove apps or sanitize occupied space.
• Uninstall infrequent used apps. Insert an additional microSD/SDHC card and move
downloaded media content on it to gain more storage space.
76
Specifications
Basic
Multimedia
Model
BenQ JM-250
Processor
ARM Cortex-A9 quad core with clock rate up to 2 GHz
Graphics
Mali-450 octuple core
Operating
System
Android™ 4.4.x
Memory
DDR3 1GB
Storage
NAND flash 8GB
Wireless
IEEE 802.11 a/b/g/n (dual band 2.4 & 5GHz )
Ports &
Interfaces
HDMI x 1, USB 2.0 x 2, microSD card slot x 1, AV-out x 1,
RJ-45 jack x 1, IR receiving port x 1
SD card slot
Yes (up to 64 GB)
Supported
USB devices
Wireless / wired keyboards / mice, flash drives, hard drives,
card readers.
Resolution
3840 x 2160
77
Other
Dimension
(antenna
excluded)
107.9 (length) x 105.2 (width) x 21.5 (height) mm
Weight
(Andriod™
Smart Box
base unit)
Approximate 260g
Power input
5V/2A
78
Safety warning & notice
Please pay extra care about the content in this section while operating this device.
• Please keep this manual appropriately so you can refer to when needed.
• Please do obey system related instructions and warnings.
• Please do not store this device beyond temperature ranging between -10°C and 50°C. Do not
operate this device beyond temperature ranging between 0°C and 40°C, or the system
performance may be affected negatively.
• Please do not expose this device to rain or damp and keep it away from liquids such as drinks or
faucets.
• Please do not expose this device to direct sunlight or the glare and keep it away from any heat
source such as radiators, furnaces, or and stoves.
• Please do not crash or shock this device.
• Please do not use this device at where gas leaks.
• Please do not use this device in the proximity of water such as tubs, basins, sinks, muggy
basements, or pools.
• Please do not store this device in the strong magnetic field.
• Please the included adapter for power supply and do not crush it.
• Please keep this device and its accessories away from the reach of infants, toddlers, and youngsters,
or they may swallow tiny objects such as memory cards.
79
• Please do not stack on this device whether in or not in use.
Safety warning on power adapter
• (Applicable to Taiwan) Please use the included power adapter with this device only. Using adapters
of other kinds may cause damage and hazards.
• Please use correct power outlets and make sure no heavy loads on the adapter or power cords.
• Please leave adequate space for radiation when the adapter is in use with this device. Please do not
cover the adapter with papers or any objects to reduce the cooling effect. Please do not use the
adapter in bags.
• Please do not use the adapter in the proximity of excessive moisture. Please do not touch the
adapter with sweaty palms.
• Please plug the adapter into appropriate power source by referring to electrical requirement on
the box or the package.
• Please do not use damaged power adapters.
• Please do not try to fix the power adapter by yourself. There is no parts in the power adapter can
be self repaired. Please replace a new power adapter if the old one is damaged or with excessive
moisture. Please contact your BenQ dealer for assistance and services.
Safety warning on wireless network
This product contains wireless module that supports 5GHz spectrum.
80
5GHz spectrum regulated in
Malaysia: 5.150~5.250GHz, 5.250~5.350GHz, 5.725~5.875GHz.
Thailand: 5.150~5.250GHz, 5.250~5.350GHz, 5.725~5.825GHz.
UAE: 5.150~5.250GHz, 5.250~5.350GHz, 5.725~5.850GHz.
81