Transcript
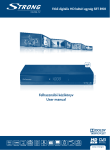
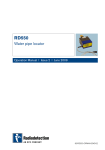
Please carefully read this user manual to ensure proper use of the device. DIGITAL CABLE SET-TOP BOX VOLIA DCD2104 Manufacturer: AccessHD Limited Address: Room 4304 China Resources Building, 26 Harbour Road, Wan Chai, Hong Kong Quick start guide Initial setup: Step 1: The first time you power on the DCD2104, you will see Production date: the Volia logo on the screen. You will then be invited to start Shelf life: unlimited channel search. Press OK on the remote control to start chan- nel search . Safety information Removing the cover of the set-top box may lead to a severe electric shock. Step 2: On completion of the “Channel Search” the system will exit the menu and display the first channel found. You can exit the process at any time by selecting EXIT on the remote control. This digital set-top box has been manufactured to meet international safety standards. However, Note: Default menu language is Ukrainian. To change the language, safety precautions must be followed to ensure the safe and reliable operation of the device. please press the Please take note of the following guidelines to avoid the risk of an electric shock: in “System Settings”→“Personal Settings” →“Language”. • This device operates with an electrical power supply in the range of 100 to 240V AC, 50/60 Hz. Use a standard AC wall outlet; a DC power source cannot be used. Remember that contact with a 110-240 Volt AC power supply can be lethal. • Ensure that all electrical connections are properly made before connecting the device to the power supply (the mains). Always unplug the device before connecting or disconnecting any cables. • Whenever you connect the device to the power supply (the mains), always connect the power lead to the power input connector on the rear panel of the device before you connect the power socket to the wall outlet. • Whenever you disconnect the device from the power supply (the mains), always remove the power socket from the wall outlet before you remove the other end of the lead from the MENU button on the remote control and select language To set up channels after the initial setup, please refer to the details below: Press the MENU button on the remote control. Select “Channel Setting” and press OK select “Search” and press . Use the ▲ and ▼arrow keys to OK . Use the ▼ arrow key to move down and select “Start Search” and press OK to start chan- nel search. Note: You have three options for channel search, the default channel search mode is “Network”. This is recommended. power input connector on the rear panel of the device. • Batteries shall not be exposed to excessive heat such as sunshine, fire or the likes. • Be extremely careful if this device is in contact with water. Immediately disconnect the power socket if possible. • Remote control This device shall not be exposed to dripping or splashing and no objects filled with liquids shall be placed on the device. • 1 Where the mains plug or an appliance coupler is used as the disconnect device, the disconnect device shall remain readily operable. 3 DO: √ 2 Unplug the device and have it checked by a qualified technician if anything falls into the 5. casing. √ 4 4 Allow adequate air circulation to prevent internal heat build-up. Do not place the device next 6 to a radiator or any heat source and make sure that the air vents are not covered. 7. 5 DO NOT: × Expose the device to extreme temperatures, direct sun light or high humidity. 7 × Place any object on top of the device in order to facilitate air circulation. 8 × Place the device on fabric furnishings, carpets or other flammable materials. 6. 9 10 11 Technical specification 8. 9. 10. • Zoran Supra 180 processor • MPEG-4 high definition 12 • Embedded Conax Conditional Access 13 • Fully DVB-C compliant 15 18 • Constellation: 64, 128, 256 QAM • DVB Subtitles and teletext 16 19 20 17 22 21 12. • Parental Access Control • Ukrainian, Russian, English, Dutch, French, German on-screen menus 23 13. 14 11. 14. Connection 15. 16. 17. 1. 2. 3. Step 1: Connect the cable providing the Volia cable feed, to the “RF IN” on the back of DCD2104 Cable STB using an IEC connector. Step 2: Connect the DCD2104 Cable STB and your TV by using an HDMI Cable (supplied with DCD2104). If your TV does not have an HDMI interface, connect the DCD2104 Cable STB and your TV by using a SCART Cable (not supplied with DCD2104). Step 3: Remove the battery cover from the remote control and insert the 2 x AAA batteries provided with the DCD2104 Cable STB into the battery compartment. Step 4: Connect the supplied power adapter to the “DC IN” on the DCD2104 Cable STB and plug the adaptor in the wall socket. Turn your TV ON. Change your TV input mode to HDMI if you connect the STB and the TV by using the HDMI Cable, and select AV1 or AV2 if you are using the SCART Cable. A green light should appear at the front of the DCD2104 and a 4-digit LED will display . If the green light does not appear at the front of the DCD2104 Cable STB, turn it ON by pressing the red POWER button on the remote control. 4. POWER – press to switch the set-top box to standby mode. To completely switch the power off, disconnect the set-top box from the power supply. FAST SCAN – press for quick program search. Numeric keys (0...9) – press to select channels in the program view mode and to input numbers in the menu. CH+ and CH- – press to switch between channels. 18. 19. 20. 21. 22. 23. TV/RADIO – press to switch between TV and radio mode. VOL+ and VOL- – press to regulate volume. INFO – press to display the channel information and see information on the following two programs. EPG – press to display the electronic program guide. EXIT – press to completely exit from the menu. ▲ ▼ ◄ ► – press to navigate up and down, left and right and to select submenus. OK – press to move to the additional menu of the selected item or to confirm the selected parameter. Press to display channel list for quick navigation in the program view mode. AUDIO MODE – press to switch audio modes: Left/Right/Mono/Stereo. MUTE– press to mute the volume. Press this key again to restore the volume. BACK – press to return to the previous channel. MENU – press to display main menu or to return one step back in the submenu. FAV – press to display the favorite list menu. AUDIO – press to select audio language. TXT – press to display teletext information. Red key – press to display the Mailbox menu. Green key – press to select subtitles. Yellow key (same function as the AUDIO key) - press to select audio language. Blue key – press to select aspect ratio. Reserved for additional functions. Service terms Do not attempt to repair or reconstruct the set-top box yourself, as serious electric shock may occur. Unauthorized changes to the set-top box lead to void warranty. If an operational problem occurs, an authorized service technician must be consulted to address the problem. Warranty 12 months from date of purchase.