1
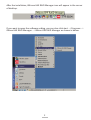
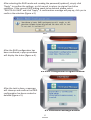
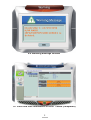
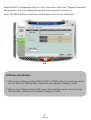
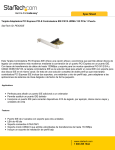
RAID function Setting
Software setting
E MK 3203
©2014 ENERMAX Technology Corporation. All rights reserved. Specifications are subject to change
without prior notice. Actual product and accessories may differ from illustrations. Omissions
and printing errors excepted. Some trademarks may be claimed as the property of others.
Reproduction in any manner without the written permission of ENERMAX is strictly forbidden.
Aug. 2014
2 x 2.5” TO 3.5” MOBILE RACK
1
Please download the software from www.enermax.com and install the software
on your computer.
2
Decompression “JMicron HW RAID Mgr_v0.09.64”, double-click “setup” then the
dialog box will appear as follow:
Click “Install” and the software will automatically install.
Click “Finish” to complete the installation.
1
After the installation, JMicron HW RAID Manager icon will appear in the corner
of desktop.
If you want to open the software setting, you can also click start → Programs →
JMiron HW RAID Manager → JMiron HW RAID Manager as shown in below
2
Software setting method:
Use GUI (Graphic user interface) for basic RAID mode setting.
The software will list available RAID selection according to hard drive type and capacity.
When users select RAID mode as demand, the software will automatically calculate and
create RAID volume. For example, if user choose RAID 1, the software will automatically
create RAID 1 volume like figure a-1.
a-1 Create RAID 1
To create password for the RAID volume (optional), please check the “Support Password”
box and enter the password (figure a-2).
a-2 Create Password for the RAID volume (optional)
3
After selecting the RAID mode and creating the password (optional), simply click
“Apply” to confirm the settings, or click cancel to return to original hard drive
condition. If the current RAID setting needs to be deleted, please select
“DELETE ALL RAID” and click “Apply”. A confirmation message will pop up, click yes to
confirm the selection (figure a-3).
a-3
After the RAID configuration has
been confirmed, a pop up window
will display the status (figure a-4).
a-4 RAID Configuration Progress window
After the task is done, a message
will show up and confirm the RAID
configuration has been created or
deleted (figure a-5).
a-5 Information Message window
4
a-6 Warming Message window
a-7 RAID and Disk Information in RAID 1 Mode (completed)
5
Deleted RAID 1 configuration (figure a-8) is required to check the “Support Password”
box and enter the user defined password if the password has been set.
Note: The DATA will be erased after confirmation, and it is not reversible.
a-8
Software Use Notice:
1. When using software setting RAID 0/ RAID 1/ JBOD mode, the hardware switch
can not be in the NOR position, otherwise the software setting is invalid.
2. When using software setting NOR mode, the hardware switch must be in the
NOR position, otherwise the software setting is invalid.
6