1
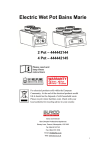
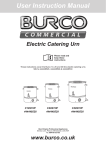
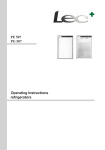
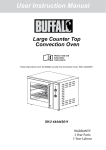
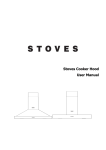
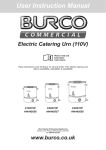
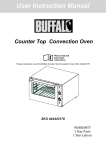
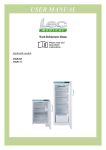
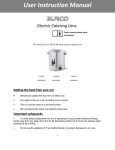
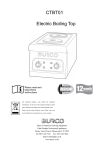
User Instruction Manual
Electric Urn
Please read and
keep these
instructions
These instructions cover the Burco C2T and C8T electric urns
SKU’s 444448536 & 444448535
C8T
C2T
SKU’s 444448536
C8T
444448535
Glen Dimplex Professional Appliances
Stoney Lane, Prescot, Merseyside, L35 2XW
Tel: 0844 815 3755
www.burco.co.uk
INTRODUCTION
To ensure you obtain full benefits from your new urn:
• Please read this instruction booklet carefully, and follow all instructions.
• If you are unsure of any aspect of the installation, use or performance of your
appliance, please contact the after sales number shown on the back page.
SPECIFICATIONS
Model
SKU Number
Dimensions
C2T
C8T
444448536
444448535
Height
315mm
530mm
Diameter 210mm
210mm
Water volume
2.5 litre
7.5 litre
Maximum draw off
2.2 litre
7.2 litre
Weight
2kg
3kg
Voltage
220-240V ~50Hz
Power rating
1840-2200W
INSTALLATION
Installation Requirements:
It is essential that this appliance is installed correctly. Installation should comply with all
local electrical, and health and safety requirements.
WEEE directive registration no. WEE/DK0059TT
At end of unit life, dispose of appliance and any replacement parts in a safe
manner, via a licenced waste handler. Units are designed to be dismantled
easily and recycling of all material is encouraged whenever practicable.
Before Connection to Power Supply:
Remove all packaging.
Check the appliance for damage. Report any damage immediately to the carrier or
supplier.
Remove any protective plastic coating.
Any water in the urn is due to testing and is normal.
Check the available power supply corresponds to that shown on the appliance rating label.
Location:
This electric urn is for indoor use only.
Allow at least 100mm clearance from any wall.
Only use on a flat level surface, that is adequate to support the weight when full of water.
Do not lift or move the urn when it contains hot water or when the mains lead is plugged in.
The appliance is only to be installed in locations where its use and maintenance is
restricted to trained personnel.
The mains lead should reach from the mains socket without straining the connections.
Do not let the mains lead hang over the edge of the table or counter, and keep it away
from any hot surfaces.
Do not let the mains lead run across an open space.
Do not place the appliance where the mains lead could fall into a sink.
Do not place the appliance near a hot gas or electric burner.
Electrical Connection:
Fitting a plug:
The mains lead of this appliance will already be fitted with a BS1363 13A plug. If the fuse
has to be replaced, use a 13 amp fuse complying with BS 1362.
If the plug is not suitable for your socket then the plug must be cut off and disposed of safely.
An appropriate plug should be fitted as follows:
IMPORTANT: The wires in the mains lead are coloured in accordance with the following
code:
Green and Yellow - Earth
Blue - Neutral
Brown - Live
The wire which is coloured green and yellow must be connected to the terminal in the plug
which is marked with the letter E or the earth symbol or coloured green or green and yellow.
The wire which is coloured blue must be connected to the terminal which is marked with the
letter N or coloured black or blue.
The wire which is coloured brown must be connected to the terminal which is marked with
the letter L or coloured red or brown.
Make sure that the connections are tight and that there are no loose strands of wire and no
insulation trapped under the terminals. Tighten the clamp in the plug making sure that it grips
the outer covering of the cord. If fitting a BS 1363 13A fused plug then fit a 13A fuse. Tighten
the plug cover securely. If you are in any doubt, consult a qualified electrician.
IMPORTANT: replace the supply cord if damaged. The supply cord may become warm
when the appliance is in use.
WARNING - THIS APPLIANCE MUST BE EARTHED
Electrical connection: 220-240V ~50Hz, 8.4-9.2A, 1840-2200W
Before Use:
Fill, heat and discard the water twice before general use.
USER GUIDE
TO AVOID BEING SCALDED, KEEP HANDS AWAY FROM ANY STEAM FROM THE LID
WHEN THE URN IS OPERATNG OR HAS JUST BEEN SWITCHED OFF.
TURN OFF THE POWER SUPPLY AND REMOVE THE PLUG WHEN NOT IN USE,
BEFORE CLEANING, AND BEFORE REPLACING ANY PARTS.
Filling:
IMPORTANT: always put water in the urn before switching on.
Remove the lid by turning anti-clockwise and fill the urn with the desired amount of water.
Do not fill above the ‘MAX’ capacity mark.
WARNING: if the urn is overfilled there is a risk that boiling water will be ejected from
around the lid.
Underfilling may cause the thermal cut-out to operate (and may shorten the element life).
Replace the lid turning clockwise to lock.
The urn is not suitable for heating liquids other than water, or for heating water containing
solids. If the water is being heated for tea making, make the tea in another container.
Controls:
The green power indicator will be illuminated whenever power is connected to the urn.
Turn the thermostat to the desired setting, the amber heating indicator will be illuminated
whenever the element is on. This will go on and off as the the thermostat maintains the
selected temperature:
Knob setting
Approximate water temp
1
30°C
2
43°C
3
56°C
4
69°C
5
82°C
6
92°C
THIS URN IS NOT INTENDED TO CONTINUOUSLY BOIL WATER, DUE TO THE
HAZARDS OF STEAM AND WATER ESCAPING FROM UNDER THE LID.
If it is necessary to keep the water at an exact temperature, use a thermometer to check.
Stir the water before taking the temperature and when the desired temperature has been
reached, turn the control knob slowly to the left until a click from the thermostat is heard.
The thermostat will then cycle on and off to maintain the temperature.
Serving:
The tap has two open positions, one self-holding so that the tap remains open, and the
other self-closing so that the tap closes as soon as the lever is released. Lift the lever up
for the self-holding position, press the lever down for the self-closing position. Return the
lever to the horizontal position to close the tap.
After use:
Turn the control knob to 0 and disconnect from the mains supply.
Water may be left in the urn when not in use for short periods, but to maintain a supply of
fresh water, it should be emptied periodically and cleaned out.
WARNING: only move the urn when it is disconnected and cool.
Protective cut-out:
The heating element is fitted with a thermal cut-out which protects the urn from damage if
allowed to boil dry or switched on without water. It is essential to keep the heating element
free from scale to ensure correct operation of this cut-out. Scale can cause the cut-out to
operate when water is heating up normally.
If the cut-out operates, allow the urn to cool down, drain out any water then press the red
reset button situated under the base.
Cleaning:
ALWAYS TURN OFF THE POWER SUPPLY AND REMOVE THE PLUG BEFORE
CLEANING, ALLOW THE URN TO COOL
THIS URN IS NOT WATERPROOF
DO NOT USE A WATER JET SPRAY TO CLEAN THE INTERIOR OR EXTERIOR OF
THE APPLIANCE, OR USE A WATER JET IN THE VICINITY OF THE APPLIANCE
Exterior
Clean with water and detergent. Do not use harsh abrasive cleaners as this could damage
the surface finish.
Interior
Brush any scale or sediment from the element and rinse thoroughly with clean water.
Descaling
In hard water areas scale will form on the element and interior. This will adversely affect
the operation of the urn if allowed to accumulate. Descale on a regular basis, using a
proprietary descaler recommended for stainless steel kettles. Follow the instructions
provided with the descaling product.
Scale build-up can also cause the tap to drip. If this should occur, turn off the power supply
and remove the plug. Empty the urn and allow it to cool. Unscrew the top of the tap from
the body. Wipe, scrape and break the scale away from the rubber flexible seal and from
the sealing surfaces inside the plastic body of the tap. Reassemble in reverse order.
Trouble-shooting:
Fault
Possible Cause
Remedy
No power to the
appliance.
Check supply socket is switched on.
Check fuse and circuit breaker.
Check green power indicator is
illuminated.
Thermostat or element
faulty.
Replace thermostat (the element is not
intended to be replaced)
The appliance does
not operate.
WIRING DIAGRAM
ELECTRIC CATERING URN
ELEMENT
THERMOSTAT
1
Bk
2
Bu
LIMIT
THERMOSTAT
95C
HEATING
INDICATOR
AMBER
Bk
Bk
Bk
Bk
Bk
POWER
INDICATOR
GREEN
CUT-OUT
THERMOSTAT
125C
Gn
Gn
Wiring colour code:
Bk
Bk
Gn
N
L
INLET SUPPLY SOCKET
Bk - Black
Bn - Brown
Bu - Blue
Gn - Green
W - White
SPARES LIST
ALWAYS TURN OFF THE POWER SUPPLY AND REMOVE THE PLUG BEFORE
REPLACING ANY PARTS
Part Number
Description
Qty
082620789
62462
59215
59214
62346
62254
62657
62784
082610785
59108
62801
62658
083193300
Tap assembly
Tap O ring
Neon green
Neon amber
Thermostat
Thermostat control knob
Reset rod tube
Conical spring
Reset rod
Cut-out thermostat
Limit thermostat
Spiderfixes push-on
Handbook
1
1
1
1
1
1
1
1
1
1
1
2
1
GUARANTEE
This electric urn is guaranteed against defective materials or faulty workmanship, for a
period of 12 months on labour and 36 months on parts.
This guarantee is given subject to the appliance being used in accordance with the
instructions supplied, and on the supply voltage marked on the rating label. The guarantee
is subject to fair wear and tear conditions.
The guarantee does not cover consequential damage arising out of any failure
acceptable under guarantee, nor does it cover damage resulting from misuse, accident or
unauthorised alterations to the appliance.
Proof of purchase will be required.
In any communication with the supplier or manufacturer, quote the model and serial
number marked on the appliance rating label.
This guarantee does not affect your statutory rights.
The products are intended for commercial use as detailed in these instructions.
The Company has a policy of continuous improvement in product quality and design. The
Company therefore reserves the right to change the specification at any time.
IMPORTANT: any service call resulting from a lack of regular
descaling is not covered by this guarantee, and will be chargeable.
Customer helpline
For spares and after-sales service please contact
Burco on:
T: 0844 815 3755
F: 0844 815 3748
E: [email protected]
Glen Dimplex Professional Appliances
(A Division of Glen Dimplex Home Appliances)
Stoney Lane,
Prescot,
Merseyside L35 2XW
www.burco.co.uk
083193300 © 09.2011