1
E1/E20 Emulator
Setup
2. Setup
2.1. Installing Emulator Software
Insert the installation media into the host machine. Follow the displayed procedure to download and install the
emulator software.
2.2. Connecting the Emulator to the Host Computer
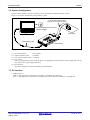
Use the USB interface cable to connect the emulator to the host computer as shown in Figure 2.1.
For the position of each connector of the emulator, refer to section 1.7, The Names of the Emulator Parts.
Host computer
USB interface cable(1.5m)
E1 or E20 emulator
Figure 2.1 System Configuration when Connecting the Emulator to the Host Computer
(1) Connect the A plug of the USB interface cable to the USB I/F connector of the host machine.
(2) Connect the mini-B plug of the USB interface cable to the USB I/F connector of the E1 or E20 emulator.
The USB interface cable included with the product conforms to the USB 2.0 high-speed standard.
When you use the E1 or E20 emulator, be sure to use the USB interface cable supplied with it.
The E1 emulator is turned on by connecting the USB interface cable. When using the E20 emulator, turn on its
power switch.
The E20 emulator is turned on when the power switch is shifted to the on position after connecting the USB
interface cable.
On Windows Vista® and Windows® 7, the USB driver is automatically installed.
On Windows® XP, the USB driver is installed first time the emulator is turned on.
When “Can Windows connect to Windows Update to search for software?” is displayed, select “No, not this time”
and then click on [Next]. When “What do you want the wizard to do?” is displayed, select “Install the software
automatically (Recommended)” and then click on [Next].
If the USB port of the host machine or the emulator to be connected is changed, the USB driver is re-installed.
R20UT0398EJ0300 Rev.3.00
Sep 01, 2012
Page 19 of 40