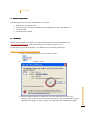
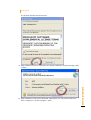
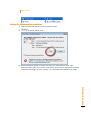
1
User Guide
Warehouse Layout Tool (wLOT)
Charlie’s Angels
Version 7
User Guide
Version History
Version
Number
1
2
3
4
5
6
7
Item
Modified by
Modified Date
Create User Guide
Improved on the “Introduction”
Added a list of terms (Appendix A)
Added contact information
Modified the Parameter Explanations
in the New Project Wizard Form
Improve user guide based on previous
testing
Added Installation guide
Added System Requirement
Updated System Requirement
Updated screenshot in Introduction
Added Tips and Hints (Section 19)
CHOY Wei Feng
CHOY Wei Feng
10th September 2008
11th September 2008
Prasanna
APURVA
Yanice Mako
KUSUMA
CHOY Wei Feng
CHOY Wei Feng
CHOY Wei Feng
11th September 2008
6th October 2008
22nd November 2008
25th November 2008
21st January 2010
Contact information
TINA Nirmal ([email protected]) – Project Manager
Prasanna APURVA ([email protected]) – Software Designer
Yanice Mako KUSUMA ([email protected]) – Test Engineer
Warehouse Layout Designer
CHOY Wei Feng ([email protected]) – User Interface Designer
2
User Guide
Contents
1.
System Requirement ...................................................................................................................... 4
2.
Installation ...................................................................................................................................... 4
Section A – Windows XP Installation .................................................................................................. 4
Section B – Windows Vista Installation .............................................................................................. 6
3.
Introduction .................................................................................................................................... 8
4.
New Project Wizard ......................................................................................................................... 8
5.
Save Project ................................................................................................................................. 10
6.
Save As Project ............................................................................................................................ 10
7.
Open Project ................................................................................................................................ 11
8.
Import Demand Data (.csv format) .............................................................................................. 11
9.
View Demand Distribution ........................................................................................................... 12
10.
View Product Information......................................................................................................... 13
11.
Define Pallet Rack and Floor Storage ...................................................................................... 14
12.
Allocate Product to Storage ..................................................................................................... 15
13.
View Storage Information.........................................................................................................
Information
15
14.
Remove Storage ...................................................................................................................... 16
15.
Remove Individual Product from Storage ................................................................................ 16
16.
Remove All Products from a Storage ....................................................................................... 17
17.
Calculate Distance ................................................................................................................... 17
18.
View Warehouse Statistics
Statistics....................................................................................................... 17
19.
Tips and Hints .......................................................................................................................... 18
Warehouse Layout Designer
Appendix A – List of Terms .................................................................................................................. 19
3
User Guide
1. System Requirement
The following are the minimum requirement to use wLOT:
•
•
•
•
Windows XP or Windows Vista
.NET Framework 3.5 (Can be installed during installation of wLOT, See Section 2)
1.5 GB of RAM
Intel Celeron M 1.6 GHz
2. Installation
Before you can begin to use wLOT, you need to download wLOT. You can download it at
http://wLOT.kevinsan.org. After downloading wLOT, unzip the wLOT-x.x.x.zip.
For Windows XP, proceed to Section A. For Windows Vista, proceed to Section B.
Section A – Windows XP Installation
1) Open the extracted folder of wLOT and select “setup”
3) Another dialog will appear to install one of the pre-requiresites of wLOT, .NET
Framework 3.5. There may be other components which are pre-requiresites. It will be
installed at this stage too. Click “Accept”. The download and installation will begin.
Warehouse Layout Designer
2) A dialog will appear. Select “Run”
4
User Guide
The process will take several minutes.
5) After installation, wLOT will be launched. Alternatively, you may launch wLOT from
Start > Programs -> Charlie’s Angels -> wLOT
Warehouse Layout Designer
4) After installation the pre- requiresites, the actual installation of wLOT will begin. Click
“Install”.
5
User Guide
Section B – Windows Vista Installation
1) Open the extracted folder of wLOT and select “setup”
2) A dialog will appear. Select “Run”
Warehouse Layout Designer
3) Another dialog will appear to install one of the pre-requiresites of wLOT, .NET
Framework 3.5. There may be other components which are pre-requiresites. It will be
installed at this stage too. Click “Accept”. The download and installation will begin.
6
User Guide
The process will take several minutes.
5) After installation, wLOT will be launched. Alternatively, you may launch wLOT from
Start icon > All Programs -> Charlie’s Angels -> wLOT
Warehouse Layout Designer
4) After installation the pre- requiresites, the actual installation of wLOT will begin. Click
“Install”.
7
User Guide
3. Introduction
Menubar
Toolbar
Shipping
Door
Storage
Grid
SKU List / Warehouse Stats
Cell Information
Receiving
Door
Zoom
function
Color Map
Program Status
4. New Project Wizard
New Project Wizard allows you to create a new warehouse project. The wizard will guide you in
entering dimension of the warehouse, the properties of pallet rack storage, unit of measurement,
cell size and location of receiving and shipping door.
2) “New Project Wizard” will be displayed. Click “Next >”.
3) Enter the parameters of the warehouse. Click “Next >”.
Warehouse Layout Designer
1) Select “File” > “New” or press “Ctrl”
“Ct and “N” together.
8
User Guide
Note: the grey colored cells are the ‘boundary cells’. You need not specify the
direction of the aisle if you locate the door at the boundary cells.
5) Select a Shipping Door by clicking on cell. Then specify the direction of the aisle next
to the door by clicking either “<”, “>”, “^” or “v”. Click “Next >”.
i. “<” means the aisle is on the left of the door.
ii. “>” means the aisle is on the right of the door.
iii. “^” means the aisle is on the top of the door.
iv. “v” means the aisle is on the bottom of the door.
Warehouse Layout Designer
Parameter Explanation
i. Warehouse Length: The number of cells that make up the length of the
warehouse.
ii. Warehouse Width: The number of cells that make up the width of the
warehouse.
iii. Cell Size: The size of each cell (i.e. if value = 1, each cell will 1 x 1 unit)
iv. Unit measurement: The unit of measurement (either metric or imperial)
v. Opening Height: The height of each level in a pallet rack.
vi. Number of Rack Levels: The number of levels of each pallet rack.
4) Select a Receiving Door by clicking on cell. Then specify the direction of the aisle next
to the door by clicking either “<”, “>”, “^” or “v”. Click “Next >”.
i. “<” means the aisle is on the left of the door.
ii. “>” means the aisle is on the right of the door.
iii. “^” means the aisle is on the top of the door.
iv. “v” means the aisle is on the bottom of the door.
9
User Guide
6) Click “Finish”.
7) You are now ready to create your own warehouse.
Note: If you move back to
o the parameter settings of the wizard, the receiving and shipping door
specified earlier will be lost.
5. Save Project
Saving a project allows you to store your project so that you can continue working on your
warehouse in another time.
1) Select “File” > “Save
ve” or press “Ctrl” and “S” together
2) If you have saved the project before, you will not see a “Save Project” dialog. However,
your project will be saved in the filename that you have specify before. If you would like to
save as different filename, see ““Save As Project”.
3) Locate a folder and enter a filename that you want your project to save as.
4) Click “Save”.
6. Save As Project
Saving as another project allows you to save your current project with a different filename.
2) Locate a folder and enter a filename that you want your project to save as.
3) Click “Save”.
Warehouse Layout Designer
1) Select “File” > “Save As” or press “Ctrl”, “Shift” and “S” together
1
0
User Guide
7. Open Project
Opening a project allows you to carry on your design of warehouse after you have saved the last
time.
1) Select “File” > “Open” or press “Ctrl” and “O” together
2) Locate the folder and the XML file that you saved the last time.
3) Your project is loaded.
8. Import Demand Data (.csv format)
Importing the demand data allows you work on a given past demand data in a comma
comma-separated
values (CSV) format.
Note: The CSV file column header must conform to the following headings (in sequence):
1)
2)
3)
4)
Manufacturer code
Number of pallet allocated
Number of pallet unallocated
Manufacturer name
Warehouse Layout Designer
1) Select “File” > “Import Data”.
2) Locate the folder and the demand data CSV file.
3) The demand data is loaded and appear on the right side of wLOT.
1
1
User Guide
5)
6)
7)
8)
9)
Height of each pallet
The number of pallet in inventory
The number of pallet that can be stacked on top pf each other
The total number of pallet shipped in a year
The number of visits to each storage location
9. View Demand Distribution
Not sure how the distribution of demand of all products looks like? This function allows you to
get an overall view of the demand distribution of all products.
products
You must import the demand data before you can use this function.
1) Select “View” > “Demand Distribution
Distribution”.
3) Click “Close” to go back to wLOT.
Warehouse Layout Designer
2) The “Demand Distribution chart will appear.
1
2
User Guide
10. View Product Information
Product information gives you information on its product including calculation
calculation of visits per
storage location.
The attribute of products and its description is as follows:
Attribute
ManufacturerCode
PalletAllocated
3
4
5
6
7
8
9
PalletUnallocated
ManufacturerName
PalletHeight
Inventory
Stackability
PalletShipped
VisitPerStorageLocation
Description
Unique code identifying the manufacturer
Number of pallet allocated into either pallet
palle rack or floor
storage
Number of pallets not allocated yet
Name of the manufacturer
Height of the pallet
Maximum inventory in the warehouse
Number of pallet that can be stacked
Total number of pallet shipped per year (i.e. Annual demand)
Total visits of this product in an opening per year
Warehouse Layout Designer
S/N
1
2
1
3
User Guide
11. Define Pallet Rack and Floor Storage
wLOT allows you to create empty pallet racks and floor stroage in the warehouse space.
1) Select “Rack” for pallet rack storage or “Floor” for floor storage on the toolbar.
2) Specify
pecify the direction of the aisle next to the rack / floor by clicking either “<”, “>”, “^” or
“v”.
i. “<” means the aisle is on the left
le of the rack / floor.
ii. “>” means the aisle is on the right of the rack / floor.
iii. “^” means the aisle is on the top of the door / floor.
iv. “v” means the aisle is on the bottom of the rack / floor
floor.
3) Change the “Lane Depth” if you want to increase the depth of pallet rack / floor.
4) Select a location on the grid you would like to place the rack / floor.
5) The pallet rack / floor storage is created.
Warehouse Layout Designer
Note: the application does not allow user to drag a few storage location. Allocation of storage is only
done one by one.
1
4
User Guide
12. Allocate Product to Storage
After defining the storage, you can now allocate products into the storage, either allocate by rack
or level.
Allocate by rack
1) In the “SKU List” tab, check the “Allocate pallets to entire Pallet Rack” box. Proceed to 2).
Allocate by level
1) In the “SKU List” tab, uncheck
uncheck the “Allocate pallets to entire Pallet Rack” box. Proceed to
2).
2) Select a product to allocate by highlighting a product from the “SKU List” tab.
3) Press on left-mouse
mouse button and drag into the storage
storage you want to allocate
allocate. Note of the
change of color.
4) The product is allocated.
Storage information gives what products
prod
are stored in this storage, the remaining levels yyou can
use to allocate products and the distances travelled by the order pickers.
1) Select either pallet rack or floor storage on the grid.
2) In the “Cell Information
nformation”,, expand the “ProductList” to view the products in the storage.
storage
Warehouse Layout Designer
13. View Storage Information
1
5
User Guide
14. Remove Storage
If the storage is not where you wanted, you can remove the storag
storage.
e. However, that there is no
products in the storage (See Remove Product in Section 13 and 14).
1) Right-click
click on the storage on the grid.
2) Select “Remove Storage”.
3) Storage is removed.
15. Remove Individual Product from Storage
If you want to change your mind in product allocation, you can remove one product at a time.
4) Rightt click and select “Remove Product from This Rack” or press
press “Delete” or “Del” button
to remove the product from the storage
5) The product is removed.
Warehouse Layout Designer
1) Select either pallet rack or floor storage on the grid.
2) In the “Cell Information”, expand the “ProductList” to view the products in the storage.
3) Select the product that you want to delete.
1
6
User Guide
16. Remove All Products from a Storage
If you want to change your mind in product allocation, you can remove all products in the storage.
storage
1) Right-click
click on the storage on the grid.
2) Select “Clear Product List”.
3) All products are removed from this storage.
17. Calculate Distance
After defining some storage and product allocation, you can occasionally calculate the weighted
wei
distance of all storages.
1) Select “Calculate Distance”
2) You can view the weighted distance of each storage location by viewing storage
information (See View Storage Information in Section 11).
3) To view the overall weighted distances of all storages, see
see “View Warehouse Statistics in
Section 16.
18. View Warehouse Statistics
In “View Warehouse Statistics”, you can get an overview of the storage and warehouse space
utilization of the warehouse, and total weighted distance of the entire warehouse.
2) Warehouse statistics is displayed.
Warehouse Layout Designer
1) Select “Warehouse
rehouse Stats” tab.
1
7
User Guide
19. Tips and Hints
You can mass allocate, clear product list and remove storage space.
•
•
•
•
For mass allocation, select multiple storage space by pressing your left mouse button, hold
and drag, then perform actions in Section 12.
For mass clearing of product list, select the multiple storage space, then perform action in
Section 16.
For mass deletion of storage space, select the multiple storage space, then perform action in
Section 14.
To select multiple storage space which are not sequentially, press and hold “Ctrl” key and left
mouse click the storage space.
Notice the following symbols in the storage space: ‘-‘, ‘_’, ‘]’, ‘[‘? It is indication of end of that
particular storage space, while ‘<’,’>’,’^’,’v’ indicates the start of that particular storage space.
Warehouse Layout Designer
End of User Manual
1
8
User Guide
Appendix A – List of Terms
Pallet Rack Storage
Pallet
Pallet
Pallet
Pallet
Side Profile of Pallet Rack
Stackability
Pallet
Height
Pallet
Pallet
Pallet
Pallet
Pallet
Order Picker
Level
Opening
Rack Depth
Floor Storage
Side Profile of Floor Storage
Pallet
Pallet
Stackability
Order Picker
Pallet
Pallet
Pallet
Lane Depth
Warehouse Layout Designer
Pallet
1
9