1
RO-DRIP® User Manual
1
INTRODUCTION
WHAT IS DRIP IRRIGATION?
Drip irrigation is about delivering water, nutrients and chemicals where you want them,
when you want them. Using a network of pipes and drip laterals, a drip system releases water
and nutrients uniformly, through precision manufactured emitters, directly into the root zone.
Near-optimum soil moisture levels are maintained and rapid response can be made to a variety
of crop needs.
The precise delivery of water and nutrients made possible by drip irrigation gives you a
level of control over the soil environment that is not possible with traditional sprinkler or
furrow irrigation. This means better control of crop health, water and fertilizer usage, harvest
time and your bottom line. Following are some of the many benefits reported by growers who
The Roberts Difference:
have converted from sprinkler and furrow irrigation to drip irrigation:
Roberts Irrigation
• Improved crop yield, quality, and uniformity
• Better control over harvest time and market timing
• Reduced water consumption
• Reduced energy consumption
• Reduced cost of chemicals and fertilizer
• Reduced field-labor cost
• Reduced disease
• Better weed control
• Better utilization of uneven terrain
• More land can be utilized if water is a limiting factor
• Reduced environmental impact from runoff and percolation of chemicals, fertilizers, and salts
Products, Inc. has been
bringing the benefits of
efficient irrigation to
growers for over
thirty years.
This is a remarkable set of benefits for any single technology to deliver. However, it is only
with careful attention and commitment to the unique requirements of your drip irrigation
system that you can enjoy its many potential benefits.
1.1
I N T R O D U C T I O N
THE ROBERTS DIFFERENCE
An ongoing commitment to tradition, integrity, and innovation have made Roberts Irrigation
Products one of the world’s leading producers of micro and drip irrigation products, including
RO-DRIP and RO-DRIP XL drip irrigation tapes. We have spent enough time in the field to
recognize the practical needs of row crop growers like you, and have applied the latest precision
manufacturing methods to produce a drip tape system that meets these needs.
Our RO-DRIP and RO-DRIP XL drip tapes represent the practical application of today’s
latest technologies to the long-felt needs of growers. Throughout this manual you will find
short captions titled "The Roberts Difference" located in the margins of each section. These
captions describe some of the unique benefits of RO-DRIP products for drip irrigation users.
IS DRIP IRRIGATION FOR YOU?
Each year large numbers of growers around the world convert from traditional irrigation
methods to drip irrigation. Some are attracted by the promise of higher yields, some by the
promise of higher profits, and some by the simple appeal of using the latest technology. Drip
irrigation is capable of delivering on each of these promises. However, you should carefully
consider your unique goals and situation when deciding whether drip irrigation will work for
you.
A drip irrigation system requires a significant investment in time and money. The first step
in this investment begins here, by taking time to become fully informed before initiating your
drip irrigation project. Your goals for this "initial investment" in time should be to:
• Develop awareness about what it takes to design, install, and operate a system
• Determine your ability - financial and otherwise - to proceed
• Assess the level of commitment you are willing to make to develop a properly designed and managed drip
irrigation system
• Locate a qualified irrigation dealer with drip experience
You are the most important component in the success of your drip irrigation system.
CULTIVATING A LONG-TERM VIEW
Growers are naturally inclined to take a long-term view on things. This common-sense
wisdom is especially valuable when applied to the planning of a drip irrigation system. Your
initial investment in terms of equipment and know-how may take 2 or more years to recover.
However, your investment should be seen not only in terms of crop quality and yield, but as
an intelligent response to global trends in diminishing natural resources, reduced government
subsidies, and increased environmental regulation.
ACCESS THE EXPERTS
If you are like most growers, you have vast experience with traditional sprinkler or furrow
irrigation practices. You recognize the value of this accumulated expertise and probably would
not think of irrigating your fields without applying that knowledge to get the best result. If
you are new to drip irrigation, you can be sure there is a great deal to learn - from quick tips
and techniques to fundamental changes in your procedures. Until you reach a comfortable
level of expertise in drip irrigation, it makes sense to get in touch with someone who can share
their expertise with you. Specifically, you should be prepared to contact qualified experts in
hydraulic engineering, filtration, chemical treatment, pest control and installation.
What you learn from these experts in one season will pay off for years to come. In a recent
survey of experienced growers, all confirmed the value of becoming fully informed, especially
by consulting experts, before initiating their own drip irrigation program.
MANAGING NEW CULTURAL PRACTICES
Drip irrigation allows precision response to changes in crop need, environmental conditions,
1.2
R O - D R I P
®
U S E R S
G U I D E
I N T R O D U C T I O N
and even market timing. All of these benefits require a well-functioning system. Unlike traditional irrigation methods that use fewer, larger applications of water, successful drip irrigation
is based on many small applications. This requires a new way of thinking: collecting and
recording better and more frequent information on your crop status and water quality,, monitoring system performance, and making minor adjustments whenever needed. Fortunately,
there is now a full line of products, know-how, and automation equipment available to help
you in this process.
While drip irrigation can deliver significant savings on labor and resources, you should
expect some increase in management time, especially in the first year as you learn to operate
the system. There is no substitute for a competent farm manager who fully understands the
drip irrigation system and is available to make adjustments as needed.
The Roberts Difference:
Roberts Irrigation has set
up a special system of
support-after-sale to help
you use and maintain your
drip irrigation system. Our
in-house technical staff,
our network of competent
USING THIS GUIDE
dealers and our library of
This guide covers all the basic requirements for drip tape irrigation in row crop, nursery
and greenhouse operations. It has been written to be a useful reference for almost any drip
irrigation question you may have, regardless of what drip tape you decide to use. However,
since Roberts Irrigation considers RO-DRIP the most advanced and cost effective drip tape
available, special sections are included that describe features and requirements unique to
RO-DRIP and RO-DRIP XL wherever applicable.
drip irrigation publications
and referrals are all at your
disposal to help you get
the job done.
NOTE: This guide is intended to provide information about RO-DRIP and generally accepted
knowledge in drip irrigation and crop production. Roberts Irrigation Products, Inc. is not engaged in
rendering engineering, hydraulic, agronomic, or other professional advice in this guide. Consultation
with qualified local irrigation dealers and agronomists is recommended.
This guide is specifically written for irrigation with drip tape - thin walled collapsible
emitting hose. While many of the concepts are applicable to other forms of drip irrigation such
as hard-wall hose with inserted or in-line emitters, this guide does not specifically address
such products.
All of the steps involved in assembling and managing a successful drip irrigation system
are covered in the following sections: Planning, Design, Installation and Startup, Management,
and Retrieval. We recommend that you read the guide completely before beginning your drip
irrigation program. At a minimum, review the following summary of Important Cautions and
Notes. Also consider reviewing the Key Concepts listed at the beginning of each section.
IMPORTANT CAUTIONS AND NOTES
Observe the following important cautions and notes when designing, installing, and managing
your drip irrigation system:
• Carefully design and engineer all parts of your drip irrigation system before installation and use. Consult
specialists in irrigation, water quality, pest control, agrochemicals and other areas as necessary.
• Always use proper filtration for your water source. Inadequate filtration or filter maintenance may severely
damage your drip irrigation system.
• Where ground pests are a potential problem always implement pest controls before installing drip tape.
• Do not step on drip tape or drag it across the soil surface. Ensure that all installation equipment is free of
burrs and other sharp edges.
• When using clear plastic over drip tape, always bury the tape.
• Operate all systems before any planting begins.
• Chemicals used in irrigation, fertigation, and water treatment can be extremely hazardous. Use extreme
caution when mixing, handling, and injecting any chemicals.
R O - D R I P
®
U S E R S
G U I D E
1.3
2
PLANNING
Before you begin a design, you need to identify clear and specific goals based on the
answers to questions such as: What crops will you grow? How often will you rotate? Will the
system deliver fertilizer and chemicals, or only water? Will you use plastic mulch? These are
the starting points for gathering the information you will need to properly plan your system.
It is also important to know what you have to work with and what other factors will
affect the design. Soil type, climate, water quality and availability, field topology, crop water
requirements, and indigenous pests can all influence system design, as can legal concerns
such as environmental and land-use regulations. Finally, proper planning will help you
design a system that makes maximum use of your existing infrastructure to reduce both capital
and labor costs.
The Roberts Difference:
The broad RO-DRIP product
KEY CONCEPTS
• Your drip system design should reflect a careful consideration of soil type, water quality, evapotranspiration,
topography, crop choice, and indigenous pests. Collect all of the necessary information before starting.
line has been successfully
used with a diverse variety
• Know the look, feel, and soil moisture content that corresponds to field capacity. Your drip irrigation system
should be designed to keep the soil moisture close to this value.
of crops and field conditions.
• Obtain a chemical and physical analysis of your irrigation water from an independent laboratory. This
information will be critical in determining filtration, water treatment and fertigation requirements.
• Have a soil sample tested to determine the nutrient content of your soil. This will be the first step in
developing your fertigation program.
• Make use of your existing infrastructure whenever possible.
2.1
P L A N N I N G
SOIL TYPE
Soil type, both texture and structure, influences your system design by determining field
water requirements and, in some cases, by limiting your choice of crops. Soil type has a great
effect on water movement and therefore on root development, plant growth, and, ultimately,
crop yield and profits. Because of its effect on water movement, soil type has a major influence
on the emitter spacing, tape placement depth, and flow rates of a good system design.
DRAINAGE
Inadequate drainage leads to inadequate aeration of soil, increased incidence of disease, limited
root zone size and limited ability to leach salts away from the root zone. Drainage problems can
be caused by perched water tables, compaction layers, and stratified soils. Adding gypsum or
organic amendments to heavy soils can improve drainage, although amendments that contain
salt should be avoided when possible.
Where drainage is poor, deep (30 in, 76 cm) subsoiling and chiseling every 1 to 4 years may be
necessary. In some cases, deep plowing can maintain good drainage for longer periods of time. If a
high water table inhibits drainage, drainage channels or subsurface drain systems may be required.
WATER AVAILABILITY
Water availability and quality are central factors in the design of your drip system. Unlike
traditional sprinkler and furrow irrigation, drip irrigation places very specific demands on the
quality and availability of your water source.
It is important to design your system so that optimum soil moisture is maintained throughout
the growing season. The system must be capable of supplying your crop’s peak needs plus any
additional amounts needed for flushing.
Although drip irrigation may use less water than required by other irrigation methods, it
requires it on a consistent and reliable basis. Typical drip systems irrigate several times a week,
or even several times a day. In addition, because drip irrigation promotes more localized root
growth, even a short lapse in water availability can cause serious crop damage. It is important to
confirm that your water source will be available whenever you need it, throughout the growing
season. If necessary, arrange for a supplementary water source that can be used in the event that
your primary source becomes unavailable. If a supplementary water source is required, confirm
that your system design includes filtration appropriate for the additional water source.
WATER QUALITY
Water quality refers to the physical and chemical composition of your irrigation water. It has
important effects on the type of filtration to use, chemical water treatment that may be necessary,
the frequency of cleaning and line flushing, and the management of salt and chemical buildup in
the soil.
The effect of water quality on your system’s performance should not be underestimated.
System designs that do not account for the quality of their specific water source can become
completely debilitated by emitter plugging and can result in serious crop damage. These problems
can be easily prevented through proper filtration and/or water treatment. Before designing your
system, order a complete physical and chemical analysis of your water source. This analysis
should quantify the amounts of the following matter commonly found in water sources:
Physical components
• Inorganic matter
• Organic matter
Chemical components
• Dissolved minerals
• Minor elements
• Salt
• Acidity
2.2
R O - D R I P
®
U S E R S
G U I D E
P L A N N I N G
Since all of these factors interact in complex ways to affect the operation of your drip system,
consult a water quality specialist and an irrigation engineer when designing your drip system.
Also, because water sources can change with time, perform water quality tests periodically and
make adjustments as necessary. See appendix A for tables to assist you in understanding your
water quality report.
Inorganic Matter
Inorganic matter found in water sources includes sand, pipe scaling, and other large particles,
all of which can lead to plugged emitters and other damage to your system. Since these particles
are usually heavier than water, they can often be removed using a centrifugal sand separator (see
DESIGN: Filtration). Smaller inorganic particles, such as silt and clay, can become cemented
together by bacteria and algae which results in a slimy buildup that can clog emitters. Since
these smaller particles are more difficult to remove, media filters and/or settling basins may be
required to protect your system.
Organic Matter
Organic matter found in water sources includes algae, slime, plants, and particles from other
living organisms. While some of these can be removed by standard filtration equipment, chemical
treatment of the water and lines is usually required for more complete control of organic matter
(see MANAGEMENT: Maintenance). Since organic matter is typically lighter than water, it cannot
be removed by a centrifugal sand separator. Sand media filtration is the most effective method
for removing most forms of organic matter.
The Roberts Difference:
Dissolved Minerals
Dissolved minerals are found in most water sources and, since they are dissolved, would not
be expected to cause emitter plugging . However, there are a number of factors that can cause
these solids to "precipitate" or settle out. These include changes in pH, changes in temperature,
and reactions with commonly used fertilizers and chemicals. The most common cause of precipitation-induced plugging is calcium carbonate (lime) precipitation. Iron or manganese, which
may be dissolved in well water, will precipitate when exposed to air or chlorine; these precipitates
are troublesome because they can lead to bacterial growth that can readily clog filters and emitters.
Sulfides can lead to similar bacterial growth and emitter plugging.
Interaction of dissolved solids with your drip irrigation system can be highly complex, and
can change throughout the season. In addition to their effects on the performance of your drip
system, dissolved ions can be both beneficial and detrimental to soil properties and plant health.
Perform a careful assessment of the dissolved solids in your water before designing your system
and especially before adding any chemicals or fertilizer to your water.
Table 2.1 Soil Solution Salinity Level
to Cause 10% Yield Reduction.
Crop
Salinity (EC) of
Soil Exctract
(dS/m)
Strawberry
1.3
Bean
1.5
Lettuce, Pepper, Raddish, Onion, Carrot
2.0
Cabbage, Cucumber, Muskmelon, Potato
3.0
Corn, Artichoke, Sweet Potato
2.5
Sugar Cane (some varieties)
2.6
Tomato, Broccoli
4.0
Cotton (after germination)
4.7
RO-DRIP drip tape is
manufactured to exacting
technical specifications to
produce a uniform wall
thickness, which means
less breakage on installation and retrieval.
Salinity
Most water sources and many
fertilizers carry some level of dissolved salt that accumulates in the
soil during regular irrigation. In arid
regions where salinity is a significant
problem, this buildup can affect the
health of your plants. In such cases,
your system design and operation
must account for and properly manage
salt buildup. Your water quality
analysis should include a report of
the salt content and type. See appendix
A for tables to assist you in interpreting
a water quality report. Table 2.1
gives the salt tolerance of several
popular crops in terms of the salinity
of the soil solution.
R O - D R I P
®
U S E R S
G U I D E
2.3
P L A N N I N G
NOTE: In areas with low rainfall, salinity of the soil solution is typically higher than the salinity of
your irrigation water. Even with good irrigation management, soil solution salinity can be 1.5 to 3 times the
irrigation water salinity.
The initial effects of salt buildup can be subtle. It is important to understand that salt damage
to your crop may not be apparent until it is too late to prevent. Fortunately, proper drip irrigation
practices include ways to manage salinity and to keep it out of the root zone. See MANAGEMENT:
Managing Soil Salinity for guidance on monitoring and managing salt buildup in the soil.
WATER REQUIREMENTS
Your system must be designed to supply enough water to exceed your crop’s water requirements
during the hottest day of the season, while also providing enough water for line flushing and salt
leaching where needed. Water requirements are influenced by the following factors:
The Roberts Difference:
The highly plug-resistant
• Plant size
• Soil type
• Solar radiation
• Ground cover
• Ambient temperature and humidity
• System efficiency
• System operations (e.g., leaching,
flushing, filter backwashing)
• Leaf canopy
• Water quality
• Growth stage
• Rainfall
• Wind conditions
• Fertilizers and chemicals used
design of RO-DRIP makes it
the right choice when water
quality is a concern.
The interaction of these factors can be complex. However, by making a few measurements,
and by referring to standard formulas and tables, it is relatively easy to calculate your actual
irrigation requirements and develop a proper irrigation schedule.
Most crops reach their full potential if the soil in the root zone is at all times maintained at a
moisture content that is near the soil’s maximum water holding capacity. The goal of a drip
irrigation system throughout most of the growing season is to maintain this level by replacing
soil water as it is lost to evapotranspiration. With some adjustments to account for local weather,
minor crop differences, salinity, and system inefficiency you can develop a good prediction of
water requirements.
Note: Applying more water than is needed can increase root disease and operating cost, while applying
less than needed can stress or burn your crop and cause your soil to dry, destroying its ability to move
water. A properly designed and managed irrigation system will deliver just enough water to maximize both
yield and profit.
Field Capacity
Field capacity is an estimate of the amount of water that is held by the soil after it has been
completely drained by gravity. Field capacity is dependent on soil type, and represents optimum
soil moisture conditions for most crops because of its ideal balance between aeration and available
water.
In order to keep soil moisture conditions ideal for crop growth, you must be able to determine
when your soil is at field capacity. If you have a moisture-sensing device available, you can
obtain a quantitative measurement of field capacity with the following procedure:
1. Determine the proper monitoring depth for your crop.
2. Prepare the field and install the moisture sensor at the proper depth. More accurate results
can be obtained by installing 4 sensors in a 10 x 10 ft (3 x 3 m) test area.
3. Irrigate until the soil under the moisture sensors is saturated. If tensiometers are used, this
should produce a reading of 0 cb.
2.4
R O - D R I P
®
U S E R S
G U I D E
P L A N N I N G
4. Monitor the sensor readings daily. When the readings level off (usually after 2-3 days), read
and record the displayed values. (If using several sensors, take the average of the 3 closest
readings.) The result is the measured water content at field capacity. If your sensor measures soil water tension the reading will generally be between 10 cb and 25 cb depending on
soil type. If your sensor measures moisture content, the field capacity reading may range
from 10% to 50% depending on soil type.
The optimum soil moisture level for most crops during vegetative growth stages is at or
slightly below field capacity. In general, your system must be capable of replacing all water used
by the crop since the last irrigation and must be used frequently enough to minimize depletion
below field capacity.
Evapotranspiration
Evapotranspiration (ET) is a measure of how much water is used by your crops for transpiration
and how much is lost through evaporation from the plant and soil surface; it is expressed in
inches (mm) of water used per day or inches (mm) of water used per month. ET measurements
allow you to anticipate how the weather in your area will interact with your crop to determine
water requirements. ET values based on a reference crop for your region are usually available
from local water resource and agricultural agencies. ET is affected by:
• Local climate
• Size of leaf canopy
• Ground cover
• Crop type
• Stage of growth cycle
• Size of wetted area
Research has shown that, for vegetative crops, yield is generally proportional to transpiration.
For given weather conditions, transpiration is maximized when the water content in the root
zone is near field capacity at all times. Therefore it is important that, as water leaves the root
zone as a result of ET, your irrigation system is able to replace it as soon as possible. The ability
to keep the root zone near field capacity at all times is an important benefit of drip irrigation.
To realize this benefit, your system design must be capable of supplying water at the rate of
ET at all times during the growing season. You can anticipate what peak demand will be by
referring to historical ET data, and use this information to design a system that can supply
enough water under any conditions. If ET information is not available for your area, refer to
MANAGEMENT: Scheduling, Determining your crop’s daily requirement for methods of
estimating ET.
Flushing Requirement
Since filtration cannot remove all contaminants, silt and clay may settle in drip laterals and,
if not removed, may build up and plug emitters. In areas where water quality is a problem or
when drip tape laterals will be used for multiple growing seasons, your system design must
allow for periodic flushing of the laterals. If flushing is necessary, the system should be designed
so that the ends of the laterals are accessible. Consider using end caps or flushing manifolds.
In systems where flushing is necessary, the capacity of the upstream components is often
determined by the flushing requirement alone. It is recommended to maintain a minimum flushing
velocity of 1 foot per second in the laterals, which requires flow rates at the end of laterals to be
at least 1 GPM (3.8 LPM) in standard 5/8-in. (16 mm) drip tape, or 2 GPM (7.6 LPM) for 7/8-in.
(22 mm) drip tape. Substantially higher flow rates at the beginning of the laterals are required to
achieve these flow rates at the end of the laterals.
CROP CHOICE
The crops you grow will have a great effect on system design and cultural practices. Any and
all crops can be grown under drip irrigation, but your choice of crops and their planting method
(direct seeded or transplanted) will have an important impact on your drip system design.
An important question about your crops is whether they will be direct seeded or transplanted.
The germination of seeds places special requirements on your drip system design and management.
If these requirements are not met, sprinklers will be required for germination and initial plant
R O - D R I P
®
U S E R S
G U I D E
2.5
P L A N N I N G
growth. See MANAGEMENT: Germinating Seeds.
TOPOGRAPHY
While topography clearly influences system design, it can also be a motivating factor in the
decision to implement a drip irrigation program. Drip irrigation allows cultivation of uneven
terrain that cannot be cultivated using furrow irrigation or certain types of sprinklers. Drip
irrigation is uniquely suited to growing on uneven terrain due to its flexibility in placement and
its use of pressure to move water directly where it is needed. Consider performing a survey to
document your field’s geometry and topography since this information will be useful in developing
a complete system design.
PEST CONTROL
Insects such as ants, crickets and wire worms; and animals such as rodents and coyotes can
all cause damage to drip tape laterals. Pest control should be initiated before placing drip tape
laterals in the field, and periodically thereafter as needed. Where pests are a significant problem,
consider using thicker drip tape and/or buried placement. Consult a pest control advisor for
guidance on controlling the specific pests found in your region.
CHEMIGATION/FERTIGATION
CAUTION: all personnel who
use or otherwise come in
contact with fertilizers and
chemicals should be thoroughly
trained and qualified in the
safe and effective storage,
use and application of these
potentially dangerous substances.
Chemigation
Chemigation refers to the combination of irrigation and chemical water treatment into a single process, and is recommended to maintain a well-functioning drip irrigation system. Chemical
treatment includes the use of chemicals to prevent plugging of the drip tape emitters. For example,
chlorine and/or acid may be injected to kill microorganisms and to prevent precipitation of
dissolved minerals. Chemical treatment may also include injection of pesticides, herbicides or
systemic fungicides to improve the health of your crops, or gypsum or acid to improve the physical
characteristics of your soil. MANAGEMENT: Water Treatment describes how to use chemical
injection to prevent emitter clogging by organic matter and precipitates.
Caution: all personnel who use or otherwise come in contact with fertilizers and chemicals
should be thoroughly trained and qualified in the safe and effective storage, use and
application of these potentially dangerous substances.
Fertigation
One of the outstanding benefits of a well-designed drip irrigation system is the ability to
precisely control the nutrient environment in the root zone of your plants for optimum yield and
quality. Drip fertigation can apply N, P, K and minor nutrients exactly where and when they are
needed, throughout the season. To take advantage of this high level of control, it is necessary to
closely monitor the nutrient level in the soil and plant tissue, and make adjustments as necessary.
Determining nutrient requirements
Before installing your drip irrigation system, have a soil sample tested to determine its nutrient
content. This should include nitrogen, phosphorus, potassium and minor nutrients.
The nutrient requirements of your plants change throughout the season, and your fertigation
program should reflect this. If possible, obtain data on the nutrient requirements of your crop at
each growth stage. In combination with tissue testing throughout the season (see MANAGEMENT:
Fertigation), this information will allow you to maximize the efficiency of your fertigation program.
EXISTING INFRASTRUCTURE
Installing a drip irrigation system inevitably requires changes in equipment, training, and cul-
2.6
R O - D R I P
®
U S E R S
G U I D E
P L A N N I N G
tural practices. However, a new system design does not always require completely new infrastructure. In fact, a good system design should identify and make use of as much existing infrastructure as possible, such as the existing water source, distribution systems, electrical supply, and
access roads.
PLASTIC MULCH
The term "plasticulture" refers to methods of growing under plastic using drip tape. Drip
irrigation is uniquely suited to cultural practices that use plastic mulch. For some crops, the
combination of drip tape and plastic mulch results in optimum yield and water usage through
improved control of soil temperature and moisture level. While growing under plastic has been a
barrier to water delivery using traditional sprinkler and furrow irrigation, plastic mulches and
crop tunnels do not present a problem with drip irrigation. Plasticulture is used for a number of
reasons, including:
• Control of soil temperature
• Water conservation
• Control of weeds, pests, and erosion
• Control of production timing
• Improved processing of nutrients by
beneficial microbes
• Control of the wetted area
• Protection of fruit from soil moisture
• Improved yields
• Prevention of nutrient leaching due
to rainfall
If you plan to use clear plastic mulch or crop tunnels, your system design should specify
buried drip tape, since the heat trapped by these plastics may cause wandering of the tape as a
result of increased expansion and contraction. Note that plastic mulch is not optimal or even
practical for all crops – see appendix B for information on specific crops.
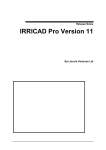
Figure 2.1 Plastic Mulch
R O - D R I P
®
U S E R S
G U I D E
2.7
3
DESIGN
Drip irrigation delivers the highest efficiency and uniformity of any commonly used form of
irrigation. This can directly result in reduced consumption of water, chemicals, and fertilizer.
High uniformity in combination with the low application rates of drip irrigation makes possible
the precise control of soil water content at the root zone which leads to more effective application
of nutrients, better salinity control, and increased yields.
Only by designing, installing and maintaining an efficient system can you achieve all of the
benefits of drip irrigation. Selecting the right drip tape product, properly sizing supply manifolds, and selecting appropriate filtration components are all necessary to maximize efficiency
and to meet the irrigation needs of your crops under any field conditions.
This section will help you design a high-efficiency drip irrigation system that meets the
The Roberts Difference:
unique needs of each of your crops. It starts by defining irrigation efficiency and explaining how
Precision-manufactured
it is affected by your choice of drip tape and other system components, and how it can change
with time. After developing this background, the section takes you through the steps of specifying
RO-DRIP products provide
components and designing the right system for your field.
the quality and consistency
needed for high uniformity
KEY CONCEPTS
and efficiency.
• Have a laboratory analysis of your irrigation water performed before beginning your system design.
• Select a high quality drip tape. This is a key decision in your drip system design.
• To design drip laterals it is necessary to specify length of run, emitter spacing, placement depth, position relative
to plant rows, and flow rate. All of these decisions require in-depth knowledge of your growing operation.
• Your design must provide enough water to meet the needs of your crop under any conditions, and must not
require more than your water supply can deliver.
• Proper filtration is crucial to prevent plugging of your drip system—don’t skimp on filtration components.
• A good design includes pressure gauges, flow meters, and other instrumentation at key locations.
3.1
D E S I G N
NOTE: The guidelines in this section are general recommendations and are not intended to suggest
complete design or production practices. Please consult your local Roberts Irrigation Products dealer for
specific design applications.
DESIGN GOALS
Before designing your drip irrigation system, use the information collected in the PLANNING section to establish clear design goals. Because of the conflicting requirements of a drip
irrigation system, some of the following goals may need to be adjusted after you begin the
design process.
• Uniformity. Define the minimum uniformity your design will need to achieve, keeping in mind that higher uniformity
designs may result in higher cost. See Irrigation Efficiency, in this section.
• Application Rate. Know what the application rate requirements will be to replace peak ET.
• System Life. Decide whether your drip tape laterals will be used for a single season or for several years. Also
determine how long the other system components should last.
• System Cost. Know your sensitivity to cost, which may influence your decisions about target uniformity and
system life.
Your challenge will be to design a system that meets these conflicting goals. You will need to
make tradeoffs between uniformity, system life, and system cost. System cost encompasses both
one-time installation costs and ongoing operating costs, which also may conflict.
RD3.1
The Roberts Difference:
COMPONENTS
RO-DRIP employs an
While there are many differences in individual drip systems, most have the components
shown in figure 3.1.
advanced emitter design
which delivers unparalleled
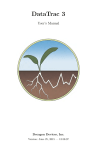
Components of a Typical Drip Irrigation System (see fig. 3.1):
discharge uniformity and
1. System controller
2. Pump
3. Back flow prevention valve
resistance to plugging.
4. Fertilizer injector/tank
5. Filter tanks
6. Butterfly valve or ball valve
1
2
12
11
4
16
15
3
17
14
6
8
5
16
11
10
19
17
18
9
13
9
7
16
14
17
18
16
17
19
18
20
Figure 3.1 Components of a Typical Drip Irrigation System
3.2
R O - D R I P
®
U S E R S
G U I D E
18
13
20
D E S I G N
7. Pressure gauges
8. Mainline control valve
9. Mainline
10. Flow meter
11. Air vents at high points, after
valves and at ends of lines
12. Pressure relief valve
13. Field control valve
14. Submain secondary filters
15. Pre-set pressure regulator
16. Submain
17. Lateral hookups
18. Laterals
19. Flushing manifolds
20. Flush valves
IRRIGATION EFFICIENCY
What is Irrigation Efficiency?
The Irrigation Efficiency (IE) of your system is a measure of the proportion of water used for
intended purposes. If your system is 90% efficient, then 90% of the water it applies is used by
your plants, or for other intended purposes, and 10% of the water is not used productively.
Irrigation Efficiency is affected by both the design and management your irrigation system.
Distribution Uniformity
Distribution Uniformity (DU) is a measure of how uniformly your irrigation system applies
water to all parts of your field. A non-uniform irrigation system delivers less water to some parts
of the field and more to others. Drip irrigation can deliver very high uniformity and this is one of
the keys to its high potential efficiency. A well-designed drip system can achieve DU of 90% or
higher.
Poor distribution uniformity leads to non-uniform crop growth and poor irrigation efficiency.
Poor uniformity can be caused by:
RD3.2
The Roberts Difference:
RO-DRIP is manufactured
with an advanced, high-precision process that results
• Drip emitters becoming plugged with dirt, algae or other material
• Pressure variations caused by uneven terrain
• Pressure variations caused by friction losses
• Excessive drip tape run lengths
• Use of poor quality drip tape
in an emitter coefficient of
variation of 0.03 or lower.
This translates to better
distribution uniformity and
All of the above factors can be controlled with careful design and management.
higher irrigation efficiency
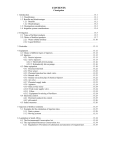
Drip Emitters and their Effects on Distribution Uniformity [fig. 3.2]
A drip tape emitter consists of an inlet, a flow channel, and an outlet. The inlet allows water
into the flow channel from the main chamber of the drip tape. The flow channel is a narrow path
with a complex shape designed to slow down the flow of water and create turbulence, which
prevents contaminants from settling. The emitter outlet is a small opening at the end of the flow
channel through which the water drips into the soil.
A well-engineered emitter does three things very well:
in your field.
• It emits water at a predictable and consistent rate
• It emits water at nearly the same rate for a range of supply pressures
• It resists plugging
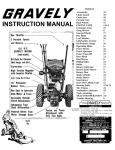
Two important numbers quantify how well a drip tape emitter does its job: the Coefficient of
Variation (Cv) and the Discharge Exponent
(x). Most drip tape manufacturers publish
Cv and x values for all of their products or
will provide them upon request. Several
independent test labs also rate emitters and
publish this information. See appendix C for
definitions of Cv and x and explanations of
how they affect system performance.
raised root deflector
turbulent vortex
dual water inlets
expanding flow
channel
top outlet (orifice)
flow channel molded into RO-DRIP®
Figure 3.2 Anatomy of a Drip Emitter
R O - D R I P
®
U S E R S
G U I D E
3.3
D E S I G N
RD3.6
The Roberts Difference:
The RO-DRIP emitter has a
unique expanding flow
channel which can open up
to pass trapped debris. If a
Plugging resistance
Drip tape can become non-uniform to a point where it is completely debilitated in the midst
of a growing season if emitters become plugged. This can result from any of the following:
• Organic or inorganic sediment in the irrigation water
• A vacuum condition inside of the drip tape causing dirt to siphon back in through the outlet
• Root intrusion
• Mineral buildup in the flow channel or at the outlet
clog occurs it can often be
removed by temporarily
increasing the supply pres-
The primary features of an emitter that determine its likelihood of plugging are the cross-sectional
area of its flow channel and the amount of turbulence created within the flow channel. A large
cross-section gives plenty of room for contaminants to pass through without accumulating into
clogs. A highly turbulent channel keeps dirt particles suspended as they move through the emitter.
sure until the expanding
flow channel flexes open
and allows it to pass.
RD3.7
Other emitter features also play important rolls in plugging resistance. Some drip tape products
have emitter outlets that resist root intrusion. The design of the emitter inlet can also affect clog
resistance. Finally, some emitters provide mechanisms that help to remove clogs if they should
occur.
DRIP LATERAL DESIGN
The Roberts Difference:
The comprehensive
RO-DRIP product line provides a broad selection of
wall thickness, emitter
spacing, flow rate and
diameter that will allow you
to select the right drip tape
for your application.
RD3.8
The Roberts Difference:
The advanced emitter
design and smooth inside
walls of RO-DRIP products
allow long lateral runs with
high uniformity. RO-DRIP
performance charts are
available in the Roberts
Irrigation Products
publication
RO-DRIP PERFORMANCE
To design your drip laterals, you need to specify the following:
• Run length
• Placement of laterals (depth, spacing, position, and run length)
• Emitter spacing
• Flow rate
• Drip tape wall thickness
• Drip tape diameter
Table 3.1 summarizes these parameters and their effect on performance. Each is discussed in
greater detail in the remainder of this section.
Lateral Run Length and its Effect on Uniformity
Length of run has a direct effect on the uniformity (DU) of each drip lateral. If laterals are too
long, pressure losses cause a higher application rate at the beginning of the run than at the end.
In general, longer run lengths with good uniformity are possible with low flow rate and/or large
diameter drip tapes, although all drip tapes have their limits.
The DU of a single lateral is determined by its length, slope, operating pressure, flow rate, x,
and Cv. Performance Charts published by most drip tape manufacturers summarize all of these
effects, and tell you how long your drip tape runs can be for a given set of conditions. Consult
the Roberts Irrigation performance charts for all RO-DRIP products.
Example
You plan to use a 13 mil RO-DRIP product with a performance chart in appendix D to irrigate
cotton. There is a 0.5% downhill slope, and the distance from the supply manifold to the end of
the field is 1000 ft (305 m). You require a DU of 85% for each lateral, and the average pressure of
the supply manifold is 8 PSI (.55 bar).
Solution
Pressure = 8-PSI (.55-bar)
Target EU = 85%
Run Length = 1000-ft (305-m)
Slope = -0.5%
Soil: Sandy loam
Using the charts in appendix D, RO-DRIP 13-12-24 has a DU of slightly more than 80% for a
SPECIFICATIONS.
3.4
R O - D R I P
®
U S E R S
G U I D E
D E S I G N
Table 3.1 Drip Tape Design Parameters and their Effect on Performance
Parameter
Effect on
Performance
•thicker walls improve resistance to
damage from pests and/or
installation
Wall thickness
•thicker walls allow higher operating
and flushing pressures
•thicker walls make longer-term installation possible
•closer emitter spacings result in higher flow rates
•closer emitter spacings are
sometimes required for seed
germination
Emitter spacing
Notes
Thicker drip tape is more costly and is
usually used where the field is rough,
for sub-surface placement, and for
long-term placement. Thick tape is
also used for better pest resistance.
Thinner tape is used for single-season
crops.
Choice of spacing is based on planting
method (germinating or transplanting),
soil texture, and crop selection.
•closer emitter spacings can provide a
better wetting pattern in some light
soils
•larger emitter spacings can deliver low
flow rates without increasing the risk
of plugging
•higher flow rates result in more
lateral movement of water in sandy
soils
Nominal flow rate
•higher flow rates reduce the risk of
emitter plugging
Choice of flow rate depends on water
availability, ET requirements, length of
drip tape laterals, soil
texture, and crop selection.
•lower flow rates allow longer lateral
runs
•lower flow rates allow improved
infiltration of water in heavy soils
Diameter
•large diameters allow longer lateral
runs
Standard drip tape is 0.625-in diameter. Larger diameter drip tape products
allow longer lateral runs, but are more
costly.
1000-ft (305-m) run at 8-PSI (.55-bar), which does not meet your requirements. RO-DRIP 13-24-17
has a DU over 85%, and 13-12-24XL has a DU over 90%, both of which meet your requirements.
RO-DRIP 13-12-24 XL will work well in this application. You may be able to save cost by
using the smaller diameter 13-24-17, but it may be difficult to achieve sufficient lateral movement
of the wetted pattern with a 24-in (61-cm) emitter spacing in sandy loam soil. Try a small test
area first. You can also realize initial cost savings by lowering your uniformity target to 80%,
which allows you to use 13-12-24, also with a 5/8-in ID. However, the initial savings may be
offset by increased water usage to compensate for the lower uniformity. The correct answer
depends on the specifics of your growing operation.
Placement of laterals
The placement of drip tape defines its depth and distance from the plants, and the distance
between laterals. In all cases, the drip tape must be oriented with the emitters facing up to resist
plugging from sediment settling. Proper placement is determined by several factors, including:
• Crop grown
• ET requirements
• Soil texture and structure
• Salinity management
R O - D R I P
®
U S E R S
G U I D E
3.5
D E S I G N
• General cultural practice
• Use of plastic mulch
• Equipment availability
• Seeding vs. transplanting
• Crop rotation
• Field topography
Each field situation has many variables, and the best solutions come from experience.
Experiment with small trial plots to find the best lateral placement and application rates to meet
the needs of your crop. Refer to the crop examples in appendix B to see how experienced drip
tape users have made lateral placement decisions. Following are a few general guidelines.
Position of laterals
The placement of drip tape relative to each plant row depends on the amount of lateral
movement of water allowed by your soil type and the requirements of your plants. In general,
lateral movement of water in light (high sand content) soils is difficult to achieve, so drip tape
should be placed close to the plant row (usually 2-12 in, 5-30 cm). Conversely, larger distances
(up to 24-in, 61-cm) are acceptable for high clay content soils, which promote easy lateral water
movement and which may result in ponding due to low infiltration rates.
Drip tape should also be placed close to the plant row if plants are direct seeded. This provides
the high soil moisture required by the seeds, as well as additional salt leaching which may be
necessary during the early, salt-sensitive growth stages. When direct seeding in sandy soil, laterals
should be placed as close as possible to the plants. See MANAGEMENT: Germinating Seeds.
Spacing between laterals
The spacing between laterals is determined to a large extent by the distance between centers
of your crop rows. Depending on your soil type and ET requirements, however, it may be possible
to irrigate more than one row with each lateral, resulting in reduced system cost and lower application
rates. Other combinations, such as using three laterals to irrigate a four-row bed, are also possible. In such cases it is important to be sure that the edge of the wetting pattern from each lateral does not coincide with the position of the plant row. Salts that accumulate at the edge of
the wetting pattern can damage or kill plants.
To calculate the total length of drip tape, L, which will be required to cover your field at a
given spacing between laterals, use the following formula:
Sandy Soil
Clay Soil
Figure 3.3 Lateral Placements
3.6
R O - D R I P
®
U S E R S
G U I D E
D E S I G N
If your field is flat, set "number of tape rows per bed" to 1, and use the lateral spacing in
place of "bed spacing" above.
Surface vs. subsurface (depth of laterals)
There are four common methods of depth placement for drip tape:
• Surface placement on flat ground
• "V-Ditch" placement
• Shallow sub-surface: 1-4 in (2.5-10 cm)
• Deep sub-surface: deeper than 5 in (13 cm)
Depending on your specific situation and crop, any of the above placement methods may be
appropriate. Table 3.2 presents some typical applications for each.
NOTE: When drip tape is installed deep enough that the wetted area does not reach the surface, salt
buildup may occur just under the surface of the soil. This can create a situation in which rain can leach
salt into the root zone and stress or even kill the crop. Refer to MANAGEMENT: Managing Soil Salinity
for information on managing salt buildup.
NOTE: Depth of laterals is critical if they are used to germinate crops. Depending on soil type, deep
subsurface laterals may not be able to supply the water to the surface required by the seeds. In such cases,
sprinklers are required.[fig. 3.4]
Raised beds
Raised beds are not necessary in drip applications. However, they should be considered
where salinity or drainage around the plants is a serious problem. Raised beds can also facilitate
harvesting of short stature crops such as strawberries. Finally, raised beds can increase soil
temperature, resulting in increased yield and earlier harvest.
Where possible, consider a large bed width of 60 or 80 inches (150-200 cm) and use 2 drip
laterals per bed to increase the percentage of production area and yield potential.
NOTE: When two laterals are used, the middle of the bed should be left open for salt accumulation.
Laterals should not be placed so that the edge of the wetting pattern is under the center of a row.
surface
shallow subsurface
deep subsurface
V-ditch
Figure 3.4 Lateral Depth Placement
Uneven terrain
Drip tape in hillside applications should be placed on the uphill side of the plant row to
ensure a balanced wetted area in the root zone. On steep slopes, the laterals should be placed
parallel to the contour lines of the terrain to minimize pressure differences caused by uphill or
downhill runs.
R O - D R I P
®
U S E R S
G U I D E
3.7
D E S I G N
Table 3.2 Typical Applications for Drip Tape Placement Depths
Placement
Application
•Single season
•Retrieval and re-use
Surface
•Applications where
installation equipment
is unavailable or the
field is small
(above ground)
Advantages
Disadvantages
Notes
•Easy, low-cost
installation
•Increases risk of
mechanical damage
•Requires anchoring of
tape
•Easy to confirm
uniformity and
operation
•Tape may wander due
to heat or wind
•Should not be used
with clear plastic coverings to avoid burning or overheating of
tape
•Easy to locate and
repair damage
•Easy to retrieve
•Surface wetting
increases weed
growth and may
promote disease
•Increases runoff in
heavy soils
•Increases
evaporation
•Same as surface placement
V-Ditch
(2-3 in deep,
5-8 cm deep)
•Easy to confirm
uniformity
•More exposure to
damage than with
sub-surface placement
•Easy to locate and
repair damage
•Increased weed
growth
•Reduced runoff
•Increased
evaporation
•Easy, low-cost
installation
•A compromise
between the characteristics of surface
and shallow subsurface placement
•Mechanical or
manual installation is
possible
•Common with
plastic mulch
•Single or
multi-season
•Prevents tape
wandering from heat
or wind
•More difficult to visually detect
damage
•Reduced
evaporation
•Rodent and insect
problems are
greatest in new fields
where
adequate control
measures have not
been used
•Reduced damage from
cultural
operations
Shallow
sub-surface
•Reduced pest
damage
(1-4 in, 2-10 cm)
•Usually requires
mechanical installation via tractor and
toolbar
•Improved water movement
•Reduced weed growth
•Prevents damage from
clear plastic coverings
•Multiple year
•Can be used for
several seasons without retrieval
•Reduced damage from
cultural
operations
Deep
sub-surface
•Reduced pest
damage
(deeper than 5
in, 13 cm)
•Reduced weed growth
•Reduced loss to evaporation
3.8
R O - D R I P
®
U S E R S
G U I D E
•Salt accumulates just
below the soil surface
and may be carried
into the root zone by
rain
•More difficult to
repair damaged tape
•Installation
equipment required
•Sprinklers may be
required to
germinate crops or to
leach salt from the
root zone
•Requires careful
design and
maintenance
•The system should be
designed for easy
flushing of
laterals
•Operation of system
during light rain may
be required to
prevent salt from
leaching into the root
zone
D E S I G N
Selection of Emitter Spacing
Common drip tape emitter spacings are 4, 8, 12, 16 and 24 inches (10, 20, 30, 40, and 60 cm).
Narrowly spaced emitters are useful in sandy soil, or where high flow rates are desired. Wider
spacings provide lower flow rates that make longer lateral runs possible.
See table 3.3 for guidelines on selecting emitter spacing. These are general descriptions only.
Table 3.3 Guidelines for Emitter Spacing
EMITTER SPACING
4 inch
10 cm
APPLICATIONS AND FEATURES
CROPS*
•greenhouse and field flower applications
•Flowers
•short lateral runs
•Potted plants
•results in good wetting patterns in sandy soils
•very high flow rate
8 inch
20 cm
•results in good wetting patterns in sandy soils
•Flowers
•aids in germination of seeds
•Potted plants
•provides a relatively high flow rate
•Strawberries
•Most vegetables
12 inch
30 cm
•crops in most soils
•Potted plants
•lower flow rate than 8-in (20 cm) spacing
•Strawberries
•longer runs are possible due to lower flow rates
•Most vegetables
•Sugar cane
•Potatoes
•Melons
16 inch
41 cm
•lower flow rate for improved infiltration of heavy soils
•Melons
•longer runs possible than with 8 or 12in (20 or 30-cm)
spacing
•Corn
•may not effectively germinate seeds in light soils
•Sugar cane
•Cotton
•Some vegetables
24 inch
61 cm
•provides lower flow rate for improved infiltration of heavy soils
•Corn
•very long runs are possible
•Cotton
•may not effectively germinate seeds in light soils
•Sugar cane
* General guidelines only. Actual spacing will depend on soil type, run length and other specifics of your operation.
Selection of Flow Rate
As illustrated in the previous section, drip tapes with narrow emitter spacing deliver higher
flow rates due to the larger number of emitters per unit of length. In addition, many drip tape
products are available with two flow rates for each emitter spacing, referred to as Standard Flow
and Low Flow products. Table 3.4 provides a comparison of Standard Flow and Low Flow emitters.
Examples of Standard Flow and Low Flow RO-DRIP products are given in table 3.5. Consult
the RO-DRIP Product Data Sheets for a complete listing of flow rates and emitter spacings.
When you select a drip tape flow rate, emitter spacing, and lateral spacing, you need to
ensure that, during irrigation,
• The system does not require a higher flow rate than your water supply can provide
• The system can sustain the application rate required by your field
R O - D R I P
®
U S E R S
G U I D E
3.9
D E S I G N
Table 3.4 Standard Flow and Low Flow Emitters
EMITTER FLOW RATES
TYPE
FEATURES
•provides a better wetting pattern in some light soils
Standard Flow
•higher application rate for a given emitter spacing
•less susceptible to emitter plugging than low-flow products
•improved infiltration on heavy soils
•longer lateral run lengths are possible
Low Flow
•more susceptible to emitter plugging
•higher flushing requirements
Table 3.5 Standard Flow and Low Flow RO-DRIP Products
UNITS
EMITTER SPACING
STANDARD FLOW
LOW FLOW
US
8-in
40 GPH/100 ft
20 GPH/100 ft
Metric
20-cm
497 LPH/100m
248 LPH/100m
US
12-in
24 GPH/100 ft
15 GPH/100 ft
Metric
30-cm
298 LPH/100m
186 LPH/100m
US
16-in
20 GPH/100 ft
10 GPH/100 ft
Metric
41-cm
248 LPH/100m
124 LPH/100m
If your system requires a higher flow rate than your water supply can provide, it will not
work. It will be necessary to divide your field into smaller zones that can be irrigated independently, or reduce the number of acres you are irrigating. Use the following formula to calculate
the total flow rate, Q, each zone of the system will require of your water supply, or use the tables
in appendix E:
If US units are used in the above formula, Q will be in gallons per minute. If metric units are
used, Q will be given in liters per minute.
Calculate the application rate, AR, of your system as follows, or use the tables in appendix E:
3.10
R O - D R I P
®
U S E R S
G U I D E
D E S I G N
AR =
( tape flow rate, GPH / 100' )
(tape flow rate, LPH / 100m)
=
62 × ( lateral spacing, feet )
100 × ( lateral spacing, meters)
If US units are used, AR will be in inches per hour. If metric units are used, AR will be in mm
per hour.
The application rate delivered by your system must be capable of replacing water lost to ET
during the peak months of the season. It is good practice to apply a safety factor when estimating your peak water requirements, to account for system inefficiency as well as the possibility of
equipment failure or extreme weather conditions.
EXAMPLE
You plan to increase the output of your quarter-section (160-acre, 65-hectare) corn field by
replacing an existing center pivot with drip irrigation. The corn is planted on 36-in (91-cm) centers and you will use one RO-DRIP 13-24-17 XL lateral for every two rows, resulting in a 6-ft (1.8m) lateral spacing. The peak ET for corn in your area is 8.5-in (216 mm) in the month of July. The
capacity of your water supply is 1200 GPM (4500 LPM).
SOLUTION
The peak daily ET requirement is 8.5/31 = 0.274 in per day (6.95 mm per day). Using a 25%
factor of safety to account for system inefficiency and possible interruptions in the water supply,
the system must be capable of an application rate of 0.274 x 1.25 = 0.343 in per day (8.71 mm per
day), or at least 0.014 in per hour (0.36 mm per hour) if operated for 24 hours.
The total length of drip tape that will be required to cover your field is
The system will be capable of delivering an application rate of
or 1.1 in per day. The required flow rate will be
From the above, the system is capable of delivering more than three times the application
rate required during peak ET, but it requires a higher flow rate than your water supply can provide. A possible solution to this problem is to divide the field into three equally sized zones, and
irrigate one zone at a time. Doing this, the maximum application rate to the field will be 1.1 / 3 =
.37 in per day (.94 mm per day), and 1097 GPM (4512 LPM) will be required of your water supply. See Dividing Your Field Into Independent Zones, in this section.
R O - D R I P
®
U S E R S
G U I D E
3.11
D E S I G N
Table 3.6 Guidelines for Selecting Wall Thickness for Drip Tape
THICKNESS
APPLICATION AND FEATURES
5 mil
0.127 mm
6 mil
0.152 mm
8 mil
0.200 mm
10 mil
0.254 mm
13 mil
0.325 mm
•minimum number of rocks and pests
•applications where installation cost is very important
•first time drip tape users who desire a thin-walled drip tape
•experienced drip tape users in multiple season applications
•first time drip tape users
•experienced drip tape users in multiple season applications
•portable applications (may be relocated)
•multiple year buried applications
•portable applications (may be relocated)
•multiple year buried applications
•maximum resistance to pests and mechanical damage
•portable applications (may be relocated)
15 mil
•multiple year buried applications
0.375 mm
•maximum resistance to pests and mechanical damage
Selection of Wall Thickness
Drip tape products are available with a variety of wall thicknesses ranging from 4 mil to 25
mil. The thinnest walled products are lower cost, but are more susceptible to mechanical and pest
damage. They are typically used in single season applications by experienced growers. The thicker walled products are more resistant to damage and can be used for multiple seasons. Their
higher tensile strength also makes them well suited for retrieval and re-installation in the field.
See table 3.6 for general guidelines on selecting wall thickness.
RD3.12
The Roberts Difference:
RO-DRIP XL is a premium
quality 7/8 in-diameter drip
Run-Length and Selection of Diameter
For a given flow rate, larger drip tape diameters allow longer lateral runs. The standard
diameter of most drip tape products is 5/8 in (16 mm). Most manufacturers also offer largerdiameter drip tape for applications requiring extremely long lateral runs. RD3.12
tape product designed for
long lateral runs. It is
Table 3.7 Considerations for Selecting Drip Tape Diameters
available in several emitter
TYPE
FEATURES
spacings and flow rates
and has been successfully
used for lateral runs over
•lower cost than 7/8-in (22-mm) diameter products
Standard Diameter
(5/8-in, 16-mm)
•run lengths are sufficient for most field layouts
•larger variety of emitter spacings and flow rates are available
1/4 mile (0.4 km) long.
•very long lateral runs with high uniformity are possible
•less problems with high water application at head of field on heavier soils
Large Diameter
(7/8-in, 22-mm)
•allows use of fewer submains, possibly resulting in cost savings
•fewer submains may also result in fewer tractor turns
•higher cost than standard diameter
•fittings and other components may cost more than with standard diameter
3.12
R O - D R I P
®
U S E R S
G U I D E
D E S I G N
Table 3.7 provides background on the selection of tape diameter. Actual design decisions may
require run length information from performance charts and price information from your irrigation dealer. See the Roberts Irrigation Products publication RO-DRIP PERFORMANCE SPECIFICATIONS.
MAINLINES AND SUBMAINS
Field Uniformity
The previous section explained how to use
performance charts to select a drip tape product and run length that meet your uniformity
goals along the length of each lateral. It is
equally important to select mainlines, submains, and other components to ensure that
the supply pressures to all of the laterals
are consistent so the distribution uniformity
over the entire field will meet your goals.
Figure 3.1 shows the major components of
a typical field layout.
Design of Submains
The function of a submain or supply manifold is to distribute water uniformly to a
number of laterals. For surface or shallow
subsurface systems, submains are commonly made of polyethylene hose or reinforced flexible
PVC (layflat) on the surface, or buried PVC. The submains for a deep subsurface system should
be PVC. When PVC is installed on the surface, use a light cover of soil to protect it from UV
degradation and algae growth within the pipe that can result from exposure to sunlight. Table 3.8
summarizes the features of each type of submain.
Each submain in your system should supply consistent pressures to all of the laterals attached
to it. Consult a qualified irrigation designer to specify submain diameters that can meet this
requirement as cost effectively as possible.
Figure 3.5 Typical Field Layout
Design for Flushing
If your system is used for multiple seasons, or water quality is poor, it may be necessary to
periodically flush the laterals by opening the ends to remove sediment with the resulting water
flow. If flushing is infrequent, this may not require any special consideration in the design stage,
although removable end caps can make the procedure easier.
In large systems that require frequent flushing, flushing manifolds, as shown in figure 3.6,
can save time and labor. Several laterals terminate to a single flushing manifold, and a valve can
be opened or an end cap can be removed to flush them all simultaneously. If flushing manifolds
are used, their diameters must be large enough to allow sufficient flow velocity from the ends of
the laterals. In addition, the connection from each lateral to the flushing manifold should not
significantly restrict flow.
To effectively remove sediment, the flushing velocity should be at least 1 ft/sec at the
end of each lateral. This translates to approximately 1 GPM (3.8 LPM) for a 5/8-in (16 mm)
lateral or 2 GPM (7.6 LPM) for a 7/8-in (22
mm) lateral. Depending on run length, this
may require 2 to 3 GPM (7.6 to 11 LPM) from
the supply manifold to flush a single 5/8-in
lateral, or 3 to 5 GPM (11 to 19 LPM) for a
7/8-in lateral. When designing a manifold to
Figure 3.6 Design for Lateral Flushing
R O - D R I P
®
U S E R S
G U I D E
3.13
D E S I G N
Table 3.8 Types of Submains
Description
Material
Rigid PVC pipe
Advantages
•Long life, if buried
PVC
Disadvantages
•Degrades if exposed to sunlight; should be buried
•More difficult to work with
than PE hose or layflat
•Not easily portable
Flexible polyethylene hose
with round or
oval-shaped cross-section
•Long life (3-5 yrs) in above
or below-ground applications
•Easy to install - simply
unroll from coil
Polyethylene Hose
•Requires more storage space
than vinyl layflat
•Thermal expansion and contraction can cause movement
•Can flatten in a buried trench
•Easy to attach laterals and
fittings
•Portable
Collapsible vinyl hose which
inflates under water pressure
Vinyl Layflat
•Very compact for
shipping and storage
•Shorter life than poly hose or
buried PVC
•Relatively long life in
above-ground
applications (2-4 yrs)
•Often moves due to
internal water velocity
•Easy to install – simply
unroll from coil
•Portable
flush several laterals simultaneously, it is important to ensure that the capacity of your water
supply will not be exceeded. If it is, the flow requirements during flushing can be reduced
by using several smaller flushing manifolds at the end of the field, which can be opened
individually.
Submains on Uneven Terrain
When drip laterals are in a level orientation across a steep slope, the submains run up or
down the slope. Pressure variations will occur within the submains if they are long and/or the
Table 3.9 Minimizing the Effects of Submain Pressure Variations
Method
Description
Short submains
If submains are short, the elevation change along each is less than 5 feet (1.5 m), and a pressure regulator is installed at the beginning of each submain, pressure
variations will be within acceptable limits.
A flow restriction is installed on the submain at each 5-foot (1.5 m) change in elevation. The
flow restriction can be an in-line valve on a PVC or poly hose submain, or a clamp on a layflat
submain. This method requires some trial and error to adjust the restrictions properly.
Flow restrictions
Submains are carefully sized so that pressure lost due to friction offsets pressure gained due
to elevation change. This results in larger diameter pipe at the top of the slope, "telescoping"
down to smaller diameters further down the slope. Telescoping submains can also be used on
flat ground to reduce cost of pipe.
Telescoping submains
Variable length transfer
tubes
3.14
R O - D R I P
®
U S E R S
If small-diameter transfer tubes are used to connect laterals to submains, their lengths can be
set to vary the amount of flow restriction they provide. Short tubes are installed at the top of
the slope and long tubes are installed at the bottom. Charts and formulas are available that
give the friction loss caused by a given length of transfer tube, or trial and error can be used.
G U I D E
D E S I G N
slope is severe. Every 5 feet (1.5 m) of elevation change will cause approximately 2 psi (0.14 bar)
pressure change, which is enough to affect uniformity. There are several ways to minimize the
effects of slope on uniformity. The submain should run downhill, with the water supply at or
near the top. Refer to table 3.9 for methods to minimize the effect of submain pressure variations.
Air/vacuum relief at the high points of sloping submains is critical to prevent vacuum conditions
that can suck dirt particles into the emitters and cause plugging when the system is drained.
Design of Mainlines
Mainlines distribute water from the source to one or more submain risers which supply the
individual submains in the system. They are most commonly made from buried PVC, although
poly hose or layflat can be used in small or portable installations. Do not use metal pipe (especially aluminum) because it can react with chemicals that are injected through the system and
plug emitters. Important considerations in the design of mainlines include the following:
• Mainlines should be carefully laid out to minimize both material cost and pumping cost.
• Tradeoffs between initial material cost and ongoing pumping cost must be made when sizing mainlines.
• Thrust blocks should be installed on large mainlines at points where flow changes direction.
• Mainline sizes should be specified such that flow velocities do not exceed 5 ft/sec (1.5 m/sec). Up to 8 ft/sec
(2.4 m/sec) is acceptable in some cases where water is free of sand and care is taken to open and close
valves slowly.
• Pressure relief valves should be installed at low points and at the end of mainlines.
• Air/vacuum relief valves should be installed at high points and downstream of any valves.
• Flush valves should be included at the end of mainlines.
Consult a qualified irrigation designer to design mainlines that meet these requirements as
Figure 3.7 Connection of a Submain to a Mainline
cost effectively as possible.
Connection of Mainlines to Submains
A pressure regulator at the start of each submain can improve distribution uniformity in
many cases. In addition, the submain connection to the mainline (fig. 3.7) may include a control
valve, an air relief valve and, if necessary, a secondary screen filter.
DIVIDING YOUR FIELD INTO INDEPENDENT ZONES
Most large drip irrigation systems are comprised of several zones that can be independently
scheduled. Each zone typically has one or more submains, and a control valve that allows it to be
turned on and off. Automatic irrigation controllers are helpful if several zones are implemented,
each with a different schedule. More than one independent zone may be required if one of the
following situations apply:
• The capacity of your water supply is not sufficient to irrigate your entire field at the flow rate and lateral
spacing specified in your design (see the example in Selection of Flow Rate)
• Fields are staggered for different planting and harvesting dates
• Several different crops are being irrigated with different water requirements
R O - D R I P
®
U S E R S
G U I D E
3.15
D E S I G N
• Topography varies throughout your operation
• Drainage or soil texture vary throughout your operation
Maximum Zone Size
The maximum size of any one zone is determined by the capacity of your water supply:
or
Ideally, each zone should be sized to fully utilize your water supply, although this is not
always practical. In some cases it is desirable to irrigate more than one zone at a time, but it is
never possible to simultaneously irrigate more acres (hectares) than the number given above.
FILTRATION
Filtration Requirements for Drip Irrigation
The main purpose of filtration is to keep your emitters clean and working properly.
Maintaining clean emitters is as important to your drip system as water is to your crops. Two
common sources of emitter clogs, in-line particulate (suspended soil, algae, etc.) and chemical
precipitates, can and should be prevented by proper filtration and water treatment.
NOTE: Filtration equipment is a crucial component of your drip system. Resist the temptation to save
money on unreliable or inappropriate filtration equipment-it is the heart of your system and should be the
right equipment for your farm water source.
In addition to filtration, chemical water treatment may be necessary to control pH or to
remove algae, bacterial slime, and mineral participates that can clog emitters. See MANAGEMENT: Water Treatment for more on water treatments.
Filter Types and Filter Selection
There are several types of filter systems available. Your choice among them should be based
on careful consideration of the following factors:
• A thorough analysis of your water supply including particle size and concentration
• Filtration requirements of the drip irrigation tape
• Seasonal or other changes in potential contaminants
• Potential for precipitation of dissolved solids due to chemical reactions
• Consultation with a qualified irrigation specialist
Table 3.10 summarizes the filter types and their proper use.
PUMPS
There are a variety of pump types available. Each has a performance profile represented by a
pump performance curve. Pump lift, capacity, and discharge pressure are all factors to consider.
The particular balance of these factors will be determined by the pressure and flow rate required
by your system, and by the type and location of your water source.
3.16
R O - D R I P
®
U S E R S
G U I D E
D E S I G N
Table 3.10 Filter Types
Filter Type
Sand Media Filter
Application
How it Works
Specifications
•Required for any open
or surface water source
where large amounts of
organic matter are present
Fine sand particles within pairs of closed tanks
create a three-dimensional filtering surface.
Removes algae, slime,
and fine suspended
solids. Filters are backflushed one at a time,
while remaining units
continue filtration.
•Filtration to 74 microns
(200 mesh)
•Cleaned by backflushing
•Sizes: 12-48 in
(30-120 cm)
• Available in carbon
steel, stainless steel,
and fiberglass
•Frequently used for well
water
•Use at least 3 tanks if
possible to avoid backflushing
problems
Notes
•A settling basin may be
required if large
amounts of silt or clay
particles are
present
•Several tanks can be
used in parallel for
large flow rates
Screen Filter
•Usually a secondary filter, as a back-up for a
media filter
•May be used as a
primary filter for very
clean water sources
•Used to remove sand,
well casing and other
inorganic material
Centrifugal Sand
•Can be used as a
Separator
pre-filter to reduce
backflushing of main filters
•For low or medium
levels of particulate
Gravity-Flow
Filters
•Used to deliver a large
volume of water at a
low pressure
•Primary filtration
Disc Filter
•Used in many of the
same applications as
media filters
Fine-meshed screen
enclosed in a
pressurized tank traps
organic and inorganic
particulate.
•Available screen mesh:
50 to 200 (300 to 74
micron)
Centrifugal action
creates a vortex that
pushes away
particulate that is heavier than water. Removes
well casing scale, sand,
and other inorganic particulate.
•Removes particles heavier than water, down to
74 microns (200 mesh)
Water falls on a screen
separator which catches particulate.
Particulate is washed
into a collection tank.
•Available from 100-200
mesh
Filters water through
microscopic grooves on
densely packed discs.
•Available from 20-600
mesh
•Clean by flushing
•Easily clogged by organic matter
•Available sizes 0.75-10
in (1.8 - 25 cm)
•Works with 5-7 psi
pressure loss
•Self cleaning
•Low maintenance
•Does not remove organic matter
•Not 100% effective usually used as a prefilter
•Cleaned by water flow
and additional spray
nozzles
•Booster pump is
usually necessary after
this filter
•Cleaned by backflushing
•Can handle high flow
conditions by installing
several banks of disk
filters
•Not for use with large
amounts of sand
Suction Screen
Filter
Settling Pond
•Used for pre-filtration at
pump intake
Relatively coarse
screen traps debris.
•Available in 10-30
mesh
•Cleaned by rotating
water jets
•Pre-filtration to remove
silt or other inorganic
particles
Allows suspended particles to settle. Removes
high quantities of silt
and clay particles. Also
provides aeration to
remove some dissolved
solids and iron
•Sized according to peak
water requirement and
particulate type
•Cleaned by draining
and removing buildup
•Care must be taken to
control algae growth
•Inlet must be away
from outlet
suspension.
R O - D R I P
®
U S E R S
G U I D E
3.17
D E S I G N
Your choice among pump types and sizes should be determined by the optimum operating
pressure and flow rate of your system. Once you have determined the requirements of your
system, you can choose the most efficient combination of pump and power source by consulting
catalogs of pump performance curves. Pump specification is an in-depth topic that is not covered
in detail here. Many pump manufacturers provide detailed guidelines on sizing pumps for
irrigation applications.
OTHER COMPONENTS
Fittings and Connectors
Connecting laterals to submains
Three basic methods used to connect drip tape laterals to submains are:
• Direct connection using twist-lock connectors
• Connection via transfer tubes and fittings
• Connection via transfer tubes without fittings
Each of these methods is described in detail in INSTALLATION AND STARTUP: Connecting
Laterals to Submains. Refer to the Accessories section of the Roberts Irrigation Product Catalog
for information on the fittings and tubing that are available from Roberts Irrigation Products, Inc.
Table 3.11 summarizes the advantages and disadvantages of each connection method.
Terminating laterals
Laterals can be terminated into flushing manifolds (see Mainlines and Submains, in this
section), or they can be individually terminated with or without fittings. The best method of
terminating laterals is usually determined by the flushing requirements of your system.
The lowest cost method of terminating an individual lateral is to fold it over and use a short
length of drip tape as a sleeve to slip over the fold. This method is described in detail in INSTALLATION AND STARTUP. Threaded end cap fittings can be used to simplify flushing of laterals.
Automatic flushing end caps are also available, although they should not be used in place of a
regular flushing program because they do not allow sufficient flushing velocity. See the
Accessories section of the Roberts Irrigation Catalog for more information on the end-caps
available from Roberts Irrigation Products, Inc.
Valves and Pressure Regulators
Drip systems rely on uniform emission rates from all emitters. While pumps provide a basic
level of pressure and flow volume, many more minor adjustments are required to keep your
system operating at optimum efficiency and safety.
The following types of valves may be required for your system:
Pressure-regulating valve
Pressure-regulating valves keep downstream pressures constant in the presence of varying
upstream pressures. They do not affect water flow directly. They can be of great value in limiting
pressure differences across the field, especially when installed at the beginning of each submain.
Pressure regulators must be sized according to the flow rates they will be subjected to, and not
according to submain size. Be careful when installing pressure regulators since they can be
damaged by water hammer. Avoid low cost units that do not regulate downstream pressure
but only maintain a pressure drop.
Pressure-relief valve
Use pressure-relief valves when the pressure in your system has the potential to increase
beyond a safe level. Temporary high pressure conditions may occur with sudden opening or
closing of valves or air vents, or may occur due to water hammer. The optimal location for pressure
relief valves can be difficult to establish. They generally should be included at low points and at
the end of lines, but also at any other point that can be subjected to large pressure surges.
3.18
R O - D R I P
®
U S E R S
G U I D E
D E S I G N
Table 3.11 Lateral Connections to Submains
Connection Method
Direct connection via
Twist-Lock fitting
Notes
•Simple and reliable - only one fitting per lateral
•Most common in surface applications
•In subsurface applications, laterals must be buried at the same depth as submains
Connection via transfer
tube using fittings
•Allows surface placement of laterals with buried submains
•Small diameter transfer tubes may result in pressure losses
•Requires up to two fittings and a transfer tube for each lateral
•Lowest cost method of connecting a lateral to a submain
Connection via transfer
tube without fittings
•Small diameter transfer tubes may result in pressure losses
•Greater risk of leaks
Field control valve
A field control valve is usually included at the beginning of each submain. Gate valves, butterfly valves, and globe valves are commonly used, and field control valves may be automatically
controlled. Field control valves are usually used as on/off valves, with in-line pressure regulators
or pressure reducing valves used to control the pressure in each submain.
Mainline control valve
Control valves used on mainlines may be simple on/off valves, or may be used to partially
restrict flow or reduce pressure. Gate valves and butterfly valves are commonly used, with globe
valves sometimes used in smaller systems. Gate valves should only be used for for on/off operation
and not to partially restrict flow, since the valve may wear while partially open and may not seat
properly when closed.
Air vent/vacuum relief valve
Air that accumulates in mainlines and submains can restrict flow and lead to damage from
water hammer. Vacuum conditions, which can occur in drip laterals when the system is shut
down, can cause contaminants to be sucked into the emitters and lead to plugging. In addition,
the vacuum that forms downstream of control valves when they are suddenly closed can damage pipes or the valves. Install air/vacuum relief valves
• At all high points on mainlines and submains
• At the ends of mainlines and submains
• Downstream of all control valves
• Upstream of pump check valves
Check valve
Check valves only allow flow in one direction. If chemical injection is used, a check valve
should be installed at the output of the chemical holding tank to prevent irrigation water from
flowing into the tank. Check valves are also installed downstream of pumps to prevent water
from flowing in the wrong direction when the pump is turned off.
Backflow prevention valve
A backflow prevention valve prevents water from flowing back into the supply from the
irrigation system. There are several types of backflow prevention valves that use different
mechanisms to operate. Backflow prevention valves prevent chemicals and other contaminants
from entering the water supply. They should be installed in drip systems that are used for
R O - D R I P
®
U S E R S
G U I D E
3.19
D E S I G N
chemigation and/or fertigation, and are required by law in many areas.
Instrumentation
The two most important devices for measuring water movement between the water source
and your field are flow meters and pressure gauges. Close monitoring and accurate record keeping
with these devices will allow you to make the most fundamental adjustments to your system
operations and detect problems before they can have serious effects on your crop.
Flow meters
Flow meters allow you to directly measure application rates, and can help you detect problems
such as clogging or line breakage. Install at least one flow meter on the main supply line to
indicate the total amount of water being applied to the field. Read this meter and record the
information for the new system a regular basis thereafter. Flow meters are available that show
total and instantaneous flow rates.
There are several types of flow meters to choose from, the most popular being the propeller-type
flow meter due to its reliability and low cost. The reliability of flow measurements is highly
dependent on the flow meter location. Propeller flow meters should be located downstream from
a straight, unobstructed length of pipe at least eight times the diameter in length. For accurate
readings, the pipe must flow full.
Pressure gauges
The performance of your system depends on consistent control of water pressure. Regardless
of how well your system is designed, or how well your drip tape is manufactured, operating
pressures must remain at design specifications to maintain the desired distribution uniformity.
Changes in pressure can indicate a variety of problems. A pressure drop may indicate a leak, a
component or line break, a blocked filter, or a malfunctioning pump. A pressure increase usually
indicates a block in the filters, valves, or lines.
Install pressure gauges on the mainline both before and after the filters. You can obtain additional
information by installing a pressure gauge directly downstream of each pressure regulator to
indicate the actual pressure supplied to the submains. As with flow meters, read all pressure
gauges and record the information when the system is new and on a regular basis during operation
CHEMIGATION/FERTIGATION
Controlled injection of chemicals and fertilizers may be the most important benefit of your
drip irrigation system. Substances commonly injected into drip systems include chlorine, acids,
fungicides, herbicides, pesticides and fertilizers. This section describes the design aspects of
chemical injection. Use of your injection system for treating your irrigation water and fertilizing
your crops is described in MANAGEMENT: Maintenance, Water Treatment, and MANAGEMENT: Fertigation.
Precision application of high quality fertilizers is especially important and can improve crop
response to essential nutrients, while using less fertilizer than traditional irrigation methods.
Drip fertigation can also efficiently fertilize crops that are covered by plastic mulch.
Injection Methods
Locate injection equipment downstream of your pump and upstream of your filters, which
aid in mixing and can prevent emitter plugging due to particulate buildup or chemical precipitation.
The only exception to this rule is strong acids, which may corrode filter components, and should
be placed downstream of the filters.
Caution: Serious plugging can occur to drip tape from unpredictable mixing of your water,
fertilizers, and chemicals that may form precipitates. Always inject fertilizers and chemicals
before the filters and know how they will react. Have a water quality analysis performed to
help you recognize and address potential incompatibilities.
3.20
R O - D R I P
®
U S E R S
G U I D E
D E S I G N
When specifying and/or installing injection equipment, always do the following:
• Include a backflow prevention device to prevent backflow of chemicals into the water source and a check valve
to prevent flow of irrigation water into chemical tanks
• Use injector pumps and components that resist corrosion from fertilizers and acids
• If using an electric injection pump, include an interlock circuit to ensure the injection pump automatically
turns off when the system pump shuts down
• Select an injector that is easy to operate and adjust during system operation
• Confirm that the injector you specify is capable of low flow rates; rates as low as 0.1% of the total irrigation
flow may be required
• Check with regulatory agencies for specific requirements regarding backflow prevention
It may be necessary to use several injectors to achieve desired flow rates and to allow separate
injection of incompatible chemicals. Before adding anything to your pipelines, test its compatibility
with your water using a jar test, which is a simple test of precipitation risk. See MANAGEMENT: Fertigation for instructions on performing a jar test.
There are many types of injectors to choose from (fig. 3.12). Table 3.13 summarizes the features
of some common injection equipment.
Injection System Materials
Highly concentrated acids and other corrosive chemicals are commonly injected into drip
irrigation systems. Be sure the components of your injection system, including tubing and fittings,
are made from suitable materials. While PVC and other commonly used materials are highly
resistant to diluted acids, concentrated acids can degrade them over time. Injection should be
into the center of the water flow in the mainline or in a mixing chamber, so the chemical is
diluted before it makes contact with the inside wall of the pipe.
Tubing and fittings made from Kynar“ (PVDF) plastic are resistant to concentrated acids and other
chemicals used in irrigation systems. Kynar is a registered trademark of Elf Atochem North America.
CAUTION: Never inject acid into aluminum pipe.
Injection Rates
One of the primary benefits of drip fertigation over other fertilizer application methods is the
accurate control of application rate. In addition the effectiveness of chlorine, acid, and other
chemicals depends heavily on concentration. As a result, it is important to design an injection
system that allows good control over injection rates. Pressure differential tanks, in particular, are
not recommended where accurate control of injection rate is required.
Backflow Prevention
If you inject fertilizer or chemicals into your system it is essential, and in some cases is
required by law, to install a backflow prevention device upstream of the injection point.
Depending on local your regulations, this may require a pressure-reduced backflow preventer or
a double check valve assembly.
R O - D R I P
®
U S E R S
G U I D E
3.21
D E S I G N
gravity
tank
venturi
pressure
differential
metering
pump
Figure 3.12 Common Injector Types
Table 3.12 Common Injector Equipment and Their Features
How it Works
Type
Batch or
Pressure Differential Tank
Gravity Tank
Notes
A pressure differential caused by a
valve or other restriction is used to
force water into a tank containing the
chemical. The chemical then mixes
with the water, exits the tank, and reenters the water flow downstream of
the restriction.
•Simple
A tank stored above the water flow
drips the chemical into the water at a
constant rate.
•Allows control of injection rates
Water passing over a narrow
opening causes a vacuum which pulls
the chemical into the water path.
•Allows control of injection rates
Venturi Device
•Does not allow control of injection
rates: the initial concentration is higher than the final concentration
•Causes a pressure drop in the main
irrigation line
•Simple
•Requires a float valve and a
metering valve
•There is a 10-30% pressure drop
caused by friction in the venturi
•Can be used in conjunction with a
small pump to reduce pressure loss
Metering Pump
3.22
R O - D R I P
®
U S E R S
G U I D E
Many types available; all require power
to push liquid forward.
•Allows precise control of injection
rates
•Water-powered models are
available
4
INSTALLATION AND STARTUP
Drip tape installation methods range from manual placement of single laterals without the
use of tractors or other equipment, to automated injection of several laterals simultaneously in
combination with other operations such as bed shaping and mulch laying. The right method for
your operation depends on a variety of factors including the size of your field, lateral placement
depth, and the equipment available to you.
Careful installation and startup of your system can reduce initial cost and enhance long term
performance. Experience has shown that most damage to drip irrigation systems occurs during
tape installation. If you use mechanical tape laying equipment, it should be carefully designed
and free of burrs, sharp edges, mud, sticks and stones. Whatever method you use to install your
system, following a few well-tested procedures can help you avoid expensive and time-consuming
The Roberts Difference:
repairs.
RO-DRIP’s unsurpassed
Accurate placement of laterals can result in increased water distribution uniformity and better
movement of water through the soil, allowing you to take advantage of the full potential of your
uniformity, simple
system. This section explains how to install drip laterals, how to connect them to submains, and
installation and retrieval,
how to properly start up and check your system for trouble-free operation over the long run.
reduced infrastructure,
and lower cultivation costs
KEY CONCEPTS
make it the performance
• Precise installation of your system can result in more uniform performance and easier retrieval.
leader for any length of
• Always install drip tape with the outlets facing up to prevent plugging by sediment that may settle during operation.
run in the field.
• The installation shank is the main tool used for mechanized drip tape installation.
• All equipment that makes contact with the drip tape during installation must be free of burrs and other sharp edges.
• Before irrigating, test the entire system to confirm proper functioning.
4.1
I N S T A L L A T I O N
A N D
S T A R T U P
Table 4.1 summarizes several important guidelines for proper installation.
Table 4.1 Installation Guidelines
DO
DO NOT
•Store drip tape in a protected area and leave wrapping in
place until ready to install
•Begin installation before carefully planning and
engineering your system
•Prepare soil and beds before planting. Particle size should
be small and uniform
•Step on laterals or drag drip tape across soil surface
•Install laterals with emitters facing up
•Maintain a low constant tension on drip tape roll
•Test the system before irrigating
•Apply uneven tension or jerks that can stretch tape and alter
flow rates
•Handle drip tape using any tools or equipment with burrs or
other sharp edges
Note: Always install tape with the emitters facing up, in both surface and subsurface applications. This
prevents sediment from settling to the bottom of the tape and clogging the emitters.
INSTALLING DRIP TAPE LATERALS
Manual Tape Installation
Manual drip tape installation is common in small fields and greenhouses where laterals are
placed on the surface, because it is often the most cost-effective choice. Manual installation is less
practical in large fields or in subsurface applications. It is generally not practical to manually
install deep subsurface drip systems.
Use PVC, vinyl layflat or poly hose for submains. If using PVC submains above ground,
protect them from sunlight with a light covering of dirt. Do not use steel or aluminum pipe.
Use the following steps to install drip laterals.
1. Mount the spool on a low stand at the front
end of the row.
2. Pull the lateral along the row, taking care not
to drag it on the soil surface (fig. 4.1). Lay the
drip tape with the emitters facing up.
Note: If the ground is rocky or there is stubble in the field, install the drip tape by carrying the
spool down the row. This avoids damage caused by
dragging the drip tape (fig. 4.2).
Figure 4.1 Pulling Drip Tape Along a Row
3. Place a shovel full of dirt on the drip tape
every 10 to 15 ft (3 to 4.5 m) to prevent twisting
or wandering (fig 4.3). Avoid stretching or jerking the lateral during installation.
4. Leave extra length at both ends of each lateral to allow for expansion and contraction and to
connect to the manifolds.
Mechanical Tape Installation
Installation equipment: an overview
Figure 4.2 Walking Spools Along a Row
4.2
R O - D R I P
®
U S E R S
G U I D E
The basic component used in all mecha-
I N S T A L L A T I O N
Figure 4.3 Placing Dirt on a Lateral
A N D
S T A R T U P
nized installation is the injection shank. Its
purpose is to accurately locate the drip tape
to the point of installation, either on or below
the surface and, in subsurface installations, to
dig a trench for the lateral. One or more
spools and injection shanks can be mounted
together on a tool bar. Figure 4.4 shows a
Tube Type injection shank, which is popular
because of its simple and functional design.
Simple injectors such as the Tube Type Shank
are easy to build, although extreme care must
be taken to eliminate all sharp surfaces. More
advanced injectors, which allow high-speed
installation of thin-walled tapes, can be pur-
chased from a number of suppliers.
Pay attention to the following important factors when you design or purchase an injection shank:
RD4.2
• The installation tube should have a flared opening and should be free of burrs, nicks, sharp edges, weld lines
or seams that can cause damage to the drip tape
• The diameter of the installation tube should be as small as possible. 1-in Schedule 40 steel for standard
5/8-in drip tape or 1.25-in for 7/8-in drip tape
• The bottom of the installation tube should be at the same depth as the bottom of the shanking tool
• The drip tape spool should be positioned close to the injection tube - directly above it if possible
• The drip tape spool should be mounted on a shaft that can spin freely; stationary shafts will be damaged by
the spool hubs, or can damage spool hubs
• The shaft should have a braking system that can provide drag to prevent overspinning of the spool when the
tractor stops
• Wood or metal disks should be used to support the cardboard drip tape spools
The Roberts Difference:
RO-DRIP spools utilize an
industry standard bore for
a 1-in shaft, making it an
easy fit for all commercially
available injection equipment.
The injection shank can be mounted on a toolbar with other equipment to perform several
tasks simultaneously. In fact, it is
possible–and now fairly common–to shape
beds, install drip tape laterals, install plastic
mulch, and even side dress beds with fertilizer all in a single pass (fig. 4.5). These operations are often performed on several rows at
once. Packaged systems that install drip tape
while performing other operations are available from a number of vendors.
Tape installation procedure - subsurface
Figure 4.4. Tube-type injection shank, Courtesy
of Andros Engineering
Figure 4.5 Combination Bed Shaper, Plastic Layer, and Drip Tape
Installer
For shallow subsurface systems, mainlines
and submains can be above ground vinyl
layflat, poly hose, or buried PVC. Deep subsurface systems should use PVC for mainlines
and submains. If using PVC submains above
ground, protect them from sunlight with a
light covering of dirt. Do not use steel or aluminum pipe. Use the following steps to install
drip laterals.
1. Mount the spool on the shaft that feeds the
injection shank.
2. Setup and align the shanking tool so that, when
installed, the drip tape emitters face upward.
R O - D R I P
®
U S E R S
G U I D E
4.3
I N S T A L L A T I O N
A N D
S T A R T U P
3. Secure the beginning of the lateral(s) with a weighted object or a stake.
4. Start and stop the tractor smoothly to prevent stretching or jerking of the drip tape through the installation
tube. Do not apply excessive drag on the spool. Avoid stretching the drip tape.
5. Leave extra length at both ends of the laterals to allow for expansion and contraction and for connection to
the manifold.
6. After the first lateral is installed, evaluate it for excess drag set on the spool. Check the tension of the lateral
by hand. Periodically re-evaluate drag throughout the installation.
Tape installation procedure - surface
Use the same basic procedure as with subsurface installation. With surface installation,
however, the means of securing the laterals
are different. Place a shovel full of dirt over
each laterals every 10-15 ft (3-4.5 m) to minimize their movement by wind or thermal
expansion and contraction as shown in figure
4.3 (Manual Installation, above).
RD4.3
The Roberts Difference:
RO-DRIP is available with
the wide variety of emitter
Installation of Tape with Plastic Mulch
For many crops, the combination of drip
irrigation and plastic mulch gives the greatest
degree of control over the root zone environFigure 4.6 Mechanical Installation of Tape
ment, and results in higher yields and more
efficient use of water and chemicals.
Injection shanks can be mounted on tool bars along with plastic layers and bed shapers.
Packaged systems are available from several vendors that lay plastic and inject tape (fig. 4.7).
Some of these systems also shape beds.
spacings required for nurs-
Note:Drip tape should be buried if it is used with clear plastic mulch. Water droplets on the surface of
the plastic act as magnifying lenses which can
focus sunlight to burn and damage drip tape.
ery and greenhouse applications. This includes a
4-in emitter spacing for
Greenhouse/Nursery Installations
Drip tape is an effective method of irrigating
nursery and greenhouse plants. It is commonly
used to irrigate both potted plants and field
plants. The increased level of control made
possible with drip tape results in higher quality
crops with reduced incidence of disease.
closely spaced plants.
Potted plants
Figure 4.7 Simultaneous Installation of Drip Tape and
Plastic Mulch
To irrigate potted plants, drip tape is laid
across pots or containers and secured tightly
at each end (fig. 4.8). In some installations it
helps to string a wire over the containers and
fasten the drip tape to the wire rather than
laying it directly on the containers. Emitters
should face to one side (instead of facing up),
to prevent water from running along the tape
and missing the pots.
Field nurseries
In field nursery applications, drip tape is
either laid on the surface or buried 2-3 in (5-8
cm) below the surface.
(see figure 4.9)
4.4
R O - D R I P
®
U S E R S
G U I D E
I N S T A L L A T I O N
A N D
S T A R T U P
CONNECTING LATERALS TO SUBMAINS
Figure 4.8 Direct Use of Dip Tape for Potted Plants
Drip tape laterals can be connected to
submains using fittings and/or transfer tubes.
Connect laterals to the submains as part of an
integrated startup procedure that includes
flushing mains and submains (See Startup
Procedure later in this section).
Drip tape laterals can connect to rigid
PVC, layflat, or polyethylene hose submains
with a few basic fitting types. See the Roberts
Irrigation Product Catalog for a complete list
of Roberts fittings and tubing.
Connecting to PVC submains
Drip laterals can be connected to PVC submains either directly with fittings or through
transfer tubing (fig. 4.10). Both glued fittings
and gasketed fittings can be used. In either
case, fittings are available that directly connect PVC submains to the following:
• Drip tape using a lock-sleeve fitting
• Transfer tubing using an external compression fitting
• Transfer tubing using an internal barb
Figure 4.9 Field Nursery Installation
See Connecting a Transfer Tube to a
Lateral below for instructions on connecting a
transfer tube to a drip tape lateral once it has
been connected to the submain.
Figure 4.10. Common Fittings for PVC Submains
R O - D R I P
®
U S E R S
G U I D E
4.5
I N S T A L L A T I O N
A N D
S T A R T U P
For either fitting type, an appropriately sized hole must be drilled that is free of gaps, cracks
or splits (fig. 4.11). Only clean holes will allow a proper connection.
Use the procedure shown in figure 4.12 to connect a fitting or 4.13 to directly connect a transfer tube to a PVC submain.
Figure 4.11 Creating a Hole in a PVC Submain
Figure 4.12c-d Connecting a Glued Fitting
to a PVC Submain
Figure 4.12a-b Connecting a Gasketed Fitting
to a PVC Submain
Figure 4.13 Directly Connecting a Transfer Tube
to a PVC Submain
Connecting to Polyethylene Hose Submains
There are 2 basic methods for connecting a drip lateral to a poly hose submain: using a direct
transfer tube or using a fitting. Fittings are available that directly connect polyethylene hose
submains to the following:
• Drip tape using a lock-sleeve fitting
• Transfer tubing using an external compression fitting
• Transfer tubing using an internal barb
Figure 4.14 shows several fittings available for connecting laterals to poly hose submains.
Figure 4.14 Common Fittings for Poly Hose Submains
4.6
R O - D R I P
®
U S E R S
G U I D E
I N S T A L L A T I O N
A N D
S T A R T U P
Create a hole in the poly hose submain that is slightly smaller than the outside diameter (OD)
of the transfer tube or barb fitting (fig. 4.15).
Use the procedure shown in figure 4.16 to connect a fitting to a poly hose submain or figure
4.17 to directly connect a transfer tube. See Connecting a Transfer Tube to a Lateral below for
instructions on connecting the transfer tube to a drip tape lateral once it has been connected to
the submain.
Figure 4.15 Creating a Hole in a Poly Hose Submain
Figure 4.16 Connecting a Fitting to a Poly Hose Submain
Figure 4.17 Connecting a Transfer Tube to a Poly Hose Submain
Connecting to Layflat Hose Submains
There are 2 basic methods for connecting a drip lateral to a layflat hose submain: using a
direct transfer tube or using a fitting. Figure 4.18 shows some common fittings for connecting a
layflat hose submain to a transfer tube or lateral.
Figure 4.18 Common Fittings for Layflat Submains
R O - D R I P
®
U S E R S
G U I D E
4.7
I N S T A L L A T I O N
A N D
S T A R T U P
Use the procedure shown in figure 4.19 to connect a fitting to a layflat submain or figure 4.20
to directly connect a transfer tube. See Connecting a Transfer Tube to a Lateral below for instructions on connecting the transfer tube to a drip tape lateral once it has been connected to the
submain.
A
B
C
RD4.4
E
D
The Roberts Difference:
Roberts Irrigation Products
manufactures a premium
quality line of polyethylene
hose products which are
available in all of the sizes
commonly used for drip
Figure 4.19 Connecting a Fitting to a Layflat Submain
irrigation transfer tubes.
A
B
Figure 4.20 Directly Connecting a Transfer Tube Layflat Submain
CONNECTING A TRANSFER TUBE TO A LATERAL
Transfer tubes connect submains to laterals. Smaller transfer tubes (1/8" to 3/8" tubing) can
be directly connected to laterals. Larger tubes (0.510"x0.610" for standard 5/8-in drip tape) are
connected using wire ties. Finally, a lateral can be connected to a transfer tube with a barbed lock
sleeve fitting.
4.8
R O - D R I P
®
U S E R S
G U I D E
I N S T A L L A T I O N
A N D
S T A R T U P
Use the procedure shown in figure 4.21 to directly connect a small-diameter transfer tube to a
lateral.
A
B
D
C
E
RD4.5
Figure 4.21 Steps for Connecting a Lateral to a Transfer Tube Without Fittings
The Roberts Difference:
Use the procedure shown in figure 4.22 to connect a transfer tube to a lateral using a wire tie.
The unique polyethylene
material blend used to
make RO-DRIP provides
A
B
C
strength as well as flexibility
and memory. The result is
reliable, leak-free connections to transfer tubes and
fittings.
Figure 4.22 Steps for Connecting a Lateral to a Transfer Tube Using a Wire Tie
Use the procedure shown in figure 4.23 to connect a transfer tube to a lateral using a lock
sleeve fitting.
A
B
C
Figure 4.23 Steps for Connecting a Lateral to a Transfer Tube with a Fitting
R O - D R I P
®
U S E R S
G U I D E
4.9
I N S T A L L A T I O N
A N D
S T A R T U P
SPLICING LATERALS
Drip tape laterals can be spliced using tubing (.510" x .610" OD) and wire ties (fig. 4.24), or by
using a locking sleeve fitting (fig. 4.25).
Figure 4.24 Splicing a Lateral Using Poly Hose
and Wire Ties
Figure 4.25 Splicing a lateral Using a Locking Sleeve Fitting
A
B
C
D
Figure 4.26 Closing a Lateral Using a Closing Band
TERMINATING LATERALS
Drip tape laterals can be terminated using a closing band (fig. 4.26) or a lock sleeve end cap
fitting (fig. 4.27).
Figure 4.27 Closing a Lateral Using an End Cap
4.10
R O - D R I P
®
U S E R S
G U I D E
I N S T A L L A T I O N
A N D
S T A R T U P
STARTUP PROCEDURE
Before you begin irrigating it is important to thoroughly flush the system, check for leaks or
breaks, and ensure that all components are working properly. Make sure you have gone through
all of the following steps before you use your drip system to irrigate your field.
1. Open mainline flushing valves with submain valves closed until discharge water runs clear for 5 minutes. Close
the mainline flushing valves. In large systems, dye can be added in the filter station – when the dye is no
longer visible at the end of the line, flushing is complete.
2. Connect laterals to the submains, without terminating the ends.
3. For each submain, open the control valve until the discharge water at the end of each lateral runs clear. If the
capacity of your water supply is not high enough to flush all laterals simultaneously, it may be necessary to
terminate some of the laterals so that you can flush only a few laterals at a time. Close the submain control
valves.
4. Close the laterals or connect the ends of the laterals to the flushing manifold, if used.
5. Operate the system until it is fully pressurized and all air is discharged.
6. Check the system for leaks and repair them if necessary.
7. Re-flush after all leaks are repaired.
8. Check all pressure gauges and adjust pressure regulators or regulating valves, if necessary.
9. Check for proper operation of all system components: pumps, controllers, valves, air vents, pressure
regulators, pressure gauges, flow meters, filters, and chemical injectors.
10. Record readings from all pressure gauges and flow meters.
R O - D R I P
®
U S E R S
G U I D E
4.11
5
MANAGEMENT
The three critical components of a drip system management program are scheduling, monitoring,
and maintenance. Each has requirements that differ from traditional furrow and sprinkler irrigation.
Scheduling must be carefully planned to keep the soil in the root zone near field capacity, providing
ideal conditions for plant growth. Monitoring of pressures, flow rates, and soil moisture is necessary to continually fine tune your irrigation schedule. Finally, a regular maintenance program is
required to keep the drip emitters clean and free of clogs that can reduce efficiency and damage
your system.
This section tells you how to schedule, monitor, and maintain your drip irrigation system for
years of successful operation. Emphasis is placed on diligent planning and adjustment of your
program to maximize crop performance and avoid potentially costly problems. The section finishes
The Roberts Difference:
with management and maintenance issues associated with chemical/fertilizer injection and
RO-DRIP®and RO-DRIP® XL
salinity management.
provide the most reliable,
KEY CONCEPTS
cost-effective solution for
• Take the time to learn, train and implement some new ways of irrigation management.
subsurface and above
• The three components of a successful drip irrigation management program are scheduling, monitoring, and
maintenance.
ground irrigation.
• The goal of drip irrigation scheduling is to replace soil moisture as it is lost to evapotranspiration. Small amounts
of water are applied frequently, often daily.
• Regularly monitor pressures, flow rates, soil moisture, and other factors to take full advantage of the high level of
control that drip irrigation offers.
• The central goal of a drip irrigation maintenance program is to keep the emitters clean, so they will continue to
deliver water and nutrients uniformly to your plants.
5.1
M A N A G E M E N T
SCHEDULING
The goal of drip irrigation scheduling is to select an irrigation duration and frequency that
results in a properly sized wetted area around plants and keeps the soil in the root zone at or
near field capacity. The right schedule for your system depends on your specific crop requirements,
soil texture, field preparation and weather conditions. Adjustments throughout the season based
on monitoring of field conditions allow you to fine-tune the irrigation schedule to the needs of
your crop.
NOTE: Deficit irrigation can be used to increase the soluble solid content of fruits or vegetables by
deliberately maintaining soil moisture below field capacity. This is usually done at the end of the growing
season, shortly before harvest, and is common with grapes, sugar cane, tomatoes, cotton and several other
crops. Precise control of application rates make drip irrigation ideally suited for deficit irrigation when
necessary.
To determine how much water to apply during irrigation, first calculate the amount needed
by your crop for evapotranspiration, and use this as a starting amount. After irrigating, you will
be able to fine-tune the schedule by examining the wetted pattern, measuring soil moisture, and
making adjustments accordingly.
Determining Your Crop’s Daily Requirements
For most crops, the soil in the root zone should be kept near field capacity at all times (see
PLANNING: Water Requirements). This means that irrigation should be frequent, and the
amount of water applied each time should be equal to the amount used by the plants since the
last irrigation. Therefore, it is important to know the rate at which water is lost to
Evapotranspiration (ET).
The ET rate of a reference crop for you area is usually available from a local agricultural
agency or, in some areas, through the Internet. Portable weather stations are also available which
can be more accurate, since ET can vary from field to field. Use the following formula to calculate
the ET rate of the specific crop in your field:
ET = Kc × ETo
where ETo is the reference crop evapotranspiration and Kc is a crop factor, or crop coefficient that
depends on the specific crop you are irrigating.
The value of the crop factor varies throughout the season as your crop matures. You can estimate
it by starting with the value shown in table 5.1 and multiplying it by the percent of ground covered
by your plants. If the resulting number is less than 0.2, use a value of 0.2. Calculate the percent
ground coverage as the distance across the bed that is covered by the crop divided by the bed
spacing times 100. For example, cucumbers early in the season which cover 50% of the ground
surface will have a crop coefficient of 0.5 x 0.9 = 0.45.
Table 5.1 Estimated Peak Crop Factors for Various Plants
ESTIMATED PEAK CROP FACTORS (Kc) FOR VARIOUS PLANTS
Crop
Kc
Crop
Kc
Cabbage
.95
Pepper
.95
.95
Potato
1.05
Cantaloupe
5.2
Carrot
1.00
Strawberry with plastic mulch
1.05
Celery
1.00
Strawberry without plastic mulch
1.10
Cotton
1.05
Sugar cane
1.05
Corn
1.00
Squash
.90
Cucumber
.90
Tomato
1.05
Lettuce
.95
R O - D R I P
®
U S E R S
G U I D E
M A N A G E M E N T
If you do not find your crop in table 5.1, you can estimate Kc as the percentage of ground
covered. Both crop coefficients and reference ETo values are now available on the Internet for
many areas. These web sites provide both real-time and historical information and can be very
useful design and management tools.
If a reference evapotranspiration (ETo) rate is not available for your area, use a potential
RD5.1
The Roberts Difference:
Table 5.2 Potential Evapotranspiration (PET)
Roberts Irrigation manufac-
POTENTIAL EVAPOTRANSPIRATION (PET)
tures several high flow rate
Climate
in per Day
mm per Day
products with close emitter
Cool humid
0.10 - 0.15
2.5 - 3.8
spacings that are specially
designed to form good
Cool dry
0.15 - 0.20
3.8 - 5.1
Warm humid
0.15 - 0.20
3.8 - 5.1
Warm dry
0.20 - 0.25
5.1 - 6.4
wetted patterns in soils
Hot humid
0.20 - 0.30
5.1 - 7.6
with high sand content.
Hot dry
0.30 - 0.45
7.6 - 11.4
These include 8-in 40 GPH
evapotranspiration rate (PET) from table 5.2 as an approximation of ETo.
RO-DRIP (20 cm 497 LPH)
Developing and Maintaining a Proper Wetted Area
In general, short irrigation cycles with high application rates help promote lateral movement
of water, resulting in better wetting patterns for light soils. "Pulse irrigation," where the system is
operated several times a day for short durations, can further widen the wetted pattern. Long
duration at a low application rate results in better infiltration of water in heavy (high clay content)
soils. The right irrigation cycle depends on the specifics of your field – experiment to find out
what works best.
and 4-in 60 GPH RO-DRIP
(10 cm 745 LPH).
Determining Your Irrigation Schedule
RD5.2
How often to irrigate (irrigation frequency)
The irrigation frequencies used in drip irrigation are typically quite different from those used
in other methods of irrigation. The increased control offered by drip systems allows you to apply
small amounts of water daily or several times a week without significant loss to evaporation or
surface runoff. As a result, irrigation can be scheduled to replace water as it is used by the plant
on a daily basis. This ability to use frequent irrigation to keep the soil moisture level near field
capacity is a unique advantage of drip irrigation.
In most cases, irrigation can take place several times a day, once a day, or several times a
week. Research has shown that there is little difference between these as long as enough water is
applied each time, although there are some exceptions. During consecutive days of hot dry
weather, or when young seedlings are grown in coarse textured soil, daily irrigation is good
practice to ensure your plants are not stressed. Irrigating several times daily may result in
reduced distribution uniformity, since the repeated filling and draining of submains and laterals
with each irrigation results in heavier irrigation at the low points of the field. As described
above, however, "pulse irrigating" can help with the development of a good wetting pattern,
making it a good choice in some cases.
The Roberts Difference:
Roberts Irrigation manufactures several low flow rate
products with wider emitter
spacings which are specially designed to form good
wetted patterns in heavy
soils with high clay content.
These include 12-in 15
GPH RO-DRIP (30-cm 186
NOTE: Drip irrigation only wets soil near the plants. Roots only develop in the wetted area and, as a
result, can be more localized than with other irrigation methods. This normally does not cause problems,
but it makes irrigation frequency critical. Because the water holding capacity in the root zone is smaller, an
extended period of time without irrigating can easily cause plant stress. During hot weather conditions,
daily irrigation may be necessary to avoid crop damage from water stress.
LPH), 16-in 10 GPH RODRIP (41-cm 124 LPH) and
24-in 17 GPH RO-DRIP (61cm 211 LPH).
How long to irrigate (irrigation duration)
Once you have determined an irrigation frequency, you must determine the duration of each
R O - D R I P
®
U S E R S
G U I D E
5.3
M A N A G E M E N T
Table 5.3 The Effect of Wetted Area on Crops
Small Wetted Area
Large Wetted Area
•Restricts roots to a small volume of soil
•Wastes water and fertilizer
•Reduces uptake of needed minor nutrients from soil
•Increases the number of weeds
•Increases potential for plant water stress during
periods of high temperature and wind
•Does not improve crop performance
Ideal Wetted Area
•The ideal wetted area is shaped as shown
Sandy Soil
Clay Soil
•The wetted area should be maintained at the same size
throughout the season to prevent salts near the edges from
damaging the crop
•Soil type and field preparation affect the shape of the cross
section dramatically
irrigation that will apply enough water to replace evapotranspiration (ET) and compensate for
system inefficiency (see DESIGN: Irrigation Efficiency). Use the following steps to determine the
proper irrigation duration:
1. Estimate the amount of water used by your crop between irrigation cycles by multiplying the daily ET rate (see
Determining you crop’s daily requirements, in this section) by the number of days between irrigation cycles.
2. Compensate for irrigation inefficiency by dividing the resulting application amount by the irrigation efficiency
(IE). Estimate IE as being equal to the distribution uniformity (DU) that you have designed for.
3. Divide the amount of water to be applied by your system application rate (AR; see DESIGN: Lateral Design).
The resulting irrigation duration, given in hours, is a starting estimate for your irrigation
schedule. After irrigating, it will be necessary to make adjustments as described later in this section.
EXAMPLE
Cantaloupes will be irrigated every other day using a drip irrigation system with the following
specifications:
ET
Spacing between laterals:
Emitter spacing:
Drip tape flow rate:
Distribution uniformity:
0.19 in/day
60 in (152 cm)
12 in (30 cm)
24 GPH per 100 ft (298 LPH per 100 m)
90%
Determine the required irrigation duration.
SOLUTION
Since irrigation is performed every other day, .19 x 2 = .38 in (9.7 mm) of water must be
replaced at each irrigation.
The distribution uniformity is 90%, so .38/.9 = .42 in (10.7 mm) must be applied by the drip
system at each irrigation.
Using the formula in DESIGN: Lateral Design, the application rate (AR) of the system is
calculated as:
The required duration, T, is the amount of water to be applied at each irrigation divided by
5.4
R O - D R I P
®
U S E R S
G U I D E
M A N A G E M E N T
the application rate:
T=
A mount to be applied
AR
=
.42 in
.077 in per hr
=
.42
.077
= 5.45 h r
or approximately 5 1/2 hours.
Adjusting your irrigation schedule
Confirming the amount of water applied
It is important to verify your irrigation schedule by taking direct readings from flow meters.
Confirm that the system is applying the amount of water each day that you intended it to in
your schedule, as described in Monitoring, below. Make adjustments as necessary.
Adjusting your schedule
Since ET can vary from day to day and even from field to field within the same geographic
area, it is always necessary to adjust your schedule based on observations of the wetted pattern
and measurements of soil moisture.
The section below: Monitoring, Soil Moisture, describes how to use moisture sensing devices
to measure the amount of water in your soil. If soil moisture measurements in the middle of the
root zone indicate the water level is consistently below field capacity or the soil is consistently
saturated, adjust your irrigation schedule by changing the irrigation duration as shown in table
5.4.
Try making small modifications over several cycles before making any drastic revisions to the
schedule.
Table 5.4 Adjusting Your Schedule with Soil Moisture Response
Sensor Response
Cause
Scheduling Change
Consistent high moisture (low tension)
readings indicating field is saturated
Too much water applied
Decrease duration
Moisture level does not return to field
capacity after each irrigation
Too little water applied
Increase duration
MONITORING
To achieve the high yields and water savings possible with drip irrigation, it is necessary to
monitor your system and make adjustments to fine tune the amount of water and nutrients
applied. In addition, careful system monitoring gives advance warnings of potential problems.
Monitoring Performance
Monitor the performance of your system by taking readings from all of the flow meters and
pressure gauges at regular intervals.
Flow meters
There should be at least one flow meter installed on the mainline to indicate the total amount
of water being applied to the field. Once your irrigation schedule has been determined, read the
flow meter to confirm that the system is applying the amount of water it was designed to apply.
Because of the large number of variables at play in an irrigation system, the measured application rate cannot be expected to be exactly the same as the predicted rate. However, a large
difference indicates either a problem in your calculations or a physical system problem such as a
broken or clogged line. If the results are not what you expect, identify and fix the problem.
Flow meter readings can also indicate problems that can occur mid-season. To make use of
this valuable information, to measure and record flow meter readings for the new system, and
on a regular basis thereafter. Table 5.5 shows some of the problems that can be diagnosed by
keeping track of system flow rates. Any of these problems should be addressed immediately to
R O - D R I P
®
U S E R S
G U I D E
5.5
M A N A G E M E N T
avoid serious crop damage.
Note: Tables 5.5 and 5.6 are intended to present examples of problems that can be diagnosed through
regular monitoring. They are not a comprehensive list of problems that can occur with your specific drip
irrigation system.
Most flow meters provide instantaneous readings of flow rate, as well as a reading of total
flow. The totalized reading is more accurate than the instantaneous reading and can be used to
calculate the average flow rate or application rate over a given time. This reading can also be
used to indicate the total water usage during an entire season.
Table 5.5 Problems Diagnosed from System Flow Rates
Indication
Possible Problem
•Emitter plugging
Gradual decrease in flow rate
•Could indicate pump wear or filter clogging - check
pressures
•Stuck or plugged control valve
Sudden decrease in flow rate
•Other flow restriction - check pressures
•Water supply failure - check pressures
Gradual increase in flow rate
•Incremental damage to laterals from insects or other pests
•Damaged or broken lateral
Sudden increase in flow rate
•Damaged or broken submain
•Damaged or broken mainline
•Pressure regulator failure
Table 5.6 Problems Diagnosed from System Pressures
Indication
Large pressure drop across filters
Gradual pressure decrease at filter input
Possible Problem
•Debris buildup in filters
•Inadequate flushing of filters
•Pump wear
•Other water supply problems
•Damaged or broken lateral
•Damaged or broken submain
Sudden pressure decrease at filter output
•Damaged or broken mainline
•Pressure regulator failure
•Water supply failure - check flow rates
Gradual pressure increase at filter output
Sudden pressure increase at filter output
Sudden pressure decrease at submain
5.6
R O - D R I P
®
U S E R S
G U I D E
•Emitter plugging
•Other flow restriction - check flow rates
•Stuck control valve
•Other flow restriction - check flow rates
•Damaged or broken lateral - check flow rates
M A N A G E M E N T
Pressure gauges
Pressure gauges, or ports for a pressure gauge, should be installed on the mainline both
before and after the filters. The pressure gauge or port after the filters should be located near the
mainline flow meter, since flow and pressure changes can work together to reveal a variety of
potential problems. Additional information can be obtained by installing a pressure gauge at
each submain riser. As with flow meters, all pressure gauges should be read and recorded for the
new system, and on a regular basis thereafter.
Table 5.6 (previous page) shows some of the problems you can diagnose by keeping track of
system pressures. Act on any of these problems immediately to avoid serious crop damage.
Note: Table 5.6 is intended as an example of some problems that can be diagnosed through regular monitoring. It is not a comprehensive list of problems that can occur with your specific drip irrigation system.
Monitoring Soil Moisture
Soil moisture measurements should be made at the following times:
• Before the first use of the system to determine field capacity (see PLANNING: Field capacity)
• After the first few irrigation cycles to verify your irrigation schedule and to make necessary
adjustments
• Periodically throughout the season to make schedule adjustments as the water requirements of your plants
change
Soil moisture content and tension
Most commercial moisture sensors provide a reading either of tension (matric potential) or
moisture content. Tension is a measure of the work a plant must do to remove water from the
soil and is usually expressed in bar or centibar (1 bar = 100 centibar). The drier the soil is, the
more work plants must do to remove water, and the higher the tension. Tension is a useful
measurement, since it is the aspect of soil moisture that directly affects your crops.
Moisture content is a measurement of the water contained in the soil as a percentage of the
volume of the entire soil solution. Moisture content can directly indicate how much water you
need to apply at the root zone to return it to field capacity.
Sensor placement
Measure soil moisture at several depths and locations in the field. With a portable moisture
sensor, you can accomplish this by taking a number of measurements with the same sensor. If
you are using a low-cost sensor such as a tensiometer or gypsum block, you can install several
Table 5.7 Important Soil Moisture Levels
Tension
Condition
Moisture Content
Saturation
0-3 cb
15-60% depending on soil type
Field Capacity
10-25 cb depending on soil type
10-50% depending on soil type
Permanent Wilting
15 bar (approx.)
2-30% depending on soil type
sensors in the field, each at a different depth and location. Take readings in sets of three
measurements - just below the surface, in the middle of the root zone, and below the root zone in
the row between plants (table 5.8). Use two or more sets within an irrigation block to verify that
measurement sites are representative. Additional sites may be helpful in non-uniform soil.
Soil moisture sensors
A variety of sensors are commercially available for measuring soil moisture. Each sensor
either measures moisture content or tension directly. Table 5.9 summarizes several types of
moisture sensors. Numerous other types are available (fig. 5.1) .
R O - D R I P
®
U S E R S
G U I D E
5.7
M A N A G E M E N T
Table 5.8 Sensor Depth
Depth below surface*
6 in (15 cm)
12 in (30 cm)
18 or 24 in
(46 or 61 cm)
Result
Reflects soil moisture conditions in the root zone during early plant growth or
throughout the season for shallow rooted crops.
Monitors the root zone as plants mature and their roots enlarge. Use this depth to monitor
irrigation during most of the plant’s life.
Monitors the degree of leaching below the root zone – should not change during
normal irrigation.
* Actual depth may vary depending on crop type and rooting depth.
Monitoring Soil Salinity
Even with low-salinity water, salt can accumulate in the soil unless some leaching occurs. In
addition to the salts that are part of almost all irrigation water, fertilizers can also add to salt
content. Relatively low concentrations can damage some crops by making the soil water less
available to the plant root system. By the time the effects of salinity are actually seen in the
plants, damage to yield has already occurred. In problem areas, periodically send samples of the
soil solution to a lab for analysis of salt concentration. Several commercial EC sensors are also
available that can give reasonably accurate results in a short amount of time.
MAINTENANCE
Maintenance of your drip irrigation system is critical. Drip systems require more diligent
attention than other forms of irrigation, and failure to properly maintain all components can lead
to system failures that result in expensive repairs or even crop damage. The purpose of most
maintenance functions is to keep emitters clean, although other functions such as pest control
and repair of damaged laterals are also important.
Keeping the emitters clean
Great care must be taken to prevent drip emitters from plugging with dirt, organic matter or
precipitates. A slight plugging problem will eventually result in greatly reduced distribution
uniformity. A serious plugging problem can result in complete failure of your drip irrigation
system. Such a failure can occur mid-season when it is not possible to make repairs or replacements.
Include the following steps in your maintenance program to prevent this from happening.
Filter maintenance
The importance of proper filtration was discussed in the DESIGN section. Once your filters
5.8
R O - D R I P
®
U S E R S
G U I D E
M A N A G E M E N T
Table 5.9 Moisture Sensors
Method or Device
How it works
Advantages
•No instrumentation cost
•Cannot be automated
"BY FEEL"
(moisture content)
With experience it is
possible to learn, with a fair
degree of accuracy, how your
soil looks and feels when it
is at field capacity. Look and
feel includes observation of
the soil as well as the crops
for signs of stress.
•Observation of soil and
plants may reveal problems that could be
missed with
automatic sensors
•Will yield inconsistent
results if several
people are taking measurements
Soil capillary action removes
water from a cup through a
porous material creating a
vacuum that is equal to the
tension of the soil matrix. A
vacuum gauge gives tension
readings in bar or centibar.
•Low cost
•Not accurate in dry soil
(above 80 cb)
•Very low cost
GYPSUM BLOCK
(Tension)
Soil water permeates a
porous block of gypsum with
two embedded
electrodes that measure
resistance. A resistance
meter is calibrated to give
readings of tension in bar or
centibar.
•High accuracy
•Relatively high cost
•Fast measurement time
•Readings can be affected by salinity
TDR SENSOR
(moisture content)
Measures the dielectric constant of the soil
solution by measuring the
time required for an
electrical pulse to travel
through a spike or probe.
Uses this measurement,
along with the known dielectric constant for water, to
report percentage moisture
content.
Measures the dielectric constant of the soil solution by
measuring the change in frequency of an RF pulse. Uses
this measurement, along with
the known dielectric constant
for water, to report percentage moisture content.
•High accuracy
•Relatively high cost
•Readings not affected
by salinity
•Calibration required
Uses measurements of the
permeation of soil by a
radioactive source to
determine hydrogen content,
which is proportional to moisture content.
•High accuracy
•High cost
•Non-destructive
•Calibration required
•Tests a relatively large
volume of soil
•Must be installed in
field for each reading
TENSIOMETER
(Tension)
FDR SENSOR
(moisture content)
NEUTRON PROBE
(moisture content)
•Reliable for tension
below 80 cb
•Not affected by salinity
•Can easily be read
remotely
Disadvantages
Notes
•Accurate in the
moisture range of
interest to
irrigation
•Relatively high maintenance requirement
•Can use electronic
vacuum transducer for remote
reading
•Poor accuracy in wetter
soil (below 1.0 bar)
•Readings can be affected by salinity
•High maintenance
requirement
•Can easily be read
remotely
•Currently the most
common method
•Provides a qualitative reading of
"wet" or "dry"
•Limited effectiveness for drip irrigation, since soil
is kept near field
capacity
•Cost is becoming
lower
•Calibration required
•Low maintenance
requirement
•Cost is becoming
lower
•Can easily be read
remotely
•Low maintenance
requirement
•Generally too
expensive and
complex for
practical farm use
•Radioactive – requires
licensing
R O - D R I P
®
U S E R S
G U I D E
5.9
M A N A G E M E N T
are operational, it is critical that you maintain them properly. This includes a regular program of
backflushing and/or cleaning filters to keep contaminants out of your drip laterals. Regular
monitoring of pressure differentials across filters is important to indicate whether your backflushing program is adequate. In addition, sand media should be replaced periodically as it
becomes worn. Check the owners’ manual of your specific filter.
Water treatment
Algae, bacteria, and mineral deposits can build up inside of laterals and eventually plug
emitters, even if a very high level of filtration is used. The rate at which this occurs depends on
your water source and climate. In many cases, buildup of organic matter and minerals can be
reduced or eliminated with regular injection of chlorine or acids, or both.
Chlorine Injection
The best defense against buildup of algae and many types of bacteria is chlorine. Chlorine is
available in three forms: sodium hypochlorite (liquid chlorine commonly used for household
bleach), calcium hypochlorite (dry chlorine used for swimming pools), and gas chlorine. Sodium
hypochlorite and calcium hypochlorite are high in salts and must be used carefully with salt-sensitive plants or in soils that are already high in salt. Gas chlorine is an extremely hazardous substance and must be contained and used with great care.
RD5.3
The Roberts Difference:
RO-DRIP employs the
largest emitter cross-section available on the market to deliver unmatched
resistance to plugging.
While this does not eliminate the need for maintenance, it can mean the
difference between success
and expensive failure in
Use chlorine as follows:
• To control algae, iron bacteria, and sulfur, add chlorine until a concentration of 2-10 ppm free chlorine is
achieved at the end of the furthest lateral from the injection point. Maintain this level for 30-60 minutes. This
can be done once every two to three weeks or as frequently as after each irrigation cycle, depending on the
chlorine concentration used and level of organic material in the irrigation water.
• Alternatively, chlorine can be applied continuously to obtain concentrations of 0.5 to 1 ppm at the ends of the
furthest lateral.
• Use higher concentrations if the organic material content of the irrigation water is high.
• Use higher concentrations of chlorine if the pH of the water is 7.5 or greater, or lower pH by injecting acid.
• To eliminate severe algae growth, consider using a one-time "superchlorination" of up to 50 ppm for 4-6 hours
at elevated pressure and pH below 6.5, followed by thorough flushing with clear water.
applications where water
quality is a problem
Chlorine is more effective at killing algae and bacteria when the pH of the water is 6.5 or
lower. Alkaline water should be acidified for effective chlorination (see Acid Injection below).
NOTE: Always inject chlorine and other chemicals upstream of filters to avoid problems from chemical
precipitation and to clean filter elements.
CAUTION: Inject acid and liquid chlorine through two different injection ports. Mixing acid
and chlorine in the same tank will release dangerous chlorine gas. Acids and chlorine
should never be mixed together.
Acid Injection
It may be necessary to add acid to irrigation water to lower its pH to prevent the precipitation
of calcium carbonate (CaCO3), calcium phosphatic compounds, or iron oxides (Fe2O3) that can
plug emitters. In addition, low concentrations of acid can increase the effectiveness of chlorine in
alkaline water. The three acids generally used are sulfuric, muriatic, and phosphoric. Extra care
5.10
R O - D R I P
®
U S E R S
G U I D E
M A N A G E M E N T
should be taken when using phosphoric acid because precipitation of minerals in the water can
occur. Care should also be take with muriatic acid, which is high in salt.
NOTE: When adding acids for extended periods of time (as part of irrigation) inject them downstream
of filters to avoid corrosion of metal filter components. Always perform a "jar test" before injecting chemicals
into your system to ensure they do not precipitate when added to your irrigation water. This is particularly
important with acids that are injected downstream of any filtration.
NOTE: Some filters, such as stainless steel media filters, are specifically designed to resist corrosion from
acids. These filters are ideal because they allow acids to be injected upstream. Consult your filter supplier.
NOTE: Some filter media materials can buffer back acids and reduce their effectiveness.
NOTE: Inject acid into the center of the mainline flow or into a mixing chamber to prevent it from
damaging pipe walls before it becomes diluted in the irrigation water.
CAUTION: Never inject acid into aluminum pipe.
Injecting acids in high concentrations can sometimes correct problems that have occurred due
to poor quality irrigation water or mismanagement of a drip system. See Clearing Clogs if they
Occur, below.
NOTE: Acid is heavier than water. When high concentrations are added, it can "lay down" and
remain in your drip system after injection is complete. If high pH fertilizers are later added, precipitation
can occur.
Flushing laterals
Even when a properly designed filtration system is used, fine silt and clay particles can get
past the filters and settle in the laterals. If they are allowed to build up, they can eventually plug
emitters and damage the system. In multiple year subsurface applications, the system should be
run with the ends of the laterals open after each season, in order to flush these particles out. In
areas where water quality is a problem, lateral flushing may be required more often. Systems
using extremely dirty water may require flushing as often as every 2 weeks or even after each
irrigation. Paying extra attention to prevention of plugging is always less costly than having to
replace an entire system once it becomes plugged.
Flush laterals by opening the ends and running the system until the discharge water runs
clear. Opening the ends is easier if removable end caps or flushing manifolds were specified in
the design stage (fig. 5.2). The flow velocity at the end of each lateral should be at least one foot
per second (0.3 meters per second) which is achieved with a flow rate of 1 GPM (3.8 LPM) at the
end of each 5/8-in (16 mm) lateral or 2 GPM (7.6 LPM) at the end of each 7/8-in lateral. A rule of
thumb that has been successfully used by many growers is that a stream of water should squirt 2
to 3 feet from the end of the lateral. You can flush several laterals simultaneously as long as your
water supply capacity is sufficient.
Clearing clogs if they occur
You can almost always avoid emitter plugging through proper system design and maintenance.
In the event that plugging does occur, however, it is sometimes possible to dislodge or dissolve
clogs by adding chemicals.
Injecting acids in higher concentrations can sometimes correct plugging problems caused by
R O - D R I P
®
U S E R S
G U I D E
5.11
M A N A G E M E N T
RD5.4
The Roberts Difference:
Figure 5.2. Open Laterals and a Flushing Manifold in Action
The emitters of RO-DRIP
drip tape incorporate a
unique expandable flow
channel (fig. 5.3) which
provides a second line of
defense against plugging
during high-contaminant
conditions. If plugging
occurs, increase the supply
pressure to the maximum
recommended pressure
(see RO-DRIP PERFORMANCE SPECIFICATIONS
for maximum pressure values) for several minutes. In
most cases the channel will
expand open to purge
algae and bacterial growth or mineral deposits. High acid concentrations can also kill roots that
have grown into lateral outlets (root intrusion).
Note: acid is very dangerous and extreme care must be taken. Always add acid to water. Never add
water to acid. When possible, have your chemical company mix acids for you.
Note: Many states require permits for the use and storage of concentrated acids (usually over 52% concentration). Storage, labeling and safety equipment requirements are often specified by law.
Use the following procedure to correct plugging problems with acid. Only use this procedure
between crops.
1. Flush all mains, submains, and laterals with clear
water before injecting acid.
2. Inject sufficient sulfuric, phosphoric, or muriatic
acid to achieve a pH below 4.0 for a period of 30-60
minutes.
3. Leave the acid solution in the system for 24 hours.
4. Increase the system pressure to the maximum pressure allowed for your drip tape for several minutes.
flow channel
5. Flush mains and submains first. Close mains and
Figure 5.3. RO-DRIP's Expandable Flow Channel
submains and flush laterals.
6. Run the system for one hour at elevated pressure.
7. Repeat the procedure if plugging or contamination is severe.
obstructions and restore
Pest Control
Pests and small animal populations must be controlled. Ants, crickets, wire worms, other
insects, rodents, coyotes, and other small animals can cause severe damage to drip tape laterals.
Irrigating as soon as drip tape is buried can often reduce damage from wire worms by keeping the soil moist enough that they do not seek out the tape. Injecting certain pesticides can also
help reduce insect damage – consult a pest control advisor. Damage from larger pests such as
coyotes is more difficult to avoid. Often a bucket of water placed in the field for animals will help
keep them away from the drip tape. Burying drip tape can also reduce damage from animals.
If pests are present in the field, consult a pest control advisor before installing and using your
drip system.
flow.
Repairing Damaged Laterals
Laterals that are damaged by pests, equipment, or inexperienced field workers can be
repaired by cutting out the damaged portions and splicing the ends together. This can be done
with twist-lock couplings or with polyethylene hose and wire ties, as described in INSTALLATION AND STARTUP: Splicing Laterals.
System Shut-Down Between Crops (multi-season subsurface)
When a drip system is shut down between crops, extra maintenance is required to kill the
5.12
R O - D R I P
®
U S E R S
G U I D E
M A N A G E M E N T
roots of the crop. If the roots of the previous crop are not killed, they will seek the water remaining in the laterals and may plug emitters, making them unusable in the future. In addition, laterals should be opened and thoroughly flushed at the end of each season.
If you plan to use your laterals for more than one crop, use the following procedure to shut
down your subsurface drip irrigation system at the end of each season. Follow the procedure
whether the laterals are permanently installed or are to be removed and re-installed.
1. As soon as the crop is no longer in production, inject a soil fumigant to kill roots around the drip tape to prevent
root intrusion.
2. If algae is present in the system, inject chlorine at a concentration of 50 ppm ("superchlorination"). If algae
and mineral deposits are both present, inject a concentration of acid that is sufficient to lower the pH to 4.0
at the ends of the laterals.
3. Allow the chlorine or acid to remain in the system for 4-6 hours.
4. Run the system for at least 1 hour with clear water.
5. Open the ends of the laterals and flush the system thoroughly, or open the flushing valve if a flushing manifold
is used.
6. Close the ends of the laterals.
GERMINATING SEEDS
The successful use of your drip irrigation system for seed germination depends on your soil
texture, soil structure, soil salinity, the depth of your laterals, the emitter spacing, and the preparation of your beds. To germinate seeds, enough water must reach the surface for the individual
seeds or plants to receive water. In addition, salt buildup must be kept away from the seeds or
plants.
Drip tape can generally be used to germinate seeds of salt-tolerant crops under the following
conditions:
• The laterals are less than 8-in deep
• The emitter spacings are 12-in or less
• The soil is not excessively coarse or sandy
• Salinity is not a major problem
• The seedbed is uniform and clod free several inches deep
Conditions are further improved if there is at least 6 in (15 cm) of effective rainfall per year to
leach salt away from the surface.
When using drip tape to germinate a crop, irrigate frequently enough and with adequate run
times to assure that near field capacity conditions are maintained around the seed at all times.
Over irrigation, however, can lead to fungal disease and "damping-off" of seedlings.
If laterals are buried deeper than 8 in, emitter spacings are greater than 12 in, or the soil has a
high sand content, water may not make it to the surface where it can be used by the seeds. In
these cases, sprinklers must be used for germination. Even under ideal water movement conditions,
some growers prefer sprinklers because of their physical impact that drives air out of the soil and
results in favorable germinating conditions for some crops.
FERTIGATION
One of the principal advantages of drip irrigation is the direct access it provides to the root
zone for injection of fertilizer and other chemicals. This allows frequent, accurate, and economical
application of nutrients to field crops–even those grown with mulch–throughout the growing
season. With proper monitoring and testing, drip irrigation allows you to quickly adjust nutrient
levels with precision that is not possible with furrow or sprinkler irrigation.
Liquid Fertilizers
Fertilizers are widely available in liquid form that can be directly injected into your drip
R O - D R I P
®
U S E R S
G U I D E
5.13
M A N A G E M E N T
irrigation system. Many fertilizer dealers provide liquid fertilizer blends specifically for drip
fertigation, which may include N, P, K and minor nutrients. These blends can be region and/or
crop specific. While some fertilizer blends can be expensive, drip fertigation maximizes their benefits by applying them precisely and efficiently. Most clear, liquid fertilizers can be injected directly into drip irrigation systems. Only apply a fertilizer through your drip system after testing its
compatibility with your local irrigation water (see Jar Test below).
Water Soluble Dry Fertilizers
Non-liquid fertilizers must be mixed with water to form a solution before they are injected.
Dry fertilizers must be water-soluble, and it is necessary to consider how they will react with the
minerals contained in your water or other fertilizers which are injected (a common problem is
phosphate reacting with calcium to form a precipitate). Only apply a fertilizer through your drip
system after testing its compatibility with your local irrigation water (see Jar Test below).
NOTE: Some dry fertilizers, which are described as being water soluble, are coated with clay or wax to
prevent clumping. This coating material is not water-soluble and can plug filters and drip emitters. It can
be removed through a "decanting" process by thoroughly mixing the fertilizer with water and allowing it
to settle for 12-18 hours. Pour the clear solution through a 200-mesh screen taking care not to allow the
sediment or precipitate to enter the system.
Jar Test
Performing a simple test of your irrigation
water and fertilizer mixture before injection
can help you avoid the high cost of cleaning
or replacing your drip system if precipitation
occurs (fig. 5.4). Perform a jar test as follows:
1. Fill a clear, 1-quart (liter) glass container with your
irrigation water and add an appropriate amount
(about 2 tablespoons) of the fertilizer mixture you
intend to apply through the drip system.
2. Mix thoroughly and let it sit overnight.
3. If the mixture is cloudy the next day, or if there is a
precipitate in the jar, do not use the fertilizer. It will
plug filters and/or emitters.
Figure 5.4 Jar Test
Specific Nutrients
Nitrogen (N)
Most nitrogen fertilizers are soluble in water and can be injected into drip systems with
minimal problems. Precipitation may occur, however, if they are mixed with other fertilizers. For
example, injecting both calcium nitrate and ammonium sulfate into the same irrigation water
will result in an insoluble gypsum precipitate that can readily plug emitters.
Phosphorus (P)
In many cases, phosphorus is applied before planting. Phosphorous is especially important
for seed emergence and healthy transplant growth, and soluble phosphorus fertilizers can be
expensive. Growers often broadcast apply phosphorous before planting, then supplement it later
in the season through drip fertigation.
Most dry phosphorus fertilizers for general farm use are insoluble and cannot be injected into
irrigation water. Applying soluble phosphorus fertilizers through drip fertigation is challenging
because they often react with other nutrients to form precipitates that can clog emitters. In
particular, most phosphate fertilizers will form precipitates when injected into water containing
calcium or magnesium. Reducing the pH of the irrigation water through acidification or by using
5.14
R O - D R I P
®
U S E R S
G U I D E
M A N A G E M E N T
phosphoric acid can usually control precipitation. White phosphoric acid can be safely injected
into most irrigation water as long as the pH of the solution is low.
Potassium (K)
Soluble potassium is a positively charged ion that easily binds to negatively charged clay
particles. As a result, when it is applied from the surface, it usually only penetrates the top few
inches where it can not always be used by the plants. Subsurface drip irrigation can help solve
this problem by delivering potassium directly to the active part of the root zone. In some cases,
foliar sprays of potassium are more effective.
All potassium fertilizers are water soluble, and precipitation problems are infrequent.
Minor Nutrients
Minor nutrient availability to plants is highly pH dependent. Metal micro-nutrients
(Cu, Fe, Mn, Zn) become less soluble in high pH soils, while S, Mo, B, C and M become less
soluble in low pH soils.
Chelated micro-nutrient metals are a convenient way of making metal ions available to the
plant root zone. Chelates are expensive, but they can be very effective – both at delivering
injected metal micro-nutrients to the plant root zone, and at making metal ions already resident
in the soil available to plants. The ability to utilize expensive fertilizers such as chelated metals as
efficiently as possible is one of the many benefits of drip fertigation.
NOTE: Fertilizers containing calcium should be flushed from all tanks, pumps, filters and tubing prior
to injecting any phosphorus, urea-ammonium nitrate, urea sulfuric fertilizer, or any sulfate form of fertilizer
to avoid precipitation which can cause severe emitter plugging. Always test the compatibility of fertilizers
with each other and with your irrigation water before mixing them in your system.
Frequency of Applications
Drip irrigation allows fertilizer to be applied as frequently as your plants need, even daily if
necessary. This flexibility allows you to quickly make adjustments to your fertigation program to
respond to changes in your plant needs, and use expensive fertilizers as efficiently as possible.
When to Fertilize
Inject fertilizer during the latter part of the irrigation cycle to reduce the possibility of leaching
some of it past the root zone. However, be sure to operate the system long enough to completely
purge fertilizer from the laterals to avoid algae and bacteria growth. Plugging is likely to occur if
algae and bacteria are allowed to grow and feed on the residual fertilizer left in the laterals. The
"travel time" required to transport chemicals to the end of a long (over 1000 feet) drip lateral can
be up to 60 minutes depending on slope and flow rate. Travel times through mainlines and submains
must also be considered. Several software packages are available which calculate travel time
within laterals.
Consider using the "25% rule" of fertilizer injection. During the first 25% of the irrigation
cycle, only clear water is delivered through the laterals. Fertilizer is injected for the next 50% of
the cycle then clear water is again used for the final 25%.
Note: Always inject fertilizers into the water stream before the filter.
Note: Only inject fertilizer if a proper backflow prevention device has been installed upstream of the
injector to prevent flow of fertilizer into the water source.
Monitoring Nutrients
Drip fertigated fields require less fertilizer than those using sprinkler or furrow irrigation.
Fertilizer is only applied to the root zone, and used as efficiently as possible. Drip fertigation
allows you to optimally use your fertilizers by adjusting the application rates throughout the
season as the needs of your plants change. To take full advantage of this feature, you will need
to know the nutrient levels of your soil and plants throughout the season to make the necessary
R O - D R I P
®
U S E R S
G U I D E
5.15
M A N A G E M E N T
adjustments.
The first step in determining which nutrients to apply and how much of each to apply is to
have a soil test performed at the beginning of the season. Use your drip system to make up the
difference between what is available in the soil and what your plants need. Additional information
such as the soil pH, EC and base saturation will help you determine which fertilizers can be
readily used by your plants when they are injected into the root zone, and what can be done to
make existing nutrients more available.
Plant tissue tests can be performed throughout the season to determine the nutrient levels
within your plants. These tests are particularly useful because they directly indicate nutrient
deficiencies that can be made up through fertigation.
"Quick Tests" for soil nutrient levels are now available and are becoming popular. These tests
can be used to monitor soil nutrient levels on-farm and use the information to immediately make
adjustments to your fertigation program. Many laboratories can now perform soil sample tests,
tissue tests and/or sap tests with a one-day turnaround, also allowing you to make necessary
adjustments exactly when they are needed.
MANAGING SOIL SALINITY
In arid regions such as the western US, salinity management is important with all fruit and
vegetable crops, and is critical with strawberries. Depending on water quality and soil type,
many other crops also require active salinity management, especially during germination. With
good management, the salinity of the soil solution can be 1.5 to 3 times the salinity of your irrigation
water. If salt is not managed properly, the salinity of the soil extract can reach levels that are
lethal to plants.
Symptoms of Salinity Problems
Salt is added to the soil during each irrigation. Adding fertilizers can further increase salinity.
Excess salt must be removed from the root zone before it increases to a level that seriously affects
yield.
Symptoms of excess salinity depend on the type of crop and the types of salts involved. Mild
salinity problems are frequently overlooked because the plant size reduction and change in color
are uniform across the field. Excess salinity initially causes a subtle change in color. As salinity
stress increases, stunting becomes apparent and leaves are eventually burned at the tip and
around the edges. It is important to recognize that yield loss from excess salinity occurs well
before the symptoms are visible in your plants.
Patterns of Salt Buildup in the Soil
Most salts are readily soluble and move with water in the soil. The salt content of the root
zone varies with depth and distance from the point in the soil where water is applied (application point). Salinity near the application point of irrigation water is usually low. Salt builds up at
the outer edges of the wetted area. Figure 5.5 shows salt patterns caused by different lateral
placements.
If the drip lateral is installed near the soil surface and the wetted area brings the soil near the
surface and plant row to above field capacity, then the salt layer will move away from the seed
line or plants. If the lateral is placed deep enough so that the wetted
Figure 5.5 Salt Patterns
5.16
R O - D R I P
®
U S E R S
G U I D E
M A N A G E M E N T
area does not reach the surface, salt can build up just under the surface of the soil. During periods
of light rain, deep subsurface drip systems for salt-sensitive crops must be left running to prevent the rain from leaching salts into the root zone. If rain is heavy enough, salts will be leached
below the root zone where they will not cause problems.
NOTE: Where salt buildup is a problem, a surface or shallow subsurface placement will give the best
results.
Do not move drip laterals after water application has started on salt-sensitive crops. Moving
the laterals will cause the salt buildup to move. If the salt buildup moves into the root zone, it
will stress or even kill plants. Also, do not allow the soil in the root zone to dry between irrigation
cycles. This can result in reverse movement of soil water, and transfer salt from the perimeter
back into the rooted area of the soil.
Salt Leaching
To minimize salt buildup in the root zone, keep the wetted area at or near field capacity at all
times. For optimal salinity control, maintain a nearly continuous, slow downward movement of
water and salts. This requires more water than is necessary to maintain field capacity. The additional water added to leach salts away from the root zone is commonly referred to as the leaching
requirement and, in problem areas, can be as much as 10-20% of the total application rate.
Place drip laterals as close as possible to salt-sensitive plants to continuously leach salts outward
from the root zone. Monitor the soil salinity throughout the season to help maintain proper levels
and avoid plant stress, which can easily go unobserved. Flood or sprinkler irrigating between
crops can be very effective in removing salts and, may be necessary, in some cases.
Apply excess water for leaching early in the season, since it may be difficult to apply adequate
water during the peak of the irrigation season.
Multiple Row Beds
In many cases you can save money by irrigating more than one crop row with each lateral. In
multiple row beds, however, be careful not to place a row directly between two drip laterals. The
salts at the edge of the wetted pattern of each lateral can accumulate under the center row and
can damage or kill salt-sensitive plants. Figure 5.6 illustrates proper and improper methods of
avoiding salt buildup when irrigating multiple rows with a lateral.
do
don’t
Figure 5.6 Proper and Improper Placement of Laterals for Multiple Rows
MANAGING SOIL PERMEABILITY
Soil permeability is affected by texture, structure, organic material content and chemical
content. Good soil preparation and addition of organic amendments can reduce permeability
problems caused by compaction. Several permeability problems are caused by the quality of
your irrigation water and can often be avoided through chemical water treatment or chemical
soil amendments.
The first step in managing permeability is to have a chemical analysis of your irrigation
water performed. Table 5.10 shows how to manage certain water quality problems that can lead
to problems with soil permeability.
R O - D R I P
®
U S E R S
G U I D E
5.17
M A N A G E M E N T
Observe the following cautions when injecting gypsum into a drip irrigation system:
• Only inject high purity gypsum.
• Only inject finely ground gypsum. 98% should pass through a 200-mesh screen.
• Always locate the injector before filtration equipment.
• Do not inject at excessively high rates that exceed the solubility limit of gypsum in water.
Table 5.10 Permeability Problems Caused by Poor Water Quality
Water Quality Problem
Description
•Increase calcium content of water by
injecting gypsum
High SARa resulting from high
Na/Ca ratio
As proportion of sodium attached to
clay particles increases, soil tends to
"run together", resulting in reduced
water penetration rates. In extreme
cases (alkali soil) soil can no longer be
used for growing.
HCO3 removes calcium from the soil by
binding with it to form CaCO3 (calcium
carbonate). The calcium removed from
the soil complex is replaced with sodium, and the soil becomes sodium-rich.
•Reduce HCO3 in water by injecting sulfuric acid, sulfur dioxide, or other acid
High SARa resulting from high
bicarbonate (HCO3) content
Pure irrigation water
5.18
R O - D R I P
®
U S E R S
G U I D E
Interaction between the salinity of
water and various ions has an effect on
permeability. Appendix B shows that
high SARa can cause more of a problem if EC is low. Very pure (EC < 0.2
dS/m) water can cause severe problems even if there is a high proportion
of calcium in the irrigation water.
Possible Solutions
•If damage to soil is already done, soil
amendment with gypsum may be
required
•If damage to soil is already done, soil
amendment with sulfur or gypsum may
be required
•Injecting or ammending with gypsum
can improve permeability of pure
water both by increasing EC and by
increasing calcium content
6
RETRIEVAL
Your drip irrigation system, or at least the laterals, will ultimately be retrieved from your
field. This may be after several years in a subsurface system, or after a single crop in a surface or
shallow buried application. In some cases the laterals may be retrieved and disposed of. In other
cases they may be re-installed in your field after being stored for a period of time. Still in other
cases, they may be moved to another location and re-installed.
The best method of retrieval depends on the specifics of your growing operation. The choice
is affected by cultural practices, drip lateral placement, residual crop material, soil moisture and
economics. This section helps you evaluate the important variables and decide whether to re-use
or dispose of your drip tape after removing it from the field. The basic procedures and equipment used for drip tape retrieval are also described for each method.
KEY CONCEPTS
• The best retrieval method for you depends on whether you will re-use or dispose of the drip tape after it is
removed from the field.
• If you plan to dispose of drip tape, it should be compacted and baled as tightly as possible.
• The retrieval head is the main tool used for mechanized drip tape retrieval.
• The two common retrieval methods are over-the-row retrieval using a tractor and end-of-row retrieval using a
fixed retrieval head.
• The most common problem encountered during retrieval is damage to the drip tape from stretching. Ensure
tape is free of entanglements, and water has been removed. If possible, perform retrieval in the morning before
the sun heats up the drip tape.
6.1
R E T R I E VA L
DISPOSAL VS. RE-USE
The following options are available at the end of the growing season:
• Retrieval and disposal of drip tape
• Retrieval and re-use of drip tape
• Leaving drip tape installed for the next season
Retrieval and disposal is currently the most common method used, although the other
options are becoming more popular. The replacement cost of drip laterals, in combination with
ever-increasing disposal costs, weigh in favor of using laterals for more than one season. Multiple
year installations, which are not retrieved and re-installed after each season, are usually buried
deep below the surface (6-18 in) so cultural operations can be performed without causing damage.
Table 6.1 summarizes the advantages and disadvantages of each option.
Table 6.1 Disposal vs. Re-use of laterals
Advantages
Method
Single season
Retrieve and re-use
Multi-season buried
Disadvantages
Notes
•Simple
•Recurring cost of drip tape
•Low-cost, thin-walled drip
tape can be used
•Cost of disposal
•Environmental impact
•Can be retrieved with or without mechanized
equipment
•Re-using drip tape may save
money
•Retrieval and reinstallation can damage
tape
•Proper maintenance is important
•Potential for very long-term
use
•Requires heavy-gauge drip
tape
•Proper maintenance is
critical
•Retrieval and reinstallation is not
necessary during most seasons
•Between-crop cultural practices require more care
•Reduced disposal requirements
•Currently the most common
use
•Requires a motorized
retrieval head
•Reduced disposal requirements
Disposal
Retrieval operations are faster and simpler if the drip tape is disposed of. Stretching and
other damage is not important as long it does not interfere with the retrieval.
In most cases, the drip tape must be disposed of in landfills, which are placing stricter
requirements on what they will accept. If you are retrieving drip tape onto spools, they should be
compact and tightly wound. If not, loose drip tape should be tightly baled and tied. Many landfills
will not accept loose drip tape because of the damage it causes to their equipment.
Drip tape is designed to last many years without degrading or decomposing. Disposal issues
are likely to become more important as landfill space becomes increasingly scarce. Any steps that
can be made to reduce this trend will have a long-term positive impact on the environment.
Re-use
Several steps must be taken to ensure that drip tape intended for re-use is in good condition
at the beginning of each season. For best results when re-using drip tape, observe the following
important guidelines:
• Follow a proper shutdown procedure (see MANAGEMENT: System Shutdown Between Crops) to ensure the drip
tape is clean and free of roots, bacteria, and algae before it is removed from the ground.
6.2
R O - D R I P
®
U S E R S
G U I D E
R E T R I E VA L
• Avoid jerking or excess tension while retrieving drip tape from the ground. Any stretching of the drip tape will
result in uneven flow rates and decreased distribution uniformity.
• Always store drip tape in a dry, pest free, protected area.
RD6.1
Retrieval for re-use is a more delicate process than retrieval for disposal. In general, it is easier
to retrieve thicker-gauge drip tape without damage. Use a great deal of care when retrieving any
tape less than 10-mil thick.
When drip tape is retrieved for re-use it should be rolled onto a suitable spool. Commercial
plastic spools are available for retrieving drip tape. Many growers choose to make their own
spools by placing wood or metal side plates on the ends of a large-diameter section of PVC pipe,
which acts as the core of the spool. When the roll is full, the side plates can be removed and the
drip tape can be stored on the PVC core.
The Roberts Difference:
Splices
When in-field splices are made, either for repairing damaged laterals or splicing rolls together,
special consideration should be taken if the laterals will later be retrieved for re-use. Twist-lock
couplings are convenient for making splices, but will not easily go through retrieval equipment
and will not roll smoothly on a retrieval spool.
When making an in-field splice, use a
piece of 0.510"x0.610" polyethylene hose and
two wire ties as described in INSTALLATION
AND STARTUP: Splicing Laterals. Be sure to
tightly wrap the wire ties around the spliced
lateral and remove all sharp points so they
will not hang up on installation equipment or
damage the drip tape. Wrap the splice with
black electrical tape for further protection.
Alternatively, several heat-seal splicers are
available now for drip-tape.
re-use. These include prod-
Figure 6.1 Manual Retrieval of Drip Tape
The RO-DRIP product line
includes several heavygauge products with high
tensile strength which are
well-suited for retrieval and
ucts with wall thicknesses
of 10, 13, and 15 mil
(.254, .330, and .381 mm).
MANUAL RETRIEVAL
Surface and shallow buried (0-3 in) drip
tape is easily retrieved for disposal without
the use of mechanical equipment (fig. 6.1). If the drip tape is to be re-used, it can be economically
retrieved using an "end of row" operation as described below in Mechanized Retrieval.
To manually retrieve drip tape for disposal, simply pull it from the field and bale it together.
As described in the previous section, make the bales as tight as possible, and tie them together
with string or drip tape for easy disposal.
MECHANIZED RETRIEVAL
Figure 6.2 Retrieval Head (Courtesy of Andros Engineering)
The main tool used for mechanized drip
tape extraction is the retrieval head. The
retrieval head consists of a driven shaft onto
which the spool is mounted, and a guide to
bring the drip tape to the spool (fig. 6.2). A
means of tension control is usually provided
to avoid damage to the tape during momentary
hang-ups or during rapid speed changes of
the tractor. Some retrieval heads incorporate a
level-wind mechanism that places the drip
tape evenly on the spool as it rolls . These
mechanisms make the roll more compact and
easy to re-use. Retrieval heads and complete
retrieval systems are available from several
R O - D R I P
®
U S E R S
G U I D E
6.3
R E T R I E VA L
suppliers.
Retrieval heads can either be mounted over-the-row on a tractor tool bar, or end-of-row
where the head is stationary and the drip tape is pulled out of the row from one end after it has
been picked up and placed on top of the crop.
Surface and Shallow Subsurface Drip Systems
Surface and shallow subsurface (less than 3-in deep) laterals are the simplest to remove,
either for re-use or disposal. When laterals are placed on the surface, either end-of-row or
over-the-row techniques can be used.
End-of-row extraction
End-of-row extraction is the most common method of retrieval due to several advantages,
including
• End-of-row extraction is not limited by the speed of a tractor, so it can be done faster
• When multiple retrieval heads are used, if one head needs to be stopped for any reason, the others can continue operating
• Pulling the tape along the row provides cleaning and water removal action which results in less damage and
better spooling
After disconnecting the laterals from the manifolds, remove water by blowing them out with
compressed air. Pull the tape out using one or more retrieval heads mounted on a trailer at the
end of the field (fig. 6.3).
If laterals are buried, they need to be manually removed from the ground before retrieval.
This is usually simple if the burial depth is less than 3 in. In some cases it helps to soften the soil
around the laterals by irrigating for a period of time before removal.
If the drip tape will be re-used, avoid stretching it or scraping it on rough soil or field stubble.
It sometimes helps to lift the drip tape off the
ground and place it on top of the plants before
retrieving it. Several retrieval heads can be
mounted on a single fixture to retrieve from
several rows simultaneously.
NOTE: The most common problem encountered
during drip tape retrieval is damage from stretching.
Ensure tape is free of entanglements, and water
has been removed. In hot climates, if possible,
perform retrieval in the morning before the sun
heats up the drip tape.
TIP: If the spool is spinning faster than the
tape appears to be coming off of the ground, the
tape is stretching. Another way to check for stretching is to stop the retrieval head and unlock the spool.
If it backspins, the tape is stretching.
Figure 6.3 End of Row Retrieval
Over-the-row extraction
Over-the-row extraction is not as common as end-of-row extraction, but it is sometimes the
best choice when laterals are buried. In over-the-row extraction, one or more retrieval heads are
mounted to a tractor tool bar (fig. 6.4). A system of guides brings the tape to the spool as it is
pulled off the surface. Over-the-row extraction is less prone to damaging the drip tape by
stretching or scraping, but it can be more costly and time consuming than end-of-row extraction.
If the drip tape is buried less than 3-in deep, and is a suitably heavy gauge, it can usually be
pulled through the soil. In some cases it helps to soften the soil around the laterals by irrigating
for a period of time before removal.
6.4
R O - D R I P
®
U S E R S
G U I D E
R E T R I E VA L
Subsurface Drip Systems
Deep subsurface drip laterals can be
removed over-the-row by using an appropriate
tool to open the bed above the tape. Use a
furrower or a disc-type opener to open the
bed down to a depth of 2-3 in (5-7 cm) above
the lateral and pull the tape through the
remaining soil in the same operation. Retrieval
is easier if the drip tape was installed accurately at the beginning of the season. A reliable and consistent burial depth allows you
to place the opening tool close to the buried
Figure 6.4 Over-the-Row Retrieval
lateral and minimize the amount of soil
through which it must be pulled.
Retrieval is simpler if the soil above and around the laterals is loosened and softened beforehand.
If possible, turn the last crop and wait a few days for subsurface plant matter to decompose and
soften. Immediately before retrieval, soften the soil around the laterals by irrigating for a period
of time. Disrupt the bed on either side of the laterals with picks or chisels.
R O - D R I P
®
U S E R S
G U I D E
6.5
A
UNDERSTANDING YOUR
WATER QUALITY REPORT
A.1
U N D E R S T A N D I N G
Y O U R
W A T E R
Q U A L I T Y
R E P O R T
The following tables summarize the information that may be presented in your water quality
report and give guidelines to help you interpret how it will affect your operations.
Table A.1 Quantities Measured in Your Water Quality Analysis
Units1
Typical Range
Ecw
dS/m
0-3
TDS
ppm
0 - 2000
Ca++
Mg++
me/l
0 - 20
me/l
0-5
Na+
CO3++
me/l
0 - 40
me/l
0 - 0.1
me/l
0 - 10
Chloride
HCO3-Cl-
me/l
0 - 30
Sulfate
SO4--
me/l
0 - 20
Symbol
Determination
SALINITY
Total Salt Content:
Electrical Conductivity
or
Total Dissolved Solids
Specific Ions:
Calcium
Magnesium
Sodium
Carbonate
Bicarbonate
NUTRIENTS2
Nitrate - Nitrogen
NO3-N
ppm
0 - 10
Ammonium - Nitrogen
NH4-N
ppm
0-5
Phosphate–Phosphorus
PO4-P
K+
ppm
0-2
ppm
0-2
Potassium
MISCELLANEOUS
Boron
B
ppm
0-2
Acidity
SAR3
pH
6.0 - 8.5
-
0 - 15
Sodium Adsorption Ratio
1 dS/m
= deciSiemen per meter (equivalent to mmho/cm)
me/l
= milliequivalent per liter
2 NO3-N is nitrogen in the form of nitrate. NH4-N is nitrogen in the form of ammonia. Both may be reported as N.
3 SAR is calculated from the reported Na, Ca and Mg:
A.2
R O - D R I P
®
U S E R S
G U I D E
U N D E R S T A N D I N G
Y O U R
W A T E R
Q U A L I T Y
R E P O R T
Table A.2 Guidelines to Interpret Your Water Quality Report
Restriction on Water Use
Water Quality Problem
None
Some
Severe
SALINITY (affects plants ability to take up water)
ECw (dS/m)
ECw < 0.7
0.7 < ECw < 3.0
ECw > 3.0
TDS < 450
450 < TDS < 2000
TDS > 2000
or
TDS (ppm)
INFILTRATION (affects rate water enters soil - use SAR and ECw)1
if SARa = 0-3
ECw > 0.7
0.2 < ECw < 0.7
ECw < .2
SARa = 3-6
ECw > 1.2
0.3 < ECw < 1.2
ECw < .3
SARa = 6-12
ECw > 1.9
0.5 < ECw < 1.9
ECw < .5
SARa = 12-20
ECw > 2.9
1.3 < ECw < 2.9
ECw < 1.3
SARa = 20-40
ECw > 5.0
2.9 < ECw < 5.0
ECw < 2.9
ION TOXICITY (affects sensitive crops)
Sodium (SAR)
SAR < 3
3 < SAR < 9
SAR > 9
Sodium (me/l)
me/l < 3
3 < me/l < 9
me/l > 9
Chloride (me/l)
me/l < 4
4 < me/l < 10
me/l > 10
Boron (ppm)
ppm < 0.7
0.7 < ppm < 3
ppm > 3
OTHER EFFECTS (affects sensitive crops)
Nitrogen, NO3-N (ppm)
ppm < 5
5 < ppm < 30
ppm > 30
Bicarbonate, HCO3, me/l
me/l < 1.5
1.5 < me/l < 8.5
me/l > 8.5
PH
Normal Range: 6.5 - 8.5
1 High SARa accompanied with high ECw allows water penetration, but is unacceptable for production of
salt-sensitive crops.
R O - D R I P
®
U S E R S
G U I D E
A.3
U N D E R S T A N D I N G
Y O U R
W A T E R
Q U A L I T Y
R E P O R T
Table A.3 Guidelines for Potential Emitter Plugging from Water Contaminants
Emitter Plugging Hazard
Type of Problem
Physical:
Suspended solids
Low
Moderate
Severe
50 ppm
50-100 ppm
>100 ppm
Chemical:
pH
7.0
7.0-8.0
>8.0
Salt
500 ppm
500-2000 ppm
> 2000 ppm
100 ppm
Bicarbonate
Manganese 1
0.1 ppm
0.1 - 1.5 ppm
> 1.5 ppm
Total iron 1
0.2 ppm
0.2 - 1.5 ppm
> 1.5 ppm
Hydrogen Sulfide
0.2 ppm
0.2 - 2.0 ppm
> 2.0 ppm
Biological:
Bacterial population
1
A.4
2,500/gal
2,500-13,000/gal
>13,000/gal
10,000/liter
10,000-50,000/liter
>50,000/liter
When testing for iron and manganese, acidify
R O - D R I P
®
U S E R S
G U I D E
B
CROP PRODUCTION
There are many variables involved in specifying a drip irrigation system design, which can
interact with each other in complex ways. Coming up with the right combination of lateral
placement, drip tape wall thickness, emitter spacing and flow rate is a complex process where
experience plays an important role.
This appendix provides examples of how experienced growers have made design decisions
for their specific crops. Each page covers one crop, and gives a description of general practices
for growing that crop with drip irrigation. The description includes a specific example of how
one experienced grower in one geographic region has grown that crop. Due to differences in
climate and soil type the best practice for your field may be different, but the examples can
give you an idea of what is required. It always helps to learn from the experience of others.
The crops described in this appendix are:
Onions . . . . . . . . . . . . . . . . . . . . . . . . . . . . . . . . . . . . . . . . . . . . . . . . . . . . . . . . . . . . . . .D2
Strawberries . . . . . . . . . . . . . . . . . . . . . . . . . . . . . . . . . . . . . . . . . . . . . . . . . . . . . . . . . . .D3
Melons . . . . . . . . . . . . . . . . . . . . . . . . . . . . . . . . . . . . . . . . . . . . . . . . . . . . . . . . . . . . . . .D4
Lettuce . . . . . . . . . . . . . . . . . . . . . . . . . . . . . . . . . . . . . . . . . . . . . . . . . . . . . . . . . . . . . . .D5
Celery . . . . . . . . . . . . . . . . . . . . . . . . . . . . . . . . . . . . . . . . . . . . . . . . . . . . . . . . . . . . . . . .D6
Sugar Cane . . . . . . . . . . . . . . . . . . . . . . . . . . . . . . . . . . . . . . . . . . . . . . . . . . . . . . . . . . . .D7
Potted Plants . . . . . . . . . . . . . . . . . . . . . . . . . . . . . . . . . . . . . . . . . . . . . . . . . . . . . . . . . . .D8
Tomatoes . . . . . . . . . . . . . . . . . . . . . . . . . . . . . . . . . . . . . . . . . . . . . . . . . . . . . . . . . . . . . .D9
Potatoes . . . . . . . . . . . . . . . . . . . . . . . . . . . . . . . . . . . . . . . . . . . . . . . . . . . . . . . . . . . . .D10
Cotton . . . . . . . . . . . . . . . . . . . . . . . . . . . . . . . . . . . . . . . . . . . . . . . . . . . . . . . . . . . . . . .D11
Corn . . . . . . . . . . . . . . . . . . . . . . . . . . . . . . . . . . . . . . . . . . . . . . . . . . . . . . . . . . . . . . . .D12
Field Flowers . . . . . . . . . . . . . . . . . . . . . . . . . . . . . . . . . . . . . . . . . . . . . . . . . . . . . . . . . .D13
Peppers . . . . . . . . . . . . . . . . . . . . . . . . . . . . . . . . . . . . . . . . . . . . . . . . . . . . . . . . . . . . . .D14
All of the crops that are irrigated with drip tape could not possibly be included in this
appendix. If you do not find your crop listed above, contact Roberts Irrigation - we may have it
on file.
B.1
C R O P
P R O D U C T I O N
Onions
Onions are usually direct seeded on four row beds, spaced 42-in (106-cm) between centers.
Rows are spaced 6 to 12-in (15 to 30-cm) apart with 1 to 4-in (2.5 to 10-cm) in-row spacing.
Spacing is closer and populations are higher for smaller bulbing varieties. Onions are extremely
shallow rooted and need an easily crumbled, medium texture soil that maintains moisture well.
Onions should never be stressed for water once bulbs start to enlarge, or splitting may result.
Avoid salty, hard, or weed-infested soils.
In the example below, the grower used a short row length of 328-ft (100-m). Using RO-DRIP
8-12-24, good uniformity can be maintained with run lengths of up to 800-ft (250-m) on flat
ground.
EXAMPLE:
Fresh Market Onions
Baja California, Mexico
328’
6”
3”
2”
6”
22”
40”
Operation:
Auxiliary Equipment:
Crop . . . . . . . . . . . . . . . . .fresh market onion
Location . . . . . . . . . .Baja California, Mexico
Field size . . . . . . . . . . . . . . .150-acres (60 ha)
Plants per acre . . . . .197,885 (488,975 per ha)
Season . . . . . . . . . . . . . . . . . . . . . . .Feb-March
Planting method . . . . . . . . . . . .direct seeded
Soil type . . . . . . . . . . . . . . . . . . . .sandy loam
Maximum ET . . . . . .0.35 in (9 mm) per day
Water Source . . . . . . . . . . . . . . . . . .deep well
Ground cover . . . . . . . . . . . . . . . . . . . . . .none
Crops rotated with . . . .broccoli, cauliflower
Time to maturity . . . . . . . . . . . . . . . .180 days
Average yield . . .60 tons/acre (134 tons/ha)
Duration of tape installation . . . . .6 months
Primary filtration . . . . . . . . . .sand separator
Secondary filtration . . . . . . . . . . . . . . .screen
Submains . . . . . . . . . . . . . . . . . . . . . . . .layflat
Mulch . . . . . . . . . . . . . . . . . . . . . . . . . . . .none
Management/Operation
Irrigation duration . . . . . . . . . . . . .4-10 hours
Irrigation frequency . . . . . . . . . . . . .3-5 days
Chemigation . . . . . . . . . . . . . . . . . . . . . . . .yes
Fertigation . . . . . . . . . . . . . . . . . . . . . . . . . .yes
Line flushing . . . . . . . . . . . . . . . . . .at startup
Filter back-flushing . . . . . . . . . . . .automatic
Drip Tape: RO-DRIP 8-12-24
(8 mil, 12-in spacing, 24 GPH per 100 ft, 5/8-in diameter)
(.200 mm, 30-cm spacing, 298 LPH per 100 m, 16-mm diameter)
B.2
R O - D R I P
®
U S E R S
G U I D E
C R O P
P R O D U C T I O N
Strawberries
Strawberry plants are extremely salt sensitive. Strawberry production with relatively salty
water is a remarkable success story that illustrates the ability of drip irrigation to manage salinity
and meet the needs of row crops under adverse conditions.
Transplants are usually planted in the early fall, three or four rows per bed. Beds are spaced
60 to 64-in (147 to 163-cm) between centers, with two drip laterals per bed placed between rows.
In-row spacing of 9 to 10-in (23 to 25-cm) is frequently used. Polyethylene mulch is typically
used to increase bed temperature and maintain winter growth. Strawberry plants must be
protected from frost.
Excessive salinity decreases root development, water uptake, growth rate, and fruit yield.
Where salts are a problem, it is important to leach with solid set sprinklers before bed preparation
or after transplanting, and prior to putting plastic mulch over the beds. Rain water can be helpful
in decreasing salinity around plants during early growth, but only if the holes in the plastic near
the plant are large enough to permit infiltration of the rain water.
EXAMPLE:
Strawberries
Central Coast, California, USA
300’
14”
14”
1”
12”
48”
66”
Operation:
Auxiliary Equipment:
Crop . . . . . . . . . . . . . . . . . . . . . . .strawberries
Location . . . .Central Coast, California, USA
Field size . . . . . . . . . . . . . . . . .40 acres (16 ha)
Plants per acre . . . . .150,000 (370,650 per ha)
Season . . . . . . . . . . . . . . . . .Sep-Jul/Aug-Dec
Planting method . . . . . . . . . . . . . . .transplant
Soil type . . . . . . . . . . . . . . . . . . . .sandy loam
Maximum ET . . . . .0.30 in (7.5 mm) per day
Water Source . . . . . . . . . . . . . . . . . . . . . . .well
Ground cover . . . . . . . . . . . . . . . . . . . . . .none
Crops rotated with . . . . . . . . . . . . . . . .celery
Time to maturity . . . . . . . . . . . . . . . . .60 days
Average yield . . . . .3,500-5,000 cartons/acre
Duration of tape installation . . .9-10 months
Primary filtration . . . . . . . . . . . . .sand media
Secondary filtration . . . . . . . . . . . . . . .screen
Submains . . . . . . . . . . . . . . . . . . . . . . . .layflat
Mulch . . . . . . . . . . . . . . . . . . . . .plastic mulch
Management/Operation
Irrigation frequency . . . .1-3 times per week
Irrigation duration . . . . . . . . . . . . . .2-4 hours
Chemigation . . . . . . . . . . . . . . . . . . . . . . . .yes
Fertigation . . . . . . . . . . . . . . . . . . . . . . . . . .yes
Line flushing . . . . . . . . .2-4 times per season
Filter back-flushing . . . . . . . . . . . .automatic
Drip Tape: RO-DRIP 5-8-40
(5 mil, 8-in spacing, 40 GPH per 100 ft, 5/8-in diameter)
(.127 mm, 20-cm spacing, 497 LPH per 100 m, 16-mm diameter)
R O - D R I P
®
U S E R S
G U I D E
B.3
C R O P
P R O D U C T I O N
Melons
Melons are typically direct seeded 3 to 4-in (8 to 10-cm) from the drip lateral in single rows at
12-in (30-cm) in-row spacing with 60 to 84-in (152 to 213-cm) between rows. Watermelons will
generally have an in-row spacing of 24 to 36-in (61 to 91-cm) with 72 to 108-in (183 to 274-cm)
between rows. Laterals are usually placed on or near the surface. Two laterals placed 4 to 6-in (10
to 15-cm) on either side of the seed line may be required in lighter soil if there is difficulty is
achieving an adequate wetted area for deep-rooted melon crops.
Heavy watering late in the season can lead to soft, poor-quality melons. This is especially true
in heavier soils. Irrigation, as a general rule, should be reduced to about one-half of ET (evapotranspiration) 2 weeks before harvesting is expected to begin. Continue reduced irrigation immediately after each harvest to support subsequent production. The best time to begin reducing
irrigation and the amount to cut back depends on soil type, rooting depth, total wetted area, and
the usable water reserve in the soil.
EXAMPLE:
Watermelons
North Central Florida, USA
800’
30”
2”
10”
48”
9’
Operation:
Auxiliary Equipment:
Crop . . . . . . . . . . . . . . . . . . . . . .watermelons
Location . . . . . .North Central Florida, USA
Field size . . . . . . . . . . . . . . . .150 acres (60 ha)
Plants per acre . . . . . . . . .1,440 (3,550 per ha)
Season . . . . . . . . . . . . .mid Feb - end of June
Planting method . . . . . . . . . . . .direct seeded
Soil type . . . . . . . . . . . . . . . . . . . . . . . . .sandy
Maximum ET . . . . . .0.35 in (9 mm) per day
Water Source . . . . . . . . . . . . . . . . . . . . . . .well
Ground cover . . . . . . . . . . . .rye in off-season
Crops rotated with . . . . . . . . . . .rye, peanuts
Time to maturity . . . . . . . . . . . . . . . .100 days
Average yield . . . .25 tons/acre (56 tons/ha)
Duration of tape installation . . . . . . . .1 year
Primary filtration . . . . . . . . . . . . . . . . .screen
Secondary filtration . . . . . . . . . . . . . . . . .none
Submains . . . . . . . . . . . . . . . . . . . . . . . .layflat
Mulch . . . . . . . . . . . . . . . . . . . . . . . . . . . .none
Management/Operation
Irrigation frequency . . . . . . . . . . . . . . . .daily
Irrigation duration . . . . . . . . . . . . . .1-4 hours
Chemigation . . . . . . . . . . . . . . . . . . . . . .none
Fertigation . . . . . . . . . . . . . . . . . . . . . . . . . .yes
Line flushing . . . . . . . . . . . . . . . . . . . . . .none
Filter back-flushing . . . . . . . . .based on well
Drip Tape: RO-DRIP 8-12-24
(8 mil,12-in spacing, 24 GPH per 100 ft, 5/8-in diameter)
(.200 mm, 30-cm spacing, 298 LPH per 100 m, 16-mm diameter)
B.4
R O - D R I P
®
U S E R S
G U I D E
C R O P
P R O D U C T I O N
Lettuce
Iceberg and mixed lettuce are typically direct seeded on double-row 40 to 42-in (102 to 107-cm)
beds. Rows are spaced 8 to 12-in (20 to 30-cm) apart with a single drip lateral in between the
plant rows, placed on or near the surface. Seed is normally planted at 2 to 3-in (5 to 8-cm)
spacing using pelleted seed and precision planters.
Germinating lettuce in hot weather can lead to thermodormancy of the seed and irregular
stands. Keep the soil around the seed moist during warm weather germination to provide cooling,
and start the germination process in the evening so the seed imbibes water during the coolest
part of the day. Plants are thinned to an in-row spacing of 8 to 12-in (20 to 30-cm) depending on
the type of leaf lettuce. Plant spacing and fertilization can be varied to control head size.
EXAMPLE:
Lettuce
Baja California, Mexico
328’
7.5”
7.5”
7.5”
8”
2”
6”
22.5”
40”
Operation:
Auxiliary Equipment:
Crop . . . . . . . . . . . . . . . . . . . . . . . . . . . .lettuce
Location . . . . . . . . . .Baja California, Mexico
Field size . . . . . . . . . . . . . . . . .90 acres (36 ha)
Plants per acre . . . . . . .37,100 (91,600 per ha)
Season . . . . . . . . . . . . . . . . . . . . . . . .Apr-Aug
Planting method . . . . . . . . . . . .direct seeded
Soil type . . . . . . . . . . . . . . . . . . . .sandy loam
Maximum ET . . . . . .0.35 in (9 mm) per day
Water Source . . . . . . . . . . . . . . . . . .deep well
Ground cover . . . . . . . . . . . . . . . . . . . . . .none
Crops rotated with . . . .broccoli, cauliflower
Time to maturity . . . . . . . . . . . . . .50-60 days
Ave. yield . . . .500 boxes/acre (1235 per ha)
Duration of tape installation . . . . . . .60 days
Primary filtration . . . . . . . . . .sand separator
Secondary filtration . . . . . . . . . . . . . . .screen
Submains . . . . . . . . . . . . . . . . . . . . . . . .layflat
Mulch . . . . . . . . . . . . . . . . . . . . . . . . . . . .none
Management/Operation
Irrigation frequency . . . . . . . . . . . . .3-5 days
Irrigation duration . . . . . . . . . . . . .4-10 hours
Chemigation . . . . . . . . . . . . . . . . . . . . . . . .yes
Fertigation . . . . . . . . . . . . . . . . . . . . . . . . . .yes
Line flushing . . . . . . . . . . . . . . . . . .at startup
Filter back-flushing . . . . . . . . . . . .automatic
Drip Tape: RO-DRIP 5-12-24
(5 mil, 12-in spacing, 24 GPH per 100 ft, 5/8-in diameter)
(.127 mm, 30-cm spacing, 298 LPH per 100 m, 16-mm diameter)
R O - D R I P
®
U S E R S
G U I D E
B.5
C R O P
P R O D U C T I O N
Celery
Celery is usually transplanted on single-row 24 to 30-in (59 to 76-cm) beds or double-row
32 to 40-in (81 to 102-cm) beds. In double-row plantings rows are spaced 10 to 12-in (25 to 30-cm)
apart with a singe drip lateral on or near the surface between the plant rows. Plants are spaced
7 to 10-in (18 to 25-cm) apart within each row.
Celery is a biennial that normally produces foliar growth in the first year and seed stalks in
the second year. However, celery plants can form seed stalks (bolt) the first year if exposed to
temperatures below 55°F (11.5°C) for 7 days or longer. Some varieties are more susceptible to
bolting than others. Celery planted early in the year in cooler climates is usually covered with
plastic tunnels to increase daytime temperatures and prevent induction of bolting by low night
temperatures.
Celery is a shallow-rooted crop; most roots are in the upper 18-in (45-cm) of soil. It is, therefore,
very susceptible to drought. Hot, dry periods without water reduce growth and may induce
blackheart.
EXAMPLE:
Celery
Baja California, Mexico
328’
6”
8”
2”
6”
22”
40”
Operation:
Auxiliary Equipment:
Crop . . . . . . . . . . . . . . . . . . . . . . . . . . . .celery
Location . . . . . . . . . .Baja California, Mexico
Field size . . . . . . . . . . . . . . . .100 acres (40 ha)
Plants per acre . . . . .120,000 (296,500 per ha)
Season . . . . . . . . . . . . . . . .Mar-Apr/Sep-Oct
Planting method . . . . . . . . . . . .direct seeded
Soil type . . . . . . . . . . . . . . . . . . . .sandy loam
Maximum ET . . . . . ..0.35 in (9 mm) per day
Water Source . . . . . . . . . . . . . . . . . .deep well
Ground cover . . . . . . . . . . . . . . . . . . . . . .none
Crops rotated with . . . . . . . . . . . . . . . . . . . . ..
Time to maturity . . . . . . . . . . . . . .50-60 days
Average yield . . .500 boxes/acre (1235 per ha)
Duration of tape installation . . . . . . .60 days
Primary filtration . . . . . . . . . .sand separator
Secondary filtration . . . . . . . . . . . . . . . . .none
Submains . . . . . . . . . . . . . . . . . . . . . . . .layflat
Mulch . . . . . . . . . . . . . . . . . . . . . . . . . . . .none
Management/Operation
Irrigation frequency . . . . . . . . . . . . .1-3 days
Irrigation duration . . . . . . . . . . . . .6-12 hours
Chemigation . . . . . . . . . . . . . . . . . . . . . . . .yes
Fertigation . . . . . . . . . . . . . . . . . . . . . . . . . .yes
Line flushing . . . . . . . . . . . . . . . . . .at startup
Filter back-flushing . . . . . . . . . . . .automatic
Drip Tape: RO-DRIP 5-8-40
(5 mil, 8-in spacing, 40 GPH per 100 ft, 5/8-in diameter)
(.127 mm, 20-cm spacing, 497 LPH per 100 m, 16-mm diameter)
B.6
R O - D R I P
®
U S E R S
G U I D E
C R O P
P R O D U C T I O N
Sugar Cane
Sugar cane is a 2-year crop in some parts of the world and a 1-year crop in others. It is typically
grown from a mechanically planted stalk every 48-in (122-cm) in the row. Rows are spaced in
pairs 36-in (91-cm) apart with the drip lateral in the center. The pairs of rows are 72-in (183-cm)
apart, resulting in a between-lateral spacing of 108-in (274-cm).
After a crop has been harvested and the ground prepared for the next crop, the soil is very
dry. With newly planted stalks, irrigate for 48 to 72 hours to wet the entire area between rows to
a depth of 60-in (152-cm). After the first long irrigation, irrigate every other day. Gradually
increase the length of the irrigation cycle during the first 6 months. After 6 months irrigate the
cane for 24 hours every other day (assuming no significant rainfall) until maturity. Upon maturity,
cease irrigation and begin harvesting when the sugar content is at its maximum.
In many areas, including Hawaii, phosphates are applied in granular form at planting time.
A typical granular fertilizer would be 10-30-10. A typical liquid nitrogen fertilizer would be
Ammonium Nitrate 32%. Fertilizer is generally applied through the system only during the first
10 months. This is necessary to build sugar content. NPK and trace elements can also be applied
through the drip irrigation system.
Some varieties of sugar cane are salt tolerant, and brackish water with up to 1500 ppm of
total dissolved salts can be used for irrigation. Sugar cane is also relatively drought-resistant; if
you miss an irrigation cycle, you can usually apply extra water during the next cycle without
much adverse effect.
EXAMPLE:
Sugar Cane
Venezuela
150 m
120 cm
20 cm
40 cm
3m
0.9 m
2.1 m
Operation:
Auxiliary Equipment:
Crop . . . . . . . . . . . . . . . . . . . . . . . .sugar cane
Location . . . . . . . . . . . . . . . . . . . . . .Venezuela
Field size . . . . . . . . . . .10,400 acres (4,200 ha)
Plants per acre . . . . . . .27,000 (67,000 per ha)
Season . . . . . . . . . . . . . . . . . . . . . .year round
Soil type . . . . . . . . . . . . . . . . . . . .sandy loam
Maximum ET . . . . . .0.28 in (7 mm) per day
Water Source . . . . . . . . . . . . . . . . . .deep well
Ground cover . . . . . . . . . . . . . . . . . . . . . .none
Crops rotated with . . . . . . . . . . . . . . . . .none
Time to maturity . . . . . . . . . . . . . . . . .30 days
Average yield . . .46 tons/acre (103 tons/ha)
Duration of tape installation . . . . . . .8 years
Primary filtration . . . . . . . . . . . . .sand media
Secondary filtration . . . . . . . . . . . . . . . . . . . . .
. . . . . . . . . . . . . . . . .screen & sand separator
Submains . . . . . . . . . . . . . . . . . . . . . . . . .PVC
Mulch . . . . . . . . . . . . . . . . . . . . . . . . . . . .none
Management/Operation
Irrigation frequency . . . . . . . . . . . . .3-4 days
Irrigation duration . . . . . . . . . . . . . .24 hours
Chemigation . . . . . . . . . . . . . . . . . . . . . . . .yes
Fertigation . . . . . . . . . . . . . . . . . . . . . . . . . .yes
Line flushing . . . . . . . . . . . . . . . . . . . .weekly
Filter back-flushing . . . . . . . . . . . . . . .weekly
Drip Tape: RO-DRIP 13-12-24
(13 mil, 12-in spacing, 24 GPH per 100 ft, 5/8-in diameter)
(.330 mm, 30-cm spacing, 298 LPH per 100 m, 16-mm diameter)
R O - D R I P
®
U S E R S
G U I D E
B.7
C R O P
P R O D U C T I O N
Potted Plants
Potted flowers and other plants can be irrigated with drip tape either directly or with the use
of a capillary mat. For direct irrigation, lay heavy-gauge drip tape across pots or containers and
secure it tightly at each end. In some installations it is advantageous to string a wire over the
containers and fasten the drip tape to the wire rather than laying it directly on the containers.
Install the drip tape with the outlets facing out to one side (not straight down). Alternatively, pots
or containers can be placed on a capillary mat that is irrigated with drip tape. The water moves
laterally across the mat and is drawn up into the container as it is used by the plant.
In the following example the grower successfully uses RO-DRIP drip tape to irrigate potted
flowers in a greenhouse.
EXAMPLE:
Potted Flowers (mums)
Sacramento Valley, California, USA
160’
12”
12”
Operation:
Auxiliary Equipment:
Crop . . . . . . . . . . . . . . . .mums (greenhouse)
Location Sacramento Valley, California, USA
Size . . . . . . . . . . . . . . . . . . . .3.5 acres (1.4 ha)
Plants per acre . . . . . . .35,000 (86,000 per ha)
Season . . . . . . . . . . . . . . . . . . . . .non-seasonal
Planting method . . . . . . . . . . . . .transplanted
Soil type . . . . . . . . . . . . . . . . . . . . . . . .pot mix
Water Source . . . . . . . . . . . . . . . . . .municipal
Ground cover . . . . . . . . . . . . . . . . . . . . . .none
Crops rotated with . . . . . . . . . . . . . . . . .none
Time to maturity . . . . . . . . . . . . . . . . .60 days
Average yield . . . . .35,000/acre (86,000/ha)
Duration of tape installation . . . . . . .2 years
Primary filtration . . . . . . . . . . . . . . . . .screen
Secondary filtration . . . . . . . . . . . . . . . . .none
Submains . . . . . . . . . . . . . . . . . . . . . . . . .PVC
Mulch . . . . . . . . . . . . . . . . . . . . . . . . . . . .none
Management/Operation
Irrigation frequency . . . . . . . . . .every 3 days
Irrigation duration . . . . . . . . . . . . .15-30 min
Chemigation . . . . . . . . . . . . . . . . . . . . . . . .yes
Fertigation . . . . . . . . . . . . . . . . . . . . . . . . . .yes
Line flushing . . . . . . . . . . . . . . . . .every crop
Filter back-flushing . . . . . . . . . . . . . .monthly
Drip Tape: RO-DRIP 8-12-24
(8 mil, 12-in spacing, 24 GPH per 100 ft, 5/8-in diameter)
(.200 mm, 30-cm spacing, 298 LPH per 100 m, 16-mm diameter)
B.8
R O - D R I P
®
U S E R S
G U I D E
C R O P
P R O D U C T I O N
Tomatoes
Tomato transplants are typically planted on single-row beds spaced 60 to 72-in (152 to 183-cm)
center-to-center, with 18 to 20-in (46 to 51-cm) in-row spacing. Stakes are placed between every
three or four plants. Twine is tied to the stakes and around the tomato plants to support their
heavy fruit crop.
Tomatoes can be grown on almost any moderately well-drained soil, from deep sand to clay
loam. The highest production is usually achieved from well-drained loamy soil types. You can
also use plastic mulch to achieve better control of soil conditions and produce higher yields.
In the following example the grower uses plastic mulch and RO-DRIP drip tape to successfully grow fresh market tomatoes.
EXAMPLE:
Tomatoes
Coastal Virginia, USA
300-400’
24”
6”
30”
72”
Operation:
Auxiliary Equipment:
Crop . . . . . . . . . . . . . . . . . . . . . . . . . .tomatoes
Location . . . . . . . . . . .Coastal Virginia, USA
Field size . . . . . . . . . . . . . . .250 acres (100 ha)
Plants per acre . . . . . . . . . .3630 (8970 per ha)
Season . . . . . . . . . . . . . . . . . . . . . .Spring/Fall
Planting method . . . . . . . . . . . . .transplanted
Soil type . . . . . . . . . . . . . . . . . . . .sandy loam
Maximum ET . . . . ..0.3 in (.75 mm) per day
Water Source . . . . . . . .surface water – pond
Ground cover . . . . . . . . . . . . . . . . . . . . . .none
Crops rotated with . . . . . . . . . . . . . .soybeans
Time to maturity . . . . . . . . . . . . .80 - 90 days
Average yield . . . .20 tons/acre (45 tons/ha)
Duration of tape installation . . . . .5 months
Primary filtration . . . . . . . . . . . . .sand media
Secondary filtration . . . . . . . . . . . . . . .screen
Submains . . . . . . . . . . . . . . . . . . . . . . . . .PVC
Mulch . . . . . . . . . . . . . .plastic, 60" x 1.25 mil
Management/Operation
Irrigation frequency . . . . . . . . . . . . . . . .daily
Irrigation duration . . . . . . . . . . . . . .1-3 hours
Chemigation . . . . . . . . . . . . . . . . . . . . . . . .yes
Fertigation . . . . . . . . . . . . . . . . . . . . . . . . . .yes
Line flushing . . . . . . . . . . . . . . . . . . . . . . . .yes
Filter back-flushing . . . . . . . . . . . .automatic
Drip Tape: RO-DRIP 8-12-24
(8 mil, 12-in spacing, 24 GPH per 100 ft, 5/8-in diameter)
(.200 mm, 30-cm spacing, 298 LPH per 100 m, 16-mm diameter)
R O - D R I P
®
U S E R S
G U I D E
B.9
C R O P
P R O D U C T I O N
Potatoes
Potato production requires good water penetration and aeration. The soil must also be worked
properly for correct tuber formation and growth. Potatoes are seeded on 34 to 40-in (86 to 102-cm)
single-row beds. In-row plant spacing is regulated by the placement of the individual seed
pieces. Seed piece spacing ranges from 6 to 7-in (15 to 18-cm) for the red varieties, and 8 to 12-in
(20 to 30-cm) for the White Rose and Russet varieties.
Proper irrigation scheduling is critical to maintain the root zone at the proper moisture level.
When stressed for water between cycles, potatoes tend to develop cracks and become "knobby"
and rough. When red varieties are water stressed they tend to develop poor color. When exposed
to soil moisture levels above field capacity for extended periods of time, potatoes frequently
develop enlarged lenticels and root or tuber diseases. Proper soil moisture during tuber development
reduces the severity of scab and is usually adequate to control disease. During tuber initiation
and early tuber growth (until tubers are golf-ball sized) maintain available soil moisture between
field capacity and 20% depletion. Avoid planting potatoes in fields with severe scab problems.
EXAMPLE:
Sweet Potatoes
Central Valley, California, USA
300’
12”
36”
50”
80”
Operation:
Auxiliary Equipment:
Crop . . . . . . . . . . . . . . . . . . . . .sweet potatoes
Location . . . .Central Valley, California, USA
Field size . . . . . . . . . . . . . . . . .50 acres (20 ha)
Plants per acre . . . . . . .13,000 (32,000 per ha)
Season . . . . . . . . . . . . . . . . . . . . . . . . .Apr-Oct
Planting method . . . . . . . . . . . . . . .transplant
Soil type . . . . . . . . . . . .sandy to sandy loam
Maximum ET . . . . . .0.35 in (9 mm) per day
Water Source . . . . . . . . . . . . . . . . . . . . . . .well
Ground cover . . . . . . . . . . .fallow with grain
Crops rotated with . . .2-3 yrs, melons/grain
Time to maturity . . . . . . . . . . . . .90-150 days
Ave. yield . .11-25 tons/acre (25-56 tons/ha)
Duration of tape installation . . . . . . . .1 year
Primary filtration . . . . . . . . . . . . .sand media
Secondary filtration . . . . . . . . . . . . . . . . .none
Submains . . . . . . . . . . . . . . . . . . . . . . . .layflat
Mulch . . . . . . . . . . . . . . . . . . . . . . . . . . . .none
Management/Operation
Irrigation frequency . . . . . . . . . . . . . . . .daily
Irrigation duration . . . . . . . . . . . . . .4-6 hours
Chemigation . . . . . . . . . . . . . . . . . . . . . . . .yes
Fertigation . . . . . . . . . . . . . . . . . . . . . . . . . .yes
Line flushing . . . . . . . . . . . . . . . . . . .minimal
Filter back-flushing . . . . . . . . . . . . . .minimal
Drip Tape: RO-DRIP 5-12-24
(5 mil, 12-in spacing, 24 GPH per 100 ft, 5/8-in diameter)
(.127 mm, 30-cm spacing, 298 LPH per 100 m, 16-mm diameter)
B.10
R O - D R I P
®
U S E R S
G U I D E
C R O P
P R O D U C T I O N
Cotton
Cotton is a deep-rooted crop (48-in; 122-cm or more) with a 6 to 8 month growing season.
Cotton is typically planted in beds spaced 30 to 40-in (75 to 102-cm) apart. Seeds are typically
planted 3 to 4-in (8 to 10-cm) apart in single rows.
A carefully managed drip irrigation system will allow you to grow cotton using saline water.
However, the seeds should be germinated and the stand established using water of at least average
quality (up to 800 ppm total dissolved salts). After the stand is established, poor quality water
(800 to 4000 ppm total dissolved salts) can be used until maturity. After harvest, the salt must be
leached from the soil before planting the next crop. If there is inadequate rainfall to accomplish
leaching, a heavy flood or sprinkler irrigation will be required. When using salty water, lay drip
tape on or near the surface to keep buildup away from the plants.
With higher quality water, the laterals can be buried up to 18-in (46-cm) deep and, on heavy
soil, can be spaced up to 80-in (203-cm) apart. On sandy soils, space the laterals 40-in (102-cm)
apart. When using a deep buried drip system, it is necessary to use a supplemental irrigation
system to germinate.
Cotton should not be grown for more than 2 to 3 years on the same land without rotating in
another crop such as wheat, sugar beets, process tomatoes, or melons. Drip irrigation can
increase yields with all crops and, since you can use the same drip system with successive crops,
a well-planned system will allow you to offset the initial installation cost.
EXAMPLE:
Cotton
Central Texas, USA
1320’
3-4’
6”
14”
40”
80”
Operation:
Auxiliary Equipment:
Crop . . . . . . . . . . . . . . . . . . . . .upland cotton
Location . . . . . . . . . . . . . .Central Texas, USA
Field size . . . . . . . . . . . . . . . .100 acres (40 ha)
Plants per acre . . . . . . .19,000 (47,000 per ha)
Season . . . . . . . . . . . . . . . . . . . .May planting
Planting method . . . . . . . . . . . .direct seeded
Soil type . . . . . . . . . . . . . . . . . . .silt clay loam
Maximum ET . . . . . .0.35 in (9 mm) per day
Water Source . . . . . . . . . . . . . . . . . . . . . . .well
Ground cover . . . . . . . . . . . . . .winter wheat
Crops rotated with . . . . . . . . . . . . . . . . .none
Time to maturity . . . . . . . . . . . . . . . . . . . . . . ..
Average yield . . . . . . . . . . . . .2.25 bales/acre
Duration of tape installation . . . .multi-year
Primary filtration . . . . . . . . . . . . .sand media
Secondary filtration . . . . . . . . . . . . . . . . .none
Submains . . . . . . . . . . . . . . . . . . . . . . . . .PVC
Mulch . . . . . . . . . . . . . . . . . . . . . . . . . . . .none
Management/Operation
Irrigation frequency . . . .1-2 times per week
Irrigation duration . . . . . . . . . . . . . . .4 hours
Chemigation . . . . . . . . . . . . . . . . . . . . . . . .yes
Fertigation . . . . . . . . . . . . . . . . . . . . . . . . . .yes
Line flushing . . . . . . . . . . . . .3 times per year
Filter back-flushing . . . . . . . . . . . .automatic
Drip Tape: RO-DRIP 15-12-15 XL
(15 mil, 12-in spacing, 15 GPH per 100 ft , 7/8-in diameter)
(.381 mm, 30-cm spacing, 186 LPH per 100 m, 22-mm diameter)
R O - D R I P
®
U S E R S
G U I D E
B.11
C R O P
P R O D U C T I O N
Corn
Corn is typically seeded on 30-in (76-cm) row spacings with 6 to 10-in (15 to 25-cm) in-row
spacing. One drip lateral is placed between every other pair of rows, resulting in a 60-in spacing
between laterals. Twelve-inch emitter spacings are common, at either 15 or 24 GPH per 100-ft.
Since RO-DRIP XL drip tape can deliver good uniformity on runs up to _ mile long, it is often
used in grain applications where large filed sizes are common.
Drip irrigation is becoming a method of choice in applications such as corn, which have
traditionally been served by center pivots. Center pivot irrigation cannot provide the same
per-acre yield or complete utilization of rectangular fields that is possible drip irrigation. In fields
where there is already a significant investment in center pivot hardware, yield can be increased
by using drip tape to irrigate the corners.
EXAMPLE:
Feed Corn
Kansas, USA
1320’
7”
8”
30”
60”
Operation:
Auxiliary Equipment:
Crop . . . . . . . . . . . . . . . . . . . . . . . . . . . . . .corn
Location . . . . . . . . . . . . . . . . . . .Kansas, USA
Field size . . . . . . . . . . . . . . . . . . . . . . .80 acres
Plants per acre . . . . . . . . . . . . . . . . . . . .28,000
Season . . . . . . . . . . . . . . . . . . . . . . . . . .Spring
Planting method . . . . . . . . . . . .direct seeded
Soil type . . . . . . . . . . . . . . . . . . . . . .clay loam
Maximum ET . . . . . . . . . . . . . .0.4 in per day
Water Source . . . . . . . . . . . . . . . . . . . . . . .well
Ground cover . . . . . . . . . . . . . . . . . . . . . .none
Crops rotated with . . . . . . . . . . . . . .soybeans
Time to maturity . . . . . . . . . . . . . . . .120 days
Ave. yield . . .200 bushels/acre (17.5 m3/ha)
Duration of tape installation . . . . . .5+ years
Primary filtration . . . . . . . . . . . . . . . . .screen
Secondary filtration . . . . . . . . . . . . . . . . .none
Submains . . . . . . . . . . . . . . . . . . . . . . . . .PVC
Mulch . . . . . . . . . . . . . . . . . . . . . . . . . . . .none
Management/Operation
Irrigation frequency . . . . . . . . . . . . . . .3 days
Irrigation duration . . . . . . . . . . . . . .16 hours
Chemigation . . . . . . . . . . . . . . . . . . . . . . . .yes
Fertigation . . . . . . . . . . . . . . . . . . . . . . . . . .yes
Line flushing . . . . . . . . . . . . . . . . . . . . . . . .yes
Filter back-flushing . . . . . . . . . . . . . . . . . .yes
Drip Tape: RO-DRIP 13-12-15 XL
(13 mil, 12-in spacing, 15 GPH per 100 ft, 7/8-in diameter)
(.330 mm, 30-cm spacing, 186 LPH per 100 m, 22-mm diameter)
B.12
R O - D R I P
®
U S E R S
G U I D E
C R O P
P R O D U C T I O N
Field Flowers
Outside field flowers are usually grown in single or double rows either on level ground or in
beds. The most commonly used tape is 8-mil wall thickness with 8-in emitter spacing. Cut flowers
are grown in greenhouses on multiple-row beds. Use three laterals for a typical 36 to 48-in
(91 to 122-cm) bed in a greenhouse. For a single or double row of flowers, or for outside bulbs,
use a single lateral with an 8 or 10-mil wall thickness and an 8-in emitter spacing.
EXAMPLE:
Field Flowers
Central Coast, California, USA
200’
8-14”
8-10”
40”
60”
Operation:
Auxiliary Equipment:
Crop . . . . . . . . . . . . . . . . . . . . . . .field flowers
Location . . . .Central Coast, California, USA
Field size . . . . . . . . . . . . . . . . .50 acres (20 ha)
Plants per acre . . . . .175,000 (450,000 per ha)
Season . . . . . . . . . . . . . . . . . . . . . .year round
Planting method . . . . . . . . . . . . . . . . . . . . . . .
. . . . . . . . . . .direct seeded and transplanted
Soil type . . . . . . . . . . . . . . . .clay to clay-loam
Maximum ET . . . . . ..30 in (7.5 mm) per day
Water Source . . . . . . . . . . . . . . . . . . . . . . .well
Ground cover . . . . . . . . . . . . . . . . . . . . . .none
Crops rotated with . . . . . . . . . . . . . . . . .none
Time to maturity . . . . . . . . . . . . . .20-60 days
Average yield . . . . . . . . .depends on market
Duration of tape installation . . . .3-6 months
Primary filtration . . . . . . .sand media filters
Secondary filtration . . . . . . . . . . . . . . . . .none
Submains . . . . . . . . . . . . . . . . . . . . . . . .layflat
Mulch . . . . . . . . . . . . . . . . . . . . . . . . . . . .none
Management/Operation
Irrigation frequency . . . .1-3 times per week
Irrigation duration . . . . . . . . . . . . . .1-2 hours
Chemigation . . . . . . . . . . . . . . . . . .fungicides
Fertigation . . . . . . . . . . . . . . . . . . . . . . . . . .yes
Line flushing . . . . . . . . . . . . . . . . . . .monthly
Filter back-flushing . . . . . . . . . . . .automatic
Drip Tape: RO-DRIP 8-8-40
(8 mil, 8-in spacing, 40 GPH per 100-ft, 5/8-in diameter)
(.200 mm, 20-cm spacing, 497 LPH per 100 m, 16-mm diameter)
R O - D R I P
®
U S E R S
G U I D E
B.13
C R O P
P R O D U C T I O N
Peppers
Peppers are a warm-season crop. Pepper plants can be injured or killed by frost and grow
best in soil temperatures above 65°F (17°C) and in air temperatures of 70 to 80°F (20 to 25°C).
Transplanted peppers root only to a depth of about 2-ft (60-cm), but use soil moisture efficiently.
Young pepper plants are relatively resistant to water stress but may show slower development
and reduced yields.
Peppers are usually transplanted in single rows on 36-in (91-cm) beds with 12-in (130-cm)
in-row spacing; or on 72-in (183-cm) beds with double rows spaced 12 to 18-in (30 to 46 cm) apart
and staggered on either side of the drip lateral, with 12 to 18-in (30 to 46-cm) in-row spacing.
Plastic mulch in combination with drip irrigation can be used to increase yields.
EXAMPLE:
Peppers
Pennsylvania, USA
400’
16”
18”
2”
6”
30”
66”
Operation:
Auxiliary Equipment:
Crop . . . . . . . . . . . . . . . . . . . . . . . . . . .peppers
Location . . . . . . . . . . . . . .Pennsylvania, USA
Field size . . . . . . . . . . . . . . . . .25 acres (10 ha)
Plants per acre . . . . . . .12,000 (30,000 per ha)
Season . . . . . . . . . . . . . . . . . . . . . . . . .summer
Planting method . . . . . . . . . . . . . . .transplant
Soil type . . . . . . . . . . . . . . . . . . . . . .silty loam
Maximum ET . . . . .0.30 in (7.5 mm) per day
Water Source . . . . . . . . . . . . . . . . . .deep well
Ground cover . . . . . . . . . . . . . .plastic mulch
Crops rotated with . . .cabbage, corn, tomato
Time to maturity . . . . . . . . . . . . . . . . .60 days
Average yield. . .22.5 tons/acre (50 tons/ha)
Duration of tape installation . . . . . .120 days
Primary filtration . . . . . . . . . . . . .screen filter
Secondary filtration . . . . . . . . . . . . . . . . .none
Submains . . . . . . . . . . . . . . . . . . . . . .2" layflat
Mulch . . . . . . . . . . . . . . . . . . . . . .black plastic
Management/Operation
Irrigation frequency . . . .1-2 times per week
Irrigation duration . . . . . . . . . . . . . .4-6 hours
Chemigation . . . . . . . . . . . . . . . . . . . . . . . .yes
Fertigation . . . . . . . . . . . . . . . . . . . . . . . . . .yes
Line flushing . . . . . . . . . . . . . . . . . . . . . . . .yes
Filter back-flushing . . . . . . . . . . . . . . . . . .yes
Drip Tape: RO-DRIP 8-12-24
(8 mil, 12-in spacing, 15 GPH per 100 ft, 5/8-in diameter)
(.200 mm, 30-cm spacing, 186 LPH per 100 m, 16-mm diameter)
B.14
R O - D R I P
®
U S E R S
G U I D E
C
COEFFICIENT OF VARIATION AND
EMITTER DISCHARGE EXPONENT
C.1
C O E F F I C I E N T
O F
VA R I A T I O N
A N D
E M I T T E R
D I S C H A R G E
E X P O N E N T
Coefficient of variation
If you randomly select several emitters from a section of drip tape, apply the same water
pressure to each, and measure the discharge rate from each, the Coefficient of Variation (Cv) is a
measure of how consistent the results will be. If the emitters were manufactured with a high
precision production process and good quality control, the discharge rates of all of the emitters
will be nearly identical and the Cv will be low. On the other hand, emitters made from a poor
design, an inconsistent manufacturing process, or with little or no quality control will have wide
variations in discharge rate and a high Cv.
Cv can be calculated by measuring the discharge rate from each emitter in a sample of drip
tape (usually long enough to provide 25 emitters), then using the following formula:
Cv =
Sq
q
where Sq is the standard deviation of the discharge rates measured in the sample, and q is the
average discharge rate of the sample. Most drip tape manufacturers publish the Cv of their products.
Several independent labs also test Cvs, and compare them among manufacturers.
A perfect manufacturing process is impossible, so emitters with zero Cv (all identical flow
rates) do not exist. However, since good Distribution Uniformity is impossible if emitter flow
rates are not consistent, you should select a drip tape with a low Cv. Table C1 gives an idea of
Cv values you can expect and what they mean.
Table C1 Emitter Cv Values and their Classification
The Roberts Difference:
RO-DRIP is manufactured
with an advanced, high-
Cv
Classification*
≤ 0.05
Excellent
0.05 - 0.07
Good
0.07 - 0.11
Marginal
> 0.11
Poor
precision process which
*As designated by American Society of Agricultural Engineers ASAE EP405.1 DEC94
results in an emitter coefficient of variation of 0.03
or lower. This translates to
better distribution uniformity
and higher irrigation
It is important to realize that the Cv values published by manufacturers are for new product;
and that long-term performance of your installed drip system can be as much affected by how
well the emitters resist plugging as by the Cv.
Emitter discharge exponent (the x-factor):
When a drip tape emitter is operating at its recommended pressure, it generally discharges
water at its published rate (with minor variations resulting from its Cv). If you increase pressure
from that point, the discharge rate will increase. If you decrease pressure, the discharge rate will
decrease. The quality of the emitter determines how much the discharge rate changes in response
to pressure changes.
The Discharge Exponent (x) of an emitter is a measure of how much its discharge rate varies as
supply pressure varies. An x of 1 means that the discharge rate varies directly with pressure
(i.e., if supply pressure doubles, discharge rate doubles). A low x means that the discharge rate
does not vary greatly when pressure varies. Most high-quality drip tape products have x values
in the range of 0.4 to 0.7. Some lower-quality products have x values greater than 1.
The discharge exponent of a drip emitter can be calculated by measuring its discharge rate at
two different pressures. The equation which relates pressure to discharge rate for a drip emitter is
efficiency in your field.
q = KP
C.2
R O - D R I P
®
U S E R S
G U I D E
x
C O E F F I C I E N T
O F
VA R I A T I O N
A N D
E M I T T E R
D I S C H A R G E
E X P O N E N T
where P is the pressure applied to the emitter, q is the discharge rate, x is the discharge exponent
and K is a constant. By measuring discharge rates at two different pressures, you can calculate
the exponent as follows:
q1 = KP1
x=
x
q 2 = KP2
x
log(q2 / q1 )
log(P2 / P1 )
where q1 is the discharge rate measured at pressure P1 and q2 is the discharge rate measured at
pressure P2 . Most drip tape manufacturers publish the discharge exponent of their products.
Several independent labs also test discharge exponents, and compare them among manufacturers.
This user guide tells you how to design your drip system to have minimal pressure variations
from elevation changes and friction losses. Even a well-designed system, however, can have
higher pressures in some parts of the field than in others. If you select a drip tape product with a
low x value, you can avoid the problems of higher discharge rates in some parts of the field than
in others and low distribution uniformity.
R O - D R I P
®
U S E R S
G U I D E
C.3
D
SAMPLE RO-DRIP
PERFORMANCE CHARTS
®
Following are sample performance charts for three RO-DRIP products, XX-12-24 (12
inch emitter spacing, 24 GPH per 100 ft), XX-24-17 (24 inch emitter spacing, 17 GPH per 100
ft)and XX-12-24 XL (12 inch emitter spacing, 24 GPH per 100 ft, 7/8-in ID). The "XX" term
denotes the wall thickness, and can be 5, 8, 10, 13 or 15 mil. For a complete set of performance
charts for all RO-DRIP products, see the Roberts Irrigation Products publication RO-DRIP
PERFORMANCE DATA.
D.1
S A M P L E
R O - D R I P ®
P E R F O R M A N C E
C H A R T S
Table D.1 Sample Performance Charts
Maximum Run Length, feet
RO-DRIP XX-24-17
RO-DRIP XX-12-24
Cv = 0.03
x = 0.52
Slope
-1.5%↓
-1.0%↓
-0.5%↓
0.0%
+0.5%↑
+1.0%↑
q = 0.40
k =.018396
Cv = 0.03
x = 0.52
Inlet Pressure - psi
EU
6
8
10
RO-DRIP XX-12-24 XL
q = 0.28
k =.115311
Cv = 0.03
Inlet Pressure - psi
Inlet Pressure - psi
12
EU
6
8
10
q = 0.40
k =.081396
x = 0.52
12
EU
6
8
R O - D R I P
®
U S E R S
12
80%
1078 1088
1088 1081
80%
1335 1355
1363 1366 80%
1830 1896
1928 1939
85%
936
941
939
930
85%
1153 1177
1183 1178 85%
1551 1632
1664 1677
90%
735
754
754
750
90%
872
947
304
1240
1306 1333
80%
1076 1069
1056 1044
80%
1349 1349
1339 1328 80%
1871 1895
1898 1894
85%
929
921
907
898
85%
1169 1167
1157 1143 85%
1615 1640
1643 1634
90%
747
740
731
720
90%
940
934
90%
1260 1308
1313 1311
80%
1022 1001
986
973
80%
1298 1273
1256 1239 80%
1805 1788
1766 1749
85%
877
857
845
833
85%
1119 1092
1077 1063 85%
1557 1534
1514 1499
90%
701
686
676
662
90%
900
856
90%
1248 1227
1211 1193
80%
834
843
850
852
80%
1039 1052
1057 1063 80%
1370 1393
1412 1430
85%
717
721
729
734
85%
897
902
905
911
85%
1172 1192
1209 1222
90%
566
574
577
578
90%
708
713
717
724
90%
920
938
949
80%
605
656
689
716
80%
702
771
823
857
80%
831
939
1018 1078
85%
510
556
586
610
85%
591
655
700
729
85%
682
784
854
909
90%
379
419
445
471
90%
431
489
531
556
90%
477
564
621
675
80%
465
530
577
614
80%
514
600
667
715
80%
560
678
773
851
85%
382
441
486
519
85%
413
494
551
601
85%
441
548
627
699
90%
264
315
354
380
90%
281
346
403
436
90%
287
367
428
484
935
939
872
944
917
846
90%
Cv = coefficient of variation ; q = discharge rate, GPM/100’ ; x = emitter exponent ; k = flow constant ; required filtration: 140 mesh.
D.2
10
G U I D E
959
E
LENGTH, APPLICATION RATES,
AND FLOW RATES
The tables in this appendix summarize the results of the equations given in DESIGN:
Lateral Design for several drip tape flow rates and lateral spacings. Lateral spacings and flow
rates must be specified for an application rate sufficient to meet irrigation requirements during
peak ET (Tables E1 and E3) without exceeding the capacity of the water supply (Tables E2 and E4).
E.1
L E N G T H ,
A P P L I C A T I O N
R A T E S ,
A N D
F L O W
R A T E S
Table E.1 Length and Flow Rate Requirements, US Units
Drip Tape Flow Rate per 100 ft at 8 PSI
Distance
Between
Laterals
(in)
Length of
Drip Tape
per Acre
(ft)
40 GPH
24 GPH
20 GPH
17 GPH
15 GPH
.67 GPM
.40 GPM
.33 GPM
.28 GPM
.25 GPM
GPM Required per Acre
30
17,424
117
70
58
49
44
32
16,335
109
65
54
46
41
34
15,374
103
62
51
43
38
36
14,520
97
58
48
41
36
38
13,756
92
55
45
39
34
40
13,068
88
52
43
37
33
42
12,446
83
50
41
35
31
44
11,880
80
48
40
33
30
46
11,363
76
46
28
32
28
48
10,890
73
44
36
31
27
54
9,680
65
39
32
27
24
60
8,712
58
35
29
24
22
66
7,920
53
32
26
22
20
72
7,260
49
29
24
20
18
84
6,223
42
25
21
17
16
96
5,445
37
22
18
15
14
120
4,356
29
17
14
12
11
Table E.2 Length and Application Rates, US Units
Drip Tape Flow Rate per 100 ft at 8 PSI
Distance
Between
Laterals
(in)
Length of
Drip Tape
per Acre
(ft)
40 GPH
24 GPH
20 GPH
17 GPH
15 GPH
.67 GPM
.40 GPM
.33 GPM
.28 GPM
.25 GPM
Application Rate (in per hour @ 8 PSI)
E.2
30
17,424
0.258
0.155
0.131
0.108
.096
32
16,335
0.242
0.145
0.123
0.101
.090
34
15,374
0.228
0.136
0.115
0.095
.085
36
14,520
0.215
0.129
0.109
0.090
.080
38
13,756
0.204
0.122
0.103
0.085
.076
40
13,068
0.193
0.116
0.098
0.081
.072
42
12,446
0.184
0.110
0.093
0.077
.069
44
11,880
0.176
0.105
0.089
0.074
.066
46
11,363
0.168
0.101
0.085
0.070
.063
48
10,890
0.161
0.093
0.082
0.067
.060
54
9,680
0.143
0.086
0.073
0.060
.054
60
8,712
0.129
0.074
0.065
0.054
.048
66
7,920
0.117
0.070
0.059
0.049
.044
72
7,260
0.107
0.064
0.055
0.045
.040
84
6,223
0.092
0.055
0.047
0.039
.034
96
5,445
0.081
0.048
0.042
0.034
.030
120
4,356
0.064
0.039
0.033
0.027
.024
R O - D R I P
®
U S E R S
G U I D E
L E N G T H ,
A P P L I C A T I O N
R A T E S ,
A N D
F L O W
R A T E S
Table E.3 Length and Flow Rate Requirements, Metric Units
Drip Tape Flow Rate per 100 m at .55 bar
Distance
Between
Laterals
(cm)
Length of
Drip Tape
per Acre
(m)
497 LPH
298 LPH
248 LPH
211 LPH
186 LPH
8.3 LPM
5.0 LPM
4.1 LPM
3.5 LPM
3.1 LPM
M3/hr Required per Acre
80
12,500
62
38
31
26
23
90
11,110
55
33
27
23
21
100
10,000
50
30
25
21
19
110
9,090
45
27
22
19
17
120
8,333
42
25
21
18
16
130
7,692
38
23
19
16
14
140
7,143
36
21
18
15
13
150
6,667
33
20
16
14
12
160
6,250
31
19
15
13
12
170
5,882
29
18
15
12
11
180
5,556
28
17
14
12
10
190
5,263
26
16
13
11
10
200
5,000
25
15
12
11
9
210
4,762
24
14
12
10
9
220
4,546
23
14
11
10
9
230
4,348
22
13
11
9
8
240
4,167
21
13
10
9
8
Table E.4 Length and Application Rates, Metric Units
Drip Tape Flow Rate per 100 m at .55 bar
Distance
Between
Laterals
(cm)
Length of
Drip Tape
per Acre
(m)
497 LPH
298 LPH
248 LPH
211 LPH
186 LPH
8.3 LPM
5.0 LPM
4.1 LPM
3.5 LPM
3.1 LPM
Application Rate (mm3/hr @ .55 bar)
80
12,500
6.25
3.75
3.12
2.61
2.30
90
11,110
5.55
3.31
2.77
2.34
2.06
100
10,000
5.00
2.98
2.50
2.11
4.86
110
9,090
4.54
2.71
2.27
1.91
1.68
120
8,333
4.16
2.48
2.08
1.76
1.55
130
7,692
3.84
2.29
1.92
1.62
1.43
140
7,143
3.57
2.13
1.78
1.51
1.33
150
6,667
3.33
1.99
1.66
1.41
1.24
160
6,250
3.12
1.86
1.56
1.32
1.16
170
5,882
2.94
1.72
1.47
1.24
1.09
180
5,556
2.77
1.66
1.38
1.17
1.03
190
5,263
2.63
1.57
1.31
1.11
0.99
200
5,000
2.50
1.49
1.25
1.06
0.93
210
4,762
2.38
1.42
1.19
1.01
0.89
220
4,546
2.27
1.35
1.13
0.96
0.85
230
4,348
2.17
1.30
1.08
0.92
0.81
240
4,167
2.08
1.24
1.04
0.88
0.78
R O - D R I P
®
U S E R S
G U I D E
E.3
F
ENGINEERING CONVERSION FACTORS
F.1
E N G I N E E R I N G
C O N V E R S I O N
F A C T O R S
APPENDIX F
ENGINEERING CONVERSION FACTORS
LENGTH
To Convert
To
Miles
Multiply by To Convert
To
Multiply by
inches
63,360
kilometers
miles
feet
5,280
kilometers
feet
3,280.8
miles
yards
1,760
kilometers
yards
1,093.6
miles
nautical miles
0.87
kilometers
miles
0.6214
miles
meters
1,609.34
kilometers
nautical miles
miles
kilometers
1.609
meters
centimeters
feet
meters
0.3048
meters
inches
39.37
feet
centimeters
30.48
meters
feet
3.281
inches
centimeters
2.54
meters
yards
1.094
inches
millimeters
25.4
centimeters
inches
0.3937
mils
1,000
millimeters
inches
0.03937
microns
25.4
millimeters
microns
inches
mils
microns
meters
1,000
0.54
100
1,000
mils
0.03937
APPENDIX F
ENGINEERING CONVERSION FACTORS
AREA
To Convert
To
To
Multiply by
sq miles
acres
640
sq kilometers
hectares
sq miles
hectares
259
sq kilometers
acres
247.1
sq miles
sq kilometers
2.59
100
sq kilometers
sq miles
0.3861
acres
sq feet
43560
hectares
sq meters
10,000
acres
sq yards
4840
hectares
acres
2.471
acres
hectares
0.4047
sq meters
sq centimeters
10,000
sq feet
sq inches
144
sq meters
sq feet
10.764
sq inches
0.1549
sq feet
sq yards
0.111
sq feet
sq meters
0.0929
sq centimeters
6.452
sq inches
F.2
Multiply by To Convert
R O - D R I P
®
U S E R S
G U I D E
sq centimeters
E N G I N E E R I N G
C O N V E R S I O N
F A C T O R S
APPENDIX F
ENGINEERING CONVERSION FACTORS
VOLUME
To Convert
To
Multiply by To Convert
To
Multiply by
325851
Cubic Meters
Liters
1000
Acre Inches
Cubic Feet
3630
Cubic Meters
Gallons
264.2
Cubic Yards
Cubic Meters
0.765
Cubic Meters
Cubic Feet
35.32
Cubic Yards
Liters
769
Cubic Meters
Cubic Yards
1.308
Cubic Yards
Cubic Feet
27
Liters
cubic Meters
0.001
Cubic Yards
Cubic Inches
46656
Liters
Cubic Yards
0.0013
Cubic Yards
Gallons
200
Liters
Cubic Feet
0.035
Cubic Feet
Gallons
7.48
Liters
Gallons
0.264
Cubic Feet
Cubic Inches
1728
Liters
Cups
4.22
Cubic Feet
Cubic Yards
0.037
Liters
Quarts
1.057
Cubic Feet
Cubic Centimeters
28317
Liters
Pints
2.11
Cubic Feet
Cubic Meters
0.0283
Liters
Cubic Inches
Cubic Feet
Liters
28.32
Liters
Cubic Centimeters
Cubic Feet
Acre Inches
0.000275
Cubic Centimeters
Cubic Feet
1000
3.53x10⁻⁵
Cubic Feet
Acre Feet
0.0000230
Cubic Centimeters
Gallons
0.000264
Gallons
Acre Feet
0.00000307
Cubic Centimeters
Pints
0.00211
Gallons
Cubic Feet
0.134
Cubic Centimeters
Cubic Millimeters
1000
Gallons
Cubic Inches
231
Cubic Centimeters
Cubic Inches
0.061
Gallons
Cubic Yards
0.005
Cubic Centimeters
Liters
0.001
Gallons
Cubic Centimeters
3785
Cubic Centimeters
Quarts
0.0011
Gallons
Cubic Meters
0.0038
Cubic Centimeters
Ounces
0.0338
Gallons
Liters
3.785
Cubic Centimeters
Tablespoons
0.067
Gallons
Quarts
4
Cubic Centimeters
Fluid Ounces
0.0333
8
Cubic Millimeters
Cubic Centimeters
0.001
Acre Feet
Gallons
Gallons
Pints
Gallons
Ounces
128
Quarts
Gallons
0.25
Quarts
Pints
2
Quarts
Liters
0.946
Quarts
Cubic Centimeters
946.4
Quarts
Cubic Inches
57.75
Quarts
Pints
Pints
Gallons
0.125
Pints
Quarts
0.5
Pints
Ounces
16
Pints
Liters
0.4732
Pints
Cubic Centimeters
473.2
Pints
Cubic Inches
28.88
Cups
Liters
Cubic Inches
Cubic Feet
61
2
0.237
0.00058
2.14x10⁻⁵
Cubic Inches
Cubic Yards
Cubic Inches
Cubic Centimeters
Cubic Inches
Gallons
0.00433
Cubic Inches
Liters
0.0164
Cubic Inches
Quarts
0.0173
Cubic Inches
Pints
0.0346
Fluid Ounces
US Gallons
0.00781
Fluid Ounces
Pints
0.0625
Fluid Ounces
Cubic Centimeters
30
Tablespoons
Cubic Centimeters
15
16.4
R O - D R I P
®
U S E R S
G U I D E
F.3
E N G I N E E R I N G
C O N V E R S I O N
F A C T O R S
APPENDIX F
ENGINEERING CONVERSION FACTORS
WEIGHT AND MASS
To Convert
To
Multiply by To Convert
To
Multiply by
Ounces
Grams
28.35
Grams
Ounces
0.0353
Ounces
Pounds
0.0625
Grams
Pounds
0.0022
Ounces
Kilograms
0.0284
Grams
Kilograms
0.001
Pounds
Grams
453.6
Kilograms
Grams
1000
Pounds
Ounces
16
Kilograms
Ounces
35.21
Pounds
Kilograms
0.454
Kilograms
Pounds
2.205
Pounds
Tons (short)
0.0005
Kilograms
Tons
0.0011
Pounds
Tons (long)
0.00045
Kilograms
Metric Tons
0.001
Pounds
Metric Tons
0.000454
Metric Tons
Kilograms
1000
Tons (short)
Tons (metric)
0.907
Metric Tons
Pounds
2205
Tons (short)
Tons (long)
0.893
Metric Tons
Tons (Long)
0.984
Tons (short)
Kilograms
907.2
Metric Tons
Tons (Short)
1.1
Tons (short)
Pounds
2000
Tons (long)
Metric Tons
1.02
Tons (long)
Tons (short)
1.12
Tons (long)
Pounds
2240
APPENDIX F
ENGINEERING CONVERSION FACTORS
YIELD
To Convert
To
Multiply by To Convert
To
Multiply by
Metric Tons per Hectare
US Tons per Acre
0.446
US Tons per Acre
Metric Tons per Hectare
Kilograms per Hectare
Pounds per Acre
0.892
Pounds per Acre
Kilograms per Hectare
1.12
11.48
Bushels per Acre
Cubic Meters per Hectare
0.087
Cubic Meters per Hecare
Bushels per Acre
2.24
APPENDIX F
ENGINEERING CONVERSION FACTORS
FLOW
To Convert
F.4
To
Multiply To Convert
by
To
Multiply
by
Acre Inches per 24 Hours
Gallons per Minute
18.86
Cubic Meters per Hour
Cubic Feet per Second
Gallons per Minute
448.8
Cubic Meters per Second
Cubic Feet per Second
Acre-in per Hour (approx)
1
Cubic Meters per Second
Cubic Feet per Second
Acre-Ft per Day (approx)
2
Liters per Minute
Cubic Feet per Second
5.89x10⁻⁴
Cubic Feet per Second
Liters per Second
28.32
Liters per Minute
Cubic Gallons per Second
4.40x10⁻³
Liters per Second
0.278
Cubic Feet per Second
35.31
Gallons per Minute
15850
Cubic Feet per Second
Liters per Minute
1699
Liters per Minute
British Gallons per Minute
13.2
Cubic Feet per Second
Cubic Meters per Second
0.0283
Liters per Second
Cubic Meters per Hour
3.6
Gallons per Minute
Cubic Meters per Second
6.39x10⁻⁵
Liters per Second
Cubic Feet per Second
0.0353
Gallons per Minute
Liters per Second
0.0631
Liters per Second
Gallons per Minute
15.85
Gallons per Minute
Cubic Feet per Second
0.00223
Gallons per Minute
Acre Inches per 24 Hours
0.053
Gallons per Second
Liters per Minute
0.0631
British Gallons per Minute
Liters per Minute
0.0757
R O - D R I P
®
U S E R S
G U I D E
E N G I N E E R I N G
C O N V E R S I O N
F A C T O R S
APPENDIX F
ENGINEERING CONVERSION FACTORS
VELOCITY
To Convert
Miles per Hour
To
Feet per Second
Multiply To Convert
by
1.467
Kilometers per Hour
Multiply
by
To
Feet per Minute
54.68
0.91
Miles per Hour
Feet per Minute
88
Kilometers per Hour
Feet per Second
Miles per Hour
Meters per Second
0.447
Kilometers per Hour
Meters per Second
0.28
Miles per Hour
Centimeters per Second
44.7
Kilometers per Minute
Meters per Second
16.67
Miles per Hour
Meters per Minute
27.0
Meters per Minute
Miles per Hour
0.037
Miles per Minute
Feet per Minute
5280
Meters per Second
Kilometers per Hour
3.6
Miles per Minute
Meters per Second
26.82
Meters per Second
Kilometers per Minute
0.06
Miles per Minute
Centimeters per Second
2682
Meters per Second
Miles per Hour
2.237
Feet per Minute
Kilometers per Hour
0.0183
Meters per Second
Miles per Minute
0.037
Feet per Minute
Meters per Second
0.00508
Meters per Second
Feet per Minute
196.8
0.0114
Feet per Minute
Miles per Hour
Feet per Minute
Miles per Minute
Feet per Second
Feet per Second
Meters per Second
Feet per Second
3.281
0.000189
Centimeters per Second
Miles per Hour
0.0224
Meters per Second
0.305
Centimeters per Second
Miles per Minute
Miles per Hour
0.68
Feet per Second
Kilometers per Hour
1.10
Feet per Second
Miles per Minute
0.000373
0.0114
APPENDIX F
ENGINEERING CONVERSION FACTORS
PRESSURE AND HEAD
To Convert
To
Multiply To Convert
by
Multiply
by
To
Pounds per Square Inch
Kg per Square Meter
703.1
Atmospheres
Pounds per Square Inch
14.7
Pounds per Square Inch
Bar
0.0689
Atmospheres
Inches of Mercury
29.9
Pounds per Square Inch
Atmosphere
0.068
Atmospheres
Feet of Water
33.9
Pounds per Square Inch
Pounds per Square Foot
144
Atmospheres
Pounds per Square Inch
Feet of Water
2.31
Bar
Pounds per Square Inch
14.5
Pounds per Square Inch
Inches of Mercury
2.036
Bar
Atmosphere at Sea Level
1.013
Pounds per Square Inch
Inches of Water (60o F)
27.68
Kg per Square Meter
Inches of Mercury
0.0029
Pounds per Square Foot
Pounds per Square Inch
0.00694
Kg per Square Meter
Pounds per Square Foot
0.2048
Pounds per Square Foot
Kg per Square Meter
4.88
Kg per Square Meter
Pounds per Square Inch
0.00142
Inches of Mercury
Atmosphere at Sea Level
0.0334
Inches of Mercury
Kg per Square Meter
345.3
Inches of Mercury
Feet of Water
1.13
Inches of Mercury
Inches of Water (60o F)
13.60
Inches of Mercury
Pounds per Square Inch
0.491
Feet of Water
Inches of Mercury
0.883
Feet of Water
Pounds per Square Inch
0.4335
Feet of Water
Atmosphere at Sea Level
0.0295
Inches of Water (60o F)
Inches of Mercury
0.0736
Inches of Water (60o F)
Pounds per Square Inch
0.0361
Bar
R O - D R I P
0.9869
®
U S E R S
G U I D E
F.5
E N G I N E E R I N G
C O N V E R S I O N
F A C T O R S
APPENDIX F
ENGINEERING CONVERSION FACTORS
WORK AND POWER
Multiply To Convert
by
Multiply
by
To Convert
To
Horsepower
Foot-Pounds per Second
550
Calories per Second
Horsepower
0.0056
Horsepower
Watts
745.7
Calories per Second
Kilowatts
0.00419
Horsepower
Kilowatts
0.7457
Watts
Kilowatts
Horsepower
Calories per Second
178.1
Watts
Horsepower
To
0.001
0.00134
Foot-Pounds per Second
Kilowatts
0.000738
Kilowatts
Watts
Foot-Pounds per Second
Horsepower
0.00182
Kilowatts
Foot-Pounds per Second
1356
Foot-Pounds
Calories
0.3239
Kilowatts
Calories per Second
238.9
Foot-Pounds
BTUs
0.00129
Kilowatts
Horsepower
1.341
Foot-Pounds
Kilowatt-Hours
Calories
Foot-Pounds
BTUs
Foot-Pounds
3.77¥10-7
778
Kilowatt-Hours
Calories
1000
3.09
8.60x10⁵
BTUs
Calories
252
Kilowatt-Hours
BTUs
3413
BTUs
Kilowatt-Hours
0.00029
Kilowatt-Hours
Horsepower Hours
1.341
Horsepower-Hour
Kilowatt-Hours
0.7457
Kilowatt-Hours
Foot-Pounds
2.66x10⁶
To
Multiply
by
APPENDIX F
ENGINEERING CONVERSION FACTORS
CONCENTRATION
To Convert
To
Multiply To Convert
by
Milligrams per Liter
Parts per Million
1
Millimho per Centimeter
Milligrams per Liter
Grams per Cubic Meter
1
Millimho
Milliequivalents per Liter
Decisiemens per Meter
Millimho per Centimeter
1
Milligrams per Liter
Parts per Million (ppm)
1
Decisiemens per Meter
Parts per Million Salt
640
Grams per Cubic Meter
Parts per Million (ppm)
1.00
Parts per Million (ppm)
Milligrams per Liter
1
Parts per Million (ppm)
Grams per Cubic Meter
Parts per Million (ppm)
Tons per Acre Foot
Parts per Million (ppm)
Decisiemens per Meter
1.00
10
1
0.00136
Grains per Gallon
0.0584
Parts per Million Salt
Decisiemens per Meter
0.00156
Tons per Acre Foot
Parts per Million (ppm)
735
Grains per Gallon
Parts per Million (ppm)
17.1
APPENDIX F
ENGINEERING CONVERSION FACTORS
TEMPERATURE
To Convert
To
Degrees Celcius (°C)
F.6
R O - D R I P
®
U S E R S
Degrees Fahrenheit (°F)
G U I D E
Formula To Convert
1.8x°C+32
Degrees Fahrenheit (°F)
To
Degrees Celcius (°C)
Formula
(°F-32)/1.8
References
Burt, Charles P.E., Ph.D & Styles, Stuart P.E. 1994. Drip and Microirrigation
for Trees, Vines, and Row Crops. The Irrigation Training & researh Center.
San Luis Obispo, CA.
Burt, C. 1995. Fertigation. The Irrigation Training & Research Center.
San Luis Obispo, CA
Solomon, Kenneth, Ph D., P.E. 1999. Irrigation Equipment
Performance Report. Center for Irrigation Technology.
Fresno, CA.
Hanson, Blaine. 1994. Drip Irrigation for Row Crops.
University of California, Davis.
Davis, CA.
700 Rancheros Drive
San Marcos, CA 92069-3007 U.S.A.
760.744.4511 800.685.5557 Fax: 760.744.0914
www.robertsirrigation.com
© 2001 Roberts Irrigation Products, Inc. All rights reserved.