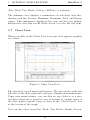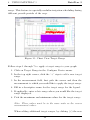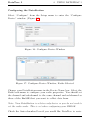
1
DataTrac 3
User’s Manual
Decagon Devices, Inc.
Version: June 25, 2015 — 13:56:37
DataTrac 3
Decagon Devices, Inc.
2365 NE Hopkins Court
Pullman WA 99163
Phone: 509-332-5600
Fax: 509-332-5158
Website: www.decagon.com
Email: [email protected] or [email protected]
Trademarks
“DataTrac” is a registered trademark of Decagon Devices, Inc.
c
2006-2013
Decagon Devices, Inc.
All Rights Reserved
ii
DataTrac 3
CONTENTS
Contents
1 Introduction
1.1 Customer Support . . . . . . . . . . . . . . . . . . . .
1.2 DataTrac 3 Software License Agreement . . . . . . . .
1
1
2
2 About the DataTrac Software
2.1 System Requirements . . . . . . . . . . . . . . . . . .
2.2 Installation . . . . . . . . . . . . . . . . . . . . . . . .
2.3 Updating DataTrac 3 from the Web . . . . . . . . . .
5
6
6
6
3 DataTrac Main Features
3.1 The DataTrac 3 Main Screen
3.2 The Menu Bar . . . . . . . .
3.3 The Toolbar . . . . . . . . . .
3.4 The Device Directory . . . .
3.5 The Device Status Area . . .
3.6 The Chart Area . . . . . . . .
3.7 Chart View . . . . . . . . . .
3.8 Table View . . . . . . . . . .
.
.
.
.
.
.
.
.
.
.
.
.
.
.
.
.
.
.
.
.
.
.
.
.
.
.
.
.
.
.
.
.
.
.
.
.
.
.
.
.
.
.
.
.
.
.
.
.
.
.
.
.
.
.
.
.
.
.
.
.
.
.
.
.
.
.
.
.
.
.
.
.
.
.
.
.
.
.
.
.
.
.
.
.
.
.
.
.
.
.
.
.
.
.
.
.
.
.
.
.
.
.
.
.
4 Using DataTrac 3
4.1 Connecting to the Logger . . . . . . . . . . . . . . .
4.2 Data Logger Configuration . . . . . . . . . . . . . .
4.3 EM50 R Radio Modes . . . . . . . . . . . . . . . . .
4.4 Sensors and Measurements Section . . . . . . . . . .
4.5 Chart Axis Section . . . . . . . . . . . . . . . . . . .
4.6 Target Range . . . . . . . . . . . . . . . . . . . . . .
4.7 Applying a Custom Calibration to Volumetric Water
Content Data . . . . . . . . . . . . . . . . . . . . . .
4.8 Copy Device Settings Between Loggers . . . . . . . .
4.9 Downloading Data from an Em50G Logger . . . . .
4.10 Downloading Data from an Em50R Logger . . . . .
4.10.1 Connecting to and Configuring a DataStation
4.11 Autocorrect Corrupt Timestamps . . . . . . . . . . .
4.12 Scan Ports . . . . . . . . . . . . . . . . . . . . . . . .
4.13 Reading in Saved Data Files . . . . . . . . . . . . . .
5 Menus
.
.
.
.
.
.
.
.
8
8
8
9
9
10
11
12
14
.
.
.
.
.
.
17
17
18
20
21
23
23
.
.
.
.
.
.
.
.
25
26
27
28
28
30
30
30
32
iii
CONTENTS
5.1
5.2
5.3
5.4
5.5
5.6
5.7
5.8
DataTrac 3
File Menu . . . . . . . . . . . .
Edit Menu . . . . . . . . . . . .
View Menu . . . . . . . . . . .
Setup Menu . . . . . . . . . . .
Connection Menu . . . . . . . .
Device Tools . . . . . . . . . .
DataTrac Help Menu . . . . . .
Preferences Menu . . . . . . . .
5.8.1 General Program Tab .
5.8.2 Measurement Units Tab
5.8.3 Communication Tab . .
5.8.4 Report Tab . . . . . . .
.
.
.
.
.
.
.
.
.
.
.
.
.
.
.
.
.
.
.
.
.
.
.
.
.
.
.
.
.
.
.
.
.
.
.
.
.
.
.
.
.
.
.
.
.
.
.
.
.
.
.
.
.
.
.
.
.
.
.
.
.
.
.
.
.
.
.
.
.
.
.
.
.
.
.
.
.
.
.
.
.
.
.
.
.
.
.
.
.
.
.
.
.
.
.
.
.
.
.
.
.
.
.
.
.
.
.
.
.
.
.
.
.
.
.
.
.
.
.
.
.
.
.
.
.
.
.
.
.
.
.
.
.
.
.
.
.
.
.
.
.
.
.
.
.
.
.
.
.
.
.
.
.
.
.
.
32
33
34
34
36
37
38
39
39
41
43
44
6 DataTrac 3 Data Tools
6.1 Reports . . . . . . . . . . . . .
6.2 Transfer Sets . . . . . . . . . .
6.3 Exported Chart File Formats .
6.4 Virtual Ports . . . . . . . . . .
6.4.1 External Measurements:
6.4.2 Growing Tools . . . . .
6.4.3 Growing Tool Options .
.
.
.
.
.
.
.
.
.
.
.
.
.
.
.
.
.
.
.
.
.
.
.
.
.
.
.
.
.
.
.
.
.
.
.
.
.
.
.
.
.
.
.
.
.
.
.
.
.
.
.
.
.
.
.
.
.
.
.
.
.
.
.
.
.
.
.
.
.
.
.
.
.
.
.
.
.
.
.
.
.
.
.
.
.
.
.
.
.
.
.
46
46
48
48
49
49
49
51
.
.
.
.
.
55
55
61
63
65
68
7 Troubleshooting
7.1 General Troubleshooting . . . . .
7.2 Decagon Hardware . . . . . . . .
7.3 Software . . . . . . . . . . . . . .
7.4 Communication Troubleshooting
7.5 Other Troubleshooting Topics . .
iv
.
.
.
.
.
.
.
.
.
.
.
.
.
.
.
.
.
.
.
.
.
.
.
.
.
.
.
.
.
.
.
.
.
.
.
.
.
.
.
.
.
.
.
.
.
.
.
.
.
.
.
.
.
.
.
DataTrac 3
1
1
INTRODUCTION
Introduction
Thank you for using DataTrac 3, a program that allows you to collect, manipulate, and analyze data from the Em50 Series – Em50,
Em50R, Em50G – and Em5b data loggers. DataTrac 3 also works
with the DataStation, a data collection point for multiple Em50R
loggers. We designed this program for ease of use and incorporate
many features to make your job easier.
This manual covers the primary functions and features of DataTrac
3.
1.1
Customer Support
If you ever need assistance with DataTrac 3, have any questions, or
feedback, there are several ways to contact us. Decagon has Customer Service Representatives available to speak with you Monday
through Friday, between 7am and 5pm Pacific time.
Note: If you purchased DataTrac 3 through a distributor, please contact them for assistance.
Email:
[email protected] or [email protected]
Phone:
509-332-5600
Fax:
509-332-5158
If contacting us by email or fax, please include as part of your message your name, address, phone, fax number, and a description of
your problem or question, and your DataTrac3 version number.
1
1
INTRODUCTION
1.2
DataTrac 3
DataTrac 3 Software License Agreement
Note: Read this agreement carefully before installation and use.
Decagon Devices, Incorporated owns DataTrac 3 Software. DataTrac 3 is not free Software. You are required to purchase a license
for each computer where you install DataTrac 3. By using this software you agree to the following terms and conditions.If you do not
agree to the terms of this License, do not use this Software.
Grant of License
Decagon grants you, the user, a nonexclusive license to use this Software solely for use with Decagon instruments. This software is not
sold to you. The user may not reproduce, distribute, sub-license,
resell, or otherwise transfer for any consideration, or reproduce for
any purposes, the Software or any modification or derivation thereof,
either alone or in conjunction with any other product or program.
Further, the user may not modify this Software. This license replaces
and supersedes all previous licenses provided by Decagon.
Disclaimer of Warranties
We provide DataTrac 3 to use “as is.” Decagon makes no warranties,
either express or implied, with respect to this software and/or associated products and/or materials provided to the user, including but
not limited to any warranty of merchantability, fitness for a particular purpose or against infringement. Decagon does not warrant that
the functions contained in the software meets your requirements, or
that the operation of the software is uninterrupted or error-free, or
that we always correct defects in the software.
Furthermore, Decagon does not warrant or make any representations regarding the use or the results of the use of the software or
any documentation provided herewith in terms of their correctness,
accuracy, reliability, or otherwise. No oral or written information
or advice given by Decagon or a Decagon authorized representative
shall create a warranty or in any way increase the scope of this war-
2
DataTrac 3
1
INTRODUCTION
ranty.
Limitation of Liability
By using this software you agree that Decagon is not liable for any
claims or damages whatsoever, including property damage, personal
injury, intellectual property infringement, loss of profits, or interruption of business, or for any special, consequential or incidental
damages, however caused, whether arising out of breach of warranty,
contract, tort (including negligence, strict liability, or otherwise.
Construction
If any provision of this License is inconsistent with, or cannot be
fully enforced under, the law, such provision shall be construed as
limited to the minimum extent necessary to be consistent with and
fully enforceable under the law. If for any reason a court of competent
jurisdiction finds any provision, or portion thereof, to be unenforceable, the remainder of this License shall continue in full force and
effect.
Applicable Law
This License shall be deemed to have been made in, and shall be
construed pursuant to, the laws of the State of Washington. The
United Nations Convention on Contracts for the International Sale
of Goods is specifically disclaimed.
Title
All title and copyrights in and to the Software the accompanying
printed materials, and any copies of the Software, are owned by
Decagon Devices Incorporated. This Software is protected by copyright laws and international treaty provisions.
3
1
INTRODUCTION
DataTrac 3
Termination
This License automatically terminates if Customer fails to comply
with any of the terms and conditions hereof. In such event, Customer
must destroy all copies of the Software and all of its component parts.
Complete Agreement; Governing Language
This License constitutes the entire agreement between the parties
with respect to the use of the Decagon Software licensed hereunder
and supersedes all prior or contemporaneous understandings regarding such subject matter. No amendment to or modification of this
License is binding unless in writing and signed by Decagon. Any
translation of this License is done for local requirements and in the
event of a dispute between the English and any non-English versions,
the English version of this License shall govern.
Enforcement
The provisions of this Agreement shall be enforceable regardless of
any other claim or dispute existing between the parties, and in any
action for violation of the terms of this license, the prevailing party
shall be entitled to recover costs and attorney fees. Jurisdiction and
Venue shall be in Whitman County, Washington.
Trademarks
ECH2 O, ECH2 O DataTrac, Em50, Em50R, and Em50G EchoLink
and DataStation are registered trademarks of Decagon Devices, Inc.
4
DataTrac 3
2
2
ABOUT THE DATATRAC SOFTWARE
About the DataTrac Software
Decagon originally created the ECH2 O line of sensors to measure
water content in soils. We then created the Em5 data logger and
some rudimentary software to download data from the logger. The
current system includes a family of soil moisture sensors that range
from simple analog sensors to sophisticated digital sensors that combine soil moisture, temperature, and electrical conductivity all in one.
We have added many common environmental sensors to the system
and a variety of Decagon loggers. Decagon continues the Em5 series
with the Em5b model and the Em50 series featuring the standard
Em50, Em50R radio logger, and the Em50G cellular logger with more
data storage and a more effective case than our low cost and limited
use five-channel mini-logger, the Em5b.
Each Decagon data logger includes a free 30 day trial of DataTrac 3.
If you want to purchase a DataTrac 3 Registration contact Decagon
sales at 509-332-2756 or [email protected].
Decagon initially designed the original DataTrac for the needs of
commercial growers and irrigation consultants working with highvalue irrigated crops, vineyards, and orchards. Some growers use
DataTrac 3 telemetry features to get up-to-the-hour views of the
status of their fields. Others would take a laptop or PDA to the field
to download data once or twice a week and then use DataTrac to
prepare a printed report from the current data.
DataTrac 3 takes into account the large number of agriculture customers using it to gain the benefits of its simple telemetry system
and to help manage data collection. Other researchers work alongside commercial growers or monitor delicate drainage basins.
Above all, DataTrac 3 helps users monitor soil moisture and makes
sensor measurement data available for their jobs or to solve problems. The DataTrac interface reduces the number of steps the user
needs to perform an update and display data in a usable form.
5
2
ABOUT THE DATATRAC SOFTWARE
DataTrac 3
Please report any bugs and send suggestions for additional features
to [email protected].
2.1
System Requirements
Minimum System Requirements
•
•
•
•
•
Operation System: Windows XP
Processor: Pentium IV/Atom
RAM: 512 MB
Free Hard Drive Space: 1 GB
Monitor: 1024 x 768 resolution
Recommend System Requirements
•
•
•
•
•
2.2
Operation System: Windows XP/Windows 7
Processor: Pentium Core 2 Duo
RAM: 2 GB
Free Hard Drive Space: 20 GB Hard Drive
Monitor: 1280 x 1024 resolution
Installation
Run the software file from the USB Drive included with your purchase or download the software from the web. When prompted, enter
the required user information and your registration key. If you do
not have a key, simply click “Evaluate DataTrac 3.” This option
allows you to evaluate a free copy of DataTrac 3 for 30 days.
Follow the on-screen instructions to install DataTrac 3 on your PC.
2.3
Updating DataTrac 3 from the Web
Decagon publishes updates to DataTrac 3 on the web. The update
installer replaces the old version of DataTrac 3 with the new release,
while retaining all of your data and settings from the old version. You
may download the update installer from the Decagon website at:
http://www.decagon.com/datatrac3. If you would like to upgrade
6
DataTrac 3
2
ABOUT THE DATATRAC SOFTWARE
from an older version of DataTrac to DataTrac 3, contact Decagon
at [email protected] or at 509-332-2756 to purchase a DataTrac 3
license.
If your computer is connected to the Internet, you can use the Decagon
Version Check web engine to check for updates to DataTrac 3. Select
“Check for Software Updates” from the Help Menu or in the upper
left hand of the program window.
Determine your installed version of DataTrac 3 by selecting “About
DataTrac 3” from the Help Menu.
7
3
DATATRAC MAIN FEATURES
3
DataTrac 3
DataTrac Main Features
Learning the primary features of DataTrac 3 is key to understanding
how to effectively navigate and utilize the software. This section
describes the primary menus and features available to DataTrac 3
users.
3.1
The DataTrac 3 Main Screen
The Main screen appears when you first start DataTrac 3. (Figure
1) The Main screen serves as the primary software navigation page
where you can access all DataTrac 3 functions.
Figure 1: DataTrac Main Screen
3.2
The Menu Bar
The Menu Bar runs along the top left corner of the DataTrac 3
screen. Execute most program features from the Menu Bar. For
detailed information on the menus contained therein, see section 6.
8
DataTrac 3
3.3
3
DATATRAC MAIN FEATURES
The Toolbar
The Toolbar (Figure 2) runs across the top of the screen. It contains
several tools that interface with your logger. The Toolbar has seven
primary features.
Figure 2: Toolbar
1. Connect Via: Select a COM Port to connect to a logger via a
Decagon USB cable adapter (UCA), RS-232 serial cable (direct
connect), or a Rm-1 radio modem.
2. Connect/Disconnect: Connects to or disconnects from a device.
3. Download: Downloads data that has been collected by the
device since the last download from that device. Performs the
same function as Connection > Download > New Data.
4. Scan: Allows you to take instantaneous readings of all logger
ports while you are connected to that logger through either an
Rm-1 or a direct connection.
5. Report: Allows you to save a PDF document of data from the
currently selected logger in the Device Directory. This PDF
includes logger location, name, notes, current chart view, and
displays the summary data below the chart.
6. Chart/Table: Switches between Chart and Table views of
downloaded data.
7. Configure: Opens the Configure window.
3.4
The Device Directory
The Device Directory or “device tree,” is where all devices and data
in DataTrac 3 appear. You may find the “Device Directory” to the
9
3
DATATRAC MAIN FEATURES
DataTrac 3
left of the Main screen. Click the listed device label to see data and
device configuration.
Figure 3: Device Directory
Creating a New Folder
Use folders and subfolders to customize your logger organization in
the device tree. Create folders and drag loggers from the device tree
into them to make subfolders.
Follow steps 1 through 4 to create a folder and/or subfolder.
1. Select Setup > Create New > Folder
2. Enter a name for the Folder (up to 24 characters) and click
“OK”
To Create a Subfolder
3. Follow steps 1 and 2 to create a new folder.
4. Click and drag that folder into the host folder. This brings up
options to create a sub-folder, rename, or delete the current
folder.
3.5
The Device Status Area
The Device Status Area displays information about the device currently selected in the device directory in DataTrac 3. For connected
loggers, it displays the logger name, type, firmware, and the last
known battery status. When DataTrac 3 connects to a radio logger
10
DataTrac 3
3
DATATRAC MAIN FEATURES
via the Rm-1 or an Em50G, the status area shows the radio or cellular signal strength for the connection.
Clicking on the battery icon provides a percentage of power level
during lab connection. Clicking on the signal strength indicator provides a numerical value for signal strength.
3.6
The Chart Area
Figure 4: The Chart Area
When you download data into DataTrac 3, it appears by default in
Chart View. This view shows the Chart Area and it has several primary features.
Charted data appears in the Chart Area. To see the specific measurement, date, and time of a data point, mouse over the data point and
a box displays the date and time for the measurement, as well as the
actual measurement. In the case of the Davis or Sonic Anemometers,
this is how you view wind direction and gusting wind speed. Zoom
into specific areas by right clicking and picking “toggle zoom box”
The chart period drop down menu allows you to set a date range
for charted data. You can select what time interval of data displays
11
3
DATATRAC MAIN FEATURES
DataTrac 3
(Day, Week, Two Weeks, 30 Days, All Data, or Custom).
The summary area displays a summation of each chart data line,
showing each line Average, Minimum, Maximum, Total, and Events
values. This summarizes displayed data only and does not include
hidden data, data that scrolls off the screen, or to the left and right.
3.7
Chart View
When you click on the Chart View icon your data appears graphed
on a chart.
Figure 5: Chart View Data
The chart has several important features. The axes on the right and
left sides of the chart represent each type of displayed measurements.
Using your mouse pointer, you can click on any of the x- or y-axes
and move them up or down for ease of viewing or custom views of
the data, input a specific range of dates in the “Chart Period” box
at the bottom of the graph.
You can also select from Day, Week, Two Weeks, Month, Season,
12
DataTrac 3
3
DATATRAC MAIN FEATURES
or All Data view in the “Chart Period” drop-down menu located in
the lower left of the Main screen. Click on the Home button to fit
all the data in the window.
By mousing over different data points, you can see the exact date,
time, and associated data corresponding to that data point. When
viewing anemometer data in Chart View, you can use the same
method to view both wind direction and gusting wind speed.
Chart View: Right-Click Menu
A right mouse click on the chart brings up a menu with several
features.
Figure 6: Chart View: Right Click Menu
Show Table View: Shows table view of data from the device you
are currently viewing.
Toggle Drag: Switches on and off the ability to drag the chart
by left-clicking and dragging your mouse. If you check this option,
the Toggle Zoom Box option is not checked.
13
3
DATATRAC MAIN FEATURES
DataTrac 3
Toggle Zoom Box: Allows you to zoom in on specific chart areas by left-clicking and dragging your mouse to create a box around
the specific area. If this option is checked, the Toggle Drag option
is not checked. Users can select either the Toggle Zoom or Toggle
Drag feature, but cannot use both simultaneously.
Zoom In/Out: Zooms in or out on the location you right-clicked.
Copy Chart to Clipboard: Copies displayed chart for pasting
to external locations.
Export Chart...: Allows you to save charts as picture files. (BMP,
PNG, or JPG)
Grid Visible: Switches grid lines on and off.
Clear All Annotations: Removes all annotations on a chart from
both the chart and the database.
Legend Visible: Switches the legend on and off.
We designed the chart axes to be larger than necessary to allow the
user to drag traces on and off the screen. For example, if you have a
busy chart and want to move a particular trace to make more space,
click on that trace chart axis and drag the mouse upward to take the
trace off the screen. The trace returns to its starting position if you
leave the chart view and return to it.
Graph Annotations: To add comments to the chart, double click
on the location where you would like an annotation and enter any
comments about the selected time period that you feel would be
helpful.
3.8
Table View
The Table View displays your data in a spreadsheet format, with the
date and time of each measurement on the left side and the five ports
along the top. Clicking the empty box to the left of each reading dis14
DataTrac 3
3
DATATRAC MAIN FEATURES
plays an “x” in that box. That reading then no longer appears in the
Chart View. You can copy and paste these cells into other programs,
such as Microsoft Excel.(Figure 7)
Note: Virtual ports do not display in Table View.
Figure 7: Table View
Graph View: Right-Click Menu
A right mouse click on the table brings up a menu with several options.
Show Chart View: Switches to chart view.
Show Processed Data: Displays the data in processed values.
Show Unprocessed Data: Displays raw values from sensors. When
using digital sensors, this number is virtually meaningless and is for
Decagon diagnostic use only.
Show Unprocessed Parts: Displays data in unprocessed parts
for use in custom calibration equations.
15
3
DATATRAC MAIN FEATURES
DataTrac 3
Copy: Copies the selected cells to the clipboard so that you can
paste it into other programs for use in reports or web pages.
Select Visible: Selects all visible data on the current screen.
Select All: Selects all data, visible or otherwise.
16
DataTrac 3
4
4
USING DATATRAC 3
Using DataTrac 3
You can use DataTrac 3 to configure your loggers (through a USB
cable), download data from loggers (either remotely or via USB cable), and interface with data from each of your loggers within the
chart. This section covers each of these capabilities in detail.
4.1
Connecting to the Logger
Connect to any Decagon data logger directly with either a Decagon
USB cable adapter (UCA) or serial cable adapter (SCA). If you have
an Em50R data logger, you can also use an Rm-1 device to create a
virtual cable from a logger to your computer.
Note: Remote connection using the Rm-1 should only be temporary,
as it drastically reduces the power efficiency of the Em50R.
Follow steps 1 through 4 to direct connect using a USB Cable Adapter
(UCA) or Serial Cable Adapter (SCA).
1. Open DataTrac 3.
2. Connect your Em50 series logger to your computer via the
Decagon serial cable adapter (SCA) or Decagon USB cable
adapter (UCA).
Note: If you are using the USB cable, make sure that you
have already installed the driver. You may find the driver at
http://www.decagon.com/support/decagon-usb-cable-adaptor-d
river/
3. In the Connect Via menu, select the COM Port for your cable.
4. Once you have selected the correct COM Port, click on the
Connect button on the toolbar.
17
4
USING DATATRAC 3
4.2
DataTrac 3
Data Logger Configuration
You can find the Configure Device window by clicking the Configure
button on the toolbar or Setup > Configure [Device Name]. The
Configure Device window consists of a tree containing all of your
sensor and logger settings. You must configure your logger for it to
properly collect data.
Figure 8: Configure Device Window
Device Section
The Device section contains the Device Model, the Device Name,
the Serial Number, the Firmware Version, and a text box for you to
input any notes that you would like to appear in generated reports.
Here you can set the logger time, erase all of the logger data, and
configure DataTrac 3 to automatically download any data from the
logger when the logger is remotely connected.
Cellular: If the device is an Em50G data logger, you have a Cellular
section that allows you to set the data upload times from the logger
to Decagon’s server. You can set up to six times per day. The fewer
uploads per day, the longer your battery life.
Radio: If the Device is an Em50R logger or a DataStation, there
18
DataTrac 3
4
USING DATATRAC 3
is a Radio subsection of the Device section. The Radio Subsection
allows you to pick the appropriate radio mode, as well as the channel
and subchannel that the device uses to communicate.
Location: DataTrac supports the storage of location data on a per
logger basis. The software stores the logistical information for each
measurement as a GPS coordinate, altitude, and a site name.
Note: You must input altitude data as meters and not feet.
Review the “Taking Measurements” section of the Em50 Series Logger Manual for instructions on setting up the logger and taking measurements. Follow steps 1 through 5 to subscribe to an Em50G.
1. Click Setup > Create New > Em50G Subscription
2. Enter the Device ID and Password of the relevant Em50G into
the window that appears. Passwords are lower case and include
dashes
3. Use the default server.
4. If you would like to see all Em50G data, select “All Data
Points” from the Retrieve drop down menu.
5. Click Subscribe.
19
4
USING DATATRAC 3
4.3
DataTrac 3
EM50 R Radio Modes
Figure 9: Configure Device Window
Before you can use an Em50R logger, you need to configure its channel and subchannel, and select a radio mode. There are six modes.
Radio Off/No Radio: The Em50R logger takes and stores measurements as configured, but only downloads via direct connection
using a Decagon USB cable and a computer.
Confirmed Delivery Transmit (Recommended Mode): This
option sends data to a DataStation using our confirm delivery protocol, which checks to make sure that all of the data that an Em50R
sends is received intact by the DataStation. This radio mode is the
most battery efficient.
Confirm Delivery (CD) Transmit + Two-Way: Same as Confirmed Delivery Transmit, but both listens and transmits data.
Auto-Download of Em50G/DataStation Data
EM50Gs and DataStations support auto-downloading of data at reg20
DataTrac 3
4
USING DATATRAC 3
ular intervals. Ensure that your device configuration has the “AutoDownload” option checked to enable auto-downloading. (Figure 10)
Figure 10: Auto Download Configuration
4.4
Sensors and Measurements Section
Set your measurement interval in the “Sensors and Measurements”
section and click on each port to configure the port sensor.
Ports: Select the appropriate sensor type and sensor depth (if applicable) for each port with a connected sensor. The sensor label
defaults to the name of the sensor, but you can change this to display something more applicable as needed.
By clicking the “+” beside each port and then the measurement
type, you can further configure calculation and display of each measurement on the chart.
21
4
USING DATATRAC 3
DataTrac 3
Figure 11: Sensors and Measurements: Port Options
Chart Controls: We designed the default colors to optimize data
visibility. However, you may configure the trace color, line width,
and markers on the graph to suit your project.
Calibrations: By default, all Decagon sensors ship factory calibration, but sensors like the volumetric water content sensor, allows you
to input a custom calibration for non-typical soils. Input the coefficients for the custom calibration you would like to apply, then click
on the “Apply to Matching Sensor” button to apply this calibration
to all other sensors of that type. Visit the Calibrations section of
the DataTrac 3 web help files for extended explanations on custom
calibrations.
22
DataTrac 3
4
USING DATATRAC 3
Figure 12: Configure Device — Approximate Soil Media Setting
Virtual Ports: See section 6.4 for more information on the features
and functionality of Virtual Ports.
4.5
Chart Axis Section
The Chart Axis section allows you to adjust the range of the chart
axis as well as the color of the axis. You can also choose to hide or
display the chart axis from this field. Your chart axis minimum and
maximum values default to the display units you select.
• Either, access the Device Configure window and select the axis
you would like to configure. Or, right-click on the specific axis
that you would like to configure.
• Click the Apply button in the bottom right corner of the window to apply the settings and remain in the setup window.
Click OK to apply the settings and exit the setup window.
4.6
Target Range
The target range section allows you to add a visual maximum and
minimum target range for a given measurement within a specific date
23
4
USING DATATRAC 3
DataTrac 3
range. This feature is especially useful in irrigation scheduling during
different growth periods of the crop.
Figure 13: Chart View Target Range
Follow steps 1 through 7 to apply a target range to your graph.
1. Click on Target Range in the Configure Device menu.
2. In the top right corner, click the “+” sign to add a new target
range.
3. In the measurement field, first pick the sensor and then the
measurement to which you would like to apply the target range.
4. Fill in a descriptive name for the target range for the legend.
5. If applicable, enter a date range where you would like the target
range displayed.
6. Pick the maximum and minimum values for the target range.
Note: These values must be in the same units as the sensor
measurement values.
When adding additional target ranges, by clicking (+) the new
24
DataTrac 3
4
USING DATATRAC 3
appears at the bottom of the lid and has to select if before
configuring values.)
7. Click Apply
Figure 14: Configure Device: Setting Target Range
4.7
Applying a Custom Calibration to Volumetric Water Content Data
Decagon has custom calibration services available for customers. We
provide factory calibration curves for mineral soils, potting soils,
perlite, and rockwool. Independent researchers have verified many
of these factory calibrations and published their findings in peerreviewed journal articles. If a factory calibration is not available, or
you would like better accuracy, you can provide a custom calibration
to the soil moisture sensor data collected.
You can input a custom calibration for each sensor independently.
Follow steps 1 through 5 to use a custom calibration in DataTrac 3.
1. Click the Configure button in the toolbar of DataTrac.
2. Under the “Sensors and Measurements” list, expand the port
containing the sensor for which you would like to input a custom calibration.
25
4
USING DATATRAC 3
DataTrac 3
3. Click on Volumetric Water Content under that port.
4. Select User Defined from the Approximate Soil Media dropdown menu.
5. Enter the coefficients for your custom calibration in the spaces
provided.
Figure 15: Applying Custom Calibrations
4.8
Copy Device Settings Between Loggers
To copy device settings from one logger to another, simply right-click
on the logger you want to copy settings from and select “Copy Device
Settings.” Right click on the logger you want to copy these settings
to and click on “Paste Device Settings from [Logger Name].” This
copies all settings from the first logger over to the logger you clicked
on, with the exception of the data stored on the original data logger.
Make sure that the second data logger has the same settings — identical sensors connected to the same ports — as the data logger you
copied. Any dissimilarity results in large amounts of corrupt data.
Redeploy a Logger
At times, you may want to use your logger for a new purpose in
26
DataTrac 3
4
USING DATATRAC 3
a new location. Simply changing the name of the logger does not
work, as all of the data collected with that logger remains, even after
you have given it a new name.
The Redeploy feature allows you to restart a logger as if it were
a new logger with no data, or change sensors and keep your old data
and current data separate. DataTrac archives previously acquired
data under the old logger name or a new name, depending on the
redeploy. Follow steps 1 through 4 to redeploy a logger.
1. Connect to the logger.
2. Go to Setup > Redeploy (name of logger). The Redeploy dialog
box then appears.
3. DataTrac 3 archives your data in a file named “Archived - date
stamp code - (name of logger)” and prompts you to erase all
the data currently on your logger to prepare for redeployment.
You can change this file name in the device directory to suit
your needs. DataTrac stores previously acquired data under
the new name assigned to the old logger.
4. The new logger appears in the device directory under New Devices. You can now configure for your new sensors and measurement interval.
When connecting using a radio logger, you can perform a “Discovery Query.” Select Connection > Discover Em50R to determine
which radio loggers are available. The radio modem (Rm-1) send
out “wake-up” calls on the specified channel and subchannel, for up
to (but no longer than) 50 seconds. The first radio logger to respond
to the call load into DataTrac.
4.9
Downloading Data from an Em50G Logger
1. In the “Set-Up” dropdown menu, select “User Configuration”
2. Note: When you use www.em50gwebviewer.com to view and
download data, use the same User ID and password included
27
4
USING DATATRAC 3
DataTrac 3
on the orange card enclosed with the Em50G to make sure the
loggers automatically load.
3. In the Set-Up dropdown menu, select “Create New” and then
Em50G subscription.
4. Enter your device ID and password, same as for Em50G WebViewer.
5. In the “Retrieve” section, click the general start time of the
data that you want to download. If this is the first time you
downloaded data, All data points is appropriate. If you are
redeploying a logger, start with either “last day” or “last week.”
4.10
Downloading Data from an Em50R Logger
Use the DataStation to collect data from Em50R loggers. The steps
below guide you through setting up your DataStation to collect data
4.10.1
Connecting to and Configuring a DataStation
DataStations are different from loggers in that the DataStation receives data from multiple radio-enabled Em50R loggers, instead of
just one Em50 or Em50G logger. The logger data from the DataStation still requires configuration and entry into the device directory,
but DataStations handle this differently than when connecting to an
individual logger. The DataStation needs to have the parameters
Name, Radio Channel, and Radio Subchannel set before it can collect data from loggers. Follow these two simple steps to connect to
a DataStation.
1. Connect the DataStation to the computer communications port
via an RS-232 cable or an adapter.
2. Open DataTrac and select the appropriate COM Port from the
“Connect Via” drop-down menu and click on the “Connect”
button. After establishing connection with the DataStation, it
should appear in the Data Sources node in the device directory.
28
DataTrac 3
4
USING DATATRAC 3
Configuring the DataStation
Select “Configure” from the Setup menu to enter the “Configure
Device” window. (Figure 16)
Figure 16: Configure Device Window
Figure 17: Configure Device Window, Radio Selected
Change your DataStation name in the Device Name box. Select the
Radio sub-menu to configure your radio properties. You should set
the channel and subchannel to the same channel and subchannel as
those of the Em50R that you want to collect data from.
Note: Your DataStation is a listen only device so you do not need to
set the radio mode. This is set when configuring your EM50R.
Check the Auto-download box if you would like DataTrac to auto29
4
USING DATATRAC 3
DataTrac 3
matically download data from your DataStation. DataTrac 3 must
be running and your DataStation connected to your computer for
this option to work.
4.11
Autocorrect Corrupt Timestamps
When importing data, timestamps occasionally become corrupt and
display nonsensical information. DataTrac 3.5 has the ability to sense
this, and attempt to correct the corrupt timestamps. When importing a file with corrupt timestamps, DataTrac displays a message box
reading “[number] faulty date/times were detected while loading data
from the device named ‘[device name].’ Would you like to attempt
to AutoCorrect them?” If you select yes, DataTrac 3 goes through
and attempts to correct all of the corrupt timestamps.
4.12
Scan Ports
When you are connected to a logger either directly or via an Rm-1
radio modem, you can take a direct measurement on all five ports
by clicking the Scan button on the toolbar. This allows you to see a
real-time measurement for all of the ports. These measurements are
not saved onto the chart.
4.13
Reading in Saved Data Files
In addition to connecting to a logger and downloading data from it,
you can also bring saved data files (in the form of transfer sets) and
DXD files into DataTrac 3. This can be done in two different ways.
1. Go to File > Import Data. Browse to where you saved your
transfer set (file extension is either DXD or DZD) and click
OK.
2. Or, place the file in your auto-import directory (Help > View
Auto-Import Directory), where it automatically imports the
next time DataTrac 3 starts.
30
DataTrac 3
4
USING DATATRAC 3
When DataTrac imports the transfer set, it places the logger in the
same device directory location as the export copy of DataTrac. You
do not have to reconfigure the logger, as all of its settings are automatically applied. When placing a file in the Import directory, the
data automatically loads into the chart or table the next time you
launch DataTrac.
Note: If a logger already exists in your system with the same name
as the one you are attempting to import, DataTrac appends a number
to the end of the device name in order to make it unique.
31
5
MENUS
5
DataTrac 3
Menus
The Menu Bar
The Menu Bar runs along the top left corner of the DataTrac 3
screen. You can perform most actions and control all software features from the Menu Bar. This section breaks down each menu item
and its associated features.
5.1
File Menu
The File menu allows you to import DataTrac and DataTrac 3 files,
export DataTrac 3 data and charts, archive all of your data, restore
all of the archived data, and print saved data. There are numerous
menu options in the File menu.
Import File Data: Imports measurement data from DataTrac
and/or DataTrac 3 data files.
Export: Exports data, as well as data logger settings, as a bundled data file for future use. This menu offers several options for
exportation: as tables, a DXD File, charts, and a transfer set.
Archival Tools: Creates or imports a separate file which includes
all Loggers and Folder Structures. Use this feature to back-up or
transfer all device data.
Table: While in Table View, you can export the table in several
different formats, which you can view with most standard spreadsheet or word processing programs.
DXD File: Exports a data file called a DXD file, which contains
all of the data, configuration settings, and tree information for a selected logger.
Chart: When in Chart View, you can export the chart as a picture file to use with most word processing and web editing programs.
32
DataTrac 3
5
MENUS
Transfer Set: Exports a data file called a transfer set, which contains all of the data, configuration settings, and tree information for
a selected logger.
Print Report: A print report contains information about the logger, the chart data (as seen on the screen), the report summary data,
and any recommendation text.
Exit: Closes the program.
5.2
Edit Menu
The Edit menu allows you to copy and/or select on-screen data. It
provides several options for manipulating data.
Undo Zoom: Reverses the last zoom function.
Redo Zoom: Repeats the last zoom reversal function.
Copy: (Table View Only) Allows you to copy data cells or rows
and paste them into word processing or spreadsheet programs such
as Word or Excel.
Copy Chart: (Chart View only) Copies the visible chart and converts it into a picture file for pasting into other applications. You
can select what picture format to use in the DataTrac Preferences
menu.
Select Visible Data Rows: Selects all data rows currently visible on the screen.
Select All: Selects all the cells in Table View or the cells in Chart
View.
33
5
MENUS
5.3
DataTrac 3
View Menu
The View Menu allows you to control how you view data in DataTrac
through numerous options.
Chart View: Returns you to the chart view of the logger that
you have selected.
Table View: Returns you to the table view of data for the logger that you have selected.
Table Data: (Table View only)
Processed: Displays the data in processed values.
Unprocessed: Displays raw values from sensors. This number is
virtually meaningless and is for Decagon diagnostic use only.
Unprocessed Parts: Displays data in unprocessed parts for use
in custom calibration equations.
Zoom In: (Chart View only) Increases the chart size.
Zoom Out: (Chart View only) Decreases the chart size.
5.4
Setup Menu
The Setup menu allows you to organize, configure, and modify your
data and loggers.
Create New: Create a new folder or Em50G subscription.
Em50G Subscription: Subscribe to deployed Em50G data loggers to receive and view delivered Em50G data. The Internet must
be enabled for this function to work properly.
Folder: Create a new folder in the device directory tree. You can
create as many folders as you like. Organize your data by moving
34
DataTrac 3
5
MENUS
loggers into different folders by dragging and dropping.
Configure (Logger Name): Takes you to the Configuration window, used for configuring loggers within DataTrac 3.
Rename (Logger Name): Change a selected logger current name.
Redeploy (Logger Name): Allows you to restart a logger like
new and with no data (See the “Redeploy a Logger” section of this
help file for more information).
Time Shift: Modifies the date of large portions of your data set
if the date and time are incorrect. DataTrac 3 auto-corrects these
corrupted timestamps if it detects them.
Hide Measurements Before...: Hides measurements taken before a selected date and time.
Hide Selected Measurements: Prevents a selected range of measurements from being graphed on the chart.
Show Selected Measurements: Allows a selected range of measurements to be graphed on the chart.
Delete (Logger Name or Folder Name): Deletes the selected
logger or folder from the system.
Load DataTrac 3 Devices: Uploads all of the DataTrac 3 devices that are currently on your computer.
DataTrac Preferences: Opens the Preferences window which modifies program operational settings. See Chapter 5 for information on
the Preferences Menu.
User Configuration: Opens the User Configuration window which
allows you to sign up to interact with the Decagon Data Service
(required for subscriptions to any Em50G).
35
5
MENUS
5.5
DataTrac 3
Connection Menu
Use the Connection menu for connecting to your logger and downloading data from it. The connections field also has useful troubleshooting tools for the Decagon Data Service.
Connect: Connects to a selected logger through the COM Port
selected in the Connect Via drop down menu.
Discover Em50R: Uses the Rm-1 to connect with any active Em50R
data loggers on a specific channel and subchannel within the Rm-1
radio range.
GPRS Session Information: Returns connection information for
the subscribed Em50G data logger selected in the device tree. This
information is useful for troubleshooting Em50G data delivery in
conjunction with a Decagon support specialist.
Download: Downloads data from a device. Not enabled unless
you are connected to a data logger.
New Data: Downloads all data your device collected since the last
download.
All Data: Downloads all the data currently stored in the device
memory.
All Data Service Devices: Downloads new data from all connected Em50G data loggers.
Scan Ports: Takes real-time readings of all logger ports. You must
be connected to a logger to enable this option.
Device Tools: Contains several tools for interfacing with your device.
36
DataTrac 3
5.6
5
MENUS
Device Tools
The Device Tools menu, located by clicking Connection > Device
Tools, allows you to perform many tasks, such as erasing data and
changing logger system settings. There are four options in the Device
Tools menu.
Note: This menu is only enabled when you are connected to a device.
Figure 18: Device Tools Menu
Set Time (Loggers only): Sets the logger date and time to the
current settings on your computer.
Firmware Test: Tests the logger firmware. A dialog box indicates
whether the firmware tests as good or bad. For more information on
firmware, and on obtaining updates, please see the Troubleshooting
portion of section 7.
Communication Test: This feature tests the quality of the connectivity of the Em50R to a DataStation or the quality of the connectivity of the Em50G to a cellular tower.
Erase Data (Name of Device): This erases all of the data currently stored on the connected data logger.
Caution: You can never recover erased data.
37
5
MENUS
5.7
DataTrac 3
DataTrac Help Menu
The Help menu contains the DataTrac 3 help file, licensing wizard,
software and firmware updates, and program version.
DataTrac Help: Opens the DataTrac help file which contains help
topics for each aspect of DataTrac 3, as well as some problem solutions. You can also access DataTrac 3 web help from here.
Send Feedback to Decagon: Allows you to send Decagon support staff questions and comments about DataTrac 3.
Check for Software Updates: Connects to the Internet to find
any available program updates (must be connected to the Internet
for this option to work).
Check for Firmware Updates: Connects to the Internet to find
any available firmware updates for your logger (must be connected
to the Internet and directly connected to your logger for this option
to work).
Registration: Displays registration information for DataTrac 3. If
you have not registered DataTrac 3, it prompts you to do so. DataTrac 3 comes with a 30-day evaluation period, but after this period
you are unable to use DataTrac 3 until you purchase and enter a
program license key.
Surrender Current Registration...: DataTrac 3 allows use of
personal registrations on up to five computers, and company registrations on up to 12. Once you reach the limit, you must surrender
the DataTrac 3 registration on one or more of your computers, or
purchase another registration key.
View Auto-Import Directory: Allows you to see the location
of your database and log files.
About DataTrac: Displays program version and splash screen.
38
DataTrac 3
5.8
5
MENUS
Preferences Menu
The Preferences menu allows you to adjust program settings, data
presentation, and select the measurement units. The General Program Preferences, Measurement Unit Preferences, Communication
Preferences, and Report Generation Preferences tabs comprise the
four components of the DataTrac Preferences Menu.
5.8.1
General Program Tab
Figure 19: DataTrac Preferences Window
The General Program tab of the Preferences window allows you to
modify basic program settings.
39
5
MENUS
DataTrac 3
Automatic Version Check: Enabling this option allows DataTrac 3 to automatically check for program updates over the Internet
when the program starts. When the updater discovers an update, it
directs you to the website where you can download it.
Automatic Clock Synchronization: By default, DataTrac 3 automatically synchronizes the logger date and time to the time set
on the computer. Not checking this check box disables the feature,
allowing you to instead update the date and time manually anytime
you are connected by selecting Connection > Device Tools > Set
Time.
Localization Settings: You have control over how your logger date
and time display on the toolbar. By default, DataTrac 3 formats the
date and time using the settings in the “Windows Regional & Language Options.” You can modify these settings to display the date in
day/month/year format and time with either 12- or 24-hour format.
(In non-English localizations the 12-hour option displays in 24-hour
format)
Users also have control over the language for DataTrac 3. By default, English is the language selected at installation time. You may
change this at any time. After changing the language, restart DataTrac 3 to switch languages.
Power Noise Filter: The AC or “mains” electrical power can add
a subtle amount of noise to sensor measurements. We designed the
logger Power Noise Filter (PNF) to eliminate electrical interference
from the AC power distribution system. You should set the value
of the PNF to match the frequency of the power cycle where you
live. (North America and most of Asia use 60 Hz, while in most of
Europe it is 50 Hz.) You only have to set this value once. DataTrac
automatically sets the PNF of each connected logger.
40
DataTrac 3
5.8.2
5
MENUS
Measurement Units Tab
Figure 20: DataTrac Preferences: Measurement Units Tab
The Measurement Units tab allows the user to adjust a variety of
unit settings.
Water Content: Specifies the unit of measurement for water content readings, as percent volumetric water content (% VWC), straight
VWC (m3 /m3 ), centimeter per meter (cm/m), dielectric permittivity, or inches per foot. Sensors return no data if set to make measurements incompatible with their hardware and design.
Only certain sensors can display data in dielectric permittivity so
if you select this unit for sensors that cannot read dielectric permittivity, no data displays.
You can switch water content units with hotkeys. When not in the
DataTrac Preferences window, hotkeys provide a quick and easy way
to change the VWC units on your chart or table.
41
5
MENUS
DataTrac 3
The five key sequences in table 1 correspond to each unit choice.
Table 1: Hotkeys
Ctrl
Ctrl
Ctrl
Ctrl
Ctrl
+
+
+
+
+
1
2
3
4
5
m3 /m3
% VWC
cm/m
Dielectric Permittivity
IPF
Water Potential: Sets the unit of measurement for soil water potential, as kilopascals (kPa), Bar, or log scale (pF).
Humidity: Specifies whether humidity displays in units of Water
Activity or % RH.
Drainage: Determines whether drainage measurements displays in
inches or millimeters.
Cumulative Drainage: Specifies whether cumulative drainage measurements displays in inches or millimeters.
Water Level: Sets whether water level measurements display in
inches or millimeters.
Temperature: Determines whether the temperature readout displays in Celsius or Fahrenheit.
Precipitation: Sets whether precipitation displays in inches or millimeters.
Electrical Conductivity: Determines whether bulk EC readings
display in dS/m (decisiemens per meter) or mmohs/cm (millimoles
per centimeter).
Note: Use the Growing Tools in the Configuration section to display pore water EC readings.
42
DataTrac 3
5
MENUS
Volume: Specifies whether water volume readings (from a rain
gauge or flow meter) display in gallons, cubic feet, liters, milliliters,
or cubic meters.
Wind Speed: Determines whether wind speed readings display in
meters per second, miles per hour, or kilometers per hour.
Leaf Wetness: Sets whether to display leaf wetness readings in
minutes or raw sensor counts (used to approximate amount of water
on a leaf).
5.8.3
Communication Tab
Figure 21: DataTrac Preferences: Communication Tab
43
5
MENUS
DataTrac 3
The Communication Options tab of the Preferences menu allows you
to control how DataTrac 3 connects to and communicates with your
instruments. In the Communication Options tab you can set the Device Command Retries, Maximum Baud Rate for Direct Connection,
and the Decagon Data Service Settings.
Device Command Retries: If you are experiencing unreliable
communication with a logger, adjust the number of Device Command
Retries (the number of times the computer automatically attempts
to reconnect to a logger). For a direct connection, set it anywhere
from three to ten times, although no more than three should be necessary; for a radio connection, you can set the retries anywhere from
five to twelve times.
Maximum Baud Rate for Direct Connection: Set a baud rate
lower than the default 115,200 baud if you consistently experience a
noisy serial connection.
Decagon Data Services: DataTrac 3 offers the ability to automatically download new data from specific devices. Decagon Data Services downloads directly from configured DataStations and Em50G
Subscriptions. The rate at which this feature runs is set from the
Communication tab in the DataTrac Preferences window. It may be
disabled or at intervals of increasing length from one hour with an
upper limit of 24 hours.
5.8.4
Report Tab
Report Setup Options: The Report tab of the Preferences window
(Setup > DataTrac Preferences or CTRL + K) allows you to add a
custom logo to PDF reports generated by DataTrac, and choose to
print a report in landscape or portrait mode.
44
DataTrac 3
5
MENUS
Figure 22: DataTrac Preferences Report Tab
Logo Location: With the “Browse” button, you may browse through
your computer files and select an image to use as a logo displayed
in the corner of your report. The logo should be 100 pixels by 100
pixels, and should be a PNG, GIF, or JPG formatted image.
Note: In order to use the report logo you must check the “Display
logo in report” check box to use the report logo.
Reporting Options: This section contains the “Page Layout” drop
down menu where you can select either portrait or landscape printing
modes.
45
6
DATATRAC 3 DATA TOOLS
6
DataTrac 3
DataTrac 3 Data Tools
6.1
Reports
DataTrac 3 combines several sources of data to print a report. The
report contains information about the logger, the chart data (as seen
on the screen), the report summary data, and any annotations or
notes you write in the logger Configuration Notes field. DataTrac 3
supports any printer that works with Windows. You may physically
print out a report, or save it as a PDF.
Edit Report Options
1. Click Setup > DataTrac Preferences to open the DataTrac
Preferences window.
2. Click on the Report tab
3. Here you can add a logo to your reports by importing a logo
file and checking the “Display logo in report” box
4. You can also edit whether you would like your report printed
or saved in landscape or portrait mode.
5. When you have finished editing the report options, click “OK.”
Print a Physical Report
1. Ensure that your printer is installed and correctly configured
by clicking File > Print Setup... Make any changes to your
printing configuration in the print setup menu.
Note: DataTrac 3 ignores paper orientation. Follow the steps
in “Edit Report Options” to specify whether to print reports in
portrait or landscape format.
2. Click File > Print Report.
3. Click “OK.”
46
DataTrac 3
6
DATATRAC 3 DATA TOOLS
Print Multiple Physical Reports at Once
1. Ensure that all of the loggers that you want to print reports
for are in one folder.
2. Click on the folder name.
3. Follow the steps contained in Print a Physical Report above.
Save a Report as a PDF
1. Click the Report button in the DataTrac toolbar.
2. Enter a file name for the report.
3. Click Save.
4. Enter any additional comments into the text box that appear.
If you have no additional comments, click OK without typing
anything.
Note: Clicking Cancel stops generating the report.
5. The PDF generates within a few seconds.
Save Multiple Reports into PDF Format – Separate Reports
1. Put all of the data loggers for which you would like to print a
report into one folder.
2. Click on the folder name in the device tree.
3. Click the Report button in the toolbar.
4. The “Batch Report” window appears, click no.
5. Type a character or two for the file name. DataTrac 3 overrides
this and names the files with the logger name, date, and time in
twenty-four hour format. You cannot click Save until typing a
file name. Your file names should look like this: “5GBETA0910Jan2013-1550.”
6. Follow steps 3 through 5 in Save a Report as a PDF above.
47
6
DATATRAC 3 DATA TOOLS
DataTrac 3
Save Multiple Reports into PDF Format – Single Report
1. Put all of the data loggers for which you would like to print a
report into one folder.
2. Click on the folder name in the device tree.
3. Click the Report button in the toolbar.
4. The “Batch Report” window appears, click yes.
5. Follow steps 2 through 5 in Save a Report as a PDF above.
6.2
Transfer Sets
DataTrac 3 allows you to export logger information and data from
one copy of DataTrac 3 and import it into another copy with a transfer set. DataTrac 3 creates a data file called a transfer set that
contains all of the data, configuration settings, and device directory
information for the selected logger. DataTrac 3 transfer sets cannot
be imported into older versions of DataTrac.
Follow steps 1 through 3 to export a transfer set.
1. Select the logger in the device directory that you want to export
a transfer set from.
2. Go to File > Export > Transfer Set.
3. Specify a file name, a save location, and then click OK. This
creates a transfer set and saves it to the specified location.
6.3
Exported Chart File Formats
DataTrac 3 can export the chart data as an image file, which you can
save as: BMP, JPG, and PNG. The bitmap data formats are useful
for web publishing or for programs that do not support the EMF
format. The Portable Network Graphics (PNG) format is a better
choice for web publishing than JPEG.
48
DataTrac 3
6.4
6
DATATRAC 3 DATA TOOLS
Virtual Ports
DataTrac 3 allows you to incorporate measurements from other devices, called virtual ports, into your device. These virtual ports graph
alongside your existing data. Growing Tools, common calculations
that growers make using collected data, are also available as virtual
ports.
To create a virtual sensor, click on Virtual Port and select the type
of virtual measurement that you would like to make.
6.4.1
External Measurements:
When you select External Measurements, you can select a measurement made by a different device.
1. After selecting Virtual Port, choose External Measurement from
the first drop down menu.
2. Expand the logger tree and click on the logger containing the
measurement you would like to incorporate into the device you
are configuring.
3. Expand the sensor measurement tree and click on the measurement that you would like to incorporate into your logger.
Select the measurement.
4. Select Create Virtual Measurement.
6.4.2
Growing Tools
Growing Tools use the data collected from your sensor to calculate
common variables used by growers. These variables are then graphed
with your other measured data. Follow steps 1 through 5 to access
the growing tools.
49
6
DATATRAC 3 DATA TOOLS
DataTrac 3
Figure 23: Configure Device Window
1. After selecting Virtual Port, choose Growing Tool from the first
drop down menu.
2. In the next drop down menu, select the growing tool that you
would like to integrate into your logger. The growing tool that
you pick appears on the graph with your other measurements.
3. Depending on which growing tool you pick, you need to select the configured sensors from which you want to derive the
required growing tool measurements.
4. Click Create Virtual Measurements to add the growing tool to
your chart and table.
5. For many of these tools, you also need to supply additional
information about your soil type for the calculations to work
properly. If prompted, enter any additional information and
click Apply.
50
DataTrac 3
6
DATATRAC 3 DATA TOOLS
Figure 24: Configure Device Window
Growing Tool Integration: To integrate a Growing Tool, select
Growing Tools from the “Select Virtual Measurement Type...” drop
down menu. Then select a growing tool from the “Select Derived
Product Type...” drop down menu. Once you have done this, a series of drop down menus labeled with the measurements necessary
for your growing tool. To select an instrument measurement to use in
the calculation, click the expand button next to the sensor you would
like to take the measurement from and then select the measurement
underneath. Once you are finished, click the “Create Virtual Measurement” button, make any desired changes to the settings on the
next screen and click OK.
6.4.3
Growing Tool Options
Plant Available Water: Uses volumetric water content data and
soil type data (input by you) to estimate plant available water (amount
of water above wilting point). Decagon calculates these estimates using a modified calculation from Saxton and Rawls1 .
1
Saxton, K. E. and W. J. Rawls, (2006). Soil Water Characteristic Estimates
by Texture and Organic Matter for Hydrologic Solutions. Soil Sci. Soc. Am. J.
70:1569-1578.
51
6
DATATRAC 3 DATA TOOLS
DataTrac 3
Pore Water Electrical Conductivity: Uses the volumetric water
content, temperature, and bulk EC to estimate Pore Water Electrical Conductivity using the Hilhorst equation.2
Growing Degree Day: This function uses the measured temperature reading, and your inputed values for base temperature, the data
logger measurement interval, and a start date to calculate accumulated growing degree days.
Reference Evapotranspiration (ETo): Estimates the amount of
water a growing reference crop removes from well-watered soil using
the environmental measurements air temperature, relative humidity,
wind speed, and total solar radiation.
Decagon uses a modified FAO Pemnan-Montieth equation to calculate a daily evapotranspiration using calculations outlined by Rick
Allen3
Daily Light Integral: Uses measured PAR to calculate an accumulated daily light integral. The time period resets daily at midnight.
Vapor Pressure Deficit: Uses the TEMP/RH sensors to calculate the difference between saturation vapor pressure and the vapor
pressure of the air.
VWC Delta: Uses any soil moisture sensor data to calculate the
difference in water content between measurement intervals.
Chill Hours: Uses a temperature measurement (from any sensor
measuring temperature) to calculate the amount of time (in hours)
that the temperature stays below a certain base temperature.
Groundwater Depth: Uses the CTD sensor to calculate depth
2
Hilhorst, M.A., (2000). A pore water conductivity sensor. Soil Science Society of America Journal , 64:6 1922-1925.
3
(Allen et al, 1998) in Appendices 1 and 2 of Ref-ET for windows manual located at http://www.http://extension.uidaho.edu/kimberly/files/2013/03/RefET-V3.1-Users-Manual.pdf. You can find a complete manual detailing the calculations at the site.
52
DataTrac 3
6
DATATRAC 3 DATA TOOLS
to groundwater by subtracting the “sensor measured depth” from
the “installation depth.”
Note: Older versions of DataTrac consider Pore Water EC and Plant
Available Water units open. To utilize these calculations in DataTrac
3, create a virtual sensor for each of the ports where you would like
to see these data.
Adding Different Data Sets to Graphs
DataTrac 3 has the ability to integrate external measurements, or
measurements from a different logger, into the graph that you are
viewing. Follow steps 1 through 7 to utilize this tool.
1. Click on the device in the device tree to whose graph you would
like to add data.
2. Select Configure from the toolbar at the top of the DataTrac 3
Main screen.
3. Under the Sensors and Measurements heading, select Virtual
Port.
4. Select a “Virtual Measurement Type...” from the drop down
menu.
5. Select the desired logger and measurement from the next drop
down menu.
6. Click the Create Virtual Measurement button, and then click
OK at the bottom of the page
Graphing Plant Available Water
In older versions of DataTrac, you could access Plant Available Water from the top toolbar. DataTrac 3 treats Plant Available Water
as a growing tool. Follow steps 1 through 9 to graph Plant Available
Water for any of your sensors.
1. Click on the logger in the device tree where you would like to
graph Plant Available Water.
53
6
DATATRAC 3 DATA TOOLS
DataTrac 3
2. Click Configure in the toolbar.
3. Select Virtual Port under Sensors and Measurements
4. In the Virtual Measurement Type drop down menu, select
Growing Tools
5. Under Select Derived Product Type drop down menu, select
Plant Available Water
6. In the Volumetric Water Content drop down menu, select the
sensor data where you would like to apply the Plant Available
Water model.
7. Click Create Virtual Measurement
8. Pick your approximate mineral soil type or pick “User Defined
Values” and manually enter your percent volumetric water content at field capacity and permanent wilting point. DataTrac
estimates Plant Available Water for each soil type using the
Saxton and Rawls method.4
9. Click OK
4
Saxton, K. E. and W. J. Rawls, (2006). Soil Water Characteristic Estimates
by Texture and Organic Matter for Hydrologic Solutions. Soil Sci. Soc. Am. J.
70:1569-1578.
54
DataTrac 3
7
7.1
7
TROUBLESHOOTING
Troubleshooting
General Troubleshooting
Although we designed DataTrac 3 to run as efficiently as possible,
problems sometimes occur. This troubleshooting chapter details the
most common problems you may encounter and their solutions. You
can find additional information on DataTrac 3 features in the DataTrac 3 Online help file. Refer to the Troubleshooting Quick Guide
to determine the nature of your problem and to locate solutions.
Table 2: Troubleshooting Quick Guide
If this problem occurs:
Refer to:
No Data Displayed
Problem # 1
Data returns “∗ ∗ ∗”
Problem # 2
Firmware is corrupt
Problem # 3
Suspected Sensor Malfunction
Problem # 4
Message “DataTrac cannot set any global settings”
Problem # 5
Message “cannot get device settings”
Problem # 6
Renaming Logger Error
Problem # 7
Message “cannot build Device Tree”
Problem # 8
Does not accept authorized license key
Problem # 9
30-day evaluation period expired
Problem # 10
Data lost when switching from Chart to Table View Problem # 11
Hardware
——
Cannot Connect
Problem # 12
Nothing listening on Communications Port
Problem # 13
COM Port Busy
Problem # 14
Rm-1 Not Connecting
Problem # 15
(When using desiccant chamber)
Connected but cannot download settings
Problem # 16
Software
——
Tree Errors
Problem # 17
Charting
Problem # 18
Does not accept registration code
Problem # 19
Communications Troubleshooting
——
Message “COM Port does not exist”
Problem # 20
Continued on next page
55
7
TROUBLESHOOTING
DataTrac 3
Table 2 – continued from previous page
If this problem occurs:
Refer to:
DataTrac does not show USB COM Port
Problem # 21
DataTrac 3 incorrectly tells me COM Port busy
Problem # 22
Receiving unreliable communication from logger
Problem # 23
Does not recognize radio when using the Rm-1
Problem # 24
Rm-1 not connecting to radio loggers
Problem # 25
Rm-1 takes too long to connect to remote logger
Problem # 26
Other Troubleshooting Topics
——
Correcting Dates on Bad Data Sets
Problem # 27
Surrendering Current Registration
Problem # 28
1. PROBLEM:
No data displays, or the letters “NP” appear in the data columns.
SOLUTION:
If the error message, “DataTrac did not load data into the chart”
ever appears or if data does not display, one or a combination of the
following may have occurred.
• The logger or connected sensors are not correctly configured.
When you first configured your logger, you may done so incorrectly or did not configure what sensors connect to each port.
Your logger stores the types of connected sensors. You may
have selected the wrong sensor type (i.e. you have connected
an EC-20 probe, but selected an EC-5). For help with this,
refer to the “Configuring Your Logger” section of this help file.
• You have deleted all of the data. You cannot recover erased
data.
• The logger does not have any connected sensors. Check to
make sure that you connected the sensors correctly. If there is
data present, go to the Preferences window > Calibration tab,
enable the “All Data” option, and then click Apply.
2. PROBLEM:
Data shows “∗ ∗ ∗” in the Scan Ports window or in the data file.
56
DataTrac 3
7
TROUBLESHOOTING
SOLUTION:
The three stars indicate that the raw data is out of the expected
range for the sensor. This could indicate a broken sensor.
Make sure you set the sensor type correctly for each port. If you
are unsure if the sensor or the port is working correctly, try plugging
the sensor into another port and trying the “scan” function again.
3. PROBLEM:
Firmware is corrupt.
SOLUTION:
Firmware – the internal code that makes the hardware function properly – can occasionally become corrupt. This may cause your logger to run slower than usual, or to produce unreliable readings. If
your logger shows these symptoms, it might be necessary to test the
firmware status. Follow steps 1 through 3 to test firmware status.
1. Go to Connection > Device Tools > Firmware Test.
2. DataTrac tests your logger firmware, and depending on its condition, displays a message saying the firmware check reported
the firmware as either good or bad. If the firmware reports as
bad, connect to the Internet, then go to http://www.de
cagon.com/support to obtain a firmware update.
3. If you do not have an Internet connection, cannot download
the update, or problems do not cease after installation, please
contact Decagon for instructions on mailing your logger to us
for repair.
4. PROBLEM:
My connected sensors may not be working properly.
SOLUTION:
57
7
TROUBLESHOOTING
DataTrac 3
Once you have connected and configured your logger, you may want
to check to see if your sensors are working properly. Follow steps 1
through 5 to check sensor function.
1. Connect to the logger.
2. Select Scan from the Menu bar.
3. DataTrac 3 does an immediate scan of all the ports and display
the data for each sensor.
4. Each port also has the option of displaying unprocessed data.
Selecting this displays the port unprocessed values.
5. To take another reading, click “Scan Again.” If this proves
successful after several attempts, the sensors are correctly configured and working properly.
5. PROBLEM:
Receive error message “DataTrac cannot set any global settings.”
SOLUTION:
The best solution to this problem is to completely reinstall DataTrac. Doing this erases all data and settings stored in your current
version of DataTrac. Please contact your ECH2 O System sales representative for assistance.
6. PROBLEM:
Receive error message “Cannot get device settings” when I connect
to my logger.
SOLUTION:
Try connecting to the logger again. If this does not work, reset
your logger, disconnect, and try to connect again; or close DataTrac
and reboot your computer. If the problem still persists, contact your
ECH2 O System sales representative.
7. PROBLEM:
58
DataTrac 3
7
TROUBLESHOOTING
Receive error message when trying to rename my logger.
SOLUTION:
When you name or rename a logger, it must conform to the following
standards
• No more than 8 characters.
• No punctuation (“ ” , ? : etc.).
• No whitespace characters.
• You cannot rename a logger unless you are connected to it,
though you can change it in DataTrac without being connected.
• The new logger name must be unique from other loggers in the
system.
8. PROBLEM:
The message “Cannot build Device Tree” appears when I start DataTrac 3.
SOLUTION:
If you see this repeatedly, please use the send feedback to Decagon
feature in the Help menu to contact Decagon support. Sending feedback automatically attaches a log file that helps determine the problem and outline proactive steps to resolve the issue.
9. PROBLEM:
When I try to license DataTrac, the program does not accept my
license key.
SOLUTION:
• When you enter your license key, you must enter your name,
company name, and license key exactly as they appear on the
license sheet.
Note: To avoid confusion between the number zero and the
59
7
TROUBLESHOOTING
DataTrac 3
letter “O,” the license key only contains the letter “O.”
• When you enter the license key, it must be entered in groups
of four as shown on the license sheet.
• Make sure that your key is for the proper version of DataTrac
3 (it say on the license key sheet).
• Old DataTrac licenses do not work with DataTrac 3.
Make sure your computer has an active Internet connection. The
first time you register your key, the computer attempts to contact
Decagon’s servers and this requires an active Internet connection.
10. PROBLEM:
My 30-day evaluation period has expired and I need more time.
SOLUTION:
You must purchase a DataTrac 3 license. Contact your sales representative for assistance.
11. PROBLEM:
I select a data point in the Table View, but when I return to the
Chart View I cannot find my data.
SOLUTION:
This problem has two solutions.
1. Under the Chart View menu, select a different view. This adjusts the chart and may adjust the axes of your displayed data.
2. If the first option does not work, try clicking on the axes and
dragging them in the appropriate direction to manually size
them.
60
DataTrac 3
7.2
7
TROUBLESHOOTING
Decagon Hardware
12. PROBLEM:
Cannot Connect.
SOLUTION:
1. No port error (port does not exist),
OS problem – Computer problem not DataTrac
2. OS knows the COM Port exists but Port not listed in DataTrac
Connect Via list (A USB to Serial adapter issue)
(a) Menu > Setup > DataTrac Settings > Show All Ports
(b) Use Connect Via box to see if port appears
(c) Example - Belkin USB to Serial adapters do not appear
in normal list
i. To fix this without showing all ports, have them replace their USB to Serial adapter with one of ours.
DataTrac is not specified to work with all adapters
13. PROBLEM:
Cannot find anything listening on communications port
SOLUTION:
1. Make sure device physically connects to the same COM Port
as selected in the Connect Via box
2. Make sure device has power (light flashing on EM50 or steady
on DataStation, etc.)
3. If using USB to Serial
(a) Adapter may not have enough capacity to power the SCA
Cable (Loggers not DataStations), replace the adapter
with a Decagon adapter.
(b) Adapter may be bad
61
7
TROUBLESHOOTING
DataTrac 3
14. PROBLEM:
Finds COM Port busy
SOLUTION:
1. PDA Active Sync may be running and tying up COM 1. Turn
off sync software
2. Another program is running and has control of the COM Port.
We cannot fix conflicting programs. You must find and quit
the conflicting program.
15. PROBLEM:
Rm-1 not connecting
SOLUTION:
1. Make sure the Rm-1 connects, powers on, etc. (See the Rm-1
Troubleshooting section in the Operators Manual.)
2. If recently connected, was it less than ten minutes ago? The
Rm-1 takes ten minutes to reset radio on same logger so it can
connect to others.
3. In DataTrac, verify that the logger configuration information
for the radio is correct (channel, subchannel, mode, etc). If
the system lists the logger as no radio, you must direct connect
to fix the setting (can use utility or mobile and bring file to
DataTrac)
4. Direct connect to make sure the logger functions and you set
it to the correct channel, subchannel, radio mode, and the batteries are good (must direct connect to do this)
5. Check for radio interference (see radio telemetry troubleshooting steps)
16. PROBLEM:
Connected but cannot download or get settings
62
DataTrac 3
7
TROUBLESHOOTING
SOLUTION:
There is a problem with DataTrac.
1. Logger not in tree - disconnect and reconnect.
2. Logger not selected in tree - select logger (connect icon should
be showing)
3. Try ECH2 O Utility,
(a) if not working see logger troubleshooting guide
(b) if Utility working,
i. shutdown DataTrac and computer
ii. Try Again
iii. Update DataTrac 3
(c) If download attempts, but an error message appears, it is
a logger problem. See the troubleshooting section of your
logger Operator’s Manual.
7.3
Software
17. PROBLEM:
Tree Errors
SOLUTION:
Tree has no nodes (node is the item in a tree like a logger or DataStation represented by that item name.)
1. Database files might be empty, take some readings on your
device.
2. You may not have added any loggers or data services, connect
to the logger and download the data.
3. Database files corrupt, use the “Send Feedback Option” to contact Decagon support.
63
7
TROUBLESHOOTING
DataTrac 3
18. PROBLEM
No Data visible in the Table/Chart.
SOLUTION:
1. You have no data in the logger that you are viewing in DataTrac. Try to download data from the logger.
2. You do not have a currently selected logger. Select the logger
of interest.
3. You do not have any loggers added to DataTrac. Add a logger
to the software.
4. A Corrupted database file. Use the “Send Feedback to Decagon”
option to contact Decagon support.
19. PROBLEM:
Does not accept registration code.
SOLUTION:
1. Does not accept registration code (various error messages).
(a) Make sure you are using DataTrac 3, the system does not
work with any earlier version.
(b) Enter the data verbatim from the form for the name, company and registration code, without additions or subtraction.
(c) Make sure your registration is for DataTrac 3.
(d) Ensure that you are connected to the Internet and you do
not have a proxy or firewall that blocks access to www.decag
on.com and its subdomains)
64
DataTrac 3
7.4
7
TROUBLESHOOTING
Communication Troubleshooting
Refer to the help topics listed here if you experience issues communicating with and downloading data from loggers. Contact Decagon
Devices if your problem persists.
20. PROBLEM:
DataTrac informs me the COM Port I want does not exist.
SOLUTION:
This is an operating system issue. Check to see if you installed the
COM Port correctly.
21. PROBLEM:
DataTrac 3 does not show that my USB is connected to the COM
Port.
SOLUTION:
You must use the Decagon USB cable to connect to the loggers.
(Avoid using cables obtained from third party vendors.)
Make sure to install the most up-to-date drivers for the USB cable. You may find the drivers at http://www.decagon.com/support
and under your logger name.
If you have installed the proper drivers, try plugging the USB cable into a different USB port on the computer.
22. PROBLEM:
DataTrac 3 reports my desired COM Port is busy or in use by another application, but no other programs are running.
SOLUTION:
Some PDA synchronization software monitors serial COM Ports.
Disable Microsoft’s ActiveSync or Palm’s HotSync system software
65
7
TROUBLESHOOTING
DataTrac 3
while trying to use the serial port with DataTrac.
23. PROBLEM:
Receiving unreliable communication from logger.
SOLUTION:
It may be necessary to reset your logger if you are continually receiving unreliable communication. Follow steps 1 and 2 to reset your
logger.
1. Open the logger case.
2. At the top of the circuit board there is a small silver button
with the word reset above it. Press this once. When you do
this, the green status light comes on for a few seconds, then
continues to blink periodically. This resets the processor, but
does not cause you to lose any of your stored data or settings.
24. PROBLEM:
DataTrac 3 informs me there is no radio in the logger when I try to
communicate via an Rm-1 to that logger.
SOLUTION:
DataTrac 3 needs to acquire the logger radio settings. This can
be done in two ways:
1. Directly connect to the radio logger and retrieve all of the settings.
2. Or, Initiate a “Query Any” and attempt to connect to that
logger. If the logger answers a “Query Any,” then DataTrac 3
updates the settings for that logger.
25. PROBLEM:
The Rm-1 does not connect to the radio loggers.
SOLUTION:
66
DataTrac 3
7
TROUBLESHOOTING
There are a myriad of errors which could cause this problem.
1. If a “No Rm-1 detected” or “Cannot setup Rm-1” type error
message appears follow steps a through e.
(a) Make sure to connect the Rm-1 power supply and turn on
the Rm-1.
(b) Reset the Rm-1 by pressing the “Reset” switch on the
case.
(c) Check that the Rm-1 connects to the correct COM Port or
serial to USB adapter. Install the drivers that came with
the Rm-1 if the Rm-1 is not showing up in the Connect
Via menu.
2. If there is no reply from a logger follow steps a through f.
(a) Check the radio antenna connection.
(b) Make sure the logger has sufficient battery power by directly connecting to the logger. The battery status shows
up in the menu toolbar.
(c) Check that it has been ten minutes since you last attempted to communicate via the Rm-1.
(d) Verify that the logger in the DataTrac 3 configuration
(channel, subchannel, and radio mode) is identical to the
radio logger you are trying to reach.
(e) Any radio interference can disrupt the Rm-1 signal and
cause it to take longer to reach a radio logger, or not
reach it at all. Make sure the Rm-1 and radio logger have
not been set up by metal buildings, or by anything that
could interfere with the transmission.
(f) If there is a reply from a logger, and a message appears
indicating a problem with the logger, this does not apply
to DataTrac 3.
Note: See the logger Operator’s manual for a solution.
67
7
TROUBLESHOOTING
DataTrac 3
26. PROBLEM:
The Rm-1 is taking too long to connect to a remote logger.
SOLUTION:
Follow steps 1 through 3 if your radio logger does not connect to
your Rm-1 transmitter after 50 seconds.
1. Make sure that the logger is still transmitting. As soon as you
disconnect from a logger, the radio becomes inactive for ten
minutes.
2. You can fix this by waiting ten minutes, or by doing a complete
system reset.
3. Make sure the radio logger is set to a radio mode other than
“Radio Off/No radio” or “Unknown Radio Mode.” Click on the
Configure button in the Menu bar to change the radio settings
under Device.
7.5
Other Troubleshooting Topics
27. PROBLEM
Correcting dates on bad data sets.
SOLUTION
If you remove the batteries from your Em50 series logger or it loses
power for any other reason without being connected to a computer,
then the Em50 records data with incorrect timestamps. DataTrac 3
tries to automatically correct the timestamps, but may occasionally
get them wrong. You can manually correct the timestamps permanently in DataTrac 3 with steps 1 through 4.
1. In the table view, select all of the incorrect dates.
2. From the Setup menu, select Timeshift.
3. Enter the new start date of the first date in your selected
records.
68
DataTrac 3
7
TROUBLESHOOTING
4. Press Ok.
5. Your data refreshes with the new date.
28. PROBLEM
Surrender Current Registration
SOLUTIONS
DataTrac 3 is either sold as a single registration or a site registration.
A single registration, though designed for only one user, allows the
user to install DataTrac 3 on up to five personal computers owned by
that user. A site registration works for up to 15 computers. DataTrac 3 does not allow registration codes to exceed these usages.
If you receive a message asking you to surrender one of your registration codes, you have two options.
1. Either, select the “Help” option in the toolbar and click “Surrender Current Registration.” This action permanently removes the DataTrac 3 registration from the computer and frees
the registration for use on a different computer.
2. Or, upgrade from a single registration to a site registration by
contacting Decagon Devices or your local Decagon distributor.
If you receive this message in error, contact Decagon for additional
support.
69
Index
Plotting Plant Available WaAbout DataTrac Software, 5
ter, 53
AutoCorrect Corrupt Timestamps,
Graph View
30
Right-Click Menu, 15
Chart Area, 11
Growing Tools, 49
Chart View
Options, 51
Right Click Menu, 13
Hotkeys, 42
Clock Synchronization
Automatic, 40
License Agreement, 2
Configure Logger
Localization Settings, 40
Target Range, 25
Logger
Connection, 17
Configuring, 18
USB to Serial, 17
Erase Data, 18
Customer Support, 1
Redeploying, 26
DataStation
Main Screen, 8
Changing Name, 29
Measurement Units, 41
Configuring, 29
Menu Bar, 8
Decagon Data Services, 44
Device Command Retries, 44
Power Noise Filter, 40
Device Directory, 9
Device Section, 18
Radio Logger
Device Tools, 36
Discovery Query, 27
Downloading Data
Radio Modes, 20
Em50G and DataStation Auto- Registration, 38
Download, 20
Does not Accept, 64
Surrender Current, 38
Em50G Subscription, 19
Reports, 46
Email, 1
Edit Options, 46
Print, 46
Firmware Updates, 38
Print Multiple, 47
Folders
Save as PDF, 47
Creating New, 10
Save Multiple as Separate PDFs,
Graph
47
Adding Different Data Sets,
Save Multiple as Single PDF,
48
53
70
DataTrac 3
INDEX
Scan Ports, 30
System Requirements
Minimum, 6
Recommend, 6
Table View, 14
Toolbar, 9
Updating DataTrac 3 from the Web,
6
Version Check
Automatic, 40
71