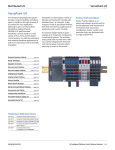
1
GE Intelligent Platforms Programmable Control Products VersaSafe VersaPoint* Module: IC220SDL543 SAFE INPUT, 24VDC POSITIVE LOGIC, 8PT User‘s Manual, GFK-2730 September 2011 Th is pa ge lef tb lan ki nte nti on all y User‘s manual VersaPoint module with safe digital inputs 2011-09-29 Catalog No.: GFK-2730 Revision: 05 This user manual is valid for: Catalog No.: Revision IC220SDL543 HW/FW: 00/201 HW/FW: 00/202 Please observe the following notes In order to ensure the safe use of the product described, you have to read and understand this manual. The following notes provide information on how to use this manual. User group of this manual The use of products described in this manual is oriented exclusively to qualified electricians or persons instructed by them, who are familiar with applicable standards and other regulations regarding electrical engineering and, in particular, the relevant safety concepts. GE Intelligent Platforms accepts no liability for erroneous handling or damage to products from GE Intelligent Platforms or third-party products resulting from disregard of information contained in this manual. Explanation of symbols used and signal words This is the safety alert symbol. It is used to alert you to potential personal injury hazards. Obey all safety messages that follow this symbol to avoid possible injury or death. DANGER This indicates a hazardous situation which, if not avoided, will result in death or serious injury. WARNING This indicates a hazardous situation which, if not avoided, could result in death or serious injury. CAUTION This indicates a hazardous situation which, if not avoided, could result in minor or moderate injury. The following types of messages provide information about possible property damage and general information concerning proper operation and ease-of-use. NOTE This symbol and the accompanying text alerts the reader to a situation which may cause damage or malfunction to the device, either hardware or software, or surrounding property. This symbol and the accompanying text provides additional information to the reader. It is also used as a reference to other sources of information (manuals, data sheets, literature) on the subject matter, product, etc. User manual IC220SDL543 - September 2011 GFK-2730 General terms and conditions of use for technical documentation This document is based on information available at the time of its publication. While efforts have been made to be accurate, the information contained herein does not purport to cover all details or variations in hardware or software, nor to provide for every possible contingency in connection with installation, operation, or maintenance. Features may be described herein which are not present in all hardware and software systems. GE Intelligent Platforms assumes no obligation of notice to holders of this document with respect to changes subsequently made. Statement of legal authority GE Intelligent Platforms makes no representation or warranty, expressed, implied, or statutory with respect to, and assumes no responsibility for the accuracy, completeness, sufficiency, or usefulness of the information contained herein. No warranties of merchantability or fitness for purpose shall apply. How to contact us Internet Up-to-date information on GE Intelligent Platforms products and our Terms and Conditions can be found on the Internet at: www.ge-ip.com. Make sure you always use the latest documentation. It can be downloaded at: http://support.ge-ip.com. Subsidiaries Published by If there are any problems that cannot be solved using the documentation, please contact your GE Intelligent Platforms subsidiary. Subsidiary contact information is available at www.ge-ip.com. GE Intelligent Platforms. Inc 2500 Austin Dr. Charlottesville Virginia Phone (+1) 800-433-2682 Fax (+1) 780-420-2047 Should you have any suggestions or recommendations for improvement of the contents and layout of our manuals, please send your comments to [email protected]. * VersaPoint is a trademark of GE Intelligent Platforms, Inc. and/or its affiliates. All other trademarks are the property of their respective owners. © Copyright 2011 GE Intelligent Platforms, Inc. All Rights Reserved GFK-2730 y all on nti nte ki lan tb lef ge pa is Th User manual IC220SDL543 - September 2011 GFK-2730 Table of contents 1 2 3 For your safety..........................................................................................................................1-1 1.1 General safety notes .......................................................................................... 1-1 1.2 Electrical safety .................................................................................................. 1-3 1.3 Safety of the machine or system ........................................................................ 1-4 1.4 Directives and standards.................................................................................... 1-5 1.5 Correct usage..................................................................................................... 1-5 1.6 Documentation ................................................................................................... 1-6 1.7 Abbreviations used ........................................................................................... 1-7 Product description...................................................................................................................2-1 2.1 Brief description of the safety module ................................................................ 2-1 2.2 Structure of the safety module ........................................................................... 2-2 2.3 Housing dimensions ........................................................................................... 2-3 2.4 Safe digital inputs and clock outputs UT1 and UT2 ........................................... 2-4 2.4.1 Safe digital inputs ............................................................................... 2-4 2.4.2 Clock outputs UT1 and UT2 ............................................................... 2-6 2.5 Connection options for sensors depending on the parameterization ................. 2-7 2.6 Local diagnostic and status indicators ............................................................... 2-8 2.7 Safe state ......................................................................................................... 2-10 2.7.1 Operating state ................................................................................. 2-10 2.7.2 Error detection in I/O devices ........................................................... 2-10 2.7.3 Device errors .................................................................................... 2-11 2.7.4 Parameterization errors .................................................................... 2-11 2.8 Process data words.......................................................................................... 2-12 2.8.1 VersaSafe ......................................................................................... 2-12 2.8.2 PROFIsafe (PROFIBUS, PROFINET) .............................................. 2-12 2.9 Programming data/configuration data .............................................................. 2-13 2.9.1 Local bus .......................................................................................... 2-13 2.9.2 Other bus systems (PROFIBUS, PROFINET, etc.) .......................... 2-13 VersaPoint potential and data routing, and VersaPoint connectors .........................................3-1 GFK-2730 3.1 VersaPoint potential and data routing ................................................................ 3-1 3.2 Supply voltage UL .............................................................................................. 3-1 3.3 Supply voltage UM .............................................................................................. 3-2 3.4 Terminal point assignment ................................................................................. 3-3 Table of contents i 4 5 6 7 ii Assembly, removal, and electrical installation ..........................................................................4-1 4.1 Assembly and removal ....................................................................................... 4-1 4.1.1 Unpacking the module ........................................................................ 4-1 4.1.2 General ............................................................................................... 4-1 4.1.3 Setting the DIP switches ..................................................................... 4-2 4.1.4 Assembly and removal of the safety module ...................................... 4-4 4.2 Electrical installation........................................................................................... 4-6 4.2.1 Electrical installation of the VersaPoint station ................................... 4-6 4.2.2 Electrical installation of the safety module .......................................... 4-6 Parameterization of the safety module .....................................................................................5-1 5.1 Parameterization in a VersaSafe system ........................................................... 5-1 5.2 Parameterization in a PROFIsafe system .......................................................... 5-2 5.3 Parameterization of the safe inputs.................................................................... 5-3 5.4 Parameterization of clock outputs UT1 and UT2................................................ 5-7 Duration of a safety demand ....................................................................................................6-1 6.1 VersaSafe .......................................................................................................... 6-1 6.2 PROFIsafe ......................................................................................................... 6-1 Connection examples for safe inputs .......................................................................................7-1 7.1 Explanation of the examples .............................................................................. 7-1 7.2 Measures required to achieve a specific safety integrity level ........................... 7-3 7.3 Single-channel assignment of safe inputs.......................................................... 7-5 7.3.1 Single-channel: Supply through UT1 (clocking enabled) or UT2 (clocking enabled) .............................................................................. 7-6 7.3.2 Single-channel: Supply through UT1 (clocking disabled) or UT2 (clocking disabled) or external supply ................................................ 7-8 7.3.3 Single-channel: Supply through OSSD ............................................ 7-10 7.4 Two-channel equivalent assignment of safe inputs.......................................... 7-13 7.4.1 Notes about errors for two-channel equivalent assignment of safe inputs ........................................................................................ 7-14 7.4.2 Two-channel equivalent: Supply through UT1 and UT2 (clocking enabled for both) ............................................................... 7-15 7.4.3 Two-channel equivalent: Supply through UT1 and UT2 (of which one clock pulse is disabled) .............................................. 7-17 7.4.4 Two-channel equivalent: Supply through a clock output (clocking enabled) and external supply ............................................ 7-20 7.4.5 Two-channel equivalent: Supply through a clock output (clocking enabled) ............................................................................ 7-23 7.4.6 Two-channel equivalent: Supply through a clock output (clocking disabled) or external supply .............................................. 7-26 7.4.7 Two-channel equivalent: External supply (OSSD) ........................... 7-29 User manual IC220SDL543 - September 2011 GFK-2730 7.5 8 9 Two-channel non-equivalent assignment of safe inputs .................................. 7-31 7.5.1 Notes about errors for two-channel non-equivalent assignment of safe inputs .................................................................................... 7-32 7.5.2 Two-channel non-equivalent: Supply through UT1 and UT2 (clocking enabled for both) ............................................................... 7-34 7.5.3 Two-channel non-equivalent: Supply through UT1 and UT2 (of which one clock pulse is disabled) .............................................. 7-37 7.5.4 Two-channel non-equivalent: Supply through a clock output (clocking enabled) and external supply ............................................ 7-40 7.5.5 Two-channel non-equivalent: Supply through a clock output (clocking enabled) ............................................................................ 7-43 7.5.6 Two-channel non-equivalent: Supply through a clock output (clocking disabled) or external supply .............................................. 7-45 Startup and validation...............................................................................................................8-1 8.1 Initial startup ....................................................................................................... 8-1 8.2 Restart after replacing a safety module ............................................................. 8-3 8.2.1 Replacing a safety module ................................................................. 8-3 8.2.2 Restart ................................................................................................ 8-3 8.3 Validation ........................................................................................................... 8-3 Errors: Messages and removal.................................................................................................9-1 9.1 Safe digital input errors ...................................................................................... 9-3 9.2 Clock output UT1 and UT2 errors ...................................................................... 9-5 9.3 Supply voltage errors ......................................................................................... 9-5 9.4 Parameterization errors...................................................................................... 9-6 9.5 General errors .................................................................................................... 9-8 9.6 PROFIsafe errors ............................................................................................... 9-8 9.7 Acknowledging an error ..................................................................................... 9-9 9.7.1 Acknowledging an error for VersaSafe ............................................... 9-9 9.7.2 Acknowledging an error for PROFIsafe .............................................. 9-9 10 Maintenance, repair, decommissioning, and disposal............................................................ 10-1 10.1 Maintenance..................................................................................................... 10-1 10.2 Repair............................................................................................................... 10-1 10.3 Decommissioning and disposal........................................................................ 10-1 11 Technical data and ordering data ........................................................................................... 11-1 GFK-2730 11.1 System data ..................................................................................................... 11-1 11.1.1 VersaSafe ......................................................................................... 11-1 11.1.2 PROFIsafe ........................................................................................ 11-1 11.2 IC220SDL543................................................................................................... 11-1 Table of contents iii 11.3 Conformance with EMC Directive .................................................................... 11-6 11.4 Ordering data ................................................................................................... 11-6 11.4.1 Ordering data: Safety module ........................................................... 11-6 11.4.2 Ordering data: Accessories .............................................................. 11-6 11.4.3 Ordering data: Documentation ......................................................... 11-7 A Appendix: PROFIsafe terms used in the manual .................................................................... A-1 B Appendix: F-Parameters and iParameters .............................................................................. B-1 C D iv B1 F-Parameters ................................................................................................... B-1 B2 iParameters ...................................................................................................... B-2 B3 Diagnostic messages for parameter errors ...................................................... B-3 B 3.1 Diagnostic messages for F-Parameters and iParameters for PROFIsafe ......................................................................................... B-3 B 3.2 Diagnostic messages for parameter errors for VersaSafe ................ B-4 Appendix: Checklists ............................................................................................................... C-1 C1 Planning ................................................................................................... C-2 C2 Assembly and electrical installation C3 Startup and parameterization C4 Validation ....................................................................................................... C-5 ............................................................ C-3 ...................................................................... C-4 Index........................................................................................................................................ D-1 User manual IC220SDL543 - September 2011 GFK-2730 1 1 For your safety Purpose of this manual The information in this document is designed to familiarize you with how the IC220SDL543 safety module works, its operating and connection elements, and its parameter settings. This information will enable you to use the IC220SDL543 module within a VersaSafe or PROFIsafe system according to your requirements. Validity of the user manual This manual is only valid for the IC220SDL543 module in the version indicated on the inner cover page. 1.1 General safety notes WARNING: Depending on the application, incorrect handling of the safety module can pose serious risks for the user When working with the safety module within the VersaSafe or PROFIsafe system, please observe all the safety notes included in this section. Requirements Knowledge of the following is required: – The non-safety-related target system (e.g., PROFIBUS, PROFINET) – The VersaSafe or PROFIsafe system – The components used in your application – The VersaPoint product range – Operation of the software tools used – Safety regulations in the field of application Qualified personnel In the context of the use of the VersaSafe or PROFIsafe system, the following operations may only be carried out by qualified personnel: – Planning – Configuration, parameterization, programming – Installation, startup, servicing – Maintenance, decommissioning This user manual is therefore aimed at: – Qualified personnel who plan and design safety equipment for machines and systems and are familiar with regulations governing safety in the workplace and accident prevention. – Qualified personnel who install and operate safety equipment in machines and systems. GFK-2730 Chapter 1 For your safety 1-1 1 In terms of the safety notes in this manual, qualified personnel are persons who, because of their education, experience and instruction, and their knowledge of relevant standards, regulations, accident prevention, and service conditions, have been authorized to carry out any required operations, and who are able to recognize and avoid any possible dangers. Documentation You must observe all information in this manual as well as in the documents listed in "Documentation" on page 1-6. Safety of personnel and equipment The safety of personnel and equipment can only be assured if the safety module is used correctly (see "Correct usage" on page 1-5). Error detection Depending on the wiring and the corresponding setting of the safe input module parameters, the VersaSafe or PROFIsafe system can detect various errors within the safety equipment. Do not carry out any repairs Repair work may not be carried out on the safety module. Do not open the housing/security seal It is strictly prohibited to open the safety module housing. In order to prevent the manipulation of the safety module and to detect the unauthorized opening of the safety module, a security seal is applied to the module. This security seal is damaged in the event of unauthorized opening. In this case, the correct operation of the safety module can no longer be ensured. Measures to prevent incorrect connection and polarity reversal Take measures to prevent the incorrect connection, polarity reversal, and manipulation of connections. 1-2 In the event that an error cannot be removed, please contact GE Intelligent Platforms immediately, engage a service engineer or send the faulty module directly to GE Intelligent Platforms. User manual IC220SDL543 - September 2011 GFK-2730 1 1.2 Electrical safety WARNING: Hazardous body currents and the loss of functional safety Disregarding instructions for electrical safety may result in hazardous body currents and the loss of functional safety. In order to ensure electrical safety, please observe the following points. Direct/indirect contact Protection against direct and indirect contact according to VDE 0100 Part 410 must be ensured for all components connected to the system. In the event of an error, parasitic voltages must not occur (single-fault tolerance). This can be achieved by: – Using power supply units with safe isolation (PELV). – Decoupling circuits, which are not PELV systems, using optocouplers, relays, and other components, which meet the requirements of safe isolation. Power supply units for 24 V supply Only use power supply units with safe isolation and PELV according to EN 50178/VDE 0160 (PELV). This prevents short circuits between primary and secondary sides. Make sure that the output voltage of the power supply does not exceed 32 V even in the event of an error. Insulation rating When selecting the operating equipment, please take into consideration the contamination and surge voltages, which may occur during operation. The IC220SDL543 module is designed for surge voltage category II (according to DIN EN 60664-1). If you expect surge voltages in the system, which exceed the values defined in surge voltage category II, take into consideration additional measures for voltage limitation. Installation and configuration Please observe the instructions for installing and configuring the system (see "Documentation" on page 1-6). WARNING: Depending on the application, incorrect installation and upgrades can pose serious risks for the user The user is obliged to design the devices used and their installation in the system according to these requirements. This also means that existing plants and systems retrofitted with VersaSafe or PROFIsafe must be checked and tested again in this respect. GFK-2730 Chapter 1 For your safety 1-3 1 1.3 Safety of the machine or system The machine/system manufacturer and the operator are solely responsible for the safety of the machine or system and the implemented application, in which the machine or system is used. The Machinery Directive must thus be observed. Draw up and implement a safety concept In order to use the safety module described in this document, you must have drawn up an appropriate safety concept for your machine or system. This includes a hazard and risk analysis according to the directives and standards specified in "Directives and standards" on page 1-5, as well as a test report (checklist) for validating the safety function (see "Appendix: Checklists" on page C-1). VersaSafe: Please refer to the documentation for the configurable safety module used. The target safety integrity level (SIL according to EN 61508, SIL CL according to EN 62061 or performance level and category according to EN ISO 13849-1) is ascertained on the basis of the risk analysis. The safety integrity level ascertained determines how to connect and parameterize the safety module within the overall safety function. Within a VersaSafe or PROFIsafe system, the safety module can be used to achieve safety functions with the following requirements depending on the conditions of use: – Up to SIL 3 according to standard EN 61508 – Up to SIL CL 3 according to standard EN 62061 – Up to Cat. 4/PL e according to standard EN ISO 13849-1 Check hardware and parameterization Carry out a validation every time you make a safety-related modification to your overall system. Use your test report to ensure that: – The safe devices are connected to the correct safe sensors and actuators – The safe input and output devices have been parameterized correctly – The variables have been linked to the safe sensors and actuators correctly (singlechannel or two-channel) 1-4 User manual IC220SDL543 - September 2011 GFK-2730 1 1.4 Directives and standards The manufacturers and operators of machines and systems, in which the IC220SDL543 module is used, are responsible for adhering to all applicable directives and legislation. For the standards observed by the module, please refer to the certificate issued by the approval body and the EC declaration of conformity. These documents are available on the Internet at http://support.ge-ip.com. 1.5 Correct usage Only use the VersaSafe or PROFIsafe system in accordance with the instructions in this section. The IC220SDL543 safety module is designed exclusively for use in a VersaSafe or PROFIsafe system. It can only perform its safety-related tasks within the system if it has been integrated into the execution process correctly and in such a way as to avoid errors. You must observe all information in this manual as well as in the documents listed in "Documentation" on page 1-6. In particular, only use the module according to the technical data and ambient conditions specified in Section 11, "Technical data and ordering data" on page 11-1 and onwards. Within a VersaSafe or PROFIsafe system, the safety module can be used to achieve safety functions with the following requirements depending on the conditions of use: – Up to SIL 3 according to standard EN 61508 – Up to SIL CL 3 according to standard EN 62061 – Up to Cat. 4/PL e according to standard EN ISO 13849-1 It is designed for connecting single-channel or two-channel sensors, which can be used in association with safety technology. For example, the module can be used in the following applications: – Single or two-channel emergency stop or safety door equipment – Applications with enable button – Applications with two-hand control devices – Applications with mode selector switches – As secondary switchgear for safety-related optical data links – Safety circuits according to EN 60204 Part 1 GFK-2730 Chapter 1 For your safety 1-5 1 1.6 Documentation Latest documentation Make sure you always use the latest documentation. Changes or additions to this document can be found on the Internet at http://support.ge-ip.com. VersaSafe When working on the VersaSafe system and its components, you must always keep this user manual and other items of product documentation to hand and observe the information therein. User manuals: – For the controller used – For VersaSafe I/O modules – For VersaSafe function blocks Please also observe the relevant information about the bus system used. PROFIsafe When working on the PROFIsafe system and its components, you must always keep this user manual and other items of product documentation to hand and observe the information therein. User manuals: – For the safe controller used – For PROFIsafe I/O modules – For PROFIsafe function blocks Please also observe the relevant information about PROFIBUS, PROFINET, and PROFIsafe, which is available on the Internet at www.profisafe.net. VersaPoint product range GFK-2736 Automation terminals of the VersaPoint product range (configuration and installation) Documentation for the Network Interface Unit (NIU) used 1-6 User manual IC220SDL543 - September 2011 GFK-2730 1 1.7 Abbreviations used Table 1-1 Abbreviations used Abbreviation Meaning SIL Safety integrity level EN 61508 SIL 2, SIL 3 SIL CL SIL claim limit EN 62061 SIL CL 3 Cat. Category EN ISO 13849-1 Cat. 2, Cat. 4 PL Performance level EN ISO 13849-1 PL e, PL d Table 1-2 Standard Example Abbreviations used Abbreviation Meaning PELV Protective extra-low voltage A circuit in which the voltage cannot exceed 30 V AC, 42.4 V peak value or 60 V DC under normal conditions, and under single-fault conditions, except earth faults in other circuits. A PELV circuit is like a SELV circuit, but is connected to protective earth ground. (According to EN 61131-2) EUC Equipment under control OSSD OSSD Output signal switching device OSSD is the part of electrosensitive protective equipment, which is connected to the machine control system and switches off if the sensor part responds during correct operation. For terms and abbreviations used for PROFIsafe, please refer to "Appendix: PROFIsafe terms used in the manual" on page A-1. GFK-2730 Chapter 1 For your safety 1-7 Th is pa ge lef tb lan ki nte nti on all y 1 1-8 User manual IC220SDL543 - September 2011 GFK-2730 2 2 Product description 2.1 Brief description of the safety module The IC220SDL543 module is an input module, which is designed for use within a VersaPoint station. The IC220SDL543 safety module can be used as part of a VersaPoint station at any point within a VersaSafe or PROFIsafe system. The transmission speed of the VersaPoint local bus can be set to 500 kbaud or 2 Mbaud on the safety module using switches. One transmission speed must be used seamlessly in the relevant VersaPoint station in a VersaSafe or PROFIsafe system. The module has a 10-pos. DIP switch, which is used to set the VersaSafe or PROFIsafe address. The module has four safe digital inputs for two-channel assignment or eight safe digital inputs for single-channel assignment. The inputs can be parameterized according to the application and enable the integration of sensors in the VersaSafe system or in the PROFIsafe system. Within a VersaSafe or PROFIsafe system, the IC220SDL543 safety module can be used to achieve safety functions with the following requirements: – Up to SIL 3 according to standard EN 61508 – Up to SIL CL 3 according to standard EN 62061 – Up to Cat. 4/PL e according to standard EN ISO 13849-1 GFK-2730 Chapter 2 Product description 2-1 2 2.2 Structure of the safety module 6 4x 1 P UM 2 FS D 0 1 2 3 1 2 1 2 9 1 2 1 2 UT1 2 UT DI8 PS 3 2MBD 4 500KBD 9 87 65 4 2 3 1 0 5 7 Figure 2-1 1 2 3 4 8 4x 76020002 Structure of the safety module Data jumpers (local bus) Electronics base with labeling including hardware/firmware version designation (not shown) Switch for setting the transmission speed and operating mode Switch for setting the protocol and address For more detailed information about setting the switches, please refer to "Setting the DIP switches" on page 4-2. 5 6 7 8 9 2-2 Potential jumper Diagnostic and status indicators; for assignment and meaning see "Local diagnostic and status indicators" on page 2-8 VersaPoint connector; for assignment see "Terminal point assignment" on page 3-3 Terminal points Labeling field User manual IC220SDL543 - September 2011 GFK-2730 2 2.3 Housing dimensions 120 72 500KBD Mode2 2MBD Mode1 F-Address 9 8 7 6 5 4 2 3 1 0 on off 48.8 Figure 2-2 GFK-2730 76022010 Housing dimensions (in mm) Chapter 2 Product description 2-3 2 2.4 2.4.1 Safe digital inputs and clock outputs UT1 and UT2 Safe digital inputs The safety module has four safe digital inputs for two-channel assignment or eight safe digital inputs for single-channel assignment. The supply voltage for the inputs can be provided externally or via the clock outputs. Technical data For the technical data for the safe inputs, please refer to page 11-4. Parameterization The individual safe digital inputs of a safety module can be parameterized differently. This means that the inputs can be adapted to various operating conditions and different safety integrity levels can be implemented (SIL, SIL CL, Cat., PL). The safety integrity level (SIL, SIL CL, Cat., PL) and error detection that can be achieved depend on the parameterization, the structure of the sensor, and the cable installation (see "Connection examples for safe inputs" on page 7-1). For information about the parameterization of the inputs, please refer to "Parameterization of the safe inputs" on page 5-3. Diagnostics Diagnostics are provided via both the local diagnostic indicators and the diagnostic messages, which are transmitted to the safe controller (PROFIsafe) or to a configurable safety module (VersaSafe). For information about the diagnostic messages of the inputs, please refer to "Safe digital input errors" on page 9-3. CAUTION: Diagnostic data is not safety-related Do not use the diagnostic data to execute safety-related functions or actions. 2-4 User manual IC220SDL543 - September 2011 GFK-2730 2 Requirements for controlling devices/sensors The error detection of the module varies depending on the parameterization. This results in specific requirements for the sensors. – To acquire input signals, the signal duration must be greater than the parameterized filter time. – The sensors must be suitable for the application. Only use appropriately qualified sensors (suitable for the required category, SIL, SIL CL, PL). – Use switches with a positive opening contact according to IEC 60947-5-1. Part 5 of this standard includes a description of the specific requirements for control switches with a positive opening contact. All positive opening control switches, which meet these specific requirements, are marked with the following symbol: – Use reliable components. These include, for example: – – – – – – – – GFK-2730 Mechanical position switches with personal protection function with positive opening contact according to EN 60947-5-1 Cam-operated switches with positive opening contact Emergency stop buttons/cable-operated switches with positive opening contact according to EN 60947-5-1 Controlling devices can be evaluated on a single-channel or two-channel connection depending on the application. Under certain circumstances, switches (e.g., for position monitoring) must be designed redundantly depending on the risk. In order to achieve Cat. 3/Cat. 4 SIL 3/SIL CL 3 or PL d or e, controlling devices must usually be designed redundantly. Please observe any special environmental requirements in your application when selecting the controlling devices. Please observe the applicable C standards in your application (e.g., EN 1010), in which, for example, the number of controlling devices required to achieve a particular category is specified. Chapter 2 Product description 2-5 2 2.4.2 Clock outputs UT1 and UT2 The module has two independent clock outputs. They provide the supply voltage for the safe inputs. Each of these clock outputs can provide a pulse pattern to detect cross circuits and short circuits in the external wiring of the inputs. Intelligent sensors can also be supplied by the clock outputs. Depending on the application, both clock outputs can be parameterized differently. Parameterization For information about the parameterization of the clock outputs, please refer to "Parameterization of clock outputs UT1 and UT2" on page 5-7. The clock outputs are also switched on and monitored when not parameterized. If a short circuit occurs at a clock output when it is in this state, the clock output is switched off. This is indicated by the local diagnostic LED. To exit the error, parameterize the device and acknowledge the error message. Technical data For the technical data for the clock outputs, please refer to page 11-5. Behavior in the event of an error In the event of short circuit to GND or overload of the clock outputs, the clock outputs are switched off. At the same time, the error is indicated at the UT1 and/or UT2 LEDs and a diagnostic message is generated at the safe controller (PROFIsafe) or at a configurable safety module (VersaSafe). This error must be acknowledged so that the system can be started up again following error removal. Error detection Error detection depends on both the parameterization of the clock outputs and which input is assigned to which clock output. As there are two clock outputs for eight inputs, there may be reciprocal effects between the inputs. Diagnostics Diagnostics are provided via both the local diagnostic indicators and the diagnostic messages, which are transmitted to the safe controller (PROFIsafe) or to a configurable safety module (VersaSafe). For information about the diagnostic messages of the clock outputs, please refer to "Clock output UT1 and UT2 errors" on page 9-5. CAUTION: Diagnostic data is not safety-related Do not use the diagnostic data to execute safety-related functions or actions. 2-6 User manual IC220SDL543 - September 2011 GFK-2730 2 2.5 Connection options for sensors depending on the parameterization Sensors that meet various safety requirements depending on the parameterization can be connected to the inputs. For connection examples, please refer to Section 7, "Connection examples for safe inputs". The maximum achievable SIL/SIL CL/Cat./PL is specified in the table. In order to achieve this: – Observe the information in the connection examples (see Section 7, "Connection examples for safe inputs") – Observe the requirements of the standards with regard to the external wiring and the sensors to be used to achieve a SIL/SIL CL/Cat./PL (see "Measures required to achieve a specific safety integrity level" on page 7-3) Input Two-channel redundant controlling device/sensor Input signal Clocking (UT1, UT2) Equivalent With Without 2x 1x Intelligent sensor Non-equivalent Without 2x 1x Without Yes Yes Yes No No No SIL 3 SIL CL 3 Cat. 4 PL e SIL 3 SIL CL 3 Cat. 3 PL d 7-37 7-40 7-43 7-45 Sensors that can be connected: – Contact-based Yes – With OSSD outputs No Achievable SIL/SIL CL/Cat./PL For connection example, see page Yes Yes Yes Yes No No Yes SIL 3 SIL 3 SIL 3 SIL CL SIL CL SIL CL 3 3 3 Cat. 3 Cat. 4** Cat. 4 PL d PL e PL e SIL 2 SIL CL 2 Cat. 3* PL d SIL 2 SIL CL 2 Cat. 2 PL d SIL 2 SIL CL 2 Cat. 2 PL d SIL 3 SIL CL 3 Cat. 4 PL e SIL 3 SIL CL 3 Cat. 4 PL e 7-6 7-8 7-10 7-15 7-17 7-20 7-23 Yes 7-26 7-29 7-34 See separate documentation for intelligent sensors Single-channel sensor or Connection to the redundant sensor VersaPoint connectors Key: GFK-2730 * Cat. 3 can only be achieved with a redundant sensor. ** The category that can be achieved depends on the sensor used. Chapter 2 Product description 2-7 2 Clocking The clocking for the inputs is provided when clock outputs UT1 and UT2 are parameterized accordingly. The parameterization of UT1 and UT2 applies to the entire module. When parameterizing the inputs, specify which clock output is assigned to which input. For two-channel inputs there are various options for assignment: 2x: Both channels are assigned different clock outputs with clocking switched on. 1x: Only one channel is assigned a clock output with clocking switched on or both channels are assigned the same clock output with clocking switched on. Without: Either a clock output with clocking switched off is assigned or no clock output is assigned. For information about error detection according to clocking, please refer to "Clock outputs UT1 and UT2" on page 2-6. Error detection For information about the special features of error detection, please refer to the connection examples. 2.6 Local diagnostic and status indicators D 1 0 2 UT1 PSDI8 UT2 P UM FS D 1 2 FS 1 1 2 UM 1 2 2 P 1 3 2 3 1 2 1 2 1 2 0 1 2 UT1 2 UT DI8 PS 500KBD Mode2 2MBD Mode1 9 87 65 4 2 3 1 0 76020003 Figure 2-3 2-8 Local diagnostic and status indicators on the IC220SDL543 module User manual IC220SDL543 - September 2011 GFK-2730 2 Table 2-1 D Local diagnostic and status indicators Green LED Diagnostics OFF: Communications power is not present Flashing at 0.5 Hz: Communications power present, local bus not active Flashing at 4 Hz: Communications power present, error at the interface between previous and flashing terminal (the terminals after the flashing terminal cannot be addressed). (E.g., loose contact at the bus interface, terminal before the flashing terminal has failed, another terminal was snapped on during operation (not permitted)) Observe the module startup time of approximately 16 s. During this time the D LED flashes at 4 Hz and the bus cannot be started up. FS UM P UT1, UT2 ON: Communications power present, local bus active Red LED Failure state Flashing at 1 Hz: Device not parameterized or parameterization was not accepted ON: Hardware fault; communication to safe controller (PROFIsafe) or configurable safety module (VersaSafe) disabled Green LED Monitoring the supply voltage UM OFF: Communications power is not present Flashing at 1 Hz: UM below the permissible voltage range (undervoltage) ON: UM present Green LED Status indicator for safe communication OFF: No safe communication Flashing at 0.5 Hz: Safe communication running, the controller requests operator acknowledgment ON: Safe communication running without errors Red LED Diagnostic message (error) for each clock output OFF: No error Flashing at 1 Hz: Cross circuit of an input with external signals ON: Short circuit or overload of the clock output The clock output is switched off until the acknowledgment is received by the safety module (see also "Clock output UT1 and UT2 errors" on page 9-5). IN 0.1 - 3.2 Green LED Status of each input (see "Terminal point assignment" on page 3-3) ON: Input at logic 1 OFF: Input at logic 0 Even when the module is not parameterized, the physical state at the inputs is indicated. However, substitute value "0" is transmitted to the safe controller. GFK-2730 Chapter 2 Product description 2-9 2 2.7 Safe state The safe state for the module is the transmission of the value equal to "0" in the image of the inputs to the safe controller (PROFIsafe) or the configurable safety module (VersaSafe). PROFIsafe: The safe state for the F-Input data is "0". The safe state is entered by means of passivation (see "iParameter" on page A-2). The safe state can be entered in the following cases: 1. Operating state 2. Error detection in I/O devices 3. Device errors 4. Parameterization errors 2.7.1 Operating state In the operating state, the inputs can enter states "1" or "0". In general, state "0" is the safe state. An exception is a non-equivalent parameterized input. For channel 2 of this input, "1" is the safe state, "0" is represented in the process data image of the two-channel input. Table 2-2 Operating state depending on the state of the inputs Type of input Operating state equals 1 in input state Operating state equals 0 (safe state) Single-channel High (1) Low (0) Two-channel equivalent High/High (1/1) Other Two-channel nonequivalent High/Low (1/0) Other Please observe the state transitions (see "Symmetry/ start inhibit" on page 5-5). 2.7.2 Inputs Error detection in I/O devices If an error is detected at an input, the safe state is set at this input and a "0" is represented in the process image of the input ("0" = safe state). Depending on the parameterization, the following errors can be detected at inputs: – Short circuit – Cross circuit – Overload/short circuit of the clock outputs 2-10 User manual IC220SDL543 - September 2011 GFK-2730 2 The relevant diagnostic message is transmitted to the safe controller (PROFIsafe) or the configurable safety module (VersaSafe) (see "Safe digital input errors" on page 9-3). For information about which errors are detected and when, please refer to "Connection examples for safe inputs" on page 7-1. 2.7.3 Device errors Device errors can lead to safe communication being set. Inputs If a hardware fault in the internal circuit is detected at an input, all module inputs enter the safe state and "0" values are represented in the process image of the inputs ("0" = safe state). The relevant diagnostic message is transmitted to the safe controller (PROFIsafe) or the configurable safety module (VersaSafe) (see "Safe digital input errors" on page 9-3). Serious errors All serious errors that can result in the loss of or adversely affect the safety function cause the entire module to enter the safe state. The FS LED on the safety module is permanently on. The following errors result in the safe state: – – – – – Serious hardware fault in the internal circuit User error Module overload Overheating of the module Incorrect supply The relevant diagnostic message is transmitted to the safe controller (PROFIsafe) or the configurable safety module (VersaSafe) (see "Errors: Messages and removal" on page 9-1). WARNING: Loss of the safety function due to sequential errors In the event of a device error, the following measures should be taken to prevent sequential errors: Disconnect the module from the power supply and replace it. 2.7.4 Parameterization errors Parameterization errors are indicated: – As long as the module is not parameterized or – In the event of faulty parameterization Parameterization errors cause the entire module to enter the safe state. The FS LED on the safety module flashes. In the event of faulty parameterization, the relevant diagnostic message is transmitted to the safe controller (PROFIsafe) or the configurable safety module (VersaSafe) (see "Parameterization errors" on page 9-6). GFK-2730 Chapter 2 Product description 2-11 2 2.8 Process data words 2.8.1 VersaSafe The module occupies four words in the VersaPoint system. For information about how these words are mapped, please refer to the documentation for the configurable safety module used. The input data can only be accessed via the standard control system. In the following tables, both the maximum single-channel and maximum two-channel assignment are illustrated. Depending on the parameterization, other process data word assignments are also possible. Assignment of inputs to the process data input word in the standard control system Word 1 (Word.bit) view Word Bit 15 14 13 Module Input (singlechannel) Input (two-channel) 11 10 9 8 7 6 5 Byte 2 (Byte.bit) view Byte Bit 12 7 6 5 4 3 4 3 2 1 0 2 1 0 Byte 3 2 1 0 7 6 5 4 3 IN3 IN3 IN2 IN2 IN1 IN1 IN0 IN0 _Ch2 _Ch1 _Ch2 _Ch1 _Ch2 _Ch1 _Ch2 _Ch1 Reserved 0 IN3 _Ch 1&2 0 IN2 _Ch 1&2 0 IN1 _Ch 1&2 0 IN0 _Ch 1&2 The diagnostic data is transmitted to the standard control system via the configurable safety module. 2.8.2 PROFIsafe (PROFIBUS, PROFINET) The module occupies four words in the VersaPoint system and three words in the PROFIBUS system. The way in which these words are mapped in the higher-level control system is specific to the controller used and is described in the Quick Start Guide for the controller. 2-12 User manual IC220SDL543 - September 2011 GFK-2730 2 2.9 Programming data/configuration data 2.9.1 Local bus Protocol VersaSafe PROFIsafe Protocol/address switch 9hex .... FFhex determined by the configurable safety module Any, 1hex .... 3FEhex Operating mode Mode 2 Mode 1 ID code A3hex (163dec) CBhex (203dec) Length code 04hex (04dec) 04hex (04dec) Input address area Controller-specific Controller-specific Output address area Controller-specific Controller-specific Parameter channel (PCP) 0 words 1 word Register length 4 words 4 words – – The PCP channel is only used internally. The switch position of the protocol/address switch is specified by the configurable safety module (see documentation for the configurable safety module). 2.9.2 Other bus systems (PROFIBUS, PROFINET, etc.) For the programming data/configuration data of other bus systems, please refer to the corresponding electronic device data sheet (GSD, EDS). GFK-2730 Chapter 2 Product description 2-13 Th is pa ge lef tb lan ki nte nti on all y 2 2-14 User manual IC220SDL543 - September 2011 GFK-2730 3 3 VersaPoint potential and data routing, and VersaPoint connectors 3.1 VersaPoint potential and data routing In order to operate the safety module it must be integrated in a VersaPoint station within the VersaSafe or PROFIsafe system. The bus signals are transmitted via the VersaPoint data jumpers. The required supply voltages are transmitted via the VersaPoint potential jumpers. For more detailed information about potential and data routing within a VersaPoint station, please refer to the GFK-2736 user manual. The segment circuit is looped through the safety module and is available again after the module. The segment circuit cannot be accessed in the safety module. 3.2 Supply voltage UL Supply the 24 V supply voltage UBK/U24V at a bus coupler or a suitable power terminal. The 7.5 V voltage UL is generated from this 24 V supply voltage in the bus coupler or power terminal. It is supplied to the safety module via the VersaPoint potential jumper UL. WARNING: Loss of the safety function when using unsuitable power supplies Please note for the voltage supply at the bus coupler or power terminal that: Only power supplies according to EN 50178/VDE 0160 (PELV) may be used. Make sure that the output voltage of the power supply does not exceed 32 V even in the event of an error. Please also observe the points in Section "Electrical safety" on page 1-3. The supply voltage UL is used to supply the communications power. For the technical data for supply voltage UL, please refer to "Supply voltage UL (logic)" on page 11-3. The maximum current carrying capacity for the supply voltage UL is 2 A. This current carrying capacity can be reduced if certain terminals are used. Please refer to the information in the terminal-specific data sheets. GFK-2730 Chapter 3 VersaPoint potential and data routing, and VersaPoint connectors 3-1 3 3.3 Supply voltage UM Supply the supply voltage at a bus coupler or a power terminal. It is supplied to the safety module via the VersaPoint potential jumper UM. WARNING: Loss of the safety function when using unsuitable power supplies Please observe the points in Section "Electrical safety" on page 1-3. The supply voltage UM is used to supply the input circuits and the clock outputs. For the technical data for supply voltage UM, please refer to Section "Supply voltage UM (sensors, clock outputs)" on page 11-4. The maximum current carrying capacity for the main circuit UM is 8 A (total current with the segment circuit that is not used in the safety terminal). This current carrying capacity can be reduced if certain terminals are used. Please refer to the information in the terminal-specific data sheets. If the limit value of the potential jumpers UM and US is reached (total current of US and UM), a new power terminal must be used. NOTE: Module damage due to polarity reversal Polarity reversal places a burden on the electronics and, despite protection against polarity reversal, can damage the module. Therefore, polarity reversal must be prevented. For the behavior of the safety module in the event of an error at the supply voltage UM, please refer to Section "Supply voltage errors" on page 9-5. 230 V 24 V + - 24 V DC (PELV) External fuse 8 A, maximum US for supply at a bus coupler or a power terminal (not required in the safety terminal) UM for supply at a bus coupler or a power terminal GND for supply at a bus coupler or a power terminal 76191004 Figure 3-1 Supply UM with connection to functional earth ground according to EN 60204-1 NOTE: Damage to module electronics in the event of surge voltage Do not use a DC distribution network. DC distribution network according to IEC 61326-3-1: A DC distribution network is a DC power supply network, which supplies a complete industrial hall with DC voltage and to which any device can be connected. A typical system or machine distribution is not a DC distribution network. For devices that are provided for a typical system or machine distribution, the DC connections are viewed and tested as I/O signals according to IEC 61326-3-1. 3-2 User manual IC220SDL543 - September 2011 GFK-2730 3 3.4 Terminal point assignment 1 1.1 1.2 1.3 1.4 2 1 1.1 2.1 1 2 1 2 1 11 3.2 4.2 5.2 6.2 7.2 8.2 22 2 22 3.3 4.3 5.3 6.3 7.3 8.3 33 33 1.4 2.4 4 11 22 1.3 2.3 3 1 3.1 4.1 5.1 6.1 7.1 8.1 11 1.2 2.2 2 2 3 33 3.4 4.4 5.4 6.4 7.4 8.4 44 44 4 44 8.1 8.2 8.3 8.4 73410004 Figure 3-2 Terminal point assignment The VersaPoint connectors are supplied with the module. They are keyed and labeled accordingly for connection to prevent polarity reversal. Only use the connectors supplied with the module. The following applies for the tables below: – – – – – All inputs are safe digital inputs The assignment to the clock output must be parameterized (see "Parameterization of the safe inputs" on page 5-3) 0 V (GND): Common ground of inputs and clock outputs FE: Common functional earth ground UT1: Controlled by first channel UT2: Controlled by second channel Table 3-1 GFK-2730 Terminal point assignment for connector 1 Terminal point Signal Channel assignment LED 1.1 IN0_Ch1 Input 0, channel 1 0.1 2.1 IN0_Ch2 Input 0, channel 2 0.2 1.2 UT1 Clock output 1 UT1 2.2 UT2 Clock output 2 UT2 1.3 0 V (GND) Channel 1 and channel 2 2.3 0 V (GND) Channel 1 and channel 2 1.4 FE 2.4 FE Chapter 3 VersaPoint potential and data routing, and VersaPoint connectors 3-3 3 Table 3-2 Terminal point assignment for connector 2 Terminal point Signal Channel assignment LED 3.1 IN1_Ch1 Input 1, channel 1 1.1 4.1 IN1_Ch2 Input 1, channel 2 1.2 3.2 UT1 Clock output 1 4.2 UT2 Clock output 2 3.3 0 V (GND) Channel 1 and channel 2 4.3 0 V (GND) Channel 1 and channel 2 3.4 FE 4.4 FE Table 3-3 Terminal point assignment for connector 3 Terminal point Signal Channel assignment LED 5.1 IN2_Ch1 Input 2, channel 1 2.1 6.1 IN2_Ch2 Input 2, channel 2 2.2 5.2 UT1 Clock output 1 6.2 UT2 Clock output 2 5.3 0 V (GND) Channel 1 and channel 2 6.3 0 V (GND) Channel 1 and channel 2 5.4 FE 6.4 FE Table 3-4 Terminal point assignment for connector 4 Terminal point Signal Channel assignment LED 7.1 IN3_Ch1 Input 3, channel 1 3.1 8.1 IN3_Ch2 Input 3, channel 2 3.2 7.2 UT1 Clock output 1 8.2 UT2 Clock output 2 7.3 0 V (GND) Channel 1 and channel 2 8.3 0 V (GND) Channel 1 and channel 2 7.4 FE 8.4 FE WARNING: Loss of functional safety due to parasitic voltages For sensors that require a GND, this must be wired to 0 V (GND) on the module. 3-4 User manual IC220SDL543 - September 2011 GFK-2730 4 4 Assembly, removal, and electrical installation 4.1 4.1.1 Assembly and removal Unpacking the module The module is supplied in an ESD box together with a package slip with installation instructions. Please read the complete package slip carefully. The module may only be installed and removed by qualified personnel. NOTE: Electrostatic discharge The safety module contains components that can be damaged or destroyed by electrostatic discharge. When handling the safety module, observe the necessary safety precautions against electrostatic discharge (ESD) according to EN 61340-5-1 and EN 61340-5-2. 4.1.2 General WARNING: Unintentional machine startup Do not assemble or remove the module while the power is connected. Before assembling or removing the module, disconnect the power to the module and the entire VersaPoint station and ensure that it cannot be switched on again. Make sure the entire station is reassembled before switching the power back on. Observe the diagnostic indicators and any diagnostic messages. The system may only be started provided neither the station nor the system poses a hazard. The IC220SDL543 safety terminal is designed for use within a VersaPoint station. Only use the safety terminal in the 24 V DC area of a VersaPoint station. To ensure reliable operation, install the safety terminal in housing protected from dust and humidity (IP54 or higher). In order to prevent manipulation, secure the housing (control cabinet/control box) against being opened by unauthorized persons. Mount all VersaPoint terminals on 35 mm DIN rails. Only connect the cables using the supplied VersaPoint connectors or VersaPoint connectors listed in the ordering data. GFK-2730 Chapter 4 Assembly, removal, and electrical installation 4-1 4 4.1.3 Setting the DIP switches The module has a 2-pos. and a 10-pos. DIP switch. The DIP switches are located on the left-hand side of the safety module. 500 KBD Mode2 A 500KBD Mode2 2 MBDMode1 9 8 7 6 5 4 2 3 1 0 B 2MBD Mode1 A Figure 4-1 9 8 7 6 5 4 2 3 1 0 B on F-Address off 76022004 DIP switches A Switch for setting the transmission speed and the operating mode B Switch for setting the protocol or the address (for PROFIsafe, VersaSafe) 2-pos. DIP switch: The transmission speed and the operating mode (Mode) are set via the 2-pos. DIP switch. Left switch: Transmission speed The transmission speed can be set to 500 kbaud or 2 Mbaud. The transmission speed is set to 2 Mbaud by default. Only use devices with a uniform transmission speed within a VersaPoint station (a local bus). A mixture of devices with different transmission speeds cannot be operated. Right switch: Mode For PROFIsafe, set Mode 1. 10-pos. DIP switch: Protocol/address switch The protocol ( VersaSafe or PROFIsafe) is set via the 10-pos. DIP switch. If you are using VersaSafe or PROFIsafe, use this DIP switch to set the VersaSafe address or the PROFIsafe address (F-Address). For VersaSafe, set Mode 2. VersaSafe: Set the VersaSafe address specified by the configurable safety module. For more detailed information about the VersaSafe address, please refer to the documentation for the configurable safety module used. PROFIsafe: Set the PROFIsafe address for the PROFIsafe device. PROFIsafe addresses 1 to 1022 (1hex to 3FEhex) are permitted. The terminal is detected as a PROFIsafe device by means of the set PROFIsafe address. The DIP switch is set to 3FFhex by default. This address is not valid for a VersaSafe or PROFIsafe system, therefore a valid address must be set. 4-2 User manual IC220SDL543 - September 2011 GFK-2730 4 Overview of the switch positions Table 4-1 Switch position for VersaSafe VersaSafe Mode switch Address switch Island number Mode 2 9 8 7 off off 6 5 4 Satellite number 3 2 1dec to 31dec Table 4-2 1 0 1dec to 5dec Switch position for VersaSafe in multiplexer mode VersaSafe multiplexer mode Mode switch Address switch Island number Mode 2 9 8 off off 7 6 5 4 Satellite number 3 2 1 0 on on on 1dec to 31dec Table 4-3 7dec Switch position for PROFIsafe PROFIsafe Mode switch Address switch 9 8 7 6 5 4 3 2 1 0 Mode 1 1hex to 3FEhex Procedure If the DIP switch settings have to be modified, proceed as follows: • Use the switch to set the transmission speed to 500 kbaud or 2 Mbaud. • Set the address. Set the DIP switches before assembling the module in the VersaPoint station. The switches cannot be accessed when the safety terminal is installed in the VersaPoint station. GFK-2730 Chapter 4 Assembly, removal, and electrical installation 4-3 4 4.1.4 Assembly and removal of the safety module For general information about mounting and removing VersaPoint terminals, please refer to the GFK-2736 user manual. Assembly – – – Snap on base Set the DIP switches prior to assembly (see "Setting the DIP switches" on page 4-2). The DIP switches cannot be accessed when the safety module is installed in the VersaPoint station. Observe a mounting distance of 30 mm above and 40 mm below the safety module. Shorter distances may inhibit proper handling during installation. • Disconnect the power to the station. • Before snapping on the safety module, remove the inserted connectors from the safety terminal and the adjacent connector from the neighboring VersaPoint terminal on the left. This prevents the potential routing knife contacts and the keyway/featherkey connections from being damaged. Hold the safety module perpendicular and snap it onto the DIN rail (7.5 mm in height). • Ensure that all featherkeys and keyways on adjacent terminals are securely interlocked. A1 Figure 4-2 – Insert connectors B1 Snapping on the safety module base • Check that all the snap-on mechanisms are securely snapped into place. • Insert the connectors in the specified order (A, B). Only use the connectors supplied with the module. B A Figure 4-3 4-4 Inserting the connector User manual IC220SDL543 - September 2011 GFK-2730 4 Removal • • Disconnect the power to the station. Remove the connectors from the safety module and the adjacent connector from the neighboring VersaPoint terminal on the left. – Remove connectors • Remove the connector by pressing the back shaft latching (A) and levering off the connector (B). A B Figure 4-4 – Remove base • Removing the connector Release the base by pressing on the front and back snap-on mechanisms (A) and pull it out perpendicular to the DIN rail (B). A B A Figure 4-5 GFK-2730 Removing the safety module base Chapter 4 Assembly, removal, and electrical installation 4-5 4 4.2 Electrical installation WARNING: Electric shock/unintentional machine startup Prior to electrical installation, disconnect the power to the system and make sure that it cannot be switched on again unintentionally. Make sure installation has been completed before switching the power back on. The system may only be started provided the system does not pose a hazard. 4.2.1 Electrical installation of the VersaPoint station Electrical installation of the VersaPoint station includes the following: – Connecting the bus system to the VersaPoint station – Connecting the supply voltages for the VersaPoint station Carry out electrical installation for the VersaPoint station according to the GFK-2736 user manual. Please also observe the specifications in the documentation for the bus coupler used. 4.2.2 Electrical installation of the safety module During installation, always observe the instructions in "Electrical safety" on page 1-3. Take measures to prevent the incorrect connection, polarity reversal, and manipulation of connections. The supply voltages are supplied at a bus coupler and/or a power terminal and are supplied to the safety module via the potential jumpers. Therefore the electrical installation of the safety module only involves connecting the sensors. The sensors are connected via VersaPoint connectors. • Wire the connectors according to your application. For the terminal point assignment, please refer to "Terminal point assignment" on page 3-3. For wiring, proceed as follows: • Strip 8 mm off the cable. VersaPoint wiring is normally done without ferrules. However, it is possible to use ferrules. If using ferrules, make sure they are properly crimped. • • 4-6 Push a screwdriver into the slot of the appropriate terminal point (Figure 4-6, detail 1), so that you can insert the wire into the spring opening. GE Intelligent Platforms recommends using a SZF 1 - 0,6X3,5 screwdriver Insert the wire (Figure 4-6, detail 2). Remove the screwdriver from the opening. This clamps the wire. User manual IC220SDL543 - September 2011 GFK-2730 4 1 In p ta l ig i 6 4 5 2 B 0 3 2 Figure 4-6 • • GFK-2730 Connecting unshielded cables Insert the assembled connectors in the corresponding module slot (see "Terminal point assignment" on page 3-3). Label all connections to prevent connections to the VersaPoint connectors being mixed up (see GFK-2736 user manual). Chapter 4 Assembly, removal, and electrical installation 4-7 Th is pa ge lef tb lan ki nte nti on all y 4 4-8 User manual IC220SDL543 - September 2011 GFK-2730 5 5 Parameterization of the safety module 5.1 Parameterization in a VersaSafe system Parameterization includes the following: – Specifying the VersaSafe address for the corresponding configurable safety module – Parameterizing the inputs and clock outputs VersaSafe address The VersaSafe address is a unique ID for the safety module in the VersaSafe structure. It is assigned in the configuration software for the assigned configurable safety module. The address of the connected satellites (here: IC220SDL543) is based on the island number of the configurable safety module and the position in the bus navigator of the software tool. Set this address via the DIP switches prior to assembly (see "Setting the DIP switches" on page 4-2). For more detailed information about the VersaSafe address, please refer to the documentation for the configurable safety module used. Parameterization of the inputs and clock outputs The parameterization of the safe inputs and clock outputs determines the behavior of the module and thus has a considerable effect on the safety integrity level that can be achieved. To parameterize the module, the parameterization of the configurable safety module created in the parameterization tool is automatically written to the module on every power up or reset. The supply voltage must be present and the local bus must be in the RUN state. The module cannot be operated if it is not parameterized. In this case, the FS LED flashes. The module is ready to operate if the parameters for all inputs and clock outputs are valid and transmitted without errors. Valid input data is only read in this state. In every other state, the safe state is transmitted for each input ("0" in the process image of the inputs). If errors are detected during parameterization, the parameterization data is not transmitted. The invalidity of the parameterization is indicated on the module by the flashing FS LED. In addition, errors are indicated at the configurable safety module. In this case, check and correct the settings. GFK-2730 Chapter 5 Parameterization of the safety module 5-1 5 5.2 Parameterization in a PROFIsafe system Parameterization includes the following: – Assigning the PROFIsafe address via the configuration software of the control system manufacturer – Parameterizing the inputs and clock outputs – Assigning the parameterizable F-Parameters and iParameters PROFIsafe address The PROFIsafe address is a unique ID for the safety module in the PROFIsafe structure. It is assigned in the configuration software. Set this address via the DIP switches prior to assembly (see "Setting the DIP switches" on page 4-2). Parameterization of the inputs and clock outputs The parameterization of the safe inputs and clock outputs determines the behavior of the module and thus has a considerable effect on the safety integrity level that can be achieved. To parameterize the module, the parameterization of the safe controller created in the parameterization tool is automatically written to the module on every power up or reset. The following conditions must be met: – The supply voltage is present. – The local bus is in the RUN state. – The communication connection has been established between the controller and safety module. The module cannot be operated if it is not parameterized. In this case, the FS LED flashes. The module is ready to operate if the parameters for all inputs and clock outputs are valid and transmitted without errors. Valid input data is only read in this state. In every other state, the safe state is transmitted for each input ("0" in the process image of the inputs). If errors are detected during parameterization, the parameterization data is not transmitted. The invalidity of the parameterization is indicated on the module by the flashing FS LED. In addition, errors are indicated at the safe controller. In this case, check and correct the settings. For information about error messages and instructions for their removal, please refer to "Errors: Messages and removal" on page 9-1. F-Parameters and iParameters 5-2 Assign the parameterizable F-Parameters and iParameters. For an overview of the module parameters and possible settings, please refer to "Appendix: F-Parameters and iParameters" on page B-1. User manual IC220SDL543 - September 2011 GFK-2730 5 5.3 Parameterization of the safe inputs The individual inputs of a safety module can be parameterized differently and thus achieve different safety integrity levels (SIL, SIL CL, Cat., PL). Two-channel If the inputs are operated via two channels, the following fixed assignment applies: – IN0_Ch1 to IN0_Ch2 – IN1_Ch1 to IN1_Ch2 – IN2_Ch1 to IN2_Ch2 – IN3_Ch1 to IN3_Ch2 Single-channel If two-channel operation in the external wiring of the inputs is not required, the inputs can be parameterized in such a way that they operate independently of one another (singlechannel). Position of the data in the process data word Word 0 (Word.bit) view Word Bit 15 14 13 12 7 6 5 4 Module Input (singlechannel) Input (two-channel) Clock outputs 10 9 8 7 6 5 2 1 0 7 6 5 Byte 0 (Byte.bit) view Byte Bit 11 3 4 3 2 1 0 2 1 0 Byte 1 4 3 IN3 IN3 IN2 IN2 IN1 IN1 IN0 IN0 _Ch2 _Ch1 _Ch2 _Ch1 _Ch2 _Ch1 _Ch2 _Ch1 Reserved 0 IN3 _Ch 1&2 0 IN2 _Ch 1&2 0 IN1 _Ch 1&2 0 IN0 _Ch 1&2 Please observe the settings of clock outputs UT1 and UT2 when parameterizing the safe inputs. If the safe inputs are assigned the same or no clock output, cross-circuit detection is not possible. GFK-2730 Chapter 5 Parameterization of the safety module 5-3 5 Parameterization Table 5-1 Parameterize all safe inputs individually. The parameterization options are described in Table 5-1. Parameterization of inputs Parameterization Value range Remark Assignment Not used Used For unused inputs, the data is filled with 0. Evaluation Single-channel Two-channel For "two-channel": The assignment of the inputs to one another is specified and cannot be parameterized. Sensor type Standard sensor Intelligent sensor If intelligent sensors are used, the clock outputs for "standard sensor" mode are no longer available. In this case, all inputs that are operated with standard sensors are operated without clock outputs. Select the clock output setting "no assignment" for these inputs. Please note that error diagnostics for I/O devices are only limited in this operating mode. Filter time (tFilter) 1.5 ms 3 ms 5 ms 15 ms The filter time is used to suppress interference for the input signals. Select the filter time so that the duration of the input signal is greater than the filter time. For inputs that are parameterized for two-channel operation, select the same filter time for both channels. The filter time directly affects the response time of the safety function. Symmetry Start inhibit due to symmetry violation Disabled 10 ms 50 ms 100 ms 1s 5s Parameterization is only active if the input is parameterized for two-channel operation. Select the same value for both channels. Disabled Enabled Disabled (default setting): A diagnostic message is generated in the event of symmetry violation. See also "Symmetry/ start inhibit" on page 5-5. Enabled: A diagnostic message is generated in the event of symmetry violation. In addition, the affected input is set to the safe state. 5-4 User manual IC220SDL543 - September 2011 GFK-2730 5 Table 5-1 Parameterization of inputs [...] Parameterization Value range Remark Clock selection (in software: pulse selection) No assignment UT1 UT2 Assignment of the input to a clock output. Only relevant for standard sensors. When using intelligent sensors, UT1 is used as the power supply and UT2 as the pulse generator for all inputs. Bouncing time monitoring (in software: bounce time monitoring) Disabled Enabled Input signal Non-equivalent Equivalent Monitoring of the activation and deactivation of the bouncing time. See also "Bouncing time monitoring (bounce time monitoring)" on page 5-5. Parameterization is only active if the input is parameterized for two-channel operation. Select the same setting for both channels. Non-equivalent: Connect N/C contact to INx_Ch1 Connect N/O contact to INx_Ch2 Equivalent: Connect N/C contact to both channels Bouncing time monitoring (bounce time monitoring) Input signal bouncing can lead to delayed state transitions. If a detected state transition is 200% longer than the parameterized filter time, a corresponding diagnostic message is sent. The exception is a filter time of 15 ms. For this filter time, the duration of the state transition can be increased by a maximum of 100%. Symmetry/ start inhibit Symmetry monitoring can be used to monitor the contact wear of the switch. Symmetry monitoring checks the extent to which the related (filtered) inputs enter another state simultaneously. Symmetry is violated if the inputs indicate different states for a time greater than the value parameterized for "symmetry". This applies for positive and negative edges. The safe controller (PROFIsafe) or the configurable safety module (VersaSafe) is informed of a symmetry violation by a diagnostic message. If "start inhibit due to symmetry violation" is enabled, symmetry violation means that the affected input enters the safe state. Key for the following diagrams: S Symmetry monitoring Diag Diagnostics Q Acknowledgment of the diagnostic message; after acknowledging the diagnostic message, the current state is read. For non-equivalent parameterization, a negated signal is present at input IN0_Ch2 shown in the diagrams. GFK-2730 Chapter 5 Parameterization of the safety module 5-5 5 After acknowledging the diagnostic message (see "Acknowledging an error" on page 9-9), the current state at the input is immediately transmitted to the safe controller (PROFIsafe) or the configurable safety module (VersaSafe). If a startup inhibit is required following error acknowledgment, this must be implemented by the user in the application program. A symmetry violation can also be triggered by a cross circuit (see "Connection examples for safe inputs" on page 7-1). 5-6 User manual IC220SDL543 - September 2011 GFK-2730 5 Processing time of the input tIN in the event of a safety demand The processing time of the input tIN in the event of a safety demand comprises the parameterized filter time tFilter and the firmware runtime tFW. It is calculated for the IC220SDL543 module according to the following formula: tIN = tFilter + tFW Where: tIN Processing time of the input tFilter Parameterized filter time tFW Firmware runtime: – For standard sensors: 250 µs – For intelligent sensors: For additional information, please refer to the data sheet for the GE Intelligent Platforms intelligent sensor used. 5.4 Parameterization of clock outputs UT1 and UT2 As long as the module is not parameterized: – The clock outputs are enabled if no errors are present. – Short circuit detection is activated. Select the parameterization of clock outputs according to Table 5-2. Table 5-2 Parameterization of clock outputs Values Remark UT1 ON/UT2 ON Clocking for UT1 and UT2 enabled UT1 ON/UT2 OFF Clocking for UT1 enabled Clocking for UT2 disabled (constant 24 V) UT1 OFF/UT2 ON Clocking for UT1 disabled (constant 24 V) Clocking for UT2 enabled OFF Clocking for UT1 and UT2 disabled (constant 24 V) Manufacturer and sensor designation Setting for intelligent sensors; for additional information, see separate documentation for intelligent sensors If clock outputs are parameterized without clock pulses, no cross circuits or short circuits can be detected between the channels. If clocking is enabled, the clock output is operated with a maximum pulse width of 1 ms and a maximum period length of 80 ms. The time offset between the clocks of the clock outputs is approximately 50% of the period length. If both channels of a two-channel input are assigned the same clock output, cross-circuit detection has no effect. GFK-2730 Chapter 5 Parameterization of the safety module 5-7 5 Typical pulse pattern for parameterization UT1 ON and UT2 ON T UT1 ≤1 T ms ≤1 T ms ≤1 ms 1 0 10 20 30 T UT2 40 ≤1 50 60 70 T ms 80 ≤1 90 100 T ms t [ms] 110 ≤1 ms 1 0 10 20 30 40 50 60 70 80 90 100 110 t [ms] 73410011 Figure 5-4 Typical pulse pattern (standard sensor) Key: T Test pulse Pulse width 1 ms Period length 80 ms 5-8 User manual IC220SDL543 - September 2011 GFK-2730 6 6 Duration of a safety demand The duration of a safety demand must be greater than the processing time of the corresponding input (tIN, see also "Processing time of the input tIN in the event of a safety demand" on page 5-7). 6.1 VersaSafe If the safety module detects a safety demand after the processing time of the input tIN has elapsed, when using VersaSafe this time is extended by the module until the configurable safety module has received the safety demand. 6.2 PROFIsafe If the safety module detects a safety demand (safe "0") after the processing time of the input tIN has elapsed, when using PROFIsafe this time is extended by the module until the consecutive number has changed twice. WARNING: Loss of functional safety Observe the behavior of the controller when processing the safe inputs. In addition to the processing time of the input tIN, please observe the system-specific PROFIsafe behavior (e.g., watchdog time, duration of demand, processing time of the safe controller). GFK-2730 Chapter 6 Duration of a safety demand 6-1 Th is pa ge lef tb lan ki nte nti on all y 6 6-2 User manual IC220SDL543 - September 2011 GFK-2730 7 7 Connection examples for safe inputs 7.1 Explanation of the examples Depending on the type of wiring, the inputs of a module can achieve different safety integrity levels (SIL, SIL CL, Cat., PL) at the same time (as long as the settings do not contradict one another). The following examples only describe the options for the electrical connection of sensors to the safe inputs. Should you have any questions regarding applications to be implemented, please contact the GE Intelligent Platforms. The following are specified for each example: – Basic specifications The main data for the example is specified in the table. – Device diagnostics and behavior of the module in the event of an error Diagnostic capability depends on the parameterization. If a message is transmitted to the safe controller (PROFIsafe) or the configurable safety module (VersaSafe) in the event of an error, the message is specified in the tables. For information about the relevant error code, possible remedies, and information about whether acknowledgment is required, please refer to "Errors: Messages and removal" on page 9-1. The symmetry violation diagnostic message is only displayed if it was not disabled during parameterization of the affected input. – Typical parameterization The table illustrates an example of all the parameters for the specified assignment. Key for all figures and tables in this section: Table 7-1 Figures Representation Meaning Floating switch (mechanical or electrical) 73410009 Table 7-2 GFK-2730 "Device diagnostics and behavior of the module in the event of an error" tables Representation Meaning SF Safety function UTx UT1 or UT2 LED; diagnostic message for each clock output Clocked Clocking enabled Chapter 7 Connection examples for safe inputs 7-1 7 Table 7-3 Parameterization tables Representation Meaning Bold Mandatory setting Normal Typical setting, another setting is possible depending on the application – Not evaluated Errors (cross circuits, short circuits), which can be prevented by correct installation (e.g., protected cable installation, isolated cable installation, double insulation, use of ferrules) are not described in the following tables. Therefore, for example, only errors between inputs, which are on the same connector, are described. For example, in the event of correct installation, cross circuits with inputs/outputs of other connectors cannot occur. For all examples, please also observe the measures specified in the individual tables, which must be taken to achieve the specified SIL/SIL CL/Cat./PL and all measures according to standards EN 61508, EN 62061, and EN ISO 13849-1 to achieve the specified SIL/SIL CL/Cat./PL. The input signals can be supplied externally or by the clock outputs. The clock outputs and the assignment of the input signals to the clock outputs are parameterized as required. 7-2 User manual IC220SDL543 - September 2011 GFK-2730 7 7.2 Measures required to achieve a specific safety integrity level The safety integrity level (SIL, SIL CL, performance level, and category) that can be achieved is specified for each connection example. SIL/SIL CL In order to determine the probability of failure according to EN 61508 (SIL), use the standard. In order to determine the probability of failure according to EN 62061 (SIL CL), use this standard. When the SIL/SIL CL is specified, the module takes up 1% of the specified SIL/SIL CL. Table 7-4 PFD and PFH depending on the SIL/SIL CL PFD PFH SIL 2/SIL CL 2 -2 1% of 10 1% of 10-6 SIL 3/SIL CL 3 1% of 10-3 1% of 10-7 Performance level Use standard EN ISO 13849-1 to determine the performance level. Category In order to actually achieve the specified category, the required measures listed below must be implemented. Cat. 2 – – – – – – GFK-2730 Use proven and basic safety principles according to EN ISO 13849-2. Use appropriately qualified sensors (see "Requirements for controlling devices/sensors" on page 2-5). Please note that mechanical failure of the switching device can result in the loss of the safety function. Take appropriate measures (e.g., fuse protection, redundancy, positive opening, etc.) to ensure that the contacts can be opened (e.g., following welding or mechanical failure) when a switch is actuated. Please note that a single error can result in the loss of the safety function between tests. Ensure that the external wiring is tested by the machine control system on machine startup and at suitable intervals. This test must detect the loss of the safety function. Chapter 7 Connection examples for safe inputs 7-3 7 Cat. 3 – – – – – – – – Use proven and basic safety principles according to EN ISO 13849-2. Use appropriately qualified sensors (see "Requirements for controlling devices/sensors" on page 2-5). Please note that mechanical failure of the switching device can result in the loss of the safety function. Take appropriate measures (e.g., fuse protection, redundancy, positive opening, etc.) to ensure that the contacts can be opened (e.g., following welding or mechanical failure) when a switch is actuated. Please take into consideration errors with a common cause. All errors that cannot be detected can result in the loss of the safety function. Take appropriate measures to prevent such errors. Suitable measures include, for example, protected cable installation or double insulation. Please note the information in the following tables. Ensure that a single error does not result in the loss of the safety function. If single-channel sensors are not available for this category, use two-channel sensors. Cat. 4 – – – – – – 7-4 Use proven and basic safety principles according to EN ISO 13849-2. Use appropriately qualified sensors (see "Requirements for controlling devices/sensors" on page 2-5). Please note that mechanical failure of the switching device can result in the loss of the safety function. All errors that cannot be detected can result in the loss of the safety function. Take appropriate measures to prevent such errors. Suitable measures include, for example, protected cable installation or double insulation. Please note the information in the following tables. An accumulation of errors must not result in the loss of the safety function. Following the third error, evaluation can be aborted if the probability of further errors occurring is low. Please take into consideration errors with a common cause. User manual IC220SDL543 - September 2011 GFK-2730 7 7.3 Single-channel assignment of safe inputs For the single-channel assignment of safe inputs, the inputs operate independently of one another. The assignment of each input signal to the clock output can be freely selected. For the following examples, please note the resulting behavior in the event of an error: Note about cross circuits – – – Please note that cross circuits with other inputs can only be detected if the input signals are assigned to different clock outputs and clocks are enabled for the clock outputs. The cross circuit error results in the transmission of the safe state in the process data image of the affected inputs. Remove the error and then acknowledge the message. Please observe the maximum failure detection time of 80 ms. If a "1" signal is present at the input and an error occurs, a maximum of 80 ms elapses until the error is detected. Within this time, another "1" can also be transmitted, even in the event of an error. Within the failure detection time (80 ms, maximum), the error can cause the state to change unexpectedly from "0" to "1". Ensure that such a change in state cannot restart the system unintentionally. Please note that the processing time for the input tIN increases by up to 80 ms in the event of an error. The following supply options are available for single-channel assignment: 1 2 3 4 5 UT1, clocking enabled UT2, clocking enabled UT1, clocking disabled UT2, clocking disabled External supply (external +24 V or OSSD) State evaluation The module evaluates the states of the inputs and transmits the result to the safe controller (PROFIsafe) or the configurable safety module (VersaSafe). In the process data image of a safe input: – A "0" is transmitted if a "0" signal is present at the input or an error has been detected. – A "1" is transmitted if a "1" signal is present at the input and no error has been detected. GFK-2730 Chapter 7 Connection examples for safe inputs 7-5 7 7.3.1 Single-channel: Supply through UT1 (clocking enabled) or UT2 (clocking enabled) S 1 IN 1 _ C h 1 U T 1 (U T 2 ) Figure 7-1 S1 Safety switch 6 9 4 0 3 1 0 1 Single-channel assignment of the inputs, supply through UT1 (clocked) or UT2 (clocked) Basic specifications Sensor Single-channel Sensor supply Internally through clock output UT1 (clocked) or UT2 (clocked) Achievable SIL/SIL CL/Cat./PL SIL 2/SIL CL 2/Cat. 3/PL d WARNING: Loss of electrical and functional safety – To achieve the specified category, please refer to "Measures required to achieve a specific safety integrity level" on page 7-3. – Please note that in order to achieve the specified PL, the sensor must have a medium level of diagnostic coverage (90% to 99%) and medium MTTFd. A high level of diagnostic coverage (> 99%) is recommended for the application according to PL d. – Use sensors that can achieve the required safety integrity level. Device diagnostics and behavior of the module in the event of an error Table 7-5 Single-channel: Supply through UT1 (clocked) or UT2 (clocked) Error type Detection Diagnostics Loss of SF Remark A contact will not open No None Yes The error cannot be detected and results in the loss of the safety function. A contact will not close No None No The error cannot be detected. Error in the sensor Other errors (depending on the sensor) Please take into consideration possible errors that can occur in the sensor. Error in the wiring Interrupt Input (Cable interrupt between clock output and sensor or between sensor and input) Yes None No – Behavior when the input is in state "1": The error is detected as a change in state from "1" to "0". An unexpected change from "0" to "1" is possible (e.g., due to a loose contact). Ensure that such a change in state cannot restart the system unintentionally. – Behavior when the input is in state "0": Please note that if this error causes the safety switch to be switched on again, this can result in delayed transmission of state "1" in the process data image of the inputs (e.g., due to a loose contact). 7-6 User manual IC220SDL543 - September 2011 GFK-2730 7 Table 7-5 Single-channel: Supply through UT1 (clocked) or UT2 (clocked) [...] Error type Detection Diagnostics Loss of SF Remark No None Yes The error cannot be detected and results in the loss of the safety function, as the safety switch is jumpered. Cross circuit Input to input If the inputs are assigned different clock outputs, this error is detected as a cross circuit after 80 ms. Input to assigned clock output No None Yes The error cannot be detected and results in the loss of the safety function, as the safety switch is jumpered. Input to non-assigned clock output Yes Cross circuit No See "Note about cross circuits" on page 7-5. Clock output to clock output Yes Cross circuit No The error is only detected in state "1" of the input. Input to ground Yes None No The error is only detected as a change in state from "1" to "0" in state "1" of the input. An unexpected change from "0" to "1" is possible (e.g., due to a loose contact). Ensure that such a change in state cannot restart the system unintentionally. Clock output to ground Yes No Short circuit UTx ON Short circuit The affected clock output is disabled. Typical parameterization Parameterization Parameterized as Remark Input Assignment Used Evaluation Single-channel Sensor type Standard sensor Filter time (tFilter) 3 ms Application-specific Symmetry Disabled Not relevant Clock selection (pulse selection) UT1 Or UT2 Bouncing time monitoring (bounce time monitoring) Disabled Application-specific Start inhibit due to symmetry violation Disabled Not relevant Input signal Equivalent Not relevant UT1 ON (UT2 any) If clock selection = UT1 Clock output GFK-2730 Chapter 7 Connection examples for safe inputs 7-7 7 7.3.2 Single-channel: Supply through UT1 (clocking disabled) or UT2 (clocking disabled) or external supply IN 1 _ C h 1 U T 1 (U T 2 ) Figure 7-2 IN 1 _ C h 1 S1 Safety switch S 1 6 9 4 0 3 1 0 1 Single-channel assignment of inputs: Supply through UT1 or UT2 (clocking disabled for each) S1 Safety switch S 1 + 2 4 V 7 0 0 7 0 0 1 8 Figure 7-3 UT1 (UT2) Supply through UT1 or UT2 +24 V Supply through external 24 V Single-channel assignment of inputs: External supply Basic specifications Sensor Single-channel switch Sensor supply – – Achievable SIL/SIL CL/Cat./PL SIL 2/SIL CL 2/Cat. 2/PL d Internally through clock output UT1 or UT2; clocking disabled for each External (24 V) WARNING: Loss of electrical and functional safety – To achieve the specified category, please refer to "Measures required to achieve a specific safety integrity level" on page 7-3. – Please note that in order to achieve the specified PL, cross circuits must be avoided. – Please note that in order to achieve the specified PL, the sensor must have a medium level of diagnostic coverage (90% to 99%) and high MTTFd. A high level of diagnostic coverage (> 99%) is recommended for the application according to PL d. – Use sensors that can achieve the required safety integrity level. 7-8 User manual IC220SDL543 - September 2011 GFK-2730 7 Device diagnostics and behavior of the module in the event of an error Table 7-6 Single-channel: Supply through UT1 (clocking disabled) or UT2 (clocking disabled), external supply or OSSD Error type Detection Diagnostics Loss of SF Remark A contact will not open No None Yes The error cannot be detected and results in the loss of the safety function. A contact will not close No None No The error cannot be detected. Error in the sensor Other errors (depending on the sensor) Please take into consideration possible errors that can occur in the sensor. Error in the wiring Interrupt Input Yes None No – Behavior when the input is in state "1": The error is detected as a change in state from "1" to "0". An unexpected change from "0" to "1" is possible (e.g., due to a loose contact). Ensure that such a change in state cannot restart the system unintentionally. (Cable interrupt between clock output and sensor or between sensor and input) – Behavior when the input is in state "0": Please note that if this error causes the safety switch to be switched on again, this can result in delayed transmission of state "1" in the process data image of the inputs (e.g., due to a loose contact). Cross circuit Input to input; the inputs are assigned different clock outputs No None Yes The error cannot be detected and results in the loss of the safety function, as the safety switch is jumpered. Input to input; the inputs are assigned the same clock output No None Yes The error cannot be detected and results in the loss of the safety function, as the safety switch is jumpered. Input to assigned clock output No None Yes The error cannot be detected and results in the loss of the safety function, as the safety switch is jumpered. Input to non-assigned clock output No None Yes The error cannot be detected and results in the loss of the safety function, as the safety switch is jumpered. Clock output to clock output No None No The error cannot be detected as clocking is disabled. Input to external 24 V No None Yes The error cannot be detected and results in the loss of the safety function, as the safety switch is jumpered. Input to ground Yes None No The error is only detected as a change in state from "1" to "0" in state "1" of the input. An unexpected change from "0" to "1" is possible (e.g., due to a loose contact). Ensure that such a change in state cannot restart the system unintentionally. No Short circuit Clock output to external 24 V No None Clock output to ground Yes No Short circuit UTx ON The affected clock output is disabled. External 24 V to ground Yes None The error is only detected as a change in state from "1" to "0" in state "1" of the input. An unexpected change from "0" to "1" is possible (e.g., due to a loose contact). No The error cannot be detected as clocking is disabled. Ensure that such a change in state cannot restart the system unintentionally. GFK-2730 Chapter 7 Connection examples for safe inputs 7-9 7 Typical parameterization Parameterization Parameterized as Remark Input Assignment Used Evaluation Single-channel Sensor type Standard sensor Filter time (tFilter) 3 ms Application-specific Symmetry Disabled Not relevant Clock selection (pulse selection) UT1 Or UT2 or no assignment Bouncing time monitoring (bounce time monitoring) Disabled Application-specific Start inhibit due to symmetry violation Disabled Not relevant Input signal Equivalent Not relevant UT1 OFF (24 V) (UT2 any) If clock selection = UT1 Clock output 7.3.3 Single-channel: Supply through OSSD O S S D + 2 4 V IN 1 _ C h 1 G N D Figure 7-4 7 0 0 7 0 0 2 7 Single-channel assignment of inputs: External supply (OSSD) WARNING: Loss of functional safety due to parasitic voltages Connect the sensor ground directly to terminal point GND of the safety module. An external ground may not be used. Basic specifications Sensor Single-channel OSSD output (with internal testing) Sensor supply External (OSSD sensor) Achievable SIL/SIL CL/Cat./PL SIL 2/SIL CL 2/Cat. 2/PL d 7-10 User manual IC220SDL543 - September 2011 GFK-2730 7 WARNING: Loss of electrical and functional safety – To achieve the specified category, please refer to "Measures required to achieve a specific safety integrity level" on page 7-3. – Please note that in order to achieve the specified PL, cross circuits must be avoided. – Please note that in order to achieve the specified PL, the sensor must have a medium level of diagnostic coverage (90% to 99%) and high MTTFd. A high level of diagnostic coverage (> 99%) is recommended for the application according to PL d. – Use sensors that can achieve the required safety integrity level. Device diagnostics and behavior of the module in the event of an error Table 7-7 Single-channel: Supply through OSSD Error type Detection Diagnostics Loss of SF Remark Error in the sensor (Depends on the sensor) Please take into consideration possible errors that can occur in the sensor. Error in the wiring Interrupt Input Yes None No – Behavior when the input is in state "1": The error is detected as a change in state from "1" to "0". An unexpected change from "0" to "1" is possible (e.g., due to a loose contact). Ensure that such a change in state cannot restart the system unintentionally. (Cable interrupt between clock output and sensor or between sensor and input) – Behavior when the input is in state "0": Please note that if this error causes the safety switch to be switched on again, this can result in delayed transmission of state "1" in the process data image of the inputs (e.g., due to a loose contact). Input No None No The error must be detected by the sensor. The sensor must ensure that the safe state is entered in the event of an error. Input to input; the inputs are assigned different clock outputs No None Yes The error cannot be detected and results in the loss of the safety function, as the safety switch is jumpered. Input to input; the inputs are assigned the same clock output No None Yes The error cannot be detected and results in the loss of the safety function, as the safety switch is jumpered. Input to assigned clock output No None Yes The error cannot be detected and results in the loss of the safety function, as the safety switch is jumpered. Input to non-assigned clock output No None Yes The error cannot be detected and results in the loss of the safety function, as the safety switch is jumpered. Clock output to clock output None No The error cannot be detected as clocking is disabled. (Cable interrupt between sensor and GND) Cross circuit GFK-2730 No Chapter 7 Connection examples for safe inputs 7-11 7 Table 7-7 Single-channel: Supply through OSSD [...] Error type Detection Diagnostics Loss of SF Remark Input to external 24 V No None Yes The error cannot be detected and results in the loss of the safety function, as the safety switch is jumpered. Input to ground Yes None No The error is only detected as a change in state from "1" to "0" in state "1" of the input. An unexpected change from "0" to "1" is possible (e.g., due to a loose contact). Ensure that such a change in state cannot restart the system unintentionally. No The error cannot be detected as clocking is disabled. Short circuit Clock output to external 24 V No None Clock output to ground Yes No Short circuit UTx ON The affected clock output is disabled. External 24 V to ground Yes None The error is only detected as a change in state from "1" to "0" in state "1" of the input. An unexpected change from "0" to "1" is possible (e.g., due to a loose contact). No Ensure that such a change in state cannot restart the system unintentionally. Typical parameterization Parameterization Parameterized as Remark Input Assignment Used Evaluation Single-channel Sensor type Standard sensor Filter time (tFilter) 3 ms Application-specific Symmetry Disabled Not relevant Clock selection (pulse selection) No assignment Bouncing time monitoring (bounce time monitoring) Disabled Application-specific Start inhibit due to symmetry violation Disabled Not relevant Input signal Equivalent Not relevant UT1 OFF (24 V) (UT2 any) Not relevant Clock output Set the filter time for the input to a value greater than the width of the test pulse for the OSSD sensor. The input must not be assigned to a clock. 7-12 User manual IC220SDL543 - September 2011 GFK-2730 7 7.4 Two-channel equivalent assignment of safe inputs For two-channel assignment of the inputs, two adjacent inputs are always used. This assignment is fixed and cannot be parameterized (see "Two-channel" on page 5-3). For two-channel equivalent assignment, the state changes from "0" to "1" only when both inputs change state from "0" to "1". If symmetry monitoring is enabled and the state at both inputs does not change within the parameterized time, a diagnostic message is generated. An input is active when the state of the signal is equal to "1". Cross circuits between different inputs can only be detected if the input signals are assigned to different clock outputs and clocks are enabled for the clock outputs. Please note that if a delayed change in state at one of the two inputs causes the safety switch to be switched on again, this can result in delayed transmission of state "1" in the process data image of the inputs (e.g., due to a loose contact). Example of correct and incorrect signal change IN 0 _ C h 1 1 IN 0 _ C h 2 1 0 0 IN 0 (C h 1 /C h 2 ) 1 0 Figure 7-5 6 9 4 0 3 0 1 4 Correct signal change IN 0 _ C h 1 1 IN 0 _ C h 2 1 0 0 IN 0 (C h 1 /C h 2 ) 1 Figure 7-6 0 Error during signal change 6 9 4 0 1 0 2 9 In Figure 7-6, the condition that both signals must be in state "0" before the change in state from "0" to "1" is not met. In this case, diagnostic message 018xhex is generated. Key for Figure 7-5 and Figure 7-6 GFK-2730 IN0_Ch1 Signal sequence at input 0 channel 1 IN0_Ch2 Signal sequence at input 0 channel 2 IN0 (Ch1/Ch2) Safety-related signal for two-channel input 0 channel 1 and channel 2 at the safe controller (PROFIsafe) or the configurable safety module (VersaSafe) Chapter 7 Connection examples for safe inputs 7-13 7 State evaluation The module evaluates the states of the inputs and transmits the result to the safe controller (PROFIsafe) or the configurable safety module (VersaSafe). In the process data image of the safe inputs: – A "0" is transmitted if a "0" signal is present at at least one of the two inputs or an error has been detected. – A "1" is transmitted if a "1" signal is present at both inputs and no error has been detected and the conditions are met for a change in state according to Figure 7-6. 7.4.1 Notes about errors for two-channel equivalent assignment of safe inputs For the following examples, please note the resulting behavior in the event of an error: Note about cross circuits – – The cross circuit error results in the transmission of the safe state in the process data image of the affected inputs. Remove the error and then acknowledge the message. Acknowledging the diagnostic message deletes the message and activates the input. The states at the input are detected immediately. In your safe application program, ensure that the system cannot be restarted unintentionally following acknowledgment of the diagnostic message. Please observe the maximum failure detection time of 80 ms. Exceptions in the failure detection time are indicated in the tables. If a "1" signal is present at the input and an error occurs, a maximum of 80 ms elapses until the error is detected. Within this time, another "1" can also be transmitted, even in the event of an error. Within the failure detection time (80 ms, maximum), the error can cause the state to change unexpectedly from "0" to "1". Ensure that such a change in state cannot restart the system unintentionally. Note about symmetry violation – – – – 7-14 The symmetry violation diagnostic message is only displayed if it was not disabled during parameterization of the affected input. Start inhibit due to symmetry violation is disabled: The symmetry violation message does not result in the transmission of the safe state (see also "Symmetry/ start inhibit" on page 5-5). The message must be acknowledged. However, the current status of the inputs is displayed in the process data image of the inputs. Start inhibit due to symmetry violation is enabled: The symmetry violation message results in the transmission of the safe state (see also "Symmetry/ start inhibit" on page 5-5). The message must be acknowledged. The current status of the inputs is displayed in the process data image of the inputs following acknowledgment. The message can be used to monitor the wear of the safety switch. User manual IC220SDL543 - September 2011 GFK-2730 7 7.4.2 Two-channel equivalent: Supply through UT1 and UT2 (clocking enabled for both) Possible wiring versions: IN 1 _ C h 1 S 1 S1, S2 Two switching elements U T 1 IN 1 _ C h 2 S 2 U T 2 Figure 7-7 IN 1 _ C h 1 6 9 4 0 4 2 1 2 Two-channel equivalent assignment of inputs, supply through UT1 and UT2 (both clocked) S 1 S1, S2 Two switching elements U T 2 IN 1 _ C h 2 S 2 U T 1 Figure 7-8 6 9 4 0 1 2 2 4 Two-channel equivalent assignment of inputs, supply through UT1 and UT2 (both clocked) Basic specifications Sensor Two-channel equivalent Sensor supply Internally through clock output UT1 and UT2 (both clocked) Achievable SIL/SIL CL/Cat./PL SIL 3/SIL CL 3/Cat. 4/PL e WARNING: Loss of electrical and functional safety – To achieve the specified category, please refer to "Measures required to achieve a specific safety integrity level" on page 7-3. – Please note that in order to achieve the specified PL, the sensor must have a high level of diagnostic coverage (> 99%) and high MTTFd. – Use sensors that can achieve the required safety integrity level. GFK-2730 Chapter 7 Connection examples for safe inputs 7-15 7 Device diagnostics and behavior of the module in the event of an error To understand the change in state, please refer to "Example of correct and incorrect signal change" on page 7-13. Table 7-8 Two-channel equivalent: Supply through UT1 and UT2 (both clocked) Error type Detection Diagnostics Loss of SF Yes No Symmetry violation Remark Error in the sensor A contact will not open The error is detected on a change in state, as the state only changes in one channel. – Change in state from "1" to "0": The faulty input remains at "1". A "0" is transmitted in the process data image of the affected inputs. – Change in state from "0" to "1": A "0" is transmitted in the process data image of the affected inputs, as the faulty input was not previously set to state "0". A contact will not close Yes No Symmetry violation Other errors (depending on the sensor) On a change in state from "0" to "1", a "0" is transmitted in the process data image of the affected inputs, as only one channel reports this change in state. Please take into consideration all possible errors that can occur in the sensor. Error in the wiring Interrupt Yes No Symmetry violation The error is detected in state "1" or on a change in state from "0" to "1", as the state only changes in one channel. Input to input Yes Cross circuit The error is detected in state "1". Input to assigned clock output Yes No Symmetry violation Input (Cable interrupt between clock output and sensor or between sensor and input) Cross circuit No The error is detected on a change in state, as the state only changes in one channel. – Change in state from "1" to "0": The faulty input remains at "1". A "0" is transmitted in the process data image of the affected inputs. – Change in state from "0" to "1": A "0" is transmitted in the process data image of the inputs, if the faulty input was not previously set to state "0". Input to non-assigned clock output Yes Cross circuit No See "Note about cross circuits" on page 7-14. Clock output to clock output Yes Cross circuit No The error is detected for inputs, which are assigned to different clock outputs. Input to ground Yes No Symmetry violation The error is detected in state "1" or on a change in state from "0" to "1", as the state only changes in one channel. Clock output to ground Yes No Short circuit UTx ON The error is detected in state "1" or on a change in state from "0" to "1", as the state only changes in one channel. Short circuit The error is also detected as a short circuit of the clock output. The affected clock output is disabled. 7-16 User manual IC220SDL543 - September 2011 GFK-2730 7 Typical parameterization Parameterization Parameterized as Remark Input Channel 1 Channel 2 Assignment Used Used Evaluation Two-channel Two-channel Sensor type Standard sensor Standard sensor Filter time (tFilter) 3 ms 3 ms Application-specific, same value Symmetry 10 ms 10 ms Application-specific, same value Clock selection (pulse selection) UT1 UT2 Or vice versa Bouncing time monitoring (bounce time monitoring) Disabled Disabled Application-specific Start inhibit due to symmetry violation Disabled Disabled Application-specific, same for both inputs Input signal Equivalent Equivalent Clock output UT1 ON and UT2 ON 7.4.3 IN 1 _ C h 1 Two-channel equivalent: Supply through UT1 and UT2 (of which one clock pulse is disabled) S 1 S1, S2 Two switching elements U T 1 IN 1 _ C h 2 S 2 U T 2 Figure 7-9 6 9 4 0 4 2 1 2 Two-channel equivalent assignment of inputs, supply through UT1 and UT2 (of which one clock pulse is disabled) Basic specifications Sensor Two-channel equivalent Sensor supply Internally through clock output UT1 and UT2 (of which one clock pulse is disabled) Achievable SIL/SIL CL/Cat./PL SIL 3/SIL CL 3/Cat. 4/PL e WARNING: Loss of electrical and functional safety – To achieve the specified category, please refer to "Measures required to achieve a specific safety integrity level" on page 7-3. – Please note that in order to achieve the specified PL, the sensor must have a high level of diagnostic coverage (> 99%) and high MTTFd. – Use sensors that can achieve the required safety integrity level. GFK-2730 Chapter 7 Connection examples for safe inputs 7-17 7 Device diagnostics and behavior of the module in the event of an error To understand the change in state, please refer to "Example of correct and incorrect signal change" on page 7-13. Table 7-9 Two-channel equivalent: Supply through UT1 and UT2 (of which one clock pulse is disabled) Error type Detection Diagnostics Loss of SF Yes No Symmetry violation Remark Error in the sensor A contact will not open The error is detected on a change in state, as the state only changes in one channel. – Change in state from "1" to "0": The faulty input remains at "1". A "0" is transmitted in the process data image of the affected inputs. – Change in state from "0" to "1": A "0" is transmitted in the process data image of the affected inputs, as the faulty input was not previously set to state "0". A contact will not close Yes No Symmetry violation Other errors (depending on the sensor) On a change in state from "0" to "1", a "0" is transmitted in the process data image of the affected inputs, as only one channel reports this change in state. Please take into consideration all possible errors that can occur in the sensor. Error in the wiring Interrupt Yes No Symmetry violation The error is detected in state "1" or on a change in state from "0" to "1", as the state only changes in one channel. Input to input Yes Cross circuit The error is detected in state "1". Input to assigned clock output Yes No Symmetry violation Input (Cable interrupt between clock output and sensor or between sensor and input) Cross circuit No The error is detected on a change in state, as the state only changes in one channel. – Change in state from "1" to "0": The faulty input remains at "1". A "0" is transmitted in the process data image of the affected inputs. – Change in state from "0" to "1": A "0" is transmitted in the process data image of the inputs, if the faulty input was not previously set to state "0". Input (assigned to the clock output Yes that is not clocked) to nonassigned clock output No Symmetry violation The error is detected on a change in state, as the state only changes in one channel. – Change in state from "1" to "0": The faulty input remains at "1". A "0" is transmitted in the process data image of the affected inputs. – Change in state from "0" to "1": A "0" is transmitted in the process data image of the inputs. Clock output (clocked) to clock output (not clocked) Yes Cross circuit No Yes No Symmetry violation The error is detected for inputs, which are assigned to the clocked clock output. Short circuit Input to ground 7-18 The error is detected in state "1" or on a change in state from "0" to "1", as the state only changes in one channel. User manual IC220SDL543 - September 2011 GFK-2730 7 Table 7-9 Two-channel equivalent: Supply through UT1 and UT2 (of which one clock pulse is disabled) [...] Error type Detection Diagnostics Loss of SF Clock output to ground Yes No Short circuit UTx ON Remark The error is detected in state "1" or on a change in state from "0" to "1", as the state only changes in one channel. The error is also detected as a short circuit of the clock output. For all inputs that are assigned to the clock output that is not clocked, cross circuits and short circuits are not detected by the device diagnostics, but only on a change in state of the input signals, as the state only changes in one channel. Early error detection, e.g., by testing the safety function at regular intervals, is required, as an accumulation of errors may result in the loss of the safety function. Typical parameterization Parameterization Parameterized as Input Channel 1 Channel 2 Remark Assignment Used Used Evaluation Two-channel Two-channel Sensor type Standard sensor Standard sensor Filter time (tFilter) 3 ms 3 ms Application-specific, same value Symmetry 10 ms 10 ms Application-specific, same value Clock selection (pulse selection) UT1 UT2 Or vice versa Bouncing time monitoring (bounce time monitoring) Disabled Disabled Application-specific Start inhibit due to symmetry violation Disabled Disabled Application-specific, same for both inputs Input signal Equivalent Equivalent Clock output UT1 ON and UT2 OFF (24 V) GFK-2730 Or vice versa Chapter 7 Connection examples for safe inputs 7-19 7 7.4.4 IN 1 _ C h 1 Two-channel equivalent: Supply through a clock output (clocking enabled) and external supply S1, S2 Two switching elements S 1 UT1 (UT2) Supply through UT1 or UT2 U T 1 (U T 2 ) IN 1 _ C h 2 S 2 + 2 4 V Figure 7-10 IN 1 _ C h 1 7 0 0 7 0 0 1 9 Two-channel equivalent assignment of inputs, supply through UT1 (or UT2) and externally S1, S2 Two switching elements S 1 +24 V Supply through external 24 V + 2 4 V IN 1 _ C h 2 S 2 U T 1 (U T 2 ) Figure 7-11 +24 V Supply through external 24 V 7 0 0 7 0 0 2 0 UT1 (UT2) Supply through UT1 or UT2 Two-channel equivalent assignment of inputs, supply through UT1 (or UT2) and externally Basic specifications Sensor Two-channel equivalent Sensor supply Internally through clock output UT1 (or UT2) and externally Achievable SIL/SIL CL/Cat./PL SIL 3/SIL CL 3/Cat. 4/PL e WARNING: Loss of electrical and functional safety – To achieve the specified category, please refer to "Measures required to achieve a specific safety integrity level" on page 7-3. – Please note that in order to achieve the specified PL, the sensor must have a high level of diagnostic coverage (> 99%) and high MTTFd. – Use sensors that can achieve the required safety integrity level. 7-20 User manual IC220SDL543 - September 2011 GFK-2730 7 Device diagnostics and behavior of the module in the event of an error To understand the change in state, please refer to "Example of correct and incorrect signal change" on page 7-13. Table 7-10 Two-channel equivalent: Supply through a clock output (clocked) and external supply Error type Detection Diagnostics Loss of SF Yes No Symmetry violation Remark Error in the sensor A contact will not open The error is detected on a change in state, as the state only changes in one channel. – Change in state from "1" to "0": The faulty input remains at "1". A "0" is transmitted in the process data image of the affected inputs. – Change in state from "0" to "1": A "0" is transmitted in the process data image of the affected inputs, as the faulty input was not previously set to state "0". A contact will not close Yes No Symmetry violation Other errors (depending on the sensor) On a change in state from "0" to "1", a "0" is transmitted in the process data image of the affected inputs, as only one channel reports this change in state. Please take into consideration all possible errors that can occur in the sensor. Error in the wiring Interrupt Yes No Symmetry violation The error is detected in state "1" or on a change in state from "0" to "1", as the state only changes in one channel. Input to input Yes Cross circuit The error is detected in state "1". Input to assigned clock output Yes No Symmetry violation Input (Cable interrupt between clock output and sensor or between sensor and input) Cross circuit No The error is detected on a change in state, as the state only changes in one channel. – Change in state from "1" to "0": The faulty input remains at "1". A "0" is transmitted in the process data image of the affected inputs. – Change in state from "0" to "1": A "0" is transmitted in the process data image of the inputs, if the faulty input was not previously set to state "0". Input (not assigned to a clock output) to clock output Yes No Symmetry violation The error is detected on a change in state, as the state only changes in one channel. – Change in state from "1" to "0": The faulty input remains at "1". A "0" is transmitted in the process data image of the affected inputs. – Change in state from "0" to "1": A "0" is transmitted in the process data image of the inputs. Clock output to clock output GFK-2730 Yes Cross circuit No The error is detected for inputs, which are assigned to the clocked clock output. Chapter 7 Connection examples for safe inputs 7-21 7 Table 7-10 Two-channel equivalent: Supply through a clock output (clocked) and external supply [...] Error type Detection Diagnostics Loss of SF Remark Input (assigned to the clocked clock output) to external 24 V Yes Cross circuit No The error is detected by the absence of the clock pulses of the clock output. Input (not assigned to any clock output) to external 24 V Yes No Symmetry violation The error is detected on a change in state, as the state only changes in one channel. – Change in state from "1" to "0": Short circuit The faulty input remains at "1". A "0" is transmitted in the process data image of the affected inputs. – Change in state from "0" to "1": A "0" is transmitted in the process data image of the inputs. Input to ground Yes No Symmetry violation The error is detected in state "1" or on a change in state from "0" to "1", as the state only changes in one channel. Clocked clock output to external 24 V Yes Cross circuit No The error is detected by the absence of the clock pulses of the clock output in the assigned input. Clock output to ground Yes No Short circuit UTx ON The error is detected in state "1" or on a change in state from "0" to "1", as the state only changes in one channel. No Symmetry violation The error is detected in state "1" or on a change in state from "0" to "1", as the state only changes in one channel. The error is also detected as a short circuit of the clock output. The affected clock output is disabled. External 24 V to ground Yes For all inputs that are not assigned to a clock output, cross circuits and short circuits are not detected by the device diagnostics, but only on a change in state of the input signals, as the state only changes in one channel. Early error detection, e.g., by testing the safety function at regular intervals, is required, as an accumulation of errors may result in the loss of the safety function. Typical parameterization Parameterization Parameterized as Input Channel 1 Channel 2 Assignment Used Used Evaluation Two-channel Two-channel Sensor type Standard sensor Standard sensor Filter time (tFilter) 3 ms 3 ms Application-specific, same value Symmetry 10 ms 10 ms Application-specific, same value Clock selection (pulse selection) UT1 No assignment Or vice versa Bouncing time monitoring (bounce time monitoring) Disabled Disabled Application-specific Start inhibit due to symmetry violation Disabled Disabled Application-specific, same for both inputs 7-22 Remark User manual IC220SDL543 - September 2011 GFK-2730 7 Parameterization Parameterized as Input signal Equivalent Remark Equivalent Clock output UT1 ON (UT2 any) 7.4.5 For specified clock selection Two-channel equivalent: Supply through a clock output (clocking enabled) S 2 IN 1 _ C h 2 U T 1 (U T 2 ) Figure 7-12 S1, S2 Two switching elements S 1 IN 1 _ C h 1 UT1 (UT2) Supply through UT1 or UT2 6 9 4 0 2 0 3 0 Two-channel equivalent assignment of inputs, supply through UT1 (or UT2) (clocked) Basic specifications Sensor Two-channel equivalent Sensor supply Internally through a clock output UT1 (or UT2) (clocked) Achievable SIL/SIL CL/Cat./PL SIL 3/SIL CL 3/Cat. 3/PL d WARNING: Loss of electrical and functional safety – To achieve the specified category, please refer to "Measures required to achieve a specific safety integrity level" on page 7-3. – Please note that in order to achieve the specified PL, the sensor must have a medium level of diagnostic coverage (90% to 99%) and medium MTTFd. A high level of diagnostic coverage (> 99%) is recommended for the application according to PL d. – Use sensors that can achieve the required safety integrity level. To understand the change in state, please refer to "Example of correct and incorrect signal change" on page 7-13. GFK-2730 Chapter 7 Connection examples for safe inputs 7-23 7 Device diagnostics and behavior of the module in the event of an error Table 7-11 Two-channel equivalent: Supply through a clock output (clocked) Error type Detection Diagnostics Loss of SF Yes No Symmetry violation Remark Error in the sensor A contact will not open The error is detected on a change in state, as the state only changes in one channel. – Change in state from "1" to "0": The faulty input remains at "1". A "0" is transmitted in the process data image of the affected inputs. – Change in state from "0" to "1": A "0" is transmitted in the process data image of the affected inputs, as the faulty input was not previously set to state "0". A contact will not close Yes No Symmetry violation Other errors (depending on the sensor) On a change in state from "0" to "1", a "0" is transmitted in the process data image of the affected inputs, as only one channel reports this change in state. Please take into consideration all possible errors that can occur in the sensor. Error in the wiring Interrupt Cable interrupt between clock output and sensor Yes None No – Behavior when the input is in state "1": Cable interrupt between sensor and input Yes No Symmetry violation The error is detected in state "1" or on a change in state from "0" to "1", as the state only changes in one channel. Input to input No None The error is not detected. An accumulation of errors can result in the loss of the safety function. Input to assigned clock output Yes No Symmetry violation The error is detected as a change in state from "1" to "0". An unexpected change from "0" to "1" is possible (e.g., due to a loose contact). Ensure that such a change in state cannot restart the system unintentionally. Cross circuit No The error is detected on a change in state, as the state only changes in one channel. – Change in state from "1" to "0": The faulty input remains at "1". A "0" is transmitted in the process data image of the affected inputs. – Change in state from "0" to "1": A "0" is transmitted in the process data image of the inputs, if the faulty input was not previously set to state "0". Input to non-assigned clock output Yes Cross circuit No See "Note about cross circuits" on page 7-14. Clock output to clock output Cross circuit No The error is detected for inputs, which are assigned to the clocked clock output. 7-24 Yes User manual IC220SDL543 - September 2011 GFK-2730 7 Table 7-11 Two-channel equivalent: Supply through a clock output (clocked) [...] Error type Detection Diagnostics Loss of SF Remark Yes None No – Short circuit Input to ground Behavior when the input is in state "1": The error is detected as a change in state from "1" to "0". An unexpected change from "0" to "1" is possible (e.g., due to a loose contact). Ensure that such a change in state cannot restart the system unintentionally. Clock output to ground No Short circuit UTx ON Yes The error is detected as a change in state from "1" to "0". An unexpected change from "0" to "1" is possible (e.g., due to a loose contact). Ensure that such a change in state cannot restart the system unintentionally. The error is also detected as a short circuit of the clock output. The affected clock output is disabled. Typical parameterization Parameterization Parameterized as Remark Input Channel 1 Channel 2 Assignment Used Used Evaluation Two-channel Two-channel Sensor type Standard sensor Standard sensor Filter time (tFilter) 3 ms 3 ms Application-specific, same value Symmetry 10 ms 10 ms Application-specific, same value Clock selection (pulse selection) UT1 UT1 Or both UT2 Bouncing time monitoring (bounce time monitoring) Disabled Disabled Application-specific Start inhibit due to symmetry violation Disabled Disabled Application-specific, same for both inputs Input signal Equivalent Equivalent Clock output UT1 ON (UT2 any) GFK-2730 Where clock selection = UT1 Chapter 7 Connection examples for safe inputs 7-25 7 7.4.6 Two-channel equivalent: Supply through a clock output (clocking disabled) or external supply S 2 IN 1 _ C h 2 U T 1 (U T 2 ) Figure 7-13 IN 1 _ C h 1 IN 1 _ C h 2 UT1 (UT2) Supply through UT1 or UT2 6 9 4 0 2 0 3 0 Two-channel equivalent assignment of inputs, supply through UT1 (or UT2) (clocking disabled) S 1 S1, S2 Two switching elements S 2 + 2 4 V Figure 7-14 S1, S2 Two switching elements S 1 IN 1 _ C h 1 7 0 0 7 0 0 2 4 +24 V External supply Two-channel equivalent assignment of inputs, external supply Basic specifications Sensor Two-channel equivalent Sensor supply Internally through clock output UT1 (or UT2) (clocking disabled) or externally Achievable SIL/SIL CL/Cat./PL SIL 3/SIL CL 3/Cat. 3/PL d WARNING: Loss of electrical and functional safety – To achieve the specified category, please refer to "Measures required to achieve a specific safety integrity level" on page 7-3. – Please note that in order to achieve the specified PL, the sensor must have a medium level of diagnostic coverage (90% to 99%) and medium MTTFd. A high level of diagnostic coverage (> 99%) is recommended for the application according to PL d. – Use sensors that can achieve the required safety integrity level. To understand the change in state, please refer to "Example of correct and incorrect signal change" on page 7-13. 7-26 User manual IC220SDL543 - September 2011 GFK-2730 7 Device diagnostics and behavior of the module in the event of an error Table 7-12 Two-channel equivalent: Supply through a clock output (clocking disabled) or external supply Error type Detection Diagnostics Loss of SF Yes No Symmetry violation Remark Error in the sensor A contact will not open The error is detected on a change in state, as the state only changes in one channel. – Change in state from "1" to "0": The faulty input remains at "1". A "0" is transmitted in the process data image of the affected inputs. – Change in state from "0" to "1": A "0" is transmitted in the process data image of the affected inputs, as the faulty input was not previously set to state "0". A contact will not close Yes No Symmetry violation Other errors (depending on the sensor) On a change in state from "0" to "1", a "0" is transmitted in the process data image of the affected inputs, as only one channel reports this change in state. Please take into consideration all possible errors that can occur in the sensor. Error in the wiring Interrupt Cable interrupt between clock output or external supply and sensor Yes None No – Behavior when the input is in state "1": Cable interrupt between sensor and input Yes No Symmetry violation The error is detected in state "1" or on a change in state from "0" to "1", as the state only changes in one channel. Input to input No None An accumulation of errors can result in the loss of the safety function. Input to clock output (assigned or not assigned) Yes No Symmetry violation The error is detected as a change in state from "1" to "0". An unexpected change from "0" to "1" is possible (e.g., due to a loose contact). Ensure that such a change in state cannot restart the system unintentionally. Cross circuit No The error is detected on a change in state, as the state only changes in one channel. – Change in state from "1" to "0": The faulty input remains at "1". A "0" is transmitted in the process data image of the affected inputs. – Change in state from "0" to "1": A "0" is transmitted in the process data image of the inputs, if the faulty input was not previously set to "0". Clock output to clock output No None No Yes No Symmetry violation The error is not detected. Short circuit Input to external 24 V The error is detected on a change in state, as the state only changes in one channel. – Change in state from "1" to "0": The faulty input remains at "1". A "0" is transmitted in the process data image of the affected inputs. – Change in state from "0" to "1": A "0" is transmitted in the process data image of the inputs, as the faulty input was not previously set to "0". Input to ground GFK-2730 Yes None No The error is detected in state "1" or on a change in state from "0" to "1", as the state only changes in one channel. Chapter 7 Connection examples for safe inputs 7-27 7 Table 7-12 Two-channel equivalent: Supply through a clock output (clocking disabled) or external supply [...] Error type Detection Diagnostics Loss of SF Remark Clock output that is not clocked to external 24 V No None No The error is not detected. Clock output to ground Yes No Short circuit UTx ON The error is detected as a change in state from "1" to "0". An unexpected change from "0" to "1" is possible (e.g., due to a loose contact). Ensure that such a change in state cannot restart the system unintentionally. The error is also detected as a short circuit of the clock output. The affected clock output is disabled. External 24 V to ground Yes None No The error is detected as a change in state from "1" to "0". An unexpected change from "0" to "1" is possible (e.g., due to a loose contact). Ensure that such a change in state cannot restart the system unintentionally. For all inputs that are not assigned to a clock output, cross circuits and short circuits are not detected by the device diagnostics, but only on a change in state of the input signals, as the state only changes in one channel. Early error detection, e.g., by testing the safety function at regular intervals, is required, as an accumulation of errors may result in the loss of the safety function. Typical parameterization Parameterization Parameterized as Remark Input Channel 1 Channel 2 Assignment Used Used Evaluation Two-channel Two-channel Sensor type Standard sensor Standard sensor Filter time (tFilter) 3 ms 3 ms Application-specific, same value Symmetry 10 ms 10 ms Application-specific, same value Clock selection (pulse selection) UT1 UT1 Or both UT2; or both no assignment Bouncing time monitoring (bounce time monitoring) Disabled Disabled Application-specific Start inhibit due to symmetry violation Disabled Disabled Application-specific, same for both inputs Input signal Equivalent Equivalent Clock output UT1 OFF (24 V) (UT2 any) 7-28 User manual IC220SDL543 - September 2011 Where clock selection = UT1 GFK-2730 7 7.4.7 Two-channel equivalent: External supply (OSSD) O S S D + 2 4 V IN 1 _ C h 1 IN 1 _ C h 2 G N D 7 0 0 7 0 0 2 8 Figure 7-15 Two-channel equivalent assignment of inputs, external supply (OSSD) WARNING: Loss of functional safety due to parasitic voltages Connect the sensor ground directly to terminal point GND of the safety module. An external ground may not be used. Basic specifications Sensor Two-channel OSSD output (with internal testing) Sensor supply External (OSSD sensor) Achievable SIL/SIL CL/Cat./PL SIL 3/SIL CL 3/Cat. 4/PL e WARNING: Loss of electrical and functional safety – To achieve the specified category, please refer to "Measures required to achieve a specific safety integrity level" on page 7-3. – Please note that in order to achieve the specified PL, the sensor must have a high level of diagnostic coverage (> 99%) and high MTTFd. – Use sensors that can achieve the required safety integrity level. Device diagnostics and behavior of the module in the event of an error To understand the change in state, please refer to "Example of correct and incorrect signal change" on page 7-13. Table 7-13 Two-channel equivalent: External supply (OSSD) Error type Detection Diagnostics Loss of SF Yes No Symmetry violation Remark Error in the sensor Channel failure The error is detected on a change in state, as the state only changes in one channel. – Change in state from "1" to "0": The faulty input remains at "1". A "0" is transmitted in the process data image of the affected inputs. – Change in state from "0" to "1": A "0" is transmitted in the process data image of the affected inputs, as the faulty input was not previously set to state "0". Other errors (depending on the sensor) GFK-2730 Please take into consideration all possible errors that can occur in the sensor. Chapter 7 Connection examples for safe inputs 7-29 7 Table 7-13 Two-channel equivalent: External supply (OSSD) [...] Error type Detection Diagnostics Loss of SF Remark Yes No Symmetry violation The error is detected in state "1" or on a change in state from "0" to "1", as the state only changes in one channel. No None No The error must be detected by the sensor. The sensor must ensure that the safe state is entered in the event of an error. Input to input No None Yes The error must be detected by the sensor. The sensor must ensure that the safe state is entered in the event of an error. Input to clock output Yes No Symmetry violation The error is detected on a change in state if the clock output is set to "1", as the state only changes in one channel. Input to 24 V Yes No Symmetry violation The error is detected on a change in state, as the state only changes in one channel. Input to ground Yes No Symmetry violation The error is detected in state "1" or on a change in state from "0" to "1", as the state only changes in one channel. Error in the wiring Interrupt Input (Cable interrupt between sensor and input) Input (Cable interrupt between sensor and GND) Cross circuit Short circuit Typical parameterization Parameterization Parameterized as Input Channel 1 Channel 2 Remark Assignment Used Used Evaluation Two-channel Two-channel Sensor type Standard sensor Standard sensor Filter time (tFilter) 3 ms 3 ms Application-specific, same value Symmetry 10 ms 10 ms Application-specific, same value Clock selection (pulse selection) No assignment No assignment Bouncing time monitoring (bounce time monitoring) Disabled Disabled Application-specific Start inhibit due to symmetry violation Disabled Disabled Application-specific, same for both inputs Input signal Equivalent Equivalent Clock output Any Set the filter time for the input to a value greater than the width of the test pulse for the OSSD sensor. The input must not be assigned to a clock. 7-30 User manual IC220SDL543 - September 2011 GFK-2730 7 7.5 Two-channel non-equivalent assignment of safe inputs For two-channel assignment of the safe inputs, two adjacent inputs are always used. This assignment is fixed and cannot be parameterized (see "Two-channel" on page 5-3). For two-channel non-equivalent assignment, the state changes from "0" to "1" only when input INx_Ch1 changes state from "0" to "1" and input INx_Ch2 changes state from "1" to "0". If symmetry monitoring is enabled and the state at both inputs does not change within the parameterized time, a diagnostic message is generated. The state is active when the state of the signal at channel 1 is equal to "1" and the signal at channel 2 is equal to "0". Cross circuits can only be detected if the input signals are assigned to different clock outputs and clocks are enabled for the clock outputs. Please note that if a delayed change in state at one of the two inputs causes the safety switch to be switched on again, this can result in delayed transmission of state "1" in the process data image of the inputs (e.g., due to a loose contact). Example of correct and incorrect signal change IN 0 _ C h 1 1 IN 0 _ C h 2 1 0 0 IN 0 (C h 1 /C h 2 ) 1 Figure 7-16 0 Correct signal change IN 0 _ C h 1 1 IN 0 _ C h 2 1 0 0 IN 0 (C h 1 /C h 2 ) 1 Figure 7-17 6 9 4 0 2 0 1 7 0 Error during signal change 6 9 4 0 2 0 1 8 In Figure 7-17, the condition that both signals must be in the opposite state before the change in state is not met. In this case, diagnostic message 018xhex is generated. GFK-2730 Chapter 7 Connection examples for safe inputs 7-31 7 Key for Figure 7-5 and Figure 7-6 IN0_Ch1 Signal sequence at input 0 channel 1 IN0_Ch2 Signal sequence at input 0 channel 2 IN0 (Ch1/Ch2) Safety-related signal for two-channel input 0 channel 1 and channel 2 at the safe controller (PROFIsafe) or the configurable safety module (VersaSafe) State evaluation The module evaluates the states of the inputs and transmits the result to the safe controller (PROFIsafe) or the configurable safety module (VersaSafe). In the process data image of the safe inputs: – A "1" is transmitted if a "1" signal is present at channel 1 of the input and a "0" signal is present at channel 2 of the input and no error has been detected and the conditions are met for a change in state according to Figure 7-17. – A "0" is transmitted in all other cases. 7.5.1 Notes about errors for two-channel non-equivalent assignment of safe inputs For the following examples, please note the resulting behavior in the event of an error: Note about cross circuits – – 7-32 The cross circuit error results in the transmission of the safe state in the process data image of the affected inputs. Remove the error and then acknowledge the message. Acknowledging the diagnostic message deletes the message and activates the input. The states at the input are detected immediately. In your safe application program, ensure that the system cannot be restarted unintentionally following acknowledgment of the diagnostic message. Please observe the maximum failure detection time of 80 ms. Exceptions in the failure detection time are indicated in the tables. If a "1" signal is present at the input and an error occurs, a maximum of 80 ms elapses until the error is detected. Within this time, another "1" can also be transmitted, even in the event of an error. Within the failure detection time (80 ms, maximum), the error can cause the state to change unexpectedly from "0" to "1". Ensure that such a change in state cannot restart the system unintentionally. User manual IC220SDL543 - September 2011 GFK-2730 7 Note about symmetry violation – – – – GFK-2730 The symmetry violation diagnostic message is only displayed if it was not disabled during parameterization of the affected input. Start inhibit due to symmetry violation is disabled: The symmetry violation message does not result in the transmission of the safe state (see also "Symmetry/ start inhibit" on page 5-5). The message must be acknowledged. However, the current status of the inputs is displayed in the process data image of the inputs. Start inhibit due to symmetry violation is enabled: The symmetry violation message results in the transmission of the safe state (see also "Symmetry/ start inhibit" on page 5-5). The message must be acknowledged. The current status of the inputs is displayed in the process data image of the inputs following acknowledgment. The message can be used to monitor the wear of the safety switch. Chapter 7 Connection examples for safe inputs 7-33 7 7.5.2 IN 1 _ C h 1 Two-channel non-equivalent: Supply through UT1 and UT2 (clocking enabled for both) S 1 S1, S2 Two switching elements U T 1 IN 1 _ C h 2 S 2 U T 2 Figure 7-18 IN 1 _ C h 1 6 9 4 0 4 2 2 2 Two-channel non-equivalent assignment of inputs, supply through UT1 and UT2 (both clocked) S 1 S1, S2 Two switching elements U T 2 IN 1 _ C h 2 S 2 6 9 4 0 1 2 2 6 U T 1 Figure 7-19 Two-channel non-equivalent assignment of inputs, supply through UT1 and UT2 (both clocked) Basic specifications Sensor Two-channel non-equivalent Sensor supply Internally through clock output UT1 and UT2 (both clocked) Achievable SIL/SIL CL/Cat./PL SIL 3/SIL CL 3/Cat. 4/PL e WARNING: Loss of electrical and functional safety – To achieve the specified category, please refer to "Measures required to achieve a specific safety integrity level" on page 7-3. – Please note that in order to achieve the specified PL, the sensor must have a high level of diagnostic coverage (> 99%) and high MTTFd. – Use sensors that can achieve the required safety integrity level. To understand the change in state, please refer to "Example of correct and incorrect signal change" on page 7-31. 7-34 User manual IC220SDL543 - September 2011 GFK-2730 7 Device diagnostics and behavior of the module in the event of an error Table 7-14 Two-channel non-equivalent: Supply through UT1 and UT2 (both clocked) Error type Detection Diagnostics Loss of SF Yes No Symmetry violation Remark Error in the sensor A contact will not open A contact will not close Other errors (depending on the sensor) The error is detected, as the state only changes in one channel. Please take into consideration all possible errors that can occur in the sensor. Error in the wiring Interrupt Yes No Symmetry violation The error is detected on a change in state at the latest, as the state only changes in one channel. Input to input Yes Cross circuit The error is detected if the other input is set to "1". Input to assigned clock output Yes No Symmetry violation The error is detected on a change in state, as the state only changes in one channel. Input to non-assigned clock output Yes Cross circuit No See "Note about cross circuits" on page 7-32. Clock output to clock output Yes Cross circuit No The error is detected for inputs, which are assigned to different clock outputs. Input to ground Yes None No The error is detected on a change in state at the latest, as the state only changes in one channel. Clock output to ground Yes No Short circuit UTx ON The error is detected on a change in state at the latest, as the state only changes in one channel. Input (Cable interrupt between clock output and sensor or between sensor and input) Cross circuit No Short circuit The error is also detected as a short circuit of the clock output. The affected clock output is disabled. An error in input circuit INx_Ch2 can only be detected in the event of a safety demand. Early error detection, e.g., by testing the safety function at regular intervals, is required, as an accumulation of errors may result in the loss of the safety function. GFK-2730 Chapter 7 Connection examples for safe inputs 7-35 7 Typical parameterization Parameterization Parameterized as Remark Input Channel 1 Channel 2 Assignment Used Used Evaluation Two-channel Two-channel Sensor type Standard sensor Standard sensor Filter time (tFilter) 3 ms 3 ms Application-specific, same for both inputs Symmetry 10 ms 10 ms Application-specific, same for both inputs Clock selection (pulse selection) UT1 UT2 Or vice versa Bouncing time monitoring (bounce time monitoring) Disabled Disabled Application-specific Start inhibit due to symmetry violation Disabled Disabled Application-specific, same for both inputs Input signal Non-equivalent Non-equivalent Same for both inputs Clock outputs UT1 ON and UT2 ON 7-36 User manual IC220SDL543 - September 2011 GFK-2730 7 7.5.3 IN 1 _ C h 1 Two-channel non-equivalent: Supply through UT1 and UT2 (of which one clock pulse is disabled) S 1 S1, S2 Two switching elements U T 1 IN 1 _ C h 2 S 2 U T 2 Figure 7-20 IN 1 _ C h 1 6 9 4 0 4 2 2 2 Two-channel non-equivalent assignment of inputs, supply through UT1 and UT2 (of which one clock pulse is disabled) S 1 S1, S2 Two switching elements U T 2 IN 1 _ C h 2 S 2 6 9 4 0 1 2 2 6 U T 1 Figure 7-21 Two-channel non-equivalent assignment of inputs, supply through UT1 and UT2 (of which one clock pulse is disabled) Basic specifications Sensor Two-channel non-equivalent Sensor supply Internally through clock output UT1 and UT2, of which one clock pulse is disabled Achievable SIL/SIL CL/Cat./PL SIL 3/SIL CL 3/Cat. 4/PL e WARNING: Loss of electrical and functional safety – To achieve the specified category, please refer to "Measures required to achieve a specific safety integrity level" on page 7-3. – Please note that in order to achieve the specified PL, the sensor must have a high level of diagnostic coverage (> 99%) and high MTTFd. – Use sensors that can achieve the required safety integrity level. To understand the change in state, please refer to "Example of correct and incorrect signal change" on page 7-31. GFK-2730 Chapter 7 Connection examples for safe inputs 7-37 7 Device diagnostics and behavior of the module in the event of an error Table 7-15 Two-channel non-equivalent: Supply through UT1 and UT2 (of which one clock pulse is disabled) Error type Detection Diagnostics Loss of SF Yes No Symmetry violation Remark Error in the sensor A contact will not open A contact will not close Other errors (depending on the sensor) The error is detected, as the state only changes in one channel. Please take into consideration all possible errors that can occur in the sensor. Error in the wiring Interrupt Input Yes No Symmetry violation The error is detected on a change in state at the latest, as the state only changes in one channel. Yes Cross circuit Cross-circuit detection depends on the switch position. (Cable interrupt between clock output and sensor or between sensor and input) Cross circuit Input to input Input to assigned clock output Yes No A cross circuit is detected if the expected behavior of the input with regard to the test pulse of the assigned clock output is not achieved (test pulse exceeded). This error can also result in symmetry violation, as the signal cannot be changed in both channels simultaneously. No Symmetry violation The error is detected on a change in state, as the state only changes in one channel. – Change in state from "1" to "0": The faulty input remains at "1". A "0" is transmitted in the process data image of the affected inputs. Yes Input (assigned to the clocked clock output) to non-assigned clock output Cross circuit No See "Note about cross circuits" on page 7-32. Input (assigned to the clock output Yes that is not clocked) to nonassigned clock output No Symmetry violation The error is detected, as the state only changes in one channel. Clock output to clock output Yes Cross circuit No The error is detected for inputs, which are assigned to the clocked clock output. The error is detected if the input assigned to the clocked clock output is active. In this case, please note that the failure detection time depends on the switch position. Input to ground Yes No Symmetry violation The error is detected in state "1" or on a change in state from "0" to "1", as the state only changes in one channel. Clock output to ground Yes No Short circuit UTx ON The error is detected in state "1" or on a change in state from "0" to "1", as the state only changes in one channel. Short circuit 7-38 The error is also detected as a short circuit of the clock output. User manual IC220SDL543 - September 2011 GFK-2730 7 For all inputs that are assigned to the clock output that is not clocked, cross circuits and short circuits are not detected by the device diagnostics, but only on a change in state of the input signals, as the state only changes in one channel. Early error detection, e.g., by testing the safety function at regular intervals, is required, as an accumulation of errors may result in the loss of the safety function. Typical parameterization Parameterization Parameterized as Remark Input Channel 1 Channel 2 Assignment Used Used Evaluation Two-channel Two-channel Sensor type Standard sensor Standard sensor Filter time (tFilter) 3 ms 3 ms Application-specific, same for both inputs Symmetry 10 ms 10 ms Application-specific, same for both inputs Clock selection (pulse selection) UT1 UT2 Or vice versa Bouncing time monitoring (bounce time monitoring) Disabled Disabled Application-specific Start inhibit due to symmetry violation Disabled Disabled Application-specific, same for both inputs Input signal Non-equivalent Non-equivalent Same for both inputs Clock outputs UT1 ON and UT2 OFF (24 V) GFK-2730 For specified clock selection Chapter 7 Connection examples for safe inputs 7-39 7 7.5.4 IN 1 _ C h 1 Two-channel non-equivalent: Supply through a clock output (clocking enabled) and external supply S1, S2 Two switching elements S 1 UT1 (UT2) Supply through UT1 or UT2 U T 1 (U T 2 ) IN 1 _ C h 2 S 2 + 2 4 V Figure 7-22 IN 1 _ C h 1 7 0 0 7 0 0 2 1 Two-channel non-equivalent assignment of inputs, internal supply through a clock output (clocked) and external supply S1, S2 Two switching elements S 1 +24 V Supply through external 24 V + 2 4 V IN 1 _ C h 2 S 2 U T 1 (U T 2 ) Figure 7-23 +24 V Supply through external 24 V 7 0 0 7 0 0 2 2 UT1 (UT2) Supply through UT1 or UT2 Two-channel non-equivalent assignment of inputs, internal supply through a clock output (clocked) and external supply Basic specifications Sensor Two-channel non-equivalent Sensor supply Internally through clock output UT1 (or UT2) (clocked) and externally Achievable SIL/SIL CL/Cat./PL SIL 3/SIL CL 3/Cat. 4/PL e WARNING: Loss of electrical and functional safety – To achieve the specified category, please refer to "Measures required to achieve a specific safety integrity level" on page 7-3. – Please note that in order to achieve the specified PL, the sensor must have a high level of diagnostic coverage (> 99%) and high MTTFd. – Use sensors that can achieve the required safety integrity level. To understand the change in state, please refer to "Example of correct and incorrect signal change" on page 7-31. 7-40 User manual IC220SDL543 - September 2011 GFK-2730 7 Device diagnostics and behavior of the module in the event of an error Table 7-16 Two-channel non-equivalent: Supply through a clock output (clocked) and external supply Error type Detection Diagnostics Loss of SF Yes No Symmetry violation Remark Error in the sensor A contact will not open A contact will not close Other errors (depending on the sensor) The error is detected, as the state only changes in one channel. Please take into consideration all possible errors that can occur in the sensor. Error in the wiring Interrupt Input Yes No Symmetry violation The error is detected on a change in state at the latest, as the state only changes in one channel. Yes Cross circuit Cross-circuit detection depends on the switch position. (Cable interrupt between clock output and sensor or between sensor and input) Cross circuit Input to input Input to assigned clock output Yes No A cross circuit is detected if the expected behavior of the input with regard to the test pulse of the assigned clock output is not achieved (test pulse exceeded). This error can also result in symmetry violation, as the signal cannot be changed in both channels simultaneously. No Symmetry violation The error is detected on a change in state, as the state only changes in one channel. – Change in state from "1" to "0": The faulty input remains at "1". A "0" is transmitted in the process data image of the affected inputs. Yes Input (assigned to the clocked clock output) to non-assigned clock output Cross circuit No See "Note about cross circuits" on page 7-32. Input (not assigned to a clock output) to non-assigned clock output Yes No Symmetry violation The error is detected on a change in state, as the state only changes in one channel. Clock output to clock output Yes Cross circuit No The error is detected for inputs, which are assigned to the clocked clock output. Error detection depends on the switch position. The error is detected if the input assigned to the clocked clock output is active. In this case, please note that the failure detection time depends on the switch position. Input (assigned to the clocked clock output) to external 24 V Yes Cross circuit No The error is detected by the absence of the clock pulses of the clock output. Input (not assigned to any clock output) to external 24 V Yes No Symmetry violation The error is detected on a change in state, as the state only changes in one channel. – Change in state from "1" to "0": Short circuit The faulty input remains at "1". A "0" is transmitted in the process data image of the affected inputs. Input to ground GFK-2730 Yes No Symmetry violation The error is detected in state "1" or on a change in state from "0" to "1", as the state only changes in one channel. Chapter 7 Connection examples for safe inputs 7-41 7 Table 7-16 Two-channel non-equivalent: Supply through a clock output (clocked) and external supply [...] Error type Detection Diagnostics Loss of SF Remark Clocked clock output to external 24 V Yes Cross circuit No The error is detected by the absence of the clock pulses of the clock output in the assigned input. In this case, please note that the failure detection time depends on the switch position. Clock output to ground Yes No Short circuit UTx ON The error is detected in state "1" or on a change in state from "0" to "1", as the state only changes in one channel. External 24 V to ground Yes No Symmetry violation The error is detected in state "1" or on a change in state from "0" to "1", as the state only changes in one channel. The error is also detected as a short circuit of the clock output. For all inputs that are not assigned to a clock output, cross circuits and short circuits are not detected by the device diagnostics, but only on a change in state of the input signals, as the state only changes in one channel. Early error detection, e.g., by testing the safety function at regular intervals, is required, as an accumulation of errors may result in the loss of the safety function. Typical parameterization Parameterization Parameterized as Input Channel 1 Channel 2 Remark Assignment Used Used Evaluation Two-channel Two-channel Sensor type Standard sensor Standard sensor Filter time (tFilter) 3 ms 3 ms Application-specific, same for both inputs Symmetry 10 ms 10 ms Application-specific, same for both inputs Clock selection (pulse selection) UT1 (or UT2) No assignment Or vice versa Bouncing time monitoring (bounce time monitoring) Disabled Disabled Application-specific Start inhibit due to symmetry violation Disabled Disabled Application-specific, same for both inputs Input signal Non-equivalent Non-equivalent Same for both inputs Clock outputs UT1 ON (UT2 any) 7-42 User manual IC220SDL543 - September 2011 For specified clock selection GFK-2730 7 7.5.5 Two-channel non-equivalent: Supply through a clock output (clocking enabled) IN 1 _ C h 1 IN 1 _ C h 2 S 1 S1, S2 Two switching elements S 2 UT1 (UT2) Supply through UT1 or UT2 U T 1 (U T 2 ) Figure 7-24 6 9 4 0 4 2 2 3 Two-channel non-equivalent assignment of inputs, supply through UT1 or UT2 (clocked) Basic specifications Sensor Two-channel non-equivalent Sensor supply Internally through clock output UT1 (or UT2) (clocked) Achievable SIL/SIL CL/Cat./PL SIL 3/SIL CL 3/Cat. 4/PL e WARNING: Loss of electrical and functional safety – To achieve the specified category, please refer to "Measures required to achieve a specific safety integrity level" on page 7-3. – Please note that in order to achieve the specified PL, the sensor must have a high level of diagnostic coverage (> 99%) and high MTTFd. – Use sensors that can achieve the required safety integrity level. To understand the change in state, please refer to "Example of correct and incorrect signal change" on page 7-31. Device diagnostics and behavior of the module in the event of an error Table 7-17 Two-channel non-equivalent: Supply through a clock output (clocked) Error type Detection Diagnostics Loss of SF Yes No Symmetry violation Remark Error in the sensor A contact will not open A contact will not close Other errors (depending on the sensor) The error is detected, as the state only changes in one channel. Please take into consideration all possible errors that can occur in the sensor. Error in the wiring Interrupt Input (cable interrupt between clock output and sensor or between sensor and input) GFK-2730 Yes No Symmetry violation The error is detected on a change in state at the latest, as the state only changes in one channel. Chapter 7 Connection examples for safe inputs 7-43 7 Table 7-17 Two-channel non-equivalent: Supply through a clock output (clocked) [...] Error type Detection Diagnostics Loss of SF Remark Input to input Yes No Symmetry violation The error is detected, as the state only changes in one channel. Input to assigned clock output Yes No Symmetry violation The error is detected on a change in state, as the state only changes in one channel. – Change in state from "1" to "0": Cross circuit The faulty input remains at "1". A "0" is transmitted in the process data image of the affected inputs. Input to non-assigned clock output Yes Cross circuit No See "Note about cross circuits" on page 7-14. Clock output to clock output Yes Cross circuit No The error is detected for inputs, which are assigned to the clocked clock output. In this case, please note that the failure detection time depends on the switch position. Input to ground Yes No Symmetry violation The error is detected in state "1" or on a change in state from "0" to "1", as the state only changes in one channel. Clock output to ground Yes No Short circuit UTx ON The error is detected as a change in state from "1" to "0". Short circuit The error is also detected as a short circuit of the clock output. The affected clock output is disabled. Early error detection, e.g., by testing the safety function at regular intervals, is required, as an accumulation of errors may result in the loss of the safety function. Typical parameterization Parameterization Parameterized as Input Channel 1 Channel 2 Assignment Used Used Evaluation Two-channel Two-channel Sensor type Standard sensor Standard sensor Filter time (tFilter) 3 ms 3 ms Application-specific, same for both inputs Symmetry 10 ms 10 ms Application-specific, same for both inputs Clock selection (pulse selection) UT1 UT1 Or both UT2 Bouncing time monitoring (bounce time monitoring) Disabled Disabled Application-specific Start inhibit due to symmetry violation Disabled Disabled Application-specific, same for both inputs 7-44 Remark User manual IC220SDL543 - September 2011 GFK-2730 7 Parameterization Parameterized as Remark Input Channel 1 Channel 2 Input signal Non-equivalent Non-equivalent Same for both inputs Clock outputs UT1 ON (24 V) (UT2 any) 7.5.6 Two-channel non-equivalent: Supply through a clock output (clocking disabled) or external supply IN 1 _ C h 1 IN 1 _ C h 2 S 1 S1, S2 Two switching elements S 2 UT1 (UT2) Supply through UT1 or UT2 U T 1 (U T 2 ) Figure 7-25 IN 1 _ C h 1 IN 1 _ C h 2 6 9 4 0 4 2 2 3 Two-channel non-equivalent assignment of inputs, supply through UT1 (or UT2) (clocking disabled) S 1 S1, S2 Two switching elements S 2 +24 V Supply through external 24 V + 2 4 V Figure 7-26 Or vice versa 7 0 0 7 0 0 2 3 Two-channel non-equivalent assignment of inputs, external supply Basic specifications Sensor Two-channel non-equivalent Sensor supply Internally through clock output UT1 (or UT2) (clocking disabled) or externally Achievable SIL/SIL CL/Cat./PL SIL 3/SIL CL 3/Cat. 3/PL d WARNING: Loss of electrical and functional safety – To achieve the specified category, please refer to "Measures required to achieve a specific safety integrity level" on page 7-3. – Please note that in order to achieve the specified PL, the sensor must have a medium level of diagnostic coverage (90% to 99%) and medium MTTFd. A high level of diagnostic coverage (> 99%) is recommended for the application according to PL d. – Use sensors that can achieve the required safety integrity level. To understand the change in state, please refer to "Example of correct and incorrect signal change" on page 7-31. GFK-2730 Chapter 7 Connection examples for safe inputs 7-45 7 Device diagnostics and behavior of the module in the event of an error Table 7-18 Two-channel non-equivalent: Supply through a clock output (clocking disabled) or external supply Error type Detection Diagnostics Loss of SF Yes No Symmetry violation Remark Error in the sensor A contact will not open A contact will not close Other errors (depending on the sensor) The error is detected, as the state only changes in one channel. Please take into consideration all possible errors that can occur in the sensor. Error in the wiring Interrupt Yes No Symmetry violation The error is detected on a change in state at the latest, as the state only changes in one channel. Input to input Yes No Symmetry violation The error is detected, as the state only changes in one channel. Input to clock output (assigned or not assigned) Yes No Symmetry violation The error is detected, as the state only changes in one channel. – Change in state from "1" to "0": No None The error is not detected. Input to external 24 V Yes No Symmetry violation The error is detected on a change in state at the latest, as the state only changes in one channel. Input to ground Yes No Symmetry violation The error is detected in state "1" or on a change in state from "0" to "1", as the state only changes in one channel. The error is not detected. Input (cable interrupt between clock output and sensor or between sensor and input) Cross circuit Clock output to clock output No The faulty input remains at "1". A "0" is transmitted in the process data image of the affected inputs. Short circuit Clock output to external 24 V No None Clock output to ground Yes No Short circuit UTx ON No The error is detected as a change in state from "1" to "0". No Symmetry violation The error is detected in state "1" or on a change in state from "0" to "1", as the state only changes in one channel. The error is also detected as a short circuit of the clock output. The affected clock output is disabled. External 24 V to ground Yes Early error detection, e.g., by testing the safety function at regular intervals, is required, as an accumulation of errors may result in the loss of the safety function. 7-46 User manual IC220SDL543 - September 2011 GFK-2730 7 Typical parameterization Parameterization Parameterized as Remark Input Channel 1 Channel 2 Assignment Used Used Evaluation Two-channel Two-channel Sensor type Standard sensor Standard sensor Filter time (tFilter) 3 ms 3 ms Application-specific, same for both inputs Symmetry 10 ms 10 ms Application-specific, same for both inputs Clock selection (pulse selection) UT1 UT1 Or both UT2 or no assignment (external) Bouncing time monitoring (bounce time monitoring) Disabled Disabled Application-specific Start inhibit due to symmetry violation Disabled Disabled Application-specific, same for both inputs Input signal Non-equivalent Non-equivalent Same for both inputs Clock outputs UT1 OFF (24 V) (UT2 any) GFK-2730 Where clock selection = UT1 Chapter 7 Connection examples for safe inputs 7-47 7 7-48 User manual IC220SDL543 - September 2011 GFK-2730 8 8 Startup and validation 8.1 Initial startup To start up, proceed as described in Table 8-1. Table 8-1 Steps for startup Step Relevant section and literature Set the transmission speed and the operating mode. "Setting the DIP switches" on page 4-2 Set the protocol/address. "Setting the DIP switches" on page 4-2 Install the safety module within the VersaPoint station. "Assembly, removal, and electrical installation" on page 4-1 Connect the bus system and supply voltage cables to the VersaPoint station. GFK-2736 or documentation for the bus coupler Wire the inputs according to your application. "Assembly, removal, and electrical installation" on page 4-1 "VersaPoint potential and data routing, and VersaPoint connectors" on page 3-1 User manuals for the function blocks used Before applying the operating voltage: – Ensure that there are no wiring errors (e.g., cross circuit or short circuit) or grounding errors by testing with a multimeter. – Check whether the ground connection is safe. Connect the required voltages to the VersaPoint station. GFK-2736 or documentation for the bus coupler Once the operating voltage has been applied: – If possible, measure the wave form of the voltages to ensure that there are no deviations. – Measure the input voltages on the module to ensure that they are in the permissible range. – Use the LEDs on the module to check that the module starts up without any errors. Check the assembly and installation. Checklist "Assembly and electrical installation" on page C-3 Carry out the necessary parameterization. "Parameterization of the safety module" on page 5-1 Documentation for the configurable safety module used (VersaSafe) Documentation for the controller used (PROFIsafe) GFK-2730 Chapter 8 Startup and validation 8-1 8 Table 8-1 Steps for startup [...] Step Relevant section and literature Program the safety function. User manuals for the function blocks used Documentation for the configurable safety module used (VersaSafe) Documentation for the controller used (PROFIsafe) For PROFIsafe: When verifying the safety function, check whether the F_iPar_CRC parameter is greater than 0 for all devices. If not, modify the settings. Checklist "Validation" on page C-5 Perform a function test and validation. Check whether the safety function responds as planned during programming and parameterization. Checklist "Validation" on page C-5 Quick Start Guide for configuring VersaPoint modules with safe inputs or outputs under PROFIsafe on your controller When connecting the supply voltages, use the diagnostic and status indicators to check whether the module has started up correctly or whether any errors are indicated. For instructions on how to proceed in the event of an error, please refer to "Errors: Messages and removal" on page 9-1. 8-2 User manual IC220SDL543 - September 2011 GFK-2730 8 8.2 8.2.1 Restart after replacing a safety module Replacing a safety module WARNING: Unintentional machine startup Do not assemble or remove the module while the power is connected. Before assembling or removing the module, disconnect the power to the module and the entire VersaPoint station and ensure that it cannot be switched on again. Make sure the entire station is reassembled before switching the power back on. Observe the diagnostic indicators and any diagnostic messages. The system may only be started provided neither the station nor the system poses a hazard. If replacing a module, proceed as described for assembly and removal (see "Assembly, removal, and electrical installation" on page 4-1). Ensure that the new safety module is mounted at the correct position in the local bus. The new module must meet the following requirements: – Same device type – Same or later version 8.2.2 Restart Once the safety module has been replaced, proceed as described for initial startup (see "Initial startup" on page 8-1). The parameterization of the previous module remains the same and is transmitted to the new module when the system is started. Plug the VersaPoint connectors into the correct connections. Perform a function test after replacing the module. 8.3 Validation Carry out a safety validation every time you make a safety-related modification to the VersaSafe or PROFIsafe system. When validating your individual EUC, check the assignment of the sensor connections. Determine whether: – The correct safe sensors are connected to the safety module – The safety module has been parameterized correctly – The variables used in your application program have been linked to the safe sensors correctly Perform a function test and error simulation. Please observe the checklist "Validation" on page C-5 during validation. GFK-2730 Chapter 8 Startup and validation 8-3 Th is pa ge lef tb lan ki nte nti on all y 8 8-4 User manual IC220SDL543 - September 2011 GFK-2730 9 9 Errors: Messages and removal Depending on the error type, errors that are diagnosed are displayed via the local diagnostic indicators and/or transmitted to the safe controller (PROFIsafe) or the configurable safety module (VersaSafe) as diagnostic messages. The tables below provide an overview of the diagnosed errors, their causes, effects, and possible measures for error removal. For VersaSafe, please also refer to the documentation for the configurable safety module used. For every error that occurs, the cause of the error must first be removed. If necessary, the error is then acknowledged. Errors that must be acknowledged are indicated in the "Acknowledgment" column in the tables below. If error codes are indicated by the system, which do not appear in the tables below, please contact GE Intelligent Platforms. Error removal To remove the cause of an error, please proceed as described in the "Remedy" column in the tables below. Error acknowledgment Instructions on how to acknowledge an error can be found in Section "Acknowledging an error" on page 9-9. Module replacement following an error If in the event of failure the safety module is replaced, please proceed as described in Section 8.2, "Restart after replacing a safety module" and Section "Restart after replacing a safety module" on page 8-3. GFK-2730 Chapter 9 Errors: Messages and removal 9-1 9 Notes on the tables below The error code of a diagnostic message is comprised of the code for the error cause and the code for the error location. Structure of the error code Error code Code for error cause Code for error location 012 x E.g., Error code The error code is specified in Table 9-1 and onwards. Error location In the error code specified, "x" specifies the location of the error. The value range for "x" is specified in the relevant row of the table. For some errors a single channel is specified as the error location (e.g., IN0_Ch1). Some errors only occur for inputs/outputs parameterized for two-channel operation. Here, the channel pair is specified as the error location (e.g., IN0_Ch1&2). Example: Safe input errors (Table 9-1) Error cause Error code (hex) Cross circuit 012x x = 0 ... 3: IN0_Ch1 ... IN3_Ch1; x = 7 ... A: IN0_Ch2 ... IN3_Ch2 012x Cross circuit 012x Error location This means, for example: 0122 Cross circuit at IN2_Ch1 (input 2 channel 1) 012A Cross circuit at IN3_Ch2 (input 3 channel 2) LED The "LED" column specifies which local diagnostic LEDs indicate the error. Acknowledgment Errors that must be acknowledged are indicated with "Yes" in the "Acknowledgment" column. Special conditions for re-enabling an input or the module are specified in brackets [e.g., Yes (1)] in the "Acknowledgment" column and explained below the relevant table. 9-2 User manual IC220SDL543 - September 2011 GFK-2730 9 9.1 Table 9-1 Error cause Safe digital input errors Error code (hex) Permissible 011x bouncing time was exceeded LED Remark Effect Remedy – Not safety-related. Poor switch quality; contact bouncing is too long compared to the filter time. Inputs continue to be detected and their states transmitted to the safe controller (PROFIsafe) or a configurable safety module (VersaSafe) Check switches and replace, if necessary Cross circuit with another input or with a clock output Affected input is in the safe state Check sensor x = 0 ... 3: IN0_Ch1 ... IN3_Ch1; x = 7 ... A: IN0_Ch2 ... IN3_Ch2 Cross circuit Safe digital input errors 012x – x = 0 ... 3: IN0_Ch1 ... IN3_Ch1; x = 7 ... A: IN0_Ch2 ... IN3_Ch2 Acknowledgment Yes (1) Check parameterized filter time Yes (2) Check clock outputs Check connector and cabling Symmetry violation 013x – x = 0 ... 3: IN0 Ch1&2 ... IN3_Ch1&2 Not safety-related. Only for inputs parameterized for two-channel operation; used to evaluate the contacts of connected switches. State change in both channels takes longer than the value parameterized for symmetry. This message can also be triggered by a cross circuit/short circuit. Hardware fault 014x – "Start inhibit due to symmetry violation" is disabled: Inputs continue to be detected and their states transmitted to the safe controller (PROFIsafe) or a configurable safety module (VersaSafe) "Start inhibit due to symmetry violation" is enabled: Affected input is in the safe state 015x x = 0 ... 3: IN0 Ch1&2 ... IN3_Ch1&2 GFK-2730 Yes (4) If not: Check value for symmetry Check switches Replace switches during next maintenance. Activate connected I/O devices once (e.g., activate and unlock emergency stop). All module inputs Power up with errorare in the safe state free selftest x = 0 ... 3: IN0_Ch1 ... IN3_Ch1; x = 7 ... A: IN0_Ch2 ... IN3_Ch2 Sensor error Check whether the message was triggered by a short circuit/cross circuit Yes (3) Replacement – At the input that was Affected input is in parameterized for the safe state an intelligent sensor Chapter 9 Errors: Messages and removal Check sensor Yes (2) 9-3 9 Table 9-1 Safe digital input errors [...] Error cause Error code (hex) LED Remark Signal error 016x – At the input that was Affected input is in parameterized for the safe state an intelligent sensor (incorrect or distorted clock signal, e.g., due to short circuit; different states at both inputs) x = 0 ... 3: IN0 Ch1&2 ... IN3_Ch1&2 Hardware fault 0170 – Error during signal change 018x – Effect Remedy Check sensor All module inputs Power up with errorare in the safe state free selftest Acknowledgment Yes (2) Yes (3) Replacement x = 0 ... 3: IN0 Ch1&2 ... IN3_Ch1&2 Only for inputs parameterized for two-channel operation; implausible signal change at indicated input pair Affected inputs in the safe state Set both inputs to the safe state Yes (1) Acknowledgment: Yes (1) Acknowledging the diagnostic message deletes the message. Acknowledgment: Yes (2) Acknowledging the diagnostic message deletes the message and activates the input. The states at the input are detected immediately. In your safe application program, ensure that the system cannot be restarted unintentionally following acknowledgment of the diagnostic message. Acknowledgment: Yes (3) Acknowledging the diagnostic message deletes the message. The module can only be restarted following power up and error-free selftest. Acknowledgment: Yes (4) "Start inhibit due to symmetry violation" is disabled: Acknowledging the diagnostic message deletes the message. "Start inhibit due to symmetry violation" is enabled: Acknowledging the diagnostic message deletes the message and activates the disabled inputs again. 9-4 User manual IC220SDL543 - September 2011 GFK-2730 9 9.2 Table 9-2 Clock output UT1 and UT2 errors Clock output errors Error cause Error code (hex) LED Remark Short circuit or overload 01Ex UT1 or UT2 ON x = 0: Clock output UT1; x = 7: Clock output UT2 Acknowledgment: Yes (1) Effect Remedy Affected clock output is disabled. Assigned inputs are set to "0". Check connector and cabling (acknowledge error at all inputs, if necessary) Acknowledgment Yes (1) Acknowledging the diagnostic message deletes the message and re-enables the clock output and the assigned inputs. In your safe application program, ensure that the system cannot be restarted unintentionally following acknowledgment of the diagnostic message. The clock outputs are also switched on and monitored when not parameterized. If a short circuit occurs at a clock output when it is in this state, the clock output is switched off. To exit the error, parameterize the device and acknowledge the error message. 9.3 Table 9-3 Supply voltage errors Supply voltage UM errors Error cause Error code (hex) LED Remark Effect Remedy Undervoltage UM 01F0 UM flashing UM below the permissible voltage range All module inputs are in the safe state Check and supply voltage level Acknowledgment Yes (1) Check supply line length and load Acknowledgment: Yes (1) Acknowledging the diagnostic message deletes the message and activates the inputs. Undervoltage at UM Supply voltage UM is measured. If UM < 17 V, a diagnostic message is generated. GFK-2730 Chapter 9 Errors: Messages and removal 9-5 9 9.4 Table 9-4 Parameterization errors Parameterization errors Error cause Error code (hex) LED Remark Effect Remedy Incorrect parameterization See Table 9-5 FS (flashing ) Each input and clock output is parameterized individually Module is in the safe state Check and correct parameterization. Acknowledgment – In order to determine what type of parameterization error has occurred, use the corresponding software to access the safe controller (PROFIsafe) or the standard control system (VersaSafe) online and read the error. Table 9-5 Parameterization errors Error code (hex) 784: IN0_Ch1 : 787: IN3_Ch1; 791: IN0_Ch2 : 794: IN3_Ch2 032x x = 0 ... 3: IN0_Ch1 ... IN3_Ch1; x = 7 ... A: IN0_Ch2 ... IN3_Ch2 800: IN0_Ch1 : 803: IN3_Ch1; 807: IN0_Ch2 : 810: IN3_Ch2 033x x = 0 ... 3: IN0_Ch1&2 ... IN3_Ch1&2 816: IN0_Ch1&2 : 819: IN3_Ch1&2 034x x = 0 ... 3: IN0_Ch1&2 ... IN3_Ch1&2 Remedy The filter time setting for the input is outside the permissible range. Correct value and resend parameter data to the module. The clock assignment for the input is outside the permissible range. Correct value and resend parameter data to the module. (dec) 031x x = 0 ... 3: IN0_Ch1 ... IN3_Ch1; x = 7 ... A: IN0_Ch2 ... IN3_Ch2 Short description 832: IN0_Ch1&2 : 835: IN3_Ch1&2 The parameterization of two related Correct values and resend parameter inputs does not correspond to the two- data to the module. channel setting. The setting for the symmetry monitoring of related inputs is not the same. Inputs that are parameterized for twochannel operation must have the same symmetry settings. Correct values and resend parameter data to the module. 035x x = 0 ... 3: IN0_Ch1 ... IN3_Ch1; x = 7 ... A: IN0_Ch2 ... IN3_Ch2 9-6 848: IN0_Ch1 : 851: IN3_Ch1; 855: IN0_Ch2 : 858: IN3_Ch2 The value for symmetry monitoring is outside the permissible range. User manual IC220SDL543 - September 2011 Correct value and resend parameter data to the module. GFK-2730 9 Table 9-5 Parameterization errors [...] Error code (hex) 036x x = 0 ... 3: IN0_Ch1 ... IN3_Ch1; x = 7 ... A: IN0_Ch2 ... IN3_Ch2 864: IN0_Ch1 : 867: IN3_Ch1; 871: IN0_Ch2 : 874: IN3_Ch2 037x x = 0 ... 3: IN0_Ch1 ... IN3_Ch1; x = 7 ... A: IN0_Ch2 ... IN3_Ch2 880: IN0_Ch1 : 883: IN3_Ch1; 887: IN0_Ch2 : 890: IN3_Ch2 038x x = 0 ... 3: IN0_Ch1 ... IN3_Ch1; x = 7 ... A: IN0_Ch2 ... IN3_Ch2 896: IN0_Ch1 : 899: IN3_Ch1; 903: IN0_Ch2 : 906: IN3_Ch2 039x x = 0 ... 3: IN0_Ch1 ... IN3_Ch1; x = 7 ... A: IN0_Ch2 ... IN3_Ch2 912: IN0_Ch1 : 915: IN3_Ch1; 919: IN0_Ch2 : 922: IN3_Ch2 03Ax x = 0 ... 3: IN0_Ch1&2 ... IN3_Ch1&2 928: IN0_Ch1&2 : 931: IN3_Ch1&2 03Cx x = 0 ... 3: IN0_Ch1&2 ... IN3_Ch1&2 960: IN0_Ch1&2 : 963: IN3_Ch1&2 03Ex x = 0: Clock output UT1; x = 7: Clock output UT2 GFK-2730 Short description Remedy Intelligent sensor has been connected to an input parameterized for singlechannel operation. Connect intelligent sensor to an input parameterized for two-channel operation and parameterize inputs accordingly. (dec) 992: Clock output UT1; 999: Clock output UT2 Correct values and resend parameter data to the module. Even though the input was parameterized for intelligent sensors, bouncing time monitoring was activated. The bouncing time monitoring function can only be activated for operation with standard sensors. Even though the input was parameterized for intelligent sensors, symmetry monitoring was activated for the input. The symmetry monitoring function can only be activated for operation with standard sensors. Even though the input was parameterized for intelligent sensors, non-equivalent signal processing was activated for the input. Non-equivalent processing of twochannel inputs may only be activated for operation with standard sensors. The settings for the input signal for the indicated input and the related input differ. Assign the same setting for the input signal for related inputs and resend parameter data to the module. The filter time of inputs parameterized for two-channel operation differs. Assign the same setting for the filter time for related inputs and resend parameter data to the module. The setting for the clock output is outside the permissible range. The clock output parameters are invalid or do not correspond to the set sensor type. Correct value and resend parameter data to the module. Correct value and resend parameter data to the module. Correct value and resend parameter data to the module. Correct value and resend parameter data to the module. Chapter 9 Errors: Messages and removal 9-7 9 Table 9-6 9.5 General errors LED Remark General errors Error cause Error code (hex) Device temperature at critical value 01F2 Error due to receipt of an unexpected message 01F3 Error due to receipt of an unexpected message while acknowledging a diagnostic message. The device firmware handles this diagnostic message with the highest priority. Only when this message has been acknowledged correctly are other errors indicated (if present). Hardware fault Acknowledgment: Yes (1) FS ON Error in the logic area Effect Remedy Acknowledgment Immediate shutdown. Further temperature increase causes the module to switch to the safe state. Check and adapt: – Ambient conditions – Derating – Switching frequency Yes (1) The acknowledgment process, during which an unexpected message was received, is aborted. The corresponding error remains in the error memory. Diagnostic message 01F3 is indicated. Check and adapt the assignment of the diagnostic and confirmation variables at the corresponding function block (see documentation for the controller used). Yes (1) Module is in the safe state Replacement Acknowledge diagnostic message 01F3 so that the next message from the error memory can be indicated. Acknowledging the diagnostic message deletes the message. 9.6 PROFIsafe errors In addition to the module errors specified, the following errors can occur: – PROFIsafe system errors: These messages can be found in Section "Diagnostic messages for parameter errors" on page B-3. – PROFIBUS or PROFINET system errors: For information about these errors, please refer to the documentation for the system used. 9-8 User manual IC220SDL543 - September 2011 GFK-2730 9 9.7 9.7.1 Acknowledging an error Acknowledging an error for VersaSafe An IC220SDL543 error is acknowledged completely via the configurable safety module. For instructions on error acknowledgment, please refer to the documentation for the configurable safety module used. 9.7.2 – – Acknowledging an error for PROFIsafe Remove the cause of the error. Then acknowledge the diagnostic message. For instructions on error acknowledgment, please refer to the documentation for the controller used. WARNING: Acknowledgment may result in a hazardous system state With the exception of a few special cases, the acknowledgment of an error immediately returns the safe input to the operating state. Before acknowledging an error you must therefore make sure that the acknowledgment will not cause the machine to switch to a dangerous state. When planning the machine or system, ensure that acknowledgment is only possible if the danger zone is visible. If in the event of failure the safety module is replaced, please proceed as described in Section 4, "Assembly, removal, and electrical installation" and Section 8.2, "Restart after replacing a safety module". GFK-2730 Chapter 9 Errors: Messages and removal 9-9 Th is pa ge lef tb lan ki nte nti on all y 9 9-10 User manual IC220SDL543 - September 2011 GFK-2730 10 10 Maintenance, repair, decommissioning, and disposal 10.1 Maintenance The device is designed in such a way that maintenance work is not required during the duration of use. However, depending on the application and connected I/O devices it may be necessary to test the function of the I/O devices and the safety chain at regular intervals. The duration of use of the module is 20 years. Repeat testing within this time is not required. Carry out maintenance of connected I/O devices (e.g., light grid) according to the relevant manufacturer specifications. 10.2 Repair Repair work may not be carried out on the safety module. In the event of an error, send the module to GE Intelligent Platforms. It is strictly prohibited to open the safety module. In order to prevent the manipulation of the module and to detect the unauthorized opening of the module, a security seal is applied to the module. This security seal is damaged in the event of unauthorized opening. In this case, the correct operation of the safety module can no longer be ensured. 10.3 Decommissioning and disposal The machine or system manufacturer specifies the procedure for decommissioning. Decommissioning may only take place according to these specified procedures. GFK-2730 Chapter 10 Maintenance, repair, decommissioning, and disposal 10-1 Th is pa ge lef tb lan ki nte nti on all y 10 10-2 User manual IC220SDL543 - September 2011 GFK-2730 11 11 Technical data and ordering data 11.1 11.1.1 System data VersaSafe For the system data for your system, please refer to the corresponding documentation for the controller used. 11.1.2 PROFIsafe PROFIsafe PROFIsafe profile 2.4 For the system data for your system, please refer to the corresponding documentation for the controller used. 11.2 IC220SDL543 General data Housing dimensions (width x height x depth) 48.8 mm x 120 mm x 71.5 mm Weight (with connectors) 200 g Operating mode VersaSafe Process data mode with 4 words PROFIsafe Process data mode with 4 words and 1 word PCP (internal use) Transmission speed 500 kbaud or 2 Mbaud Ambient temperature Operation -25°C to +55°C Storage/transport -25°C to +70°C Humidity Operation 75% on average, 85% occasionally (no condensation) In the range from -25°C to +55°C appropriate measures against increased humidity must be taken. Storage/transport: 75% on average; 85% occasionally (no condensation) For a short period, slight condensation may appear on the outside of the housing. Air pressure Operation 80 kPa to 108 kPa (up to 2000 m above sea level) Storage/transport: 66 kPa to 108 kPa (up to 3500 m above sea level) GFK-2730 Chapter 11 Technical data and ordering data 11-1 11 General data [...] Degree of protection IP20 Housing material Plastic PBT, self-extinguishing (V0) Air and creepage distances According to IEC 60664-1 Protection class III (PELV) Gases that may endanger functions according to DIN 40046-36, DIN 40046-37 Sulfur dioxide (SO2) Concentration 10 ±0.3 ppm Ambient conditions: – Temperature 25°C ±2 K – Humidity 75% ±5% – Test duration 10 days Hydrogen sulfide (H2S) Concentration 1 ±0.3 ppm Ambient conditions: – Temperature 25°C ±2 K – Humidity 75% ±5% – Test duration 4 days Resistance of the housing material to termites Resistant Resistance of the housing material to fungal decay Resistant Ambient compatibility Not resistant to chloroform Connection data for VersaPoint connectors Connection method Spring-cage terminals Conductor cross section 0.2 mm2 to 1.5 mm2 (solid or stranded), 24 - 16 AWG Mechanical requirements Vibration according to IEC 60068-2-6 Operation: 2g, Criterion A Shock according to IEC 60068-2-27 15g over 11 ms, Criterion A Safety characteristics according to IEC 61508/EN 61508 Achievable SIL SIL 2 (single-channel) SIL 3 (two-channel) Depends on the parameterization and wiring (see "Connection options for sensors depending on the parameterization" on page 2-7 and "Connection examples for safe inputs" on page 7-1) Probability of a dangerous failure on demand by the safety function (PFD) SIL 2: 1% of 10-2, maximum (corresponds to 1 x 10⁻⁴) SIL 3: 1% of 10-3, maximum (corresponds to 1 x 10⁻⁵) Probability of a dangerous failure per hour for the entire module (PFH) SIL 2: 1% of 10-6, maximum (corresponds to 1 x 10⁻⁸) SIL 3: 1% of 10-7, maximum (corresponds to 1 x 10⁻⁹) Depends on the parameterization (see Table 7-4 on page 7-3) Hardware fault tolerance (HFT) of the module 1 Permissible duration of use 20 years Safety characteristics according to DIN EN 62061 Achievable SIL claim limit SIL CL = SIL 2 (single-channel) SIL CL = SIL 3 (two-channel) Depends on the parameterization and wiring (see "Connection options for sensors depending on the parameterization" on page 2-7 and "Connection examples for safe inputs" on page 7-1) Safe failure fraction (SFF) 99% 11-2 User manual IC220SDL543 - September 2011 GFK-2730 11 Safety characteristics according to DIN EN 62061 Probability of a dangerous failure per hour for the entire module (PFH) SIL 2: 1% of 10-6, maximum (corresponds to 1 x 10⁻⁸) SIL 3: 1% of 10-7, maximum (corresponds to 1 x 10⁻⁹) Depends on the parameterization (see Table 7-4 on page 7-3) Hardware fault tolerance (HFT) of the module 1 Permissible duration of use 20 years Safety characteristics according to EN ISO 13849-1 Achievable performance level PL e (two-channel) PL d (single-channel) Depends on the parameterization and wiring (see "Connection options for sensors depending on the parameterization" on page 2-7 and "Connection examples for safe inputs" on page 7-1) Diagnostic coverage (DC) 99% Mean time to dangerous failure (MTTFd) For single-channel assignment: 76 years For two-channel assignment: 100 years Supply voltage UL (logic) The safety terminal is supplied with communications power via the bus coupler or a designated power terminal in the station. The communications power is led in the VersaPoint station via potential routing. For the technical data, please refer to the data sheet for the bus coupler or power terminal used. Current consumption GFK-2730 180 mA, maximum Chapter 11 Technical data and ordering data 11-3 11 Supply voltage UM (sensors, clock outputs) The safety terminal is supplied with main voltage UM via the bus coupler or a power terminal in the station. The main voltage is led in the VersaPoint station via potential routing. For the technical data, please refer to the data sheet for the bus coupler or power terminal used. WARNING: Loss of the safety function when using unsuitable power supplies Only use power supplies according to EN 50178/VDE 0160 (PELV). Nominal voltage 24 V DC according to EN 61131-2 and EN 60204 Tolerance -15%/+20% including an entire AC voltage component with peak value of 5% Ripple 3.6 VPP Permissible voltage range 19.2 V DC to 30.0 V DC, ripple included Current consumption 25 mA, typical (plus current consumption of the inputs when supplied through the clock outputs plus current consumption of the connected initiators when supplied through the clock outputs) Permissible interruption time 10 ms (output voltage of the clock outputs can fail) Surge protection Yes (in the bus coupler/power terminal) Protection against polarity reversal Yes (in the bus coupler/power terminal) NOTE: Module damage due to polarity reversal Polarity reversal places a burden on the electronics and, despite protection against polarity reversal, can damage the module. Therefore, polarity reversal must be prevented. Undervoltage detection Yes, at 17 V, approximately Diagnostic indicators Green UM LED (see "Local diagnostic and status indicators" on page 2-8) External fuse 8 A slow-blow, maximum NOTE: Module damage in the event of overload The power supply unit must be able to supply four times (400%) the nominal current of the external fuse. . Safe digital inputs Number 4 two-channel or 8 single-channel Input design According to the requirements of EN 61131-2 Type 3 Supply Via clock outputs UT1 and UT2 or external supply Input current Approximately 4.2 mA at 24 V, typical Maximum permissible current for "0" 2 mA Minimum permissible current for "1" 3.1 mA Permissible input voltage range -3 V to +30 V Voltage range for "0" -3 V to +5 V Voltage range for "1" 11 V to 30 V Maximum switching frequency 10 Hz Filter time tFilter Can be parameterized; see "Parameterization of the safe inputs" on page 5-3 Minimum filter time 1.5 ms, accuracy +0 ms, -0.5 ms 11-4 User manual IC220SDL543 - September 2011 GFK-2730 11 Safe digital inputs [...] Processing time of the input tIN = tFilter + tFW (see "Processing time of the input tIN in the event of a safety demand" on page 5-7) Simultaneity 100% Symmetry evaluation Yes, can be parameterized, accuracy ±25% Derating No Permissible cable lengths 200 m from the clock output to the safe input (total based on forward and return path) Status indicators One green LED per input (see "Local diagnostic and status indicators" on page 2-8) The switching state of the inputs is constantly monitored. In the event of an error, e.g., if a component fails, the error is indicated at the safe controller (PROFIsafe) or a configurable safety module (VersaSafe). . Clock outputs Number 2 Supply From UM Maximum switching current 0.4 A short-circuit and overload protection Saturation voltage UM -1 V Simultaneity 100% Derating No Permissible cable lengths The total length of the connected cables must not exceed 200 m per clock output Status indicators None Diagnostic indicators One red LED for each (UT1, UT2) (see "Local diagnostic and status indicators" on page 2-8) Power dissipation If UM = 24 V, no input is set, without load at clock outputs UT1 and UT2 1560 mW If UM = 24 V, 8 inputs are set, load at clock outputs UT1 and UT2 is 100 mA each 2330 mW Electrical isolation/isolation of the voltage areas To provide electrical isolation between the logic level and the I/O area, it is necessary to supply the bus coupler and this safety module from separate power supply units. Interconnection of the power supply units in the 24 V area is not permitted (see also user manual). Separate potentials in the system comprising bus coupler/power terminal and safety module - Test distance - Test voltage 5 V supply incoming remote bus/7.5 V supply (bus logic) 500 V AC, 50 Hz, 1 min. 5 V supply outgoing remote bus/7.5 V supply (bus logic) 500 V AC, 50 Hz, 1 min. 7.5 V supply (bus logic)/24 V supply UM, FE 500 V AC, 50 Hz, 1 min. The isolating distance between UM and FE is covered by a varistor. GFK-2730 Chapter 11 Technical data and ordering data 11-5 11 Approvals For the latest approvals, please visit http://support.ge-ip.com. 11.3 Conformance with EMC Directive Conformance with EMC Directive 2004/108/EC Noise immunity test according to DIN EN 61000-6-2 Electrostatic discharge (ESD) EN 61000-4-2 (IEC 61000-4-2) Criterion B Electromagnetic fields EN 61000-4-3 (IEC 61000-4-3) Criterion A, field strength 10 V/m Fast transients (burst) EN 61000-4-4 (IEC 61000-4-4) Criterion B, test voltage 2 kV Surge voltage EN 61000-4-5 (IEC 61000-4-5) Test intensity 2, Criterion B 6 kV contact discharge, 8 kV air discharge DC supply lines: 0.5 kV/0.5 kV (symmetrical/asymmetrical) Signal lines: 1.0 kV/2.0 kV (symmetrical/asymmetrical) Conducted interference EN 61000-4-6 (IEC 61000-4-6) Criterion A, test voltage 10 V Noise emission test according to DIN EN 61000-6-4 Noise emission EN 55011 11.4 11.4.1 Class A, industrial applications Ordering data Ordering data: Safety module Description Catalog No. Pcs./Pkt. VersaPoint module with safe digital inputs IC220SDL543 1 11.4.2 Ordering data: Accessories Description Catalog No. Pcs./Pkt. Connector set, consisting of four VersaPoint connectors with integrated discharge electronics IC220SCO543 1 set 11-6 User manual IC220SDL543 - September 2011 GFK-2730 11 11.4.3 Ordering data: Documentation Description Catalog No. Pcs./Pkt. GFK-2736 – GFK-2731 – VersaPoint "Automation terminals of the VersaPoint product range" user manual VersaSafe "VersaPoint module with integrated safety logic and safe digital outputs" user manual PROFIsafe "PROFIsafe - Profile for Safety Technology on PROFIBUS DP and PROFINET IO, Version 2.4, February 2007" specification See http://www.profisafe.net Make sure you always use the latest documentation. It can be downloaded at http://support.ge-ip.com. Documentation for PROFIsafe, PROFIBUS, and PROFINET is available on the Internet at www.profibus.com/pall/meta/downloads. GFK-2730 Chapter 11 Technical data and ordering data 11-7 Th is pa ge lef tb lan ki nte nti on all y 11 11-8 User manual IC220SDL543 - September 2011 GFK-2730 A Appendix: PROFIsafe terms used in the manual Some of the terms that are used in connection with PROFIsafe in this manual are described below. A definition of PROFIsafe terms is also provided in the PROFIsafe profile. Consecutive number Consecutive number Method for ensuring that the safe data is transmitted completely and in the correct order. CRC Cyclic Redundancy Check A cyclic redundancy check is used to verify the validity of the process data contained in the safety telegram, check whether the assigned address relationships are correct, and verify the safety-related parameters. This value is part of the safety telegram. F_Destination_Address F-Parameter; PROFIsafe destination address; address of the safe device (see also "F-Parameter") F_Source_Address F-Parameter; PROFIsafe source address; address of the safe controller (see also "F-Parameter") F-CPU Failsafe control system, safe controller F-I/O device Failsafe I/O device; safe input and/or output modules Modules with integrated safety functions, which are approved for safety-related operation. F-Parameter (According to PROFIsafe system description, Version 09, November 2007) F-Parameters contain information for adapting the PROFIsafe layer to specific customer specifications and for checking the parameterization by means of a separate method (diverse). The main F-Parameters are: F_S/D_Address (F-Address for short) A unique address for F-Devices within a PROFIsafe island. The technology part of the F-Device compares the value with the address switch locally or with an assigned F-Address in order to check the authenticity of the connection. F_WD_Time Specifies the millisecond value for the watchdog timer. The timer monitors the time that elapses until the next valid PROFIsafe message is received. F_SIL Indicates the SIL that the user can expect from the relevant FDevice. It is compared with the manufacturer's specification that is stored locally. F_iPar_CRC A checksum that is calculated from all iParameters of the technology-specific part of the F-Device. F_Par_CRC A CRC signature, which is created via all F-Parameters and ensures error-free transmission of the F-Parameters. F-Slave Failsafe slave GFK-2730 Chapter A Appendix: PROFIsafe terms used in the manual A-1 A F-System Failsafe system A failsafe system is a system that remains in the safe state or immediately enters a safe state when specific failures occur. iParameter Individual safety parameter of a device Passivation If the safety module (F-I/O device) detects an error, it switches the affected channel or all channels of the module to the safe state; the channels are then passivated. The detected errors are indicated at the safe controller. For a safe input module when the F-System is passivated, instead of the process values present at the safe inputs, substitute values (0) are provided for the safety program. For a safe output module when the F-System is passivated, instead of the output values provided by the safety program, substitute values (0) are transferred to the safe outputs. PROFIsafe Safety-related bus profile based on PROFIBUS DP or PROFINET. It defines the communication between a safety program and the safe I/O device (F-I/O device) in a safe system (F-System). PROFIsafe address Each safe module has a PROFIsafe address. This address must be set on the safety module (F-I/O device) via DIP switches and then configured in the configuration tool for the safe controller used. PROFIsafe monitoring time Monitoring time for safety-related communication between the safe controller (F-CPU) and safe I/O device (F-I/O device). This time is parameterized in the F_WD_Time F-Parameter. A-2 User manual IC220SDL543 - September 2011 GFK-2730 B Appendix: F-Parameters and iParameters B1 F-Parameters The values indicated in italics in Table B-1 are preset by the system and cannot be modified manually. Table B-1 Overview of the F-Parameters for the module F-Parameter Default value Description F_Source_ Address Automatic The parameter uniquely identifies the PROFIsafe source address (controller address). The address is assigned automatically. F_Destination_ Address Automatic PROFIsafe destination address (address of the safe device). The address is assigned automatically. However, the value can be modified. Make sure that the value set under F_Destination_Address and the value that you have set via the 10-pos. DIP switch are the same. Value range: 1 ... 1022 F_WD_Time 150 Monitoring time in the safety module. A valid current safety telegram must arrive from the safe controller within the monitoring time. Otherwise, the safety module enters the safe state. The selected monitoring time must be sufficiently high for telegram delays to be tolerated by the communication, but still ensure a sufficiently fast error response in the event of an error (e.g., interruption in communication). Value range: 1 ... 65534, in 1 ms increments Unit: ms F_SIL SIL 3 Safety integrity (SIL according to IEC 61508) of the safety module WARNING: Safety functions up to SIL 3 can be achieved with the safety module. The safety integrity level that can actually be achieved depends on the parameterization, the structure of the sensor, and the cable installation (see "Connection examples for safe inputs" on page 7-1). F_CRC_Length GFK-2730 3-byte CRC This parameter transmits the length of the CRC2 code to be expected in the safety telegram to the safe controller. Chapter B Appendix: F-Parameters and iParameters B-1 B Table B-1 Overview of the F-Parameters for the module F-Parameter Default value Description F_Block_ID 1 Parameter block type identification 1: The parameter block of the F-Parameters contains the F_iPar_CRC parameter. F_Par_Version 1 Version number of the F-Parameter block. 1: Valid for V2 mode F_iPar_CRC 0 CRC checksum via the iParameters The value must be greater than 0. When verifying the safety function, check whether the F_iPar_CRC parameter is greater than 0 for all devices. If not, check the iParameters and the CRC checksum in the iParameter and F-Parameter. B2 iParameters The iParameters are individual device parameters. These include: – Device parameters (see "Parameterization of the safe inputs" and "Parameterization of clock outputs UT1 and UT2") – PST_Device_ID (10hex for IC220SDL543) – F_Destination_Address (not included in the checksum calculation) iPar_CRC The device parameters are verified with a checksum: iPar_CRC. F_Destination_Address This address is the PROFIsafe address of the module. Make sure that it matches the switch position of the 10-pos. DIP switch. B-2 User manual IC220SDL543 - September 2011 GFK-2730 B B3 B 3.1 Table B-2 Error code Diagnostic messages for parameter errors Diagnostic messages for F-Parameters and iParameters for PROFIsafe F-Parameter parameter errors Error cause Remedy dec hex 64 40 The parameterized F_Destination_Address does not match the PROFIsafe address set on the safety module (F-Module). Make sure that the PROFIsafe address of the safety module and the value in F_Destination_Address are the same. 65 41 Invalid parameterization of F_Destination_Address. Addresses 0000hex and FFFFhex are not permitted. Correct value. 66 42 Invalid parameterization of F_Source_Address. Addresses 0000hex and FFFFhex are not permitted. Correct value. 67 43 Invalid parameterization of F_WD_Time. A monitoring time of 0 ms is not permitted. Correct value. 68 44 Invalid parameterization of F_SIL. The safety module (F-Module) cannot support the required SIL. Use a device with the required SIL. The safety module achieves SIL 3, maximum. 69 45 Invalid parameterization of F_CRC_Length. The CRC length generated by the safety module (F-Module) does not match the required length. Check device description. 70 46 Invalid F-Parameter record version. The safety module (F-Module) version does not match the required version. Check device description. Only V2 mode permitted. 71 47 The checksum determined by the safety module (F-Module) via the PROFIsafe parameters (CRC1) does not match the CRC1 transmitted in the parameter telegram. Check F-Parameters, repeat calculation. 255 FF During active process data communication, a new F-Parameter block was received, which differs from the F-Parameter block currently used. Only send modified parameter data when process data communication is not active. Incorrect type ID for the F-Parameter block (F_Block_ID). Check device description. GFK-2730 Chapter B Diagnostic messages for parameter errors B-3 B Table B-3 iParameter parameter errors Error code (hex) Error cause Remedy 03F2 iPar_CRC is incorrect Check iParameters, repeat calculation. 03FA iPar_CRC is not equal to F_iPar_CRC Apply correct value. 03FB PST_Device_ID is incorrect Correct value (10hex for IC220SDL543). 03FC F_Destination_Address in the iParameters is incorrect Correct value. Make sure that the value set under F_Destination_Address and the value that you have set via the 10-pos. DIP switch are the same. 03FD Incorrect order of iParameter blocks B 3.2 Table B-4 VersaSafe error code dec hex 1088 440 1089 ... 1094 441 ... 446 1095 447 B-4 Check infrastructure components. Diagnostic messages for parameter errors for VersaSafe Parameter errors Error cause Remedy VersaSafe: The parameterized VersaSafe address does not match the address set on the safety module. Make sure that the addresses are the same. Internal errors Please contact GE Intelligent Platforms. The configurable safety module detected a distortion in the configuration and parameter data record. Attempt transmission again. If the error occurs permanently, the data record in the controller is distorted. In this case, you can get VersaConf Safety to generate a new data record. User manual IC220SDL543 - September 2011 GFK-2730 C Appendix: Checklists The checklists listed in this section provide support during the planning, assembly and electrical installation, startup, parameterization, and validation of the IC220SDL543 module. These checklists may be used as planning documentation and/or as verification to ensure the steps in the specified phases are carried out carefully. Archive the completed checklists to use as reference for recurring tests. The checklists do not replace the validation, initial startup, and regular testing performed by qualified personnel. The following section of a checklist shows an example of a completed checklist. Checklist . . . Device type/equipment identification IC220SDL543/BK20NA10 Version: HW/FW 00/200 Date January 1, 2008 Test engineer 1 John Smith Test engineer 2 Jane Brown Remark System XXX has been checked for engine hood production No. Requirement (mandatory) Yes Remark X ... No. Requirement (optional) Y Yes No Remark ... Key: Equipment identification Enter the device type and/or the equipment identification for the relevant device. Version: HW/FW Enter the hardware and firmware version of the device (see "Structure of the safety module" on page 2-2). Date Enter the date on which you began to fill in this checklist. Test engineer 1/2 Enter the names of the test engineers. Remark Enter a remark, if necessary. Requirement (mandatory) These requirements must be met for a safety application, in order to complete the relevant phase using the checklist. Requirement (optional) These requirements are optional. For points that are not met, please enter an appropriate remark in the relevant field. GFK-2730 Chapter C Appendix: Checklists C-1 C C1 Planning Checklist for planning the use of the safety module Device type/equipment identification Version: HW/FW Date Test engineer 1 Test engineer 2 Remark No. Requirement (mandatory) 1 Has the current module user manual been used as the basis for planning? 2 Are the sensors approved for connection to the module (according to the technical data and parameterization options)? 3 Has the voltage supply been planned according to the specifications for the protective extra-low voltage in accordance with PELV? 4 Is external fuse protection of the module planned (according to the specifications in this user manual for supply voltage UM)? 5 Are measures planned to prevent simple manipulation? Yes Remark Revision: 6 Are measures planned to prevent connectors being mixed up? 7 Are requirements for the sensors and cable installation observed according to the SIL/SIL CL/Cat./PL to be achieved and is the corresponding implementation planned? 8 Are the specifications for the parameterization for each channel specified? 9 Has it been ensured that any person intentionally starting hazardous movements has a direct view of the danger zone? 10 Does the planned use correspond to the intended use? 11 Are the ambient conditions observed according to the technical data? 12 Have test intervals been defined? No. Requirement (optional) 13 Have the accessories to be used been planned according to the ordering data in this user manual (cables, connectors)? 14 Have specifications for assembly and electrical installation been defined (e.g., EPLAN) and communicated to the relevant personnel? 15 Have specifications for startup been defined and communicated to the relevant personnel? C-2 Yes No Remark Date Signature (test engineer 1) Date Signature (test engineer 2) User manual IC220SDL543 - September 2011 GFK-2730 C C2 Assembly and electrical installation Checklist for assembly and electrical installation of the safety module Device type/equipment identification Version: HW/FW Date Test engineer 1 Test engineer 2 Remark No. Requirement (mandatory) 1 Was assembly completed according to the specifications (specifications from the planning phase or according to the user manual)? 2 Was the safety module installed in the control cabinet (IP54)? 3 Yes Remark Do the cable cross sections correspond to the specifications? No. Requirement (optional) 4 Is the transmission speed and the operating mode set correctly according to the specifications? 5 Is the protocol/address set correctly according to the specifications? GFK-2730 Yes No Remark Date Signature (test engineer 1) Date Signature (test engineer 2) Chapter C Assembly and electrical installation C-3 C C3 Startup and parameterization Checklist for startup and parameterization of the safety module Device type/equipment identification Version: HW/FW Date Test engineer 1 Test engineer 2 Remark No. Requirement (mandatory) 1 Was startup completed according to the specifications (specifications from the planning phase or according to the user manual)? 2 During startup, is it ensured that any person starting hazardous movements intentionally can only do so with a direct view of the danger zone? 3 Are all parameters parameterized for the inputs? 4 5 For inputs that are parameterized for two-channel operation, are both channels parameterized correctly for each other? Is the assignment to the clock outputs parameterized for the inputs? 6 Are the clock outputs parameterized? Yes No. Requirement (optional) Yes 7 Are safety distances that must be observed calculated according to the response and delay times implemented? Date Date C-4 User manual IC220SDL543 - September 2011 Remark No Remark Signature (test engineer 1) Signature (test engineer 2) GFK-2730 C C4 Validation Checklist for validating the safety module Device type/equipment identification Version: HW/FW Date Test engineer 1 Test engineer 2 Remark No. Requirement (mandatory) 1 Have all the mandatory requirements for the "Planning" checklist been met? 2 Have all the mandatory requirements for the "Assembly and electrical installation" checklist been met? 3 Have all the mandatory requirements for the "Startup and parameterization" checklist been met? 4 Does the parameterization of the safe inputs and clock outputs correspond to the version and the actual connection of the controlling device? 5 Has the assignment of the sensors to the inputs and the variables of the safe application program been tested (also as online status in SafetyProg)? 6 Has a function test been performed to check all safety functions, in which the module is involved? 7 Have measures been taken to achieve a specific Cat.? Yes Remark 8 Do all cables correspond to the specifications? 9 Does the voltage supply correspond to the specifications for the protective extra-low voltage in accordance with PELV? 10 Is external fuse protection of the module implemented (according to the specifications in this user manual for supply voltage UM)? 11 Have measures been taken to prevent simple manipulation? 12 Have measures been taken to prevent connectors being mixed up? 13 Are the requirements for the sensors and cable installation observed according to the SIL/SIL CL/Cat./PL to be achieved? 14 Are the specifications for the parameterization for each channel implemented? 15 For PROFIsafe: Is the F_iPar_CRC parameter greater than 0 for all devices? 16 Has it been ensured that any person intentionally starting hazardous movements has a direct view of the danger zone? GFK-2730 Chapter C Validation Date Signature (test engineer 1) Date Signature (test engineer 2) C-5 C C-6 User manual IC220SDL543 - September 2011 GFK-2730 D Index A F Abbreviations ............................................................. 1-7 Assembly ................................................................... 4-4 Assignment ................................................................ 5-4 F-CPU....................................................................... A-1 F-I/O device .............................................................. A-1 Filter time ................................................................... 5-4 Firmware runtime....................................................... 5-7 F-Parameter.............................................................. A-1 F-System .................................................................. A-2 B Bouncing time ............................................................ 5-5 Bouncing time monitoring (bounce time monitoring) . 5-5 C Housing dimensions .................................................. 2-3 Clock outputs, parameterization ................................ 5-7 Clock selection (pulse selection) ............................... 5-5 Clocking ..................................................................... 2-8 Conformance with EMC Directive ............................ 11-6 Consecutive number................................................. A-2 CRC .......................................................................... A-1 Current carrying capacity................................... 3-1, 3-2 D Decommissioning .................................................... 10-1 Device errors Inputs ................................................................. 2-11 Serious errors..................................................... 2-11 Diagnostic indicators.................................................. 2-8 Directives ................................................................... 1-5 Disposal ................................................................... 10-1 Documentation, latest ................................................ 1-6 E Error code .................................................................. Error location ............................................................. Errors Acknowledgment.................................................. General ................................................................ Inputs ................................................................... Parameterization .................................................. Removal ............................................................... Supply voltage...................................................... Evaluation .................................................................. H 9-2 9-2 I ID code .................................................................... 2-13 Indicators, diagnostic and status ............................... 2-8 Input address area................................................... 2-13 Input signal ................................................................ 5-5 Inputs ......................................................................... 2-4 Device errors...................................................... 2-11 Equivalent ............................................................ 2-7 I/O errors............................................................ 2-10 Non-equivalent..................................................... 2-7 Parameterization.................................................. 5-3 Requirements for sensors.................................... 2-5 Single-channel ..................................................... 2-7 Two-channel ........................................................ 2-7 Installation Instructions........................................................... 4-1 Insulation rating ......................................................... 1-3 iParameter ................................................................ A-2 L Length code ............................................................. 2-13 9-9 9-8 9-3 9-6 9-1 9-5 5-4 M Maintenance ............................................................ 10-1 module ....................................................................... 2-8 Mounting Location ............................................................... 4-1 O Output address area ................................................ 2-13 GFK-2730 Chapter D D-1 D P T Package slip .............................................................. 4-1 Parameter channel .................................................. 2-13 Parameterization......................................... 5-1, 6-1, B-1 Clock outputs ....................................................... 5-7 Inputs ................................................................... 5-3 Passivation ............................................................... A-2 PELV.................................................................. 1-3, 3-1 Power supply unit ...................................................... 1-3 Processing time of the input ...................................... 5-7 PROFIsafe ................................................................ A-2 PROFIsafe address .................................... 5-1, 5-2, A-2 PROFIsafe monitoring time ...................................... A-2 tFilter.......................................................................... tFW ............................................................................ tIN .............................................................................. Transmission speed................................................... Setting.................................................................. 5-7 5-7 5-7 1-2 4-2 U Usage, correct ........................................................... 1-5 V Validation ................................................................... 8-3 Q Qualified personnel.................................................... 1-1 R Register length......................................................... 2-13 Removal..................................................................... 4-4 Repair ...................................................................... 10-1 Replacement, module................................................ 8-3 Restart ....................................................................... 8-3 S Safe state................................................................. 2-10 Inputs ....................................................... 2-10, 2-11 Operating state................................................... 2-10 Safety notes............................................................... 1-1 Security seal .............................................................. 1-2 Sensor type................................................................ 5-4 Sensors Connection options .............................................. 2-7 Requirements....................................................... 2-5 Standards .................................................................. 1-5 Start inhibit due to symmetry violation ....................... 5-4 Startup ....................................................................... 8-1 Status indicators ........................................................ 2-8 Supply voltage UM................................................................ 3-1, 3-2 Symmetry................................................................... 5-4 D-2 User manual IC220SDL543 - September 2011 GFK-2730