1
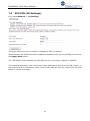
DataRoute voice Installation and User Manual Version 4 – October 2011 DataRoute voice User Manual Document Control Date Doc Version Change Dec 2010 1 1st release of document Dec 2010 2 Added VoIP options Jan 2011 3 Security Options Oct 2011 4 Additional features and options Notices Emergency Calls This terminal operates using mobile signals, which cannot guarantee connection in all conditions. Therefore, you should never rely solely on the terminal equipment for essential communications such as medical or emergency services. No responsibility is assumed by TFM for the use or reliability of the DataRoute voice when used in a situation or with other equipment not supplied or specified by TFM. TelecomFM shall accept no liability for any error or damages of any kind resulting from the use of this document or the equipment it relates to. The wording in this document may change from time to time. Please refer to the TelecomFM web site www.telecomfm.co.uk for the latest release. 2 DataRoute voice User Manual 1. Contents 1. Contents ..................................................................................................... 3 2. Overview .................................................................................................... 5 3. Specification ............................................................................................... 5 3.1 Indicators & Interfaces ................................................................................ 5 3.2 Package Contents ....................................................................................... 7 4. Getting Started ........................................................................................... 8 4.1 Hardware Connection .................................................................................. 8 4.2 Computer Configuration ............................................................................... 9 4.3 Log In ..................................................................................................... 10 5. Status ....................................................................................................... 11 6. Quick Setup .............................................................................................. 12 7. Network ................................................................................................... 19 7.1 3G Configuration (WAN Device/WAN Service) ................................................ 19 7.2 ADSL Configuration (WAN Service) .............................................................. 21 7.3 SIM PIN (3G Settings) ............................................................................... 24 7.4 Advanced ADSL Settings ............................................................................ 25 7.5 DMZ Host ................................................................................................ 25 7.6 Port Forwarding (Virtual Servers) ................................................................ 26 7.7 Advanced IP Routing (Static Route) ............................................................. 27 7.8 QoS Configuration ..................................................................................... 28 8. Application ............................................................................................... 30 8.1 UPnP Settings........................................................................................... 30 8.2 Dynamic DNS ........................................................................................... 30 8.3 VPN (IPSec VPN)....................................................................................... 31 8.4 VPN (PPTP Config)..................................................................................... 32 9. Wireless (WLAN) ...................................................................................... 33 9.1 WLAN Basic.............................................................................................. 33 9.2 WLAN Security ......................................................................................... 34 9.3 Advanced Settings .................................................................................... 34 3 DataRoute voice User Manual 9.4 WLAN MAC Filters ..................................................................................... 35 9.5 WLAN Bridge ............................................................................................ 36 10. LAN (DHCP) .............................................................................................. 37 11. Firewall .................................................................................................... 39 11.1 Firewall Settings .................................................................................... 39 11.2 IP Filters ............................................................................................... 39 11.3 Domain Filters ....................................................................................... 41 11.4 MAC Filters ............................................................................................ 42 11.5 Access Control (Remote Access) ............................................................... 43 12. Voice (VoIP) ............................................................................................. 44 12.1 Voice Configuration ................................................................................ 44 12.2 Basic Settings ........................................................................................ 44 12.3 Advanced Settings.................................................................................. 46 13. Tools ........................................................................................................ 48 13.1 Account Settings (Users) ......................................................................... 48 13.2 Time Settings ........................................................................................ 49 13.3 Backup Settings ..................................................................................... 50 13.4 Update (Restore) Settings ....................................................................... 50 13.5 Update Software .................................................................................... 51 13.6 Factory Settings ..................................................................................... 51 13.7 Reboot Router ....................................................................................... 51 13.8 TR-069 Client ........................................................................................ 52 13.9 Ping Reboot ........................................................................................... 53 13.10 3G Link Notice ....................................................................................... 53 14. Troubleshooting ....................................................................................... 54 14.1 Unable to Access Internet ........................................................................ 54 4 DataRoute voice User Manual 2. Overview The DataRoute voice is a high-speed gateway with functions including: Build-in wireless module with speed up to 7.2Mbps; ADSL2/2+ modem for broadband connection; Four 10/100M auto-sensing Ethernet ports for wired connections; Built-in 802.11n enhanced WLAN complies with IEEE 802.11n draft v2.0 and backward to 802.11b/g specifications. It supports 2x2 MIMO and up to 300Mbps of bandwidth. The throughput of WLAN to LAN is more than 100Mbps; Integrated FXS port for voice calls; Supports TR-069 remote management; 3. Specification 3.1 Indicators & Interfaces Front Panel Indicators: Power LAN 1 LAN 2 LAN 3 LAN 4 Internet ADSL Phone WiFi WPS Right Side Interfaces: Power LAN 1 LAN 2 3G Reset WPS LAN 3 Left Side Interfaces: SIM 5 LAN 4 Phone ADSL 3G DataRoute voice User Manual Item Label Description Solid green: DataRoute Power on Power Solid red: Firmware update in progress Off: DataRoute Power off On: Ethernet is connected LAN1-4 Blinking green: Ethernet Traffic flows Off: Ethernet is disconnected Blinking green: PPP/DHCP negotiation Internet Solid green: PPP/DHCP up Quick blinking green: Tx/Rx traffic on line On: Modem synchronized to the DSLAM ADSL Quick blinking green: Modem training, but not synchronized Slow blinking green: Modem Idle Indicators Phone On: The analogue phone connected to Phone port off-hook Off: The analogue phone connected to Phone port on-hook On: Wi-Fi connection is available Wi-Fi Blinking green: Negotiation or traffic on line Off: Wi-Fi connection is not available On: WPS connection setup successfully WPS Blinking: WPS connection has been activated Off: WPS connection is not activated Blinking green: Negotiation or traffic on line Solid green: Up 3G Quick blinking green: Tx/Rx traffic on line Solid red: Authentication failed Off: Traffic through DSL interface Power switch Right Side Left Side Power For 12V DC power adapter LAN1-4 LAN interface for connecting to computers Phone Connection for analogue telephones ADSL Connection for ADSL enabled telephone line 3G Manually connect/disconnect 3G data WPS Start Wi-Fi Protected Setup Reset Restore to factory default settings 6 DataRoute voice User Manual 3.2 Package Contents Item Quantity Power Adapter 1 Phone Line 2 RJ-45 Cable 1 DataRoute Voice 1 User Manual 1 ADSL Splitter 1 7 DataRoute voice User Manual 4. Getting Started 4.1 Hardware Connection Power Wi-F LAN 1 LAN 2 LAN 3 LAN 4 Phone ADSL i Analog Phone PC Modem LapTop Splitter LINE DSL Line Phone RJ11 Cable RJ45 Cable Analog Phone 1. Use a telephone cord to connect the LINE port of the splitter with the phone socket on the wall (only if using ADSL). 2. Use another telephone cord to connect the MODEM port of the splitter with the ADSL port of the DataRoute voice (only if using ADSL). 3. Connect Ethernet port of the DataRoute voice with 10/100BASE-T port of the computer using the network cable that comes with the unit. 4. Plug in the power cord, and turn on the power. 8 DataRoute voice User Manual 4.2 Computer Configuration The default IP address for DataRoute voice is: 192.168.1.1 The Subnet Mask is:255.255.255.0 Devices can be connected via one of the Ethernet ports or via Wi-Fi. The default Wi-Fi settings are: Wireless SSID: DATAROUTE Wireless Key: data1234 Users can configure the DataRoute voice through a web browser. The DataRoute voice can be used as a gateway, DNS server and DHCP server; by default the DataRoute voice will automatically assign an IP address to any devices connecting to it, alternatively users can set the computer’s TCP/IP settings manually as follows: 1. Set the computer IP address to the same subnet as the DataRoute voice i.e. set the IP address of the PC to one in the range of 192.168.1.2 - 192.168.1.254” excluding 192.168.1.1. 2. Set the computer’s gateway address to the IP address of the DataRoute voice. 3. Set the computer’s Primary DNS server to the IP address of the DataRoute voice or to that of an effective DNS server. 9 DataRoute voice User Manual 4.3 Log In Start the web browser and enter the following in the address bar: http://192.168.1.1 The authentication interface will pop up as below: The default user name and password is admin for web log-on. Press ENTER or click on ‘OK’ to enter the configuration interface. Warning: Please be sure the IP of the computer network card is in the same IP range as the DataRoute voice LAN port before trying to log on (ex: 192.168.1.2 and 192.168.1.1 are in the same IP range). If the login is not displayed please check in Internet Explorer--Tools---Internet Options---Connection---LAN Setup---Proxy server, disable the function ‘Proxy for LAN’ and then retry. If log on successful, the status page will be displayed as follows: 10 DataRoute voice User Manual 5. Status Click on the Status menu in the web interface The following status information is available by clicking the links on the left of the webpage: Basic Info Includes hardware and software versions, system time info and basic IP information. Network Status Includes basic 3G status (SIM card details, network and signal strength) and basic ADSL status. WAN Info Lists the configured WAN (3G and ADSL) interfaces and shows type, connection status and basic IP information. WLAN Status Includes basic Wireless information and a list of clients connected wirelessly. Connected Devices Shows a full list of connected clients, both wired and wireless. Routing Table Displays the current IP routing table Statistics Displays a list of configured WAN (3G and ADSL) interfaces and shows the amount of traffic sent and received on each interface. VoIP Status Shows the current registration status of a configured VoIP provider. 11 DataRoute voice User Manual 6. Quick Setup Click on the Quick menu in the web interface. This will show a quick setup wizard that allows the user to configure the most commonly used options: Step 1: Access Account This sets the username and password to access the web interface. The default username to access the DataRoute voice is admin. The default password is admin. To change the password: 1. Select admin from the Username drop-down box 2. Enter the password admin in the Old Password box 3. Enter a new password in both the New Password and Confirm Password boxes 4. Click the Next button 5. Login with the new password 6. Click on the Quick menu to continue the wizard To continue to the next step without changing the password click the Skip button. 12 DataRoute voice User Manual Step 2: Time Settings From this page the current time can be set manually or the DataRoute voice can be set to obtain the correct time from an internet time server. Note: it is recommended that an internet time server is used when available – if the time is set manually it will be lost in the event of a power cut or if the unit is restarted. To set 1. 2. 3. 4. the time manually: Select Manual Setting Enter the current time Select the correct Time Zone Click Next To use an internet time server: 1. Select Time Server 2. Enter the time server domain name e.g time.nist.gov or pool.ntp.org 3. Select the correct Time Zone 4. Click Next 13 DataRoute voice User Manual Step 3: Wireless Settings By default the Wireless (Wi-Fi) access point is enabled and the SSID (the name that is displayed when users search for Wi-Fi networks) is set to “DataRoute”. To keep the default settings click Next to go to the next step. To change the SSID: 1. Enter the new SSID in the SSID box 2. Select the correct Country 3. Click the Next button 14 DataRoute voice User Manual Step 4: Local Area Network Setup By default the DataRoute voice has an IP Address of 192.168.1.1 and the DHCP server is enabled so that IP addresses will be automatically assigned to clients connecting to either the wired ethernet ports or via Wi-Fi. To keep the default settings click Next to go to the next step. A new IP address can be assigned to the DataRoute voice and the DHCP options can be changed from this screen – for more details on available options refer to section 10. Step 5: 3G Failover When both ADSL and 3G connections are available the DataRoute voice can failover to the 3G connection when the ADSL connection is unavailable. To use the feature check the Enable Automatic 3G backup box and enter the amount of time (in seconds) that the ADSL link must be unavailable before switching to 3G. Click Next 15 DataRoute voice User Manual Step 6: Configure 3G and ADSL connections To setup the 3G connection: Click the Edit button for the 3G service For most networks it is only required to set the correct APN value (this should be provided by your network operator)– leave the other settings on default values. If your network requires login enter the valid PPP Username and PPP Password. Fill in the required information and click the Apply/Save button. 16 DataRoute voice User Manual To setup the ADSL connection: Click the Add button to start the ADSL network wizard. Enter the values for VPI and VCI supplied by the ADSL Service Provider and click Next. Select the DSL link type and Encapsulation Mode supplied by the ADSL service provider; (note: please choose EoA for PPPoE connection) and click Next. 17 DataRoute voice User Manual If EoA link type was selected choose the WAN service type, normally PPP over Ethernet (PPPoE). Click Next. Enter the username and password provided by the ADSL service provider; select any other options required and click Next. Check the Summary screen and then click Apply/Save to enable the connection. The Quick Setup wizard is now complete. Refer to the following sections for a complete description of all of the available options. 18 DataRoute voice User Manual 7. Network 7.1 3G Configuration (WAN Device/WAN Service) Note: please power off the Gateway before inserting the SIM card. Please go to path: Network -> WAN Device page. When both ADSL and 3G connections are available the DataRoute voice can failover to the 3G connection when the ADSL connection is unavailable. To use the feature check the Enable Automatic 3G backup box and enter the amount of time (in seconds) that the ADSL link must be unavailable before switching to 3G. Then click Apply/Save. Then go to path: Network -> WAN Service Click the Edit button for the 3G service 19 DataRoute voice User Manual Fill in the required information and click the Apply/Save button. For most networks it is only required to set the correct APN value – leave the other settings on default values. If your network requires login enter the valid PPP Username and PPP Password. 20 DataRoute voice User Manual 7.2 ADSL Configuration (WAN Service) Please go to path: Network -> WAN Service page. Then do the following to setup an ADSL connection: 1) Click Add button to start the ADSL network wizard; Enter the values for VPI and VCI supplied by the ADSL Service Provider. 2) Click Next to select the DSL link type and Encapsulation Mode supplied by the ADSL service provider; (note: please choose EoA for PPPoE connection) 21 DataRoute voice User Manual 3) Click Next – if EoA link type was selected choose the WAN service type, normally PPP over Ethernet (PPPoE) 4) Click Next to input the username and password provided by the ADSL service provider; select any other options required. 22 DataRoute voice User Manual 5) Click Next to check the Summary of this connection; 6) Click Apply/Save to enable the connection. 23 DataRoute voice User Manual 7.3 SIM PIN (3G Settings) Go to path Network -> 3G Settings This page allows the user to enable or disable the SIM pin function. Select whether the SIM Pin should be enabled or disabled, enter the current SIM pin and click the Apply/Save button. The “PIN State” shows whether the SIM PIN function is currently enabled or disabled. The “Residual allowed try time” shows how many attempts to enter a correct PIN remain – if the incorrect PIN is entered too many times a PUK code will then be required for the SIM before it can be used again. 24 DataRoute voice User Manual 7.4 Advanced ADSL Settings Go to page Network -> ADSL Settings This page allows advanced settings for the ADSL interface to be adjusted. It is recommended that these settings are unchanged from their default values unless instructed by the ISP. 7.5 DMZ Host Go to page Network -> DMZ Host This page allows an IP Address to be entered where all incoming traffic from the WAN interfaces will be routed. Note that the “Virtual Servers” options take precedence – all traffic that does not match any application configured in Virtual Servers will be forwarded to the DMZ Host IP Address. Enter the required IP Address and clickt the Save/Apply button. 25 DataRoute voice User Manual 7.6 Port Forwarding (Virtual Servers) Go to path Network -> Virtual Servers This page allows the user to forward incoming traffic on selected ports on the WAN interfaces to internal hosts. This can be used to make internal applications available to the internet (e.g. a web server). Click the Add button to add a new forward: Use Interface – select the WAN interface to forward from Service Name – either select from the list of predefined services (e.g. Web Server (HTTP)) or enter a name for a custom service. Server IP Address – enter the local IP Address to forward network traffic to Ports Table – if a predefined service is selected the table will be completed automatically. If a custom service is being entered the table must be filled in manually. o Enter the range of IP addresses to match from the external (WAN) interface (start and end ports can be the same to match a single IP Address). o Select the Protocol (TCP, UDP or both TCP/UDP) o Enter the range of IP addresses to forward to at the internal host. These can be the same as the external ports or the traffic can be forwarded to a different port on the internal host. Enter the required values and then click the Apply/Save button. 26 DataRoute voice User Manual 7.7 Advanced IP Routing (Static Route) Go to page Network -> Static Route This page allows the user to manually edit the routing table and create Static IP Routes. Note that in normal operation this is not required. Click the Add button to add a new static route: Destination IP address/prefix length – enter the destination in the format IP address/network prefix e.g. 124.80.0.0/16 Interface – select the network interface to route to Gateway IP address – specify the IP address for the gateway (if required) Metric (optional) – specify the route metric Enter the required values and then click the Apply/Save button 27 DataRoute voice User Manual 7.8 QoS Configuration Please go to path: Network -> QoS Configuration page to enable Queue Management Configuration. If Enable QoS checkbox is selected, a default DSCP mark should be chosen to automatically mark incoming traffic without reference to a particular classifier. Click Apply/Save button to save. Note: If Enable QoS checkbox is not selected, all QoS will be disabled for all interfaces; The default DSCP mark is used to mark all egress packets that do not match any classification rules. Please click QoS QUEUE button to enter the QoS Queue setup page, then click Add button. This screen allows you to configure a QoS queue and assign it to a specific layer 2 interface. The scheduler algorithm is defined by the layer 2 interface. Click Apply/Save to save and activate the queue. 28 DataRoute voice User Manual Please click QoS Class button to enter QoS Classification Setup page, then click Add button to configure network traffic classes. This screen creates a traffic class rule to classify the upstream traffic, assign queue which defines the precedence and the interface and optionally overwrite the IP header DSCP byte. A rule consists of a class name and at least one condition. All of the specified conditions in this classification rule must be satisfied for the rule to take effect. Click Apply/Save to save and activate the rule. 29 DataRoute voice User Manual 8. Application 8.1 UPnP Settings Go to path Application -> UPnP Use this page to enable or disable Universal Plug and Play (UPnP) functionality. UPnP allows networked devices to automatically discover each other. By default UPnP is enabled – it is recommended that this setting be left unchanged. 8.2 Dynamic DNS Go to path Application -> Dynamic DNS Dynamic DNS allows a static hostname to be assigned to a connection which is not assigned a static IP address. A subscription to a Dynamic DNS provider is required to maintain the mapping between the hostname and the currently assigned IP address. DataRoute voice can work with either the DynDNS or TZO dynamic DNS services. Click the Add button and then enter the details provided by the dynamic DNS service provider 30 DataRoute voice User Manual 8.3 VPN (IPSec VPN) Go to path Application -> IPSec VPN A Virtual Private Network (VPN) Tunnel can be established to provide secure communications between 2 points on the internet using the IPSec tunneling protocol. Click the Add New Connection button to display the IPSec Settings: IPSec Connection Name – specify a name to identify the tunnel Remote IPSec Gateway Address – specify the IP address or FQDN for the remote end of the tunnel, this should be the internet IP address for the remote gateway Tunnel access from local IP addresses – specify the IP address or subnet for the local side of the IPSec tunnel Tunnel access from remote IP addresses – specify the IP address or subnet for the remote side of the IPSec tunnel Key Exchange Method – select Auto to use the standard Internet Key Exchange (IKE) method or Manual to specify the encryption and authentication keys manually Authentication Method – only Pre-Shared Key is supported Pre-Shared Key – enter the Pre-Shared Key Perfect Forward Secrecy – select whether to use the Perfect Forward Secrecy (PFS) method Fill in the required options and then click the Apply/Save button 31 DataRoute voice User Manual 8.4 VPN (PPTP Config) Go to path Application -> PPTP Config A default PPTP tunnel is automatically created for each available WAN interface. Click the Edit button to configure the tunnel: Tunnel Name – specify a name to identify the tunnel Ip Address or Domain Name – specify the IP Address or FQDN for the remote PPTP Network Server PNS Username - -specify the username required to login to the remote PPTP Network Server PNS Password - -specify the password required to login to the remote PPTP Network Server Enable – set to use to start using the PPTP tunnel Use Default Gateway On the Remote Network – set to yes to forward traffic to the remote gateway Authentication Method – select the authentication method required to login to the PNS (PAP/CHAP/MSCHAP) or set to AUTO for the authentication method to be determined automatically. Use Static IP Address – select to specify the IP Address manually Set the required options and then click the Apply button 32 DataRoute voice User Manual 9. Wireless (WLAN) 9.1 WLAN Basic Go to path: WLAN -> WLAN Basic Enable WLAN – select to enable the built-in Wi-Fi access point Disable SSID broadcast – select to prevent the Access Point from being discoverable. Users will need to manually specify the SSID to connect. SSID – enter the SSID to identify the Wi-Fi access point, this is the name that will be displayed when users search for Wi-Fi networks. Country – select the country where the DataRoute voice is installed Max client number – specify the maximum number of Wireless clients that will be allowed. The DataRoute voice supports up to 16 simultaneous Wi-Fi connections. Channel – select the Wireless channel to use. The channel number can be changed if interference is experienced. After entering the required settings click the Apply/Save button. 33 DataRoute voice User Manual 9.2 WLAN Security Go to path: WLAN -> WLAN Security The default Wireless Pre-Shared Key is data1234 – it is strongly recommended that this be changed. It is recommended that all other security settings be left unchanged to maintain maximum security and compatibility. Enter a new WPA Pre-Shared Key and then click Apply/Save. This is the key that must be entered whenever connecting a PC or other client to the DataRoute voice via Wi-Fi. 9.3 Advanced Settings Go to path WLAN -> Advanced Settings This page contains Advanced parameters for the Wireless LAN interface. It is strongly recommended that these settings be left unchanged unless there is a specific requirement for different settings in the environment where the DataRoute voice is installed. Altering these parameters may result in a reduction in Wireless performance. 34 DataRoute voice User Manual 9.4 WLAN MAC Filters Go to path WLAN -> WLAN MAC Filters This page can be used to restrict the clients that are permitted to connect Wirelessly to the DataRoute voice. WARNING: Changing the mode takes immediate effect and so may disconnect any connected Wireless clients. MAC Restrict Mode – select from the following: Disabled – all MAC Addresses will be allowed to connect Allow – only MAC addresses listed below will be allowed to connect Deny – all MAC Addresses will be allowed to connect EXCEPT those listed below Use the Add button to add MAC addresses to the list. 35 DataRoute voice User Manual 9.5 WLAN Bridge Go to path WLAN -> WLAN Bridge Use this page to configure Wireless Bridging functionality. Wireless Bridging allows a Wi-Fi network to be extended to cover a larger area through the use of multiple Wi-Fi bridge devices. AP Mode: Access Point – DataRoute voice can be used as both a Wireless Access Point and a Wireless Bridge (default) Wireless Bridge – DataRoute voice can be used as a Wireless Bridge only Bridge Restrict: Enabled –only Wireless Bridges whose MAC Addresses are entered below may connect Disabled – any Wireless Bridge may connect Remote Bridges MAC Address – enter MAC Addresses for remote bridges which are permitted to connect when “Bridge Restrict” option is enabled. Enter the required settings and then click the Apply/Save button. 36 DataRoute voice User Manual 10. LAN (DHCP) Configure the DataRoute voice’s IP address and DHCP options. Go to path DHCP -> LAN Setup Set the required options then click the Apply/Save button Important Note – changes will take effect immediately and if the IP Address of the DataRoute voice is changed the connection to the web interface will be lost. The new IP address will need to be entered into the web browser (The PC must be in the same subnet as the new IP address to view the webpage). IP Address – enter the IP address that the DataRoute voice will be available on. The default IP address is 192.168.1.1. Subnet Mask – enter the Subnet Mask. The default subnet mask is 255.255.255.0. Enable IGMP Snooping – select to have the DataRoute voice monitor all IGMP network traffic for the purpose of reducing the multicast overhead (Advanced option) 37 DataRoute voice User Manual Disable DHCP Server – turn off the built-in DHCP server. If the DHCP server is disabled all clients will need to have manually assigned IP addresses in order to connect. Enable DHCP Server – turn on the built-in DHCP server Start/End IP Address – enter the range of IP addresses that the DHCP server can assign to clients. These IP addresses must be in the same subnet as the IP address assigned to the DataRoute voice. Leased Time – enter the duration for the lease of DHCP IP addresses (default is 24 hours) Static DNS Server – enter an IP address for a DNS server to pass to DHCP clients. By default this is set to the IP address of the DataRoute voice to use the built-in DNS server (recommended). Get DNS Server from WAN – select to pass the DNS server addresses obtained automatically from the WAN interface to the DHCP clients. Configure the second IP address – select to assign an additional IP address to the DataRoute voice (advanced option). Notes: 1. When you use the DHCP Server, please make sure you don’t have multiple DHCP Servers in one LAN. 2. To view a list of clients that have been assigned addresses by the DHCP server go to the path DHCP -> Assigned Leases 3. To reserve an IP address within the DHCP range for a client so that the client always receives the same IP address go to the path DHCP -> Static Leases. Click the Add Static Lease button and enter the MAC address and required IP Address for the client. Make sure that the IP address chosen is within the range entered on the LAN Setup page. 38 DataRoute voice User Manual 11. Firewall 11.1 Firewall Settings Please go to path: Firewall -> Firewall Settings page, check Enable to activate Global firewall settings, then click Apply/Save. Note: three Firewall levels are supported in the device, they are: Low: enable basic firewall features - prevent port scanning; allow PING from WAN side; allow ICMP redirect messages from WAN side. Middle: in addition to Low level, prevent ICMP redirect messages. High: in addition to Middle level, prevent SYN Flood attack; against PING from WAN side. Note: by default the Firewall is enabled and set to the “High” setting – it is recommended that to maintain maximum security this setting is not changed, 11.2 IP Filters When the firewall is enabled on a WAN or LAN interface, all incoming IP traffic is BLOCKED. However, some IP traffic can be ACCEPTED by setting up filters. Please go to path: Firewall -> IP Filters -> Incoming IP Filtering Setup. 39 DataRoute voice User Manual Click Add button to configure incoming IP filters. The following interface allows user to create a filter rule to identify incoming IP traffic by specifying a new filter name and at least one condition. All of the specified conditions in this filter rule must be satisfied for the rule to take effect. Click Apply/Save to save and activate the filter. By default, all outgoing IP traffic from LAN is allowed, but some IP traffic can be BLOCKED by setting up filters. Please go to path: Firewall -> IP Filters -> Outgoing IP Filtering Setup. Click Add button to configure outgoing IP filters. The following interface allows the user to create a filter rule to identify outgoing IP traffic by specifying a new filter name and at least one condition. All of the specified conditions in this filter rule must be satisfied for the rule to take effect. Click Apply/Save to save and activate the filter. 40 DataRoute voice User Manual 11.3 Domain Filters Please go to path: Firewall -> Domain Filters page. Please select the list type first then configure the list entries. List type: Exclude: accept all the DNS except the list; Include: drop all the DNS except the list; Click Add to do the configuration after choosing a domain list type. Then set the domain address and port number in the next interface. Click Apply/Save to add the entry to the domain filter. 41 DataRoute voice User Manual 11.4 MAC Filters Please go to path: Firewall -> MAC Filters page to setup MAC filtering. All MAC layer frames will be forwarded except those matching with any of the specified rules in the settings. Please click Add to create a filter to identify the MAC layer frames by specifying at least one condition. If multiple conditions are specified, all of them will take effect. Click Apply to save and activate the filter. 42 DataRoute voice User Manual 11.5 Access Control (Remote Access) The Access Control feature allows ports to be opened to the internet (WAN) connections so that it is possible to connect remotely to the DataRoute voice. Go to path Firewall -> Access Control To enable remote access to the DataRoute voice web interface check the Enable box under WAN for the HTTP service. The default port is the standard web port 80 which can be changed by entering a new value under WAN Port. Once enabled it will be possible to access the web interface by browing to the Internet IP Address assigned to the DataRoute voice. For example, if the IP address assigned by the ISP is 80.70.60.50 and the WAN Port is set to 8080 the following would be entered into the web browser: http://80.70.60.50:8080 Note: It is strongly recommended that the web interface password be changed (go to path Tools -> Access Control) before enabling the Access Control feature. This feature can be used via an ADSL or 3G connection. Note that some 3G networks have internal NAT and Firewall systems which do not allow remote access. 43 DataRoute voice User Manual 12. Voice (VoIP) 12.1 Voice Configuration Connect a normal analogue telephone to the Phone port. Phone calls can be made over the GSM/3G network (when a valid SIM is inserted) and using Voice over IP (when there is an active connection to the internet). By default, all calls are dialled over the GSM/3G network. To make calls via VoIP (SIP) it is necessary to configure a connection to a SIP Service Provider: 12.2 Basic Settings Go to path: VoIP -> Basic Settings page, then click on the Service Provider 0 tab. Enter SIP parameters and click Apply to save the parameters. Locale selection: choose the Location – this will set the local tones etc. heard on the phone. SIP Domain Name: enter the SIP Domain provided by the SIP Provider 44 DataRoute voice User Manual Voip Dialplan Setting: specify the dial strings to be matched for VoIP calls. All numbers dialled which match one of the dial strings will be dialled via the SIP Service Provider; all numbers dialled which do not match any of the dial strings will be dialled via the GSM/3G network. Key: x = any digit . = 1 or more digits T = dial after timeout # = dial immediately when # terminator dialled | = separator between dial strings e.g. 9x.T|9x.# = all numbers starting with a 9 will be dialled via SIP (numbers will be dialled after a timeout or after a # is dialled) 012x.T|013x.T = all numbers starting with 012 or 013 will be dialled via SIP (numbers will be dialled after a timeout) Use SIP Proxy: enable to allow using SIP Proxy. Enter the SIP proxy address (IP address or FQDN) and port Use SIP Outbound Proxy: enable to allow using SIP Outbound Proxy. Enter the SIP Outbound Proxy address (IP address or FQDN) and port Use SIP Registrar: enable to register to a SIP server. Enter the SIP Registrar address (IP address or FQDN) and port Authentication Name: the username which is provided by the SIP provider Password: the password which is provided by the SIP provider Preferred codec list: select the order of the audio codecs to be used Once the configuration is complete, click the Apply button to save changes. Click Stop SIP client, and then click Start SIP client to enable the configuration. 45 DataRoute voice User Manual 12.3 Advanced Settings Go to path: VoIP -> Advanced Settings page, to configure the advanced VoIP features. Echo Cancellation – select to enable the built-in echo canceller Call forwarding Number: set a number to use call-forwarding. Select the conditions to use call forwarding by ticking the required boxes. MWI – select to enable MWI (Message Waiting Indicator) support Call Barring – select to enable Call Barring Anonymous Call Blocking – select to disallow incoming calls with no CLI Anonymous Calling – select to withhold CLI on outgoing calls DND – select to enable DND (Do Not Disturb) support Silence Suppression – when selected audio packets will not be transmitted to the network if no audio is detected to reduce bandwidth usage CNG – select to enable detection of CNG (Fax) tones Ingress Gain – used to increase or decrease the volume of the incoming audio Egress Gain – used to increase or decrease the volume of the outgoing audio 46 DataRoute voice User Manual Enable T38 Support – enable support for T.38 fax compatible devices Enable V18 Support – enable support for V.18 Textphone compatible devices Registration Expire Timeout – enter the timeout length for the registration Registration Retry Interval – enter the retry interval for the registration DSCP for SIP/RTP – select the codepoint to use when connecting via QoS compatible systems Dtmf Relay Setting – select the format to transmit DTMF tones to the network. Tones can be transmitted In-Band or Out-Of-Band (SIP INFO or RFC2833) Hook Flash Relay Setting – select whether local Hook Flash should be ignored or sent as SIP INFO packet SIP Transport Protocol – select the protocol (UDP or TCP) to use for SIP packets. Most systems use UDP. Enable SIP Tag Matching – uncheck when using with Vonage SIP Prack – use the SIP Prack method instead of ACK Music Server – enter an address and port for an external music server to provide music on hold. 47 DataRoute voice User Manual 13. Tools 13.1 Account Settings (Users) When you configure the DataRoute voice through an Internet browser, the system requires user name and password to validate access permission. The factory sets the default username of “admin” and the password of “admin”. Go to path Tools -> Account Settings, you can choose the username and change the password. Attention: please remember the password after change, otherwise you will need to reset the device and will lose all configuration settings. 48 DataRoute voice User Manual 13.2 Time Settings Go to path Tools -> Time Settings From this page the current time can be set manually or the DataRoute voice can be set to obtain the correct time from an internet time server. Note: it is recommended that an internet time server is used when available – if the time is set manually it will be lost in the event of a power cut or if the unit is restarted. Enter the required options and click the Apply/Save button. 49 DataRoute voice User Manual 13.3 Backup Settings To backup the current configuration to a file: Please go to path: Tools -> Backup Settings page. Click Backup Settings button, then a File download window will pop-up. Click Save button to download/save current configuration of the device to the PC. 13.4 Update (Restore) Settings Please go to path: Tools -> Update Settings page. Click Browse button to choose a configuration file, then click Update Settings to restore configuration. 50 DataRoute voice User Manual 13.5 Update Software Please go to path: Tools -> Update Software page. Click Browse to choose the right software. Then click Update Software to update. The power LED will go red to indicate that the software upgrade is in progress. Once complete the unit will automatically restart with the new software. The current software version can be viewed by going to path Status -> Basic Info Attention: please make sure the power to the device is not interrupted during the software updating process. Also, the RJ45 cable should be connected tightly between the PC and device during the software uploading process. Once updated, please press the reset button or go to path: Tools -> Factory Settings to restore the device to the new factory default settings if necessary. 13.6 Factory Settings To restore the DataRoute voice to the factory default configuration either press the Reset button on the side of the unit or go to path Tools -> Factory Settings and click the Restore Default Settings button. Note: all user entered configuration options will be lost. 13.7 Reboot Router To perform a soft restart of the DataRoute voice go to path Tools -> Reboot Router and click the Reboot button. A restart takes approximately 2 minutes. 51 DataRoute voice User Manual 13.8 TR-069 Client The DataRoute voice can be provisioned remotely via the use of a TR-069 remote management server. Please go to path: Tools -> TR-069 Client page to setup an auto-configuration server to perform auto-configuration, provision, collection and diagnostics to this device. Select the desired values and click Apply/Save to configure the TR-069 client options. Note: all the parameters in the screenshot should be matched with the TR-069 Server. 52 DataRoute voice User Manual 13.9 Ping Reboot The “Ping Reboot” feature can be used to monitor the status of the internet connection and to automatically restart the DataRoute voice when the internet connection is unavailable. Go to path Tools -> Ping Reboot Enter an IP Address to ping in order to test the internet connection and a ping interval for how often to check the connection. 13.10 3G Link Notice The 3G Link Notice feature can be used to send an SMS to inform the user when the 3G data connection is unavailable. Enter the Mobile Number to send the SMS to and click the Apply/Save button. 53 DataRoute voice User Manual 14. Troubleshooting 14.1 Unable to Access Internet Check the Line and the Device 1. Check the power supply indicator is on - if not, make sure the connection to the power supply is correct; Make sure the power switch is turned on; 2. Check the LAN indicator for the PC is on - if not, check the cable connection between the PC and the DataRoute voice; Make sure that the correct cable is used; 3. Check the ADSL LED to see if it is flashing. If no fast flashing is observed within 3 minutes, please check whether phone line has been correctly connected; check whether ADSL filter is correctly used. If multiple extensions have been installed, make sure that the filter is installed prior to the junction box of the phone line. If the above items are confirmed and still no fast flashing of DSL LED is observed, call the ISP to query whether ADSL service has been provided on your line; 4. Check the ADSL LED to see whether it is unable to change status from fast flashing to always on, or whether it changes status to fast flashing after some time of being always on. If these phenomena occur constantly, please contact your ISP with a request to check lines and signal quality; If there are no problem in the above items, the line and the device should be working. Problems may be caused by your computer configuration or device configuration. Check Your Configuration 1. Enter the device manager to check if Ethernet adapter is correctly installed. If any problem exists, please re-install it; 2. Check the configuration of Ethernet adapter in PC. Try to manually set IP address that is in band 192.168.1.X without conflict. 3. Try to run command “ping 192.168.1.1” in a command prompt (Start, Programs, Accessories, Command Prompt). If the response returns “time out”, please check Ethernet connection and IP settings; 4. If the DataRoute voice is reachable, try to ping a known internet IP, e.g. a DNS server: “ping 4.2.2.2”. If ping is reachable, there are no problems in the DataRoute voice. Please go to step 5; If ping is not reachable, see step 6 and check if the configuration is correct. 5. Please try to ping a internet URL, e.g. “ping www.google.com”. If ping is reachable, there are problems in the network settings. Please check the settings of the PC terminal, e.g. whether the security level is too high, or whether anti-virus or firewall is installed; If ping is not reachable, check the DNS setting of Ethernet adapter. 54 DataRoute voice User Manual Note 1:The precondition is that LAN settings in the DataRoute voice have not been modified. Note 2:To start a Command Prompt in Windows click on the Start menu, Programs, Accessories, Command Prompt Note 3:The returned values of ping command in the following format show the standard of “reachable” 6. If ping of the modem is reachable but ping of the internet fixed IP is unreachable, attention should be concentrated upon device settings. Please enter the web interface following the instructions in this manual. (1) Check first the number of WAN connections. If more than one connection exists, for troubleshooting, delete unused connections and leave the one connection you are using. (2) Check the connection to see whether correct “type” is selected. When you use PPPoE/PPPoA to login, the following information should be provided: VPI and VCI, which can be queried from your ISP, user name and password. (3) Then make sure that “using NAT” and “default gateway” have been selected with a tick. Check whether “Dial on demand” has been selected with a tick. If it is selected, the connection is activated only when traffic to the internet arrives. Make sure that the above parameters are saved after configuration. 55