1
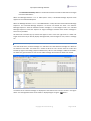
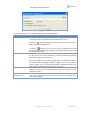
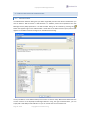
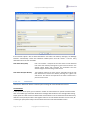
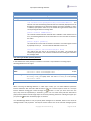
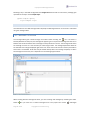
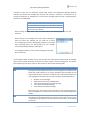
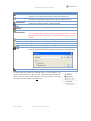
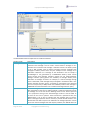
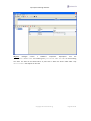
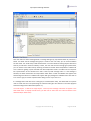
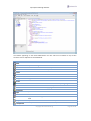
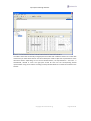
Release 2.5 User Manual Opensphere Message Detector Contents 1. Message Detector ..................................................................................................................... 3 1.1. 1.1.1. Message Sequence View .............................................................................................. 4 1.1.2. Destination Summary View .......................................................................................... 5 1.1.3. Tool bar and pop-up menus ......................................................................................... 5 1.2. Enhanced Features ........................................................................................................... 8 1.2.1. Message Timelines (Filtered Messages) ........................................................................ 8 1.2.2. Message Event Swapping ............................................................................................. 9 1.3. Configuration and Persistance ........................................................................................ 11 1.3.1. JMS Provider .............................................................................................................. 11 1.3.2. Persistent Listener Definitions.................................................................................... 14 1.3.3. Detecting Tibco EMS Queue Messages ....................................................................... 20 1.4. 2. Introduction ..................................................................................................................... 3 Message Editors ............................................................................................................. 21 1.4.1. Message List Editor .................................................................................................... 21 1.4.2. JMS Messages............................................................................................................ 24 1.4.3. Rendezvous Message Editor ....................................................................................... 31 1.4.4. XML Editor ................................................................................................................. 35 1.4.5. Hexadecimal Editor .................................................................................................... 37 Appendix ................................................................................................................................. 40 2.1. Disclaimer ...................................................................................................................... 40 2.2. Terms and Abbreviations ................................................................................................ 40 copyright © centeractive ag Page 2 of 40 Opensphere Message Detector 1. MESSAGE DETECTOR 1.1. INTRODUCTION The Opensphere Message Detector is a program that detects messages of a certain type (Tibco Rendezvous or JMS) and presents them to the user through different views. It provides powerful message filtering functionality and lets one easily edit, store and re-send detected messages. The Message Detector program gets started through the appropriate menu group on the windows start menu. Depending on the components that have been selected during the installation procedure, different message listener types can be chosen from the initial pop-up dialog shown beside. The Message Detector listens on one or several destinations (topics/queues/subjects or topic/subject hierarchies) the user defines in the field located on the dialog tool bar. When defining Rendezvous subjects, feel free to use the known wildcards such as the asterisk (*) that substitutes whole elements or the greater-than (>), which matches all the elements remaining to the right. The field accepts multiple topics/subject entries separated by the semicolon (;) each. For each entered destination string (subjects, topics or queues), the Opensphere Message Detector creates a separate listener regardless whether two destinations are identical or whether one represents a subset of another destination. Every single listener reports received messages independent from the other listeners. Therefore if for example you define the same destination twice within the destination list, messages intercepted on that destination would be reported twice as well. When the Message Detector gets started, it detects messages that are sent on the specified destination (subject, topic or queue), buffers and displays them up to the configured buffer size. Buffered messages of the selected row can be displayed within a Message List Editor by pressing the appropriate button from the tool bar ( ). The messages may through that editor be modified and saved to an XML formatted file for further use. The Message Detector has two default views (tabs) on received messages: The Message Sequence View on the other hand displays every single received message in a chronological order; the last arrived on its bottom. When running the Message Detector in “Tibco Rendezvous” or “JMS Topic” mode, all detected messages get displayed on the same and unique Message Sequence View to clearly show the chronologically sequence of detected messages. Page 3 of 40 copyright © centeractive ag Opensphere Message Detector The Destination Summary View is a condensed overview of all distinct destinations messages have been detected for. When the Message Detector is run in “JMS Queue” mode, a dedicated Message Sequence View appears for each defined JMS queue. When the Message Detector is run in “Tibco EMS Monitor” mode, two tabs named “Monitor Message Sequence” and “Included Message Sequence” are shown one beside the other. The “Monitor Message Sequence” shows all detected monitor messages in a chronological order. The “Included Message Sequence” shows the sequence of original messages extracted from monitor messages if there are any available. All views have convenient pop-up menus that appear as soon as the user right clicks on a table row. Single menu items let you directly display message details, save messages to a file, resend a message etc. 1.1.1. MESSAGE SEQUENCE VIEW This view shows every received message as a new table row. New detected messages are added to the bottom of the table. The table size is limited to what the user chooses from the combo box located top right on the dialog (“Sequence Buffer Size”). When a new message is added to the buffer, the oldest one gets discarded in case the new added message would make the buffer size exceed. The details of the selected message are displayed at the bottom of the view as shown in the figure above. The message detail view can be hidden or displayed again using the copyright © centeractive ag button. Page 4 of 40 Opensphere Message Detector 1.1.2. DESTINATION SUMMARY VIEW Each different destination(subject, topic or queue) received by the program at runtime appears on the Destination Summary View in its own row together with a counter that reflects the number of messages totally received on that destination. An additional column shows the message buffer size and the number of messages that are currently present in the buffer. The current buffer fill degree is represented by a yellow bar that turns more and more into red as the fill grade approaches the buffer limit. The overall message buffer size can be changed by selecting the appropriate entry from the combo box located at the right limit of the tool bar. To change this value however, message detecting must not be running. The buffer size of single message summary rows may be changed by right clicking the corresponding row and selecting the menu item Change Buffer Size… from the pop-up menu, this can be done while message detecting is running. 1.1.3. TOOL BAR AND POP-UP MENUS The table below gives an overview of the toolbar items of the Message Detector: Button Open File Description Let’s you select and open a message event file that was previously written to a message event swapping directory (see 1.2.2 Message Event Swapping). Please keep in mind that the current defined message buffer size may prevent the Message Detector from loading all message events from the selected file. Page 5 of 40 copyright © centeractive ag Opensphere Message Detector Button Start Description If the Message Detector is launched in “Tibco Rendezvous” or “JMS Topic” Mode Starts detecting messages on the specified destinations (subjects, topics or queues) and keeps doing this until it gets stopped through the “Stop” button or until the Message Detector dialog gets closed. If the Message Detector is launched in “JMS Queue” Mode Stop Remove Rows Show Message Show Message Buffer Enable Auto Refresh Disable Auto Refresh Show Predefined Listener Definitions Removes all current displayed messages from the “Destination Summary View” and the “Message Sequence Views” and starts downloading the messages from all specified queues. The program stops as soon as all messages are downloaded from the queues or if the user presses the “Stop” button. Keep in mind that the messages are not physically removed from the queues but remain unchanged there. Stops the message detecting process. It can be restarted at any time through the start button. Removes all rows from the message tables Shows the most recent detected message represented by the selected row of the message summary table or the selected row from the message sequence table. The message is shown within the Message List Editor. Shows all currently buffered messages represented by the selected row of the message summary table or all messages from the message sequence table. This messages are shown within the Message List Editor. The same dialog is shown as well when double clicking the left mouse button on any table row. The messages appearing in the table on top of the editor are ordered chronologically ascending, the message with the highest row number being the most recent detected one. This button enables automatic refreshing of the displayed messages. The user has to enter the number of seconds to be observed by the application prior to automatically refresh the content of the message detector. This button is only available in case the message detector is launched in “JMS Queue” mode. Automatic refreshing will be active only when the message detecting process gets started next time by using the regular “Start” button. This button disables automatic refreshing of the displayed messages Shows a dialog that lets you predefine message listeners by editing their transport and destinations/subjects. These definitions are made persistent by the application. copyright © centeractive ag Page 6 of 40 Opensphere Message Detector Button Show Current Connection Definition Description Displays a dialog where the user can define the settings of the current used connection (or transport) for detecting new messages. The settings can be changed only if message detecting is not running. Restarting the message detecting process with changed settings does not automatically remove previous detected messages from the message tables. Show Message Selector Dialog Displays a dialog where the user can define a message selector when working with JMS listeners. The message selector can only be edited if the JMS listeners defined on the message detector are not running. Show Message Filter Dialog The message selector field is available for JMS message listeners only; it lets you define SQL like criteria that reduce the set of received messages (please consult standard JMS documentation). Defining message selectors prevents the JMS provider of delivering certain messages to the consumer and can significantly reduce network traffic. Displays a dialog where the user can define message filter options in order to have corresponding messages displayed on a separate tab. The user can enter a simple value that shall be contained in a message or he may define a regular expression that is applied on the string representation of the entire message. The message filter field lets you enter any value at any time. Additionally you may also define a name for the filter. When you define the first filter, a new tab gets added to the message detector and messages from the “Message Sequence” tab immediately also appear in the table of that tab if their content matches the filter criteria. Newly detected messages are checked by Opensphere and are added to the filter table in case their content matches the filter criteria. Existing filter criteria can be changed on the fly if you press the button when the corresponding tab is selected or the corresponding button that appears directly on the tab. You can add new filters and inherently new tabs if you select the “Add new tab” check box. Defining a message filters does not reduce network traffic since message Page 7 of 40 copyright © centeractive ag Opensphere Message Detector Button Toggle Message Detail View Show About Info Destination Field Find JMS Destination Sequence Buffer Size Description filtering is done by the message consumer. Filtering voluminous messages will even slow down the receiving program that has to check for the occurrence of the specified value within the whole message. The message filter can be inversed by selecting the check box located top right on the dialog. Shows or hides the message details in the message sequence view. This button appears only in case the Message Detector is run as a standalone application. Shows the Message Detector information dialog. This text field accepts the destination (Rendezvous subject, JMS topic or queue), the Message Detector shall work with. This button lets you search for available destinations to be added to the destination field. The function is available only if the current selected JMS Provider has an admin class defined (see 1.3.1 JMS Provider). This combo box lets you change the size of the message buffers, which corresponds to the message table size for the message sequence and the filter tabs. On the destination summary tab, the buffer size is applied on a “per destination” way. The buffer/table size is limited to what the user chooses from the combo box. When a new message is added to the table, the oldest one gets discarded in case the new added message would make the buffer size exceed. 1.2. ENHANCED FEATURES 1.2.1. MESSAGE TIMELINES (FILTERED MESSAGES) When one or several message filters are defined (see Show Message Filter Dialog), the Message Detector shows a chart on its bottom where a message timeline appears for every defined filter. A message timeline has a number of items attached that represent one or several message each, depending on the time they were detected. When you move the mouse pointer over a message item, its destination together with the message detection time will be displayed in form of a tool tip. In case a message item represents more than one message with identical detection time each, this would be shown in the tooltip as well, the figure below for example shows an item that represents two messages since the tool tip starts with “2x”. If you click on a message item, a message editor dialog pops up and lets you edit, store and resend the message. copyright © centeractive ag Page 8 of 40 Opensphere Message Detector If a message timeline contains lots of message items, you may not be able to distinguish between single messages. To get a more detailed view of the desired time period, you can zoom into the chart by simply mark the desired area with the mouse pointer. Press the left mouse button and move the mouse top left to see the original chart area again. By pressing the right mouse button, you will see a pop-up menu that lets you further customize the message chart and perform other functions like printing the chart for example. 1.2.2. MESSAGE EVENT SWAPPING The Message Detector keeps detected messages in the buffer (table) up to the number defined in the combo box appearing right on the toolbar. When newly added messages exceed the defined buffer size, the oldest message gets discarded and cannot be retrieved anymore. In order to be able to access such messages at some time later on, the program lets you define a folder where it shall write such discarded message events to. Optionally you can also instruct the Message Detector to write all detected message events to the file system and not only the ones that exceed the buffer size. Message events are written to a file within the configured target directory up to the size defined by the user. Each time the size of the message event file is reached, a new one gets created. The file names contain the name of the GUI tab together with the creation date in the format “yyyyMMddhhmmss”. In front of the message sequence and the message filter tabs (see figure below) you’ll find a button that lets you open the message swap options dialog. The button appears with a different icon depending whether message event swapping for that specific tab is currently defined or not: Icon Description Message swapping for this tab is currently not enabled (not defined) Message swapping for this tab is currently enabled If you click the button, the Swap Options dialog below appears and lets you either remove the existing configuration or define a new one. Page 9 of 40 copyright © centeractive ag Opensphere Message Detector The different controls on the dialog are explained in the following table: Control Description Target Directory The directory where message events shall be written to. Message swapping is enabled as soon as this field contains a valid directory name. The button opens a dialog where you can browse the file system and select an existing target directory. Maximum File Size Write all messages Write exceeding messages only… The button removes the current entry from the target directory field and thereby disables message swapping if the dialog would also get closed through the “OK” button. The maximum size in kilobytes for message event swapping files. Each time the size of the current file is exceeded; a new file is created and gets the following message events written to it. Since the message events stored in swapping files are most often aimed to be reloaded into the Message Detector program, the file size should be chosen carefully. The current buffer size defined in the GUI may prevent you from loading all message events contained in such a file. If this radio box is selected, all newly detected message events that get added to the table of the corresponding tab will also be written to the swapping directory. If this radio box is selected, message events are written to the file system only in case they get discarded from the table of the corresponding tab upon buffer overflow. copyright © centeractive ag Page 10 of 40 Opensphere Message Detector 1.3. CONFIGURATION AND PERSISTANCE 1.3.1. JMS PROVIDER The JMS Provider definition dialog lets you define single JMS providers that will be needed when you have to define a JMS connection. A JMS Provider is a software product that implements the Java Message Service (JMS) specification. The JMS Provider dialog can be invoked by pressing the button that appears right to the “JMS Provider” combo box on the JMS connection panel, which itself appears on the JMS Connection dialog and on the JMS Listener dialog. The top located list on the JMS Provider panel contains an item for every JMS Provider defined for the current instance of the Opensphere Message Detector. Using the right located buttons, you can simply add a new JMS provider definition or you can remove the current selected one. Page 11 of 40 copyright © centeractive ag Opensphere Message Detector When configuring JMS providers, you basically tell the Message Detector where to find the Java classes that are required to act as a client towards a particular JMS implementation (product) such as Tibco EMS, SwiftMQ or WebSphere MQ. Depending on the available classes, you can then define up to three connection templates and optionally also an administration class. The connection templates will then be available within the Message Detector when you define a JMS connection. The “JMS Provider Details” box shows the details of the current selected JMS provider according to the table below. Property Description Name Name of the JMS provider (i.e. “Tibco EMS”) that must be unique between all JMS provider definitions. The JMS provider name gets referenced by JMS components you define in your project (i.e. a JMS Queue Browser) but also from within JMS listener definitions mad for the Message Detector. Therefore be careful when choosing the name and avoid changing it if it is still referenced somewhere. If you may think of working with different releases of the same JMS product simultaneously, it is advised to include the release number in the name straight from the beginning. This list contains all Java archives (.jar and/or .zip files) used by a client of the defined JMS provider. Since Opensphere acts as a client through its configurable components (Message Detector, JMS Message Producer etc.), it needs to have access to related Java classes. Such classes are the factory classes for creating connections to the related JMS server or admin classes that let you retrieve information about available destinations. Java Libraries When adding a new JMS provider definition, Opensphere automatically adds the Java archive files present in the folder <OPENSPHERE_HOME>/lib/jmsAdmin. These files contain a set of predefined admin classes for known JMS provider. From the file chooser dialog that pops up, you now have to select the required provider specific Java archive files. Using the button, you can add missing Java archive files at any time later or you can remove selected unnecessary ones using the button. Opensphere scans the specified Java archive files for factory classes and admin classes and provides them within the appropriate bottom located tab labeled “JNDI”, “Queue”, “Topic” or “Admin” for further selection. copyright © centeractive ag Page 12 of 40 Opensphere Message Detector Property Description JNDI This panel lets you define a template for JMS connection definitions through the Java Naming and Directory Interface (JNDI). The Initial Context Factory combo box contains all classes found in the defined Java archive files that implement the interface javax.naming.spi.InitialContextFactory. The Available Properties list contains all available JNDI properties except the ones that are already assigned to the selected initial context factory. Queue The Selected Properties table shows the properties already assigned to the selected initial context factory. By pressing the button or the button, you can easily add or remove single or multiple selected properties. The buttons and let you change the position of single assigned properties. You can define a default value for individual properties if you like, this is especially useful if the final property value needs to comply to a certain pattern (i.e. “tibjmsnaming://host:port”). This panel lets you define a template for JMS queue connection definitions. The Connection Factory combo box contains all classes found in the defined Java archive files that implement the interface javax.jms.QueueConnectionFactory. The Available Properties list contains all properties available for the selected queue connection factory except the ones that are already assigned to it. Topic The Selected Properties table shows the properties already assigned to the selected queue connection factory. By pressing the button or the button, you can easily add or remove single or multiple selected properties. The buttons and let you change the position of single assigned properties. You can define a default value for individual properties if you like, this is especially useful if the final property value needs to comply to a certain pattern (i.e. “tcp://host:7222”). This panel lets you define a template for JMS topic connection definitions. The Connection Factory combo box contains all classes found in the defined Java archive files that implement the interface javax.jms.TopicConnectionFactory. The Available Properties list contains all properties available for the selected topic connection factory except the ones that are already assigned to it. The Selected Properties table shows the properties already assigned to the selected topic connection factory. By pressing the button or the button, you can easily add or remove single or multiple selected properties. The buttons and let you change the position of single assigned properties. You can define a default value for individual properties if you like, this is especially useful if the final property value needs to comply to a certain pattern (i.e. “tcp://host:7222”). Page 13 of 40 copyright © centeractive ag Opensphere Message Detector Property Description Admin This panel lets you define an administrator class used to show and retrieve available destinations. The Admin Class combo box contains all classes found in the defined Java archive files that implement the interface com.centeractive.Opensphere.msg.jms.admin.JMSAdmin. If the file OpensphereJMSAdmin_n_n.jar from the directory <OPENSPHERE_HOME>/lib/jmsAdmin is defined in the list of java libraries, a few admin classes for well-known JMS providers will be available by default. If there is no predefined admin class available for your JMS provider, you can write your own by implementing above mentioned JMSAdmin interface. The javadoc for the JMSAdmin interface can be found in the appendix at the end of this document, the binary code is contained in the Opensphere_n_n.jar that is located in the folder <OPENSPHERE_HOME>/lib. 1.3.2. PERSISTENT LISTENER DEFINITIONS When the message detecting process is not running, you can open a dialog that lets you define persistent listener definitions. Simply add new listener definition by activating the button located top right on the dialog. If the dialog gets closed through the “OK” button, the current selected definition is copied to the Message Detector and determines how to detect and handle new messages. 1.3.2.1. RV LISTENER When launching the Message Detector in “Tibco Rendezvous” mode, the listener definition dialog lets you define listeners with different Rendezvous transports, Rendezvous string encoding as well as one or several subjects to listen on. The Rendezvous listener definition dialog gets invokes through the button. In case you enter more than one subject, they must be separated by a semicolon (;) each. In the “Message Filter” field at the bottom of the dialog you can define filter criteria. When you choose a message listener with a non-empty message filter, the program automatically creates a tabbed message filter panel on the Message Detector. When a new message gets detected, the program checks the filter value against the whole message (send and reply subject and message content). Messages will be added to the tabbed filter panel only in case they match the defined filter criteria. Defining a message filter does not reduce network traffic since message filtering is done by the message consumer. Filtering voluminous messages slows down the receiving program that has to check for the occurrence of the specified value within the whole message. copyright © centeractive ag Page 14 of 40 Opensphere Message Detector If the entered subject is able to detect Rendezvous host status info advisory messages, the Message Detector automatically creates two additional tabbed panels that will contain a row for every detected host and service as follows: Host Status Info (Total) Each row contains a snapshot of the value from the last detected host status info advisory message for a given host and service. The statistic values within each snapshot are cumulative since the daemon began communicating on the service. Host Status Info (Per Minute) The statistical values from each row are calculated using the last two detected host status info advisory message for a given host and service. The amount corresponds to the value increase over a period of one minute. 1.3.2.1.1. ADVANCED Activate the “Advanced“ button to define optional settings for Tibco Rendezvous listeners. Custom Editors In the top area of the panel, you can define a number of custom editors for specific rendezvous field data. Those editors get used when Rendezvous messages will be edited in the message editor dialog. Simply press the “add” button and define what custom editor to use for what kind of field data. Every definition must specify the editor class together with one or several field identifiers such as name, ID or data type. Opensphere always uses the editor where the most field identifiers match. Page 15 of 40 copyright © centeractive ag Opensphere Message Detector Option Description Field Name Field ID Data Type Editor Class Name Name of the Rendezvous message field ID of the Rendezvous message field Data type of the Rendezvous message field The full name of a class that extends the editor class com.centeractive.Opensphere.msg.JCustomDataEditor. This abstract class has the following methods that are invoked by Opensphere to set Rendezvous field data and to determine whether this data is editable. In case it is editable, Opensphere makes sure, the edited value gets written back to the corresponding Rendezvous message field. public boolean isEditable() This method indicates whether the field data is editable. If this method returns true, the method getData has to be overwritten to return the data contained in the editor public Object getData() This method returns the data contained in the editor. This method gets invoked by Opensphere only in case the method isEditable returns true abstract public void setData(Object data) This method sets the data to be contained in the editor. This method gets invoked by Opensphere each time the Rendezvous field node gets selected in the message editor User Data Type Handler (Encoder/Decoder) In the bottom area of the panel you can define a class that is responsible for encoding and/or decoding Rendezvous user types. Option Description Handler Class Name The full name of a class that implements the interfaces com.tibco.tibrv.TibrvMsgEncoder and/or com.tibco.tibrv.TibrvMsgDecoder Comma separated integer values between TibrvMsg.USER_FIRST(128) and TibrvMsg.USER_LAST(255) each. The class TibrvMsg is in the package com.tibco.tibrv. User Data Types 1.3.2.2. JMS TOPIC LISTENER When launching the Message Detector in “JMS Topic” mode, you can define different persistent listener definitions with their own JMS connection and one or several topics to listen on. The topic listener definition dialog gets invokes through the button. In case you enter more than one topic, they must be separated by a semicolon (;) each. You can either freely edit the destinations (topics) field or detect and add single topics to the list by selecting them from a dialog that pops up if you press the button located top right on the field. The “JMS Message Selector” lets you specify what messages to be detected, based on the values of message headers and properties. The SQL like criteria reduces the set of received messages (please copyright © centeractive ag Page 16 of 40 Opensphere Message Detector consult standard JMS documentation). Defining message selectors prevents the JMS provider of delivering certain messages to the consumer and can significantly reduce network traffic. In the “Message Filter” field at the bottom of the dialog you can define filter criteria. When you choose a message listener with a non-empty message filter, the program automatically creates a tabbed message filter panel on the Message Detector. When a new message gets detected, the program checks the filter value against the whole message (destination name, properties, body). Messages will be added to the tabbed filter panel only in case they match the defined filter criteria. Defining a message filter does not reduce network traffic since message filtering is done by the message consumer. Filtering voluminous messages slows down the receiving program that has to check for the occurrence of the specified value within the whole message. 1.3.2.3. JMS QUEUE BROWSER When launching the Message Detector in “JMS Queue” mode, you can define different persistent listener definitions with their own JMS connection and one or several queues to download messages from. The queue listener definition dialog gets invokes through the Page 17 of 40 copyright © centeractive ag button. In case you enter Opensphere Message Detector more than one queue, they must be separated by a semicolon (;) each. You can either freely edit the destinations (queues) field or detect and add single queues to the list by selecting them from a dialog that pops up if you press the button located top right on the field. The “JMS Message Selector” lets you specify what messages to be detected, based on the values of message headers and properties. The SQL like criteria reduces the set of received messages (please consult standard JMS documentation). Defining message selectors prevents the JMS provider of delivering certain messages to the consumer and can significantly reduce network traffic. In the “Message Filter” field at the bottom of the dialog you can define filter criteria. When you choose a message listener with a non-empty message filter, the program automatically creates a tabbed message filter panel on the Message Detector. When a new message gets detected, the program checks the filter value against the whole message (destination name, properties, body). Messages will be added to the tabbed filter panel only in case they match the defined filter criteria. Defining a message filter does not reduce network traffic since message filtering is done by the message consumer. Filtering voluminous messages slows down the receiving program that has to check for the occurrence of the specified value within the whole message. copyright © centeractive ag Page 18 of 40 Opensphere Message Detector 1.3.2.4. TIBCO EMS MONITOR This message detecting mode is applicable only if you work with TIBCO Enterprise Message Service (EMS) software. Prior to be able to use the Message Detector as a TIBCO EMS Monitor, you must define a JMS Provider for EMS. When launching the Message Detector in “Tibco EMS Monitor” mode, you can define different listeners with their own EMS connection and specific monitor topics that must all start with $sys.monitor. When adding a new listener definition, the topic $sys.monitor.*.* appears as the default value in the “Destinations” field. This topic lets you detect all messages sent by the EMS server to notify about certain events. To see monitor messages related to JMS message communication, you have to add destination specific topics according to the EMS documentation. This can be achieved by pressing the “Add” button located top right of the “Destination” field. Available destinations get shown within a pop-up dialog from where they can be selected; the program makes sure to generate the appropriate monitor topic. If for example you choose the topic named topic.test.5, the generated monitor messages would be $sys.monitor.T.*.topic.test.5. Each topic in the “Destination” field must be separated by a semicolon (;). Further details about monitoring topics can be found in the official EMS documentation. When a new monitor definition gets added to the list, a default JMS message selector appears in the corresponding field. This is used for monitoring message communication and has the effect that you would see a monitor message only when a message gets posted by a producer. Therefore the messages appearing on the “Included Message Sequence” tab would be unique. You may be interested in other events as well when monitoring message communication; so you have to remove the JMS message selector or adapt it to your needs. Except the above described monitoring topics and the pre-defined message selector, the listener definition is done the same as would be a normal “JMS Topic Listener”. Page 19 of 40 copyright © centeractive ag Opensphere Message Detector 1.3.3. DETECTING TIBCO EMS QUEUE MESSAGES This section is applicable only if you work with Tibco Enterprise Message Service (EMS) software. When you’re using the Message Detector in the JMS Queue Browser mode, you must be aware that messages sent to a JMS queue may be consumed by another program even before you can see them. If you are interested in messages sent to a queue and you want to make sure you can see all messages arriving to that queue, you have to switch off all other message consumer programs. Using the EMS Monitor you can however see the queue messages when you add the appropriate monitor topic. The queue queue.test.1 for example can be monitored using the topic $sys.monitor.Q.*.queue.test.1. When running the message detector, the original message contained in the monitoring message gets extracted and displayed on a separate tabbed pane named “Included Message Sequence”. As an alternative to monitoring messages you may create a JMS destination bridge that will automatically duplicate every message to a second destination, a topic or a queue. There is no impact on the original message sent to the queue. If for example we got a queue named sample.queue, the copyright © centeractive ag Page 20 of 40 Opensphere Message Detector following entry in the EMS configuration file bridges.conf would make sure that every message gets replicated to the topic named sample.topic. [queue:sample.queue] topic=sample.topic 1.4. MESSAGE EDITORS Tibco Rendezvous and JMS messages within Opensphere Message Detector can be shown and edited using the message editor. 1.4.1. MESSAGE LIST EDITOR The message editor gets invoked through the toolbar button showing the icon. The editor is basically divided into two parts, the message list appearing on its top and the message view that on its bottom that shows the details of the message currently selected in the list. The message view shows the message structure as a tree and lets you select single nodes. The message dependent details of the selected tree node get displayed right to the tree. Some tree nodes contain read only information some others are editable. Some data may be edited directly within the message list (table) or within the message structure tree; this is dependent on the message type however. When working with the message list editor, you start creating new messages by activating the “Add” button or you load one or several messages from a file (“Open File” button Page 21 of 40 copyright © centeractive ag ). Messages Opensphere Message Detector contained in files have an application specific XML format. The Opensphere Message Detector however first deducts the message type from the file extension. Therefore it is important not to change the extension of message files. Current known message types and their corresponding file extensions are listed below. Message Type File Extension JMS Message jms Tibco Rendezvous® Message rvm Web Service Message wsm (can contain wso and wsr) When loading messages from a file, the editor detects the message type from the file extension. When creating a new message from scratch within a dialog that does not contain any message yet, you have first to select the message type from the dialog shown beside. The message types appearing within the dialog depend on the modules currently activated (installed) in Opensphere. The message list editor can only contain messages of one type at the same time. The message list editor contains a menu and a tool bar that contain generic items valid for all message types but also specific items that are shown only when editing a certain message type. The generic items appearing in the menu and/or on the tool bar are listed in the following table: Button Open File Description Opens a file that contains the definition of one or several messages in the Opensphere specific XML format. When a new message file is loaded into the editor that shows already one or several messages, those messages are not simply replaced by the new ones. Instead the user is asked how he wants the new messages to be loaded. He can choose between the following options: Save Replace current messages Append to the end of the message table Insert at the beginning of the message table Insert after the selected message Insert before the selected message Be aware that in case you press the save button or the corresponding menu item, all messages are saved to the file from where the latest messages were loaded. Saves the message contained in the message editor to its original file. If the message was not initially loaded from a file, this will save it to a new file using the appropriate file extension. The file name and its location can be altered by the user. copyright © centeractive ag Page 22 of 40 Opensphere Message Detector Button Save As Add Message Duplicate Message Remove Show Comparison Rules Description Saves the message contained in the message editor to a file other then its original one. The name and its location can be chosen by the user. Switches to the mapping view and back to the normal view. This button is available on embedded message editors for specific components only. Adds a new empty message to the multiple message editor Duplicates the selected message from the message Removes the selected message from the message Switches the message list editor to the comparison rule mode First This is a feature that is useful only when working with the fully featured Opensphere test suite. Therefore it is not further documented in this user manual. Navigates to the first message in the message table Prior Navigates to the previous message in the message table Next Navigates to the next message in the message table Last Navigates to the last message in the message table Find Opens the search dialog shown below and lets the user define and perform a search for data present inside the message contained in the message editor. Find Again Performs the defined search again starting at the current position To move single rows within the message table to a new position or to remove them from there, right click the corresponding row-header and select one of the menu items contained in the pop-up menu. The same menu items are also available in the Edit menu. Page 23 of 40 copyright © centeractive ag Opensphere Message Detector 1.4.2. JMS MESSAGES When adding a new message to the message editor, a dialog pops up where you have to select the type of JMS message you want to add. The JMS message type cannot be changed on an existing message but the message list editor can contain messages of different JMS type at the same time. A Message (without body) does not contain a body at all and could be used for some kind of advisory. A Bytes message object is used to send a message containing a stream of non-interpreted bytes A Map message object is used to send a set of name-value pairs An Object message object is used to send a message that contains a serializable object in the Java programming language (“Java object”). A Stream message object is used to send a stream of primitive types in the Java programming language A Text message object is used to send a message containing plain text. This message type may also contain XML formatted content. 1.4.2.1. JMS MESSAGE HEADER AND PROPERTIES The JMS message header contains a number of standard properties. Few of them are editable within the message editor while the other can only be set by the message producer itself. To see the properties, you have to select to message root node within the structure tree. As you may notice in the figure below, you can also define custom properties in the table that appears at the bottom of the node detail view. copyright © centeractive ag Page 24 of 40 Opensphere Message Detector The JMS header fields are explained in the table that follows: Header Fields Delivery Mode Expiration Page 25 of 40 Description Client marks a message as persistent if it feels that the application will have problems if the message is lost in transit. A client marks a message as nonpersistent if an occasional lost message is tolerable. Clients use delivery mode to tell a JMS provider how to balance message transport reliability with throughput. Delivery mode covers only the transport of the message to its destination. Retention of a message at the destination until its receipt is acknowledged is not guaranteed by a PERSISTENT delivery mode. Clients should assume that message retention policies are set administratively. Message retention policy governs the reliability of message delivery from destination to message consumer. For example, if a client's message storage space is exhausted, some messages may be dropped in accordance with a sitespecific message retention policy. A message is guaranteed to be delivered once and only once by a JMS provider if the delivery mode of the message is PERSISTENT and if the destination has a sufficient message retention policy. When a message is sent, the JMSExpiration header field is left unassigned. After completion of the send or publish method, it holds the expiration time of the message. This is the sum of the “Message Time-To-Live” values specified in the properties dialog of the JMS Message Producer and the GMT at the time of the send or publish. If the time-to-live is specified as zero, the JMSExpiration is set to zero to indicate that the message does not expire. When a message's expiration time is reached, a provider should discard it. The JMS API does not define any form of notification of message expiration. Clients should not receive messages that have expired; however, the JMS API does not copyright © centeractive ag Opensphere Message Detector Priority Correlation ID Type Destination Message ID Timestamp guarantee that this will not happen. The JMS API defines ten levels of priority value, with 0 as the lowest priority and 9 as the highest. In addition, clients should consider priorities 0-4 as gradations of normal priority and priorities 5-9 as gradations of expedited priority. The JMS API does not require that a provider strictly implement priority ordering of messages; however, it should do its best to deliver expedited messages ahead of normal messages. A Client can use the JMSCorrelationID header field to link one message with another. A typical use is to link a response message with its request message. JMSCorrelationID can hold one of the following: A provider-specific message ID An application-specific String A provider-native byte[] value Since each message sent by a JMS provider is assigned a message ID value, it is convenient to link messages via message ID. All message ID values must start with the 'ID:' prefix. In some cases, an application (made up of several clients) needs to use an application-specific value for linking messages. For instance, an application may use JMSCorrelationID to hold a value referencing some external information. Application-specified values must not start with the 'ID:' prefix; this is reserved for provider-generated message ID values. Some JMS providers use a message repository that contains the definitions of messages sent by applications. The JMSType header field may reference a message's definition in the provider's repository. The JMS API does not define a standard message definition repository, nor does it define a naming policy for the definitions it contains. Some messaging systems require that a message type definition for each application message be created and that each message specify its type. In order to work with such JMS providers, JMS clients should assign a value to JMSType, whether the application makes use of it or not. This ensures that the field is properly set for those providers that require it. To ensure portability, JMS clients should use symbolic values for JMSType that can be configured at installation time to the values defined in the current provider's message repository. If string literals are used, they may not be valid type names for some JMS providers. The JMSDestination header field contains the destination to which the message is being sent. When a message is sent, this field is ignored. After completion of the send or publish method, the field holds the destination specified by the method. When a message is received, its JMSDestination value must be equivalent to the value assigned when it was sent. The JMSMessageID header field contains a value that uniquely identifies each message sent by a provider. When a message is sent, JMSMessageID can be ignored. When the send or publish method returns, it contains a providerassigned value. A JMSMessageID is a String value that should function as a unique key for identifying messages in a historical repository. The exact scope of uniqueness is provider-defined. It should at least cover all messages for a specific installation of a provider, where an installation is some connected set of message routers. All JMSMessageID values must start with the prefix 'ID:'. Uniqueness of message ID values across different providers is not required. The JMSTimestamp header field contains the time a message was handed off to a provider to be sent. It is not the time the message was actually transmitted, because the actual send may occur later due to transactions or other client-side queueing of messages. When a message is sent, JMSTimestamp is ignored. When the send or publish method returns, it contains a time value somewhere in the interval between the call and the return. The value is set as milli seconds. copyright © centeractive ag Page 26 of 40 Opensphere Message Detector Reply To Redelivered The JMSReplyTo header field contains the destination where a reply to the current message should be sent. If it is null, no reply is expected. The destination may be either a Queue object or a Topic object. Messages sent with a null JMSReplyTo value may be a notification of some event, or they may just be some data the sender thinks is of interest. Messages with a JMSReplyTo value typically expect a response. A response is optional; it is up to the client to decide. These messages are called requests. A message sent in response to a request is called a reply. In some cases a client may wish to match a request it sent earlier with a reply it has just received. The client can use the JMSCorrelationID header field for this purpose. Indicates whether this message is being redelivered. If a client receives a message with the JMSRedelivered field set, it is likely, but not guaranteed, that this message was delivered earlier but that its receipt was not acknowledged at that time. In addition to the header fields, it is possible to define custom properties. The type of properties can be 27rganiz, byte, short, integer, long, float, double or String. The name of properties must not be null or empty. By convention: if the name of a property begins with JMSX, the property is specified by JMS API (like JMSXGroupID and JMSXGroupSeq to group messages) and is expected to work with all provider (JMS API 1.1 defines JMSXUserID, JMSXAppID, JMSXDeliveryCount, JMSXGroupID, JMSXGroupSeq, JMSXProducerTXID, JMSXConsumerTXID, JMSXRcvTimestamp and JMSXState. See JMS API documention for more information), if the name starts with JMS_vendor_name, the property targets the JMS provider and is specific to this provider (like the property JMS_TIBCO_COMPRESS which tells Tibco EMSTM to compress the message) if the name does not start with JMS, the property is an application specific property. Any of these fields can be used in a message selector to select incoming messages Page 27 of 40 copyright © centeractive ag Opensphere Message Detector 1.4.2.2. JMS MESSAGE BODY The JMS API defines five types of message body: Bytes, Map, Object, Stream and Text. For each body type, Opensphere offers specific editors. A Text message can be edited either as plain text without any formatting it may be edited using the built-in XML editor. To switch between both editors, simply click on the appropriate tab located at the bottom of the node detail view. Byte messages are shown and edited within the built-in hexadecimal editor that lets you switch between different base modes and character encoding. copyright © centeractive ag Page 28 of 40 Opensphere Message Detector A dynamic table let you edit Map and Stream messages. Single rows are added or removed, moved to another position or altered as much you want. Depending on the selected data type, values are edited either directly in the table cell or within a specific editor dialog that pops up when a mouse click occurs on the cell or on the icon appearing right to it. Page 29 of 40 copyright © centeractive ag Opensphere Message Detector Object messages contain a JavaBeans component. Opensphere uses the java.beans.XMLEncoder for serializing and java.beans.XML Decoder for de-serializing such data. The data can be edited either as plain text or within the built-in XML editor. Only Serializable Java objects can be used. copyright © centeractive ag Page 30 of 40 Opensphere Message Detector 1.4.3. RENDEZVOUS MESSAGE EDITOR Tibco Rendezvous™ messages are self-describing tree like structured data constructs. The top level message node holds information on the send subject and the reply subject and it contains zero or more dependent message fields. Such fields are sub-messages (field groups) containing themselves other fields or they are payload data fields. TIBCO Rendezvous messages within Opensphere are shown and edited using the standalone message list editor (menu item Message > Message Editor…) and through the multi message document editor (menu item Message > Multi Message Doc Editor…). Rendezvous specific program nodes such as the “RV Publisher” also let you edit Rendezvous messages directly within their property dialog. The message editor lets you display and modify existing messages but it also offers the possibility to create messages from scratch. A message can be read from a file and saved back either to the application specific XML format (.rvm) or as rvscript (.rvs). To save a message as rvscript, select the menu item File > Save As rvscript… . Each Rendezvous message has exactly one send subject and may have a reply subject. While the send subject can be edited directly within the message table appearing on top of the dialog, both subjects can be edited also within the detail view that gets displayed as soon as the message root node gets selected. The message root node detail view contains also an area where the text representation of the entire message appears. Page 31 of 40 copyright © centeractive ag Opensphere Message Detector Non root nodes are either message fields or message field groups, represented either by a sheet or a folder. The detail view of message field groups is similar to the root node, you can choose between the two views. The “Field Group” view however does not contain fields for editing subjects but others that let you edit their name and identity. In both, the root node and the message group detail view, you can switch to the table view by selecting the bottom located “Direct Dependents” labeled tab. This is useful for getting a quick overview of all direct dependent nodes. The table view is an explorer like representation of the selected tree node. If the top level message node or a sub-message is selected, the detail view shows all its dependent nodes within a table. All editable cells appear with white background while non-editable cells appear with gray background. Editable value cells have an icon on their right, it invokes a specific editor dialog as soon as you click on it. If a message field node other than a field group is selected (data node), the detail view of its parent node is shown but the row representing the selected node gets also selected in the table (appears with blue background on Windows systems i.e.). The send subject - as well as the reply subject - of the top level message node does not appear in the table detail view. To display and edit them, you will have to select the root node and switch to the default view (for detail view) copyright © centeractive ag Page 32 of 40 Opensphere Message Detector The detail view of message field nodes by default appears with fields that let you edit their name, the identity, the data type and the value of course. Depending on the data type a certain edit format is required. Opensphere provides data type related support by displaying the expected format pattern, through popup editors and through specific built-in editors. Editing date/time, binary and XML data for example is fast and seamless and does not require switching to any tool external to Opensphere. Page 33 of 40 copyright © centeractive ag Opensphere Message Detector The Rendezvous message specific items appearing in the menu and/or the tool bar of the message list editor offer the following functionality: Item Save as rvscript Import AE Data Edit AE Data Rendezvous Transport Description Saves the messages currently contained in the editor to a file that can be used by an rvscript. The file extension by default is rvs. Lets the user select an ActiveEnterprise data object and edit it in the AE data editor. It will then be converted to a Rendezvous message and imported to the message editor. Shows the selected message within the ActiveEnterprise data editor. This works only if the message is of AE wire format. Pops up a dialog where you can change the transport options used by the publisher copyright © centeractive ag Page 34 of 40 Opensphere Message Detector Item Send Message Description Publishes the current displayed Rendezvous™ message on the transport defined within the transport options dialog. The transport can be changed temporary through the menu item Tools > Rendezvous Transport…, which will display the above shown option dialog. Each tree node has its own popup menu that is displayed when you right click on it. Some of the actions available in the popup menu may also be performed by pressing a button from the toolbar appearing on top of the tree: Button Add Sub Message Description Adds a sub message (message field group) to the selected node Add Message Field Adds a message field to the selected node Duplicate Sub Message Makes a copy of the selected sub message (message field group) node and adds it to the parent node Duplicate Message Field Makes a copy of the selected message field node and adds it to the parent node Move Up Moves the selected node up to the previous position within its parent node Move Down Moves the selected node down to the next position within its parent node Expand All Expands the node and all its dependent nodes recursively Collapse All Collapses the node and all its dependent nodes recursively Remove Removes the selected node and all its dependent nodes 1.4.4. XML EDITOR The Opensphere Message Detector contains a highly featured built in XML Editor that may appear as inbuilt editor within the message editor (i.e. inside the Tibco Rendezvous message editor enabling you to edit nested XML data). The XML editor lets you create or load a single document but also multiple documents. Each XML document appears within its own internal frame or as a tabbed pane depending on your choice. XML Documents are shown in a text view with color highlighting and a content assistant (see below). Left of the text view, the document structure is represented by a tree where each element – including text elements – appears as single tree nodes. The XML element detail view appears below the structure tree view, it shows the element name together with the element attributes. All of the three views are synchronized; if for example a certain tree node gets selected, its text representation gets marked and its element detail view gets displayed. The XPath expression that uniquely identifies the selected element is shown in addition in the status bar below the text view. Page 35 of 40 copyright © centeractive ag Opensphere Message Detector The buttons appearing on the inbuilt XML Editor’s tool bar and the one located on top of each structure tree are explained in the table below. Button New Description Creates a new XML document Open File Opens an existing XML file Save Saves the XML document to the file system Save As Saves the XML to a file chosen by the user Undo Undo the last action but this is a new document action Redo Redo the last action but to undo action has been called Cut Cut a text Copy Copy a text Paste Paste a text Search Parse the current document and show a tree for easily navigating Parse Parse the current document and show any error in red Format Formats the current XML text applying indentation Comment Comment the current tree node Split Split the current editor in two ones Select Node Select the current tree node in text Edit Text Node Expand All Opens an editor dialog and lets the user edit the current selected text tree node Expands the selected tree node and all its dependants Collapse All Collapses the selected tree node and all its dependants copyright © centeractive ag Page 36 of 40 Opensphere Message Detector 1.4.4.1. EDITOR ASSISTANTS XML content assistant is available for three parts: 1. Element completion (from a schema like DTD or W3C Schema) 2. Entity completion (from DTD declaration and default ones) 3. System completion like CDATA or comment. This completion is enabled by inserting "<!". The syntax assistant works in several ways: 1. By reading a DTD (relative to the current document or not). The DTD will be automatically read for your current XML document each time it is saved, loaded or parsed. 2. By reading a Schema (relative to the current document or not). The schema will be automatically read for your current XML document each time it is saved, loaded or parsed. A bookmark appears in the text editors left bar as an icon together with the colored line it belongs to. The mark is set by a single mouse click inside the text editors left bar and removed by clicking on the icon. When a bookmark is set, it follows each line change thus it stays bound to the right element. Bookmarks are not persistent and will therefore disappear when a document is reloaded from the file system. 1.4.5. HEXADECIMAL EDITOR Frequently message and other data are present in raw format that cannot be interpreted as such by the application. Sometimes however, you know about the internal format of such data and you want to be able to edit it. The Opensphere Message Detector embedded Hexadecimal Editor lets you see and edit binary data. Page 37 of 40 copyright © centeractive ag Opensphere Message Detector The editor shows two horizontally arranged panes that offer both a different view on the same data and that let you both edit that data. The left located pane shows a byte wise representation of the document content. Depending on the current selected button, the representation – the base - is hexadecimal, decimal or octal. The right pane shows for each line the corresponding textual representation using the character encoding currently selected within the combo box located on the tool bar. copyright © centeractive ag Page 38 of 40 Opensphere Message Detector Functions within the Hexadecimal Editor are triggered either through tool bar buttons or menu items according to the following table: Button Open File (CTRL+O) Description Load the content of the file into the editor Save (CTRL+S) Save data into a file Save As Save data into the specified file Undo (CTRL+Z) Undo previous changes Redo (CTRL+Y) Redo undone changes Search/Replace (CTRL+F) Search and maybe replace a given pattern Cut (CTRL+X) Cut selected data Copy (CTRL+C) Copy selected data Paste (CTRL+V) Paste data from clipboard Goto Go to the specified index Hexadecimal Decimal Octal Encoding Page 39 of 40 Display bytes in hexadecimal representation Display bytes in decimal representation Display bytes in octal representation The character encoding used for representing the textual representation of the content can be changed at any time by selecting the appropriate value from the combo box copyright © centeractive ag Opensphere Message Detector 2. APPENDIX 2.1. DISCLAIMER Java and all Java-based trademarks and logos are trademarks or registered trademarks of Sun Microsystems, Inc. in the U.S. and other countries. This product includes (http://www.apache.org/) software developed by the Apache Software Foundation Tibco and all related products such as Rendezvous and EMS are trademarks or registered trademarks of TIBCO Software Inc. in the U.S. and other countries. 2.2. TERMS AND ABBREVIATIONS CM Certified Message Delivery is a TIBCO Rendezvous protocol. Certified delivery features offer greater certainty of delivery – even in situations where processes and their network connections are unstable EMS The TIBCO Enterprise Message Service is a Java Messaging Service (JMS) implementation GUI Graphical User Interface Rendezvous TIBCO Rendezvous software is an industrial-strength messaging tool that allows application developers to build scalable distributed applications RV See Rendezvous TIBCO TIBCO Software is the leading global provider of business integration solutions XML XML is the Extensible Mark-up Language. It is designed to improve the functionality of the Web by providing more flexible and adaptable information identification. It is called extensible because it is not a fixed format like HTML (a single, predefined mark-up language). Instead, XML is actually a `meta language' - a language for describing other languages - which lets you design your own customized mark-up languages for limitless different types of documents copyright © centeractive ag Page 40 of 40