1
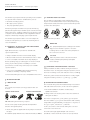
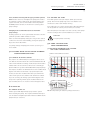
COM PA SS | HIG H - EFFICIEN C Y
WE T- ROTO R CIRCU L ATO R S
|
I N S TA L L AT I O N A N D O P E R AT I N G I N S T R U C T I O N S
File No: 10.895uk
Date: march 28, 2014
Supersedes: 10.895uk
Date: feb. 12, 2014
1.0 Symbols used in this document
1
6.0 Setting the pump
2 .0 General description
1
6.1 Pump setting for system type
4
5
2 .1 The Armstrong compass circulator pump
1
2 . 2Advantages of installing an
Armstrong Compass
7.0Systems with bypass valve between flow
and return pipes
2
2
8 .0Start-up
3 .0Installation
7.1 Purpose of bypass valve
4
5
5
3 .1Mounting
2
8 .1 Before start-up
5
3 . 2 Control box positions
2
8 . 2 Venting the pump
5
3 .3 Changing the control box position
2
9 .0 Pump settings and pump performance
4 .0Electrical connection
2
5 .0 Control panel
3
9 .1 Relation between pump setting and pump performance
5
5 .1 Elements on the control panel
3
5 . 2Display
3
5 .3 Light fields indicating the pump setting
3
w arning
• Children shall not play with the appliance. Cleaning
and user maintenance shall not be made by children
without supervision.
• If the supply cord is damaged, it must be replaced by
the manufacturer or its service agent or a similarly
qualified person in order to avoid a hazard.
• The maximum ambient temperature is 40oc at which
the pump is to be used.
• It is not used for maintenance of swimming pool.
• For indoor use only.
• Use copper conductors only.
• Do not install with motor above or below pump body.
• Do not submerge.
• Do not run pump dry.
7
11.0 Technical data and installation dimensions
7
11.1 Technical data
1.0 symbols used in this document
warning
The safety instructions must be followed to
prevent potential personal injury.
• The use of this product requires experience with and
knowledge of the product. Only licensed or trained
installers should install this product.
• This appliance can be used by children aged from 8
years and above and persons with reduced physical,
sensory or mental capabilities or lack of experience
and knowledge if they have been given supervision or
instruction concerning use of the appliance in a safe
way and understand the hazards involved.
10.0Troubleshooting
• Prior to installation, read these installation
and operating instructions. Installation and
operation must comply with local regulations
and accepted codes of good practice.
caution
5
The safety instructions must be followed to
prevent potential malfunction or damage to
the equipment.
hint
Hints or instructions that make the setup easier
and ensure safe operation
2.0 gener al installation
2 .1 the armstrong compass circulator
The Armstrong Compass circulator is designed for
circulating water in closed hydronic heating systems or
potable water systems.
Model
• Compass 25-60-130 ci
• Compass 25-60-180 ci
• Compass 25-60-180 ss
7
i n sta l l at i on &
o p erat in g in str uction s
Armstrong Compass
2
The Armstrong Compass includes operating modes suitable
for systems with constant or variable flows, such as:
• Underfloor heating systems
• One-pipe (series) systems
• Two-pipe (parallel) systems
3 . 2 control box positions
The orientation of the display can be adjusted by removing four screws that attach the motor to the pump housing.
Pump must be isolated from the system as this will open the
system to the atmosphere.
Armstrong Compass circulators incorporate Armstrong
patented Design Envelope variable speed control technology
with an ecm motor, enabling optimum energy efficiency and
occupant comfort, with built-in control algorithms that can
adapt to continuously changing system requirements.
The Armstrong Compass features a user-friendly frontmounted control panel (see section 6) and wiring box for
ease of installation.
fig. 3 Control box positions
warning
2 . 2 benefits of installing an armstrong compass circulator
Eight different modes of operation to suit different
system requirements:
caution
• Easily selectable from the front mounted display.
• Modes include Sensorless demand-based control – Auto.
• Power consumption and flow rate clearly displayed.
Broad operating range, producing up to 6.1 meters of head
and 4.5 m3/h of flow, provide versatility to cover the
performance of a wide range of fixed speed or variable
speed circulators.
• Port to Port compatibility with existing Armstrong
circulators and many competing models.
Front mounted wiring box for ease of installation and service.
The pumped liquid may be scalding hot and under
high pressure. Drain the system or close the
isolating valves on either side of the pump before the screws are removed.
After the position of the control box has been
rotated, refill the pump with system liquid
before startup.
3 .3 changing the wiring box position
Always install the circulator with the wiring box below or
beside the motor. To change the wiring box position, remove
the motor mounting screws and rotate the motor (see fig. 3).
Ensure the gasket is intact and seated before evenly retightening the mounting screw to 6 - 7.5 Nm (4.5 - 5.5 lb/ft).
3 .0 installation
3 .1 mounting
4 .0 electrical connection
Note:
For convenience in future servicing, isolation valve can
be used.
The electrical wiring must be installed strictly in accordance
with national electrical codes, local codes and regulations.
correct installations
incorrect installations
1 Electrical installation should be conducted by a
qualified electrician.
2 Always make sure electric power is disconnected before
wiring the circulator.
The motor is designed for 50 Hz, 1 phase, 230 volt power.
fig. 2 Mounting the Armstrong compass
Arrows on the pump housing indicate the liquid flow
direction through the pump.
1 Fit the two gaskets supplied when the pump is mounted in
the pipe.
2 Install the pump with the motor shaft horizontal (see fig. 2).
The wire shall be 0.75 to 1.5mm2 stranded wire with ordinary
tough rubber sheathed flexible cord (h05rr-f or h05rn-f) or
be 0.75 to 1.5mm2, rated for 60oc, solid wire
To wire, loosen the screw from the wiring box cover and
remove the screw and cover.
Insert wires through supplied liquid-seal connector
(installed) or other strain relief connector (not provided).
Armstrong Compass
i nsta l l a ti o n &
o perati ng i nstr ucti o ns
3
5 .0 control panel
Strip 0.5 cm (3 /af") of insulation from the ends of the three
wires to be connected.
To insert the wires into the terminal
strip, press the terminal lever downward firmly. Insert the stripped wire
into the opening and release the lever
(see fig.4). Tug on the wire gently to
ensure it is secured.
5 .1 elements on the control panel
1
2
Connect the live wire to terminal 'l1',
the neutral wire to terminal 'l2/n', and
the ground wire to terminal f
fig. 4 Terminal strip
(see fig. 5).
a
c
b
Place the terminal box cover
and tighten screw.
The motor is thermally protected so overload protection is
not necessary. All that is required is a fused plug or circuit
breaker in the power line. Electrical information can be found
on the side of the terminal box.
The electrical connections and protection must be carried
out in accordance with local regulations.
L1 L2/N
fig. 5 Electrical connection
fig. 6 Armstrong compass control panel
The control panel on the Armstrong compass includes:
position description
a
Display showing the actual pump power consumption in Watt and reference flow in m3/h. Display
alternates between Watt and m3/h every 5 seconds.
b
Eight light fields indicating the pump setting
c
Mode Select button for changing pump setting
Note
m3/h value is a flow indicator only, not calibrated.
5 . 2 first power-up
warning
The pump must be connected to ground.
The display is on and in Auto mode (position 0 in fig. 7) when
the electricity has been switched on.
The display shows the actual pump power consumption in
Watts and reference flow in m3/h during operation.
Note
Display shows "E#" when the pump is not operating properly
(see section 10). (# is between 0 to 4)
5 .3 display
The Armstrong Compass has eight pump settings which can
be selected with the press button.
Every time the Mode button is pressed (see fig. 6, c) the
pump setting is changed to the next option.
A full cycle is eight button presses.
The selected pump setting is indicated by one of eight
different light fields (see fig. 7).
i n sta l l at i on &
o p erat in g in str uction s
Armstrong Compass
4
speed
6.0 setting the pump
pressure curve
7
4
6
2
5
auto
fig. 7 Eight light fields
6.1 pump setting for system type
3
1
0
Note
Optimum energy savings & comfort can be achieved by
careful selection of the correct operation mode.
Recommended and alternative pump settings
according to fig. 8:
image
See section 9, Pump settings and pump performance, for
information about the function of each setting.
position description
0
auto (factory setting)
1
pc1 Lowest proportional-pressure curve
2
pc2 Highest proportional-pressure curve
3
pc3 Lowest constant-pressure curve
4
pc4 Highest constant-pressure curve
5
Constant curve, speed i
6
Constant curve, speed ii
7
Constant curve, speed iii
system
type
recommended
setting
alternative
setting
a
Underfloor
auto
heating
Highest constantpressure curve (pc4)*
or
Lowest constantpressure curve (pc3)*
b
Two-pipe
(parallel)
systems
auto
Highest proportionalpressure (pc2)*
c
One-pipe
(series)
systems
Lowest proportional-pressure
curve (pc1)*
Highest proportionalpressure (pc2)*
* See pump settings and pump performance (section 9).
single zone - constant resistance
a
radiant heat
system
recommended
speed
gas or oil
boiler
pressure curve
alternative
speed
pressure curve
circulation
pump
auto
auto
ok
ok
multiple zone - variable loads parallel
recommended
b
speed
pressure curve
alternative
speed
pressure curve
auto
auto
ok
ok
multiple zone - variable loads in series
c
recommended
speed
fig. 8 Selection of pump setting for system type
pressure curve
alternative
speed
pressure curve
auto
auto
ok
ok
i nsta l l a ti o n &
o perati ng i nstr ucti o ns
Armstrong Compass
5
auto (underfloor heating and two-pipe (parallel) systems)
auto function observes and adjusts the pump performance
to satisfy the system requirement. The pump adapts to the
system over time, it is recommended to leave the pump in
the auto position at least one week before selecting other
pump settings.
8. 2 venting the pump
Changing from recommended (auto) to alternative
pump setting:
Heating systems are 'slow' systems that cannot be set to the
optimum operation within minutes or hours.
Once the pump is vented (the noise has ceased), set the pump
mode according to the recommendations (see section 6).
If the recommended pump setting does not give the desired
comfort in some areas of the building, change the pump setting to the shown alternative.
See pump settings and pump performance (section 9) for
more details.
7.0 systems with bypass valve between flow and return pipes
Even with system vented, air may be still be present in the
pump. The air in the pump may cause noise but the noise
should cease after a few minutes running.
The venting process can be shortened by setting the pump to
run at speed III for a short period of time (20 seconds).
caution
The pump must not run dry.
9.0 pump settings and
pump performance
9.1 relation between pump setting
and pump performance
compass performance curves
7.5
7.1 purpose of bypass valve
A Compass circulator can eliminate the need for a differential
bypass valve when used in Auto or proportional pressure
modes, because the circulator will reduce speed when the
valves in the system close and the heat demand is reduced.
If you are servicing an existing system with a bypass valve
and you are replacing a fixed speed circulator with a Compass circulator, there is no need to remove the bypass valve.
8.0 start-up
8.1 before start-up
Fill the system with liquid and properly vent the system
before starting the pump. The required minimum inlet pressure in relation to liquid temperature must be available at the
pump inlet (see section 11).
6.5
6.0
5.5
head - meter (m)
The purpose of a differential pressure bypass valve is to ensure that the heat from the boiler can be distributed when all
valves in the underfloor-heating circuits and/or thermostatic
radiator valves are closed. These valves were commonly applied in multi zone systems with traditional fixed speed pumps.
7.0
5.0
4.5
pc3
pc4
4.0
3.5
3.0
2.5
auto
pc1
pc2
2.0
1.5
1.0
0.5
iii
i
ii
0
0
0.5
1.0
1.5
2.5
2.0
3.0
3.5
4.0
flow - m 3 /h
speed
pressure curve
iii
ii
pc4
pc2
i
pc3
pc1
au to
fig. 10 Pump setting in relation to pump performance
4.5
5.0
i n sta l l at i on &
o p erat in g in str uction s
Armstrong Compass
6
Select the optimum setting:
The Compass circulator comes with 8 modes of operation.
There are three fixed speed curve options which will operate just like traditional fixed speed circulators, except that
compass motor technology is far more energy efficient than
traditional fixed speed circulators.
The constant pressure curves maintain pre-selected pressure
ratings at the circulator.
auto mode operates on the sensorless differential pressure
principle, but will Learn usage patterns and adjust circulator
performance over time to optimize energy efficiency.
The proportional pressure curves operate as Sensorless
differential pressure circulators. These curves follow preselected performance curves and will reduce flow and energy
consumption when the valves in the system close and the
flow requirements are reduced.
setting
auto
(factory setting)
pump curve
Operating within the
defined range
function
The auto function controls the pump performance automatically within a defined
performance range (see fig. 10).
• Adapt to the size of the system.
• Adapt to system demand over time.
In auto, Compass is set to proportional-pressure curve control.
The operation point of the pump will follow the lowest proportional-pressure curve
(see fig. 10) depending on the load demand.
pc1
Lowest proportional
pressure curve
pc2
Highest proportional
pressure curve
pc3
Lowest constant
pressure curve
pc4
Highest constant
pressure curve
III
Speed iii
Speed III is the highest constant speed performance curve of Compass and it also
presents the max performance capability of the pump (see fig. 10). Speed III can also
be used to vent the pump (see section 8.2).
II
Speed ii
Speed II is the medium constant speed performance curve of Compass (see fig. 10).
I
Speed i
Speed I is the lowest constant speed performance curve of Compass (see fig. 10).
The head (pressure) is reduced during low demand and increased during high demand
until the maximum wattage is reached, then the pump will run on the speed III curve.
The operation point of the pump will follow the highest proportional-pressure curve
(see fig. 10) depending on the load demand.
The head (pressure) is reduced during low demand and increased during high demand
until the maximum wattage is reached, then the pump will run on the speed III curve.
The operation point of the pump will follow the lowest constant-pressure curve
(see fig. 10) depending on the load demand.
The head (pressure) is kept constant, regardless of the load demand until the maximum wattage is reached, then the pump will run on the speed III curve.
The operation point of the pump will follow the highest constant-pressure curve (see
fig. 10) depending on the load demand.
The head (pressure) is kept constant, regardless of the load demand until the maximum wattage is reached, then the pump will run on the speed III curve.
Armstrong Compass
i nsta l l a ti o n &
o perati ng i nstr ucti o ns
7
10.0 troubleshooting
warning
Before starting any work on the pump, make sure
that the electricity supply has been switched off
and that it cannot be accidentally switched on.
fault
control panel cause
Light off
The pump
does not run
Shows "e0" or "e1"
Shows "e2"
Shows "e3"
Shows "e4"
Noise in the
system
Shows wattage
and m3/h
remedy
A fuse in the installation is blown.
The circuit breaker has tripped out.
The pump is defective.
Electricity supply failure. Voltage may be too
low or too high.
The impeller is locked.
No liquid in system
Voltage may be too low
Control (internal circuit) is broken
Air in the system.
The flow is too high.
Pump may be running dry. No liquid in system
Noise in the
pump
Shows wattage
and m3/h
Insufficient
heat
in space
Shows wattage
and m3/h
The inlet pressure is too low.
The pump performance setting may
be too low.
11.1 technical data
Supply voltage: 1 × 230 v 50 Hz
Amp
Watt
minimum
ma ximum
0.05
5
0.38
45
Motor protection: The pump requires no external
motor protection.
Maximum working temperature: tf 110
Maximum working pressure: 10 bar (150 psi).
Maximum relative air humidity (rh): 95%.
Enclosure class: ip 42
Insulation class: 180 (h)
Certification: ec declaration of conformity:
• Low voltage directive (2006/95/ec)
Standard used: en 60335-2-51:
2003+a1:08+a12:12, en 60335-1: 2012,
en62233: 2008
Check voltage level of the electricity supply.
Unlock the impeller/rotor.
Fill up the system
Check voltage level of the electricity supply.
Replace the pump.
See section 8.2 Venting of the pump system.
Select a lower speed or pressure curve (see section 9).
Pump settings and pump performance.
Fill up the system
Let the pump run. It vents itself over time (see
section 8.2) venting the pump.
Increase the inlet pressure or check the air volume in
the expansion tank, if installed.
Select a higher speed or pressure curve setting (see
section 9). Pump settings and pump performance.
Confirm that the system requirement can be met by
this pump capacity or larger pump may be required.
Air in the pump.
11.0 technical data and
installation dimensions
Replace the fuse.
Switch the circuit breaker on.
Replace the pump.
• emc directive (2004/108/ec)
Standard used:
en 55014-1: 2006/+a1:2009/+a2:2011,
en 55014-2: 1997/+a1:2001/+a2:2008,
en 61000-3-2: 2006/+a1:2009/+a2:2009,
en 61000-3-3: 2008
• Ecodesign directive (2009/125/ec),
Regulation No 641/2009
2015 Standard used: en 16297-1:2012
ready
eup
model
ma x head (m)
eei**
Compass 25-60-130 ci
Compass 25-60-180 ci
6
6
eei ≤ 0. 2 2
eei ≤ 0. 2 2
Compass 25-60-180 ss
6
eei ≤ 0. 2 2
**The benchmark for the most efficient circulators is eei ≤ 0.20.
inlet pressure
Minimum inlet pressure in relation to liquid temperature:
liquid temperature
minimum inlet pressure
65°c (150°f)
75°c (167°f)
90°c (194°f)
110°c (230°f)
0.91 m (3.0 ft)
1.34 m (4.4 ft)
2.8 m (9.2 ft)
11.0 m (36.1 ft)
i n sta l l at i on &
o p erat in g in str uction s
Armstrong Compass
8
Sound pressure level: The sound pressure level of the pump is lower than 43 dB(A).
Cast iron: For closed systems (boiler loops)
Ambient temperature: 0°c (32°f) – 40°c (104°f)
Stainless steel: Open or closed systems (potable hot water
or boiler loops)
Pumped liquids: Water or water Glycol mix.
warning
warranty information
No flammable liquids such as diesel oil, petrol or
similar liquids
The manufacturer provides warranty in accordance with the
legislation of the customer’s own country of residence, with a
minimum of 2 year, starting from the date on which the appliance is sold to the end user or 30 months from the datecode
printed on the nameplate. Datecode: wwyy, ww=week in the
year & yy= year. Example 2512 = 25th week of 2012.
Liquid temperature: 2°c (36°f) – 110°c (230°f)
To avoid condensation in the control box and stator, the
liquid temperature must always be higher than the
ambient temperature.
ambient temperature
0°c (32°f)
10°c (50°f)
20°c (68°f)
30°c (86°f)
35°c (95°f)
40°c (104°f)
The warranty only covers defects in material
or workmanship.
liquid temperature
min.
max.
2°c (35.6°f)
10°c (50°f)
20°c (68°f)
30°c (86°f)
35°c (95°f)
40°c (104°f)
110°c (230°f)
110°c (230°f)
110°c (230°f)
100°c (212°f)
90°c (194°f)
80°c (176°f)
caution
volute material
Since water conditions can vary with geographical
location (i.e. amount and type of dissolved solids) it is recommended that the operating temperature of the liquid for open (potable)
systems be kept as low as possible (i.e. below 65°c or 150°f) to avoid precipitation of calcium.
toronto
The repairs under warranty may only be carried out by an
authorized service centre. When making a claim under the
warranty, the original bill of purchase (with purchase date)
must be submitted.
The warranty will not apply in cases of:
• Normal wear and tear
• Incorrect use, e.g. overloading of the appliance, use of
non-approved accessories
• Use of force, damage caused by external influences
• Damage caused by non-observance of the user manual.
E.g. connection to an unsuitable mains supply or non-compliance with the installation instruction
• Partially or completely dismantled appliances
correct disposal of this product
+1 416 755 2291
buffalo
+1 716 693 8813
This marking indicates that this product should
not be disposed with other household wastes
thoughout the eu. To prevent possible harm to the
environment or human health from uncontrolled
waste disposal, recycle it responsibly to promote
the sustainable reuse of material resources. To return your used device, please use the return and collection systems or contact the retailer where the product was purchased. They can take this product for environmental safe recycling.
birmingham
+44 (0) 8444 145 145
manchester
+44 (0) 8444 145 145
bangalore
+91 (0) 80 4906 3555
shanghai
+86 21 3756 6696
a r m s t r o n g f lu i d t e c h n o lo g y
established 1934
a r m s t r o n g f lu i d t e c h n o lo g y. c o m