1
User's Guide
Revision A
RDM SYNERGY II User’s Guide Rev. A
Revised: November 2012
©2012 RDM Corporation.
All rights reserved. No part of this publication may be reproduced, stored in a retrieval system, or transmitted, in any form or by any
means, electronic, mechanical, photocopy, recording, or otherwise, without the prior written permission of RDM Corporation.
Trademarks
ITMS, RDM, and the RDM logo are registered trademarks of RDM Corporation. Synergy Deposit is a trademark of RDM Corporation.
All other brand names and trademarks appearing in this guide are the property of their respective holders.
Disclaimer
RDM Corporation makes no warranty with respect to the adequacy of this documentation, programs, or hardware that it describes for
any particular purpose or with respect to the adequacy to produce a particular result. In no event shall RDM Corporation be held liable
for special, direct, indirect, or consequential damages, losses, cost, charges, claims, demands, or claim for lost profits, fees, or expenses
of any nature or kind.
RDM Corporation
www.rdmcorp.com
End-User/Customer Agreement
Please read the end-user/customer agreement regarding software license and warranty terms during the installation of the application.
Contents
1 Introduction .............................................................................1
Keys ........................................................................................................................... 1
Menus ........................................................................................................................ 5
2 Setting up your RDM SYNERGY II terminal .........................................7
Before you begin ........................................................................................................ 7
Installing the franking printer cartridge ..................................................................... 10
Connecting to a telephone line or network ............................................................... 11
Connecting peripheral devices ................................................................................. 12
Connecting power .................................................................................................... 12
Installing the printer paper roll .................................................................................. 12
Modifying parameters ............................................................................................... 13
Uninstalling an app ................................................................................................... 15
3 Using the terminal ................................................................... 17
Scanning checks ...................................................................................................... 17
Swiping credit cards ................................................................................................. 18
Printing receipts ....................................................................................................... 18
Modifying Settings .................................................................................................... 18
Status Signals .......................................................................................................... 19
4 Maintaining your RDM SYNERGY II terminal ..................................... 21
Cleaning the terminal ............................................................................................... 21
Cleaning the printer .................................................................................................. 21
Cleaning the imager ................................................................................................. 22
5 Troubleshooting ...................................................................... 23
Paper moves through printer, but it does not print ................................................... 23
Modem does not function ......................................................................................... 23
Peripheral device does not respond ........................................................................ 24
Printer does not respond .......................................................................................... 24
Printer is jammed ..................................................................................................... 24
Display does not function properly ........................................................................... 25
Keypad does not respond ........................................................................................ 25
Check feeder does not function properly ................................................................. 25
Card swiping does not work ..................................................................................... 26
Connection to the network fails ................................................................................ 27
6 FCC Compliance Statement ........................................................ 29
RDM Corporation
i
CONTENTS
ii
RDM SYNERGY II USER’S GUIDE REV. A
RDM Corporation
Introduction
RDM SYNERGY II is an all-in-one electronic payment solution. Your RDM SYNERGY II
terminal includes Ethernet/modem communication, configurable double or single sided imaging, an
integrated keypad, a magstripe reader, a thermal printer, and a franker.
RDM SYNERGY II accepts most forms of non-cash payments. Depending on the application you
are using, it can process:
•
checks and other documents such as remittance payment coupons
•
credit, debit, and ATM cards
•
electronic benefits transfer (EBT), loyalty cards, and gift cards
For more information about the application you are running, see the user manual for the application
you are using.
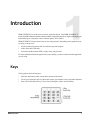
Keys
The keypad has the following keys:
RDM Corporation
•
Four blue function keys that correspond to options in the menus
•
Twelve grey telephone-style keys that can be used to type numbers, letters, and other characters
•
Four color-coded function keys: Clear/Cancel, Backspace, Alpha, and Func/Enter
1
CH 1: INTRODUCTION
RDM SYNERGY II USER’S GUIDE REV. A
Blue function keys
The four blue keys below the display screen correspond to options in the menus. Press a blue key
to open the option just above it.
In the following example, press the blue key below “PgUp” to move up a page.
Color-coded function keys
You can use the four color-coded function keys in the following ways:
Key
Function
Clear/Cancel (red)
Press Clear once to clear the field.
Press Clear twice to terminate the current operation.
Backspace (yellow)
Deletes the last character typed on the screen.
Alpha (orange)
Enables you to enter up to 50 different ASCII characters from the
numeric keypad.
Func/Enter (green)
Initiates a procedure, confirms an entry, answers Yes to a query, or
selects a displayed option.
Typing characters
The numbers on the keypad can also be used to type letters and other characters. To convert a
number to a character, you use the orange Alpha key.
To type a letter on the screen, press the number that contains the letter, and then press Alpha to
convert the number to a letter. In some cases you will need to press Alpha more than once.
2
RDM Corporation
RDM SYNERGY II USER’S GUIDE REV. A
CH 1: INTRODUCTION
For example, the key for the number 2 also shows the letters A, B and C. To enter the letter C, press
the number 2, and then press Alpha to convert the number to a letter. Press Alpha twice more to
scroll to C. If you want a lower case c, continue to press Alpha until it appears.
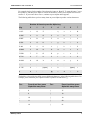
The following table shows you how many times to press Alpha to produce various characters.
Number of times to press the Alpha key
Key
0
1
2
3
4
5
6
7
1 QZ .
1
Q
Z
.
q
z
1
Q
2 ABC
2
A
B
C
a
b
c
2
3 DEF
3
D
E
F
d
e
f
3
4 GHI
4
G
H
I
g
h
i
4
5 JKL
5
J
K
L
j
k
l
5
6 MNO
6
M
N
O
m
n
o
6
7 PRS
7
P
R
S
p
r
s
7
8 TUV
8
T
U
V
t
u
v
8
9 WXY
9
W
X
Y
w
x
y
9
*,‘“
*
,
‘
“
*
,
‘
“
0 - SP
0
-
[space]
+
0
-
[space]
+
#
#
!
:
@
=
&
/
%
The hash key (#) provides the ability to type additional characters, as the following table shows. For
example, press # and then press Alpha 10 times to produce an underscore (_).
For...
Press # and then press
Alpha this many times
For...
Press # and then press
Alpha this many times
|
8
)
17
;
9
[
18
_
10
]
19
~
11
{
20
‘
12
}
21
RDM Corporation
3
CH 1: INTRODUCTION
RDM SYNERGY II USER’S GUIDE REV. A
For...
Press # and then press
Alpha this many times
For...
Press # and then press
Alpha this many times
$
13
<
22
^
14
>
23
?
15
\
24
(
16
#
25
Hotkeys
Hotkeys are combinations of keys that allow special functionality. For example, press the hash key
(#) and then zero (0) to exit the application. RDM SYNERGY II provides the following hotkeys.
Some applications may not support all of the keys, but at a minimum they can be used from the Start
Menu.
4
Hotkey
Description
#0
Exits the application to the Start Menu. You can use this hotkey in the main
screen of most applications.
#1
Form feed: Advances the paper about 2 inches. This hotkey is useful when
loading printer paper.
#2
Line feed: Advances the paper 1 line.
#3
Display the software version.
#4
Spins the check feed motor. This clears the document path, which is useful to
free a check that is stuck in the terminal.
#6
If pressed while in the Start Menu, this option opens the Control Panel.
#8
Re-orders the selection list. This option applies to terminals installed with
multiple applications or merchants. The first item in a list cannot be moved.
#9
Opens the Merchant Selection menu. When pressed within a multi-merchant
application, this option lets you start a merchant: highlight a merchant and
press Enter.
*7
Opens the Download menu. When pressed at the Start Menu, this allows
download management, PABX configuration, date and time setup, and
application removal.
RDM Corporation
RDM SYNERGY II USER’S GUIDE REV. A
CH 1: INTRODUCTION
Menus
On the RDM SYNERGY II terminal, tasks are completed by using menus.
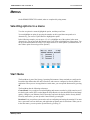
Selecting options in a menu
To select an option in a menu: highlight the option, and then press Enter.
You can highlight an option by pressing the number on the keypad that corresponds to it.
Alternatively, you can use Up and Down to highlight the option.
In the following example, you can press 1, 2 or 3 to highlight one of the options in the menu.
Alternatively, you can press the blue button below Up or Down to highlight one of the options. You
can press the blue button below Page Up or Page Down to see more options. (Sometimes there is
also a More option for moving to more options.)
Start Menu
The Start Menu is part of the Synergy Operating Environment. Some terminals are configured to
launch the Start Menu when the unit is turned on, and some are configured to directly launch an
application. When you are in an application‘s main menu, you can open the Start menu by pressing
#0.
The Start Menu has the following sub-menus:
Control Panel: Lets you adjust screen backlighting and contrast, turn the key click sound on or off,
test the keypad, test the LED, test the Magnetic Stripe Reader, test the check MICR read and image
quality, configure your Ethernet (LAN) connection, and reset the display back to factory default.
From any main menu, you can open the Control Panel by pressing #6.
Download: Lets you perform system tasks such as configuring and testing the terminal. You must
have a password to access this menu, and application programs must be shut down. When you are
in the Start menu, you can open the System menu by pressing *7.
RDM Corporation
5
CH 1: INTRODUCTION
6
RDM SYNERGY II USER’S GUIDE REV. A
RDM Corporation
Setting up your RDM
SYNERGY II terminal
To set up your RDM SYNERGY II terminal, complete the steps in this chapter.
Before you begin
Examine the terminal for damage received in shipping. If the terminal or any component appears
damaged, do not use it. File a claim with the shipping company and contact your distributor.
Placement
Choose a location for the RDM SYNERGY II terminal that:
•
Has a flat surface and is convenient for the terminal operator.
•
Is not close to any device that can emit electromagnetic interference, such as a computer
monitor or power adaptor.
•
Offers adequate ventilation and protection from heat, dust, oil or moisture.
•
Is close to a telephone line or network connection, as well as a power connection.
Contents
Your box includes the following:
•
RDM SYNERGY II terminal
•
Power adapter
•
Telephone cord (for the modem)
•
Thermal printer paper roll
•
Check Franking Acknowledgement printer cartridge
Cautions
RDM Corporation
•
RDM SYNERGY II is for indoor use only.
•
Keep RDM SYNERGY II dry. Avoid areas of high humidity.
7
CH 2: SETTING UP YOUR RDM SYNERGY II TERMINAL
RDM SYNERGY II USER’S GUIDE REV. A
•
RDM SYNERGY II must be used with the power adapter supplied in the original shipping
container, which is RDM Part #302815, Model ABL-D838.
•
Do not remove any cabinetry other than the areas specified in this guide. Removing cabinetry
other than the areas specified in this guide will void the warranty.
Recommendations
•
Save the original box and packing material. Re-use them if the unit must be shipped to a new
location.
•
Position the unit so that the operator has easy access to the check path and a clear view of the
display. Do not put the unit close to a heat source, in direct sunlight or close to any device that
can emit electromagnetic interference, such as a computer monitor or power adapter.
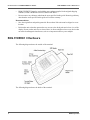
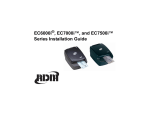
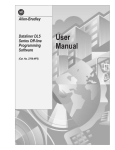
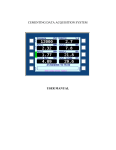
RDM SYNERGY II Hardware
The following diagram shows the outside of the terminal:
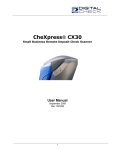
The following diagram shows the inside of the terminal:
8
RDM Corporation
RDM SYNERGY II USER’S GUIDE REV. A
CH 2: SETTING UP YOUR RDM SYNERGY II TERMINAL
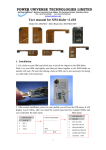
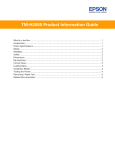
The back of the terminal has the following connection ports:
Port
Description
Power
Red. Use this port to connect to the power adapter.
USB
Orange. This port is not currently functional.
AUX
Yellow. Use this port to connect to optional peripheral
devices.
COM
Green. Use this port to connect to optional peripheral
devices.
Ethernet
Blue. Use this port to connect to an Ethernet LAN.
TEL
Purple. Use this port to connect to a modem and telephone
line.
RDM Corporation
9
CH 2: SETTING UP YOUR RDM SYNERGY II TERMINAL
RDM SYNERGY II USER’S GUIDE REV. A
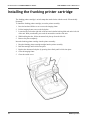
Installing the franking printer cartridge
The franking printer cartridge is an ink stamp that marks checks with the words “Electronically
Presented”.
To install the franking printer cartridge, access the printer assembly:
1
Press the latch and lift the cover to access the imaging frame.
2
Lift the imaging frame to access the feed plate.
3
Locate the blue tab on the right side of the unit and a similar-looking black tab on the left side
of the unit. With your thumbs, press each tab towards the outside of the unit.
4
While holding the tabs, lift the document feed plate up from the left side.
5
Remove the plate completely.
Insert the franking printer cartridge into the printer assembly:
10
1
Drop the franking printer cartridge straight into the printer assembly.
2
Push the cartridge until it clicks into place.
3
Replace the document feed plate by pressing down firmly until it clicks into place.
4
Close the imaging frame.
5
Close the outside cover.
RDM Corporation
RDM SYNERGY II USER’S GUIDE REV. A
CH 2: SETTING UP YOUR RDM SYNERGY II TERMINAL
Connecting to a telephone line or network
Telephone line
RDM SYNERGY II has a built-in modem. If you don’t have access to a network, you can use the
modem to connect over a telephone line. The modem is also useful as a backup if your network goes
down.
To connect to a telephone line, insert one end of the telephone cable into the TEL port at the back
of the terminal, and the other end into a telephone wall plug.
Local Area Network
RDM SYNERGY II supports a 10Base-T wired Ethernet connection.
To connect to a LAN over a wired connection, insert one end of the Ethernet cable into the Ethernet
port on the back of the terminal, and the other end into a network port.
You can configure the Ethernet from the Control Panel.
To open the Control Panel
1
Open the Start Menu: From the main menu of your application, press #0.
2
Open the Control Panel: From the Start Menu, press #6.
To view Ethernet settings
1
Open the Control Panel.
2
Select 1. Ethernet Settings, and then press Enter.
3
Select 1. IP Config, and then press Enter.
The IP Configuration screen displays information about your Ethernet settings:
•
MAC: The Media Access Control address, which is a unique identifier
•
Setup: Either DHCP or Static
•
IP: The terminal’s current IP address
•
GateW: The address of the terminal’s default gateway
•
DNS: The address of the terminal’s primary Domain Name System
To use a static IP address
You can switch to a static IP address through the Ethernet Settings option on the Start Menu. You
must provide values for the following options:
•
Static: The static IP address
•
Subnt: The subnet mask
•
GateW: The address of the terminal’s default gateway
•
DNS1: The address of the terminal’s primary Domain Name System
RDM Corporation
11
CH 2: SETTING UP YOUR RDM SYNERGY II TERMINAL
•
RDM SYNERGY II USER’S GUIDE REV. A
DNS2: The address of the terminal’s secondary Domain Name System
Connecting peripheral devices
RDM SYNERGY II can work with peripheral PIN pad devices if they are supported by the
application you are using. Peripheral devices plug into either of the RS232 peripheral ports (AUX
or COM) on the back of the terminal.
Before connecting any optional tool, ensure that the unit is unplugged from its power source.
Connecting power
When you connect to power, the terminal is on. To connect RDM SYNERGY II to a power source,
insert the round end of the power cord into the POWER port on the back of the terminal, and plug
the cord into a wall socket.
To turn off the terminal, unplug it by holding the sliding lock sleeve that attaches to the terminal.
(Do not tug on the cable.)
Typically, the terminal is left on overnight because that is when processing is scheduled to occur.
You will probably only turn off the terminal if you need to reboot it, or if you are not using it for an
extended period.
Installing the printer paper roll
RDM SYNERGY II uses single-ply, thermal-sensitive paper that comes in a roll that is 2.25 inches
(5.8 cm) wide.
The thermal paper is coated only on one side, and only that side can be used for printing. Ensure
that the roll is installed so that the paper curls up from the bottom of the roll and into the unit.
Handle thermal paper with care. Friction, humidity, light, etc. will damage it. Do not load paper
with wrinkles, folds, or tears. For best results, cut the paper, rather than tearing it, to feed it into the
printer.
To install a roll of paper:
12
1
Ensure the RDM SYNERGY II terminal is turned on.
2
Open the lid of the round paper roll cover at the back of the unit.
RDM Corporation
RDM SYNERGY II USER’S GUIDE REV. A
CH 2: SETTING UP YOUR RDM SYNERGY II TERMINAL
3
Hold the paper roll with the paper feeding from the bottom towards the RDM SYNERGY II
terminal. Guide the straight-cut end of the paper into the paper feed slot that is in line with the
holder. The feed mechanism will pull the paper into the unit.
4
Place the roll loosely into the paper roll holder.
5
Close the paper roll cover.
Modifying parameters
There are two ways to install an application or parameters:
•
With VeriFone VeriCentre using an Ethernet connection. This is the standard method and is
strongly recommended.
•
With VeriCentre over a phone connection, using the modem that is built into the terminal.
The following sections explain both options.
If you do not have access to VeriCentre, you should contact your deployment partner for help with
downloading.
Your terminal will probably have the Synergy Operating Environment (SOE) and application
installed before you receive it. However, in some rare cases you may need to do the installation
yourself. For example, you may need install a later version of the SOE. You can use the same
procedure for installing the SOE or application as you do for installing parameters.
Updating parameters or an app over Ethernet with
VeriCentre
This procedure uses the network connection that is typically used with the RDM SYNERGY II
terminal.
1.
Plug an ethernet cable into the Ethernet port in the back of the terminal.
This cable must provide the terminal access to the Internet.
2.
On the Start Menu, press *7.
The terminal prompts you for a password.
3.
Enter the password.
The correct password is the current date on the terminal in MMDDYY format. For example,
093012.
The Start Menu DOWNLOAD screen appears.
RDM Corporation
13
CH 2: SETTING UP YOUR RDM SYNERGY II TERMINAL
4.
RDM SYNERGY II USER’S GUIDE REV. A
Highlight the menu option 1. Download Mngmt, and then press Enter.
The Dwnld menu appears. This menu has seven options, followed by an eighth option that
starts the download. If your terminal is already set up, most of the information is already in
the options. If you need to change any of the options, highlight the option and press Enter.
•
1. VTC App Id: the name of your application.
•
2. VTC Terminal Id: The ID of your RDM SYNERGY II terminal.
•
3. Dwnld Type: Choose Full to download an application, or Partial to download
parameters.
•
4. Device: Typically, choose TCP on DHCP, which is the option for Ethernet.
•
5. VeriCentre URL: The URL of your VeriCentre server, not including http://
•
6. Baud Rate: By default, this is set to the highest baud rate, and you shouldn’t typically
change it.
•
7. Model: EC8316f: The model of your terminal. Don’t change this.
5.
To start the download, highlight the menu option 8. *Start* Download, and then press Enter.
6.
When the application or parameters file has downloaded, press the blue button below Cont.
7.
On the Start Menu DOWNLOAD screen, select Cancel.
8.
On the Start Menu, highlight your application name, and then press Enter.
9.
Reboot the terminal by cycling the power.
Updating parameters or an app over the modem with
VeriCentre
This procedure uses the modem that is built in to RDM SYNERGY II terminals.
1.
Plug a telephone cable into the TEL port in back of the terminal.
This cable must provide the terminal access to a live telephone line.
2.
On the Start Menu, press *7.
3.
Enter the password.
The password is the date on the terminal in MMDDYY format. For example, 093012.
The Start Menu DOWNLOAD appears.
4.
Highlight the menu option 1. Download Mngmt, and then press Enter.
The Dwnld menu appears. This menu has seven options, followed by an eighth option that
starts the download. If your terminal is already set up, most of the information is already in
the options. If you need to change any of the options, highlight the option and press Enter.
14
•
1. VTC App Id: the name of your application.
•
2. VTC Terminal Id: The ID of your RDM SYNERGY II terminal.
•
3. Dwnld Type: Choose Full to download an application, or Partial to download
parameters.
•
4. Device: Choose 1. Modem Internal.
RDM Corporation
RDM SYNERGY II USER’S GUIDE REV. A
CH 2: SETTING UP YOUR RDM SYNERGY II TERMINAL
•
5. Phone: The phone number of the VeriCentre server.
•
6. Baud Rate: By default, this is set to the highest baud rate, and you shouldn’t typically
change it.
•
7. Model: EC8316f: The model of your terminal. Don’t change this.
5.
To start the download, highlight the menu option 8. *Start* Download, and then press Enter.
6.
When the application or parameters file has downloaded, press the blue key below Cont.
7.
On the Start Menu DOWNLOAD screen, select Cancel.
8.
On the Start Menu, highlight your application name, and then press Enter.
9.
Reboot the terminal by cycling the power.
Uninstalling an app
1.
On the Start Menu, press *7.
You are prompted for a password.
2.
Enter the password.
The correct password is the current date on the terminal in MMDDYY format. For example,
093012.
The Start Menu DOWNLOAD screen appears.
3.
Select 5. Edit RunApps, and then press Enter.
You are prompted for a password.
4.
Enter the password.
The correct password is the current date on the terminal in MMDDYY format. For example,
112409.
The Start Menu startmenu_RunApps screen appears.
5.
Highlight the name of the application you want to uninstall, and then press Enter.
6.
Highlight the menu option 1. Uninstall, and then press Enter.
7.
Delete the 0, enter 1, and then press Enter.
8.
Press Clear/Cancel until you return to the Start Menu.
The Start Menu no longer lists the application you uninstalled. If there are no more
applications, the Start Menu displays none.
RDM Corporation
15
CH 2: SETTING UP YOUR RDM SYNERGY II TERMINAL
16
RDM SYNERGY II USER’S GUIDE REV. A
RDM Corporation
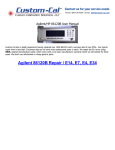
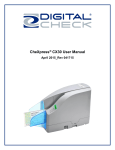
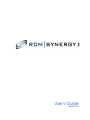
Using the terminal
Typically, the main uses of the terminal are to scan checks, swipe cards, and print receipts. The
following diagram shows how to insert cards and checks:
Scanning checks
You can scan other documents besides checks (such as remits), but checks are the most common.
To reduce the possibility of errors and damage to the unit, you should:
•
Remove any paper clips and staples from the check.
•
If necessary, unfold the check and flatten creases.
Insert the check into the feeder tray at the front of the terminal. Make sure that the check is:
•
Flush to the right side of the feeder tray
•
With the information side facing up
•
With the MICR line to the inside right
Do not open the cover or otherwise try to access the inside of the unit while it is in the process of
scanning a document.
If a check becomes jammed, clear it from the feed path by pressing #4 at the Start Menu.
RDM Corporation
17
CH 3: USING THE TERMINAL
RDM SYNERGY II USER’S GUIDE REV. A
After the check is processed, you can frank it with the words “Electronically Presented”. For more
information about franking, see the documentation for your application.
Swiping credit cards
The slot for swiping cards is on the right side of the terminal.
Swipe cards so that the black magnetic strip is facing downward and to the left. You can swipe a
card in either direction (towards the front or back of the terminal).
Printing receipts
Printing receipts is controlled by the application you are using. The receipt should print
automatically and can then be torn off.
The following key sequences provide easy ways to advance the printer paper:
Key sequence
Description
#1
Form feed. This advances the printer paper about 2 inches.
It is useful when loading printer paper.
#2
Line feed. This advances the printer paper one line.
Modifying Settings
Changing the date and time
To change the date and time settings: On the Start Menu, press *7.
The Download menu opens, which contains settings for date and time.
18
RDM Corporation
RDM SYNERGY II USER’S GUIDE REV. A
CH 3: USING THE TERMINAL
To change the date or time, you need to enter a password. By default, the password is the current
date in MMDDYY format.
Making the screen easier to read
You can adjust the contrast and brightness of the RDM SYNERGY II screen on the Control Panel.
To open the Control Panel: On the Start Menu, press #6.
You can reset the terminal to its default contrast and brightness by cycling the power. (This is useful
if you accidentally change the settings so that you can’t read the screen.)
Reducing the brightness of the screen when idle
You can adjust the backlight of the screen so that it is less bright when the terminal is inactive. You
do this on the Control Panel with the Adjust Backlight setting.
To open the Control Panel: On the Start Menu, press #6.
Turning key sounds off or on
When key sounds are activated, you hear a beep each time a key is pressed. You can turn on or off
this feature using the Adjust Key Sounds option on the Start Menu.
Displaying the SOE version
When troubleshooting, you may need to know your version of the Synergy Operating Environment.
You can access this information from the Start Menu by pressing #3.
Status Signals
The RDM SYNERGY II terminal comes equipped with default light and sound signals. However,
the light and sound signals may change depending on the application in use. For a more detailed
status description, always look at the terminal display.
The status of the terminal is shown in the light on the front, right side of the unit. The following
table shows the default status lights:
RDM Corporation
19
CH 3: USING THE TERMINAL
20
RDM SYNERGY II USER’S GUIDE REV. A
Status light
Description
Green solid
The unit is ready to accept a transaction. For example, you
can insert a check.
Green flashing
The unit is busy processing the last transaction. Wait for
the job to finish.
Amber Solid
The unit is idle. You can start the next job.
Amber Flashing
The unit is sending or receiving information. Wait for it to
finish.
Red / Green / Amber Flashing
The unit is processing information. Wait for it to finish.
Red Solid
The unit failed during operation. Check the display for
instructions.
Red Flashing
An error occurred during processing.
RDM Corporation
Maintaining your RDM
SYNERGY II terminal
RDM SYNERGY II performs best when all working surfaces are clean and free of foreign material.
Cleaning the terminal
To clean the outside cabinetry, use a damp cloth and mild soap.
To clean the inside of the unit:
1
Disconnect the unit from its power source.
2
Press the latch and lift the cover to access the imaging frame.
3
Lift the imaging frame to access the document feed plate.
4
Locate the blue tab on the right side of the unit and a similar-looking black tab on the left side
of the unit. With your thumbs, press each tab towards the outside of the unit.
5
While holding the tabs, lift the document feed plate up from the left side.
6
Remove the plate completely.
7
To clean the inside, use: a compressed air duster; a soft cloth; or a dusting brush designed for
electronic equipment.
Cleaning the printer
RDM Corporation
1
Disconnect the unit from its power source.
2
Swing open the clear plastic paper roll cover at the back of the unit.
3
Lift out the paper roll. Cut the paper that is in the feed mechanism from the roll.
21
CH 4: MAINTAINING YOUR RDM SYNERGY II TERMINAL
RDM SYNERGY II USER’S GUIDE REV. A
4
Press the latch and lift open the cover.
5
Toward the back of the unit, locate the paper slot and the gray lever on the right side of it. Flip
the gray lever up and toward the front of the unit to release the paper.
6
Manually remove the remaining paper from the feed mechanism. Carefully remove any dirt,
dust, or scraps of paper stuck in the printer parts.
7
Flip the gray lever back into place. Close the cover again.
8
Re-install the paper roll.
Cleaning the imager
Occasionally, it may be necessary to clean the image sensor and remove dust or debris from the
interior of RDM SYNERGY II. To locate and access the image sensor:
22
1
Disconnect the unit from its power source.
2
Press the latch and lift the cover to access the imaging frame.
3
Lift the imaging frame.
4
Use a lens cleaning tissue or a damp lint-free cloth to remove any ink or dust from the image
sensor.
RDM Corporation
Troubleshooting
In the course of everyday operations, you may encounter minor malfunctions in your RDM
SYNERGY II unit. Before calling for service:
•
Turn the machine off and then on again.
•
Review the troubleshooting steps below.
Paper moves through printer, but it does
not print
Your RDM SYNERGY II terminal uses thermal printer paper that is coated on one side. It will not
print on the other side. Ensure that the paper is placed in the roller so that the paper curls up from
the bottom of the roll into the Synergy II terminal.
Modem does not function
RDM Corporation
1
Examine the telephone cord to ensure that it is connected properly.
2
Ensure the telephone line is working by removing the connection from RDM SYNERGY II and
connecting it to a telephone.
3
If the telephone line is not working, contact your local telephone company for repair.
23
CH 5: TROUBLESHOOTING
RDM SYNERGY II USER’S GUIDE REV. A
Peripheral device does not respond
Ensure that the device’s cable is properly connected to the correct port on the back of the unit
(according to instructions provided by your distributor or transaction integrator).
If the problem persists, contact your distributor or transaction integrator.
Printer does not respond
Ensure that the unit is still receiving power. The LED indicator light (at the front of the terminal on
the right) should be on.
Check to ensure the printer has paper. If it is out of paper, install a new roll.
If the problem persists, contact your distributor.
Printer is jammed
The first thing to try is to spin the check feed motor. You can do this from the Start Menu by
pressing #1. This might be able to clear the jam. If that doesn’t work:
1
Swing open the clear plastic paper roll cover at the back of the unit.
2
Lift out the paper roll. Cut the paper that is in the feed mechanism from the roll.
3
Press the latch and lift open the cover.
4
Toward the back of the unit, locate the paper slot and the gray lever on the right side of it. Flip
the gray lever up and toward the front of the unit to release the paper.
5
Manually remove any remaining paper from the feed mechanism. Carefully remove any dirt,
dust, or scraps of paper that are stuck in or to the printer parts.
6
Flip the gray lever back into place. Close the cover again.
7
Re-install the paper roll.
To install a roll of paper:
24
1
Ensure the RDM SYNERGY II terminal is turned on.
2
Open the lid of the round paper roll cover at the back of the unit.
3
Hold the paper roll with the paper feeding from the bottom towards the RDM SYNERGY II
terminal. Guide the straight-cut end of the paper into the paper feed slot that is in line with the
holder. The feed mechanism will pull the paper into the unit.
4
Place the roll loosely into the paper roll holder.
RDM Corporation
RDM SYNERGY II USER’S GUIDE REV. A
5
CH 5: TROUBLESHOOTING
Close the paper roll cover.
Display does not function properly
There could be several reasons for this problem:
•
If the brightness and contrast settings have been set too low, you may not be able to read
anything on the screen. You can reset the defaults by cycling the power.
•
Examine the cable connections to ensure that they are connected properly.
•
Verify that the electrical outlet is working and the power adapter connectors are connected. If
they are not working, replace the terminal power adapter with one from another RDM Synergy
II terminal. If the replacement solves the problem, contact your distributor to order a
replacement power adapter.
If the problem persists, contact your distributor.
Keypad does not respond
If you are having problems pressing key sequences, you may be pressing the keys at the same time.
Be sure to press keys sequentially. For example, to use #7, press # and then press 7.
If the display panel is blank or displays incorrect characters when you press a key, follow the
directions in the “Display Does Not Function Properly” section, above.
If pressing a key does not result in the expected action, refer to the documentation for your
application to ensure that you are entering data in the correct sequence.
If the problem persists, contact your distributor.
Check feeder does not function properly
Ensure that you are inserting the check properly: flush to the right side of the feeder tray,
information side facing up, with the MICR line to the inside right.
RDM Corporation
25
CH 5: TROUBLESHOOTING
RDM SYNERGY II USER’S GUIDE REV. A
Ensure that there are no staples or paper clips on the document.
Remove the jammed document, or any other debris, using the following instructions:
1
Press the latch and lift the cover to access the imaging frame.
2
Lift the imaging frame to access the document feed plate.
3
Clear any paper or debris from these areas. Re-close the imaging frame and cover.
If the problem persists, contact your distributor.
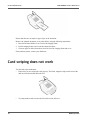
Card swiping does not work
Test the card swipe mechanism:
26
•
Ensure that you are swiping the card properly: The black, magnetic stripe on the back of the
card must face downward and to the left.
•
Try using another card to ensure the first card was not defective.
RDM Corporation
RDM SYNERGY II USER’S GUIDE REV. A
CH 5: TROUBLESHOOTING
Test the hardware and software:
1
Process the transaction manually by typing the card data into the keypad.
2
If you are able to process the card through the keyboard, then the problem lies with the card
reader. Contact your distributor to have the card reader repaired.
If processing the card through the keyboard does not work, test the telephone line using a different
telephone base unit.
Test the telephone line and third-party line: Call the number to which you are trying to connect to
ensure that it is working properly. If the line is working, contact your local telephone company for
repair. If the telephone line works, contact your distributor to have your RDM SYNERGY II
terminal serviced.
Connection to the network fails
RDM SYNERGY II supports a 10Base-T wired Ethernet connection.
You can configure the Ethernet connection from the Control Panel.
To open the Control Panel
1
Open the Start Menu: From the main menu of your application, press #0.
2
Open the Control Panel: From the Start Menu, press #6.
To troubleshoot TCP/IP
There is no default port value for TCP/IP. To configure TCP/IP for troubleshooting:
1
Open the Control Panel.
2
Select 1. Ethernet Settings, and then press Enter.
3
Select 2. Diag Config, and then press Enter.
4
Select 1. TCP IP, and then press Enter.
5
Enter the IP address of the network server, and then press Enter.
6
Select 2. TCP Port, and then press Enter.
7
Enter the TCP port number on the network server, and then press Enter.
8
Select 5. Save Diag Config, and then press Enter.
9
Perform troubleshooting. (See below.)
To troubleshoot SSL
There is no default port value for SSL. If you do not have a specific port number for the protocol,
use the standard port value 443. To configure SSL for troubleshooting:
1
Open the Control Panel.
2
Select 1. Ethernet Settings, and then press Enter.
3
Select 2. Diag Config, and then press Enter.
4
Select 3. SSL IP, and then press Enter.
RDM Corporation
27
CH 5: TROUBLESHOOTING
RDM SYNERGY II USER’S GUIDE REV. A
5
Enter the IP address of the network server, and then press Enter.
6
Select 4. SSL Port, and then press Enter.
7
Enter the SSL port number on the network server (or 443), and then press Enter.
8
Select 5. Save Diag Config, and then press Enter.
9
Perform troubleshooting. (See below.)
To perform a ping test
1
Open the Control Panel.
2
Select 1. Ethernet Settings, and then press Enter.
3
Select 3. Ping test, and then press Enter.
4
Enter the IP address or the host name of the machine you want to ping, and then press Enter.
If the ping is unsuccessful, perform Troubleshooting (below).
To repair an IP connection
If the connection to the network stops working, you can manually force the connection to be
repaired:
1
Open the Control Panel.
2
Select 1. Ethernet Settings, and then press Enter.
3
Select 4. Repair IP Conn, and then press Enter.
To perform troubleshooting
1
Open the Control Panel.
2
Select 1. Ethernet Settings, and then press Enter.
3
Select 5. Troubleshooting, and then press Enter.
The terminal performs the following tasks:
28
•
Pings the default gateway
•
Pings the primary DNS
•
Performs a DNS lookup on www.rdmcorp.com
•
Pings the IP address that it found for www.rdmcorp.com
•
Attempts to connect over TCP/IP to test that the host port is working
•
Attempts to connect over SSL to test that SSL is working
RDM Corporation
FCC Compliance Statement
This equipment has been tested and found to comply with the limits for a Class A digital device,
pursuant to Part 15 of the FCC rules. These limits are designed to provide reasonable protection
against harmful interference when the equipment is operated in a commercial environment. This
equipment generates, uses, and can radiate radio frequency energy and, if not installed and used in
accordance with the instruction manual, may cause harmful interference to radio communications.
Operation of this equipment in a residential area is likely to cause harmful interference in which
case the user will be required to correct the interference at his own expense.
Warning: Changes or modifications not expressly approved by RDM could void the user’s authority
to operate the equipment.
All units covered by this manual have no user-serviceable parts inside. In the event repairs are ever
needed to any RDM product, they should be performed by RDM Corporation or an authorized
representative of RDM Corporation. For information please contact RDM Corporation, 4-608
Weber Street North, Waterloo, Ontario, Canada N2V 1K4, at 1-800-567-6227, or RDM’s US
service agent below.
US Service Agent
William Buser
(703) 286-5734
[email protected]
RDM Corporation
29