1
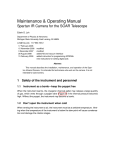
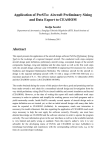
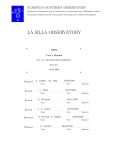
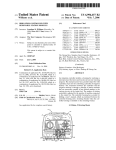
SAO Wide-field InfraRed Camera
(SWIRC)
User’s Manual
Warren R. Brown
Version 17 Nov 2005
TABLE OF CONTENTS
I. The SWIRC project.
II. Instrument Characteristics.
III. Quick Start.
IV. Details on the MICE Interface and Dither Catalogs.
V. Tips for Observing at the MMT.
VI. Troubleshooting.
VII. Reduction Scripts -- old.
I. The SWIRC project
SWIRC is a J- and H-band imager for the f/5 cassegrain focus of the MMT. The goal of
the instrument was to deliver quickly a wide field-of-view instrument with minimal optical
elements and hence high throughput. The trade-off was to sacrifice K-band capability by not
having an internal, cold Lyot stop. SWIRC has two filters — J-band (1.2 um) and H-band (1.6
um) — plus dark slides. There is an available filter slot for a user-provided filter. The detector is
a 2048x2048 pixel Hawaii-2 HgCdTe engineering-grade array with good cosmetics, purchased
as part of the MMT Magellan Infrared Spectrograph project. SWIRC’s detector mount,
electronics, and observing software are prototypes for the MMT Magellan Infrared Spectrograph.
SWIRC was proposed in 2003 May and commissioned 2004 June 30 - July 6. Sustained
seeing of 0.4 arcsec FWHM was observed during commissioning. Throughput is 2.5-3 times
that of FLAMINGOS on the MMT. An exposure time calculator and this manual are available
from SWIRC’s homepage:
http://www.cfa.harvard.edu/swirc
SWIRC was made possible by significant efforts from the following people.
Principal Investigator:
Dr. Warren Brown
Co-Investigators:
Mr. Stephen Amato
Dr. Matt Ashby
Ms. Emily Bowsher
Dr. Giovanni Fazio
Dr. John Geary
Dr. Joe Hora
Dr. Brian McLeod
Dr. Tom Megeath
Dr. Michael Pahre
Dr. Andy Szentgyorgyi
Dr. Steven Willner
Mr. William Wyatt
Mr. Joseph Zajac
II. Instrument Characteristics
Secondary:
Detector:
Pixel scale:
Field-of-view:
Electronics gain:
Read-noise:
Full well:
Linearity:
Dark current:
Bias drifts:
f/5
2048 x 2048 pix, HgCdTe Hawaii-2
0.1500 arcsec/pix
5.12 x 5.12 arcmin^2
4.0 e-/DN
31 e~190,000 e-, or 48,000 DN
Linear to 40,000 DN (linear to better than 0.1%)
16 e-/s/pix
The bias changes by 400 DN over 20 sec,
thus darks must be taken for every exposure time <20 sec.
Detected electrons for 15th mag star (Vega-relative):
J-band:
40,000 e-/s
H-band:
38,000 e-/s
Sky background:
J-band:
870 e-/s/pix = 14.7 mag/arcsec^2
H-band:
3400 e-/s/pix = 13.4 mag/arcsec^2
Exposure time for sky to reach 20,000 DN (half the linear regime): J 90 sec, H 20 sec.
Distortion:
Very small (predicted 0.01% center-to-corner).
Cross-talk:
None between quadrants; very little in channels within a quadrant.
Known problem:
Channel 4.5 suffers from RMS=19 DN bias variations.
Images with the Hawaii-2 are taken by differencing a pair of non-destructive reads. There is no
shutter in SWIRC; rather, each line is cleared before being read the first time. The Hawaii-2 is
put in a continuous clear mode in-between exposures.
Readout:
32 channels; 8 channels per quadrants.
Readout time:
0.7 sec per readout; ~8 sec total overhead per exposure.
Exposure times:
Must be integer seconds >= 1 sec.
Filters:
J, H, and two dark positions D1 and D2.
Filter focus offset from wavefront sensor focus: H = +15 micron, J = -15 micron.
Optical Layout:
III. Quick Start
Introduction:
MICE (= MMT ICE) is a graphical interface for observing with SWIRC. MICE allows
you to control filters, exposures times, and dither sequences, and is run on the computer “clark.”
MICE automatically displays the current image to a ds9 frame 1, and display the difference of
the current and previous image to a ds9 frame 2. Status displays monitoring the telescope and
instrument are provided on the monitor (“hudson”) located above clark.
To observe on clark:
1. Log into clark.mmto.arizona.edu with username swirc (password located in the drawer).
2. At a UNIX prompt run go.go to bring up the MICE interface and status display windows.
3. On the MICE start tab click the “Home Filter Wheel” button and wait ~3 sec for “Homed” to
turn green.
4. Click the “Standard Ops” or the “Catalog Ops” tab.
5. Select your exposure time, filter, and optionally a dither catalog.
6. Start observing!
At the end of each night:
1. Fill SWIRC dewar (takes ~10 minutes).
2. Note that images are automatically archived via ftp to the CfA, and will be available to the
user at the end of the run.
Details on observing:
Section IV discusses MICE in detail.
Section V gives tips for observing at the MMT.
Section VI gives troubleshooting advice.
IV. How to Use the “MICE” Interface and Dither Catalogs
STARTUP
1. To set the file counter to 1, edit the sequence number in IRAF “obspars” before running mice.
2. Run go.go or domice to start a Mice window.
3. Mice will start you in the “Startup” window shown below.
IMPORTANT: press “Home Filter Wheel” to home the filter wheel.
4. Note that the area above the “Startup” and other tabs shows status displays; no information
can be entered in those boxes.
OBSERVING
The “Standard Ops” window lets you take a series of exposures at a given position.
1. TELNAME should be set to “mmt_ir” to enable communication with the telescope.
2. The PROPID and P.I. are selected from pull-down menus; OBSVRS are entered by the user.
3. The FileRoot is taken from the MMT catalog object column and cannot be edited.
Note that images are titled fileroot.####.fits and are located in /data/ccd/SWIRC/year.date,
where year.date looks like 2005.0924.
To observe,
4. Select the Filter from the drop-down menu.
5. Clicking the “ConfigObs” button will immediately change the filter, otherwise the selected
filter will be moved into position at the beginning of the next observation.
6. The drop-down menu on the lower left selects what type of image to take. Science images
should be “object.” Selecting “dark” will automatically move the filter wheel to a dark position
and name the fileroot dark.
7. Enter in the first and last numbers of the sequence.
8. Enter in the exposure time.
9. Press the green “Go” button to start.
10. Beware the POP-UP window: type the object title and press return to start the sequence.
11. If you want to pause, abort, or change the length of the sequence, press the yellow “PAUSE
Queue” button and then take the appropriate action with the buttons at the bottom of the screen.
12. Pause Expo does not work with SWIRC.
DITHERING
Very similar to the “Standard Ops” window, “Catalog Ops” allows one to observe using a dither
catalog.
1. Clicking on the DITHER button allows one to load a dither catalog. Alternatively, clicking
DITHER and then Cancel will remove the current dither catalog.
2. If the filter is not specified in the dither catalog, select a filter with the drop-down menu.
3. If exptime is not specified in the dither catalog, enter in the exposure time
4. The “first” and “last” set the number of images to take. Setting “first=1” and “last=9” will do
the first 9 positions in a dither catalog, for example.
5. Press “Go” to start the dither sequence; “Pause Queue” works the same as before.
Other points:
6. The “Title “ button allows you to enter the title (located in the .fits image header) before a
sequence is started, however you will still be asked to confirm the title at the beginning of the
next observation.
7. The red “Clear” button may be used to clear a hung exposure, but if you are in such a
situation, closing mice and re-starting mice is a better solution.
8. The Pause Expo button has no functionality for SWIRC.
DITHER CATALOGS: IMPORTANT INFORMATION
Dither catalogs are starbase tables (http://www.cfa.harvard.edu/~john/starbase/starbase.html)
with two primary columns: azoff and eloff.
Azoff and eloff are offsets in the x- and y-directions, respectively, in instrument pixel
coordinates. That is, azoff and eloff do not correspond to the cardinal directions “east” or
“north” unless the MMT instrument rotator is set to track north.
The format of the starbase table is a header line titled azoff<tab>eloff, a separator line
-----<tab>-----, and then lines with offsets in units of in units of arcseconds. Everything must
be separated by tabs. For example:
azoff
-----60
-60
60
-60
eloff
-----60
60
-60
-60
Loading this dither catalog, setting first=1 and last=4, and pressing “Go” will cause SWIRC to
take 4 images at the indicated offsets from the catalog position. To take a second series of 4
images with the same dither catalog, but not centered on the catalog position, use the paddle to
offset in RA/DEC coordinates (not INST coordinates) and then repeat the observation.
To re-iterate, dither offsets are applied in instrument coordinates, and do not alter the
angle of the MMT rotator. The operator normally sets the MMT rotator so that it tracks North =
up. Thus in normal operation the example dither catalog offsets are purely north-east-southwest. If you wish to map at a different angle, simply tell the telescope operator to have the
rotator track at your desired angle (measured in degrees east of north=0).
The filter and exposure time used for a dither sequence are the filter and exposure time
set on the MICE window. Alternatively, you can add columns filts and exptime to set the values
yourself. For example:
azoff
----0
300
0
300
eloff
----0
0
0
0
filts
----H
H
J
J
exptime
------15
15
10
10
This dither catalog will cause SWIRC to take a 15 sec H-band image ON and OFF source,
followed by a 10 sec J-band image ON and OFF source.
To repeat a dither sequence on a slightly offset position, use the paddle tool to offset your
pointing in RA/DEC coordinates (not INST coordinates), and then run the dither sequence again.
DITHER TOOL
MICE can generate dither catalogs with its “Dither Tool” tab:
a. Enter the size of the x and y offsets.
b. Enter the number of x and y offsets.
c. Enter the desired filter and exposure time or
leave these blank so that the dither catalog will
look to the current values on the MICE window.
d. Press “Save” and enter the desired filename.
e. You can now press “View” to review the
generated catalog.
OBSLOG TOOL
MICE automatically generates an observing log. Use the “Obslog Tool” tab to add comments
and view the postscript file. You can also run stand-alone version from the command line with
“comment.” Do not use obslog and comment simultaneously.
1. To add a comment:
a. click a file.
b. type the comment in the “Comments” field.
c. press the Save Changes button, or click to another file.
2. To generate and view the postscript logfile: press the SAO symbol on the lower right.
3. Note that the log is generated with LaTeX, so avoid unhappy LaTeX symbols (& \ $).
START/STOP
MICE provides you the ability to re-start all of the instrument servers and all of the status
windows via buttons on the Start/Stop tab. Server buttons are green when they are running, red
when they are not running. Note that green buttons do not necessarily mean that things are
working; if power has been cycled on the instrument, the top two servers must be re-started.
1. ccdswirc re-starts the detector server and re-initializes the electronics. Use this if the
instrument has been turned off and turned back on.
2. hskswirc re-starts the housekeeping (temperature monitor) server. Use this if the instrument
has been turned off and turned back on.
3. fwswirc re-starts the filter wheel server. After pressing this, home the filter wheel (Startup
tab).
4. crunchswirc and archiveswirc are the two processes that archive images to the local disk
farm and to the CfA, respectively.
5. The gray buttons on the right column allow you to re-start any status display window, and
MICE itself.
V. Tips for Observing at the MMT
1. Getting Started
a. Password: located in the drawer under the table at the observer station.
b. Use the machine “hudson” to display status windows:
c. Reset the image sequence number:
i) close mice (using the close button on the upper left corner of the window).
ii) type obspars in IRAF and set the sequence number to the desired value.
iii) restart mice with domice
d. Data on “lewis” and “clark” are located at: /data/ccd/SWIRC
2. Calibrations
a. Darks:
i) I recommend taking darks for each exposure time that you use.
ii) You can take darks in the afternoon.
iii) The darks are temperature sensitive, so make sure that the instrument has been
powered on for at least 2 hours (ambient chip temp is 83-84 K).
iv) Throw away the first 2 or 3 darks in a sequence. Amps on the HAWAII-2 device
warm up when used, thus the first few darks have spurious statistics until the chip has
equilibrated to the cadence of exposures you are taking.
b. Flats:
i) Flats are done as sky flats.
ii) Sky flats are taken in a 10 minute window starting ~5 minutes after sunset (or before
sunrise).
iii) Set object type to “skyflat” shortly after sunset.
iv) Ask the operator to run the “slew authorization” program.
v) Take *one* exposure, which will set the telescope at the point in the sky with the least
gradient.
vi) Change object type to “object.”
vii) Take ~10 exposures in each filter, once the images are no longer saturating
viii) Saturating does not harm the detector.
ix) The J and H filter come out of saturation around the same time.
x) Offset a couple arcmin between each exposure (using the paddle tool).
xi) Make sure telescope tracking is on during sky flats.
xii) You can probably get 10 flats for each filter in the time available.
3. Typical Observing Procedure
a) Take darks.
b) Let the operator know you want to take sky flats (so the telescope is ready to go at sunset).
c) Take sky flats.
d) Go to your first target.
e) About 45 min after sunset, it is dark enough to use the wavefront sensor to focus the
telescope.
f) Optional: you can more exactly align the optical axis to the center of SWIRC
i) Take a short exposure with SWIRC.
ii) Open the “fix pointing” task under the “Observe” menu on ds9.
iii) Drag the red “current” circle onto the star.
iv) Click “OK” for a hexapod move.
v) Ask the operator to write down this offset and apply it in the future, otherwise the next
wavefront sensor focus will eliminate the offset.
g) Go to your target.
h) Ask the operator to track North (for SWIRC: 180 in the South, 0 in the North).
i) Observe. Be sure to tell the operator to set focus for your current filter.
h) If you repeat dither patterns, offset the central pointing in RA/DEC coords with the paddle
tool.
4. Focus
a) A wavefront sensor focus is generally required:
i) if moving to a different part of sky,
ii) if the temperature changes by more than 1 degree F, or
iii) if more than a couple hours has elapsed since the previous wavefront focus.
b) A wavefront sensor focus takes ~10 minutes, which is a significant investment of time.
c) Monitor the FWHM and PSF shape of stars in your images as they are displayed in the ds9
window. If the PSF no longer looks peaked, or the FWHM changes substantially, you require a
wavefront sensor focus.
d) Remember, each filter has a focus offset from the wavefront sensor: +15 for H, -15 for J.
5. Lightening Protection
a) Turn off instrument power: press the switch on the black power strip to the OFF position.
b) Physically unplug the power cord on the cable drape.
c) Unplug the ethernet cord from the black EDAS box on the instrument.
6.
a)
b)
c)
d)
e)
f)
Maintenance
Refill the dewar each morning.
Filling dewar takes ~10 minutes.
The dewar is very messy; the dewar is not full until a good fountain of LN2 comes out.
The fill tube has a quick release connector that freezes; wait ~10 minutes before removing it.
Replace the little red cap onto the fill tube to prevent ice build-up on the fill tube.
Dewar hold time is 36 hours with the power on; 48 hours with the power off.
VI. Troubleshooting
1. Most problems are solved by closing the MICE window and running “domice” again.
Examples of such times are when:
a) the exposure status says “exposing” or “readout” but nothing is happening.
b) the “first” and “last” boxes or the “exptime” box are grayed-out (instead of blue), as
happens after trying to cancel an exposure.
2. If you have problems starting the instrument servers, the Ethernet connection to the
instrument may be down.
a) Make sure the instrument power is on, and the Ethernet cord plugged in.
b) Ask the operator to make sure the cell rack is on.
3. On rare occasion the image readout becomes scrambled or has weird lines. To fix this:
a) Cycle the power on the instrument.
b) Re-initialize the electronics by pressing the ccdswirc button on the MICE Start/Stop
tab.
VII. Reduction Scripts -- old
Preliminary data reduction may be done on the computer “lewis.”
Data reduction scripts are in various stages of refinement. On lewis, the procedure is:
1) Run cl from the swirc home directory to start IRAF.
2) cd /data/crunch/SWIRC/[year].[date]
3) Outside of IRAF, type sethead *fits BPM=mask.pl so IRAF knows to use the mask file.
The file mask.pl, and J & H sky flats, are located in the directory /home/swirc/Cal.
4) epar imcombine and set masktype=badvalue and offset=none.
5) Combine your darks and flats as your normally would.
6) In IRAF, type swirc.
7) epar swircreduce and set the dark subtraction, flatfield, sky subtraction, and mask params.
Do not use the WCS refinement or alignment – this part does not work on cracker.
8) Run swircreduce from epar with a :g command.
9) When swircreduce is finished, look at the msk*fits files for bad features.
On the Unix command line, you can:
10) Fix bad bias variations on channel 4.5 with: swirccolfix ___.fits
11) Fix the “pinwheel”-looking readout bias variation with: swircfix ___.fits
12) Run imwcs on the msk*fits files using the script runimwcs.sc.
13) Back in IRAF, epar imcombine and set offset=wcs.
14) Run imcombine to stack the msk*fits files.