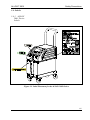
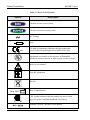
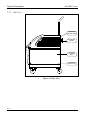
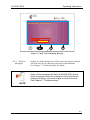
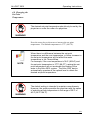
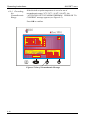
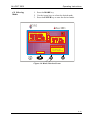
1
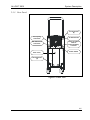
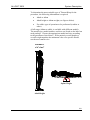
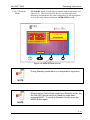
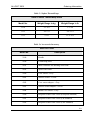
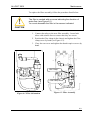
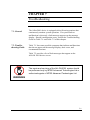
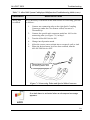
A L L O N ™ 2 0 0 1 THERMOREGULATION SYSTEM U S E R ' S M A N U A L C a t a l o g N o .DDT-063-000 Rev: A Revised: February 2010 Conformity according to the Council Directive 93/42/EEC concerning Medical Devices Manufacturer’s Name : MTRE Advanced Technologies Ltd. 4 Hayarden Street, Yavne, 8122804 P.O. Box 102, Rehovot, 7610002, Israel Tel.: +972-8-9323333 Fax: +972-8-9328510 European Representative : Charter-Kontron Limited Unit 18 Avant Business Centre 21 Denbigh Road Milton Keynes MK1 1DT England Tel.: 01908 646070 Fax: 01908 646030 US Representative: Mennen Medical Corp. 290 Andrews Road Feasterville-Trevose, PA 19053-3480 Phone 215 259-1020 Fax 215 357-2010 Publication No. DDT-063-000 Rev A Revision: February 2010 Copyright 2010 by MTRE. All RIGHTS RESERVED Registered trademarks are the intellectual property of their respective holders. All rights reserved No part of this manual may be reproduced or copied in any form by any graphic, electronic or mechanical means – including photocopying, scanning, typing or information retrieval systems – without advanced written permission from MTRE. U.S. Patent No. 6,500,200 BI Disclaimer MTRE is not responsible for any consequential or incidental damages or expenses of any kind, impairment of or damage to other goods or to any third party resulting from loss of use of the system caused by or due to the following: a. Installed, operated, maintained contrary to MTRE’s instructions, notes or warnings under this manual. b. Misuse, unauthorized use, negligence, accident, (including fire, water, explosion, smoke, vandalism, etc.) c. Ignoring any of the warnings, precautions and safety measures indicated in this manual. d. Replace, repair or alter not by MTRE’s authorized personnel. e. Anyone other than MTRE’s authorized and certified personnel removes, casing and/or attempts to make or makes any internal changes, removals, attachments or additions to the 2001 System or components thereof; f. The power supplied to the System or any part thereof differs from the rated value, or any external device attached by user creates conditions exceeding the tolerance of the System; g. The use of accessories and other parts or equipment made by other manufacturers, whether or not warranted by such manufacturers, which have been attached or connected to the System after installation, unless such accessories and other parts have been supplied and attached or installed by the MTRE. h. Using the system in a contrary manner than indicated in this manual, or using the system for any purpose other than indicated in the manual. i. Failure to replace the ThermoWrap in each procedure while operating the system. Note that all ThermoWraps are one-use disposable materials and should not be reused. j. Force Majeure In no event shall MTRE be liable for loss of use, loss of profits, or other collateral, special or consequential damages. Use of Manual: The Allon® 2001 system described in this manual has been designed to meet international safety and performance standards. Only qualified personnel may operate the system, and these operators must first have a full understanding of the proper operation of the system. The purpose of this manual is to help qualified personnel understand and operate the system. It is important that you read this manual and familiarize yourself thoroughly with its contents before you attempt to operate the system. If you do not understand any part of this manual, or if anything is unclear or ambiguous in any way, please contact your MTRE representative for further clarification. The information provided in this manual is not intended to replace regular medical training procedures. This manual should always accompany the system. All qualified personnel operating the system should know the location of the manual. For additional copies of this manual, please contact your MTRE representative. TABLE OF CONTENTS CHAPTER 1 ................................................................................................................ 1-1 Safety Precautions ....................................................................................................... 1-1 1.1. Definitions .......................................................................................... 1-1 1.2. Intended Use ....................................................................................... 1-1 1.3. Warnings............................................................................................. 1-1 1.4. Precautions.......................................................................................... 1-3 1.5. Improper Use ...................................................................................... 1-4 1.6. Labels ................................................................................................. 1-5 1.6.1. ALLON 2001 Device Labels ................................... 1-5 CHAPTER 2 ................................................................................................................ 2-1 System Description ...................................................................................................... 2-1 2.1. General Description............................................................................. 2-1 2.2. ALLON 2001 ...................................................................................... 2-2 2.2.1. ALLON 2001 Device .............................................. 2-2 2.3. External Features................................................................................. 2-3 2.3.1. Front View .............................................................. 2-3 Side View................................................................ 2-4 2.3.2. 2.3.3. Rear Panel ............................................................... 2-5 2.3.4. ThermoWrap ........................................................... 2-5 2.3.5. Accessories.............................................................. 2-5 CHAPTER 3 ................................................................................................................ 3-5 Installation ................................................................................................................... 3-5 3.1. Pre-installation Requirements .............................................................. 3-5 3.1.1. Space and Environmental Requirements .................. 3-5 3.1.2. Electrical Requirements ........................................... 3-5 Unpacking and Inspection........................................ 3-5 3.1.3. 3.1.4. Assembling the Handle ............................................ 3-5 3.1.5. Equipment List ........................................................ 3-5 3.2. Moving the Unit .................................................................................. 3-5 3.2.1. Preparation: ............................................................. 3-5 3.2.2. Locking and Unlocking the Trolley Wheels ............. 3-5 3.3. Storage Conditions and Transport........................................................ 3-5 3.3.1. Storage .................................................................... 3-5 i TABLE OF CONTENTS CHAPTER 4 ................................................................................................................ 4-5 Operating Instructions ................................................................................................ 4-5 4.1. General ............................................................................................... 4-5 4.2. Controls, Indicators and Connections................................................... 4-5 4.2.1. Main Power Switch ................................................. 4-5 4.2.2. QCC—Quick Coupling Connector........................... 4-5 Sensor Sockets ........................................................ 4-5 4.2.3. 4.3. Control Panel ...................................................................................... 4-5 4.4. Preparing the System for Operation ..................................................... 4-5 4.5. Procedures for Turning on the System ................................................. 4-5 4.6. Self-Test ............................................................................................. 4-5 4.6.1. Self-test Messages ................................................... 4-5 4.7. Operating In Operation mode .............................................................. 4-5 4.8. Changing the Set Point Temperature.................................................... 4-5 Exceeding the Normothermia Range........................ 4-5 4.8.1. 4.9. Selecting Modes .................................................................................. 4-5 4.10. Modes ............................................................................................... 4-5 4.10.1. Operation Mode....................................................... 4-5 4.10.2. Temp Graph Mode .................................................. 4-5 4.10.3. Stand-by Mode ........................................................ 4-5 4.10.4. Preference Mode...................................................... 4-5 4.11. Inserting and Attaching Human Sensors ............................................ 4-5 4.11.1. Insert Core Sensor into Patient................................. 4-5 4.11.2. Attaching Surface Sensor......................................... 4-5 4.12. Fastening the Universal ThermoWrap to Patient ................................ 4-5 4.13. Fastening Cardiac ThermoWrap to Patient......................................... 4-5 4.14. Fastening Infant ThermoWrap to Patient............................................ 4-5 4.15. Procedures for Turning Off the System and Moving the Patient to ICU with the ThermoWrap......................................................................... 4-5 CHAPTER 5 ................................................................................................................ 5-5 Ordering Information.................................................................................................. 5-5 5.1. Equipment and Accessories - Ordering Information............................. 5-5 5.2. Equipment and Accessories - Inventory ............................................... 5-5 5.2.1. Available ThermoWraps.......................................... 5-5 ii TABLE OF CONTENTS CHAPTER 6 ................................................................................................................ 6-5 Maintenance................................................................................................................. 6-5 6.1. Introduction......................................................................................... 6-5 6.2. Service Information............................................................................. 6-5 6.3. Routine Maintenance........................................................................... 6-5 6.4. Sterilization of Reusable Sensors and Disposable Sensor Adapters ...... 6-5 6.5. Filter Replacement .............................................................................. 6-5 CHAPTER 7 ................................................................................................................ 7-5 Troubleshooting ........................................................................................................... 7-5 7.1. General ............................................................................................... 7-5 7.2. Trouble-shooting Guide....................................................................... 7-5 CHAPTER 8 ................................................................................................................ 8-5 Specifications ............................................................................................................... 8-5 8.1. Physical............................................................................................... 8-5 8.2. Control System.................................................................................... 8-5 8.3. Auxiliary Systems ............................................................................... 8-5 8.4. Warranty ............................................................................................. 8-5 8.5. Operation ............................................................................................ 8-5 8.6. Storage and Transport.......................................................................... 8-5 8.7. Electricity............................................................................................ 8-5 8.8. Safety.................................................................................................. 8-5 8.9. Accessories ......................................................................................... 8-5 Appendix A ..................................................................................................................A-5 MTRE Customer Service Representative ...................................................................A-5 iii LIST OF FIGURES Figure 1-1 Label Placement for the ALLON 2001 Device .......................................... 1-5 Figure 2-1 Front View ................................................................................................. 2-3 Figure 2-2 Side View.................................................................................................... 2-4 Figure 2-3 Rear View................................................................................................... 2-5 Figure 2-4 Cardiac ThermoWrap ............................................................................... 2-5 Figure 2-5 Universal ThermoWrap............................................................................. 2-5 Figure 2-6 Universal/Pediatric ThermoWrap............................................................. 2-5 Figure 2-7 Infant ThermoWrap .................................................................................. 2-5 Figure 3-1 Handle Assembly........................................................................................ 3-5 Figure 4-1 Control Panel ............................................................................................. 4-5 Figure 4-2 Initial Self Test Screen ............................................................................... 4-5 Figure 4-3 Self Test Preheating Message .................................................................... 4-5 Figure 4-4 Operation Mode Screen ............................................................................. 4-5 Figure 4-5 Out of Normothermia Message ................................................................. 4-5 Figure 4-6 Mode Selection Screen ............................................................................... 4-5 Figure 4-7 Temp Graph Mode .................................................................................... 4-5 Figure 4-8 Stand-by Mode Screen............................................................................... 4-5 Figure 4-9 Preference Mode Screen ............................................................................ 4-5 Figure 6-1 Filter Orientation ....................................................................................... 6-5 Figure 6-2 Filter Assembly .......................................................................................... 6-5 Figure 7-1 Connecting Tubes and Special Male Connector ....................................... 7-5 v LIST OF TABLES Table 1-1 Key to Label Symbols.................................................................................. 1-6 Table 2-1 Cardiac ThermoWraps ............................................................................... 2-5 Table 2-2 Universal ThermoWraps............................................................................. 2-5 Table 2-3 Infant ThermoWraps .................................................................................. 2-5 Table 2-4 Sensor and Data Provider Input Specifications.......................................... 2-5 Table 4-1 Key to Control Panel Symbols .................................................................... 4-5 Table 5-1 Cardiac ThermoWraps ............................................................................... 5-5 Table 5-2 Universal ThermoWraps............................................................................. 5-5 Table 5-3 Infant ThermoWraps .................................................................................. 5-5 Table 5-4 Accessories Inventory.................................................................................. 5-5 Table 6-1 Inspection and Maintenance Schedule........................................................ 6-5 Table 7-1 Allon 2001 System Undisplayed Malfunction Troubleshooting Guide ...... 7-5 Table 7-2 Allon 2001 System Message Troubleshooting Guide.................................. 7-5 vii CHAPTER 1 Safety Precautions 1.1. Definitions WARNING—indicates a condition that may endanger the patient or the system operator CAUTION—indicates a condition that may damage the equipment NOTE—indicates ways in which the system’s operation can be made more efficient 1.2. Intended Use The ALLON 2001 system is designed to regulate body temperature as determined by the physician. 1.3. Warnings 1. The physician must be notified if the patient's temperature does not respond properly, does not reach the prescribed temperature, or if there is any change in the prescribed temperature range. Failure to inform the physician may result in injury to the patient. 2. The patient should be constantly attended by a physician. The misuse of the temperature regulation equipment can be potentially harmful to the patient. 3. 4. 5. 6. Do not plug wet PL plugs of the human sensors into the sensor sockets of the ALLON 2001 device. The user should verify that no fluids are present at the skin/ThermoWrap interface during the operation. Failure to do so can cause lesions on the patient's skin. Following the procedure, a pattern resembling the ThermoWrap may appear for a short period of time on the patient's skin. In operations that usually extend over two hours, pressure sores may appear or develop when soft tissue is compressed between a bony prominence and external surface. The use of the Allon 2001 system does not prevent this occurrence. It is therefore recommended to use pressure sores protective means between the operating table and the ThermoWrap. 1-1 Safety Precautions ALLON™ 2001 7. Before initiating maintenance procedures as described in Chapter 6, disconnect the power cord from the power source. 8. The default setting is intended to maintain normothermia. However, the system provides the physician with the option of selecting a body temperature in the range of 30C to 40C (86F-104F). 9. Do not lift or move the patient by means of the ThermoWrap. This may cause tearing and water leakage. 10. Use reusable core sensors or disposable sensor adapters supplied by MTRE or YSI series 400 compatible sensors. 11. The technical principles, clinical applications, and risks associated with circulatory support must be thoroughly understood before using this product. Read the entire manual before attempting to activate the system. Completion of the training program prior to using the ALLON 2001 system is mandatory. 12. The repair, calibration, and servicing of the ALLON 2001 system should be performed only by MTRE Advanced Technologies LTD or authorized agents of MTRE Advanced Technologies LTD. 1-2 ALLON™ 2001 1.4. Precautions Safety Precautions Follow the warning notes listed in the various sections of this manual. Only trained personnel, familiar with all system operating procedures and certified only by MTRE Advanced Technologies Ltd or authorized agents of MTRE Advanced Technologies Ltd, are allowed to use the ALLON 2001 system. All hospital personnel using the ALLON 2001 system must complete the ALLON 2001 training program. The repair and servicing of the ALLON 2001 device should be performed only by qualified medical equipment service technicians certified by MTRE Advanced Technologies Ltd or authorized agents of MTRE Advanced Technologies Ltd. If moisture or leaks are discovered in the connecting hose and/or ThermoWrap, turn off the ALLON 2001 device, disconnect the power cable from its power source, and correct the problem before proceeding. The desired set-point temperature should be fixed only as prescribed by and under the order of a physician. If the device sounds an alarm and/or presents a display other than the standard MTRE display, the operator should proceed according to the display message and/or the troubleshooting instructions (see Chapter 7 Troubleshooting). Avoid folds in the ThermoWrap—these may obstruct water flow. Do not block the ALLON 2001 device ventilation grilles. Air must be able to flow freely in and out in order to keep the device cool. Do not use de-ionized or distilled water. Use tap water only. When X-ray imaging is performed on a patient wearing a ThermoWrap, shadows from the ThermoWrap may appear on the X-ray film. Avoid inserting any sharp object between the patient and the ThermoWrap. 1-3 Safety Precautions 1.5. Improper Use WARNING ! CAUTION 1-4 ALLON™ 2001 Improper use of the ALLON 2001 system may lead to skin lesions, electrical hazards, and severe changes in body temperature. The technical principles, clinical applications, and risks associated with circulatory support must be thoroughly understood before using this product. Read the entire manual before attempting to activate the system. Completion of the training program prior to using the ALLON 2001 system is mandatory. U.S. Federal law restricts this device to sale by or on the order of a physician. ALLON™ 2001 Safety Precautions 1.6. Labels 1.6.1. ALLON 2001 Device Labels Figure 1-1 Label Placement for the ALLON 2001 Device 1-5 Safety Precautions ALLON™ 2001 Table 1-1 Key to Label Symbols Symbol Description Location of core sensor socket Location of surface sensor socket ~ AC Voltage Fuse 0473 CE mark of conformity indicates that the product has received the European approval for MDD 93/42/EEC. Equipment not suitable in the presence of flammable anesthetic mixture with air or with oxygen or nitrous oxide. Refer to user manual Type BF equipment Recycle Date of manufacture M fg 2007 R C US xx - yyyy 1-6 CSA symbol indicates that the product has received the approval of the Canadian Standards Association. Machine Version - Machine serial number CHAPTER 2 System Description 2.1. General Description The ALLON 2001 system maintains desired patient body temperature before, during, and after surgery. The desired patient temperature is set by the surgeon and covers the normothermia to hypothermia range. Most regular operations require normothermia. This is achieved by heating to compensate for body heat losses resulting from redistribution due to the general anesthesia and from reduced metabolic rate and exposure of body organs and skin to the cold operating theatre environment. The system is designed to maintain normothermia, induce hypothermia, and precise rewarming. The system is composed of two elements, the ALLON 2001 device and the ThermoWrap disposable garment. The ALLON 2001 device performs the functions of heat pump, water circulating pump, and control unit. The control unit constantly monitors the patient's core temperature through specific sensors and, using its on-board body temperature control algorithm, decides on the optimum water temperature to reach the desired set point. The heat pump brings the water to the required temperature and the pump circulates it to the garment. The ThermoWrap garment is a flexible heat exchanger through which the water circulates. It is designed to be in close contact with a large area of the body, thus effecting good heat transfer with the body. The garment, designed to be disposable, comes in a variety of styles and sizes to suit various types of operations and ages. Access to virtually any part of the body for surgical procedure without seriously interrupting heat transfer is made possible by various flaps that are built into the design. 2-1 System Description ALLON™ 2001 2.2. ALLON 2001 The ALLON 2001 system consists of the following elements: ALLON 2001 device ThermoWrap Accessories 2.2.1. ALLON 2001The ALLON 2001 device has a microprocessor that controls the water temperature flowing into the ThermoWrap worn by the Device patient. The decision as to the correct water temperature is based on the desired set point temperature and the actual measured patient temperature (core and surface). Water pressure in the ThermoWrap is regulated by timed pauses of the flow during clinical operation. The ALLON 2001 device is equipped with a handle for easy transport. 2-2 ALLON™ 2001 System Description 2.3. External Features 2.3.1. Front View Handle Adjustable Control Panel Surface Sensor Socket Core Sensor Socket Water-in Quick Coupling Connector Water-out Quick Coupling Connector Water Tank Cap Water Level Indicator Figure 2-1 Front View 2-3 System Description ALLON™ 2001 2.3.2. Side View Top Cover with Air Outlet Grille Accessories Bracket Lower Side Cover Air Inlet Grille Figure 2-2 Side View 2-4 ALLON™ 2001 System Description 2.3.3. Rear Panel Thumb Screws (4) Three-prong Connector Air Outlet Grille 6mm Threaded Hole for Equipotentiality Location RS-232 Comm Connector Power Switch Rear Cover Thumb Screws (2) Figure 2-3 Rear View 2-5 System Description ALLON™ 2001 2.3.4. ThermoWrap 1. General The ThermoWrap is a one-piece garment with a oneinflow and a one-return water connection. It is designed to facilitate the wrapping of individual parts of the body (chest, arms thighs, etc) to maximize surface coverage. 2. Description and Intended Use 2-6 The ThermoWrap is: Biocompatible Inflatable Adjustable Disposable Antistatic Latex free Each section of the ThermoWrap is separately wrapped around the appropriate area of the patient (e.g. chest, arms and thighs) to ensure maximum body surface coverage. The water’s exit and entrance points are short sections of tubing integrated with a Quick Coupling Connector (QCC) and welded to convenient locations on the edges of the ThermoWrap. The ThermoWrap design allows the physician to bare different body parts as dictated by surgical procedure. The ThermoWrap is available in a range of sizes and designs (depending on surgery type) to optimize body coverage. The ThermoWrap is secured to the patient via pressure sensitive adhesive strips that adhere to the garment. The ThermoWrap can be secured to the patient’s skin with medically approved peelable adhesive strips. ALLON™ 2001 System Description The Garments are defined for single patient use only. Reusing may cause cross contamination and/or irritation. WARNING The Garments performances were validated only to defined usage time as defined in subsection 3. 2-7 System Description ALLON™ 2001 3. ThermoWrap Designs MTRE Advanced Technologies Ltd. offers disposable ThermoWraps in a wide range of sizes. There are three different ThermoWrap designs: Cardiac ThermoWrap—used for open-heart surgery. See Table 2-1 on page 2-5. Universal ThermoWrap—used for any typical surgery other than openheart surgery. For available sizes, see Table 2-2 on page 2-5. LOT Figure 2-5 Universal ThermoWrap Figure 2-4 Cardiac ThermoWrap Universal / Pediatric ThermoWrap —used for pediatric surgery. For available sizes, see Table 2-2 on page 2-5. Figure 2-6 Universal/Pediatric ThermoWrap 2-8 Infant ThermoWrap—used for infant surgery. For available sizes, see Table 2-3 on page 2-5. Figure 2-7 Infant ThermoWrap ALLON™ 2001 System Description To determine the most suitable type of ThermoWrap for the procedure, the following information is required: Adult or infant Adult height or infant weight (see figures below) For adult: type of operation to be performed (cardiac or other) A full range (infant to adult) is available with different models. The model type, model number, and sizes are listed on the label on each package. Choose the appropriate model and size according to the parameters listed above. If the patient's overall height or overall weight matches the minimum value of a specific model, use the next smaller size. xxx-xxxcm x'x"-x'xx" Infant Weight Adult Height 2-9 System Description ALLON™ 2001 Table 2-1 Cardiac ThermoWraps Table of Cardiac ThermoWrap Sizes Model No. Patient Height Range Quantity per box 3363* One size fits all adults 12 * Models 3365 and 3368 may still be used. Table 2-2 Universal ThermoWraps Table of Universal ThermoWrap Sizes 2-10 Model No. Height Range in Inches Height Range in Feet & Inches Height Range in Centimeters 3131 31"–36" 2'7"–3'0" 79–91 3136 36"–41" 3'0"–3'5" 91–104 3141 41"–48" 3'5"–4'0" 104–122 3148 48"–53" 4'0"–4'5" 122–135 3153 53"–60" 4'5"–5'0" 135–152 3160 60"–66" 5'0"–5'6" 152–168 3166 66"–71" 5'6"–5'11" 168–180 ALLON™ 2001 System Description Table 2-3 Infant ThermoWraps Table of Infant ThermoWrap Sizes Model No. Weight Range in kg Weight Range in lb 3118 2.5–4.0 5.5–8.8 3121 4.0–7.0 8.8–15.4 3125 7.0–11 15.4–24.2 2.3.5. Accessories To operate the ALLON 2001 system the following accessories are needed: 1. Human Temperature Sensors a. Reusable Sensors There are three color-coded sensors: Core (gray), Surface (green), and Infant Core (gray). Both core and surface sensors must be plugged into the ALLON 2001 device. The core sensor must be inserted and the surface sensor must be attached to the patient for the device to function properly. b. Disposable Sensors Disposable sensors are attached to two color-coded adapters: Core (gray) and Surface (green). The core sensor must be inserted and the surface sensor must be attached to the patient for the device to function properly. Sensors and adapters are guaranteed for one year. Use reusable core sensors or disposable sensor adapters supplied by MTRE or YSI series 400 compatible sensors. WARNING 2-11 System Description ALLON™ 2001 Reusable Core Sensor (model no.4200): The core sensor (gray) measures core body temperature when inserted into the patient’s body. The PL plug of the sensor cable is plugged into the gray core sensor socket at the front of the ALLON 2001 device. The other end is inserted into the patient and measures core body temperature. Disposable Core Sensor Adapter (model no. 4202): The disposable sensor is attached to the core sensor adapter (gray). The PL plug of the adapter is plugged into the gray core sensor socket at the front of the ALLON 2001 Device. The sensor is inserted into the patient and measures core body temperature. Reusable Infant Core Sensor (model no.4204): The infant core sensor (gray) measures infant core body temperature when inserted into the patient’s body. The PL plug of the sensor cable is plugged into the gray core sensor socket at the front of the ALLON 2001 device. The other end is inserted into the patient and measures core body temperature. Use only reusable surface sensors or disposable surface sensor adapters supplied by MTRE. NOTE Reusable Surface Sensor (model no. 4201): The surface sensor (green) measures body surface temperature when attached to the patient's skin. The PL plug of the sensor cable is plugged into the green surface sensor socket at the front of the ALLON 2001 device. The other end is attached with adhesives to the patient’s skin. 2-12 ALLON™ 2001 System Description Disposable Surface Sensor Adapter (model no. 4203): The disposable sensor is attached to the surface sensor adapter (green). The PL plug of the adapter is plugged into the green surface sensor socket at the front of the ALLON 2001 device. The sensor is attached with adhesives to the patient’s skin and measures surface body temperature. Table 2-4 Sensor and Data Provider Input Specifications Model No. Name Description 4200 Core Inner body temp. ± 0.3°C ± 0.1°C Medical Grade Thermistor 4201 Surface Skin temp. ± 0.3°C ± 0.1°C Medical Grade Thermistor 4204 Core Infant Infant Inner body temp. ± 0.3°C ± 0.1°C Medical Grade Thermistor 2. Accuracy Resolution Type Detachable Electric Power Cable & Plug See Table 5-4 Accessories Inventory on page 5-5. 3. Connecting Tubes (model no. 4100) Two flexible 2.5m long connecting tubes, connect the ThermoWrap with the ALLON 2001 device to enable the flow of water between them. The tubes are supplied as a paired unit with two male Quick Coupling Connectors at the ALLON 2001 device end and with two female Quick Coupling Connectors at the ThermoWrap end. 2-13 System Description 4. ALLON™ 2001 Male Connector for Draining Water Tank (model no. 4101) Refer to Section Table 7-1 on page 7-5. 5. Spare Water Filter (model no. 4102) For annual filter replacement - packed in the accessory box 6. 2-14 Handle (model no. 2100) ALLON™ 2001 System Description THIS PAGE INTENTIONALLY LEFT BLANK 2-15 CHAPTER 3 Installation 3.1. Preinstallation Requirements 3.1.1. Space and Environmental Requirements The ALLON 2001 device is supplied on a trolley as a mobile unit for user convenience. It must be located no less than 5 cm (2") from other objects to avoid impairing ventilation to the ALLON 2001 device. The following dimensions should be considered when placing the ALLON 2001 device: 260 mm W x 625 mm D x 940 mm H / (10.23"W x 24.6"D x 37"H) 3.1.2. Electrical Requirements ! 120/230 VAC 500W Verify that the voltage switch is set for the local voltage. CAUTION 3-1 Installation 3.1.3. Unpacking and Inspection ALLON™ 2001 The ALLON 2001 device has undergone full quality assurance testing before shipment and should be operational upon delivery. The unit should be unpacked, installed and tested only by MTRE’s authorized personnel. No attempt should be made by the purchaser to unpack or assemble the unit alone. Report any container damage prior to opening the container, or any unit damage prior to unpacking, installation, or testing to your MTRE distributor. NOTE 3.1.4. Assembling the Handle Assemble the handle as follows: 1. 2. 3. Release the four thumb captive screws by hand. Slide the two ends of the handle into the holes in the top cover (pay attention to the direction of the curve in the handle) until the handle is inserted all the way in (see Figure 3-1). Press in and screw the four thumb captive screws by hand (do not use force when screwing) to secure the handle and the top cover. Thumb Screws Figure 3-1 Handle Assembly 3-2 ALLON™ 2001 3.1.5. Equipment List Installation The ALLON 2001 system includes the following: Allon 2001 device Universal, Cardiac, Infant ThermoWraps (ordered separately) Connecting tubes Special connector for draining the water tank Reusable core sensor (for 230V system) Reusable surface sensor (for 230V system) Reusable infant core sensor (ordered separately) (for 230V system) Disposable core sensor adapter (for 120V system) Disposable surface sensor adapter (for 120V system) Handle Spare Filter Power cable User manual Quick Reference Guide 3-3 Installation ALLON™ 2001 3.2. Moving the Unit 3.2.1. Preparation: Prior to moving the unit: 1. 2. 3.2.2. Locking and Unlocking the Trolley Wheels Ensure that the ALLON 2001 device is off by pressing the ON / OFF switch. Ensure that all electrical connections are disconnected. The ALLON 2001 device trolley has four wheels. The front wheels are fitted with a brake. The brake lever is located over the wheel. To lock the wheels, firmly press the lever. To release the wheels, lift the lever. When the unit is stationary, the brakes must be in the locked position. Release the brakes only when transporting the unit. 3.3. Storage Conditions and Transport 3.3.1. Storage ! Use protective means to avoid excessive vibration during device transport. CAUTION Store the ALLON 2001 device in a clean and dry area with: a. An ambient temperature of -40°C to +70°C (-40°F to +158°F) b. A relative humidity range of 10% to 100% c. An atmospheric pressure range of 500 hPa to 1060 hPa. The ALLON 2001 device features a utility bracket in the rear for storage of the connecting tubes and sensors when not in use. 3-4 CHAPTER 4 Operating Instructions 4.1. General 4.2. Controls, Indicators and Connections This chapter contains: A description of the controls, indicators and connections for the ALLON 2001 device. Detailed operating instructions for the ALLON 2001 system. Included in this section is a short description of the following: Main power switch QCC—Quick Coupling Connectors Sensor sockets Control panel Indicators Displays 4.2.1. Main Power Switch The main power switch, located on the rear side of the unit, switches the ALLON 2001 device ON and OFF. 4.2.2. QCC— Quick Coupling Connector The Quick Coupling Connectors are located at the front of the ALLON 2001 device, and are connected to the ThermoWrap by means of the connecting tubes. 1. Connecting the Connecting Tubes: Lock the connecting tubes by pressing them against the connectors. When locked, a clicking sound is produced. Verify that the tubes have been locked by lightly tugging them towards you. 2. Disconnecting the Connecting Tubes: Press the metal flange and pull out the connecting tubes. 4-1 Operating Instructions 4.2.3. Sensor Sockets ALLON™ 2001 There are two sensor sockets located in the front of the ALLON 2001 device. 1. Connecting the Sensors Insert the appropriate reusable sensor or disposable sensor adapter into the designated socket. When using disposable adapters, you must connect the adapter to the disposable sensor before you insert the connector into the designated socket. NOTE 2. Disconnecting the Sensor Pull the appropriate reusable sensor or disposable adapter out of its socket. 4-2 ALLON™ 2001 4.3. Control Panel Operating Instructions The adjustable control panel is located at the top of the ALLON 2001 device. Once the ALLON 2001 device is turned on, all operating functions are controlled through the control panel. The control panel’s simple soft-touch keys and visual displays guide the user through each operational phase. Heating/Cooling Status Core Temperature System Function Status CORE Surface Temperature SURFACE 33.4 Heat transfer to / from patient SET POINT Temperature Set point MODE Alarm Mute Arrow Keys Mode Keys Figure 4-1 Control Panel Table 4-1 Key to Control Panel Symbols Symbol Description Explanation Heat transfer to / from patient Graphical representation of the intensity of heat transferred between the patient and the Allon system Heating/Cooling Status Indicates the direction of the heat transfer. System Function 'Status Indicates the condition of the pump. If the icon is not displayed, the pump is not functioning and water does not flow to the ThermoWrap. Sun icon - Heat transferred to the patient Snowflake icon - Heat transferred from the patient 4-3 Operating Instructions 4.4. Preparing the System for Operation ! ALLON™ 2001 1. Place the unit in the desired position according to section 3.1.1, Space and Environmental Requirements on page 3-5. Do not place the ALLON 2001 device under the operating table or patient's bed. CAUTION 2. Press the brake pedals and lock the wheels to secure the ALLON 2001 device. 3. Remove the water tank feeder cover, and pour in tap water until the maximum allowable level is reached. Observe the water-level indicator to prevent overfilling the water tank. Close the water tank feeder cover. In case of overfilling, see Table 7-1 on page 7-5. Insert the reusable core and surface sensors or the disposable core and surface adapters into the ALLON 2001 device sockets as described in section 2.3.5 on page 2-5. Connect the connecting tubes to the ALLON 2001 device. 4. 5. 6. 7. 8. 4-4 Choose the appropriate model and size ThermoWrap as described in section ThermoWrap Designs on page 2-5. Place it on the operating table as described in the leaflet enclosed with the ThermoWrap, sections 1 and 2. Make sure to lie out the ThermoWrap evenly and avoid twisting or bending the tubes. Connect the ALLON 2001 device to the power source. ALLON™ 2001 Operating Instructions 4.5. Procedures for Turning on the System The patient must be under constant supervision. The misuse of temperature regulation equipment can potentially injure a patient. WARNING Turn the main switch, located in the rear of the unit, upwards to the ON position. Once power is supplied to the ALLON 2001 device, the unit performs a self-test (see section 4.6 Self-Test). 4.6. Self-Test The self-test is performed in order to ensure the proper functioning of the ALLON 2001 device (see Figure 4-2 on page 4-5). A selftest is conducted every time the system is restarted. In the event of a power failure of less than 10 seconds, the self-test will not be performed and the ALLON 2001 device will remain in operation mode. During the self-test, the “PERFORMING SELFTEST PLEASE WAIT...” message appears until the system is ready (see Figure 4-2 on page 4-5). Whenever the Allon 2001 device is activated, a complete self-test must be performed. Do not interrupt the self-test, and wait until the ALLON 2001 device shifts into operation mode. NOTE 4-5 Operating Instructions ALLON™ 2001 The self-test performs a complete check of the system and initiates heating. The time required for the self-test is indicated both by the progress bar and by the message on the control panel. The selftest checks the functionality of the following components: Screen and buzzer Pump ThermoWrap connection Pressure meter Heating and Cooling unit Temperature of water inflow and water outflow Successful completion of the self-test indicates that the ALLON 2001 device is operational. PERFORMING SELFTEST PLEASE WAIT... ABOUT 3 MINUTES OPERATION Figure 4-2 Initial Self Test Screen 4-6 ALLON™ 2001 Operating Instructions PREHEATING PLEASE WAIT... OPERATION Figure 4-3 Self Test Preheating Message 4.6.1. Self-test Messages If there is a failure during the self-test, messages appear, and the ALLON 2001 device does not proceed to operation mode. See Chapter 7 “Troubleshooting” for details. Some of the messages will halt the ALLON 2001 device. Other messages allow the completion of the self-test but display the actions you need to take to correct the error. See Chapter 7 “Troubleshooting”. NOTE 4-7 Operating Instructions 4.7. Operating In Operation mode ALLON™ 2001 After completing the self-test, the ALLON 2001 device shifts into operation mode. A buzzer is sounded, and an "ATTENTION CORE READOUT TOO LOW" message appears (see Figure 4-4 Operation Mode). The sensors read the room temperature until you position them on the patient, and therefore the message appears. When the core sensor is inserted in the patient, the sensors read the patient's body temperature and the message clears. CORE SURFACE 19.7 ATTENTION SET POINT 18 ON MODE Figure 4-4 Operation Mode Screen 4-8 ALLON™ 2001 Operating Instructions 4.8. Changing the Set Point Temperature The desired set point temperature should only be set by the physician or under the order of a physician. WARNING Press the arrow key to decrease or increase the set point temperature. The default temperature is 37oC (98.6oF). NOTE When there is a difference between the set point temperature and the core temperature, a further increase in the set point temperature will not affect the water temperature in the ThermoWrap. For example, if the core temperature is 36oC (96.8oF) and the set-point temperature is 37oC (98.6oF), raising the setpoint temperature will not accelerate the heating of the water in the Allon 2001 system. The Allon 2001 device automatically operates at the optimal level to obtain the desired set-point temperature. The default setting is intended to maintain normothermia. However, the system provides the physician with the option of selecting a body temperature in the range of 30C to 40C (86F-104F). WARNING 4-9 Operating Instructions 4.8.1. Exceeding the Normothermia Range ALLON™ 2001 If the desired set point temperature is set to be out of normothermia range (36oC–38oC / 96.8oF–100.4oF), the “ATTENTION OUT OF NORMOTHERMIA! PRESS OK TO CONFIRM” message appears (see Figure 4-5). Press OK to confirm. CORE SURFACE 32.1 ATTENTION SET POINT OK Figure 4-5 Out of Normothermia Message 4-10 ALLON™ 2001 Operating Instructions 1. Press the MODE key 2. Use the Arrow keys to select the desired mode. 4.9. Selecting Modes 3. Press the ENTER key to enter the desired mode. CORE SET POINT SURFACE 33.4 ENTER OPERATION TEMP GRAPH STAND-BY PREFERENCE Figure 4-6 Mode Selection Screen 4-11 Operating Instructions ALLON™ 2001 4.10. Modes 4.10.1. Operation Mode OPERATION mode enables the operator to go directly to the operation mode (see Figure 4-4 on page 4-5). 4.10.2. Temp Graph Mode TEMP GRAPH mode displays a graphic readout of the patient’s Core temperature on an hourly scale (see Figure 4-7). Up to eleven hours are stored in memory and can be viewed by pressing the arrow keys to scroll back or forward on the graph. Both Core and Surface temperatures are displayed in real time at the top of the screen. To return to OPERATION mode, press BACK. CORE 36.9°c SURFACE 33.4°c 42 NT 30 -1H -2H -3H BACK Figure 4-7 Temp Graph Mode 4-12 ALLON™ 2001 4.10.3. Stand-by Mode Operating Instructions STAND-BY mode is used only to monitor body temperature (see Figure 4-8). The ALLON 2001 Device circulates the water internally and maintains the water temperature at the appropriate level to be ready when returning to OPERATION mode. CORE STAND-BY MONITORING ONLY! SURFACE 33.3 MODE Figure 4-8 Stand-by Mode Screen During Stand-by mode there is no temperature regulation. NOTE When entering Temp Graph mode from Stand-by mode, the ALLON 2001 device returns to Stand-by mode when pressing BACK. To return to Operation mode, press the MODE button again. NOTE 4-13 Operating Instructions 4.10.4. Preference Mode ALLON™ 2001 PREFERENCE mode (see Figure 4-9) enables the operator to: Select a language—The Language preference allows you to change the language of the control panel interface. Select temperature unit readout—The Degrees preference allows you to select control panel units from either Centigrade or Fahrenheit. The active settings are indicated with a star. Selected items are highlighted. 1. 2. 3. Select the desired preference (language or temperature) with the Arrow down button. Select the desired item with the Arrow right button. When you move from one preference to the next, the last item selected is the active setting and a star appears. Press EXIT at any time to return to OPERATION mode. Access to Thermal Verification is for MTRE authorized personnel only. NOTE LANGUAGE : EN IT DEGREE : *°C FR SU PT FI NL NO °F THERMAL VERIFICATION ON EXIT Figure 4-9 Preference Mode Screen 4-14 DE ES ALLON™ 2001 Operating Instructions 4.11. Inserting and Attaching Human Sensors ! For proper use of the ALLON 2001 device, the core sensor must be inserted and the surface sensor must be attached. CAUTION 4.11.1. Insert Core Sensor into Patient Insert the reusable core sensor or the disposable core sensor as soon as possible into the patient prior to fastening the ThermoWrap. Immediately connect the disposable core sensor to its adapter. If core temperature reads less then 35.5C, the “PATIENT TEMPERATURE BELOW 35.5C (95.9F)” message appears. NOTE 4.11.2. Attaching Surface Sensor Attach the reusable surface sensor or the disposable surface sensor to an exposed area of skin with adhesive tape. Immediately connect the disposable surface sensor to its adapter. When using disposable sensors and adapters, make sure to connect the appropriate sensor to its adapter (note the labeling on the adapter). WARNING 4-15 Operating Instructions ALLON™ 2001 4.12. Fastening the Universal ThermoWrap to Patient Refer to the "Instructions for Use" leaflet supplied with each ThermoWrap. 4.13. Fastening Cardiac ThermoWrap to Patient Refer to the "Instructions for Use" leaflet supplied with each ThermoWrap. 4.14. Fastening Infant ThermoWrap to Patient Refer to the "Instructions for Use" leaflet supplied with each ThermoWrap. 4-16 ALLON™ 2001 4.15. Procedures for Turning Off the System and Moving the Patient to ICU with the ThermoWrap Operating Instructions 1. Turn off the ALLON 2001 device by pressing the ON / OFF switch downwards to the OFF position and disconnecting the power cord from the power source. 2. Close the clamps on the connecting tubes to avoid returning water overflow. 3. Disconnect the connecting tubes from the ALLON 2001 device and from the ThermoWrap. 4. Disconnect the core and surface sensors from the ALLON 2001 device. If the patient is not transferred to the ICU with the ALLON 2001 system, proceed to step 9. 5. Place the sensors beside the patient. 6. Upon arrival to the ICU, reconnect the sensors to the ALLON 2001 device. Reconnect the connecting tubes to the ALLON 2001 device and the ThermoWrap. 7. 8. Turn on the ALLON 2001 device to resume treatment. 9. At the end of treatment repeat steps 1–4. Remove the ThermoWrap and the sensors from the patient. 10. Dispose of the ThermoWrap in accordance with national regulations governing non-toxic plastic waste discharge. 11. Disinfect the surface of the connecting tubes and the exterior of the ALLON 2001 device with a wet cloth soaked in 70% alcohol. 12. Dispose of disposable sensors or disinfect the reusable sensors and disposable sensor adapters as required by hospital/clinic protocol. 13. Store the ALLON 2001 device and its accessories in a safe place. 4-17 Operating Instructions ALLON™ 2001 THIS PAGE INTENTIONALLY LEFT BLANK 4-18 CHAPTER 5 Ordering Information This section outlines information for ordering, shipping and replacing parts of the ALLON 2001 system. 5.1. Equipment and Accessories Ordering Information All equipment and accessories may be ordered directly from your local MTRE representative. When ordering parts, specify the model number as listed in this chapter as well as the serial number of your ALLON 2001 device. 5.2. Equipment and Accessories Inventory 5.2.1. Available ThermoWraps ThermoWraps for adult models are packed in a twelve-unit package that contains two six-unit boxes each. The minimum order for any model ThermoWrap is twelve units or any multiplication of twelve. ThermoWraps for infant models are packed in a twenty four-unit package. The minimum order for any infant model ThermoWrap is twenty-four units or any multiplication of twenty-four. 5-1 Ordering Information ALLON™ 2001 Table 5-1 Cardiac ThermoWraps Table of Cardiac ThermoWrap Sizes Model No. Patient Height Range Quantity per box 3363* One size fits all adults 12 * Models 3365 and 3368 may still be used. Table 5-2 Universal ThermoWraps Table of Universal ThermoWrap Sizes 5-2 Model No. Height Range in Inches Height Range in Feet & Inches Height Range in Centimeters 3131 31"–36" 2'7"–3'0" 79–91 3136 36"–41" 3'0"–3'5" 91–104 3141 41"–48" 3'5"–4'0" 104–122 3148 48"–53" 4'0"–4'5" 122–135 3153 53"–60" 4'5"–5'0" 135–152 3160 60"–66" 5'0"–5'6" 152–168 3166 66"–71" 5'6"–5'11" 168–180 ALLON™ 2001 Ordering Information Table 5-3 Infant ThermoWraps Table of Infant ThermoWrap Sizes Model No. Weight Range in kg Weight Range in lb 3118 2.5–4.0 5.5–8.8 3121 4.0–7.0 8.8–15.4 3125 7.0–11 15.4–24.2 Table 5-4 Accessories Inventory Allon 2001 Unit Model No. Description 2100 Handle 4100 Connecting tubes 4101 Male connector for draining water tank 4102 Spare water filter 4200 Core sensor—Gray 4201 Surface sensor—Green 4202 Core sensor adapter—Gray 4203 Surface sensor adapter—Green 4204 Infant Core sensor—Gray 4300 Hospital Grade Power Cable (European standard) 4301 Hospital Grade Power Cable (UK standard) 4302 Hospital Grade Power Cable (USA standard) 5-3 Ordering Information ALLON™ 2001 THIS PAGE INTENTIONALLY LEFT BLANK 5-4 CHAPTER 6 Maintenance 6.1. Introduction This chapter outlines the maintenance instructions for the ALLON 2001 system. Qualified hospital staff may perform routine maintenance unless otherwise specified. The repair, and servicing of the Allon 2001 system should be performed only by MTRE Advanced Technologies LTD or authorized agents of MTRE Advanced Technologies LTD. WARNING 6.2. Service Information When communicating with authorized MTRE representatives regarding the ALLON 2001 system, always state the model and serial numbers on the identification label located on the rear panel of the ALLON 2001 device (see Figure 1-1 Label Placement for the ALLON 2001 Device on page 1-5). When communicating regarding ThermoWraps, refer to the label on the ThermoWrap package for lot number details. 6.3. Routine Maintenance The ALLON 2001 device should be periodically inspected and maintained to make sure that it remains in optimum condition. A recommended routine inspection and maintenance schedule is provided in Table 6-1 Inspection and Maintenance Schedule on page 6-5. 6-1 Maintenance 6.4. Sterilization of Reusable Sensors and Disposable Sensor Adapters ! ALLON™ 2001 Use the Ethylene Oxide Method (E.T.O.) to sterilize reusable sensors and disposable sensor adapters as required by hospital/clinic protocol. Do not use the steam autoclave method to sterilize reusable sensors and disposable sensor adapters. CAUTION 6.5. Filter Replacement An additional filter is supplied in the accessory box. NOTE The filter must be replaced every twelve months. Replacement is done by the hospital personnel as follows: 1. Drain the water tank (see Table 7-1 on page 7-3). 2. Remove the rear cover: a. Unscrew the thumb captive screws at the bottom of the cover. b. Pull the bottom part of the cover towards you and then down to release the lip from the chassis. 3. Unscrew the filter clamp screw and remove the filter clamp (see Figure 6-2). 4. Release both the water-in and water-out tubes from the filter assembly by pressing the release ring of each end of the filter and pulling the tubes from the filter. 5. Dispose of the old filter. 6-2 ALLON™ 2001 Maintenance To replace the filter assembly, follow the procedure listed below. ! The filter is marked with an arrow indicating the direction of water flow (see Figure 6-1). You must assemble the filter in the manner indicated. CAUTION 1. Connect the tubes to the new filter assembly. Insert both tubes with suitable force to ensure that they are secure. 2. Position the filter clamp in the chassis and tighten the filter clamp screw by hand (see Figure 6-2). 3. Close the rear cover and tighten the thumb captive screws by hand. Filter Clamp Filter Clamp Screw Figure 6-1 Filter Orientation Figure 6-2 Filter Assembly 6-3 Maintenance ALLON™ 2001 Table 6-1 Inspection and Maintenance Schedule Frequency Inspection/Service Before each treatment Clean connecting tubes and Quick Coupling Connector with a wet cloth. Performed By Staff Perform a visual inspection for any mechanical failure in sensors, connecting tubes, and power cable. Perform a visual inspection of the exterior of the ALLON 2001 Device. As required by hospital/clinic protocol Routine external cleaning and disinfection. Staff Annually Calibration check BMD Replace filter Staff The ThermoWrap contains chlorine tablets that prevent contamination of the hydraulic system of the Allon 2001 system. NOTE 6-4 CHAPTER 7 Troubleshooting 7.1. General The Allon 2001 device is equipped with self-testing routines that continuously monitor system operation. If a system fault or malfunction is detected, a fault message appears on the message display. Should a malfunction occur, consult the Troubleshooting Guide in Table 7-1 and Table 7-2 of this chapter. 7.2. Troubleshooting Guide Table 7-1 lists some possible symptoms that indicate malfunctions that do not appear on the message display, their cause, and recommended actions. Table 7-2 provides a list of fault messages that appear on the ALLON 2001 device screen. The repair and servicing of the ALLON 2001 system should be performed only by MTRE Advanced Technologies Ltd or authorized agents of MTRE Advanced Technologies Ltd. WARNING 7-1 Troubleshooting ALLON™ 2001 Table 7-1 Allon 2001 System Undisplayed Malfunction Troubleshooting Guide Observation The power switch of the Allon 2001 device is set to "ON" but it is not activated and the control panel is blank. ThermoWrap begins to leak. Possible Problem Action to be Taken ALLON 2001 device is unplugged. Check the 120/230 VAC power cable connections. No line voltage Call BMD The garment was accidentally punctured during the course of the operation. Turn off the ALLON 2001 device and allow the water to return to the reservoir. Replace the ThermoWrap if possible Water leaks from the connector between ThermoWrap and the connecting tube. Water leaks between connecting tubes and the Allon 2001 device. 7-2 Connecting tubes are not connected properly. Close clamps on ThermoWrap. Disconnect connecting tubes and reconnect connecting tubes until the click sound is heard. Damage to connecting tubes. Replace connecting tubes. Damage to Quick Coupling Connector. Call BMD. Connecting tubes are not connected properly. Disconnect connecting tubes from the machine and re-connect again. Damage to connecting tubes. Replace connecting tubes. Damage to Quick coupling connector. Call BMD. ALLON™ 2001 Troubleshooting Table 7-1 Allon 2001 System Undisplayed Malfunction Troubleshooting Guide (cont.) Observation Water tank overfilled. Action to be Taken If it is necessary to drain the water tank because of overfilling, proceed as follows: 1. Connect one connecting tube to the right Quick Coupling Connector (under the Core Sensor socket) but not to a ThermoWrap. 2. Connect the special male connector model no. 4101 to the connecting tube (see Figure 7-1) in Step 1. Turn the Allon 2001 device ON. 3. 4. 5. 6. Change into Operation mode. Allow the excess water to drain into a receptacle, pail or sink. When the desired water level has been reached, turn the ALLON 2001 device OFF. Special Male Connector for Draining Water Tank Figure 7-1 Connecting Tubes and Special Male Connector A muted alarm is activated when a subsequent message appears. NOTE = 7-3 Troubleshooting ALLON™ 2001 The Halt – Please Restart message indicates an error that can have numerous causes. You must restart the ALLON 2001 device. NOTE Table 7-2 Allon 2001 System Message Troubleshooting Guide Message HALT - PLEASE RESTART Probable Cause Action to be Taken Error during normal function Turn OFF the system for 3 seconds and then turn it ON again. If the problem persists, turn OFF the ALLON 2001 device and contact your local service representative. Note the number that appears on the screen (1–16). ATTENTION NO WATER – PLEASE ADD WATER No water in tank Refill water to maximum level. Water tank float is jammed Open water tank cap and insert a long object to release the float. ATTENTION OUT OF NORMOTHERMIA PRESS OK TO CONFIRM Desired set-point is set to be out of 36oC–38oC XX - Indicates alarm activated 7-4 Approve the action. Disapprove the action. ALLON™ 2001 Troubleshooting Table 7-2 Allon 2001 System Message Troubleshooting Guide (cont.) Message ATTENTION CHECK THERMOWRAP 10 ATTENTION CHECK CORE SENSOR 11 ATTENTION CHECK SURFACE SENSOR 12 ATTENTION CONNECT CORE SENSOR* Probable Cause Action to be Taken Connecting tubes are not connected. Connect connecting tubes. ThermoWrap is blocked due to improper wrapping Check for snarls, folds, or objects that obstruct the water flow in the ThermoWrap. ThermoWrap clamps are closed Check clamps Misplacement of sensor in core socket Connect the core sensor to the appropriate socket. Core adapter is connected to the Allon2001 device without the disposable temperature sensor. Connect disposable sensor Misplacement of sensor in surface socket Connect the appropriate surface sensor to its socket. Surface adapter is connected to the Allon2001 device without the disposable temperature sensor. Connect disposable sensor No core sensor inserted in its socket. Connect core sensor. Note: In operation mode, the water temperature default setting is 38.5C if the core sensor has not been inserted yet. - Indicates alarm activated * The alarm is activated again after 30 minutes if no action is taken. 7-5 Troubleshooting ALLON™ 2001 Table 7-2 Allon 2001 System Message Troubleshooting Guide (cont.) Message ATTENTION WATER TEMP TOO LOW Probable Cause Water Temperature < 10oC Turn OFF the system for 3 seconds and then turn it ON again. If the problem persists, turn OFF the ALLON 2001 device and contact your local service representative. Water Temperature > 42o Turn OFF the system for 3 seconds and then turn it ON again. If the problem persists, turn OFF the ALLON 2001 device and contact your local service representative. Core temperature is less then 27.0ºC (80.6ºF) if set point above 36ºC (96.8ºF) Insert the core sensor into patient. Core temperature is less then 32ºC (89.6ºF) if set point is below 36ºC (96.8ºF) 16 ATTENTION WATER TEMP TOO HIGH 17 ATTENTION CORE READOUT TOO LOW 18 Action to be Taken PATIENT TEMP ABOVE 38.5ºC (101.3ºF)** Core temperature reading above 38°C (101.3°F). Inform the physician. PATIENT TEMP BELOW 35.5ºC (95.9ºF) ** Core temperature is higher than 27.0ºC (80.6ºF) Inform the physician.. - Indicates alarm activated ** Pressing Alarm Mute silences the buzzer for this present condition and any reoccurrence of this condition for thirty minutes. 7-6 ALLON™ 2001 Troubleshooting Table 7-2 Allon 2001 System Message Troubleshooting Guide (cont.) Message ATTENTION ELECTRO-MAGNETIC INTERFERENCE Probable Cause Action to be Taken The ALLON 2001 device detects an electromagnetic field greater than allowable standard. The message will disappear after ten seconds. No surface sensor inserted into the socket. Connect surface sensor to its socket 22 ATTENTION CONNECT SURFACE SENSOR If the message appears for more then ten seconds, replace the core sensor. 7-7 Troubleshooting ALLON™ 2001 THIS PAGE INTENTIONALLY LEFT BLANK 7-8 CHAPTER 8 Specifications 8.1. Physical Dimensions: 260 mm W x 625 mm D x 940 mm H / (10.23"W x 24.6"D x 37"H) Net Weight: 33 kg / 77 lb 8.2. Control System Micro-controller Operating icons Set point switch and mode switch Displays: Surface Temperature Core Temperature Graphic display of core temperature Set point temperature Alarm displays Controller range: Water Temperature (outflow) 13-40.8ºC (55-105.4ºF) Set Point Temperature 30-40ºC (86-104ºF) Sensors accuracy: Patient Temperature ± 0.3ºC (0.4ºF) 8-1 Specifications ALLON™ 2001 Water accuracy: Water Temperature ± 0.3ºC (0.4ºF) 8.3. Auxiliary Systems Water tank—Maximum Volume: 8.4. Warranty One year 8.5. Operation Ambient Temperature: 6 liters (1.6 gal.) 10ºC–40°C (50ºF–104ºF) 8.6. Storage and Transport Control ALLON 2001 Device: Maximum storage time is 26 weeks An ambient temperature range of -40°C to +70°C (-40°F to 158°F) A relative humidity range of 10% to 100% An atmospheric pressure range of 500 hPa to 1060 hPa. Temp range without water: -40°C to 70°C (-40ºF to 158ºF) 8.7. Electricity Input power: 120/230 VAC with isolation transformer 50/60 Hz Maximum Current 120/230 VAC 6.3 amp Transformer: Medical multiple isolation transformer: 120/230 8-2 ALLON™ 2001 8.8. Safety Specifications Warning displays: ( SYSTEM HALT ( ) indicates audible alarm ) ATTENTION NO WATER – PLEASE ADD WATER ( ) ATTENTION OUT OF NORMOTHERMIA RANGE! PRESS OK TO CONFIRM ATTENTION CHECK THERMOWRAP ( ATTENTION CHECK CORE SENSOR ( ) ) ATTENTION CHECK SURFACE SENSOR ATTENTION CONNECT CORE SENSOR ( ) ATTENTION WATER TEMP TOO LOW ( ) ATTENTION WATER TEMP TOO HIGH ( ) ATTENTION CORE READOUT TOO LOW ( ) ATTENTION PATIENT TEMPERATURE ABOVE 38.5ºC ) (101.3ºF) ( ATTENTION PATIENT TEMPERATURE BELOW 35.5ºC (95.9ºF) ( ) ATTENTION ELECTROMAGNETIC INTERFERENCE ATTENTION CONNECT SURFACE SENSOR Protection against electric shock: Type BF Degree of protection against electric shock: Class 1 8-3 Specifications ALLON™ 2001 Special mechanism Prevents extremely high pressure and temperature Quick coupling connectors Prevent leakage Anti-current overload system: 6.3 amp fuse ALLON 2001 device shutdown mechanism Software failure 8.9. Accessories Connecting tubes Connector for draining the water tank Power cable Spare filter Sensors – ¼” PL Stereo Phone Plug: Reusable core Reusable surface Reusable infant core Disposable adapter core Disposable adapter surface ThermoWrap: Various ThermoWrap types Sizes range from 40 cm–196 cm (1'4"–6'5") Humidity level range: 10–90% Maximum shelf lifetime of three years 8-4 Appendix A MTRE Customer Service Representative Important! The following details are necessary to contact your MTRE representative. Keep this form with the User’s Manual for easy access in case your Allon 2001 device is in need of service. Representative Name: Company Name: Address: Telephone No: Fax: E-mail: A-1


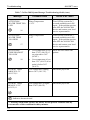
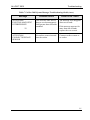


![TSD Series -40C ULT User Manual [EN]](http://vs1.manualzilla.com/store/data/005634658_1-66c9db561a67486106446026c707a26c-150x150.png)