1
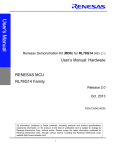
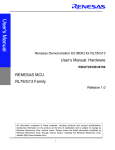
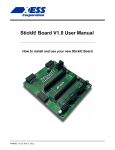
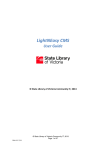
StickIt! VGA V1.0 User Manual How to install and use your new StickIt! VGA Module MAN006 (V1.0) Feb 9, 2012 Principles of VGA Video XESS is disclosing this Document and Intellectual Property (hereinafter “the Design”) to you for use in the development of designs to operate on, or interface with XESS hardware devices. XESS expressly disclaims any liability arising out of the application or use of the Design. XESS reserves the right to make changes, at any time, to the Design as deemed desirable in the sole discretion of XESS. XESS assumes no obligation to correct any errors contained herein or to advise you of any correction if such be made. XESS will not assume any liability for the accuracy or correctness of any engineering or technical support or assistance provided to you in connection with the Design. THE DESIGN IS PROVIDED “AS IS” WITH ALL FAULTS, AND THE ENTIRE RISK AS TO ITS FUNCTION AND IMPLEMENTATION IS WITH YOU. YOU ACKNOWLEDGE AND AGREE THAT YOU HAVE NOT RELIED ON ANY ORAL OR WRITTEN INFORMATION OR ADVICE, WHETHER GIVEN BY XESS, OR ITS AGENTS OR EMPLOYEES. XESS MAKES NO OTHER WARRANTIES, WHETHER EXPRESS, IMPLIED, OR STATUTORY, REGARDING THE DESIGN, INCLUDING ANY WARRANTIES OF MERCHANTABILITY, FITNESS FOR A PARTICULAR PURPOSE, TITLE, AND NONINFRINGEMENT OF THIRD-PARTY RIGHTS. IN NO EVENT WILL XESS BE LIABLE FOR ANY CONSEQUENTIAL, INDIRECT, EXEMPLARY, SPECIAL, OR INCIDENTAL DAMAGES, INCLUDING ANY LOST DATA AND LOST PROFITS, ARISING FROM OR RELATING TO YOUR USE OF THE DESIGN, EVEN IF YOU HAVE BEEN ADVISED OF THE POSSIBILITY OF SUCH DAMAGES. THE TOTAL CUMULATIVE LIABILITY OF XESS IN CONNECTION WITH YOUR USE OF THE DESIGN, WHETHER IN CONTRACT OR TORT OR OTHERWISE, WILL IN NO EVENT EXCEED THE AMOUNT OF FEES PAID BY YOU TO XESS HEREUNDER FOR USE OF THE DESIGN. YOU ACKNOWLEDGE THAT THE FEES, IF ANY, REFLECT THE ALLOCATION OF RISK SET FORTH IN THIS AGREEMENT AND THAT XESS WOULD NOT MAKE AVAILABLE THE DESIGN TO YOU WITHOUT THESE LIMITATIONS OF LIABILITY. The Design is not designed or intended for use in the development of on-line control equipment in hazardous environments requiring failsafe controls, such as in the operation of nuclear facilities, aircraft navigation or communications systems, air traffic control, life support, or weapons systems (“High-Risk Applications”). XESS specifically disclaims any express or implied warranties of fitness for such High-Risk Applications. You represent that use of the Design in such High-Risk Applications is fully at your risk. © 2012 XESS, Inc. XESS, the XESS logo, and other designated brands included herein are trademarks of XESS Corporation. PMOD is a trademark of Digilent Inc. All other trademarks are the property of their respective owners. This document is licensed under the Attribution-ShareAlike 3.0 Unported license, available at http://creativecommons.org/licenses/by-sa/3.0/. MAN006 (V1.0) Feb 9, 2012 www.xess.com StickIt! VGA V1.0 User Manual Principles of VGA Video StickIt! VGA V1.0 User Manual MAN006 (V1.0) February 9, 2012 The following table shows the revision history for this document. Date Version 02/09/12 1.0 Revision Initial release for StickIt! VGA module V1.0. MAN006 (V1.0) Feb 9, 2012 www.xess.com StickIt! VGA V1.0 User Manual Principles of VGA Video Table of Contents C.1 Preliminaries........................................................................................................................... 1 Getting Help!................................................................................................................................ 1 Take Notice!................................................................................................................................. 1 Packing List.................................................................................................................................. 1 C.2 Setup....................................................................................................................................... 2 Inserting Your StickIt! VGA Module Into Your StickIt! Board.................................................................2 Inserting Into a PMOD Socket.....................................................................................................2 Inserting Into a Wing Socket......................................................................................................3 C.3 Operation...............................................................................................................................5 Generating Analog Color Signals......................................................................................................5 Generating Sync Signals.................................................................................................................5 C.4 Using the Module.....................................................................................................................7 A.1 I/O Locations..........................................................................................................................8 A.2 Schematic..............................................................................................................................10 MAN006 (V1.0) Feb 9, 2012 www.xess.com StickIt! VGA V1.0 User Manual C.1 Preliminaries Here's some helpful information before getting started. Getting Help! Here are some places to get help if you encounter problems: If you can't get the StickIt! VGA module to work, send an e-mail message describing your problem to [email protected] or submit a problem report at http://www.xess.com/help.php. Our web site also has ● answers to frequently-asked-questions, ● example designs, application notes and tutorials, ● a forum where you can post questions. Take Notice! It's pretty hard to get in trouble with this module. Packing List Here is what you should have received in your package: a StickIt! VGA module. PMODTM male header (x 2). Wing male headers (8-pin x 2 & 4-pin x 2). StickIt! VGA V1.0 User Manual MAN006 (V1.0) Feb 9, 2012 www.xess.com 1 C.2 Setup The StickIt! VGA module connects to one or two PMOD or Wing sockets on your StickIt! Board and can display color images with up to 14 bits of color depth on a VGA monitor. Inserting Your StickIt! VGA Module Into Your StickIt! Board Inserting Into a PMOD Socket To use the StickIt! VGA module with a PMOD socket, first solder the included male PMOD headers to the module as shown. If you only need six bits of color depth, then install just a single header in the STK1 slot and leave STK2 empty. Installing both headers increases the color depth to 10 bits but also requires you to use two PMOD sockets. (To insure a stable connection, only use a header with 0.25” square pins.) StickIt! VGA V1.0 User Manual MAN006 (V1.0) Feb 9, 2012 www.xess.com 2 Setup Next, insert the module into one of the PMOD sockets on the StickIt! Board. The figure below shows the StickIt! VGA plugged into a single PMOD socket where it can generate six-bit color images. Plugging the module into two adjacent sockets increases the color depth to ten bits but consumes more I/O pins. (This module does not directly connect to any power supply so there is no need to change the setting of the voltage selection jumper of the PMOD socket.) Inserting Into a Wing Socket To use the StickIt! VGA module with a Wing socket, first solder the included Wing headers to the module as shown. If you only need six bits of color depth, then install just a single header in the STK1 slot and leave STK2 empty. Installing both headers increases the color depth to 14 bits but also requires you to use two Wing sockets. (To insure a stable connection, only use a header with 0.25” square pins.) StickIt! VGA V1.0 User Manual MAN006 (V1.0) Feb 9, 2012 www.xess.com 3 Setup Next, insert the module into the Wing sockets on the StickIt! Board. The figure below shows the StickIt! VGA plugged into two adjacent Wing sockets where it can generate 14bit color images. Plugging only the STK1 header of the module into a single Wing socket decreases the color depth to six bits but frees I/O pins for other uses. StickIt! VGA V1.0 User Manual MAN006 (V1.0) Feb 9, 2012 www.xess.com 4 C.3 Operation This chapter describes the operation of the StickIt! VGA module using a simplified schematic. You can find a complete schematic at the end of this manual. Generating Analog Color Signals There are three signals -- red, green, and blue (RGB) -- that send color information to a VGA monitor. Signal levels between 0 (completely dark) and 0.7 V (maximum brightness) control the intensity of each color component, which combine to make the final color of a pixel on the monitor screen. Each analog color input can be set to one of 32 levels by five digital outputs using a simple five-bit digital-to-analog converter (DAC) consisting of a resistor network combined with the 75Ω input resistance of the monitor input. The 32 possible levels on each analog input are combined by the monitor to create a pixel with one of 32 x 32 x 32 = 32768 different colors. So the fifteen digital control lines let you select from a palette of 32768 colors. (Note that I/O limitations of the StickIt! Board and modules reduce the maximum color depth to 14 bits.) Generating Sync Signals An image (or frame) on a monitor screen is composed of h lines each containing w pixels. VGA frame size is expressed as w x h with typical sizes of 640 x 480, 800 x 600, 1024 x 768 and 1280 x 1024. In order to send a frame of pixels to the monitor, two sync signals are required: a horizontal sync to indicate the start and stop of each line of pixels going from left to right on the screen, and a vertical sync that marks the top and bottom lines so they stack up StickIt! VGA V1.0 User Manual MAN006 (V1.0) Feb 9, 2012 www.xess.com 5 Operation to form an image. The StickIt! VGA module has two digital outputs that send these sync signals to the monitor. The timing for the sync signals is shown in below. Negative pulses on the horizontal sync signal mark the start and end of a line and ensure that the monitor displays the pixels between the left and right edges of the visible screen area. The pixels are sent on the RGB signal lines within a 25.17 μs window. After this, a front porch interval of 0.94 μs is inserted before the horizontal sync signal goes low for 3.77 μs. After a back porch interval of 1.89 μs, the next line of pixels begins. Therefore, a single line of pixels occupies 25.17 μs of a 31.77 μs interval. The red, green and blue signals are blanked during the 6.6 μs interval comprised of the front porch, sync pulse and back porch. In a similar fashion, negative pulses on the vertical sync signal mark the start and end of a frame of video lines and ensure that the monitor displays the lines between the top and bottom edges of the visible monitor screen. The lines are displayed within a 15.25 ms window. After this, a front porch interval of 0.45 ms is inserted before the vertical sync signal goes low for 64 μs. After a back porch interval of 1.02 ms, the next frame begins. Therefore, a single frame of pixels occupies 15.25 ms of a 16.784 ms interval. The RGB signals are blanked during the 1.534 ms interval comprised of the front porch, sync pulse and back porch. StickIt! VGA V1.0 User Manual MAN006 (V1.0) Feb 9, 2012 www.xess.com 6 C.4 Using the Module To use the StickIt! VGA module, you will need to do the following: Create a Xilinx ISE FPGA project and write some HDL code for translating image data into RGB values along with horizontal and vertical syncs. Attach the module to either a PMOD or Wing socket on the StickIt! board. Determine the channel signals on the PMOD or Wing socket that connect to each I/O pin of the module. Find which FPGA pin of the XuLA board connects to each channel signal. Make a UCF file associating each FPGA pin with an I/O pin of the module. Include the UCF file in your ISE project. That's a lot of work just to display an image, so we've done most of it for you. Just go to http://github.com/xesscorp/StickIt. There, you will find a subdirectory with a Xilinx ISE project that includes: an HDL file containing two related modules: one for displaying bitmapped graphics, and another for displaying text-based graphics, an example that uses the bitmapped VGA module to display an image on a VGA monitor, and a UCF file containing the FPGA pin assignments to use when installing the StickIt! VGA module into any of the PMOD or Wing sockets. StickIt! VGA V1.0 User Manual MAN006 (V1.0) Feb 9, 2012 www.xess.com 7 A.1 I/O Locations The connections of the I/O signals to the PMOD and Wing headers of the StickIt! VGA module are shown below. Please note the following: 1. The top PMOD header (STK1) contains the two most-significant bits of the red, green and blue color signals along with the horizontal and vertical sync signals. This means you can generate images with up to 26 = 64 colors using only a single PMOD socket. 2. The bottom PMOD header (STK2) provides an additional four bits of color depth: two StickIt! VGA V1.0 User Manual MAN006 (V1.0) Feb 9, 2012 www.xess.com 8 I/O Locations more bits of green (to which the human eye is most sensitive) and one additional bit of red and blue. Because there is an overlap of four I/O pins between adjacent PMOD sockets on the StickIt! Board, four of the I/O pins on the lower PMOD header have been left unconnected to prevent interference. So using two PMOD sockets means you can generate images with up to 210 = 1024 colors. 3. The top Wing header contains the same signals as the top PMOD header, so using a single Wing socket provides the same capability for generating 64-color images. 4. The bottom Wing header provides an additional eight bits of color depth: three more bits of green and blue and two additional bits of red. So using two Wing sockets means you can generate images with up to 214 = 16,384 colors. StickIt! VGA V1.0 User Manual MAN006 (V1.0) Feb 9, 2012 www.xess.com 9 A.2 Schematic StickIt! VGA V1.0 User Manual MAN006 (V1.0) Feb 9, 2012 www.xess.com 10 Schematic StickIt! VGA V1.0 User Manual MAN006 (V1.0) Feb 9, 2012 www.xess.com 11