1
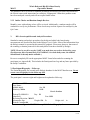
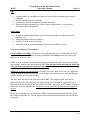
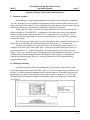
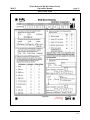
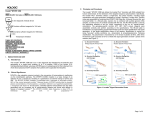
MOST
Operations Manual
page 1
WHOLE BODY AND HIP DXA BONE DENSITY
TABLE OF CONTENTS
1.
Introduction.................................................................................................................................... 2
2.
Study Logistics ............................................................................................................................... 2
2.1
Division of Quality Assurance Responsibilities .......................................................................... 3
2.1.1 Clinical Center Responsibilities ................................................................................................... 3
2.1.2 MOST DXA Quality Assurance Center responsibilities ............................................................ 4
2.2
Training and Certification of MOST DXA Operators............................................................... 4
2.3
Review of DXA Scans .................................................................................................................... 5
2.3.1 Flagged Scans ................................................................................................................................. 5
2.3.2 Outlier Checks and Random Sample Reviews............................................................................ 6
3.
DXA Scan Acquisition and Analysis Procedures ........................................................................ 6
3.1
Participant Biography – Follow-up ............................................................................................. 6
3.2
Whole Body Scans.......................................................................................................................... 7
3.2.1 Whole Body Acquisition ................................................................................................................ 7
3.2.2 Whole Body Analysis at Follow-up .............................................................................................. 8
3.3
Hip Scans ........................................................................................................................................ 8
3.3.1 Hip Acquisition at Follow-up ....................................................................................................... 8
3.3.2 Hip Analysis at Follow-up............................................................................................................. 9
3.4
Scan Flagging Criteria .................................................................................................................. 9
3.5
Excessive Bone Loss Procedures ................................................................................................ 10
4.
Scanner Quality Control ............................................................................................................. 11
4.1
Phantom scans .............................................................................................................................. 11
4.2
Whole Body Air Scans ................................................................................................................. 12
4.3
Machine, Software, and Service Problems ................................................................................ 13
4.4
Hardware/Software Change Control ......................................................................................... 13
5.
Data Management ........................................................................................................................ 14
5.1
Hard Copies of Scans................................................................................................................... 14
5.2
Electronic Scan Archive .............................................................................................................. 14
5.3
Transfer of Data to the MOST DXA Quality Assurance Center ............................................ 14
5.4
Return materials sent by the MOST DXA Quality Assurance Center ................................... 15
Appendix 1 Hologic Whole Body Phantom Protocol ............................................................................ 17
Appendix 2 Study Forms .......................................................................................................................... 20
Appendix 3 Apex Addendum ................................................................................................................... 29
Whole Body and Hip DXA Bone Density
Version 1.0
6/1/13
Whole Body and Hip DXA Bone Density
Operations Manual
MOST
page 2
1. Introduction
The purpose of this manual is to describe the DXA body composition and bone mineral density
(BMD) quality assurance programs for the clinical centers participating in the MOST study. It
provides information specific to the Hologic 4500A and 4500W scanner operating with Windows
based software and is intended as a supplement to the appropriate Hologic Users’ Guide.
To use this manual effectively, it is essential to have read and understood the appropriate Hologic
User’s Manual. The study densitometry operators are required to have participated in a Hologic
training session and should be familiar with all instrument features and procedures discussed in
the Hologic User’s Manual.
During the study, any questions regarding procedures that arise should be directed to:
Caroline Navy
MOST DXA Quality Assurance Center
University of California, San Francisco
185 Berry Street, Lobby 5, Suite 5700
San Francisco CA 94107-1762
Telephone: (415) 514-8096
Fax: (415) 514-8150
[email protected]
IMPORTANT: Unauthorized changes in scanner software or personnel can have a large
impact on the integrity of study data. If, for any reason, changes in any of these areas are
anticipated, please contact the MOST DXA Quality Assurance Center in San Francisco in
advance for further instructions.
2. Study Logistics
Table 1 summarizes the body composition and bone density scan acquisition schedule. A whole
body and hip scan will be obtained at the baseline and 84-month follow-up visit. Follow-up visit
scans will be compared to the MOST baseline visit scans for positioning, analysis, and excessive
bone loss at the hip.
Table 1 Scan Acquisition
DXA Scans
Whole Body and Hip
Whole Body and Hip DXA Bone Density
Baseline
X
84-Month
X
Version 1.0
6/1/13
MOST
Whole Body and Hip DXA Bone Density
Operations Manual
page 3
2.1 Division of Quality Assurance Responsibilities
2.1.1 Clinical Center Responsibilities
The clinical centers must ensure the overall quality and completeness of the DXA data and that
all protocols and procedures are strictly followed. Specific responsibilities include the following:
1. Require that operators are properly trained and certified. If there are state requirements for
DXA operators, these must be met;
2. Identify a chief densitometry operator to train and supervise other operators;
3. Perform and review daily QC scans and schedule cross-calibration scans of traveling
phantoms;
4. Assure that proper archiving and back-up procedures for participant scans are performed
and that archives are stored securely on appropriate archiving media until the end of the
study;
5. Once per month on or about the 1st of the month send the following materials to the QA
Center:
a. Printouts of plots of the daily QC data (BMD, BMC, Area)
b. Hologic service reports, if appropriate
c. Original printouts of flagged scans
d. Original printouts of other requested scans
e. Traveling disk with all newly acquired scan files obtained since the last data
transfer
6. Reanalyze centrally reviewed scans, as requested by the QA Center
7. Assure proper functioning of hardware/software and request service from Hologic:
a. Notify Hologic and the QA Center of any machine or software problems or if the
QDR machine is being relocated
b. Record machine/software problems and service on the Hologic DXA
Repair/Service/Upgrade Log
c. Perform 10 QC spine phantom scans before (if possible) and after service
d. Perform 10 QC spine phantom scans before and after machine relocation
8. Contact the QA Center with any questions or problems that cannot be dealt with in the
batch mailings.
Whole Body and Hip DXA Bone Density
Version 1.0
6/1/13
MOST
Whole Body and Hip DXA Bone Density
Operations Manual
page 4
2.1.2 MOST DXA Quality Assurance Center responsibilities
The following are the responsibilities of the QA Center:
1. Write and maintain the quality assurance operations manual;
2. Promptly review the QC phantom scan data received from each clinical center in order to
identify surges or drifts in machine performance;
3. Incorporate new participant data into the study wide database;
4. Review certification and flagged scans and return results to each clinical center;
5. Review random samples of scans from each clinical center;
6. Arrange for cross-calibration of all DXA instruments using traveling phantoms;
7. Prepare quality control summary reports for MOST Steering Committee review;
8. Identify possible sources of error, and suggest possible solutions. (However, the QA
Center will not be responsible for the solution of a hardware or software problem;
that will rest with the clinical center and Hologic.)
Any questions or correspondence regarding this manual or the technical aspects of the DXA
measurements should be directed to:
Caroline Navy
MOST DXA Quality Assurance Center
SF Coordinating Center
185 Berry Street, Lobby 5, Suite 5700
San Francisco, CA 94107-1762
Telephone: (415) 514-8096
Fax: (415) 514-8150
[email protected]
2.2 Training and Certification of MOST DXA Operators
To obtain consistent results, the densitometry operators must be aware of possible sources of
error that may affect data collection and analysis. Only those operators who have been
certified through Hologic training and the QA Center review are allowed to perform the
scanning and analysis for this study.
Anyone performing scans for the MOST study must meet the following requirements:
1. Read and understand both the Hologic user’s guide and this manual;
Whole Body and Hip DXA Bone Density
Version 1.0
6/1/13
MOST
Whole Body and Hip DXA Bone Density
Operations Manual
page 5
2. Successfully complete a Hologic training course;
3. Satisfactory review of each operator’s initial scans by the QA Center.
It is the clinical center’s responsibility to ensure that all of the above certification criteria are
met as new operators are brought into the study. Since the Hologic central training sessions
are held infrequently, there may be several months delay between when a new operator is
hired and when certification is complete. Personnel not meeting these requirements may not
scan participants without close supervision by a certified operator, unless specifically
authorized by the QA Center.
Recertification at Follow-up: In order for an individual operator to be certified to perform
scans of a given skeletal site, the first 10 follow-up scans done on study participants at both
skeletal sites (hip and whole body) for each operator must be sent to the QA Center for review.
Printouts of the corresponding baseline scans must accompany the follow-up scans. Printouts
of the scans should be sent to the QA Center at the address listed above as soon as the first 10
follow-up scans have been completed.
2.3 Review of DXA Scans
Scan analysis quality will be ensured by a central review of flagged whole body scans and
flagged hip scans.
Whenever scans are to be reviewed centrally:
1. An original printout and electronic copy of the scan should be sent to the QA Center.
Write the reason for the flagged scan on the scan printout and on the Participant Scan
Log.
2. It is the responsibility of the operator to reanalyze the scan according to QA Center
comments and return a printout of the reanalyzed scan with an electronic copy to the QA
Center for verification.
Procedures for compiling and forwarding scans to the QA Center are outlined in Section 5. Data
management.
2.3.1 Flagged Scans
Any scans that appear unusual or difficult to analyze should be flagged for review by the QA
Center. Guidelines for flagging scans are listed in Section 3.4 Scan Flagging Criteria.
Flagged scans should be sent to the QA Center monthly. Note the reason(s) for flagging on the
MOST Participant Scan Log and on the original printout for clarification of the problem.
Whole Body and Hip DXA Bone Density
Version 1.0
6/1/13
Whole Body and Hip DXA Bone Density
Operations Manual
MOST
page 6
The printouts will be reviewed for standard positioning and analysis procedures and returned to
the clinical centers with instructions for reanalysis, if appropriate. Often these problem scans
have been analyzed correctly and will not require further action.
2.3.2 Outlier Checks and Random Sample Reviews
Monthly, scans with outlying values will be reviewed. Additionally, a random sample will be
conducted to verify site performance. These checks may result in requests for reanalysis by the
QA Center.
3.
DXA Scan Acquisition and Analysis Procedures
Standard scanning and analysis procedures for the hip and whole body bone density
measurements are described in detail in the Hologic User’s Guide. Some of the information from
the Hologic manual is repeated in this manual for emphasis. Please note, however, that some of
the scanning evaluation protocols for this study differ from those detailed by Hologic.
NOTE: Please be careful to use the SAME scan mode that was used on the baseline scans.
(For hip scans, this was most likely FAST ARRAY; for whole body scans, the ARRAY
default mode is the only mode available. )
Be sure to completely fill out the appropriate MOST forms before and after scanning the
participant (see Appendix B). This includes the Participant Scan Log and any forms provided by
the Study Coordinator.
3.1 Participant Biography – Follow-up
The Patient Biography was created in the Hologic database for the MOST baseline scan. Do not
create a new biography for the follow-up visit.
The participant’s current weight and height must be updated at follow-up.
Last Name: JSMI
First Name:
Middle Initial:
Ethnicity: White
Sex: M
DOB:
Month: October
Patient ID: MB01010
Day: 20
Identifier2:
Year: 1930
Referring Physician: MOST
Menopause Age:
Weight: 130 lb
Height: 64
in
Patient Comment: 84
Figure 1. MOST Follow-up Visit Patient Biography Screen
Whole Body and Hip DXA Bone Density
Version 1.0
6/1/13
MOST
Whole Body and Hip DXA Bone Density
Operations Manual
page 7
3.2 Whole Body Scans
The Hologic user’s guide should be consulted for the proper whole body scanning and analysis
procedures. Clarifications for the MOST Study are noted below.
3.2.1 Whole Body Acquisition
Before scanning the participant have a printout of the baseline scan available to ensure consistent
scanning of the same area. Careful positioning and visual comparison of the current scan with
baseline are essential for producing precise measurements.
Use the DXA Bone Density Follow-up Visit TELEForm (follow-up) (see Appendix B) to
determine and document artifacts. File this TELEForm in the participant’s clinic binder; do not
send to the QA center.
The following points should be followed:
1. Have the participant remove all clothing, including shoes, and dress them in a hospital
gown. Check that no metal or plastic objects remain in the scanning area. This includes
hair clips and pins, snaps, zippers and buttons. Have participant remove any jewelry,
earrings, bracelets, watches, or rings.
2. Position the participant in the center of the scanning table with their head just below the
head of the table. It is extremely important that the participant is correctly positioned
on the exact center of the table. The arms should be separated from the sides of the body
with the hands placed palm down, within a few centimeters of the table edge. If the hands
do not fit in the scan field, tuck the hands under the thighs.
3. Place a loop of tape around the top of the feet so that the feet are slightly inverted - this
will help to prevent motion during the scan and create a separation between the tibia and
fibula. If the feet do not fit in the scan field, keep the legs straight and cut the feet from
the scan field.
4. Verify that the participant is aligned with the scanner axis (solid line on the table). If
during scanning it is apparent that part of the participant's body lies outside the scan field,
restart the scan.
5. The participant should be positioned as comfortably as possible since this reduces the
chances of unwanted movements. In general, try to avoid the use of any pillows or
blankets. If the participant feels uncomfortable in that position, you may use pillows for
the head only after the upper half of the scan is done. You may then carefully place a
pillow under the head of the participant without causing motion artifacts. This procedure
should be practiced with the participant before scanning. If the participant cannot lie flat
at all without the aid of a pillow (due to kyphosis), use a radio-lucent pillow.
6. If the participant is very tall, try to include their feet in the scan by placing their head near
the very top of the table.
Whole Body and Hip DXA Bone Density
Version 1.0
6/1/13
MOST
Whole Body and Hip DXA Bone Density
Operations Manual
page 8
7. Instruct the participant not to move until the end of the measurement.
8. Print out a hard copy of each scan and file in the participant’s folder.
3.2.2 Whole Body Analysis at Follow-up
Display the baseline evaluation using the COMPARE feature and compare it to the current image
on the screen.
Match the location of the region markers as closely as possible to the baseline measurement.
Optimally matched, in this context, means that the markers should be at the same position
between the body regions as on the baseline image.
3.3 Hip Scans
The Hologic user’s guide should be consulted for the proper hip scanning and analysis
procedures. Clarifications for the MOST Study are noted below.
3.3.1 Hip Acquisition at Follow-up
Before scanning the participant have a printout of the baseline scan available to ensure consistent
scanning of the same area. Careful positioning and visual comparison of the current scan with
baseline are essential for producing precise measurements.
1. Refer to the baseline hip scan printout. Use the DXA Bone Density Follow-up Visit
TELEForm (see Appendix B) to determine and document which side to scan. File this
TELEForm in the participant’s clinic binder; do not send to the QA center. If the opposite
hip from baseline must be scanned, perform the acquisition and analysis according to the
baseline MOST DXA operations manual instructions.
2. Position the hip in exactly the same position as. In particular the hip rotation must be the
same. The best way to check hip rotation is to be sure that the lesser trochanter has the
same size, shape, and location on the follow-up scan as at baseline.
3. If it is impossible to reproduce the positioning from baseline (e.g., pain, worsening
arthritis), produce the best possible scan. Flag the follow-up scan, write the problem on
the scan printout and send copies of both the baseline and follow-up scan to the QA center.
4. Use the same scan mode (e.g., fast array or array) that was used on the baseline scan.
5.
No metal or plastic object should remain in the scanning area. Check for jewelry, coins or
other objects in the hip pockets, zippers, buttons, rivets, belts or any other clothing
fasteners, as well as hip and back braces.
6.
Keep the participant’s hands out of the scanning area by placing them well away from the
hips.
Whole Body and Hip DXA Bone Density
Version 1.0
6/1/13
Whole Body and Hip DXA Bone Density
Operations Manual
MOST
page 9
7.
Ensure rotation of the hip by holding the knee and the ankle when positioning the leg.
Optimum positioning of the leg is most important to achieve a consistent projection of the
femur.
8.
After proper rotation attach the leg to be scanned to the angled foot block supplied by the
manufacturer.
9.
The participant should be made as comfortable as possible to reduce the chance of
unwanted movements. Use a pillow for the head and a small pillow under the knee of the
leg not being scanned. Maintain the participant at a comfortable body temperature for the
duration of the scan.
10.
Instruct the participant to remain still until the end of the measurement. Make sure that
the leg is not moved during the scan. Flag any scans in which the participant has moved
and has not been rescanned.
11.
Print out a hard copy of each scan and file in the participant’s folder.
3.3.2 Hip Analysis at Follow-up
Load the baseline scan onto the hard disk. Display this baseline evaluation using the COMPARE
feature along with the current scan to be analyzed. It is important to realize that proper
comparison of a follow-up hip scan to its baseline depends upon maintaining the identical size
and relative position of the region markers. Vertical or horizontal shifts of these regions by one
or more pixels can greatly alter the final values of the analysis.
3.4 Scan Flagging Criteria
General
•
•
Scan has unusual appearance or is difficult to analyze
Any of the following in scan field (either in the bone or soft tissue)
- Unusual anatomical variations
- Surgical hardware (metal plates, screws, pins, prostheses, etc)
- Participant motion during scan
- Superimposed buttons, pins, zippers, pacemakers, vitamin pills, etc.
•
•
•
Bone edges have been altered in any way
ROI used on follow up is different size than used at baseline
Follow-up scans cannot be reasonably matched to baseline analysis
Whole Body and Hip DXA Bone Density
Version 1.0
6/1/13
Whole Body and Hip DXA Bone Density
Operations Manual
MOST
page 10
Hips
•
•
•
•
Femoral midline is not aligned and cannot be corrected by following proper analysis
techniques
Neck box width reduced from default
Ischium bone deleted; bone added to femoral head/neck
Analysis program repeatedly fails to place regions appropriately - major operator
interaction required for analysis
Whole Body
•
•
•
•
Internal or external artifacts that cannot be removed (prostheses, implants, medical
bracelets, etc)
Participant motion without rescanning
Unable to fit both arms in scan field
Significant changes in positioning between baseline and follow-up scan.
3.5 Excessive Bone Loss Procedures
Excessive Bone Loss (EBL) is defined as a loss of greater than or to 15% from baseline to 84month visit. Use the Hologic rate-of-change to determine the actual percent loss between the
baseline and follow-up visit.
If EBL is found, rescan by having the participant get off and on the table, repeat the positioning
and scanning / analysis, and check again for EBL. This will necessitate analyzing the follow-up
scans while the participant is still on the scan table.
Whether or not the scan confirms EBL, fill out the “Excessive Bone Loss Form” (see Appendix
B) and forward to the MOST DXA QA Center, along with electronic copies of the baseline and
both 84-month scans at the affected site.
The QA Center will review the scans and confirm EBL. The completed EBL form will be
returned to the clinic. The study site investigator should be notified about confirmed cases of
EBL to provide the participant and their physician with the appropriate MOST Sample Excessive
Bone Loss letter (see Appendix B). These letters can be altered by the Principal Investigator as
desired.
Do not discuss the presence or implication of EBL with a participant until the DXA QA center
has confirmed the bone loss. The investigator should be notified and inform the onsite staff how
to proceed.
Whole Body and Hip DXA Bone Density
Version 1.0
6/1/13
Whole Body and Hip DXA Bone Density
Operations Manual
MOST
page 11
4. Scanner Quality Control
Monitoring of machine performance throughout the study is the joint responsibility of the clinical
centers and the QA Center. Table 2 lists the quality control procedures and schedule.
Table 2 Quality Control Scanning Schedule
Phantom
Scanning frequency
Local Hologic Spine Phantom
3 times / week and always on a day that
participants are scanned
Local Hip Phantom
2 times / week
Local Whole Body Phantom
3 times / week
Whole Body Air Scan
1 time / week
Tissue Bar
1 time / week
4.1 Phantom scans
Perform the spine and hip QC phantom scans as outlined in the Hologic manual, Quality Control
Chapter. The results of these scans should be reviewed locally for abrupt changes in machine
performance and sent to the QA Center once a month.
Whole body quality control consists of Hologic whole body phantom scans, whole body air scans
and tissue bar scans. Hologic whole body phantom comes with instructions from Hologic and
there are supplemental instructions in Appendix A. The instructions for the whole body air scans
are in Section 4.2 of this manual. The tissue bar comes with instructions from Hologic.
Points of procedure to note:
1. Create only one patient biography per phantom. There should be a biography for the
Spine, Hip and Whole Body phantoms. Avoid duplication of phantom biographies by
using the patient menu to select the appropriate biography prior to scanning the phantom.
2. Use the following instructions to create the phantom biographies. The phantom serial
number is on the phantom label. It may have letters in front of the numbers. If this is a
new biography, put in both letters and numbers. The NAME field contains the type of
phantom and the phantom serial number (indicated by XXXX): Spine Phantom #XXXX
Hip Phantom #XXXX Whole Body Phantom #XXXX
3. The PAT ID field contains the phantom serial number (indicated by XXXX):
#XXXX
4. Scan each phantom on top of the pad. Ensure alignment with the scanner axis by using
Whole Body and Hip DXA Bone Density
Version 1.0
6/1/13
MOST
Whole Body and Hip DXA Bone Density
Operations Manual
page 12
the laser cross-hairs.
5. Add the spine and hip phantom scan data to the QC database immediately after
completing scanning and analysis. See the Hologic manual, Quality Control Chapter,
section “Adding Data to QC Database”. Note: the Whole Body phantom and Whole Body
Air scan data can not be added to the QC database.
6. Be sure to scan the hip phantom in Array mode, not the default Fast Array mode
(Fast Array hip scans cannot be added to the QC database). See the Hologic manual,
Quality Control Chapter, section “Setting Up a New QC Plot (Graphs)”. Follow the
directions to set up the mean and limit lines for the hip QC plot. After the set up is done,
scan the hip phantom two times a week.
7. Use the plot feature to verify that the spine and hip phantom BMD, BMC and AREA
values of your scanner are within normal limits. It is best to plot at least one year of data.
If the most recent scan falls outside the limits, reposition the phantom and repeat the scan.
If the scan also falls outside the limits and/or the CV of the BMD exceeds 0.60%, contact
both Hologic and the QA Center.
8. After the spine and hip phantom scans have been analyzed and added to the QC database,
delete the scans from the hard drive. Note: the Whole Body phantom scans should be
archived to the clinic optical and copied to the traveling optical disks before being deleted
from the hard drive.
9. Generate a printout of the daily phantom plots (BMD, BMC and AREA for hip and spine)
once a week on your designated “QC day.” This will facilitate detection of long-term
drifts as well as short-term inconsistencies. Store these plots in a QC log book.
10. QC plots (BMD, BMC and AREA) for hip and spine are to be sent to the QA Center
with each batch. The date range for the plots should cover the entirety of the study. The
whole body phantom scans should be copied to the traveling disk.
11. Perform a System Backup at least once a week and store at the clinical site. Disks may be
rotated monthly.
4.2 Whole Body Air Scans
A Whole Body scan of “air” should be performed at least once a week. This scan is performed
automatically on scanners with later versions of software. It is called the radiographic uniformity
scan. The “air” scan will assess the proper functionality of the scanner and indicate any potential
problems with the x-ray beam or tabletop.
To prepare for the air scan, clear the entire tabletop of any objects and clean the pad of any
debris. Only the table pad should remain on the table. This is critical since the test can detect
items as thin as a single piece of Scotch tape.
Whole Body and Hip DXA Bone Density
Version 1.0
6/1/13
Whole Body and Hip DXA Bone Density
Operations Manual
MOST
page 13
Once the air scan has been performed, you will need to fill out the WB Air Scan Worksheet (see
Appendix B).You will find the SD values for HiBone in the upper right hand corner. Record
these values for lines 10 through 19 (10 values in all) on the worksheet. Also record the Global
Hi and Lo Air values on the worksheet. The global values are displayed right after the air scan is
completed.
Air scans should be sent monthly to the DXA QA Center. COPY them to the traveling disk and
archive to the clinic disk. The traveling disk will be sent to the DXA QA Center once a month.
IMPORTANT:
o
In the event that the Hi or LoAir values exceed 3.0, immediately fax the worksheet to
Caroline Navy at UCSF (415-514-8150) and call Hologic.
o
If the SD for any of the individual lines 10 through 19 exceeds 2.0 units, immediately fax
the worksheet to Caroline Navy at UCSF (415-514-8150). The DXA QA Center will
review the data and decide if further action is needed.
4.3 Machine, Software, and Service Problems
If your machine needs to be repaired or if any adjustment has to be made that possibly
might affect your data:
1. Perform a System Backup before any work is done on your scanner.
2. If possible, contact the QA Center before the repairs or adjustments are made to find out
whether additional measures are required.
3. Perform 10 scans of the Hologic daily QC spine AND hip phantoms before (if possible)
and after the repairs or adjustments are made.
Send the Hologic service report, along with the Repair/Service/Upgrade Log to the QA Center
with the monthly shipment.
4.4 Hardware/Software Change Control
Unauthorized hardware/software changes must be avoided. If for any reason you think you
have to change the hardware/software, or your Hologic service representative recommends
a hardware/software change, contact the QA Center before any changes are made, if
possible.
Future hardware/software upgrades will be checked by the QA Center in conjunction with
Hologic technical support personnel to assure that the upgrade will not adversely affect the study.
Authorized upgrades must be cleared by the QA Center before installation at the clinical centers.
Record hardware/software upgrades on the Hologic DXA Repair/Service/Upgrade Log.
Whole Body and Hip DXA Bone Density
Version 1.0
6/1/13
Whole Body and Hip DXA Bone Density
Operations Manual
MOST
page 14
5. Data Management
5.1 Hard Copies of Scans
1. The clinical center is responsible for maintaining original hard copies of all scans
performed during the study. Keep the original printouts in the participant's scan printout
folder. The following printed reports are needed for each scan:
Hip: Print the standard report
Whole body: Print the BMD and body composition reports (2 pages).
5.2 Electronic Scan Archive
Each clinical center works on a four disk system, two clinic disks and two traveling disks. Both
clinic disks and one traveling disk are updated at the end of each day. The other traveling disk
may be in transit between the QA Center and clinical center. Please be sure to re-archive any
scans that are reanalyzed. One clinic disk should be a dedicated MOST disk, used only for
archiving scans acquired for MOST.
Scans to be archived each day to the clinic and traveling disks include:
1. All new participant scans acquired since the last archive was performed;
2. All scans that have been reanalyzed since the last archive. Note that if a scan needs to be
restored and reanalyzed for any reason, it will need to be re-archived.
Clinic disks will remain at the clinical center at all times. The traveling disks will be sent back
and forth between the clinical center and the QA Center.
The clinical centers are responsible for following the archive schedule and for keeping the disk
archives safe until the end of the study.
5.3 Transfer of Data to the MOST DXA Quality Assurance Center
The following items are to be sent to QA Center on or around the first of the month:
1. QC PRINTOUT. Send a printout of the most recent plots of the QC database (spine and
hip -BMD, BMC and AREA). The plots are reviewed at the QA Center and problems are
reported back to the clinic.
Whole Body and Hip DXA Bone Density
Version 1.0
6/1/13
Whole Body and Hip DXA Bone Density
Operations Manual
MOST
page 15
2. PARTICIPANT SCAN LOG. Send a copy of the written participant scan log covering
participants scanned since the last data transfer. Use the log sheets to “flag” individual
scans for review at the QA Center.
3. SCANS FOR REVIEW. Send original printouts of certification scans, “flagged” scans,
random sample scans, and any scans requested for review by the QA Center. Please write
directly on the printout the reason the scan was flagged, requested or being sent. These
scans will be triaged visually based on the original printouts and analyzed on the Hologic
workstation if necessary.
4. TRAVELING DISK. Send electronic copies of all scans acquired and reanalyzed since
the last data transfer.
5. REANALYZED SCANS. Send original printouts of all scans that have been reanalyzed
according to the QA Center instructions since the last data transfer. Attach the annotated
printouts sent by the QA Center that indicated the problems requiring reanalysis. Be sure
to copy reanalyzed scans to the traveling disk.
6. Copy of the Hologic Repair/Service/Upgrade Log (with a copy of the Hologic service
report), if service has been done.
Pack the materials carefully. The disk should be placed in a protective envelope. Batches
containing DXA data should be sent via FedEx/UPS, or a trackable courier.
Assign a number to each batch of DXA data shipped to the QA Center,. The first 84-month
batch should be assigned the next sequential number (e.g., if the last batch number was 057, the
first 84-month batch number will be 058).
The DXA data should be shipped monthly to the following address:
UCSF-SFCC
MOST DXA Quality Assurance Center
ATTN: Caroline Navy
185 Berry Street, Lobby 4, Suite 5700
San Francisco, CA 94107-1762
Telephone: (415) 514-8096
5.4 Return materials sent by the MOST DXA Quality Assurance Center
The QA Center will return the following items to the clinical center after review:
1. Annotated printouts of flagged scans, random sample scans, and any other requested
scans are returned to the clinical center with instructions for reanalysis, as necessary.
2. Traveling disk.
Whole Body and Hip DXA Bone Density
Version 1.0
6/1/13
MOST
Whole Body and Hip DXA Bone Density
Operations Manual
page 16
3. Any recommendations for service, additional phantom scans, etc., as
necessary based on the quality control data.
Whole Body and Hip DXA Bone Density
Version 1.0
6/1/13
Whole Body and Hip DXA Bone Density
Operations Manual
MOST
page 17
Appendix 1 Hologic Whole Body Phantom Protocol
I. Phantom Assembly
Before lifting or transporting the phantom, break it down into its individual components.
Use care, the impact force of a phantom component dropped from table height can cause severe
injury, particularly if the impact is delivered through one of the phantom’s beveled edges. Having
another person help move the phantom components is strongly recommended.
A thin, gray PVC sheet is attached to the large white plastic piece that contains the two
plastic locating pins. This HDPE/PVC combination is the bottom layer (base) of the phantom.
Position it on the scanner table such that the PVC is on the bottom (i.e., the gray PVC is in
contact with the table pad and the two plastic locating pins project out of the plane of the table
towards the ceiling).
Place the large white plastic piece on top of the phantom base, using the locating pins as a
guide. The piece should be placed such that the beveled edge forms a “V” with the base.
Next, place the medium size white plastic pieces on the phantom, again forming a “V”
with the two beveled edges of the middle pieces. Then place the small white plastic pieces on
top, forming another “V” with the small pieces. The final assembly will form a pyramid (see
Figure 1, side view). This is the only valid configuration for the phantom measurement. All other
configurations including adding materials to the phantom, removing pieces of the phantom,
scanning the phantom upside down, etc. violate the intended use of the phantom and may
produce invalid results.
II. Phantom Positioning
Carefully position the whole body phantom in the center of the scanner table with the
head of the phantom at the head of the table. Allow 24” (61cm) of empty air space at the head of
the table. Carefully position the phantom parallel with the long axis of the table, using the table
pad markings as a guide. When properly centered, there will be a constant 3.5” (8.9 cm) gap
between the side of the phantom and the front and back limits of the QDR 4500 scanner table
(see Figure 1).
Whole Body and Hip DXA Bone Density
Version 1.0
6/1/13
MOST
Whole Body and Hip DXA Bone Density
Operations Manual
page 18
Figure 1. Layout of Whole Body Phantom positioned on the QDR 4500 scanner table. Also
shown, the fully assembled phantom viewed from the side. (Note that the amount of empty space
between the side of the phantom and the sides of the table will vary depending upon scanner
model).
III. Data acquisition - Scanning the whole body phantom
1. Make sure that the phantom is centered, is parallel to the long axis of the table and is
correctly oriented with respect to the head of the table.
2. Enter Whole Body Phantom #XXXX in the Name field of the Patient Biography (where
XXXX is the phantom serial number, including any letters, found on the phantom label).
Enter #XXXX in the Pat ID field of the Patient Biography (where XXXX is the phantom
serial number, including any letters, found on the phantom label).
3. Remove all artifacts from the table surface. Extraneous objects in the scan field will
interfere with the measured results in an unpredictable fashion.
4. Select the standard Adult Whole Body scan mode commonly employed at your facility.
Accept the default scan length and scan width. Perform a complete scan of the entire table
surface including the phantom. Do not interrupt the scanner during the measurement.
5. Carefully inspect the scan image to ensure that the phantom was (i) centered, (ii) parallel
to the long axis of the scanner table and (iii) the phantom’s head appears at the top of the
image. If the scan image appears satisfactory, proceed to the analysis section. If not,
carefully reposition the phantom according to the instructions in Section II and repeat the
scan.
6. After receipt of the whole body phantom, scan the phantom four (4) times a day for the
first week (20 scans). This will allow the setting of a consistent mean for monitoring
performance and comparison purposes. Note that the whole body phantom scans can
NOT be added to the QC database. The QA Center will plot and check the data and notify
the clinical centers of any problems.
7. After the first 20 scans are performed, scan the phantom three times a week.
IV. Analysis
A. General Comments
The goal of the analysis is to carefully delineate the various body regions in a standard and
reproducible fashion, so that measured results will reflect instrument performance, not variations
in analysis techniques. Of particular importance are the placement of the head ROI cutline and
the cutlines that delineate the ribs, since these two regions affect global body composition and
BMD. It is essential that the baseline measurement is technically adequate and that the analysis is
performed by direct comparison to the sample analysis on the Hologic diskette labeled:
“SAMPLE ANALYSES: WB PHANTOM” or “Whole Body Phantom Analysis Template”. Use
the sample scan for your model of scanner (see Table 1).
B. Specific Instructions - Hologic QDR systems
Whole Body and Hip DXA Bone Density
Version 1.0
6/1/13
Whole Body and Hip DXA Bone Density
Operations Manual
MOST
page 19
Follow the instructions in Sections II and III of Appendix A to acquire a technically adequate
scan of the Whole Body phantom. Restore the appropriate scan from the Hologic diskette
labeled “SAMPLE ANALYSES: WB PHANTOM” or “Whole Body Phantom Analysis
Template” to the analysis workstation (see Table 1 for the correct scan to restore for your QDR
model). Select the newly acquired WB Phantom scan. Then use the Compare feature to register
the ROI cutlines of the sample scan to the newly acquired scan of the WB Phantom. Once the
ROI’s have been matched as nearly as possible, complete the analysis and print the first and last
pages of the report.
Archive the baseline measurement for safekeeping but do not delete it from the analysis
workstation. All future whole body phantom measurements will be compared to the initial
baseline measurement. After the initial measurement, the sample scan restored from the
sample diskette should be deleted. Archive Whole Body Phantom scans to both the clinic and
traveling opticals, then delete the scans from the hard drive.
Table 1. Scans to restore for a given QDR model number.
QDR MODEL NUMBER
WB PHANTOM SCAN (RESTORE
FROM SAMPLE DISK)
1000W, 1500, 2000 Pencil beam
1000/1500/2000 Pencil WB Phantom
2000 Fan Beam
2000 Fan WB Phantom
4500W
4500W WB Phantom
4500A
4500A WB Phantom
V. Interpretation of measured values
The phantom measurements should be printed out, placed in a logbook/file and kept at the clinic
center. The QA Center will plot selected variables periodically from the scans sent on the
traveling optical and notify the clinic center of any problems.
Whole Body and Hip DXA Bone Density
Version 1.0
6/1/13
MOST
Whole Body and Hip DXA Bone Density
Operations Manual
page 20
Appendix 2 Study Forms
Copies of DXA forms are included in this manual. Always keep a copy of any form you
send to the QA Center.
MOST DXA Bone Density data collection form as provided by the MOST Coordinating
Center (Do NOT photocopy)
DXA Participant Scan Log
DXA Batch Record Form
Hologic DXA Repair/Service/Upgrade Log
Whole Body Air QC Scan Worksheet
Excessive Bone Loss Form
Excessive bone loss alert letter
Whole Body and Hip DXA Bone Density
Version 1.0
6/1/13
MOST
Whole Body and Hip DXA Bone Density
Operations Manual
page 21
MOST DXA Form
Whole Body and Hip DXA Bone Density
Version 1.0
6/1/13
MOST
Whole Body and Hip DXA Bone Density
Operations Manual
Whole Body and Hip DXA Bone Density
page 22
Version 1.0
6/1/13
MOST
Whole Body and Hip DXA Bone Density
Operations Manual
Whole Body and Hip DXA Bone Density
page 23
Version 1.0
6/1/13
MOST
Whole Body and Hip DXA Bone Density
Operations Manual
Whole Body and Hip DXA Bone Density
page 24
Version 1.0
6/1/13
MOST
Whole Body and Hip DXA Bone Density
Operations Manual
Whole Body and Hip DXA Bone Density
page 25
Version 1.0
6/1/13
MOST
Whole Body and Hip DXA Bone Density
Operations Manual
Whole Body and Hip DXA Bone Density
page 26
Version 1.0
6/1/13
MOST
Whole Body and Hip DXA Bone Density
Operations Manual
Whole Body and Hip DXA Bone Density
page 27
Version 1.0
6/1/13
MOST
Whole Body and Hip DXA Bone Density
Operations Manual
page 28
Excessive bone loss alert letter
April 30, 2011
Jane Doe
1234 Market Street
Birmingham, AL 35201
Dear Ms. Doe:
During your last clinic visit for the MOST study, we repeated measurements of your hip bone density.
Analysis of the results indicated that you have lost bone in the hip at a rate greater than 2% per year
since your baseline measurement was made.
This loss is greater than average for a person your age and may indicate an increased risk of fracture.
This bone loss may also be related to other health conditions, or could result from use of certain
medications.
We have enclosed both copies of your hip scan, your baseline measurement and your last measurement.
We suggest that you consult with your personal doctor to find out why this is occurring, and we would
be happy to forward these results to your doctor.
If you do not have a source of medical care, we can provide you with the name of a doctor who
specializes in treating osteoporosis in Birmingham.
Thank you for your time and interest in the MOST study. Please do not hesitate to call us if you have
questions at (
)
and ask for
.
Sincerely,
Cora Beth Lewis, M.D.
MOST Principal Investigator
Whole Body and Hip DXA Bone Density
Version 1.0
6/1/13
MOST
Whole Body and Hip DXA Bone Density
Operations Manual
page 29
Appendix 3 Apex Addendum
Analysis Procedures with Apex 3.0
The purpose of this addendum is to describe supplemental analysis procedures to be used at the
MOST Birmingham clinic due to an upgrade to Apex 3.0.
**Please do not reanalyze any baseline scans at this visit! Please be sure to use the Compare
feature when analyzing the 84-mo scans.
If you use the COMPARE feature for analysis, the Apex software will analyze the scans using
the analysis version of the BL scan. If you do not, the follow-up will be analyzed in 3.0 and the
BMD will be calculated in a DIFFERENT way. BE CAREFUL TO ONLY USE COMPARE
AND TO NOT REANALYZE ANY BASELINE SCANS.
Please flag any baseline scan that you believe must be reanalyzed; the QA Center will review and
reanalyze it at UCSF, if necessary. The scan will be sent back to the clinic for archival.
Whole Body and Hip DXA Bone Density
Version 1.0
6/1/13