1
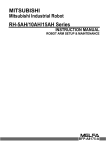
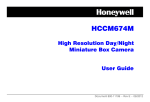
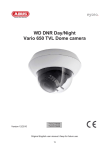
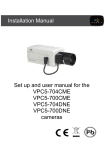
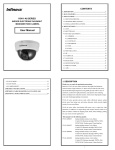
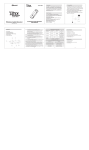
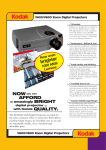
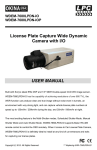
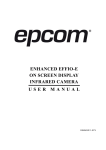
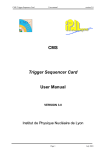
Operational Manual BIPRO-420VF9 500 TVL, 42 IR Day & Night Effio-E Weatherproof Bullet Color Camera FEATURES · · · · · · · · · · · 1/3” Sony Ex-View HAD II CCD Sony Effio-E DSP 500 TV Lines 42 IR LEDs IR Distance up to 95ft / 30m 2.8~12.0mm Varifocal Lens On-Screen Display (OSD) Weatherproof IP65 Rating 3-AXIS Cable Management Bracket 420mA @ IR “on” / 120mA @ IR “off” Power 12V DC This IR camera uses a high sensitive 1/3” Interline transfer Charge Coupled Device (CCD) image sensor and an all-state circuitry, which provides extremely long life and high reliability. This camera offers excellent image quality and is not subject to distortions from magnetic fields. This camera is an excellent choice for your CCTV system. It captures high-speed moving objects; the sensor changes the day/night mode automatically to show qualified color picture during daytime and clear picture at night time. Copyright © 2011. All Rights Reserved. 1 I-339 / I-340 / I-341 R201111-V04 Please read the Manual before attempting to use this product. Disposal of Old Electrical & Electronic Equipment (Applicable in the European Union and other European countries with separate collection systems). This symbol on the product or on its packaging indicates that this product shall not be treated as household waste. Instead it shall be handed over to the applicable collection point for the recycling of electrical and electronic equipment. By ensuring this product is disposed of correctly, you will help prevent potential negative consequences for the environment and human health, which could otherwise be caused by inappropriate waste handling of this product. The recycling of materials will help to conserve natural resources. For more detailed information about recycling of this product, please contact your local city office, your household waste disposal service or the shop where you purchased the product. CAUTION 1. Never point the camera toward the sun Do not expose the lens directly to the sun or to strong light as this may damage the pick-up device. 2. Handle this camera with care Avoid any shock or bumping of the camera. Improper handling could damage the camera. 3. Requires a proper operating environment This camera is designed for indoor use. The allowable temperature range for operation of this camera is between -4°F ~ 122°F / -20°C ~ 50°C. Copyright © 2011. All Rights Reserved. 2 I-339 / I-340 / I-341 R201111-V04 4. Clean the front face or lens It is recommended that the surface be cleaned every 3~6 months. Cleaning should be done by using a chamois, a very fine soft cloth, lens tissue, or cotton tipped applicator and ethanol to carefully remove any fingerprint or dust. 5. Check the power source voltage The power source voltage should be within the specified range. (Camera must meet the specifications). Camera must be connected to a surge protector at all times. 6. Objects and liquid entry Never push objects of any kind into this camera as this may touch dangerous voltage points of short out parts that could result in a fire or electric shock. Never spill any kind of liquid on the video product. 7. Servicing Do not attempt to service this video product by yourself as opening or removing covers may expose you to dangerous voltage or other hazards. Refer all service to qualified servicing personnel. 8. Damage requiring service Unplug this video product from the wall outlet and refer service to qualified servicing personnel under the following conditions: a. When the power supply cord or plug is damaged. b. If liquid has been spilled, or objects have fallen into the video product. c. If the video product has been exposed to rain or water. d. If the video product has been dropped or the cabinet has been damaged. e. When the video product exhibits a distinct change in performance. LIMITED WARRANTY This product is covered under warranty for one (1) year from the date of purchase. The warranty will automatically be voided if any of the following occurs: 1. Camera sticker is removed If the camera sticker is removed, we will not be able to confirm any information regarding when and where the product was purchased. We have no other way to verify the purchase record without the serial number on the camera sticker; therefore, it should not be removed. 2. Camera is modified in any way If the camera is scratched, damaged, or modified in a manner not described in this manual, the warranty will be voided immediately. It is the customer’s responsibility to keep the camera in good condition. 3. Video or power cable is cut The video cable and the power cable should not be tampered with. Cutting or modifying of the cables will result in termination of the warranty. Copyright © 2011. All Rights Reserved. 3 I-339 / I-340 / I-341 R201111-V04 PACKAGE CONTENTS One (1) IR Bullet Camera with power/video cable and sunshield One (1) Allen Wrench Three (3) Screws Three (3) Wall Anchors One (1) Mounting Guide Sticker One (1) Operational Manual * For any returns, please include all components listed above with original packaging in Re-sellable Condition. Absolutely No Returns will be accepted if any component is missing and or damaged. DIMENSIONS PARTS & FUNCTIONS 1. Sunshield Cover 2. Zoom Adjustor Knob 3. Focus Adjustor Knob 4. Video/Power Cable 5. 3-AXIS Bracket 6. OSD Multi-function button Copyright © 2011. All Rights Reserved. 4 I-339 / I-340 / I-341 R201111-V04 OSD OPERATIONS Attention: 1) Use the following 4 arrow buttons to navigate the menu: ←→↑↓ Selection will have a gray background. 2) Use the “ENTER” button to confirm selection. Note: Options with “←” means it has a submenu. 3) The OSD main menu has two pages. The user can switch between the two pages by “NEXT←” or “BACK←”. 4) Select the “SAVE ALL” to save any changed settings, and then press “ENTER”. Otherwise it will revert back to the original when the camera reboots. The first page of the main menu is shown below: SETUP MENU LENS SHUTTER/AGC MANUAL AUTO ← WHITE BAL ATW ← BACKLIGHT PICT ADJUST OFF ← ATR MOTION OFF ON ← DET NEXT ← EXIT ← SAVE ALL 5 The second page of the main menu is shown below: SETUP MENU PRIVACY DAY / NIGHT OFF AUTO ← ← NR CAMERA ID SYNC OFF INT LANGUAGE CAMERA RESET ENGLISH BACK ← EXIT ← SAVE ALL 1. LENS LENS MANUAL “LENS” has 2 options -–“MANUAL” and “AUTO”. (This camera cannot install the auto-iris lens temporarily) 1) MANUAL - The default setting is manual. If the installed lens is manual type, please select this option. 2) AUTO - If the installed lens is manual one, please select this option. The user can select the option by “RIGHT” or “LEFT”. AUTO ← LENS The auto lens has the following parameters for the user to set. Enter the setting page by using the “ENTER” button. TYPE MODE SPEED DC AUTO 80 6 [TYPE]: The drive mode of auto lens (or the lens type). It has 2 options-- DC and VIDEO. DC means direct current control of iris lenses, while VIDEO means video control of iris lenses. [MODE]: 3 options for adjusting iris--AUTO, OPEN and CLOSE. AUTO means it can automatically adjust the size of the iris according to the light. OPEN means open the iris all the time, while CLOSE means close the iris. [SPEED]: The sensitivity of the adjustment of the iris when choosing AUTO. The setting value range is 0~255. 2. SHUTTER / AGC AUTO ← SHUTTER/AGC It has 2 options--AUTO and MANUAL. 1) AUTO “AUTO” is the default setting. AUTO SETUP HIGH LUMINANCE MODE BRIGHTNESS SHUT 24 LOW LUMINANCE MODE AGC [SHUT]: (The setting value range of brightness is 0~255.) AGC (AGC / OFF) (The setting value range of AGC brightness is X0.25, X0.50, X0.75 and X1.00.) 2) MANUAL MANUAL SETUP MODE SHUTTER AGC SHUT+AGC 1/50 6.00 7 [SHUTTER]: The setting value range of SHUTTER is 1/50, 1/120, 1/250, 1/500, 1/1000, 1/2000, 1/4000, 1/10000. [AGC]: The setting value range of AGC is 6.00, 12.00, 18.00, 24.00, 30.00, 36.00, 42.00, 44.8. 3. WHITE BALANCE WHITE ATW ← BAL There are 7 types of white balance mode. 1) ATW - ATW means automatic tracking white balance. In the range of 1800K~10500K, it can continuously survey the color temperature to automatically adjust the white balance. This mode is prior. The setting menu is show as below: ATW SPEED DELAY CNT ATW FRAME 239 016 X1.00 ENVIRONMENT INDOOR [SPEED]: (The setting value range of SPEED is 0~255.) [DELAY CNT]: (The setting value range of Delay CNT is 0~255.) [ATW FRAME]: (The setting value range of ATW FRAME is X1.00、X1.50、X2.00) [ENVERONMENT]: 2 options-- INDOOR and OURDOOR. 2) PUSH - An auto white balance control mode. If the color temperature in the range of 2300K~10000K, it can exactly adjust the white balance. 3) USER1 - User-defined white balance mode 1. It can achieve the best effect by adjusting BLUE or RED. The setting page is shown below: UESE1 WB B-GAIN R-GAIN 030 033 8 4) USER2 - User-defined white balance mode 2. The settings are like above. 5) ANTI CR - Used in the environment where there is a serious chromatic difference. 6) MANUAL - Adjust the white balance mode manually. In specific lighting environment, it can achieve the best white balance results. The setting value range of Level is 0~255. MANUAL WB LEVEL 7) PUSH LOCK 034 An auto white balance lock mode. 4. BACKLIGHT COMPENSATION (BLC) BACKLIGHT OFF Backlight compensation include the following 3 options: 1) OFF - Close the backlight compensation function. The default setting is OFF. 2) Open the backlight compensation function. 3) Shelter from the over brightness light, such as: car license plate recognition light. HLC likes ECLP function. 5. PICTURE ADJUST ← PICT ADJUST Choose “Enter←” button, then enter into the picture adjusting menu. 9 PICT ADJUST MIRROR BRIGHTNESS CONTRAST OFF 000 128 SHARPNESS HUE 128 128 1) MIRROR - Mirror image the whole picture. The default setting is OFF. 2) BRIGHTNESS - Adjust the entire brightness of the whole picture. The setting value range is 0~255. 3) CONTRAST - The setting value range is 0~255 4) SHARPNESS - The setting value range is 0~255 5) HUE - The setting value range is 0~255 6) GAIN - The setting value range is 0~255 6. ATR ATR OFF ATR is similar to WDR function. While bright and dark parts are displayed on the screen simultaneously, this function can help the user see the various parts of the screen more clearly. And it can be adjusted according to different circumstances. \ ATR LUMINANCE CONTRAST MID MID 10 1) LUMINANCE - 3 options—HIGH, MID and LOW 2) CONTRAST - 5 options—HIGH, MIDHIGH, MID, MIDLOW, LOW 7. MOTION DETECTION MOTION ON ← DET When a moving object appears in the set detection area, the camera will alarm. We can enter the setting menu if the function is on. MOTION DET DETECT SENSE 111 BLOCK DISP OFF MONITOR AREA ON AREA SEL 1/4 TOP BOTTOM LEFT RIGHT 1) 000 000 000 000 DETECT SENSE - Used to set the camera’s detect sensitivity. The setting value range is 0~127. 2) BLOCK DISP - A block display switch. If the function on, the moving object would be traced by a flashing square grid. 3) MONITOR AREA - A monitoring area switch. If the function on, the square grid will appear in the monitor area. 4) AREA SEL - There are 4 monitor areas that can be set. The size can be adjusted by 4 buttons--up, down, left and right. The default setting is 0. If the user does not adjust the area size, the square grid will not appear. 11 8. PRIVACY AREA SHIELD PRIVACY OFF The user can set privacy area on the image randomly. If the function on, the user can enter the setting menu. The setting page is show as below: PRIVACY AREA SEL TOP BOTTOM LEFT RIGHT COLOR TRANSP 1) 1/8 000 000 000 000 1 1 00 AREA SEL - There are 8 zones that can be set. Their size can be adjusted by 4 buttons--up, down, left and right. The default setting is 0. If the user does not adjust the area size, the square grid will not appear. 2) COLOR - For every zones’ color setting, the user has 8 options—red, green, blue, light green, light blue, light red, white and black. 3) TRANSP - The function is used for setting privacy area’s transparency. There are 4 options--0.00、0.05、0.75 and 1.00 . 4) MOSAIC - Set the privacy area to mosaic. Notice the privacy area will be dim if the transparency is too high. It will be clear if the setting value is adjusted to 0.00. 9. DAY/NIGHT MODE DAY/NIGHT AUTO ← The Day/night Mode has 3 options: Auto, Color and B/W. 1) AUTO - If the setting is set to “Auto”, the camera will switch the mode automatically. In the daytime, the camera is in color to get perfect color; whereas, the camera is in B/W at night. DAY/NIGHT BURST DELAY CNT DAY→NIGHT ON 010 003 NIGHT←DAY 005 [BURST]: (It is a Burst switch.) [DELAY CNT]: (It’s used to set mode conversion delay time. The setting value range is 0~255.) DAY→NIGHT]: (It’s used for set DAY→NIGHT switching sensitivity. The setting value range is 0~255.) [NIGHT←DAY]: (It’s used for set NIGHT←DAY switching sensitivity . The setting value range is 0~255.) 2) COLOR - Used to switch the mode to Color manually 3) B/W - Used to switch the mode to B/W manually. If the user meets Burst interference, the user can turn off the “BURST”. B/W BURST ON 10. NR The settings of “NR MODE” has 4 options—Y/C, Y, C and OFF. The settings can be adjusted by Level Y and C. NR ← NR NR MODE Y/C 11. CAMERA ID CAMERA ID OFF The user can set the CAMERA ID by Menu. CAMERA ID CAMERA ABCDEFGHIJKLMNOPQRSTUV WXYZ0123456789-!”#$%&' ( ) _ ` ,¥:;<=>?@\^*.×+/ CHR1 CHR2 ← →↑↓CLR POS The Menu has 7 sections: 1) CAMERA - There are 2 lines for inputting ID characters. 2) CHARACTER - It indicates every character’s position. There are 2 group characters—CHR1 and CHR2. CHR1 consists of 26 English letters, 10 digitals and 28 specific symbols. 3) CHR1 - CHR1 consists of 26 English letters, 10 digitals and 28 specific symbols. 4) CHR2 - CHR2 has no character temporarily. 5) ←→↑↓- When input ID, please use “←→↑↓” to move the cursor. Choose one of them, and then press “ENTER”. 6) CLR - Used to Clear ID characters. Move the cursor to the ID character needs to be cleared. Then choose “CLR” and press “ENTER”. This way, the user can clear ID character one after another. 7) POS - Used to preview ID. 14 12. SYNCHRONIZATION MODE SYNC INT 13. LANGUAGE LANGUAGE ENGLISH There are 8 languages: Chinese, English, Japanese, German, French, Russian, Portuguese and Spanish. 14. CAMERA RESET CAMERA RESET Used to restore to factory defaults. If parameter settings are disordered, please choose “CAMERA RESET”, and then press “ENTER”. CONNECTION 15 TROUBLESHOOTING Item Problems 1 No picture or unstable 2 The image is blurred 3 4 Remedies Check video connection and power line First: check the lens for dirt or dust, then use customized lens paper or cotton with little alcohol to clean. Second; check the focus length and OSD settings Adjust the CNT of monitor and iris. The image is dim No motion detection frame and privacy shaded frame Check the option is ON or OFF. Or check the menu parameters 5 Screen color cast in the special environment Adjust WEB mode or direction 6 The screen glittering The camera might be facing the sun 7 Functions are unresponsive Restore default settings Camera is not working correctly and surface overly hot Cut off the power supply, 8 Then contact manufacturer 16 Copyright © 2011. All Rights Reserved. I-339 / I-340 / I-341 R201111-V04 INSTALLATION NOTES: 1. Avoid pointing the lens directly towards the sun or intense sources of light even when the camera is off. The subject must not be backlit. 2. Do not install the camera in a place where temperature is below -20°C / -4°F or above 50°C / 122°F. 3. Avoid the following location for camera installation: 4. Near an object that releases a strong magnetic or electric field. 5. Areas with strong vibrations. Step 1. Adhere the Ø84mm position sticker on the wall. Step 2. Drill a Ø5mm hole on the position selected, insert the plastic plug into hole. Step 3. Put the power cable, communication cable and video cable through bracket hole and leave sufficient length of connect cable. Step 4. Fix the bracket on the wall with 3pcs PA4×25mm screws. Copyright © 2011. All Rights Reserved. 17 I-339 / I-340 / I-341 R201111-V04 Copyright © 2011. All Rights Reserved. 18 I-339 / I-340 / I-341 R201111-V04 SPECIFICATIONS Model (NTSC) Image Sensor DSP Total Pixel Synchronizing System Resolution Minimum Illumination S/N Ratio Auto Gain Control White Balance Back Light Compensation Day & Night Function Gamma Sony Effio-E 270k Internal 500 TV Lines 0 Lux @ IR “on” / F1.2 >52B Auto / Manual, 8 setting values ATW / PUSH / USER1 / USER2 / ANTI CR / MANUAL / PUSH LOCK Backlight compensation, highlighting compensation, WDR Auto / Manual ; Color / B&W 0.45 Electronic Shutter Video Output Lens 1/60~1/100,000s (NTSC); 1/50~1/100,000s (PAL) Auto / Fixed Composite Video 1.0Vp-p/75 Ohms 2.8mm~12.0mm Varifocal Lens IR LED IR Wavelength IR Distance Control Mode Motion Detection Privacy IP Rating Power Supply IR ON Power BIPRO-420VF9 1/3” Sony Ex-View CCD II IR Off Operating Temperature Dimension Weight 42 IR LED 850nm Max illumination is up to 95ft / 30m OSD Menu, Supports 8 languages Box tracking and 4 zones ; set the position and size randomly 8 zones ; set the position and size randomly (8 colors) Weatherproof rating of IP65 12V DC 420mA max. 120mA max. -4°F ~ 122°F / -20°C ~ 50°C 6.46(L) x 4.28(H) x 3.66 (Ø) inches / 164(L) x 108.8(H) x 90(Ø) mm 2.2 lbs / 1 kg * Specifications are subject to change without notice Copyright © 2011. All Rights Reserved. 19 I-339 / I-340 / I-341 R201111-V04