1
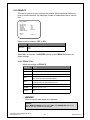
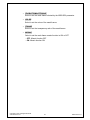
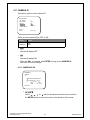
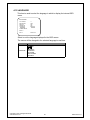
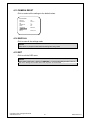
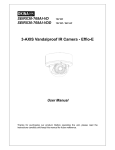
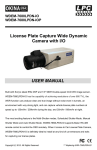
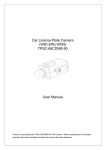
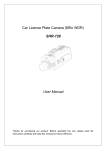
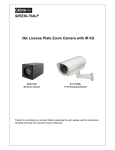
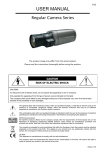
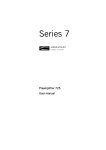
SEDX-761AI-B SEDX-761AI-W SEDX-761AI-BD SEDX-761AI-WD 12V DC, Black 12V DC, White 12V DC / 24V AC, Black 12V DC / 24V AC, White 3-AXIS Varifocal Dome Camera - Effio-E User Manual Thanks for purchasing our product. Before operating the unit, please read the instructions carefully and keep this manual for future reference. Safety Warnings 1. Read this manual carefully before installing the unit Please read this manual first for correct installation and operation. 2. Never install the camera on a ceiling that cannot hold its weight The product may fall down and cause damages. 3. Never install the camera near electric or magnetic fields Install the camera away from TV, radio transmitter, magnet, electric motor, transformer, audio speakers since the magnetic fields generate from above devices would distort the video image. 4. Never install or use the camera in areas exposed to water, oil or gas The water, oil or gas may result in operation failure, electric shock or fire. Do not use this unit near water-for example, near a bath tub, wash bowl, kitchen sink, or laundry tub, in a wet basement, near a swimming pool, in an unprotected outdoor installation, or any area which is classified as a wet location. 5. Never face the camera toward the sun Direct sunlight or severe ray may cause fatal damage to sensor and internal circuit. 6. Power Cord Protection Touching the wet power cord with hands or touching the power cord with wet hands may result in electric shock. Power supply cords should be routed so that they are not likely to be walked on or pinched by items placed upon or against them, playing particular attention to cords and plugs, convenience receptacles, and the point where they exit from the appliance. 7. Attachments Do not use attachment not recommended by the product manufacturer as they may cause hazards. 8. Object and Liquid Entry Never push objects of any kind into this product through openings as they may touch dangerous voltage points or short-out parts that could result in a fire or electric shock. Never spill liquid of any kind onto the product. 9. Do not operate the camera in environments where the temperature, humidity or power source is beyond the specified ones Use the camera in suitable environments where the temperature is within -10°C~50°C and humidity below 90%. Use the input power source as the specifications listed. Copyright © 2010. All Rights Reserved. www.okinausa.com i REV122010-V17 10. Cleaning Unplug the unit from the outlet before cleaning. Do not use liquid cleaners or aerosol cleaners. Use a damp cloth for cleaning. 11. Never disassemble the camera nor put impurities in it Disassembly or impurities may result in trouble or fire. 12. Stop using when the product emits smoke or abnormal heat 13. Servicing Do not attempt to repair this unit yourself as opening or removing covers may expose you to dangerous voltage or other hazards. Refer all servicing to qualified service personnel. 14. Retain Instructions THE SAFETY AND OPERATING INSTRUCTIONS SHOULD BE RETAINED FOR FUTURE REFERENCE. Warranty OKINA USA Products are covered under warranty for one year from the date of purchase. The warranty will automatically be voided if any of the following occurs: 1. Camera sticker is removed If the camera sticker is removed, we will not be able to confirm any information regarding when and where the product was purchased. We have no other way to verify the purchase record without the serial number on the camera sticker; therefore, it should not be removed. 2. Camera is modified in any way If the camera is scratched, damaged, or modified in a manner not described in this manual, the warranty will be voided immediately. It is the customer’s responsibility to keep the camera in good condition. 3. Video or power cable is cut The video cable and the power cable should not be tampered with. Cutting or modifying of the cables will result in termination of the warranty. NOTICE: The information in this manual was up-to-date when published. The manufacturer reserves the right to revise and improve its products. All specifications are therefore subject to change without notice. Copyright © 2010. All Rights Reserved. www.okinausa.com ii REV122010-V17 Table of Contents 1. INTRODUCTION ............................................................................................................................ 1 1.1 MAIN FEATURES ....................................................................................................................... 1 1.2 CONTENT LIST ......................................................................................................................... 1 1.3 SPECIFICATIONS....................................................................................................................... 2 2. CAMERA OVERVIEW.................................................................................................................... 3 2.1 DIMENSIONS ............................................................................................................................ 3 2.2 DESCRIPTION OF CAMERA PARTS .............................................................................................. 4 3. OSD OPERATION ......................................................................................................................... 4 3.1 OSD CONTROL BUTTONS ......................................................................................................... 5 3.2 OSD OPERATION ..................................................................................................................... 6 4. CONFIGURATION ......................................................................................................................... 7 4.1 LENS ..................................................................................................................................... 7 4.1.1 AUTO IRIS .................................................................................................................. 7 4.2 SHUTTER/AGC ..................................................................................................................... 9 4.2.1 AUTO SETUP ............................................................................................................. 9 4.2.2 MANUAL SETUP ...................................................................................................... 10 4.3 NR ........................................................................................................................................ 11 4.4 WHITE BAL (WHITE BALANCE) .............................................................................................. 12 4.4.1 ATW (Auto Trace White Balance) .............................................................................. 13 4.4.2 PUSH ........................................................................................................................ 13 4.4.3 USER1 ...................................................................................................................... 13 4.4.4 USER2 ...................................................................................................................... 14 4.4.5 MANUAL WB (Manual White Balance)...................................................................... 14 4.4.6 PUSH LOCK ............................................................................................................. 14 4.5 ATR...................................................................................................................................... 15 4.5.1 ATR ON ..................................................................................................................... 15 4.6 BACKLIGHT ........................................................................................................................ 16 4.7 DAY/NIGHT ......................................................................................................................... 17 4.7.1 B/W ........................................................................................................................... 17 4.7.2 DAY/NIGHT ............................................................................................................... 18 4.8 PICT ADJUST ...................................................................................................................... 19 4.9 MOTION DET (MOTION DETECTION) ...................................................................................... 20 4.9.1 MOTION DET ON ..................................................................................................... 20 4.10 PRIVACY ............................................................................................................................. 22 4.10.1 PRIVACY ON ............................................................................................................ 22 4.11 CAMERA ID ......................................................................................................................... 24 4.11.1 CAMERA ID ON ........................................................................................................ 24 4.12 LANGUAGE ......................................................................................................................... 26 4.13 CAMERA RESET ................................................................................................................. 27 4.14 SAVE ALL ............................................................................................................................ 27 4.15 EXIT..................................................................................................................................... 27 Copyright © 2010. All Rights Reserved. www.okinausa.com iii REV122010-V17 1. Introduction SEDX-761AI-B / SEDX-761AI-W / SEDX-761AI-BD / SEDX-761AI-WD are built with Sony’s latest image processor. This super-wide dynamic camera has the capability of achieving resolutions of over 610 TVL. The features include 2D noise reduction, spot removal, strong-light suppression, intelligent motion, face detection and OSD functions. SEDX-761AI-B / SEDX-761AI-W / SEDX-761AI-BD / SEDX-761AI-WD reproduces nearly perfect images like no other. 1.1 Main Features 1/3" Sony 760H Super HAD CCD II Sony Effio-E DSP Color: 610 TVL, B/W: 630 TVL Color: 0.15 Lux @ F1.2, B/W: 0.1 Lux @ F1.2 Multi-Language OSD Control ATR Digital Powerful 128x WDR (52dB) Anti-Headlight (HLC) 2D Noise Reduction High Contrast Images Ideal for Backlight Environments Mosaic Privacy Mask Advanced Motion Detection Function Picture Quality Adjustable (Contrast/Sharpness/Hue/Gain) Built-in Varifocal Lens & Unique 3 Axis Gimble Mechanism SEDX-761AI-B / SEDX-761AI-W: 12V DC, 2.3W SEDX-761AI-BD / SEDX-761AI-WD: 12V DC / 24V AC, 2.3W 1.2 Content List One (1) SEDX-768AI-B or SEDX-768AI-W or SEDX-768AI-BD or SEDX-768AI-WD camera with video/power cable Two (2) Mounting Screws One (1) DC Male Connector One (1) Cleaning Cloth One (1) Warning Sign Sticker One (1) User Manual One (1) CD * For any returns, please include all components listed above with original packaging in Resalable Condition. Absolutely No Returns will be accepted if any component is missing/damaged or if any cable is cut or tampered with. Copyright © 2010. All Rights Reserved. www.okinausa.com 1 REV122010-V17 1.3 Specifications PIC Model Base Color Image Sensor Total Pixels Resolution ; DSP Minimum Illumination Wide Dynamic Range Video Output ; Connector Signal Noise Ratio Gamma Correction Menu Title Synchronizing System Digital Day&Night Mode Electronic Shutter Automatic Gain Control White Balance Back Light Compensation Flickerless Dynamic Noise Reduction Language Motion Detection ; Privacy Automatic IRIS ; Connector Lens Mount D-233 SEDX-761AI-B Black D-234 D-239 D-240 SEDX-761AI-W SEDX-761AI-BD SEDX-761AI-WD White Black White 1/3" Sony 760H Super HAD CCD II NTSC: 811(H)x508(V) / PAL: 795(H)x596(V) Color: 610 TVL, B/W: 630 TVL ; Sony Effio-E Color: 0.15 Lux @ F1.2, B/W: 0.1 Lux @ F1.2 ATR Digital WD (ATR: Adaptive Tone-curve Reproduction) ; 128x Normal Camera (52dB) 1.0Vp-p Composite, 75Ω ; BNC 1.0Vp-p Composite, 75Ω ; BNC RCA Service Monitor Output More than 52dB (AGC off, Weight on) 0.45 OSD Control TITLE (LOCATION) INTERNAL COLOR / B&W / AUTO AUTO (1/50(60)~1/100,000sec.) / MANUAL: 1/50(60), FL 1/120(100), 1/250, 1/500, 1/1,000, 1/2,000, 1/4,000, 1/10,000sec. AUTO (4 Steps) ATW / PUSH / USER1 / USER2 / ANTI CR / MANUAL / PUSH LOCK HLC / BLC / OFF ON / OFF 2D ENGLISH / JAPANESE / GERMAN / FRENCH / RUSSIAN / PORTUGUESE / SPANISH / SIMPLIFIED CHINESE ON / OFF (24x16 Zones, Alarm) ; ON / OFF (8 Zones Programmable, Mosaic) DC Lens, Angle of View(H) Power Input ; Consumption Operation ; Storage Temperature Operation ; Storage Humidity Dimensions 12V DC Built-in DC Auto IRIS Lens f2.8 mm~10.5mm / F1.2 Aspherical Auto Iris Lens/ 99.5°~27.4° 12V DC / 24V AC ; 2.3W Internal 12V DC Only ; 2.3W 14˚F~122˚F ; -4˚F~140˚F / -10˚C~50˚C ; -20˚C~60˚C Maximum:RH80% ; RH90% 4.88”(DIA) x 3.78”(H) Net Weight 0.71 lbs / 124(DIA) × 96(H)mm / 320g * Specifications are subject to change without notice PAL version also available Copyright © 2010. All Rights Reserved. www.okinausa.com 2 REV122010-V17 2. Camera Overview 2.1 Dimensions Copyright © 2010. All Rights Reserved. www.okinausa.com 3 REV122010-V17 2.2 Description of Camera Parts 5 7 8 4 12V DC SEDX-761AI-B SEDX-761AI-W 4 6 (1) FAR/NEAR To adjust the lens focus for near and far. Dual Power SEDX-761AI-BD SEDX-761AI-WD (2) WIDE/TELE To adjust the lens angle for wide and tele. (3) OSD Control Buttons ENTER button UP & DOWN button LEFT & RIGHT button (4) VIDEO Connector This is an output for BNC connection to a video monitor, etc (75Ω). (5) Power Input Terminal Connect the power input of 12V DC for SEDX-761AI-B / SEDX-761AI-W. (6) Power Input Terminal Connect the power input of 12V DC / 24V AC for SEDX-761AI-BD / SEDX-761AI-WD. (7) 12V DC Input (Available for SEDX-768AI-BD / SEDX-768AI-WD only) (8) RCA Service Monitor Output (Available for SEDX-768AI-BD / SEDX-768AI-WD only) Copyright © 2010. All Rights Reserved. www.okinausa.com 4 REV122010-V17 3. OSD Operation 3.1 OSD Control Buttons ENTER L U R D ① U (UP) Use this button to move the cursor upwards to the desired item. ② R (RIGHT) Use this button to move the cursor to the right to select or to adjust the parameters of the selected item. The parameter increases when the right button is pressed. ③ D (DOWN) Use this button to move the cursor downwards to the desired item. ④ L (LEFT) Use this button to move the cursor to the left to select or to adjust the parameters of the selected item. The parameter decreases when the left button is pressed. ⑤ ENTER Use this button to display the main menu, to confirm and to enter the submenus when they’re available. Items with the symbol “<┘” in the end contain sub-menus. For further settings of those items, select the desired item with the button c or d and press the ENTER button to bring up the sub-menu and edit. Copyright © 2010. All Rights Reserved. www.okinausa.com 5 REV122010-V17 3.2 OSD Operation SETUP MENU ENTER L U LENS SHUTTER/AGC NR WHITE BAL ATR BACKLIGHT DAY/NIGHT NEXT<┘ EXIT<┘ R D AUTO<┘ AUTO<┘ <┘ ATW<┘ OFF OFF AUTO<┘ SAVE ALL<┘ 1. Start to operate the OSD menu Press the ENTER button to bring up the OSD main menu to start operating OSD menus. 2. Select items with the cursor buttons y y Use buttons c and d to move the cursor up and down. Use buttons e and f to switch the modes or to adjust the parameters or the values of the settings. 3. Switch to the sub-menu Items with the symbol “<┘” in the end contain sub-menus. For further settings of those items, select the desired item with the button c or d and press the ENTER button to bring up the sub-menu and edit. SETUP MENU LENS SHUTTER/AGC NR WHITE BAL ATR BACKLIGHT DAY/NIGHT NEXT<┘ EXIT<┘ AUTO IRIS AUTO<┘ AUTO<┘ <┘ ATW<┘ OFF OFF AUTO<┘ TYPE MODE SPEED DC AUTO |||||||||||||||| 080 RETURN<┘ SAVE ALL<┘ Main Menu Sub-Menu 4. Return to the previous page Select RETURN and press the ENTER button to return to the previous page. 5. Exit the OSD menu Select EXIT with the button c or d and press the ENTER button to exit the OSD menu. Copyright © 2010. All Rights Reserved. www.okinausa.com 6 REV122010-V17 4. Configuration 4.1 LENS When the SETUP MENU is displayed on the screen, use buttons c and d to select the LENS and press the ENTER button to do further settings. SETUP MENU AUTO IRIS LENS SHUTTER/AGC NR WHITE BAL ATR BACKLIGHT DAY/NIGHT NEXT<┘ EXIT<┘ AUTO<┘ AUTO<┘ <┘ ATW<┘ OFF OFF AUTO<┘ TYPE MODE SPEED DC AUTO |||||||||||||||| 080 RETURN<┘ SAVE ALL<┘ Main Menu Sub-Menu Select to set the mechanical iris of the lens. Function Option LENS MANUAL AUTO<┘ y MANUAL Auto electronic shutter y AUTO<┘ Auto electronic shutter + Mechanical auto IRIS When AUTO<┘ is selected, click ENTER to bring up the AUTO IRIS sub-menu for further settings. 4.1.1 AUTO IRIS Adjust the settings of the AUTO IRIS. Function Option TYPE DC VIDEO MODE OPEN CLOSE AUTO SPEED 000 – 255 y TYPE Select to set the type of the mechanical iris. - DC: DC Lens. - VIDEO: VIDEO Lens. Copyright © 2010. All Rights Reserved. www.okinausa.com 7 REV122010-V17 y MODE Select to set the type of control to be exercised over the mechanical iris. - OPEN: The mechanical iris is fixed to open. - CLOSE: The mechanical iris is fixed to close. - AUTO: The mechanical iris is controlled automatically. y SPEED Select to set the convergence speed of the mechanical iris. Copyright © 2010. All Rights Reserved. www.okinausa.com 8 REV122010-V17 4.2 SHUTTER/AGC When the SETUP MENU is displayed on the screen, use buttons c and d to select the SHUTTER/AGC and press the ENTER button to do further settings. SETUP MENU LENS SHUTTER/AGC NR WHITE BAL ATR BACKLIGHT DAY/NIGHT NEXT<┘ EXIT<┘ AUTO<┘ AUTO<┘ <┘ ATW<┘ OFF OFF AUTO<┘ SAVE ALL<┘ Select to set Auto exposure or Manual exposure. Function Option SHUTTER/AGC AUTO<┘ MANUAL<┘ y AUTO<┘: When AUTO<┘ is selected, click ENTER to bring up the AUTO SETUP sub-menu for further settings. y MANUAL<┘: When MANUAL<┘ is selected, click ENTER to bring up the MANUAL SETUP sub-menu for further settings. 4.2.1 AUTO SETUP Adjust the settings of the AUTO SETUP. Function HIGH LUMINANCE LOW LUMINANCE y Option MODE SHUT+AUTO IRIS AUTO IRIS * BRIGHTNESS 000 – 255 MODE OFF AGC BRIGHTNESS x0.25 ; x0.50 ; x0.75 ; x1.00 HIGH LUMINANCE - MODE Select to specify AE control on the medium- and high-brightness side. SHUT + AUTO IRIS: Auto electronic shutter + Mechanical auto IRIS AUTO IRIS: Shutter fix + Mechanical auto IRIS NOTICE: If MANUAL has been selected as the LENS function setting, SHUT will be displayed, and the settings made in this section will not take effect. Copyright © 2010. All Rights Reserved. www.okinausa.com 9 REV122010-V17 - BRIGHTNESS Select to specify the high- and medium-brightness side reference. The brightness changes depending on whether the ATR function is ON or OFF, and whether the CRS mode has been selected as the AWB function. Please note that the brightness will change when ATR or WHITE BAL is set to ANTI CR (CRS mode), etc., after BRIGHTNESS has been set. y LOW LUMINANCE - MODE Select to specify AE control on the low-brightness side. OFF: OFF AGC: Auto gain control - BRIGHTNESS Select to specify the low-brightness side reference. 4.2.2 MANUAL SETUP Adjust the settings of the MANUAL SETUP. Function Option MODE SHUT+ AGC SHUTTER 1/60* ; 1/100* ; 1/250 ; 1/500 ; 1/1000 ; 1/2000 ; 1/4000 ; 1/10000 AGC 6.00 ; 12.00 ; 18.00 ; 24.00 ; 30.00 ; 36.00 ; 42.00 ; 44.80 y MODE "SHUT+AGC" is the only option available for the ME operation mode. There are no other options. y SHUTTER Select to set the ME shutter speed (in fractions of a second). y AGC Select to set the AGC value for ME. Copyright © 2010. All Rights Reserved. www.okinausa.com 10 REV122010-V17 4.3 NR This item is used to set the noise reduction. SETUP MENU LENS SHUTTER/AGC NR WHITE BAL ATR BACKLIGHT DAY/NIGHT NEXT<┘ EXIT<┘ AUTO<┘ AUTO<┘ <┘ ATW<┘ OFF OFF AUTO<┘ SAVE ALL<┘ Select to bring up the NR sub-menu for further settings. y Function Option NR MODE OFF Y C Y/C Y LEVEL 000-015 C LEVEL 000-015 NR MODE Select to set the 2D NR filter mode. y OFF: Y and C filters OFF Y: Y filter ON C: C filter ON Y/C: Y and C filters ON Y LEVEL Select to set the Y filter strength. y C LEVEL Select to set the C filter strength. Copyright © 2010. All Rights Reserved. www.okinausa.com 11 REV122010-V17 4.4 WHITE BAL (White Balance) The screen color can be adjusted by using the WHITE BAL function. 1. Please use the c and d buttons to WHITE BAL on the SETUP MENU and press the ENTER button to do further settings. 2. Please select the desired item and press e and f buttons to adjust the settings. SETUP MENU LENS SHUTTER/AGC NR WHITE BAL ATR BACKLIGHT DAY/NIGHT NEXT<┘ EXIT<┘ AUTO<┘ AUTO<┘ <┘ ATW<┘ OFF OFF AUTO<┘ SAVE ALL<┘ Select to set the white balance Mode. y Function Option WHITE BAL ATW PUSH USER1 USER2 ANTI CR MANUAL PUSH LOCK ATW (Auto Trace White balance) When ATW<┘ is selected, click ENTER to bring up the ATW sub-menu for further settings. y PUSH: All pull-in Select to set the white balance mode to the PUSH mode. y USER1: Fluorescent light fixed gain (3200K) When USER1<┘ is selected, click ENTER to bring up the USER1 WB sub-menu for further settings. y USER2: Outdoor fixed gain (6300K) When USER2<┘ is selected, click ENTER to bring up the USER2 WB sub-menu for further settings. y ANTI CR: Color rolling suppression Select to set the white balance mode to the ANTI CR mode. y MANUAL: Manual white balance When MANUAL<┘ is selected, click ENTER to bring up the MANUAL WB sub-menu for further settings. Copyright © 2010. All Rights Reserved. www.okinausa.com 12 REV122010-V17 y PUSH LOCK Select to set the white balance mode to the PUSH LOCK mode. 4.4.1 ATW (Auto Trace White Balance) Adjust the settings of the ATW. Function Option SPEED 000-255 DELAY CNT 000-255 ATW FRAME x0.50 ; x1.00 ; x1.50 ; x2.00 ENVIROMENT INDOOR ; OUTDOOR y SPEED Select to adjust the pull-in speed of ATW. y DELAY CNT Select to set the time-based hysteresis of ATW. y ATW FRAME Select to set the pull-in frame magnification. y ENVIROMENT Select to set the pull-in frame (indoor/outdoor) of ATW. 4.4.2 PUSH Select to allow the camera automatically adjust the white balance under all conditions. 4.4.3 USER1 The gain values for the fluorescent light fixed mode are used as the adjustment items of USER1 WB on the internal OSD menu. y Function Option B-GAIN 000-255 R-GAIN 000-255 B-GAIN Used for operating the B gain in the WB fixed gain mode. y R-GAIN Used for operating the R gain in the WB fixed gain mode. Copyright © 2010. All Rights Reserved. www.okinausa.com 13 REV122010-V17 4.4.4 USER2 The gain values for the outdoor fixed mode are used as the adjustment items of USER2 WB on the internal OSD menu. Function Option B-GAIN 000-255 R-GAIN 000-255 y B-GAIN Used for operating the B gain in the WB fixed gain mode. y R-GAIN Used for operating the R gain in the WB fixed gain mode. 4.4.5 MANUAL WB (Manual White Balance) The B and R gain values for manual WB are set on this screen. Function Option LEVEL 000-255 y LEVEL Select to set the B and R gain values for MANUAL WB. By incrementing or decrementing the B gain value, the R gain value is also adjusted in tandem. NOTICE: The actual variable range is limited to the range from the low color temperature (approx. 1800K) to the high color temperature (approx. 10500K) stored when the pre-white balance was adjusted. 4.4.6 PUSH LOCK To find the optimal setting for the current luminance environment in this mode, point the camera towards a sheet of white paper and press the ENTER button. Whenever the condition changes, readjust it. ATTENTION: The white balance can not fully function under the following conditions. Please select PUSH LOCK Mode when the following occurred. < When there’s a higher temperature surrounded the object. < When there’s darkness surrounded the object. < When there’s a fluorescent light surrounded the object or where the light changes all the time. Copyright © 2010. All Rights Reserved. www.okinausa.com 14 REV122010-V17 4.5 ATR This item is used to set the Day/Night function. SETUP MENU LENS SHUTTER/AGC NR WHITE BAL ATR BACKLIGHT DAY/NIGHT NEXT<┘ EXIT<┘ AUTO<┘ AUTO<┘ <┘ ATW<┘ OFF OFF AUTO<┘ SAVE ALL<┘ Select to set ATR to OFF or ON. y Function Option LUMINANCE LOW MID HIGH CONTRAST LOW MIDLOW MID MIDHIGH HIGH OFF ATR OFF y ON ATR ON When ON<┘ is selected, click ENTER to bring up the ATR sub-menu for further settings. 4.5.1 ATR ON y LUMINANCE Select to set the extent of the luminance compression. y CONTRAST Select to set the extent of the contrast enhancement. Copyright © 2010. All Rights Reserved. www.okinausa.com 15 REV122010-V17 4.6 BACKLIGHT This item is used to set the backlight compensation operation. SETUP MENU LENS SHUTTER/AGC NR WHITE BAL ATR BACKLIGHT DAY/NIGHT NEXT<┘ EXIT<┘ AUTO<┘ AUTO<┘ <┘ ATW<┘ OFF OFF AUTO<┘ SAVE ALL<┘ Select to set BACKLIGHT to OFF, BLC or HLC. y Function Option BACKLIGHT OFF BLC HLC OFF Backlight compensation OFF. y BLC Backlight compensation ON. y HLC HLC(Headlight compensation) function ON. Copyright © 2010. All Rights Reserved. www.okinausa.com 16 REV122010-V17 4.7 DAY/NIGHT This item is used to set the Day/Night function. SETUP MENU LENS SHUTTER/AGC NR WHITE BAL ATR BACKLIGHT DAY/NIGHT NEXT<┘ EXIT<┘ AUTO<┘ AUTO<┘ <┘ ATW<┘ OFF OFF AUTO<┘ SAVE ALL<┘ Select to set DAY/NIGHT to AUTO, COLOR or B/W. y Function Option DAY/NIGHT AUTO<┘ COLOR B/W AUTO Day or Night is automatically identified and controlled accordingly. When AUTO<┘ is selected, click ENTER to bring up the DAY/NIGHT sub-menu for further settings. y COLOR The Day/Night function is set to OFF. y B/W The NIGHT mode is established forcibly, and chroma is set to OFF. When B/W<┘ is selected, click ENTER to bring up the B/W sub-menu for further settings. 4.7.1 B/W Adjust the settings of B/W. Function Option BURST ON OFF Select to set whether to output the burst signal when the B/W (NIGHT mode established forcibly) status has been identified. y ON Burst signal ON y OFF Burst signal OFF Copyright © 2010. All Rights Reserved. www.okinausa.com 17 REV122010-V17 4.7.2 DAY/NIGHT Adjust the settings of DAY/NIGHT. Function Option BURST ON OFF DELAY CNT 000-255 DAY->NIGHT 000-255 NIGHT->DAY 000-255 y BURST Select to set whether to output the burst signal when the Night status has been identified. - ON: Burst signal ON - OFF: Burst signal OFF y DELAY CNT Select to set the Night/Day identification transfer time. y DAY->NIGHT Select to set the threshold for identifying the Night status from the Day status. y NIGHT->DAY Select to set the threshold for identifying the Day status from the Night status. Copyright © 2010. All Rights Reserved. www.okinausa.com 18 REV122010-V17 4.8 PICT ADJUST This item is used to set the PICT ADJUST function. SETUP MENU PICT ADJUST MOTION DET PRIVACY CAMERA ID LANGUAGE CAMERA RESET <┘ ON<┘ OFF OFF ENGLISH BACK<┘ EXIT<┘ SAVE ALL<┘ Select to bring up the PICT ADJUST sub-menu for further settings. y Function Option MIRROR OFF ON BRIGHTNESS 000-255 CONTRAST 000-255 SHARPNESS 000-255 HUE 000-255 GAIN 000-255 MIRROR Select to set the horizontal flip for the display output. y OFF: Normal output ON: Horizontally flipped output BRIGHTNESS Select to set the screen brightness. y CONTRAST Select to set the screen contrast. y SHARPNESS Select to set the screen sharpness. y HUE Select to adjust the hue. y GAIN Select to adjust the color gain. Copyright © 2010. All Rights Reserved. www.okinausa.com 19 REV122010-V17 4.9 MOTION DET (Motion Detection) This item is used to set the Motion Detection function. SETUP MENU PICT ADJUST MOTION DET PRIVACY CAMERA ID LANGUAGE CAMERA RESET <┘ ON<┘ OFF OFF ENGLISH BACK<┘ EXIT<┘ SAVE ALL<┘ Select to set motion detection to OFF or ON. y Function Option MOTION DET OFF ON<┘ OFF Motion detection OFF y ON Motion detection ON When ON<┘ is selected, click ENTER to bring up the MOTION DET sub-menu for further settings. 4.9.1 MOTION DET ON Adjust the settings of MOTION DET. Function Option DETECT SENSE 000-127 BLOCK DISP OFF ON ENABLE MONITOR AREA OFF ON AREA SEL 1/4 ; 2/4 ; 3/4 ; 4/4 TOP 000-244 BOTTOM 000-244 LEFT 000-474 RIGHT 000-474 y DETECT SENSE Select to set the motion detection sensitivity. Copyright © 2010. All Rights Reserved. www.okinausa.com 20 REV122010-V17 y BLOCK DISP Select to control the ON/OFF status of the motion detection block display. - OFF: No display - ON: Luminance highlighted y MONITOR AREA Select to set whether to use the monitoring frames. - OFF: The monitoring frames are not used. - ON: The monitoring frames are used. y AREA SEL Select to deinfe the monitoring frame to be set. y TOP/BOTTOM/LEFT/RIGHT Select to set the monitoring frame selected with the AREA SEL function. Copyright © 2010. All Rights Reserved. www.okinausa.com 21 REV122010-V17 4.10 PRIVACY This item is used to set up to eight privacy masks. When monitoring frames are used for motion detection, the maximum number of masks which can be used is four. SETUP MENU PICT ADJUST MOTION DET PRIVACY CAMERA ID LANGUAGE CAMERA RESET <┘ ON<┘ OFF OFF ENGLISH BACK<┘ EXIT<┘ SAVE ALL<┘ Select to set the masks to OFF or ON. Function Option PRIVACY OFF ON<┘ When ON<┘ is selected, click ENTER to bring up the PRIVACY sub-menu for further settings. 4.10.1 PRIVACY ON Adjust the settings of PRIVACY. Function Option AREA SEL 1/8 ; 2/8 ; 3/8 ; 4/8 ; 5/8 ; 6/8 ; 7/8 ; 8/8 * TOP 000-244 (NTSC) ; 000-288 (PAL) BOTTOM 000-244 (NTSC) ; 000-288 (PAL) LEFT 000-251(510H)/378(760H)/474(960H)(NTSC) ; 000-246(510H)/370(760H)/468(960H)(PAL) RIGHT 000-251(510H)/378(760H)/474(960H)(NTSC) ; 000-246(510H)/370(760H)/468(960H) (PAL) COLOR 1-8 TRANSP 0.00 ; 0.50 ; 0.75 ; 1.00 MOSAIC OFF ON y AREA SEL Select to set the mask frame to be adjusted. NOTICE: When MONITOR AREA has been set to ON by the MOTION DET setting, four frames--1/4, 2/4, 3/4 and 4/4--are selected. Copyright © 2010. All Rights Reserved. www.okinausa.com 22 REV122010-V17 y TOP/BOTTOM/LEFT/RIGHT Select to set the mask frame selected by the AREA SEL parameter. y COLOR Select to set the colors of the mask frames. y TRANSP Select to set the transparency ratio of the mask frames. y MOSAIC Select to set the mask frame mosaic function to ON or OFF. - OFF: Mosaic function OFF - ON: Mosaic function ON Copyright © 2010. All Rights Reserved. www.okinausa.com 23 REV122010-V17 4.11 CAMERA ID This item is used to set the camera ID. SETUP MENU PICT ADJUST MOTION DET PRIVACY CAMERA ID LANGUAGE CAMERA RESET <┘ ON<┘ OFF OFF ENGLISH BACK<┘ EXIT<┘ SAVE ALL<┘ Select to set the camera ID to OFF or ON. y Function Option CAMERA ID OFF ON<┘ OFF Camera ID display OFF y ON Camera ID display ON When the ON<┘ is selected, click ENTER to bring up the CAMERA ID sub-menu for further settings. 4.11.1 CAMERA ID ON CAMERA ID CAMERA ABCDEFGHIJKLMNOPQRSTUV WXYZ0123456789 - ! ” # $ % & ’ ( ) _ ` , ¥ : ; <=>?@\ ^ * . x+/ CHR1 CHR2 ← →↑↓ CLR POS RETURN<┘ y ← →↑↓ Select ←, →, ↑ or ↓ with the character selection cursor, and click the ENTER button to move the cursor in the direction of the arrow. Copyright © 2010. All Rights Reserved. www.okinausa.com 24 REV122010-V17 y CLR Select to clear one letter of the input. y POS Adjust the position of the camera ID. Copyright © 2010. All Rights Reserved. www.okinausa.com 25 REV122010-V17 4.12 LANGUAGE This item is used to select the language in which to display the internal OSD menu. SETUP MENU PICT ADJUST MOTION DET PRIVACY CAMERA ID LANGUAGE CAMERA RESET BACK<┘ EXIT<┘ <┘ ON<┘ OFF OFF ENGLISH SAVE ALL<┘ Select to set the language displayed in the OSD menus. The menus will be changed to the selected language in real time. Function Option LANGUAGE ENGLISH 日本語 DEUTSCH FRANCAIS РУССКИЙ PORTUGUÊS ESPAÑOL Copyright © 2010. All Rights Reserved. www.okinausa.com 26 REV122010-V17 4.13 CAMERA RESET Click to restore all the settings to the default values. SETUP MENU PRIVACY DAY/NIGHT NR CAMERA ID SYNC LANGUAGE CAMERA RESET BACK<┘ EXIT<┘ OFF AUTO<┘ <┘ OFF INT ENGLISH SAVE ALL<┘ 4.14 SAVE ALL Click to save all the settings made. NOTICE: There will be no prompt windows while the settings are being saved. 4.15 EXIT Click to exit the OSD menu. NOTICE: Before exit the OSD menu, please click SAVE ALL<┘ to save all the settings made. Fail to do that, all the settings will not take effect once the power is reconnected. Copyright © 2010. All Rights Reserved. www.okinausa.com 27 REV122010-V17