1
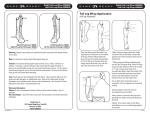
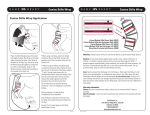
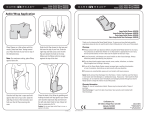
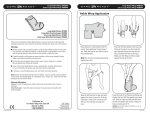
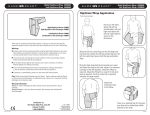
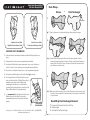
®
Right Hock Wrap #580322
Left Hock Wrap #580324
Hock Wrap =
Sleeve
+
Heat Exchanger
1
Connector
fig. 1 Place the Sleeve on a flat surface with the logo side up and open the zipper.
Right Hock Sleeve: 540322
Right Hock Heat Exchanger: 560322
Left Hock Sleeve: 540324
Left Hock Heat Exchanger: 560324
2
o ve r
IMPORTANT SAFETY INFORMATION
1 Always consult with your veterinarian before using the Game Ready System for an
injury.
2 During treatment, the horse must be accompanied by an attendant.
3 Do not place the Wrap directly against open wounds, sores, rashes, infections, or
stitches. First place a sterile dressing on the wound and then apply the Wrap.
la p
fig. 2 Insert the Heat Exchanger into the Sleeve with the green side down. Slide the
Connector through the opening in the Sleeve. The flaps of the Heat Exchanger must
overlap slightly to fit into the Sleeve. The green side of the Heat Exchanger should
touch the green side of the Sleeve.
4 Do not store in a closed plastic bag after use, as this may promote mold growth.
5 Do not puncture the Wrap; doing so will void the Game Ready warranty.
6 The first application of this Wrap will likely cause most
horses to flex their hind leg. The Quick-Release Strap is
provided for your safety, so that the Wrap can be
removed quickly until the horse is familiar with the
sensation. Once the individual horse is familiar with the
Wrap, the Quick-Release Strap may be removed.
7
3
fig. 3 Make sure the Heat Exchanger is flat inside the Sleeve with no folds or creases. Zip up
the Sleeve. After assembly, fold at the natural vertical fold, and make sure the Wrap
is flat and smooth.
It is recommended that the highest level of pressure is
Medium Pressure for this Wrap. If the pressure is
uncomfortable, pause the Unit, and restart with lower
pressure.
Hock Wrap Heat Exchanger Removal
QUICK-RELEASE
STRAP INCLUDED
1 Disconnect the Connector Hose from the Wrap
2 Unzip the zipper
3 Gently pull out the Heat Exchanger
CoolSystems, Inc. 1201 Marina Village Pkwy Suite 200 Alameda, CA 94501 1-888-GAMEREADY
www.gamereadyveterinary.com
Game Ready 2008
®
Right Hock Wrap #580322
Left Hock Wrap #580324
Hock Wrap Application
(left leg illustrated)
Note: For maximum cooling, place the
Wrap against the horse’s bare leg, unless
there is a wound. In the case of a wound,
cover with a bandage before applying the
Wrap.
Step 2: Hold the Wrap above the hock and
secure the top flap around the leg so that
the Wrap fits snugly around the horse's leg,
above the hock joint.
®
Note:
When using only one Wrap, place the Control Unit on the opposite side of the injured hock
and place the Single Connector Hose over the back of the horse, attach the Single
Connector Hose to the Wrap. Connect the opposite end of the Connector Hose into the
Control Unit.
When using two Wraps
simultaneously, use the Dual
Connector Hose. Raise the Hose up
Hook Strap
and over the hindquarters of the
horse to make a "Y" split. Connect
each Hose to its corresponding
Wrap. Adjust the length of the
Hose by moving the Hook Strap up
or down. Connect the single
opposite end of the Connector Hose
into the Control Unit.
Do not allow the Hose to bend the
Wrap at the connection. This can
restrict water flow and affect
cooling.
Step 1: Place the Wrap around the horse's
leg, aligning the Hose connection on the
outside of the leg.
Step 3: Pull the lower inside edge so that
the Wrap is snug against the leg below the
joint. Secure with the lower flap.
Caution: Do not open the zipper on the
Wrap while the Wrap is in use, or while
being applied to the horse.
Protocol: 30-40 minute application on low,
medium or no pressure. Always consult your
veterinarian before using the Game Ready
System on any injury.
Right Hock Wrap #580322
Left Hock Wrap #580324
Dual Connector Hose
Control Unit
(in Carry Bag)
After treatment, disconnect the
Hose from the Wrap first, before
removal of the Wrap from the
horse.
Care: Gently remove the Heat Exchanger from the Sleeve. Hand or machine wash the
Sleeve in cold water and mild detergent, or antibacterial soap. Hang to dry. Hand wash the
Heat Exchanger, do not machine wash; doing so will void the warranty. See Control Unit
User's Manual for more detail. Cold sterilization only.
Warranty Information:
Sleeve: In case of manufacturer defect: Sleeve may be returned within 7 days of purchase.
Heat Exchanger: 1 year from date of purchase. See warranty card included with the Heat
Exchanger.
702021 Rev C