1
8124
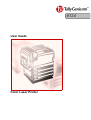
User Guide
Color Laser Printer
Adobe, Adobe Type Connection, Acrobat, PostScript, the PostScript logo are trademarks of Adobe Systems
Incorporated.
Microsoft, Windows, Windows NT, Windows Server are either registered trademarks or trademarks of Microsoft
Corporation in the United States and/or other countries.
Novell, Netware are registered trademark of Novell, Inc., in the United States and other countries.
Macintosh, Apple, AppleTalk, EtherTalk, Mac OS, TrueType are trademark of Apple Computer, Inc., registered in
the U.S. and other countries.
PCL and HP-GL are registered trademarks of Hewlett-Packard Corporation.
UNIX is a registered trademark of The Open Group in the United States and other countries.
MagicGate Memory Stick, Memory Stick are registered trademarks or trademarks of Sony.
This product is equipped with RSA® BSAFE™ Crypto-C of RSA Security Inc.
RSA is a registered trademark of RSA Security Inc. BSAFE is a registered trademark of RSA Security Inc. in the
United States and other countries. RSA Security Inc. All rights reserved.
All product/brand names are trademarks or registered trademarks of their respective holders.
This software is based in part on the work of the Independent JPEG Group.
It may be a legal offence to print currency notes, certificates of stocks and securities, or any other
documents of similar nature, regardless of whether they will be used.
Data loss from the hard disk drive
Saved data may be lost if hard disk of the machine breaks down due to external shocks or if the power is
accidentally cut off in a manner not following the methods listed in manuals or other documentations
TallyGenicom is not responsible for such data loss and any consequence caused by such data loss.
Damage by computer virus
TallyGenicom is not responsible for any breakdown of machines due to infection of computer virus.
Precautions
(1) This guide is copyrighted with all rights reserved. Under the copyright laws, this guide may not be copied or
modified in whole or part, without the written consent of the publisher.
(2) Parts of this guide are subjected to change without prior notice.
(3) We welcome any comments on ambiguities, errors, omissions or missing pages.
(4) Never attempt any procedure on the machine that is not specifically described in this guide. Unauthorized
operation can cause faults or accidents. TallyGenicom is not liable for any problems resulting from
unauthorized operation of the equipment.
Preface
Thank you for purchasing the TallyGenicom 8124. Written with the new user in mind, this User
Guide provides the necessary information on how to prepare this machine as a printer, how to
operate print jobs, and precautions on operating the printer functions. To get the most out of this
printer, please read this guide before using it.
After reading it keep this guide handy as a reference for problems which you might encounter
when using the printer.
In this manual, safety instructions are preceded by the symbol
.
Always read and follow the instructions before performing the required procedures.
This equipment is certified as a Class 1 laser product, which does not emit hazardous laser radiation.
Follow the operations described in the User Guide. Do not operate the machine in any way other than
described in the User Guide. Unauthorized operation can cause faults or accidents.
As a member of the International Energy Star Program, TallyGenicom confirms this product
satisfies the requirements for International Energy Star Program standards.
TallyGenicom shares the global concern about environmental conservation and has integrated that
concern in its business activities—from research and development to disposal. We have implemented a
number of programs to lessen the burden on the environment. For example, we have totally eliminated
ozonedepleting chlorofluorocarbons from our manufacturing facilities. We are committed to leadership
in the conservation of resources by reusing and recycling post-consumer waste material such as paper,
cartridges, and parts from our customer's copiers and printers. Along with our efforts to make
environmental values a part of the TallyGenicom culture, TallyGenicom 8124 adopts recycled
components that satisfy our strict quality standards.
Reception interference
When installed at a certain location, the machine may cause interference with radio and television
reception. If you notice flickering or distorted images or noises on your audio-visual units, your machine
may be causing radio interference. Switch it off, and if the interference disappears, the machine is the
cause of radio interference. Perform the following procedure until the interference is corrected.
● Move the machine and the TV and/or radio away from each other.
● Reposition or reorientate the machine and TV and/or radio.
● Unplug the machine, TV and/or radio, and replug them into outlets that operate on different circuits.
● Reorientate the TV and/or radio antennas and cables until the interference stops. For an outdoor
antenna, ask your local electrician for support.
●
Use coaxial cable antennas.
3
Types of Manuals
Guides supplied with this printer and their contents
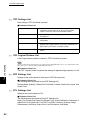
■ Quick Start Guide
Installation procedure for the printer.
■ Manual included in Software Pack CD-ROM
● User Guide (this manual)
Descriptions of print settings
Menu items on the control panel
●
Replacing consumables
●
Reports/lists
● HP-GL,HP-GL/2 Emulation Settings Guide (HPGL.pdf)
●
●
Setting items of the HP-GL and HP-GL/2 emulation modes
● Network Print Environment User Guide (Network.pdf)
●
●
Setting items of the network environment
■ On-line Help of the printer driver
Descriptions of the setting items of the printer driver
Guide supplied with optional products
■ Installation procedure guides of optional products
The installation procedure guide is supplied with each option.
4
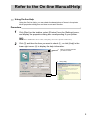
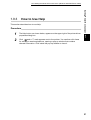
Refer to the On-line Manual/Help
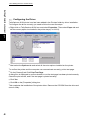
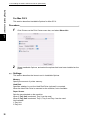
Using On-line Help
Using the On-line Help, you can check the descriptions of items in the printer
driver properties dialog box and how to set each function.
Procedure
1
Click [Start] on the taskbar, select [Printers] from the [Settings] menu,
and display the properties dialog box corresponding to your printer.
For Windows XP/Windows Server 2003, click [Start], then select [Printers and Faxes].
2
Click [?] and then the item you want to check (1), or click [Help] in the
lower right corner (2) to display the help information.
1. Click [?] and then the item
you want to check.
2. Click [Help].
5
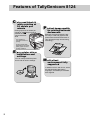
Features of TallyGenicom 8124
C
olor and black &
white printing at
24 sheets per
minute
Printing speed of 24 sheets per
minute for A4 size print jobs is
possible for both
color and black &
white
*This speed is for
one-sided continuous
printing.
image quality
P erfect
for printing business
documents.
Business documents featuring text
are easy to read and graphics and
photos have the distinctive luster of
color printing through oil free fusing
technology.
Printing speeds differ
depending on the image
quality, paper and other
printing conditions.
E asy printer driver
installation and
settings
You can easily install the printer
driver and do various settings.
M ulti-client
environment fully
supported
In addition to PCL and HP-GL, which
are standard page description
languages, an PostScript ® Software
also supplied.
6
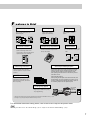
F
eatures in Brief
Multiple Up
2 sided print
Prints multiple pages on a single
sheet of paper with options of
different layouts.
Poster
Prints on both sides of the
paper (when optional
duplex unit is installed).
Booklet Creation
Prints an image across multiple
pages; suitable for creating
posters.
Transparency Separators
Prints specific characters, such
as “Confidential” over the print
data.
A sheet of paper is automatically
inserted in between transparencies
as they are printed.
Prints pages on both sides of the
paper and arranges them in the
Watermarks
correct order to form a booklet (when
optional duplex unit is installed).
Work sheet
Work sheet
l
ntia
fide
Con
Receiving restriction
Secure print/Sample print*1
You can limit the IP addresses from
which the printer will accept jobs
when the printer is set up for TCP/IP
protocol.
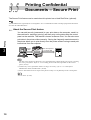
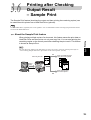
What is security printing?
This function allows you to send print data to the printer,
where it is stored until you instruct the printer from the
operation panel to print it out. This function is handy
when printing secret documents or documents you don’t
want others to see.
Favorites
What is sample printing?
When printing several copies of the same document, this
function allows you to print a sample copy, which you can
check for quality, before instructing the printer to print out
the remaining copies from the operation panel.
Allow you to register frequently used
print settings in [Favorites] on the
printer drive’s properties, and select
them for printing.
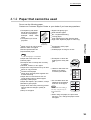
Printing long paper*3
Can print on long paper with a
length of up to 1200 mm by using
Tray 5 (bypass tray).
Send data
Store in
printer
Use control
panel to
output data
*1 Security and sample printing need the Hard Disk Drive (optional) and 384 MB of memory or more.
*2 Printing on long size paper requires 384 MB of memory or more.
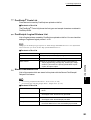
For information about the setting items, refer to the On-line Help for the printer driver.
For the procedure to see the On-line Help, refer to “Refer to the On-line Manual/Help” (P.5).
7
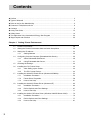
Contents
◆ Preface ................................................................................................................................. 3
◆ Types of Manuals ................................................................................................................. 4
◆ Refer to the On-line Manual/Help ......................................................................................... 5
◆ Features of TallyGenicom 8124 ........................................................................................... 6
◆ Contents ............................................................................................................................... 8
◆ Using This Guide ................................................................................................................ 13
◆ Safety Notes ....................................................................................................................... 14
◆ The Objectives of the International Energy Star Program .................................................. 24
◆ Illegal Copies and Printouts ............................................................................................... 25
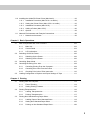
Chapter 1 Setting Printer Environment
1.1
Printer Environments ........................................................................................... 28
1.2
Setting the Printer Environment With the Quick Setup Menu .............................. 30
1.3
Setting the IP Address ......................................................................................... 33
1.3.1
1.4
Configuring from the Computer (Embedded Web Server)................................... 39
1.4.1
About Embedded Web Server .............................................................. 39
1.4.2
Using Embedded Web Server............................................................... 41
1.5
Checking the Settings.......................................................................................... 42
1.6
Installing the PCL Printer Driver .......................................................................... 44
1.7
1.8
1.9
8
Setting Address..................................................................................... 35
1.6.1
After Setting up the Printer.................................................................... 44
1.6.2
The PCL Printer Drivers ........................................................................ 44
Installing the AdobePS Printer Driver (Windows 95/98/Me) ................................ 53
1.7.1
Installation Procedure ........................................................................... 53
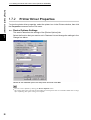
1.7.2
Printer Driver Properties ....................................................................... 58
1.7.3
How to Use Help ................................................................................... 61
Installing the AdobePS Printer Driver (Windows NT) .......................................... 62
1.8.1
Installation Procedure ........................................................................... 62
1.8.2
Device Options and Print Settings ........................................................ 67
1.8.3
How to Use Help ................................................................................... 71
Installing the Adobe PS Printer Driver (Windows 2000/XP/Server 2003)............ 72
1.9.1
Installation Procedure ........................................................................... 72
1.9.2
Device Options and Print Settings ........................................................ 77
1.9.3
How to Use Help ................................................................................... 81
1.10 Installing the AdobePS Printer Driver (Macintosh) .............................................. 82
1.10.1
Installation Procedure (Mac OS 9.x or earlier) ...................................... 82
1.10.2
Setting the Printer Driver (Mac OS 9.x or earlier) ................................. 83
1.10.3
Installation Procedure (Mac OS X)........................................................ 85
1.10.4
Adding a Printer (Mac OS X)................................................................. 86
1.10.5
Options.................................................................................................. 89
1.11 Network Environments and Example Connections.............................................. 96
1.11.1
Network environments .......................................................................... 96
Chapter 2 Basic Operations
2.1
2.2
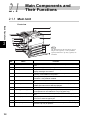
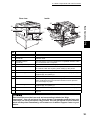
Main Components and Their Functions............................................................. 102
2.1.1
Main Unit ............................................................................................. 102
2.1.2
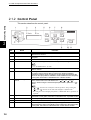
Control Panel....................................................................................... 104
2.1.3
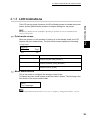
LCD Indications................................................................................... 105
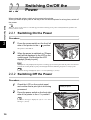
Switching On/Off the Power ............................................................................... 106
2.2.1
Switching On the Power ...................................................................... 106
2.2.2
Switching Off the Power ...................................................................... 106
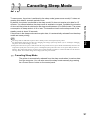
2.3
Canceling Sleep Mode....................................................................................... 107
2.4
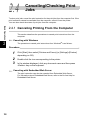
Canceling/Checking Print Jobs.......................................................................... 108
2.5
2.4.1
Canceling Printing From the Computer ............................................... 108
2.4.2
Canceling Print Jobs From the Printer ................................................ 109
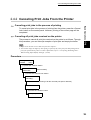
2.4.3
Checking Print Jobs of Print Instruction .............................................. 110
Loading Configuration of Options and Paper Settings of Trays ......................... 111
Chapter 3 Printing
3.1
3.2
3.3
Printing from the Computer................................................................................ 114
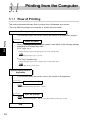
3.1.1
Flow of Printing ................................................................................... 114
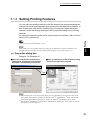
3.1.2
Setting Printing Features..................................................................... 115
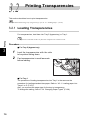
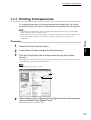
Printing Transparencies ..................................................................................... 116
3.2.1
Loading Transparencies ...................................................................... 116
3.2.2
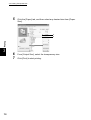
Printing Transparencies....................................................................... 117
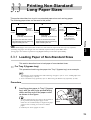
Printing Non-Standard/Long Paper Sizes .......................................................... 119
3.3.1
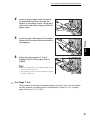
Loading Paper of Non-Standard Sizes ................................................ 119
3.3.2
Setting Non-Standard Paper Sizes ..................................................... 122
3.3.3
Printing on Non-Standard Paper Sizes ............................................... 126
9
3.4
3.5
3.6
3.7
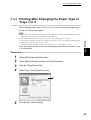
Changing Paper Types ...................................................................................... 128
3.4.1
Printing after Changing the Paper Type in Tray 5 (bypass tray) .......... 128
3.4.2
Printing after Changing the Paper Type in Trays 1 to 4 ....................... 129
Printing Confidential Documents – Secure Print ............................................... 130
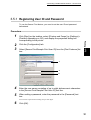
3.5.1
Registering User ID and Password ..................................................... 131
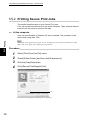
3.5.2
Printing Secure Print Jobs .................................................................. 132
Printing after Checking Output Result – Sample Print....................................... 135
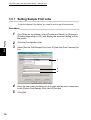
3.6.1
Setting Sample Print Jobs................................................................... 136
3.6.2
Printing Sample Print Jobs.................................................................. 137
Printing E-Mail – E-Mail Print............................................................................. 140
3.7.1
Setting up the Environment for E-mail Printing ................................... 140
3.7.2
Sending E-mail.................................................................................... 143
3.7.3
Precautions for Sending Documents by E-mail................................... 144
Chapter 4 About Paper
4.1
4.2
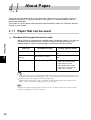
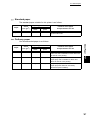
About Paper....................................................................................................... 146
4.1.1
Paper that can be used ....................................................................... 146
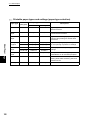
4.1.2
Paper that cannot be used .................................................................. 149
4.1.3
Storage and Handling of Paper ........................................................... 150
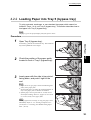
Loading Paper ................................................................................................... 151
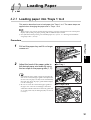
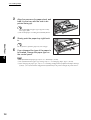
4.2.1
Loading paper into Trays 1 to 4 ........................................................... 151
4.2.2
Loading Paper into Tray 5 (bypass tray) .............................................. 153
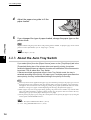
4.2.3
About the Auto Tray Switch ................................................................. 154
Chapter 5 Setting Control Panel
5.1
5.2
5.3
10
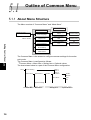
Outline of Common Menu.................................................................................. 156
5.1.1
About Menu Structure ......................................................................... 156
5.1.2
Changing Common Menu Settings ..................................................... 158
Description of Common Menu ........................................................................... 161
5.2.1
Print Language Setting ....................................................................... 161
5.2.2
The System Administrator Menu......................................................... 171
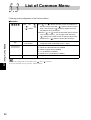
List of Common Menu........................................................................................ 192
Chapter 6 Troubleshooting
6.1
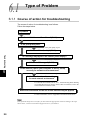
Type of Problem ................................................................................................. 200
6.1.1
6.2
Course of action for troubleshooting ................................................... 200
Clearning Paper Jams ....................................................................................... 201
6.2.1
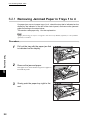
Removing Jammed Paper in Trays 1 to 4............................................ 202
6.2.2
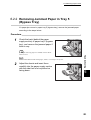
Removing Jammed Paper in Tray 5 (Bypass Tray).............................. 203
6.2.3
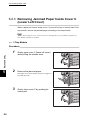
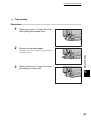
Removing Jammed Paper Inside Cover C (Lower Left Cover)............ 204
6.2.4
Removing Jammed Paper Inside Cover B (Duplex Unit Cover) ......... 206
6.2.5
Removing Jammed Paper Inside Cover A (Left Cover)...................... 207
6.3
Unusual Conditions............................................................................................ 213
6.4
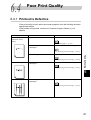
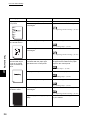
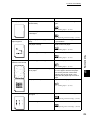
Poor Print Quality............................................................................................... 217
6.5
6.6
6.4.1
Printout Is Defective ............................................................................ 217
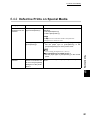
6.4.2
Defective Prints on Special Media....................................................... 221
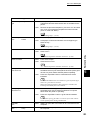
List of Messages................................................................................................ 222
6.5.1
List of Messages (Alphabetical Order) ................................................ 222
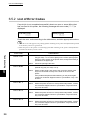
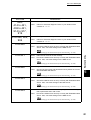
6.5.2
List of Error Codes .............................................................................. 230
Network-Related Problems ................................................................................ 236
6.6.1
Troubleshooting When Working in a TCP/IP Environment .................. 236
6.6.2
Troubleshooting When Using Embedded Web Server ........................ 238
6.7
Mail-Related Problems ...................................................................................... 239
6.8
Ejecting Remaining Data – When Printing Stops Halfway Through .................. 240
Chapter 7 Daily Control
7.1
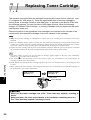
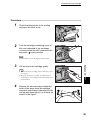
Replacing Toner Cartridge................................................................................. 242
7.2
Replacing Drum Cartridge ................................................................................. 245
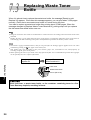
7.3
Replacing Waste Toner Bottle............................................................................ 250
7.4
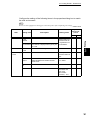
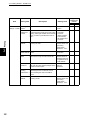
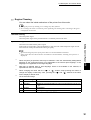
Printing Report/List ............................................................................................ 253
7.4.1
Type of Reports/Lists........................................................................... 253
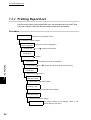
7.4.2
Printing Report/List ............................................................................. 254
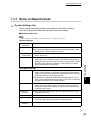
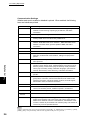
7.4.3
Items in Reports/Lists ......................................................................... 255
7.5
Checking Printer Status by Web Browser .......................................................... 264
7.6
Checking Printer Status by E-Mail ..................................................................... 265
7.7
7.6.1
Information to Be Notified by Mail Notice Service ............................... 265
7.6.2
Settings for Using Mail Notice Service ................................................ 265
Check Meter ...................................................................................................... 267
7.7.1
Checking Total Number of Printed Pages by Meter............................. 267
7.7.2
Checking Total Number of Printed Pages by [Printer Meter Report] ... 268
11
7.8
7.9
7.10
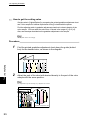
Adjusting Gradation ........................................................................................... 271
7.8.1
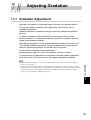
Gradation Adjustment ......................................................................... 271
7.8.2
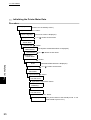
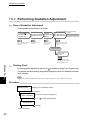
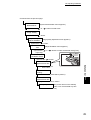
Performing Gradation Adjustment ....................................................... 272
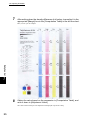
Adjusting Color Registration .............................................................................. 281
7.9.1
Printing Color Registration Chart ........................................................ 281
7.9.2
How to Get the Adjustment Value ....................................................... 282
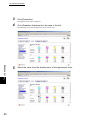
7.9.3
Entering the Adjustment Value............................................................ 283
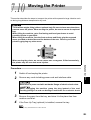
Moving the Printer ............................................................................................ 285
Appendix
A
B
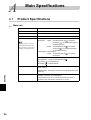
Main Specifications............................................................................................ 288
A.1
Product Specifications......................................................................... 288
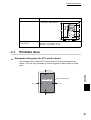
A.2
Printable Area ..................................................................................... 291
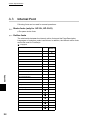
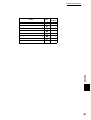
A.3
Internal Font ........................................................................................ 292
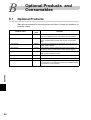
Optional Products and Consumables ............................................................... 294
B.1
Optional Products................................................................................ 294
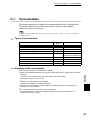
B.2
Consumables ...................................................................................... 295
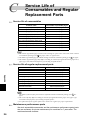
C
Service Life of Consumables and Regular Replacement Parts......................... 296
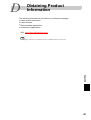
D
Obtaining Product Information ........................................................................... 297
E
Precautions/Limitations ..................................................................................... 298
E.1
Precautions/Limitations ....................................................................... 298
E.2
TCP/IP (lpd) ........................................................................................ 299
◆ Index ................................................................................................................................ 301
12
Using This Guide
This section describes the organization of this guide.
Prerequisite Knowledge
This guide assumes that the operator has a basic knowledge of the operating
environment of the computer in use, networking environments, and how to
operate a personal computer.
For more information about the environment of the computer in use, basic
knowledge of networking environments, and how to operate a personal
computer, refer to the manuals provided with the computer, OS (operating
system), and network system.
Conventions
(1) In this guide, “computer” refers to personal computer and workstation.
(2) The following icons are used in this guide.
Indicates important information which you should read.
Indicates additional information on operations or features.
Indicates reference sources.
(3) The following conventions are used in this guide.
“
”
: The reference is in other manuals instead of this guide.
“
”
: Indicates the name of a folder, file, application, or CD-ROM.
[
]
: Indicates the name of a menu, command, window, or dialog box on
the computer, and the name of a button or menu which is displayed in
the printer driver or the LCD on the control panel.
<
> key
: Indicates keys on the keyboard.
<
> button
: Indicates buttons on the control panel.
(4) When a checkbox is checked, it indicates ON, otherwise it indicates OFF.
(5) The item with the radio button checked is the selected item.
13
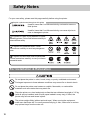
Safety Notes
For your own safety, please read this page carefully before using the printer.
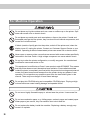
Graphic symbols used throughout this guide.
Used for items that if not followed strictly, can lead to severe or
fatal injuries.
Used for items that if not followed strictly, can cause injuries to
user or damages to printer.
A symbol for items to pay attention to when
handling printer. Follow instructions carefully to
use machine safely.
A symbol for prohibited items. Follow
instructions carefully to avoid any dangerous
acts.
A symbol for items that must be performed.
Follow instructions carefully to carry out these
essential tasks.
For Installation & Relocation
Do not place the printer in a hot, humid, dusty, or poorly ventilated environment.
Prolonged exposure to these adverse conditions may cause fire or electric shock.
Do not place the printer near heaters or volatile, flammable, or combustible
materials such as curtains that may catch fire.
Place the printer on a level and sturdy surface that can withstand a weight of 115 kg
(with all options installed, and A3-size paper loaded in every tray). If tilted, the
printer may fall over and cause injuries.
The printer weighs 64kg (without optional trays). When moving the equipment,
make sure that there are 3 or more persons carrying it. Also, make sure to remove
any optional trays from the main unit.
14
When lifting the printer, get a firm footing and bend your knees to avoid possible
injuries to your back.
When lifting the machine, face the right/left side and rear panel, and firmly grip the
recessed areas provided on both sides and rear of the machine. Never try to lift the
printer by gripping any other areas.
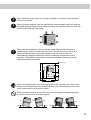
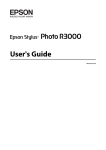
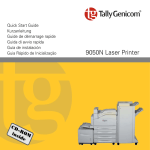
The printer has ventilation holes on the rear panel. Ensure that the printer is
installed with a minimum clearance of 200 mm from the rear vent to the wall. A
poorly ventilated printer may cause excessive internal heat and fire. The
accompanying diagram shows the minimum clearances required for normal
operation, consumables replacement, and maintenance to ensure your printer
operates at peak performance.
200
Unit: mm
631
1656
425
50
300
678
100
400
1128
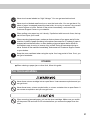
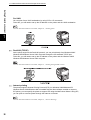
When moving the printer, be sure to unplug the power cord from the outlet. If the
printer is moved with the power cord connected, it can cause damage to the cord
which could result in fire or electric shock.
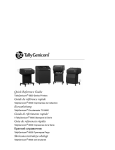
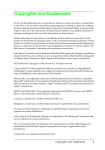
When moving the printer, do not tilt it more than 10 degrees. If tilted excessively,
the printer may fall over and cause injuries.
Front
10°
Front
Rear
Rear
Left
10°
10°
Right
Left
Right
10°
15
When the printer is installed, be sure to lock the caster stoppers. An unlocked
machine may fall over or slide and cause injuries.
OTHERS
● The printer is capable of operating normally within the following recommended
environmental limits.
Temperature range 10-32°C
humidity range 15-85% (no condensation).
Humidity should be 65% or below at 32°C, and temperature should be 28°C or below at
85% humidity.
Sudden temperature fluctuations can affect copy quality. Rapid heating of a cold room can cause
condensation inside the printer, directly interfering with image transfer.
● Do not expose the printer to direct sunlight. Exposure to direct sunlight can
adversely affect the machine’s performance.
● Connecting an Ethernet cable directly to outdoor may cause printer breakdown by
lightning.
Use an Ethernet cable only for indoor connections.
● Do not place the printer where it will be exposed directly to an air-conditioner.
Temperature conditions inside the printer will change and may cause the printer
breakdown.
16
For Power & Earth Connection
The power specifications are listed below. The specifications that apply to your
printer depend on your printer configuration. Connect the power plug only to a
properly rated power outlet. Otherwise, it may cause fire or electric shock. If in
doubt, contact our Customer Support Center or your dealers.
●
Rated voltage 110 V
Rated frequency 60 Hz
●
Rated voltage 220-240 V
Rated frequency 50/60 Hz
Ensure that the plug connection is free of dust. In a damp environment, a
contaminated connector can draw a non-negligible amount of current that can
generate heat over an extended period of time and eventually cause fire.
Always use the power cord provided with your printer. When an extension power
cord is required, always use a properly rated cord.
In Japan: 125 V/15 A
In other countries: Contact our Customer Support Center or your dealers.
If you use a cord with an unspecified current rating, the printer or plug may emit
smoke or become hot to the touch externally.
Do not attempt to rework, pull, bend, chafe, or otherwise damage the power cord.
Do not place a heavy object on the cord. A damaged cord can cause fire or electric
shock.
Never touch a power cord with wet hands. Danger of electric shock exists.
Stop operation immediately if your printer produces smoke, excessive heat,
unusual noise, or smell, or if water is spilt onto the printer. These conditions can
cause fire. Immediately switch off and unplug the printer, and contact our Customer
Support Center or your dealers.
17
To prevent fire or electric shock, follow the instructions below based on your printer
configuration.
If in doubt, contact our Customer Support Center or your dealers.
- If your printer is a 220-240 V model, there is no need to attach a separate earth
line since the earth connection is incorporated in the power line. Plug it into a
properly rated outlet.
- If your printer is a 100 or 110 V model, use the green earth bundled with the
power cord, located at the rear of the printer.
The earth wire must be connected to one of the following conductors:
- Earth terminal of the specified power outlet
- A piece of copper buried in the earth 650 mm or deeper
- Earth terminal with Class D* earthing.
*Class D is the regulation for Japan only.
Never connect the earth wire to any of the following:
● Gas pipe, which can be ignited and explode
●
Telephone line earth wire or lightning rod, which can draw an excessive electric
current if hit by lightning
● Water faucet or pipe whose electrical conductivity is broken by a non-metal part
If the power cord is broken or insulated wires are exposed, ask our Customer
Support Center or your dealers for a replacement. Using a damaged cord can
cause fire or electric shock.
Do not unplug or replug the printer while it is on. Unplugging a live connector can
deform the plug and cause fire.
When unplugging the printer, grasp the plug instead of the cord. Forcibly pulling on
a cord can damage it and cause fire or electric shock.
Once a month, unplug the printer and check the power cord for the following:
●
The power cord is plugged firmly into a receptacle.
● The plug is not excessively heated, rusted, or bent.
●
The plug and receptacle are free of dust.
●
The cord is not cracked or frayed.
If you notice any unusual conditions, contact our Customer Support Center or your
dealers.
18
When the printer is not used over an extended period of time, switch it off and,
when the display turns off, unplug it. If an unused printer is left connected to a
power source for a long period, degraded insulation can cause electric shock,
current leakage, or fire.
Be sure to switch off and wait for the display to turn off, and then unplug the printer
before accessing the interior of the printer for cleaning, maintenance, or fault
clearance. Access to a live printer's interior can cause electric shock.
Switch off the printer before connecting the interface cable or options. Connecting
the cable or card to a live printer can cause electric shock.
OTHERS
● Use a soft cloth moistened with water when cleaning the printer exterior. If dirt is not
removed, wipe with a soft cloth using a small amount of mild detergent. Do not spray
the cleaner directly onto the printer. The cleaner mist may get into the printer through
gaps, resulting in trouble. Also, never use anything other than mild detergent.
● The printer has a built-in circuit for protection against lightning-induced surges in
current. If lightning strikes in your neighborhood, switch off the printer. Disconnect
the power cord “and telephone line” from the printer, and reconnect them only when
the lightning has stopped.
● Reception interference
If this printer is supposed to be the cause of poor reception such as radio static or
blinking and deflection in a television display, switch off the printer and check if the
poor reception goes away. If the poor reception goes away after switching off the
printer, combine the following methods to prevent it.
●
Reposition or reorientate the machine and TV and/or radio.
● Move the machine and the TV and/or radio away from each other.
●
Unplug the machine, TV and/or radio, and replug them into outlets that operate
on different circuits.
● Reorientate the TV and/or radio antennas and cables until the interference stops.
For an outdoor antenna, ask your local electrician for support.
●
Use coaxial cable antennas.
19
For Machine Operation
Do not place any liquid container such as a vase or coffee cup on the printer. Spilt
water can cause a fire or electric shock.
Do not place any metal parts such as staples or clips on the printer. If metal and
flammable parts get into the printer, they can short-circuit internal components, and
cause fire or electric shock.
If debris (metal or liquid) gets into the printer, switch off the printer and, when the
display turns off, unplug the printer. Contact our Customer Support Center or your
dealers. Operating a debris-contaminated printer can cause fire or electric shock.
Never open or remove printer covers that are secured with screws unless specifically
instructed in the User Guide. A high voltage component can cause electric shock.
Do not try to alter the printer configuration, or modify any parts. An unauthorized
modification can cause smoke or fire.
This equipment is certified as a Class 1 laser product under IEC60825. This means
that the printer does not emit hazardous laser radiation. Since radiation emitted
inside the printer is completely confined within the protective housings and external
covers, the laser beam cannot escape from the printer during any phase of user
operation. Do not perform any operation apart from the instructions given in the
manual. There may be a danger of laser beam leakage.
Do not play this CD-ROM using an incompatible CD-ROM player. Playing at high
volume levels can cause hearing damage and speaker failure.
Do not use a highly flammable spray or solvent near the printer. It can cause fire.
Do not use conductive paper, e.g. folding paper, carbonic paper and coated paper.
When paper a jam occurs, they can cause a short circuit and fire.
Do not replace the battery inside the machine. Replacing a battery wrongly may
cause it to explode.
20
Never touch areas labeled as “High Voltage.” You can get an electric shock.
Never touch a labeled area found on or near the heat roller. You can get burnt. If a
sheet of paper is wrapped around the heat roller, do not try to remove it by yourself
to avoid injuries or burns. Switch off the printer immediately, and contact our
Customer Support Center or your dealers.
When pulling out a paper tray, do it slowly. If pulled out with too much force, the tray
can hit and injure your knees.
When removing jammed paper, make sure that no pieces of torn paper are left in the
machine. A piece of paper remaining in the printer can cause fire. If a sheet of paper is
wrapped around the heat roller, or when clearing a jammed paper that is difficult or
impossible to see, do not try to remove it by yourself. Doing so can cause injuries or
burns. Switch off the machine immediately, and contact our Customer Support Center
or your dealers.
Keep the room ventilated when using the copier for a long period of time. If not, you
can get a headache.
OTHERS
● When clearing a paper jam or other fault, follow this guide.
For Consumables
Never throw a toner cartridge into an open flame. It can cause an explosion and you
can get burnt.
Never throw toner, a toner recycle bottle, or a toner container into an open flame. It
can cause an explosion and you can get burnt.
When removing jammed paper, pull out the drum cartridge. Make sure you switch
off the power first and wait for 20 minutes before you remove the paper from the
fuser.
21
OTHERS
● Do not unpack consumables before use. Store consumables in a cool, dry, and
clean environment, away from an open flame, and out of direct exposure to sunlight.
● When using consumables, read and observe operating instructions and safeguards
given on the package and container.
● Post-consumer toner cartridges and drum cartridges are recycled for resource
conservation.
- Handling instructions Used toner cartridges, toner collection bottles, and drum cartridges should be
properly disposed of. Contact our Customer Support Center or your dealers for
disposal.
● Follow the procedure below to give first aid.
●
●
●
●
If toner gets into your eyes, bathe your eyes until the pain stops, and submit to
medical treatment if required.
If the toner adheres to your skin, wash away the toner with soap.
If you breathe the toner, gargle with large amounts of water.
If you swallow the toner, vomit it and submit to medical treatment immediately.
Switching Off
OTHERS
● When the power is switched off, print data remaining in the printer and information
spooled in the memory will be erased.
Before switching off the power during normal operation, ensure that “Ready to print” is
displayed on the LCD of the control panel.
22
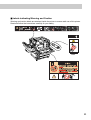
■ Labels indicating Warning and Caution
Warning and caution labels are attached inside the printer to ensure safe use of this printer.
Read and follow the instructions carefully for your safety.
23
The Objectives of the International Energy Star Program
To protect the global environment and conserve energy sources, the International Energy
Star Program encourages the following product features. TallyGenicom confirms 8124
satisfies the requirements for this program.
Sleep Mode feature
This product has a power-saving feature, which switches the printer to the sleep
mode automatically if the printer is on and not operated for a certain period of
time. In this mode the machine lowers the fuser temperature and saves the
power consumption. The default sleep mode start time is set at 15 minutes. You
can change this setting from 15 to 240 minutes at 1 minute intervals.
For information about the procedure, refer to 5.2.2 The System Administrator
Menu (P.171).
The sleep mode is displayed as [Power Saver Mode] in the control panel.
24
Illegal Copies and Printouts
Copying or printing certain documents may be illegal in your country. Penalties of fines
or imprisonment may be imposed on those found guilty. The following are examples of
items that may be illegal to copy or print in your country.
● Currency
● Banknotes and checks
● Bank and government bonds and securities
● Passports and identification cards
● Copyright material or trademarks without the consent of the owner
● Postage stamps and other negotiable instruments
This list is not inclusive and no liability is assumed for either its completeness or accuracy. In
case of doubt, contact your legal counsel.
25
26
1
Setting Printer
Environment
1.1
Printer Environments.................................................................................. 28
1.2
Setting the Printer Environment With the Quick Setup Menu..................... 30
1.3
Setting the IP Address ............................................................................... 33
1.4
Configuring from the Computer (Embedded Web Server) ......................... 39
1.5
Checking the Settings ................................................................................ 42
1.6
Installing the PCL Printer Driver................................................................. 44
1.7
Installing the Adobe PS Printer Driver (Windows 95/98/Me)...................... 53
1.8
Installing the Adobe PS Printer Driver (Windows NT) ................................ 62
1.9
Installing the Adobe PS Printer Driver (Windows 2000/XP/Server 2003) .. 72
1.10 Installing the Adobe PS Printer Driver (Macintosh).................................... 82
1.11 Network Environments and Example Connections .................................... 96
Setting Printer Environment
1
1.1
Printer Environments
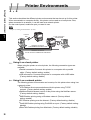
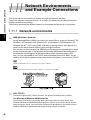
This section describes the different printer environments that can be set up for this printer.
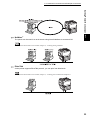
When connected to a computer directly, this printer can be used as a local printer. Also,
when connected to a network, it can be used as a network printer.
On the control panel, enable the port you want to use.
“Chapter 5, Setting Control Panel” (P.155)
Internet
IPP
Local connection
Parallel/USB
Network connection
LPD/SMB/Port9100/EtherTalk
Network connection
Printer shared in NetWare and Windows
Server
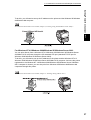
Using it as a local printer
When using the printer as a local printer, the following connection types are
available:
● Parallel connection:Connects this printer to a computer with a parallel
cable. (Factory default setting: enable)
● USB connection: Connects this printer to a computer with a USB cable.
(Factory default setting: disable)
Using it as a network printer
The following printer environments can be set up for this printer when using it as
a network printer.
● LPD:Enables direct communications with this printer using TCP/IP
protocol. (Factory default setting: enable)
● NetWare:Enables shared control of this printer using the NetWare server.
(Factory default setting: disable)
● SMB:Enables printing using a Windows network. (Factory default
setting: enable)
● IPP:Enables printing over the Internet. (Factory default setting: disable)
● Port9100:Enables printing using Port9100 as a port. (Factory default setting:
disable)
● EtherTalk:Enables printing from Macintosh. (Factory default setting: disable)
28
1.1 Printer Environments
Connection type
Network
Local
Port name
Parallel
Protocol
-
Windows 95
{
Windows 98
{
Windows Me
{
Windows NT 4.0
{
USB1.1 USB2.0
-
-
LPD
TCP/IP
NetWare
SMB
TCP/IP IPX/SPX NetBEUI TCP/IP
IPP
Port9100
EtherTalk
TCP/IP
TCP/IP
AppleTalk
{*6
{
{
{
{
{*6
{*1,3 {*2,3
{*6
{
{
{
{
{*6
{*1,3 {*2,3
{*6
{
{
{
{
{
{
{
{
{
{
{
{*6
{
{
{
{
{*1
{*2,4
{
{
{
Windows XP
{
{*1
{*2,5
{
{
{
{
{
{
Windows
Server 2003
{
{*1
{*2
{
{
{
{
{
{
OS Windows 2000
UNIX
{
Macintosh
{*7
Setting Printer Environment
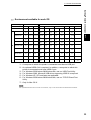
Environment available for each OS
1
{
*1 : A computer to which this printer is connected must have a USB port.
*2 : An optional USB2.0 kit is required. In addition, a computer to which this
printer is connected must have USB2.0 port.
*3 : For Windows 95/Windows 98/Windows Me, use our USB Print Utility.
*4 : For Windows 2000, Microsoft USB driver supporting USB2.0 is required.
*5 : For Windows XP, SP1 and later are applicable.
*6 : For Windows 95/Windows 98/Windows Me, use our TCP/IP Direct Print
Utility.
*7 : Only for Mac OS X.
For information about the network environment, refer to the Network Print Environment Guide.
29
Setting Printer Environment
1
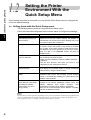
1.2
Setting the Printer
Environment With the
Quick Setup Menu
When setting the printer environment, you can use the Quick Setup menu to configure the
minimum required settings.
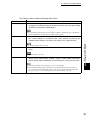
Setting items with the Quick Setup menu
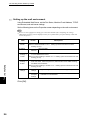
The following items can be set using the Quick Setup menu.
Follow the instructions displayed on the control panel to configure the settings.
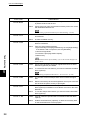
Setting item
Description
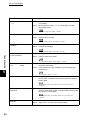
Setting whether to
automatically print the Job
History Report
The information on a maximum of the 50 latest print jobs is
printed out to the [Job History Report]. Set whether to
automatically print out this [Job History Report] every time
the number of print jobs exceeds 50.
Setting the system clock
Set the date (year/month/day) and time (hour/minute) of
the system clock in this printer in the format of Christian
year (4 digits, in the range of 2000 to 2099) and 24 hours.
The date/time set here is printed out on the list or report.
(Enter the date in YYYY/MM/DD format, and time in
HH:MM format.)
Setting the network port,
protocol, and spool
The Setup menu allows you to set multiple ports at one
time according to a series of steps.
● SMB, LPD, IPP, NetWare, Port9100, SNMP, EtherTalk
(optional)
Set the port, protocol, and spool you want to use
depending on the network environment.
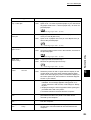
Setting whether to use
Internet services
Using Internet services (Embedded Web Server) allows
you to display the printer/job status or change the settings
of this printer by using the Web browser.
Setting whether to use
SNMP
Set this item to activate when using software such as
Embedded Web Server that remotely controls multiple
printers, or automatically installing the printer driver from
Software Pack CD-ROM.
Setting whether to use
DHCP, BOOTP, and RARP,
and setting IP address.
(Set this item only when
using TCP/IP.)
Set whether to automatically obtain the information
required to use TCP/IP (IPaddress, subnet mask, and
gateway address) from DHCP (Dynamic Host
Configuration Protocol) server, BOOTP, and RARP.
When you do not use the DHCP server, BOOTP, or RARP,
enter the IP address manually.
You can also set items separately depending on the printer environment without using the Quick Setup
menu. For information about items which cannot be set with the Quick Setup menu and how to set
items separately, refer to “Chapter 5 Setting Control Panel” (P.155).
30
1.2 Setting the Printer Environment With the Quick Setup Menu
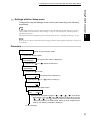
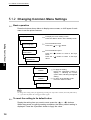
Configure the required settings on the control panel according to the following
procedures:
If you changed settings using the Quick Setup menu, the [System Settings List] may not be correct
when printed in step 8. Select for “Save Settings” in step 9, reboot the printer, and then print the
[System Settings List].
For information about printing the [System Settings List], refer to “ Checking the Settings” (P.42).
Setting Printer Environment
Settings with the Setup menu
1
If you press the <Menu> button during the setting procedure with the Quick Setup menu, settings will
be canceled.
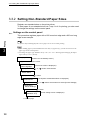
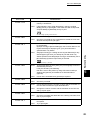
Procedure
Ready to print
(Printer is in the standby mode.)
(1) Press the <Menu> button.
Menu
Print Language
(The menu mode screen is displayed.)
(2) Press the <
> or <
> button several times.
Menu
Quick Setup
(3) Press the <
> button.
Setup?
N/Y
(4) Press the <
(The Setup menu is displayed.)
> or <
> button to select [Y].
Setup?
N/Y
(5) Press the <Eject/Set> button.
Job History Auto
Print
R/N/Y
(6) Answer each question using the < >, < >, < >, < >, and <Eject/
Set> buttons. Use the < > and < > buttons to select [N/Y], use the
< >, < >, < >, and < > buttons to enter the value, and press the
<Eject/Set> button to save the setting. When you finish configuring the
settings, the following message is displayed.
To the next page
31
1.2 Setting the Printer Environment With the Quick Setup Menu
Setting Printer Environment
1
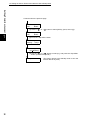
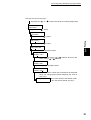
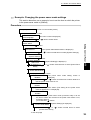
Continued from the previous page
Print Settings
List?
R/N/Y
(7) Use the <
> or <
> button to select [R/N/Y]. (Here, select [Y]).
Print Settings
List?
R/N/Y
(8) Press the <Eject/Set> button.
Print Settings
Printing... Tray1
Save Settings?
R/Y(Reboot)
(9) Use the < > or < > button to select [Y], and press the <Eject/Set>
button (to reboot the printer).
Ready to Print
32
(The printer returns to the standby mode. It can now
receive data at any time.)
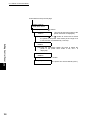
This section describes the procedures to set the IP address.
You can set the IP address with one of the following methods.
●
Using the Quick Setup menu on the control panel.
●
Setting the IP address from the control panel.
This section describes the procedure to set the IP address from the control panel.
To set the IP address using the Quick Setup menu, refer to “Setting the Printer Environment
With the Quick Setup Menu” (P.30).
●
●
●
●
●
Setting Printer Environment
1.3
Setting the IP Address
1
You can change the IP address from the Embedded Web Server. For information about Embedded Web Server,
refer to “Configuring from the Computer (Embedded Web Server)” (P.39).
Depending on the network environment, you may need to set the subnet mask and gateway address for the printer.
If your network has the DHCP, BOOTP, or RARP environment, this printer can obtain these addresses from each
of these servers.
By factory default setting, these addresses are automatically obtained from the DHCP server.
Use the DHCP server together with the Windows Internet Name Service (WINS) server.
When using the BOOTP or RARP server, change the item [Get IP Address] to [BOOTP] or [RARP] on the
control panel. Check with your system administrator for any queries on the BOOTP or RARP environment.
“Chapter 5 Setting Control Panel” (P.155)
33
1.3 Setting the IP Address
Setting Printer Environment
1
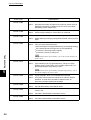
Printing out [System Settings List]
Procedure
1
2
Refer to “Checking the Settings” (P.42), and print out the [System Settings List].
In the [System Settings List], check the address of each of [TCP/IP: IP Address],
[TCP/IP: Subnet Mask], [TCP/IP: Gateway Address] and [WINS: Primary Wins
Server Address], [WINS: Secondary Wins Server Address] under
[Communication Settings].
●
●
The layout of the [System Settings List] may differ depending on the configuration of options and
settings of this printer.
For information about how to check the [System Settings List], refer to the next section, “Checking
System Settings List”.
Checking [System Settings List]
■ When neither TCP/IP nor WINS address is obtained
Your network has neither a DHCP server nor a WINS server. Refer to “1.3.1
Setting Address” (P.35) to set the IP address.
■ When the address is obtained for TCP/IP but not for WINS
Your network has no WINS server. Do not use the DHCP environment
because printing may be disabled when the IP address assigned to this printer
is changed. Refer to “1.3.1 Setting Address” (P.35) to set the IP address of this
printer manually.
■ When both TCP/IP and WINS addresses are obtained.
Your network has the DHCP and WINS servers operating. It is recommended
to use the DHCP environment. The IP address of this printer will be set by the
DHCP server. The host name displayed in the [SMB] column on the [System
Settings List] is registered in the WINS server.
34
1.3 Setting the IP Address
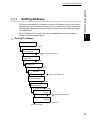
Setting Address
This section describes the procedure to set the IP address on the control panel.
Depending on the network environment used, you may need to set subnet mask
and gateway address. Consult your network administrator for details on setting
the needed item.
Even if [Ready to print Get IP Add. Fail] is displayed first, press the <Menu>
button to continue the procedure.
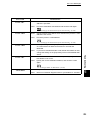
Setting IP address
Setting Printer Environment
1.3.1
1
Ready to print
(1) Press the <Menu> button.
Menu
Print Language
(2) Press the <
> or <
> button several times.
Menu
Admin Menu
(3) Press the <
> button.
Admin Menu
Network/Port
(4) Press the <
> button.
Network/Port
Parallel
(5) Press the <
> or <
> button several times.
Network/Port
TCP/IP Settings
(6) Press the <
> button.
TCP/IP Settings
Get IP Address
(7) Press the <
> button.
Get IP Address
DHCP *
(8) Press the <
> or <
> button several times.
Get IP Adress
Manual
(9) Press the <Eject/Set> button.
To the next page
35
1.3 Setting the IP Address
Setting Printer Environment
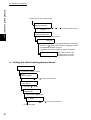
Continued from the previous page
IP Address
000.000.000.000*
(10) Use the <
address.
><
><
><
> buttons to enter the IP
IP Address
XXX.XXX.XXX.XXX
1
(11) Press the <Eject/Set> button.
Get IP Address
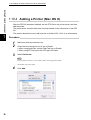
Manual *
To set the subnet mask and gateway address continuously,
press the < > button, and proceed to “Setting the subnet
mask/gateway address” in step 8.
(12) Press the <Menu> button (to reboot the printer).
Ready to print
(The printer returns to the
standby mode. It can now
receive data at any time.)
Setting the subnet mask/gateway address
Ready to print
(1) Press the <Menu> button.
Menu
Print Language
(2) Press the <
> or <
> button several times.
Menu
Admin Menu
(3) Press <
> button.
Admin Menu
Network/Port
(4) Press the <
> button.
Network/Port
Parallel
(5) Press the <
To the next page
36
> or <
> button several times.
1.3 Setting the IP Address
Setting Printer Environment
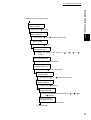
Continued from the previous page
Network/Port
TCP/IP Settings
(6) Press the <
> button.
TCP/IP Settings
Get IP Address
(7) Press the <
> or <
1
> button several times.
TCP/IP Settings
Subnet Mask
(8) Press the <
> button.
Subnet Mask
000.000.000.000*
(9) Enter the subnet mask using the <
buttons.
> <
> <
> <
>
><
>
Subnet Mask
XXX.XXX.XXX.XXX
(10) Press the <Eject/Set> button.
Subnet Mask
XXX.XXX.XXX.XXX*
(11) Press the <
> button some times.
TCP/IP Settings
Subnet Mask
(12) Press the <
> or <
> button several times.
TCP/IP Settings
Gateway Address
(13) Press the <
> button.
Gateway Address
000.000.000.000*
(14) Enter the gateway address using the <
< > buttons.
><
Gateway Address
XXX.XXX.XXX.XXX
(15) Press the <Eject/Set> button.
To the next page
37
1.3 Setting the IP Address
Setting Printer Environment
1
38
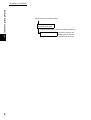
Continued from the previous page
Gateway Address
XXX.XXX.XXX.XXX*
(16) Press the <Menu> button (to reboot the printer).
Ready to print
(The printer returns to the
standby mode. It can now
receive data at any time.)
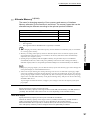
1.4.1
About Embedded Web Server
Embedded Web Server is a service that enables you to use a web browser to
display the printer/job status or change the settings of this printer when it has
been configured for use in TCP/IP environment.
Among the items that can be set through the control panel for this printer to be
used as a printer, you can use the Properties screen of this service to set items
like system setting as well as the setting of each network port.
Setting Printer Environment
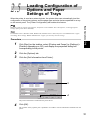
1.4
Configuring from the Computer
(Embedded Web Server)
1
When you use this printer as a local printer, Embedded Web Server is not available.
The environment, computer, and browser that can be used for Embedded Web
Server are as follows:
Applicable environment
To use Embedded Web Server, you need the network environment using TCP/IP
protocol as well as to set the Internet service to [Enable] (Factory default setting:
Enable) at the printer.
About Web browser settings for using Embedded Web Server
When using Embedded Web Server, it is recommended to specify the address of
this printer directly without going through a proxy server.
●
●
When specifying the address of this printer through a proxy server, the printer may take a long time
to respond or the screen might not be displayed.
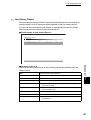
For settings, refer to the manual of your Web browser.
39
1.4 Configuring from the Computer (Embedded Web Server)
Setting Printer Environment
1
Items that can be set with Embedded Web Server
Main functions that can be set in each tab sheet of Embedded Web Server are
as follows:
Tab name
Main function
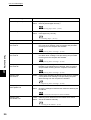
Jobs
●
Displays the job list and job history. You can also delete jobs.
Status
●
Displays the paper type/remaining amount of the paper loaded in the
paper tray, the status of the output tray, and the remaining amount/
status of consumables such as the toner cartridge.
Properties
●
Machine Details: Displays the product name and serial number of this
printer. This tab enables you to set the addresses of the administrator*
and the printer* which are required for e-mail printing.
Configuration: Displays the memory and printer language.
Counters: Displays the total number of color/black and white pages
output.
Paper Tray Attributes: Enables you to set the priority for the paper trays.
Paper Settings: Enables you to set the priority for each paper type.
Power Saver Settings: Enables you to set the duration of time until the
printer switches to thesde sleep mode (power saver mode).
Gradation Adjustment: Enables you to set the grayscale offset.
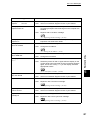
Mail Notice Settings*: Enables you to set the destination/notice interval
when using Mail Notice services. This item is displayed when [Mail
Notice Services] in [Port Status] is set to [Enabled].
Internet Services Settings*: Enables you to set whether to use System
Administration Mode of Embedded Web Server, as well as the
administrator name/password if used. By factory default setting, the
administrator name is set as “admin”, and the password is set as
“x-admin”.
Port Status: Enables you to set whether to activate or deactivate each
port.
Port Settings: Enables you to configure settings regarding the interface.
Protocol Settings: Enables you to configure detailed settings for each
protocol.
Emulation Settings: Enables you to configure detailed settings for each
emulation.
Memory Settings: Enables you to set the capacity of memory used by
the interface and protocol.
●
●
●
●
●
●
●
●
●
●
●
●
●
Maintenance
●
Displays the error history report.
Support
●
Displays support information. You can change the settings.
*: Items which can be set only through Embedded Web Server.
40
1.4 Configuring from the Computer (Embedded Web Server)
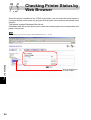
Using Embedded Web Server
To use this services, start the web browser by the following procedure.
If Embedded Web Server screen does not appear even though you follow the procedure below, refer to
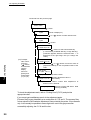
“About Web browser settings for using Embedded Web Server” (P.39).
Procedure
1
2
Setting Printer Environment
1.4.2
1
Start your computer, and then the web browser.
Enter the IP address of this printer in the address column of the web browser,
and then press the <Enter> key.
● Example: When the IP address is 192.168.1.100
Enter “http://192.168.1.100/”.
The Embedded Web Server screen will be displayed.
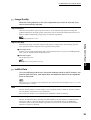
Using On-line Help
For details on items that can be set on each screen, click [Help] to see On-line
Help.
41
Setting Printer Environment
1
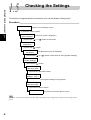
1.5
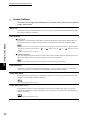
Checking the Settings
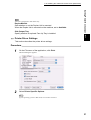
To check the configured printer environment, print out the [System Settings List].
Procedure
Ready to print
(Printer is in the standby mode.)
(1) Press the <Menu> button.
Menu
Print Language
(2) Press the <
(The menu screen is displayed.)
> or <
> button several times.
Menu
Report/List
(3) Press the <
> button.
Report/List
Job History
(4) Press the <
(The Report/List menu is displayed.)
> or <
> button several times to select [System Settings].
Report/List
System Settings
(5) Press the <
> button.
System Settings
Use Set to Print
(6) Press the <Eject/Set> button.
System Settings
Printing... Tray 1
(The [System Settings List] is printed.)
System Settings
Use Set to Print
(7) Press the <Menu> button.
Ready to print
(The printer can receive data any time.)
The layout of the [System Settings List] may differ depending on the configuration of options and settings of this
printer.
42
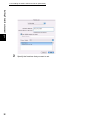
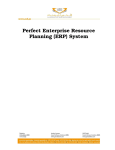
1.5 Checking the Settings
Setting Printer Environment
Check the IP address
settings.
1
Check the network/port
settings.
43
Setting Printer Environment
1
1.6
Installing the PCL Printer
Driver
To print from the computer, install the printer driver on the computer.
The printer driver is software that converts print data or instructions from the computer into
data that can be understood by this printer.
The installation method varies depending on the environment you use.
1.6.1
After Setting up the Printer
Before you can print on the TallyGenicom 8124 you need to configure your computer. When
the printer is used as a local printer, install the printer driver onto the computer connected to
the printer. If it is to be used as a network printer it is normal to first install the printer driver
on the computer connected to the printer and then share it to other computers. In several
places throughout this chapter it is necessary to load the TallyGenicom 8124 CD-ROM into
the drive. It is recommended that all other applications are closed down before inserting the
CD-ROM. The CD will auto start and give you choose of installing PCL or Adobe Post Script
drivers. To install PCL drivers follow the procedures below, for PS driver installation see the
“Installing the Adobe PS Printer Driver (Windows 95/98/Me)” section of this manual.
1.6.2
The PCL Printer Drivers
A printer driver is software that converts print data or instructions from the computer to data
interpreted by the printer.
The drivers for the Windows operating systems (OS) are available for the printer.
The printer drivers are stored on the TallyGenicom 8124 auto-run CD. If the CD does not
either auto run or you wish to manually install the drivers you can add the printer drivers and
utilities by searching for the relevant files on the CD.
44
1.6 Installing the PCL Printer Driver
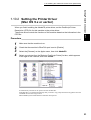
The procedure for installing the 8124 printer driver onto Windows 95/Windows 98/Me is
described in this section.
Here, we will use Windows 98 as an example. Once the driver is installed, see the “Network
Print Environment User Guide” for details of configuring the printer over a network.
Procedure
Auto Run Option
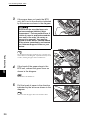
1
Power on the printer.
2
Power on your computer running Windows 98.
When the printer is connected to the computer, a dialog box indicating that new
hardware has been detected maybe displayed when you activate Windows 98.
In this case, click Cancel to close the dialog box.
3
Insert the 8124 Auto Installer CD into your CD-ROM drive.
If the CD-ROM does not start automatically, go to [My Computer] and double
click the CD-ROM drive icon.
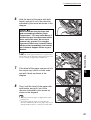
4
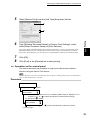
After reading the License Agreement Click the I Accept button.
5
Click the Install button on PCL Driver to start the driver installation.
6
Click Exit when the driver installation is complete. This installs the TallyGenicom
8124 printer onto local lpt1: port.
Setting Printer Environment
Installing the Printer Driver
(Windows 95/Windows 98/Windows Me)
1
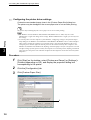
The driver needs to be configured correctly before sending a print job to the
printer.
For instructions on how to configure the printer see below “Configuring the Driver”.
45
1.6 Installing the PCL Printer Driver
Setting Printer Environment
1
46
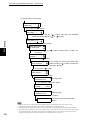
Procedure
Manual installation procedure
1
2
Start Windows 98.
3
4
5
6
On the Start menu, point to Settings and click Printers.
7
8
Click Have Disk.
Insert the 8124 Auto Installer CD into your CD-ROM drive. If the CD-ROM starts
automatically, cancel the auto run installation by clicking on Exit.
In the Printers window, double-click Add Printer.
Click Next.
Select [Local Printer] and then click Next.
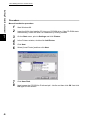
Next browse the CD-ROM to D:\drivers\pcl\...\win9x and then click OK. And click
OK again at next screen.
1.6 Installing the PCL Printer Driver
Setting Printer Environment
1
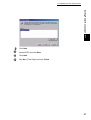
9
10
11
12
Click Next.
Select LPT1: and click Next.
Click Next.
Say No to [Test Page] and click Finish.
47
1.6 Installing the PCL Printer Driver
Setting Printer Environment
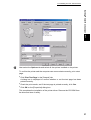
Configuring the Driver
TallyGenicom 8124 printer icon has been added in the Printers folder by driver installation.
To configure the driver correctly you need to follow the next few steps.
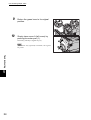
●
Right-click on TallyGenicom 8124 Icon and select Properties. Then select Paper tab and
set the correct paper size loaded in the printer trays (i.e. A4 A3).
●
Next select the Options tab and select all the extra options installed on the printer.
1
To confirm the printer and the computer can communicate correctly, print a test page.
On the [General] tab Click Print Test Page.
A dialog box is displayed to confirm whether or not the test page has been printed correctly
Check the print results, and if the test page is printed correctly,
●
●
Click Yes.
●
Click OK on the [Properties[ dialog box.
This completes the installation of the printer driver. Remove the CD-ROM from the drive and
store it safely.
48
1.6 Installing the PCL Printer Driver
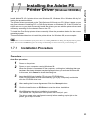
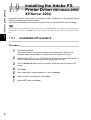
The procedure for installing the printer driver onto Windows NT 4.0/Windows 2000/Windows
XP is as follows. The Auto run CD will install the printer driver onto the lpt1 port. This is the
best method to use under normal circumstances. If the printer is using SMB or Novell
printing it may be necessary under some circumstances to not allow the CD to Auto Install.
Please consult your network administrator for advice. Instead the printer driver should be
added by selecting the add printer driver and pointing to the correct place on the CD. This
should always be done when printing using IPP. This is due to the difficulty in selecting
network ports on the above systems after installing the printer driver
Setting Printer Environment
Installing the Printer Driver
(Windows NT 4.0/Windows 2000/Windows XP/Windows 2003)
1
To Install and configure the printer on Windows NT, 2000 XP and Win2003 you need
to log on as either an administrator or power user.
Refer to the “Network Print Environment User Guide” for more details on configuring the printer over a network.
Procedure
Auto run option
1
2
Power on the printer.
3
Insert the 8124 Auto Installer CD into your CD-ROM drive. If the CD-ROM does
not start automatically, go to [My Computer] and double click the CD-ROM drive
icon.
4
After reading the License Agreement Click the I Accept button
The TallyGenicom Setup Menu is displayed.
5
6
Click Install PCL Driver to start the driver installation.
Power on your computer running Windows NT 4.0 or Windows 2000/XP/
Windows 2003. When the printer is connected to the computer, a dialog box
indicating that new hardware has been detected may be displayed when you
activate Windows 2000/XP. In this case, click Cancel to close the dialog box.
Click OK and exit the CD when the driver installation is complete.
The driver needs to be configured correctly before sending a print job to the
printer, to configure the printer go to step 16 below.
49
1.6 Installing the PCL Printer Driver
Setting Printer Environment
1
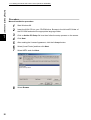
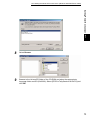
Procedure
Manual installation procedure
1
2
3
4
5
6
7
8
9
10
11
12
13
14
Start Windows 2000/XP.
Insert the 8124 Auto Installer CD into your CD-ROM drive. If the CD-ROM starts
automatically, cancel the auto run installation by clicking on Exit.
On the [Start] menu, point to [Settings] and click Printers and Faxes.
In the Printers window, double-click Add Printer.
Click Next.
Select Local Printer and then click Next.
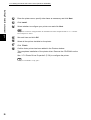
Click Next.
Click Have Disk.
Next browse the CD-ROM to D:\drivers\pcl\...\win2000 and then click OK.
Click Next.
Select Yes or No to [Default Printer] and click Next.
Select if it’s to be a Share Printer or not and click Next.
Select No to [Test Page] and click Next.
Click Finish.
After the installation finishes a TallyGenicom 8124 printer icon will be added in
the [Printers and Faxes] Folder.
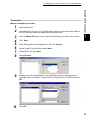
15
50
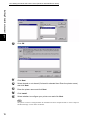
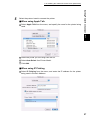
Right-click on this Icon and select Properties. Then select Printing
Preferences and set the correct paper size.
1.6 Installing the PCL Printer Driver
Setting Printer Environment
1
16
Next select the Options tab and select all the options installed on the printer.
To confirm the printer and the computer can communicate correctly, print a test
page.
●
Click Print Test Page in the [General] tab.
A dialog box is displayed to confirm whether or not the test page has been
printed correctly.
●
Check the print results, and if the test page is printed correctly, click Yes.
●
Click OK on the [Properties] dialog box.
This completes the installation of the printer driver. Remove the CD-ROM from
the drive and store it safely.
51
1.6 Installing the PCL Printer Driver
Setting Printer Environment
1
52
Obtaining the latest printer driver
There may be new printer drivers with future upgrades and you can download the latest
version of printer driver from the TallyGenicom home page.
Before the printer driver can be networked over Windows NT 4.0 system, it is necessary to set up TCP/IP Protocol
and Microsoft TCP/IP Printing. Refer to the manuals on Windows NT 4.0 for details. You can select LPR Port or
Standard TCP/IP Port as the output destination for the port on a Windows 2000 system. When you select LPR Port,
before installing the printer driver, you are required to set up Print Services for UNIX on Windows 2000. Refer to
the manuals on Windows 2000 for details.
Install AdobePS 4.5.4 printer driver onto Windows 95, Windows 98 or Windows Me by following the procedure below.
The printer drivers are stored on the TallyGenicom 8124 auto-run CD. When it starts up you
are given choose of installing PCL or Post Script drivers on Windows OS. If the CD does not
either auto run or you wish to manually install the drivers you can add the printer drivers and
utilities by searching for the relevant files on the CD
To install the Post Script printer drivers manually follow the procedure below for the correct
operating system.
This section describes how to install the printer driver for Windows 98, as an example.
Setting Printer Environment
1.7
Installing the Adobe PS
Printer Driver (Windows 95/98/Me)
1
It is possible to cancel installation of the printer driver by clicking Cancel in the dialog box displayed during installation. You can also click Back to ignore the settings in that dialog box and return to the previous dialog box.
1.7.1
Installation Procedure
Procedure
Auto Run procedure
1
2
Power on the printer.
3
Insert the 8124 Auto Installer CD into your CD-ROM drive.
If the CD-ROM does not start automatically, go to [My Computer] and double
click the CD-ROM drive icon.
4
5
6
After reading the License Agreement Click the I Accept button.
Power on your computer running Windows 98.
When the printer is connected to the computer, a dialog box indicating that new
hardware has been detected maybe displayed when you activate Windows 98.
In this case, click Cancel to close the dialog box.
Click the Install button on PS Driver to start the driver installation.
Click Exit when the driver installation is complete.
This installs the TallyGenicom 8124 printer onto local lpt1: port.
The driver needs to be configured correctly before sending a print job to the
printer, go to step 15 below.
53
1.7 Installing the Adobe PS Printer Driver (Windows 95/98/Me)
Setting Printer Environment
1
54
Procedure
Manual installation procedure
1
2
Start Windows 98.
3
4
5
6
7
Click on Adobe PS Setup file Icon then follow the setup process on the screen.
8
Select Browse.
Insert the 8124 CD into your CD-ROM drive. Browse to the \drivers\PS folder of
the CD-ROM and select the appropriate language folder.
Click Next.
After reading the License Agreement, click the I Accept button.
Select [Local Printer] and then click Next.
Select LPT1: and click Next.
1.7 Installing the Adobe PS Printer Driver (Windows 95/98/Me)
Setting Printer Environment
9
Browse to the drivers\PS folder of the CD-ROM and select the appropriate
language folder & OS (Win9x). Select PPD file [TallyGenicom 8124 PS] and click
OK.
10
Click OK.
11
Click Next.
1
55
1.7 Installing the Adobe PS Printer Driver (Windows 95/98/Me)
Setting Printer Environment
1
12
13
14
Enter the printer name, specify other items as necessary and click Next.
Click Install.
Select whether to configure your printer now and click Next.
The printer can also be configured after all installation has been completed. Refer to “1.7.2 Printer
Driver Properties” below.
15
16
17
18
Set each item and click OK.
Select all the options installed on the printer.
Click Finish.
Confirm that a printer has been added in the Printers window.
This completes installation of the printer driver. Remove the CD-ROM from the
drive.
See “1.7.2 Printer Driver Properties” (P. 58) to configure the printer.
Store your CD-ROM in a safe place.
56
1.7 Installing the Adobe PS Printer Driver (Windows 95/98/Me)
When you click Disagree button in the End User License Agreement, the following
dialog box appears.
Click the No button to return to 5 and continue the operation.
Click the Yes button to cancel installation. A printer is added in the Printers window,
but the printer driver is not installed properly.
When you right-click the printer and click Properties command from the menu, the
Reinstall tab is added to the printer driver properties dialog box. Follow the directions
on that tab.
When you finish reinstalling the printer driver, see “1.7.2 Printer Driver Properties” (P. 58)
to set up the printer.
Setting Printer Environment
If you click Disagree in the End User License Agreement
1
57
1.7 Installing the Adobe PS Printer Driver (Windows 95/98/Me)
Setting Printer Environment
1
1.7.2
Printer Driver Properties
To view the printer driver properties, select the printer icon in the Printers window, then click
the Properties command on the File menu.
Device Options Settings
This section describes the settings of the [Device Options] tab.
Select the function that you want to set in Features List and change the settings in the
Change box below.
Select all the installed opions on the printer and then click OK.
●
●
58
You can restore defaults by clicking the Restore Defaults button.
The settings that can be selected vary depending on which options have been installed. Make these settings
after confirming that option settings are complete.
1.7 Installing the Adobe PS Printer Driver (Windows 95/98/Me)
This section describes the settings in the Options tab.
Select the settings that you want to make in Hardware Options and change them in the
Change box below. To use this function, it is necessary to make appropriate settings in
this tab.
You can restore defaults by clicking the Restore Defaults button.
Settings
Setting Printer Environment
Device Options Settings (continued)
1
Hard Disk
Specifies whether or not the Hard Disk Drive (optional) is mounted.
When the Hard Disk Drive is mounted on the machine, set to Available.
Paper Source
Sets the tray attached on the machine.
When 1-Tray Unit is selected, Tray 2 can be used.
When 3-Tray Unit is selected, Tray 2, Tray 3 and Tray 4 can be used.
Not Available*
1-Tray Unit
3-Tray Unit
Duplex Module
Sets whether or not the Duplex Unit is mounted.
When the Duplex Unit is mounted on the machine, set to Available.
Side Output Tray
Specify whether an optional Face Up Tray is installed.
Memory
Specify the amount of printer memory.
This function is not available when the machine is used as a local printer. Manually set the required items for
the printer driver.
59
1.7 Installing the Adobe PS Printer Driver (Windows 95/98/Me)
Setting Printer Environment
1
RGB Color Correction
Specify the coloration of the RGB Color Correction.
Normal This setting is optimized for printing documents that contain text and
graphs, such as a business documents.
Photo This setting is optimized for printing photos or images with gradations.
Select this setting when printing images in RGB.
Presentation This setting is optimized for printing color documents vividly,
such as presentation documents.
Web Pages This setting is optimized for printing Web pages.
OFF The RGB Color Correction is not applied.
Screen
You can adjust the image quality. Select [Gradation] to print photos and gradations
clearly. Select [Fineness] to print the colors in illustrations, tables, or graphs evenly.
RGB Gamma Correction
Specify the brightness of the documents. The higher the value is, the darker the print
becomes.
Gray Guaranteed
Activate this setting to print documents in black only. This feature does not apply to the
images of the documents.
60
1.7 Installing the Adobe PS Printer Driver (Windows 95/98/Me)
How to Use Help
This section describes how to use Help.
Procedure
1
2
You can see
in the upper right, or the Help button in the lower right of the
printer driver properties dialog box.
Setting Printer Environment
1.7.3
1
Click
and a “?” mark appears next to the pointer. You can then click items for
which you need explanations, opening a pop-up window that contains relevant
information. Click inside the pop-up window to close it.
Also, if you click Help, an explanation of the current tab appears as Help
information.
61
Setting Printer Environment
1
1.8
Installing the Adobe PS
Printer Driver (Windows NT)
Install the AdobePS 5.2.2 printer driver onto Windows NT by following the procedure below.
It is possible to cancel installation of the printer driver by clicking Cancel in the dialog box displayed during installation. You can also click Back to delete the settings in that dialog box and return to the previous dialog box.
1.8.1
Installation Procedure
Procedure
Auto Run procedure
1
2
Power on the printer.
3
Insert the 8124 Auto Installer CD into your CD-ROM drive.
If the CD-ROM does not start automatically, go to My Computer and double click
the CD-ROM drive icon.
4
5
6
After reading the License Agreement Click the I Accept button.
Power on your computer running Windows NT.
When the printer is connected to the computer, a dialog box indicating that new
hardware has been detected maybe displayed when you activate Windows NT.
In this case, click Cancel to close the dialog box.
Click the Install button on PS Driver to start the driver installation.
Click Exit when the driver installation is complete.
This installs the TallyGenicom 8124 printer onto local lpt1: port.
The driver needs to be configured correctly before sending a print job to the printer, go to step 16
below:
62
1.8 Installing the Adobe PS Printer Driver (Windows NT)
Manual installation procedure
1
2
Start Windows NT.
3
4
5
6
7
8
Click on Adobe PS setup file Icon then follow the setup process on the screen.
9
Browse to the \drivers\PS folder of the CD-ROM and select the appropriate
language folder and OS(NT). Select PPD file [TallyGenicom 8124PS] and click
OK.
10
Insert the 8124 CD into your CD-ROM drive. Browse to the \drivers\PS folder of
the CD-ROM and select the appropriate language folder.
Setting Printer Environment
Procedure
1
Click Next.
After reading the License Agreement, Click the Accept.
Select [Local Printer] and then select Next.
Select LPT1: and click Next.
Select Browse.
Click OK.
63
1.8 Installing the Adobe PS Printer Driver (Windows NT)
Setting Printer Environment
1
11
12
13
14
15
64
Click Next.
Select shared or not shared and click Next.
Enter the printer name, specify other items as necessary and click Next.
Click Install.
Select whether to configure your printer now and click Next.
1.8 Installing the Adobe PS Printer Driver (Windows NT)
16
17
18
19
Set each item and click OK.
Select all the options installed on the printer.
Click Finish.
Confirm that the printer has been added in the Printers window.
This completes installation of the printer driver. Remove the CD-ROM from the
drive.
See “1.8.2 Device Options and Print Settings” (P. 67) to configure the printer.
Setting Printer Environment
The printer can also be configured after all installation has been completed. Refer to “1.8.2 Device
Options and Print Settings” below.
1
Store your CD-ROM in a safe place.
65
1.8 Installing the Adobe PS Printer Driver (Windows NT)
Setting Printer Environment
1
66
If you click Disagree in the End User License Agreement
When you click the [Disagree] button in the End User License Agreement, the following
dialog box appears.
Click the No button to return to step 5 and continue the operation.
Click the Yes button to cancel the installation. A printer is added in the Printers
window, but the printer driver is not installed properly.
Select the printer and click Properties command on the File menu. The Reinstall tab is
added to the printer driver properties dialog box. Follow the directions on that tab.
When you finish reinstalling, see “1.8.2 Device Options and Print Settings” to set up
the printer.
1.8 Installing the Adobe PS Printer Driver (Windows NT)
Device Options and Print Settings
This section describes printer specific settings in the settings in the printer driver [Properties]
and document presets.
●
Installable Options in the [Device Settings] tab
●
[Configuration] tab
●
Printer Specific Sections in the [Device Settings] of the [Advanced] tab
●
[Output Settings] tab
Setting Printer Environment
1.8.2
1
You can also refer to Help for explanations of these settings. See “1.7.3 How to Use Help” (P. 71) for details about
how to use Help.
To view the Device Settings or Configuration tabs, select the printer icon in the Printers window, then click Properties on the File menu.
To view the Advanced or Output Settings tabs, select the printer icon in the Printers window,
then click Document Defaults on the File menu.
Device Settings Tab
This section describes Installable Options in the [Device Settings] tab.
To print correctly, it is necessary to make appropriate settings in this tab.
Select the items in [Installable Options] and change the settings in the [Change
Setting] box at the bottom of the tab.
Settings
Memory
Specify the amount of printer memory.
Hard Disk
Specifies whether or not the Hard Disk Drive (optional) is mounted.
When the Hard Disk Drive is mounted on the machine, set to Available.
Paper Source
Sets the tray attached on the machine.
When 1-Tray Unit is selected, Tray 2 can be used.
When 3-Tray Unit is selected, Tray 2, Tray 3 and Tray 4 can be used.
Not Available*
1-Tray Unit
3-Tray Unit
Duplex Module
Sets whether or not the Duplex Unit is mounted.
When the Duplex Unit is mounted on the machine, set to Available.
67
1.8 Installing the Adobe PS Printer Driver (Windows NT)
Setting Printer Environment
1
Side Output Tray
Specify whether an optional Face Up Tray is installed.
Advanced Tab Settings
This section describes the settings of Printer Features in the Advanced tab.
Select the items in Printer Features under Document Options of the Advanced tab and
change the settings in the Change Setting box at the bottom of the tab.
The settings that can be selected vary depending on which options have been installed. Make these settings
after confirming that option settings are complete.
“Device Settings Tab”, (P.67).
Settings
Output Destination
Set the destination for output.
The items that can be selected vary according to whether the Face Up Tray has been installed.
Feed Separators from
Set the destination where the separators are to be fed to when the transparency
separator function is used.
When Auto is selected, the tray set on the machine is used as the feed destination.
None*
Auto
Tray 1
Tray 2
Tray 3
Tray 4
Print on Separators
Sets whether or not to print the details printed on the transparencies on the separators
as well when the transparency separator function is used.
Blank Separators*
Printed Separators
Bypass Feed Orientation
Specify the paper orientation when printing from the bypass tray. When you set the
short edge of the paper in the bypass tray feed direction, select Landscape setting.
When you set the long edge of the paper in the bypass tray, select Portrait setting.
Print Mode
Specify whether to give priority to the print speed or the image quality.
68
1.8 Installing the Adobe PS Printer Driver (Windows NT)
RGB Color Correction
Specify the coloration of the RGB Color Correction.
Normal This setting is optimized for printing documents that contain text and
graphs, such as a business documents.
Photo This setting is optimized for printing photos or images with gradations.
Select this setting when printing images in RGB.
Presentation This setting is optimized for printing color documents vividly,
such as presentation documents.
Web Pages This setting is optimized for printing Web pages.
OFF The RGB Color Correction is not applied.
Setting Printer Environment
Output Color
Specify whether to print in color or black.
1
RGB Gamma Correction
Specify the brightness of the documents. The higher the value is, the darker the print
becomes.
Screen
You can adjust the image quality. Select Gradation to print photos and gradations
clearly. Select Fineness to print the colors in illustrations, tables, or graphs evenly.
Image Enhancement
Specify whether to use the Image Enhancement function.
Selecting On smooths out boundaries when printing.
This reduces jagged edges, thereby artificially increasing the resolution of the image.
When printing an image (bitmap) composed of coarse halftone dots, smooth color
gradation is impossible in certain situations. In this case, select Off.
Draft Mode
Specify whether to reduce the amount of toner used when printing drafts.
When you select On, the overall printed color becomes lighter. This is best for printing
documents when print quality is not necessary.
Gray Guaranteed
Select On to print documents in black only. This feature does not apply to the images
of the documents.
Custom Paper Image
Specify whether to correct the paper orientation when printing on custom paper.
When printing with custom paper, select On to correct the orientation rotated at 90
degrees.
69
1.8 Installing the Adobe PS Printer Driver (Windows NT)
Setting Printer Environment
1
Substitute Tray
Specify what action to take when the paper for the print size is not loaded in the
machine.
Use Printer Settings
Use the printer setting. The settings can be confirmed on the printer control panel.
Display Message
Display paper supply messages on the printer control panel. Printing is impossible
until paper is supplied.
Use Nearest Size (With Zoom)
Select the nearest paper size and prints in an equal size. Automatically reduces
images for printing, as necessary.
Use Nearest Size (No Zoom)
Select the nearest paper size and prints in equal size.
Use Larger Size (With Zoom)
Print in an equal size on paper larger than the original. Automatically reduces
images for printing, as necessary.
Use Larger Size (No Zoom)
Print in an equal size on paper larger than the original.
Feed from Bypass Tray
Uses paper from Tray 5 (Bypass) when there are no more paper in the paper tray
containing the selected paper size.
CID Font
Sets CID font.
To set to the mode for handling only CID font, select CID Native. To set to the mode for
handling both CID and OCF fonts, select OCF Compatible.
CID Native*
OCF Compatible
70
1.8 Installing the Adobe PS Printer Driver (Windows NT)
How to Use Help
This section describes how to use Help.
Procedure
1
2
The Help button (
in the figure below) appears on the upper right of the printer
driver properties dialog box.
Setting Printer Environment
1.8.3
1
Click
and a “?” mark appears next to the pointer.You can then click items for
which you need explanations, opening a pop-up window that contains relevant
information. Click inside the pop-up window to close it.
71
Setting Printer Environment
1.9
Installing the Adobe PS
Printer Driver (Windows 2000/
It is possible to cancel installation of the printer driver by clicking Cancel in the dialog box displayed during
installation. You can also click Back to delete the settings in that dialog box and return to the previous dialog
box.
1
1.9.1
XP/Server 2003)
Install MS PScript 5 printer driver onto Windows 2000, Windows XP, and Windows Server
2003 by following the procedure below.
This section describes how to install the printer driver for Windows 2000, as an example.
Installation Procedure
Procedure
72
1
Start Windows 2000.
Log on as a Power User group member or an Administrator. Refer to the
Windows 2000 documentation for details about the Power User group.
2
Insert the 8124 CD into your CD-ROM drive. Browse to the \drivers\PS folder of
the CD-ROM and select the appropriate language & OS folder.
3
Click on Adobe PS setup file Icon, and then follow the setup process on the
screen.
4
5
6
7
Click Next.
After reading the License Agreement, Click the Accept.
Select [Local Printer] and then select Next.
Select LPT1: and select Next.
1.9 Installing the Adobe PS Printer Driver (Windows 2000/XP/Server 2003)
Setting Printer Environment
1
8
Select Browse.
9
Browse to the \drivers\PS folder of the CD-ROM and select the appropriate
language folder and OS (Win2000). Select [PPD file TallyGenicom 8124 PS] and
click OK.
73
1.9 Installing the Adobe PS Printer Driver (Windows 2000/XP/Server 2003)
Setting Printer Environment
1
10
Click OK.
11
12
Click Next.
13
14
15
Enter the printer name and click Next.
Select shared or not shared (If shared is selected then Enter the printer name)
and click Next.
Click Install.
Select whether to configure your printer now and click Next.
The printer can also be configured after all installation has been completed. Refer to "Device Options
and Print Settings” section below for details.
74
1.9 Installing the Adobe PS Printer Driver (Windows 2000/XP/Server 2003)
Setting Printer Environment
1
16
Select the correct paper size loaded in the trays .
17
Select the installable options fitted on the printer then click OK.
75
1.9 Installing the Adobe PS Printer Driver (Windows 2000/XP/Server 2003)
Setting Printer Environment
1
76
18
19
Click Finish.
Confirm that the printer has been added in the Printers window.
This completes the installation of the printer driver. Remove the CD-ROM from the drive.
Store your CD-ROM in a safe place.
1.9 Installing the Adobe PS Printer Driver (Windows 2000/XP/Server 2003)
Device Options and Print Settings
This section describes the settings specific to the printer, which are among the settings to be
made using the printer driver properties. For other items, refer to the Help.
●
Installable Options in the Device Settings tab
●
Sections Specific to the Printer in [Printer Features] of the [Advanced Options] dialog box
To view the Device Settings, select the printer in the Printers window, then click [Properties]
on the [File] menu.
To view the [Advanced Options] dialog box, select the printer in the Printers window, then
click Printing Preferences on the [File] menu. Click [Advanced] in the Layout screen.
Setting Printer Environment
1.9.2
1
Device Settings Tab Settings
This section describes Installable Options in the Device Settings tab.
To print correctly, it is necessary to make the appropriate settings in this tab.
Select the items in Installable Options and change the settings in the menu that
appears on the right.
Settings
Memory
Specify the amount of printer memory.
Hard Disk
Specifies whether or not the Hard Disk Drive (optional) is mounted.
When the Hard Disk Drive is mounted on the machine, set to Available.
Paper Source
Sets the tray attached on the machine.
When 1-Tray Unit is selected, Tray 2 can be used.
When 3-Tray Unit is selected, Tray 2, Tray 3 and Tray 4 can be used.
Not Available*
1-Tray Unit
3-Tray Unit
Duplex Module
Sets whether or not the Duplex Unit is mounted.
When the Duplex Unit is mounted on the machine, set to Available.
Side Output Tray
Specify whether an optional Face Up Tray is installed.
77
1.9 Installing the Adobe PS Printer Driver (Windows 2000/XP/Server 2003)
Setting Printer Environment
1
Advanced Options Dialog Box Settings
This section describes the settings of the Advanced Options dialog box displayed
when clicking Advanced in the Layout tab.
Select the items from Printer Features and change them on the menu displayed to the
right.
Settings
Output Destination
Set the destination for output.
The items that can be selected vary according to whether the Face Up Tray has been installed.
Feed Separators from
Set the destination where the separators are to be fed to when the transparency
separator function is used.
When Auto is selected, the tray set on the machine is used as the feed destination.
None*
Auto
Tray 1
Tray 2
Tray 3
Tray 4
Print on Separators
Sets whether or not to print the details printed on the transparencies on the separators
as well when the transparency separator function is used.
Blank Separators*
Printed Separators
Bypass Feed Orientation
Specify the paper orientation when printing from the bypass tray. When you set the
short edge of the paper in the bypass tray feed direction, select Landscape setting.
When you set the long edge of the paper in the bypass tray, select Portrait setting.
Image Enhancement
Specify whether to use the Image Enhancement function.
Selecting On smooths boundaries when printing. This reduces the jagged edges,
thereby artificially increasing the resolution of the image. When printing an image
(bitmap) composed of coarse halftone dots, smooth color gradation is impossible in
certain situations. In this case, select Off.
78
1.9 Installing the Adobe PS Printer Driver (Windows 2000/XP/Server 2003)
Custom Paper Image
Specify whether to correct the paper orientation when printing on custom paper.
When printing with custom paper, select On to correct the orientation rotated at 90
degrees.
Substitute Tray
Specify what action to take when the paper for the print size is not loaded in the
machine.
Use Printer Settings
Use the printer setting. The settings can be confirmed on the printer control panel.
Display Message
Display paper supply messages on the printer control panel. Printing is unavailable
until paper is supplied.
Use Nearest Size (With Zoom)
Select the nearest paper size and prints. Automatically reduces images for printing,
as necessary.
Use Nearest Size (No Zoom)
Select the nearest paper size and prints in an equal size.
Use Larger Size (With Zoom)
Print in an equal size on paper larger than the original. Automatically reduces
images for printing, as necessary.
Use Larger Size (No Zoom)
Print in an equal size on paper larger than the original.
Feed from Bypass Tray
Uses paper from Tray 5 (Bypass) when there are no more paper in the paper tray
containing the selected paper size.
Setting Printer Environment
Draft Mode
Specify whether to reduce the amount of toner used when printing drafts.
When you select On, the overall printed color becomes lighter. This is best for printing
documents when print quality is not necessary.
1
CID Font
Sets CID font.
To set to the mode for handling only CID font, select CID Native. To set to the mode for
handling both CID and OCF fonts, select OCF Compatible.
CID Native*
OCF Compatible
79
1.9 Installing the Adobe PS Printer Driver (Windows 2000/XP/Server 2003)
Setting Printer Environment
1
Advanced Options Dialog Box Settings (continued)
This section describes the settings in the Color Settings tab.
Settings
Output Color
Specify whether to print in color or black.
Print Mode
Specify whether to give priority to the print speed or the image quality.
RGB Color Correction
Specify the coloration of the RGB Color Correction.
Normal This settings is optimized for printing documents that contain text and
graphs, such as a business documents.
Photo This setting is optimized for printing photos or images with gradations.
Select this setting when printing images in RGB.
Presentation This setting is optimized for printing color documents vividly,
such as presentation documents.
Web Pages This setting is optimized for printing Web pages.
OFF The RGB Color Correction is not applied.
Screen
You can adjust the image quality. Select Gradation to print photos and gradations
clearly. Select Fineness to print the colors in illustrations, tables, or graphs evenly.
Gray Guaranteed
Activate this setting to print documents in black only. This feature does not apply to the
images of the documents.
RGB Gamma Correction
Specify the brightness of the documents. The higher the value is, the darker the print
becomes.
80
1.9 Installing the Adobe PS Printer Driver (Windows 2000/XP/Server 2003)
How to Use Help
This section describes how to use Help.
Procedure
1
2
The Help button, as shown below, appears on the upper right of the printer driver
properties dialog box.
Setting Printer Environment
1.9.3
1
Click
and a “?” mark appears next to the pointer. You can then click items
for which you need explanations, opening a pop-up window that contains
relevant information. Click inside the pop-up window to close it.
81
Setting Printer Environment
1
1.10
Installing the Adobe PS
Printer Driver (Macintosh)
This section describes how to install the Adobe printer driver and how to set the printer
driver for this machine. There are two steps to install the printer driver. Firstly, use the
installer enclosed in the CD-ROM to install the printer to the Macintosh. Then, configure the
printer driver according to the printer used.
1.10.1 Installation Procedure
(Mac OS 9.x or earlier)
This section describes the procedures for installing the AdobePS printer driver.
Here is the procedure to install AdobePS 8.8, as an example.
Procedure
1
2
Insert the 8124 CD into your CD-ROM drive.
3
4
5
Double-click AdobePS Installer 8.8.
Browse to the \drivers\PS folder of the CD-ROM and select the appropriate Mac
OS9 folder. Click on Adobe PS Installer file Icon, then follow the setup process
on the srceen.
Click Continue.
Read through the license agreement carefully and if you have no objections to it,
click Accept.
Read the Read Me displayed, then click the Continue button.
6
Confirm the Install Location and change it if necessary, then click Install.
Installation begins.
When installation is complete, the dialog box appears.
7
Click Restart or Quit.
This completes installation.
Proceed to “1.10.2 Setting the Printer Driver (Mac OS 9.x or earlier)” to continue.
82
1.10 Installing the Adobe PS Printer Driver (Macintosh)
When you finish installing the AdobePS printer driver, set the PostScript Printer
Description (PPD) file for this machine to the printer driver.
The printer driver controls the functions of this machine based on the information in the
PPD file.
Procedure
1
2
3
4
Setting Printer Environment
1.10.2 Setting the Printer Driver
(Mac OS 9.x or earlier)
1
Make sure that the machine is on.
Check that the machine’s EtherTalk port is set to [Enable].
Select the [Chooser] on the Apple menu, then click AdobePS.
Select your printer from the [Select a PostScript Printer] list box, which appears
to the right of the Chooser, then click Create.
It automatically searches for the printer and sets the PPD file.
If the PPD file is not found automatically then you need to copy TallyGenicom 8124.ppd file from the
CD-ROM into the following location:
MacintoshHD\system Folder\Extensions\Printer Descriptions\
83
1.10 Installing the Adobe PS Printer Driver (Macintosh)
Setting Printer Environment
(1) Click Select PPD.
(2) Select your printer model in the list, then click Select.
1
The PPD file for this machine is set.
5
Click Configure to set the options.
●
●
6
7
84
You can change the print settings after you install the printer driver.
To use the function of the options, it is necessary to set [Configure]. Always set this according to
the configuration of your machine. Also, installable Options should normally be set automatically
according to the bi-directional communications with this machine. You do not have to change the
settings.
Click OK. Click OK once more in the screen displayed.
Close the [Chooser].
1.10 Installing the Adobe PS Printer Driver (Macintosh)
Install the Postscript Printer Description (PPD) file for the Mac OS X into the Mac OS X
v10.2.x Macintosh.
This section describes how to install the PPD file on a Mac OS X v10.2.4, as an
example.
The printer driver does not need to be installed on the Mac OS X. It uses the Adobe PostScript driver that is
provided with the OS.
Setting Printer Environment
1.10.3 Installation Procedure (Mac OS X)
1
Procedure
1
2
Insert the 8124 CD into your CD-ROM drive.
3
Enter the Administrator’s user name and password, then click OK.
4
Read through the license agreement carefully and if you have no objections to it,
click Accept.
5
6
Confirm the Install Location and change it if necessary, then click Install.
Browse to the \drivers\PS folder of the CD-ROM and select the appropriate Mac
OSX folder. Double-click on TallyGenicom PPD Installer Icon, then follow the
setup process on the srceen.
The License screen opens.
Click Quit.
This completes the installation.
Proceed to “1.10.4 Adding a Printer (Mac OS X)” to continue.
85
1.10 Installing the Adobe PS Printer Driver (Macintosh)
Setting Printer Environment
1
1.10.4 Adding a Printer (Mac OS X)
After the PPD file has been installed, set the PPD file for the printer driver, and then
add the printer.
The printer driver controls the printer functions based on the information in the PPD
file.
This section describes how to add a printer on a Mac OS X v10.2.4, as an example.
Procedure
1
2
Make sure that the machine is on.
3
Start Print Center.
Check that the machine’s port is set to Enable.
● When using AppleTalk, set the EtherTalk port to Enable.
● When using IP Printing, set the LPD port to Enable.
You can find Print Center in the Utilities folder in the Applications folder.
The Printer List screen opens.
4
86
Click Add.
1.10 Installing the Adobe PS Printer Driver (Macintosh)
Select the protocol used to connect the printer.
■ When using Apple Talk
1 Select Apple Talk from the menu, and specify the zone for the printer being
used.
Setting Printer Environment
5
1
2 Select the printer you are using from the list.
3 Select Auto Select from Printer Model.
4 Click Add.
■ When using IP Printing
1 Select IP Printing from the menu, and enter the IP address for the printer
being used in Printer’s Address.
87
1.10 Installing the Adobe PS Printer Driver (Macintosh)
Setting Printer Environment
1
88
2 Select TG from Printer Model, and then select TallyGenicom 8124.
3 Click Add.
This completes the addition of a printer.
Regarding printer options
Click Printers on the Print Center menu bar, and select Show Info.
Next, select Installable Options, and select the options that have been installed to the
printer.
1.10 Installing the Adobe PS Printer Driver (Macintosh)
For Mac OS 9.x and earlier
Setting Printer Environment
This section describes Installable Options for operating systems earlier than Mac OS
9.x.
1
1.10.5 Options
This section describes the printer options and the printer driver settings.
Printer Specific Options Settings
Normally, Installable Options are automatically set according to the bi-directional communications with this
machine. You do not have to change the settings.
Procedure
1
Select the printer using the Chooser and click Setup.
2
Click Configure.
3
Set the option menu items in Installable Options, and click OK.
The Current Printer Description File (PPD) Selected dialog box appears.
The Installable Options list appears.
89
1.10 Installing the Adobe PS Printer Driver (Macintosh)
Setting Printer Environment
For Mac OS X
This section describes Installable Options for Mac OS X.
Procedure
1
Click Printers on the Print Center menu bar, and select Show Info.
2
Select Installable Options, and select the options that have been installed on the
printer.
1
Settings
This section describes the items to set in Installable Options.
Memory
Specify the amount of printer memory.
Hard Disk
Specifies whether1 or not the Hard Disk Drive (optional) is mounted.
When the Hard Disk Drive is mounted on the machine, set to Available.
Paper Source
Sets the tray attached on the machine.
When 1-Tray Unit is selected, Tray 2 can be used.
When 3-Tray Unit is selected, Tray 2, Tray 3 and Tray 4 can be used.
Not Available*
1-Tray Unit
3-Tray Unit
90
1.10 Installing the Adobe PS Printer Driver (Macintosh)
Duplex Module
Sets whether or not the Duplex Unit is mounted.
When the Duplex Unit is mounted on the machine, set to Available.
Side Output Tray
Specify whether an optional Face Up Tray is installed.
Printer Driver Settings
Setting Printer Environment
This item is displayed in Mac OS X only.
1
This section describes the printer driver settings.
Procedure
1
On the File menu of the application, click Print.
2
Select Printer Specific Options.
The Print dialog box appears.
If your operating system is Mac OS X, select Printer Features.
91
1.10 Installing the Adobe PS Printer Driver (Macintosh)
Setting Printer Environment
1
3
92
Specify the functions that you want to set.
1.10 Installing the Adobe PS Printer Driver (Macintosh)
This section describes the settings of the Printer Specific Options list.
The settings that can be selected vary depending on which options have been installed. Make these settings
after specifying the installed options in Configure.
“Printer Specific Options Settings”, (P.89)
Output Destination
Set the destination for output.
Setting Printer Environment
Settings
1
The items that can be selected vary according to whether the optional Face Up Tray has been installed.
Collated
Select whether to collate a multiple-page file per set when they are printed.
If you operating system is Mac OS X, set Copies & Pages.
Feed Separators from
Set the destination where the separators are to be fed to when the transparency
separator function is used.
When Auto is selected, the tray set on the machine is used as the feed destination.
None*
Auto
Tray 1
Tray 2
Tray 3
Tray 4
Print on Separators
Sets whether or not to print the details printed on the transparencies on the separators
as well when the transparency separator function is used.
Blank Separators*
Printed Separators
Bypass Feed Orientation
Specify the paper orientation when printing from the bypass tray. When you set the
short edge of the paper in the bypass tray feed direction, select Landscape setting.
When you set the long edge of the paper in the bypass tray, select Portrait setting.
Bypass Tray Paper Type (Media)
Select the type of paper set in the bypass tray when using the bypass tray.
93
1.10 Installing the Adobe PS Printer Driver (Macintosh)
Setting Printer Environment
1
Print Mode
Specify whether to give priority to the print speed or the image quality.
Output Color
Specify whether to print in color or black.
RGB Color Correction
Specify the coloration of the RGB Color Correction.
Normal This settings is optimized for printing documents that contain text and
graphs, such as a business documents.
Photo This setting is optimized for printing photos or images with gradations.
Select this setting when printing images in RGB.
Presentation This setting is optimized for printing color documents vividly,
such as presentation documents.
Web Pages This setting is optimized for printing Web pages.
OFF The RGB Color Correction is not applied.
RGB Gamma Correction
Specify the brightness of the documents. The higher the value is, the darker the print
becomes.
Screen
You can adjust the image quality. Select Gradation to print photos and gradations
clearly. Select Fineness to print the colors in illustrations, tables, or graphs evenly.
Image Enhancement
Specify whether to use the Image Enhancement function.
Selecting On smooths out boundaries when printing. This reduces jagged edges,
thereby artificially increasing the resolution of the image. When printing an image
(bitmap) composed of coarse halftone dots, smooth color gradation is impossible in
certain situations. In this case, select Off.
Draft Mode
Specify whether to reduce the amount of toner used when printing drafts.
When you select On, the overall printed color becomes lighter. This is best for printing
documents when print quality is not necessary.
Gray Guaranteed
Activate this setting to print documents in black only. This feature does not apply to the
images of the documents.
Custom Paper Image
Specify whether to correct the paper orientation when printing on custom paper.
Select On when printing on custom-size paper when the printing result is shifted at 90
degrees.
94
1.10 Installing the Adobe PS Printer Driver (Macintosh)
Setting Printer Environment
Substitute Tray
Specify what action to take when the paper for the print size is not loaded in the
machine.
Use Printer Settings
Use the printer setting. The settings can be confirmed on the printer control panel.
Display Message
Display paper supply messages on the printer control panel. Printing is unavailable
until paper is supplied.
Use Nearest Size (With Zoom)
Select the nearest paper size and prints. Automatically reduces images for printing,
as necessary.
Use Nearest Size (No Zoom)
Select the nearest paper size and prints in an equal size.
Use Larger Size (With Zoom)
Print in an equal size on paper larger than the original. Automatically reduces
images for printing, as necessary.
Use Larger Size (No Zoom)
Print in an equal size on paper larger than the original.
Feed from Bypass Tray
Uses paper from Tray 5 (Bypass) when there are no more paper in the paper tray
containing the selected paper size.
1
CID Font
Sets CID font.
To set to the mode for handling only CID font, select CID Native. To set to the mode for
handling both CID and OCF fonts, select OCF Compatible.
CID Native*
OCF Compatible
95
Setting Printer Environment
1
1.11
Network Environments
and Example Connections
This printer can be connected to a network through the Ethernet interface.
The printer supports multiple protocols. As a result, one printer can be shared even from
different network environments.
This section describes the different network environments that be set up for the printer.
1.11.1 Network environments
SMB (Windows Network )
Server Message Block (SMB) is a protocol for sharing file or printer on Windows 95/
Windows 98/ Windows Me/ Windows NT 4.0/Windows 2000/Windows XP/
Windows Server 2003. Using SMB, print data or settings can be sent directly to a
printer on the same network without going through the server.
You can print by just activating the SMB port on the printer and registering the printer
on the network on each of the Windows 95/Windows 98/Windows Me/Windows NT
4.0/Windows 2000/Windows XP/Windows Server 2003 operating system (OS).
Also, you can use NetBEUI and TCP/IP as the transport protocol for SMB. You will
need to set up the IP address on the printer and the computer if you are using TCP/IP.
Windows XP/Windows Server 2003 does not support NetBEUI.
Network Print Environment User Guide, Chapter 4 “Printing throug SMB”
LPD (TCP/IP)
The printer supports LPD (TCP/IP) Protocol. The printer connections are as follows:
For Windows 95/Windows 98/Windows Me
TCP/IP Direct Print Utility is a software which allows print data to be sent directly from
Windows 95/Windows 98/Windows Me computer to a printer on the same network without
going through the server. You can print by sending print data directly to the printer from the
Windows 95/Windows 98/Windows Me computer when using the software.
96
1.11 Network Environments and Example Connections
Network Print Environment User Guide, Chapter 1, Printing Using TCP/IP Direct Print Utility"
Setting Printer Environment
To do this, you will need to set up the IP address on the printer and the Windows 95/Windows
98/Windows Me computer.
1
For Windows NT 4.0/Windows 2000/Windows XP/Windows Server 2003
You can print directly from a Windows NT 4.0/Windows 2000/Windows XP/Windows Server
2003/Mac OS X computer through the OS standard LPR port (standard TCP/IP port for
Windows 2000/Windows XP/Windows Server 2003).
To do this, you will need to set up the IP address on the printer and the Windows NT 4.0/
Windows 2000/Windows XP/Windows Server 2003/Mac OS X computer. And once the printer
registered on the Windows NT 4.0/Windows 2000/Windows XP/Windows Server 2003/Mac
OS X computer is shared, you can also print from Windows 95/Windows 98/Windows Me
computers through this printer.
Network Print Environment User Guide, Chapter 3 “Printing throug LPD or Port "
97
1.11 Network Environments and Example Connections
Setting Printer Environment
For UNIX
You can print from a UNIX workstation by using LPR or LP commands.
To do this, you will need to set up the IP address on the printer and the UNIX workstation.
Network Print Environment User Guide, Chapter 6, “Printing from"
1
Port9100 (TCP/IP)
As the printer supports the Port9100 protocol, you can print directly from Windows 2000/
Windows XP/Windows Server 2003 computer through the OS standard TCP/IP port.
To do this, you will need to set up the IP address on the printer and the Windows 2000/
Windows XP/Windows Server 2003 computer.
Network Print Environment User Guide, Chapter 2, “Printing through LPD or Port"
Internet printing
The printer supports Internet Printing Protocol (IPP). As Windows 2000/Windows XP/
Windows Server 2003/Windows Me is installed with the client software needed to output to
IPP printer, you can specify the printer to support IPP using the Add Printer Wizard. Using IPP,
you can print to a remote printer through the Internet or intranet.
Network Print Environment User Guide, Chapter 3, “Internet Printing"
98
1.11 Network Environments and Example Connections
Setting Printer Environment
NetWare
The printer can be used in an environment using Novell NetWare as a network OS.
1
Network Print Environment User Guide, Chapter 5, “Printing throug NetWare"
EtherTalk
As the printer supports EtherTalk protocol, you can print from Macintosh.
Network Print Environment User Guide, Chapter 7, “Printing from a Macintosh Computer"
99
2
Basic Operations
2.1
Main Components and Their Functions ......................................... 102
2.2
Switching On/Off the Power ........................................................... 106
2.3
Canceling Sleep Mode................................................................... 107
2.4
Canceling/Checking Print Jobs ...................................................... 108
2.5
Loading Configuration of Options and Paper Settings of Trays...... 111
2.1
Main Components and
Their Functions
2.1.1 Main Unit
Front view
Basic Operations
2
The illustration on the left shows when a
Duplex Unit (option), a 3 Tray Module
(option) and a Face Up Tray (option) are
installed.
Num
ber
102
Name
Function
1
Output tray
The tray where documents are ejected with the printed side facing
down.
2
Document stopper
Raise this stopper when printing.
3
Control panel
The panel where buttons to operate the printer and the LCD to
display messages are located.
4
Front cover
The cover located on the front of the printer. Open this cover when
replacing consumables in the printer.
5
Trays 1, 2, 3, 4
The trays where paper is loaded. The illustration shows the main
unit with a 3 Tray Module installed.
6
Caster
Used to move the printer. Lock the casters when the printer is set
up.
7
Cover C (lower left cover)
If a paper jam occurs when the printer has more than two paper trays
installed, open this cover to clear the paper jam.
8
Power switch
The switch to turn the printer on and off.
9
Tray 5 (bypass tray)
The tray used when printing with special paper. Special paper such
as transparencies are loaded into Tray 5 (bypass tray).
10
Cover A (left cover)
Open this cover when replacing consumables or clearing paper
jams.
11
Cover B (duplex unit cover) If a paper jam occurs when the optional duplex unit is installed, open
this cover to clear the paper jam.
12
Duplex Unit
Open this unit when replacing consumables or clearing paper jams.
13
Face Up Tray
The tray where printouts are ejected with the printed side facing up.
The Face Up Tray is optional.
2.1 Main Components and Their Functions
Rear view
Inside
25
21
24
18
22
15
20
16
17
23
Basic Operations
19
2
Num
ber
Name
Function
15
USB connector
The connector to connect a USB cable.
16
Network interface
connector
The connector to connect a 10Base-T/100Base-TX Ethernet
interface cable.
17
Parallel interface
connector
The connector to connect a Centronics-compatible interface cable
for a connection with a computer.
18
Cover for printer options
Open this cover when installing options such as additional memory.
19
Exhaust outlet
Releases heat from the inside of the printer. Be sure not to block
the exhaust outlet with anything when setting up the printer.
20
Power cord connector
The connector to connect a power cord.
21
Toner cartridge
The cartridge containing four colors of toner; black (K), cyan (C),
magenta (M), and yellow (Y).
22
Waste toner bottle
The bottle to collect used toner for recycling.
23
IDT unit
The unit to integrate images individually created with each of four
photo conductors into one so that the transfer unit can print the
four-color image on paper.
Drum cartridge
The cartridge containing four photo conductors; black (K), cyan (C),
magenta (M), and yellow (Y).
24
BTR unit
The unit to transfer images created on the drum surface to paper.
25
Fuser unit
The unit to fix toner on paper. Do not touch this unit as it becomes
very hot.
Never touch the area (the fuser unit and surroundings) labeled as “High
Temperature”. You can get burnt. If a sheet of paper is wrapped around the fuser unit
or the roller, do not try to remove it by yourself. You can get injured or burnt. Instead,
switch off the printer immediately, and contact our Customer Support Center or your
dealers.
103
2.1 Main Components and Their Functions
2.1.2 Control Panel
This section describes the control panel.
Basic Operations
2
Num
Name
ber
1
Indicator
2
<Ready> indicator
3
4
<Error> indicator
LCD
5
<Menu> button
6
<Online> button
7
Up/down/left/right/
buttons
Function
Check the position of the cover or tray corresponding to the message
when an error occurs.
When this indicator is on, the printer is ready to receive data from the
computer.
Indicates the abnormal condition of the printer.
Displays the setting menus, status of the printer, messages.
“2.1.3 LCD Indications” (P.105)
Enables the menu control. In this guide, this button is indicated as the
<Menu> button.
Pressing this button switches the printer off-line. When switched off-line,
the printer cannot receive data or perform any printing operation.
Pressing this button again cancels the off-line mode and switches the
printer on-line (the printer is enabled to receive data from the computer).
In this guide, this button is indicated as the <Online> button.
Scroll through the menus, setting items, and option values. In this
guide, these buttons are indicated as the < >< >< >< >
buttons. When using the secure/sample print feature, press the < >
button.
< >< > buttons can scroll faster when kept down. Also pressing the
< > and < > buttons at the same time displays a default value.
● For using the secure/sample print feature, a Hard Disk Drive (optional) is
required.
<Eject/Set> button
Sets the optional value for the menu. This button is also used to print
reports/lists. In this guide, this button is indicated as the <Eject/Set> button.
<Cancel Job> botton
Cancels printing.
<Power Saver> indicator When the indicator is on, the printer is in the sleep mode.
<Power Saver> button When the printer is in the sleep mode, pressing this button cancels the
sleep mode and, when in the standby mode, switches to the sleep mode.
In this guide, this button is indicated as the <Power Saver> button.
●
8
9
10
11
104
2.1 Main Components and Their Functions
2.1.3 LCD Indications
The messages displayed in the LCD differs depending on optional accessories installed and the
settings on this printer.
Print mode screen
When the printer is in the process of printing or in the standby mode, the LCD
displays the print mode screen. The print mode screen displays the following:
Printer status
Printing...
LPD
Port
Basic Operations
The LCD has two types of screens; the [Print Mode] screen to indicate the printer
status, and the [Menu Mode] screen to configure settings for the printer.
2
Tray1
Tray
Name
Description
Printer status
Indicates the status of the printer.
Example: [Please wait], [Printing...]
Port
Indicates the port to be used for receiving data.
Example: [Parallel], [LPD], [NetWare]
Tray
Indicates the tray to be used as a paper source.
Example: [Tray1], [Tray2]
Menu mode screen
This is the screen to configure the settings on the printer.
To display the menu mode screen, press the <Menu> button. The following is the
first screen of the menu mode screen:
Menu
Print Language
For more information about the menu screen, refer to “Chapter 5, Setting Control Panel” (P. 155).
105
2.2
Switching On/Off the
Power
When using this printer, switch on the power to the printer.
When you finish all print jobs for the day or will not use the printer for a long time, switch off
the power.
Basic Operations
2
When the power to the printer is switched off, print data remaining in the printer and information spooled in the
memory will be erased.
2.2.1 Switching On the Power
Procedure
1
Press the power switch on the front left
side of the printer to the < > position.
The power is switched on.
2
When the power is switched on, [Please
wait] will be displayed in the LCD on the
control panel. Confirm that the LCD
displays [Ready to print].
When [Please wait] is displayed, the printer is warming-up. You cannot print while the printer is in this state.
In about 30 seconds, [Ready to print] will be displayed instead, indicating the printer is ready to print.
If an error message is displayed, refer to “6.5 List of Messages” (P.222).
2.2.2 Switching Off the Power
Procedure
1
Check the LCD on the control panel
and confirm that a print job is not being
processed.
2
Press the power switch on the front right
side of the printer to the <{> position.
If an error message is displayed, refer to “6.5 List of
Messages” (P.222).
106
Ready to print
2.3
Canceling Sleep Mode
●
●
●
The sleep mode is indicated as [Power Saver mode] on the control panel of the printer.
For information about the procedure for changing the settings of the sleep mode, refer to “Example: Changing
the power saver mode settings” (P.159).
This printer has the low-power mode besides the sleep mode. The low-power mode automatically decreases the
temperature of the fuser unit to save power consumption if the printer does not receive print data for about 15
minutes. The status of the printer in the low-power mode and the procedure to cancel the mode are the same as
the sleep mode. You cannot change the settings of the low-power mode.
Basic Operations
To save power, the printer is switched to the sleep mode (power saver mode) if it does not
receive print data for a certain period of time.
By default, the printer is switched to the sleep mode if it does not receive print data for 15
minutes. You can set whether the sleep mode is enabled or not and, if enabled, the duration
of time until the printer is switched to the sleep mode between 15 to 240 minutes. The power
consumption in sleep mode is 4 W or less. The transition time from the sleep mode to the
standby mode is about 30 seconds.
If the printer in the sleep mode receives print data, it is automatically released from the sleep
mode and starts printing.
2
Canceling Sleep Mode
The printer is automatically released from the sleep mode when it receives data
from the computer. You can also cancel the sleep mode manually by pressing
the <Power Saver> button on the control panel.
107
2.4
Canceling/Checking Print
Jobs
To abort print jobs, cancel the print instruction for the print jobs from the computer first. If the
print instruction cannot be canceled from the computer, cancel it from the printer.
You can also check the status of print jobs from the computer.
Basic Operations
2.4.1 Canceling Printing From the Computer
This section describes the procedures to cancel print instructions from the
computer.
Canceling with Windows
2
The procedure to cancel print instructions from Windows® is as follows:
Procedure
1
Click [Start], then select [Printers and Faxes] (or [Settings]>[Printers]
depending on OS).
2
3
Double-click the icon corresponding to the printer.
In the window displayed, click any document name and then press
<Delete> key on the keyboard.
Canceling with Embedded Web Server
The print instruction can also be canceled from Embedded Web Server.
For information about Embedded Web Server, refer to the On-line Help for
Embedded Web Server.
108
2.4 Canceling/Checking Print Jobs
2.4.2 Canceling Print Jobs From the Printer
To cancel print jobs in the process of printing from the printer, press the <Cancel
Job> button on the control panel. However, printing of the current page will be
completed.
Canceling all print jobs received on the printer
The process to cancel all print jobs received on the printer is as follows. Through
this procedure, you can interrupt reception of print jobs and empty the buffer.
●
●
Buffer is the location to store data sent from the computer.
You can also empty the buffer by interrupting reception of any more print jobs and printing all the
print jobs spooled in the printer. For more information, refer to “6.8 Ejecting Remaining Data –
When Printing Stops Halfway Through” (P.240).
Basic Operations
Canceling print jobs in the process of printing
2
Procedure
Printing...
Parallel
Tray1
(1) Press the <Online> button.
Off-line
Data exists
(Off-line status)
(2) Press the <Cancel Job> button.
All data
Canceling...
(Printing of all the received print jobs is aborted.)
Off-line
(3) Press the <Online> button.
Ready to print
109
2.4 Canceling/Checking Print Jobs
2.4.3 Checking Print Jobs of Print Instruction
Basic Operations
2
Checking with Windows
The procedure to check print jobs of print instruction is as follows.
Procedure
1
Click [Start], then select [Printers and Faxes] (or [Settings]>[Printers]
depending on OS).
2
3
Double-click the icon corresponding to the printer.
Check [Status] in the displayed window.
Checking with Embedded Web Server
You can also use Embedded Web Server to check print jobs sent to the printer.
For information about Embedded Web Server, refer to the On-line Help for
Embedded Web Server.
110
2.5
Loading Configuration of
Options and Paper
Settings of Trays
When the printer is used as a network printer, the printer driver can automatically load the
configuration of the printer options, and the paper type and size that are specified for a tray
on the control panel. The [Printer Configuration] tab enables this feature.
For Windows NT 4.0, Windows 2000, Windows XP, Windows Server 2003, only users with Administrator’s rights
can change these settings. Without Administrator’s rights, you can only view the settings.
Procedure
1
Click [Start] on the taskbar, select [Printers and Faxes] (or [Settings] >
[Printers] depending on OS), and display the properties dialog box
corresponding to the printer.
2
3
Click the [Options] tab.
Basic Operations
When the printer is used as a local printer, the feature is not available. For a local printer, set the appropriate
settings of the printer driver manually.
2
Click the [Get Information from Printer].
3
4
The printer information is loaded into the printer driver.
4
Click [OK].
The contents of the [Options] tab is updated in accordance with the information obtained from the
printer.
111
2.5 Loading Configuration of Options and Paper Settings of Trays
●
●
Basic Operations
2
112
The paper size and orientation in the [Paper Tray Attributes] list box are automatically updated
with the detected values.
For the paper type in the [Paper Tray Attributes] list box, the paper type set on the control panel is
loaded.
3
Printing
3.1
Printing from the Computer............................................................ 114
3.2
Printing Transparencies ................................................................. 116
3.3
Printing Non-Standard/Long Paper Sizes ...................................... 119
3.4
Changing Paper Types................................................................... 128
3.5
Printing Confidential Documents – Secure Print............................ 130
3.6
Printing after Checking Output Result – Sample Print ................... 135
3.7
Printing E-Mail – E-Mail Print ......................................................... 140
3.1
Printing from the Computer
3.1.1 Flow of Printing
This section describes the basic flow of printing from a Windows® environment.
(This may differ according to the computer or system structure used.)
Start up an application on the computer
For information about the process, refer to the manual of the application program.
Printing
3
If necessary
Check the paper
When you change the type of paper loaded, make either of the following settings
depending on the paper tray used.
●
For Trays 1 to 4
Change the paper type for the appropriate tray on the control panel.
“3.4 Changing Paper Types” (P.128)
●
For Tray 5 (bypass tray)
Change the paper type for Tray 5 (bypass tray) on the printer driver.
On-line Help for the printer driver
Specify printing from an
application
For information about the process, refer to the manual of the application.
If necessary
Cancel the print job
“2.4 Canceling/Checking Print Jobs” (P.108)
If necessary
Eject the print job
“6.8 Ejecting Remaining Data – When Printing Stops Halfway Through” (P.240)
End
114
3.1 Printing from the Computer
3.1.2 Setting Printing Features
You can set most printing features in the tab sheets of the properties dialog box
of the printer driver which appears when printing from the application program, or
that of the printer icon which is installed on your computer. When setting the
features, switch the settings displayed on the properties dialog box by clicking
each tab.
For information about the printer driver options and how to set them, refer to On-line
Help for PCL printer driver.
Printing
“Refer to the On-line Manual/Help” (P.5)
Some features are not available when the settings for the optional accessories installed are not
configured on the [Options] tab. Unavailable features appear in gray and cannot be set.
Properties dialog box
3
Example: For Windows XP
■When you click [Printers and Faxes] in
■When you display the printer Properties dialog
[Start] menu, and display the Properties
dialog box corresponding to the printer
box from the application program
Tab
●
●
Tabs which appear in the [Properties] dialog box vary depending on the item selected from the
[File] menu of the [Printers] window for Windows NT ® 4.0 and Windows® 2000, and from the
[File] menu of the [Printers and Faxes] window for Windows® XP/Windows Server 2003.
For Windows® 98/Windows® Me/Windows 2000/Windows XP/Windows Server 2003, the [Color
Management] tab also appears.
115
3.2
Printing Transparencies
This section describes how to print transparencies.
For information about using Tray 5 (bypass tray), refer to “4.2 Loading Paper” (P.151).
3.2.1 Loading Transparencies
For transparencies, load them into Tray 5 (bypass tray) or Tray 1.
Printing
3
Transparencies with white borders or full color transparencies cannot be used.
Procedure
■ For Tray 5 (bypass tray)
1
Load the transparencies with the side
to be printed facing down.
2
Fan transparencies in small amounts
before loading.
Side to be
printed
■ For Tray 1
The procedure of loading transparencies into Tray 1 is the same as the
procedure for loading standard-size paper. Refer to “4.2.1 Loading paper into
Trays 1 to 4” (P.151).
Also, you must set the paper type for the tray to transparency.
To change the setting, refer to “3.4 Changing Paper Types” (P.128).
116
3.2 Printing Transparencies
3.2.2 Printing Transparencies
To configure the settings for printing transparencies, display the [Tray/Output]
tab and the [Paper] tab. Here, we use Wordpad of Windows XP as an example.
●
●
Depending on the application, the way to display the printer properties dialog box might differ.
Refer to the guide for the application used.
When continuously printing transparencies, the output transparencies may stick to each other. To
prevent this, remove about 20 sheets from the output tray, and then fan well to lower the
temperature.
Printing
Procedure
1
2
3
Select [Print] from the [File] menu.
Check [Select Printer] and then click [Preferences].
3
Click the [Tray/Output] tab, and then select the tray from [Paper
Source].
For transparencies, you can also select [Tray 1] or [Tray 5 (bypass tray) ]. To select Tray 1, you must
set the paper type on the control panel in advance.
“3.4 Changing Paper Types” (P.128)
3
4
4
When selecting [Tray 5 (Bypass)] from [Paper Source], select the paper
type from [Paper Type (Bypass Tray)].
When selecting Tray 1, proceed to step 5.
117
3.2 Printing Transparencies
5
Click the [Paper] tab, and then select any desired size from [Paper
Size].
5
6
Printing
3
118
6
7
From [Output Size], select the transparency size.
Click [Print] to start printing.
3.3
Printing Non-Standard/
Long Paper Sizes
This section describes how to print non-standard paper sizes such as long paper.
The following paper sizes can be used in this printer.
For Tray 1
For 2 to 4
Short edge
(vertical):
182 to 297 mm Feeding
Feeding
direction
For Tray 5 (bypass tray)
Short edge
(vertical):
182 to 297 mm 90 to 305 mm
* Except for the sizes with a short
edge less than 182 mm and a long
edge exceeding 297 mm.
* Except for the sizes with a short
edge less than 182 mm and a long
edge exceeding 297 mm.
●
Long edge (horizontal):
98 to 431.8 mm
Long paper Size:
431.9 to 1200 mm
Non-standard paper sizes of less than 135 mm on a side cannot be output to the Face Up Tray (optional).
Printing long paper sizes (length: 431.9 to 1200 mm) requires memory of 384 MB or more.
Long paper sizes cannot be printed even if [High Resolution] is selected in [Print Mode].
Printing
Long edge
(horizontal): 182 to 431.8 mm
●
Feeding
direction
direction
Long edge
(horizontal): 148 to 431.8 mm
●
Short edge
(vertical):
3
3.3.1 Loading Paper of Non-Standard Sizes
This section describes how to load paper of non-standard sizes.
For Tray 5 (bypass tray)
This procedure loads long-size paper into Tray 5 (bypass tray) as an example.
●
●
To load paper of non-standard sizes other than long-size paper, refer to “4.2.2 Loading Paper into
Tray 5 (bypass tray)” (P.153).
To use the Banner Tray (optional), refer to “When using the Banner Tray (optional)” (P.120).
Procedure
1
Load long-size paper in Tray 5 (bypass
tray) with the side to be printed facing
down and the end of the paper curled
as shown in the figure.
●
●
Curl the end of the long-size paper at the location as
far as possible from the paper supply section.
Otherwise, the curled end may be caught in the paper
supply section, resulting in creased or wrinkled
paper.
Load only one sheet of paper at a time.
Side to be
printed
119
3.3 Printing Non-Standard/Long Paper Sizes
2
Adjust the paper size guide to fit the
long paper size.
To prevent paper jam, remove the output paper from the
tray one sheet by one.
When using the Banner Tray (optional)
Printing
Attaching the Banner Tray (optional) to Tray 5 (bypass tray) allows you to load
up to 10 sheets of paper with a maximum long side length of 1200 mm.
Procedure
3
1
Spread the paper guide of Tray 5
(Bypass tray) to both sides.
2
Insert the Banner Tray into Tray 5
(bypass tray).
Insert it firmly to the end.
3
120
Stand the paper holder against the
printer.
3.3 Printing Non-Standard/Long Paper Sizes
4
Insert long-size paper with the side to
be printed facing down through the
bottom of the paper holder, and push it
right to the end while aligning it with the
paper guide.
Printed side
5
Printing
Insert the end of the paper to the paper
holder with the edge curled as shown in
the diagram.
3
6
Adjust the paper guide of Tray 5
(bypass tray) to fit the paper that is
loaded.
●
●
To prevent paper jams, remove the output paper from
the tray one sheet at a time.
After printing, be sure to remove the Banner Tray and
keep it in a safe place.
For Trays 1 to 4
The procedure for loading non-standard paper sizes into Trays 1 to 4 is the same
as the procedure for loading paper of standard sizes. Refer to “4.2.1 Loading
paper into Trays 1 to 4” (P.151).
121
3.3 Printing Non-Standard/Long Paper Sizes
3.3.2 Setting Non-Standard Paper Sizes
Register non-standard sizes on the printer driver.
To load paper of non-standard sizes into Trays 1 to 4 for printing, you also need
to change the settings on the control panel.
Settings on the control panel
This procedure registers paper with a 200 mm short edge and a 300 mm long
edge as an example.
Printing
3
The printer may be damaged if the correct paper size is not set while printing.
●
●
When loading paper of non-standard sizes into Tray 5 (bypass tray), you do not need to set the
paper type on the control panel.
To change the paper type loaded in Trays 1 to 4, see “3.4.2 Printing after Changing the Paper
Type in Trays 1 to 4” (P.129).
Ready to print
(Printer is in the standby mode.)
(1) Press the <Menu> button.
Menu
Print Language
(2) Press the <
(The menu screen is displayed.)
> or <
> button several times.
Menu
Admin Menu
(3) Press the <
> button.
Admin Menu
Network/Port
(4) Press the <
(The System Administrator Menu is displayed.)
> or <
> button several times to select [Printer Settings].
Admin Menu
Printer Settings
(5) Press the <
Printer Settings
Substitute Tray
To the next page
122
> button.
(Printer setting screen is displayed.)
3.3 Printing Non-Standard/Long Paper Sizes
Continued from the previous page
(6) Press the <
> or <
> button several times to select [Paper Size].
Printer Settings
Paper Size
(7) Press the <
> button.
Paper Size
Tray1Auto *
(8) Press the <
> button.
(9) Press the <
> button.
Paper Size
Tray 1Non-Std
(10) Press the <Eject/Set> button.
Tray 1 Non-Std
X:182 Y:148 *
Printing
Paper Size
Tray 1Auto *
3
(11) Enter the value using < > < > buttons, and move the
cursor using < > < > buttons.
Tray 1 Non-Std
X:200 Y:300
(12) Press the <Eject/Set> button.
Tray 1 Non-Std
X:200 Y:300 *
(13) Press the <Menu> button (the machine will be rebooted
when you change [Auto] to [Non-Std] and vice versa in
step (10).)
Ready to print
(The printer returns to the standby mode.
It can now receive data at any time.)
123
3.3 Printing Non-Standard/Long Paper Sizes
Configuring the printer driver settings
Customize non-standard paper sizes in the [Custom Paper Size] dialog box.
The printer may be damaged if the correct paper size is not set while printing.
The printer may be damaged if the correct paper size is not set while printing.
●
●
Printing
3
For Windows NT 4.0, Windows 2000, Windows XP,Windows Server 2003, only users with
Administrator’s rights can change these settings. Without Administrator’s rights, you can only view
the settings.
As a local printer uses the computer’s form database, configuring settings in the [Custom Paper
Size] dialog box on Windows NT 4.0/Windows 2000/Windows XP/Windows Server 2003 will affect
other printers used by the computer. For network printer, using the form database of the server
with print queue will also affect the shared printer on the same network of other computers. For
Windows 95, Windows 98, Windows Me, defining customized paper sizes for each printer icon will
not affect settings of other printers used by the computer. For network printers, defining customized
paper sizes for each printer icon will also not affect the shared printer on the same network of other
computers.
Procedure
1
Click [Start] on the taskbar, select [Printers and Faxes] (or [Settings] >
[Printers] depending on OS), and display the properties dialog box
corresponding to the printer.
2
3
Click the [Configuration] tab.
Click [Custom Paper Size].
3
The [Custom Paper Size] dialog box is displayed.
124
3.3 Printing Non-Standard/Long Paper Sizes
4
Select the desired custom definition from the [Details] list box.
4
5
6
In the [Change Setting For] group, specify the short edge and long
edge.
You can either enter the value with the keyboard or use the [ ] and [ ] buttons on the screen.
The short edge cannot be longer than the long edge even if it is still within the allowable range.
Conversely, the long edge cannot be shorter than the short edge even if it is still within the allowable
range.
6
Printing
5
3
To name the paper size, check the [Name the Paper Size] check box,
and then enter the name at the [Name] text box.
You can enter up to 14 characters for the name.
7
8
9
10
If necessary, repeat steps 4 to 6 to set the paper size.
Click [OK].
Click [Apply] on the [Configuration] tab.
When you customize custom sizes for Trays 1 to 4 on the control panel,
click [Get Information from Printer] on the [Options] tab.
The printer setting information is loaded into the printer driver.
“2.5 Loading Configuration of Options and Paper Settings of Trays”(P.111)
11
Click [OK].
125
3.3 Printing Non-Standard/Long Paper Sizes
3.3.3 Printing on Non-Standard Paper Sizes
The procedure to print on non-standard paper sizes is as follows.
Here, we use Wordpad in Windows XP as an example.
Depending on the application program, the way to display the printer properties dialog box might
differ. Refer to the guide of the application program used.
Procedure
Printing
3
1
2
3
4
Select [Print] from the [File] menu.
Check [Select Printer] and then click [Preferences].
Click the [Tray/Output] tab.
Select the appropriate tray from [Paper Source].
4
5
126
5
For Tray 5 (bypass tray), select the paper type from [Paper Type
(Bypass Tray)].
6
Click the [Paper] tab.
3.3 Printing Non-Standard/Long Paper Sizes
7
Select the document size from [Paper Size].
7
8
Printing
8
From [Output Size], select the non-standard paper size which was
registered.
9
Click [Print] to start printing.
3
127
3.4
Changing Paper Types
When changing the paper type in use, you also need to change the paper type setting.
The procedure for setting the paper type differs between Trays 1 to 4 and Tray 5 (bypass tray).
Here, we use Wordpad in Windows XP as an example.
3.4.1 Printing after Changing the Paper Type in
Tray 5 (bypass tray)
●
Printing
●
●
●
3
Depending on the application program, the way to display the printer properties dialog box might
differ. Refer to the guide for the application program used.
For information about using Tray 5 (bypass tray), refer to “4.2 Loading Paper” (P.151).
To print on special paper using Trays 1 to 4, “3.4.2 Printing after Changing the Paper Type in
Trays 1 to 4” (P.129).
For information about paper that can be used, refer to “4.1 About Paper” (P.146).
Procedure
1
2
3
4
5
Load special paper in Tray 5 (bypass tray).
Select [Print] from the [File] menu.
Check [Select Printer] and then click [Preferences].
Click the [Tray/Output] tab.
From [Paper Source], select [Tray 5 (Bypass)].
5
6
6
7
128
Select the paper type from [Paper Type (Bypass Tray)].
Click [Print] to start printing.
3.4 Changing Paper Types
3.4.2 Printing after Changing the Paper Type in
Trays 1 to 4
When changing paper type in Trays 1 to 4, you need to change the paper type
for the tray on the control panel.
●
●
●
Here, we explain printing on A4-size heavyweight paper which is loaded in Tray
1 as an example.
Procedure
1
2
3
4
Printing
●
Depending on the application program, the way to display the printer properties dialog box might
differ. Refer to the guide for the application program used.
For information about using Trays 1 to 4, refer to “4.2 Loading Paper” (P.151).
To print on special paper using Tray 5 (bypass tray), refer to “3.4.1 Printing after Changing the
Paper Type in Tray 5 (bypass tray)” (P.128).
For information about paper that can be used, refer to “4.1 About Paper” (P.146).
3
Select [Print] from the [File] menu.
Check [Select Printer] and then click [Preferences].
Click the [Tray/Output] tab.
Select Tray 1 from [Paper Source].
4
5
Click [Print] to start printing.
129
3.5
Printing Confidential
Documents – Secure Print
The Secure Print feature can be used when this printer has a Hard Disk Drive (optional).
The Hard Disk Drive (optional) has a risk of failure. It is recommended to make a backup of important documents
stored on the Hard Disk Drive.
About the Secure Print feature
Printing
You can add security (passwords) to your print data on the computer, send it to
the machine for temporary storing; and then print out the data using the control
panel on the machine. This feature is known as Secure Print. You can also store
print data in the printer without security. Saving the frequently-used document in
the printer allows you to print directly from the printer without having to send print
instructions from the computer.
Send
data
3
●
●
●
Use control panel
to output data
You may select whether to delete the secure print data after printing during the steps for executing
the secure print feature. Refer to “3.5.2 Printing Secure Print Jobs, Operation on the control
panel” (P.133).
To delete any secure print data which is no longer necessary, refer to “5.2.2 The System
Administrator Menu, Init/Del Data” (P.189).
Secure Print data cannot be output when [Secure Print] is set to [Disable] on the control panel.
“Secure Print” (P.183)
130
Store in
printer
3.5 Printing Confidential Documents – Secure Print
3.5.1 Registering User ID and Password
To use the Secure Print feature, you need to set the user ID and password
beforehand.
Procedure
Click [Start] on the taskbar, select [Printers and Faxes] (or [Settings] >
[Printers] depending on OS), and display the properties dialog box
corresponding to the printer.
2
3
Click the [Configuration] tab.
Select [Secure Print/Sample Print User ID] from the [Print Features] list
box.
Printing
1
3
3
4
5
4
Enter the user name consisting of up to eight alphanumeric characters
in the [Secure Print/Sample Print User ID] text box.
5
When setting a password, enter the password in the [Password] text
box.
You can enter a password consisting of up to four digits.
6
Click [OK].
131
3.5 Printing Confidential Documents – Secure Print
3.5.2 Printing Secure Print Jobs
This section describes how to print Secure Print jobs.
First, set and send the Secure Print job at the computer. Then, execute the print
instruction at the printer to print out the data.
At the computer
Here, we use Wordpad of Windows XP as an example. The procedure is the
same when using other OSs.
Printing
3
Depending on the application program, the way to display the printer properties dialog box might
differ. Refer to the guide of the application program used.
Procedure
1
2
3
4
Select [Print] from the [File] menu.
Check [Select Printer] and then click [Preferences].
Click the [Tray/Output] tab.
Click [Secure Print/Sample Print].
4
The [Secure Print/Sample Print] dialog box is displayed.
132
3.5 Printing Confidential Documents – Secure Print
5
Select [Secure Print] from the [Job Type] drop-down list box.
5
6
From [Retrieve Document Name] in [Secure Print Settings], select
either [Enter Document Name] or [Auto Retrieve].
If you select [Enter Document Name], enter the name equivalent to 12 bytes (12 characters) in the
[Document Name] text box. If the document name exceeds 12 bytes, the remaining is truncated.
If you select [Auto Retrieve], you can enter up to 12 alphanumeric characters for document name.
7
8
Printing
6
3
Click [OK].
Click [Print] in the [General] tab to start printing.
Operation on the control panel
This section describes the procedure to output print data stored inside the
machine using the Secure Print feature.
You can also delete the secure print data stored in the printer without printing. For more information,
refer to “Stored Documents” (P.190).
Procedure
Ready to print
(1) Press the <
> button.
Print Menu
Secure Print
(When an optional Media Print kit is installed, [Media Print] is displayed. If so,
press the < > or < > button several times to select [Secure Print].)
(2) Press the < > button.
Select User ID
1001.yamada
(3) Press the <
> or <
> button several times to select the user ID.
To the next page
133
3.5 Printing Confidential Documents – Secure Print
Continued from the previous page
Select User ID
1005.User1
(4) Press the <
> button.
Enter Password
Press Set [ ]
(5) Move the cursor with the < > button, and enter the password
(within four digits) with the < > or < > button.
Printing
Enter Password
Press Set [1111]
(6) Press the <Eject/Set> button.
Select Document
All documents
3
(7) Press the <
document.
> or <
> button several times to select the
Select Document
1.Report
(8) Press the <
> button.
1.Report
Print & Delete
(9) Press the <
(If you delete the secure print data after
printed, Press the < > button, and then the
<Eject/Set> button.)
> button.
1.Report
Print & Save
(10) Press the <
> button.
1.Report
Use Set to Print
(Printing starts.)
(11) Press the <Eject/Set> button.
1.Report
Printing..............Tray1
1.Report
Use Set to Print
(Printing ends.)
(12) Press the <Menu> button.
Ready to print
●
●
●
134
(The printer returns to the standby
mode.)
The user ID, the user name which you specified in [Secure Print/Sample Print User Name] on the
[Configuration] tab of the PCL printer driver is displayed (up to eight characters).
For the password, enter [Password] for secure print which you specified on the [Configuration] tab of the
PCL printer driver. When you have not set [Password], you need not enter the password on the control panel.
As the document name, the name which you have specified in [Retrieve Document] on the [Secure Print/
Sample Print] dialog box of the PCL printer driver is displayed (up to 12 bytes).
3.6
Printing after Checking
Output Result
– Sample Print
The Sample Print feature (checking the output and then printing the remaining copies) can
be used when this printer has a Hard Disk Drive (optional).
The Hard Disk Drive (optional) has a risk of failure. It is recommended to make a backup of important documents
stored on the Hard Disk Drive.
About the Sample Print feature
You can delete the sample print data that is no longer necessary, using the control panel. Refer to
“3.6.2 Printing Sample Print Jobs, Operations on the control panel” (P.138).
Printing
When printing multiple copies of a document, this feature saves the print data on
Hard Disk Drive and then prints out only one copy first. You can start printing the
remaining copies on the control panel after checking the print result. This feature
is known as Sample Print.
3
OK
Print out remaining sets
using the control panel
Print only first set
Send
data
Store in
printer
Stop printing using
the control panel
NG
135
3.6 Printing after Checking Output Result – Sample Print
3.6.1 Setting Sample Print Jobs
To use the Sample Print feature, you need to set the user ID beforehand.
Procedure
Printing
1
Click [Start] on the taskbar, select [Printers and Faxes] (or [Settings] >
[Printers] depending on OS), and display the properties dialog box for
the printer.
2
3
Click the [Configuration] tab.
3
Select [Secure Print/Sample Print User ID] from the [Print Features] list
box.
3
4
5
136
4
Enter the user name consisting of up to eight alphanumeric characters
in the [Secure Print/Sample Print User ID] text box.
5
Click [OK].
3.6 Printing after Checking Output Result – Sample Print
3.6.2 Printing Sample Print Jobs
This section describes how to print sample print jobs.
First, set and send the sample print job at the computer. Then, execute the print
instruction at the printer to print out the data.
At the computer
Here, we use Wordpad in Windows XP as an example.
Procedure
1
2
3
4
5
Printing
Depending on the application program, the way to display the printer properties dialog box might
differ. Refer to the guide for the application program used.
3
Select [Print] from the [File] menu.
Check [Select Printer] and then click [Preferences].
Click the [Paper] tab, and set [Copies] to at least two.
Click the [Tray/Output] tab.
Click [Secure Print/Sample Print].
5
The [Secure Print/Sample Print] dialog box is displayed.
137
3.6 Printing after Checking Output Result – Sample Print
6
Select [Sample Print] from the [Job Type] drop-down list box.
When you set the number of copies to be printed to at least two, [Sample Print] is displayed.
6
7
Printing
3
7
From [Retrieve Document Name] in [Sample Print Settings], select
either [Enter Document Name] or [Auto Retrieve].
If you select [Enter Document Name], enter the name equivalent to 12 bytes (12 characters) at the
[Document Name] text box. If the document name exceeds 12 bytes, the remaining is truncated.
If you select [Auto Retrieve], you can enter up to 12 alphanumeric characters for the document name.
8
9
Click [OK].
Click [Print] in the [General] tab to start printing.
Operations on the control panel
This section describes the procedure to output/delete print data stored inside the
printer using the Sample Print feature.
Procedure
Ready to print
(1) Press the <
> button.
Print Menu
Secure Print
(When an optional Media Print kit is installed, [Media Print] is displayed.)
(2) Press the < > or < > button some times.
Print Menu
Sample Print
(3) Press the <
To the next page
138
> button.
3.6 Printing after Checking Output Result – Sample Print
Continued from the previous page
Select User ID
2002.yamada
(4)Press the <
> or <
> button several times to select the user ID.
Select User ID
2005.User1
(5)Press the <
> button.
(6) Press the < > or < > button several times to select the document
(to select all documents, press the < > button).
Select Document
1.Report1
(7)Press the <
Printing
Select Document
All documents
3
> button.
1.Report1
Print
(To delete the sample print data saved, press the <
select [Delete], and then press the <
(8) Press the <
> or <
> button to
> button and <Eject/Set> button.)
> button.
1.Report1
Use Set to Print
(9) Press the <Eject/Set> button.
1.Report1
Printing..............Tray1
Select Document
1.Report1
(Printing starts)
(Printing ends)
(10) Press the <Menu> button.
Ready to print
●
●
(The printer returns to the standby
mode.)
The user ID, the user name which you specified in [Secure Print/Sample Print User Name] on the
[Configuration] tab of the PCL printer driver is displayed (up to eight characters).
As the document name, the name which you have specified in [Retrieve Document] on the [Secure
Print/Sample Print] dialog box of the PCL printer driver is displayed (up to 12 bytes).
139
3.7
Printing E-Mail
– E-Mail Print
E-mail can be sent to this printer from the computer when this printer is connected to the
network and configured for TCP/IP communications and mail reception, it also has a Hard
Disk Drive (optional).
You can print the E-mail itself as well as the attached TIFF or PDF documents with this
printer.
This feature is known as e-mail Printing.
The Hard Disk Drive (optional) has a risk of failure. It is recommended to make a backup of important documents
stored on the Hard Disk Drive.
Printing
Automatically
printed
Mail
3
Automatically
printed
3.7.1 Setting up the Environment for E-mail
Printing
To use the e-mail Print feature, you need to configure the settings for the feature
also on each server (SMTP server or POP3 server) in your network environment.
Setting up the mail environment incorrectly may cause serious trouble on the network. The network
administrator should set up the mail environment.
Setting up the network environment
●
User account registration
Setting up the mail environment.
Using Embedded Web Server, set the Port Status, Machine e-mail Address,
TCP/IP environment, and mail server settings.
140
3.7 Printing E-Mail – E-Mail Print
Configure the setting of the following items in the properties dialog box to match
the mail environment.
Be sure to click [Apply New Settings] to reboot the printer after completing the settings.
*: default value
Item
Setting item
Description
Setting value
Settings to define
based on the
protocol
SMTP POP3
Machine Details
Enter an e-mail
address within 128
characters that can
be registered as an
e-mail address.
{
{
Sets to enable receiving of e-mails.
-
{
{
Sets the host name of this machine.
Enter any
characters within 32
bytes
{
{
When set to ON, the machine automatically
obtains the DNS server address from the
DHCP server.
●
{
-
Sets the administrator’s e-mail address.
Machine
Sets the e-mail address of this machine.
E-mail Address This address is displayed at the [From] box
on e-mail.
Port Status
Receive
E-mail
Protocol Settings Host Name
>TCP/IP
Get DNS
Address
●
Off: Manual*
On: DHCP
Printing
Administrator
E-mail
Address
DNS Address Sets the DNS server address.
1-3
xxx.xxx.xxx.xxx
{
-
DNS Name
Enter a domain
name within 255
bytes using
alphanumeric
characters, . and -.
{
-
Sets the DNS domain name.
3
141
3.7 Printing E-Mail – E-Mail Print
Item
Setting item
Description
Setting value
Settings to define
based on the
protocol
SMTP POP3
SMTP*
POP3
{
{
None
Auto Mail
Contents
*Basic Headers
and Contents
All Headers and
Contents
{
{
Enter a server
address within 128
bytes using
alphanumeric
characters, . and -.
-
{
POP3 Server Sets the interval to check mail in the POP3 1~120 minutes
Check Interval server.
10 minutes*
-
{
POP User
Name
Sets the user name for connecting to the
POP3 server. Only one user can be set.
-
{
POP User
Password
Set the password for each POP user name Enter a password
and enter the same password again at the within 64
characters.
[Confirm Password] box.
-
{
SMTP
Sending
Authorization
Set [POP before SMTP] to On when
authorizing the user in the POP server
before sending the mail to the SMTP
server.
{
-
{
-
Protocol
Receiving
Settings > E-Mail Protocol
Print Mail
Headers and
Contents
Sets how to receive e-mail messages.
●
●
Sets to insert the header of the e-mail onto
the attached documents (TIFF, PDF) when
printing. Select [All Headers and Contents]
when you want to print all items of the email.
●
●
●
●
Printing
3
POP3 Server
Address
Sets the POP3 server address for
receiving the mail.
SMTP Server Sets the SMTP server address for
Address
receiving e-mail.
142
Enter a mail
address within 64
characters that can
be registered as an
e-mail address.
-
Enter a server
address within 128
bytes using
alphanumeric
characters, . and -.
3.7 Printing E-Mail – E-Mail Print
3.7.2 Sending E-mail
Attached files that can be sent
Files that can be sent as attached documents are as follows.
● PDF file
● TIFF file
This section describes how to send e-mail to the printer from the computer using
Outlook Express as an example.
1
Using your e-mail software, create a mail and then attach a TIFF or
PDF document, if available.
Printing
Procedure
3
Only the text format file can be used for the text body of e-mail. In your e-mail application, set the
format of the text for the e-mail to text format.
●
●
2
3
If the file format of the attached document is not .tif or .pdf, the attached document may be printed
incorrectly.
Up to 31 documents can be attached.
Enter the e-mail address of this printer in the destination field.
Send the e-mail.
After the e-mail has been received at the printer, it will be automatically printed.
The e-mail itself and the attached document will be printed at the printer based on the following
settings:
● E-mail itself: Default values of the PCL printer driver for this printer that is installed on the
computer.
● Attached TIFF documents: Default values of the logical printer settings for [Memory Settings] of
[TIFF] in [Emulation Settings] of Embedded Web Server.
● Attached PDF document: The values specified in [PDF] under the Mode Menu of the control panel.
143
3.7 Printing E-Mail – E-Mail Print
3.7.3 Precautions for Sending Documents by
E-mail
Precautions on security
Printing
3
The e-mail is sent through the Internet which is connected to computers all over
the world. So, you need to pay much attention to security to prevent the e-mail
from being intercepted or altered by a third party.
It is recommended to use other secure methods when sending confidential data.
Also, it is recommended not to carelessly disclose the e-mail address of the
printer to a third party to prevent unnecessary mail from being received.
Setting the domain from which e-mail can be received
You can set this printer so that it receives e-mail from a specified domain only.
For how to set the domain from which the mail can be received, refer to the On-line
Help of Embedded Web Server.
Precautions for using the e-mail feature with this printer
connected to the Internet
●
●
●
●
●
●
144
If you do not make a flat-rate contract with the Internet provider, the calling rate
is charged every time the printer periodically retrieves the data received.
Use this machine in the IP-masqueraded environment. If you use this machine
with global IP address assigned, the operation cannot be guaranteed.
When receiving e-mail through POP, be sure to apply for an e-mail account for
this printer. Using the e-mail account shared with other users may cause
troubles.
If the line speed of the Internet is low, it may take a long time to receive large
data such as the images.
Some providers permit receiving data through SMTP. If so, thorough
coordination with the provider is required.
When installing this machine in the environment that MTA is set in the private
segment, you need to configure settings for this printer based on the operation
mode.
4
About Paper
4.1
About Paper ................................................................................... 146
4.2
Loading Paper................................................................................ 151
4.1
About Paper
Using the improper paper may cause paper jams, deterioration in print quality, failure, or
damage to the printer. To get the most out of this printer, it is recommended to use the
paper introduced here.
If you want to use the paper other than that recommended, contact our Customer Support
Center or your dealers.
4.1.1 Paper that can be used
Standard of the paper that can be used
About Paper
4
When printing on commercially available paper (called plain paper), use the one
that meets the standards below. However, to get a sharper print result, it is
recommended to use the standard paper introduced in the next section.
Paper tray
Standard
(G.S.M/Ream weight)
Loading capacity (sheets)
Paper tray 1
G.S.M.: 60 to 216 g/m2
500 sheets (P paper)/54 mm or
less
Paper tray 2 to 4
(Option)
G.S.M.: 63 to 175 g/m2
500 sheets (P paper)/54 mm or
less
Tray 5 (bypass tray)
G.S.M.: 60 to 216 g/m2
●
●
●
●
When smaller than A4 and
Letter size, 180 sheets (P
paper)/18 mm or less
When larger than A4 and
Letter size, 100 sheets (P
paper)/10 mm or less
If the paper size or type used for printing is different from the selection on the printer driver, or if
the paper is loaded in an unsuitable paper tray, it may cause paper jam. To print correctly, select
the correct paper size and type, as well as the paper tray.
Moisture derived from water, rain, or steam may remove the image from the printed side. For
details, contact our Customer Support Center or your dealers.
G.S.M. is the weight of a sheet of paper with an area of 1 m2. Ream weight refers to the weight of
1,000 sheets of paper of size 788 × 1,091 mm.
146
4.1 About Paper
Standard paper
The standard paper suitable for this printer is as follows.
Paper
P paper
G.S.M.
(unit: g/m2)
64
Paper type selection
Printer
driver
Control
panel
Plain
Plain
Features of the paper
and precautions for use
Semi-heavyweight for in-house materials or
general office use.
Ordinary paper
Our recommended paper is as follows.
G.S.M.
(unit: g/m2)
Paper type selection
Printer
driver
Control
panel
Features of the paper
and precautions for use
C2
70
Plain
Plain
Paper with less ink penetration for general
office use that is suitable for black and white
as well as color printing.
C2r
70
Recycled
Recycled
Recycled paper, mixed with 70% used
paper pulp, that is suitable for black and
white as well as color printing.
Green100
67
Recycled
Recycled
Recycled paper that consists of 100% used
paper pulp with minimum necessary
whiteness (with EcoMark).
About Paper
Paper
4
147
4.1 About Paper
Printable paper types and settings (paper type selection)
About Paper
4
148
Paper type selection
G.S.M
(unit:g/m2)
Printer driver
Control panel
Plain
60 to 80
Plain
Plain
Recycled
paper
60 to 80
Recycled
Recycled
Bond
paper
81 to 105
Bond
Bond
Heavyweig
ht paper
106 to 169
Heavyweight 1
Heavyweight 1
170 to 216
Heavyweight 2
Heavyweight 2
106 to 169
Coated 1
Coated 1
170 to 216
Coated 2
Coated 2
Transpare
ncies
-
Transparency
Transparency
Labels
-
Labels
Labels
Envelopes
-
Envelope
Envelope
Paper type
Coated
paper
Description
Regular paper used in-house for normal
office documents
Regular recycled paper used in-house for
normal office documents
Regular medium weight paper widely
used for color printing for normal office
documents
Regular heavyweight paper widely used
for color printing of posters or catalogs
Coated paper used for printing posters or
catalogs
Transparent film used for giving
presentations on an overhead projector
Adhesive labels that can be pealed off the
backing sheet after something has been
printed on them.
4.1 About Paper
4.1.2 Paper that cannot be used
Do not use the following paper.
Contact our Customer Support Center or your dealer if you have any questions.
●
●
Transparency with white
border like FUJI XEROX
Full Color Transparency
Example: V556, V558,
V302
Transparency for an ink
jet printer
●
●
●
●
●
●
Digital coat glossy type
Heat-sensitive paper
No. 2 registered drawing
Tracing paper
Cloth transfer/color cloth transfer paper
High class Japanese paper for color copy
●
●
●
●
Paper only for an ink jet printer
Black or dark color paper
Electric spectaculars film
Aqua-transfer paper
●
●
●
Xerographic photo paper
Tucked film
Coated paper of 126 g/m2 or less
4
J, J-D coated paper is available.
●
●
●
●
●
●
●
●
●
●
●
●
●
Paper that is too thick or thin
Carbon paper
Envelopes with concavity and convexity
or catches
Wrinkled, creased, or torn paper
Paper which was printed once by an other
printer or copy machine
Treated colored paper
Paper which is tightly stuck together due
to static electricity
Paper with non-smooth face such as
rough printing paper or fibered paper
Specially-coated paper
Paper with staples, clips, ribbons, or tape
Bonded or glued paper
Paper which has been previously printed
with ink that will change in quality at
155°C
Damp or wet paper
●
About Paper
Full color
transparency
Envelopes on which the
sealing part is sticky with
glue
Sticky with glue
●
Labels on which the mat
board is not entirely
covered by the labels
●
Pre-cut labels which are
loaded in the orientation
as shown in the figure
Not entirely covered
Can be used when loading it
into Tray 5 (bypass tray) in
orientation.
●
Pre-cut
When using acid paper, the print result
may blur. If so, change the paper to acidfree paper.
149
4.1 About Paper
4.1.3 Storage and Handling of Paper
Pay attention to the following when storing paper.
●
Store paper in a cabinet or a place free from moisture. If the paper absorbs
moisture, it may cause paper jams or deterioration in image quality.
●
Store the remaining paper wrapped in its package. It is recommended to put a
moisture-exclusion agent together in the package.
●
To prevent paper from being creased or curled, lay it down on its side rather
than standing it up.
About Paper
4
150
Observe the following precautions before loading the paper into the tray.
● Do not use a paper stack which was once scattered and collected up.
● Do not use creased or wrinkled paper.
● Do not use waved or curled paper.
● Do not load different paper types together.
● Fan transparencies and labels well before using them. Otherwise, paper jams
may occur or multiple sheets may be sent together.
4.2
Loading Paper
4.2.1 Loading paper into Trays 1 to 4
This section describes how to load paper into Trays 1 to 4. The same steps are
applied when changing the paper size in Trays 1 to 4.
●
●
When a paper tray runs out of paper during printing, a message will appear on the control panel
display. After feeding the paper, printing will be automatically restarted.
For information about printing non-standard paper size, refer to “3.3 Printing Non-Standard/
Long Paper Sizes” (P.119).
Procedure
About Paper
1
Pull out the paper tray until it no longer
comes out.
4
2
Adjust the head of the paper guide to
the desired paper size scale by using
the two clips on the paper guide (1, 2).
●
●
Check that the paper guide is properly fixed into the
hole at the scale. If the paper guide is not adjusted to
the size scale, the paper size may not be automatically
detected. If so, move the paper guide and then adjust
it to the scale again.
Be sure to set the three directional paper guides to
the paper size scale. Do not load paper that has a
width that is smaller than that to which the guides can
be set. The printer may be damaged if they are not set
correctly.
■For Tray 1
■For Trays 2 to 4
151
4.2 Loading Paper
3
Align four corners of a paper stack, and
load it in the tray with the side to be
printed facing up.
●
●
4
About Paper
4
Slowly push the paper tray right back
in.
Be careful not to push the paper tray too strongly.
5
If you changed the type of the paper to
be loaded, change the paper type on
the control panel.
●
●
●
152
Do not load different paper types together. It may
cause paper jams.
Do not load paper exceeding the maximum fill line.
For information about paper type, refer to “4.1 About Paper” (P.146).
For information about paper type settings refer to “3.4 Changing Paper Types” (P.128).
After changing the paper type, refer to “2.5 Loading Configuration of Options and Paper Settings
of Trays” (P.111) and obtain configuration information for the printer through the printer driver.
4.2 Loading Paper
4.2.2 Loading Paper into Tray 5 (bypass tray)
To print postcards, envelopes, or non-standard size paper which cannot be
loaded in Trays 1 to 4, use Tray 5 (bypass tray). This section describes how to
load paper into Tray 5 (bypass tray).
Set paper type in the [Tray/Output] tab of the printer driver.
Procedure
Open Tray 5 (bypass tray).
2
Check the position of the paper guide
located in front of Tray 5 (bypass tray).
3
Insert paper with the side to be printed
facing down, and push it right to the
end.
If necessary, pull out the extension tray. The extension
tray can be pulled out in two stages.
●
●
●
About Paper
1
4
Different size or type paper cannot be loaded together.
It may cause paper jams.
Do not load paper exceeding the maximum fill line. It
may cause paper jams or machine breakdown.
If thick paper such as postcards are curled, uncurl
them before loading. However, if paper is too curled
or creased, it may cause paper jams.
Loading of postcard, envelope, or long-size paper varies
individually. Refer to “3.2 Printing Transparencies”
(P.116) and “3.3 Printing Non-Standard/Long Paper
Sizes” (P.119).
153
4.2 Loading Paper
About Paper
4
4
Adjust the paper size guide to fit the
paper loaded.
5
If you changed the type of paper loaded, change the paper type on the
printer driver.
To print without using the printer driver, like printing from a medium, set [Paper Type] on the control
panel. For more information, refer to “Paper Type” (P.185).
“4.1 About Paper” (P.146)
4.2.3 About the Auto Tray Switch
If you select [Auto] from the [Paper Source] menu on the [Tray/Output] tab in the
[Properties] dialog box of the printer driver and specify printing, the printer
selects the appropriate tray based on the size and orientation of the document to
be printed. This is called Auto Tray Switch.
If there are multiple appropriate trays in Auto Tray Switch mode, the tray is
selected according to the priority for paper type. If multiple paper types have the
same priority, the tray is selected according to the priority for the tray.
●
●
●
●
●
●
154
Auto Tray Switch is not applied to the paper type for which the priority for the paper type is not set.
If no appropriate tray is found in Auto Tray Switch mode, a message prompting you to feed paper
will appear. You can also select the setting for printing to the paper of almost the same size as the
document or larger size paper without displaying this message. (Replacement of paper)
When a paper tray runs out of paper during printing, the printer selects another tray with the same
paper size and orientation to continue printing. In this case, the printer does not switch to the tray
with the paper type for which [Paper Priority] is set to [Off].
Set the priority for paper type by using the control panel. Set the priority for paper tray by using the
control panel or Embedded Web Server.
“5.2.2 The System Administrator Menu” (P.171)
“1.4.2 Using Embedded Web Server” (P.41)
5
Setting Control Panel
5.1
Outline of Common Menu .............................................................. 156
5.2
Description of Common Menu ....................................................... 161
5.3
List of Common Menu .................................................................... 192
5.1
Outline of Common Menu
5.1.1 About Menu Structure
The Menu consists of “Common Menu” and “Mode Menu”.
Mode Menu
Common Menu
Ready to print
Press the
<Menu> button
Setting Control Panel
5
Print Language
HPGL
HP-GL
Extended settings
Menu
Report/List
Print Language
PDF
PDF
Extended settings
Menu
Meter Reading
Print Language
PCL
PCL
Extended settings
Menu
Print Language
Menu
Quick Setup
Menu
Admin Menu
The Common Menu is the screen to configure common settings for the entire
print mode.
The Common Menu is configured as follows:
●
Common Menu > Menu item > Setting item > Optional values
The chart shown below is a part of the Common Menu configuration.
Menu
Meter Reading
Admin Menu
Network/Port
Parallel
Meter 1
Meter 2
Meter 3
Port Status
Enable
Disable
Print Mode
Auto
PS
System Settings
Common Menu
156
Menu item
Setting item
Optional values
5.1 Outline of Common Menu
The Common Menu has the following menu items.
Common Menu
Print Language
Description
The menu for setting HP-GL, HP-GL/2, PDF, and PCL emulation mode, and for
configuring the settings related to functions to directly print PDF files. Setting
operation is enabled in the Mode Menu.
●
Report/List
For information about setting items for HP-GL, HP-GL/2 emulation, refer to the HP-GL,
HP-GL/2 Emulation Settings Guide supplied with this printer.
The menu for printing out and checking the printer’s internal information such as
the current settings for emulation mode when optional accessories are
installed, printer settings, error history, job history, font, output summary.
Meter Reading
The menu for displaying the number of printed sheets in the LCD on the control
panel.
“7.7 Check Meter” (P.267)
Admin Menu
The menu for configuring the settings for network/port, system (such as alarm
sound, power saver mode), printing, memory, image quality adjustment,
printer setting values, initialization of Hard Disk Drive, removal of form data.
●
●
You cannot configure any settings for ports set to [disable].
For information about setting items for the System Administrator Menu, refer to
“5.2.2 The System Administrator Menu” (P.171). For information about the basic
operation, refer to “5.1.2 Changing Common Menu Settings” (P.158).
Setting Control Panel
“7.4 Printing Report/List” (P.253)
5
157
5.1 Outline of Common Menu
5.1.2 Changing Common Menu Settings
Basic operation
Press the buttons shown below to display menu screen, or shift layers of each
menu to set the printer features.
Ready to print
To display the menu setting screen
Press the <Menu> button in the standby mode.
Setting Control Panel
Menu
Print Language
To move between items
Menu
Admin Menu
To move between layers
Press the < > button to move to the layer
below.
Press the < > button to return to the layer
above.
Press the <
Admin Menu
Network/Port
> or <
> button.
5
Port Status
Enable
Port Status
Enable *
To apply the setting
Press the <Eject/Set> button to
display “*” following the current
option value, indicating the applied
setting.
To return to the standby mode
Press the <Menu> button.
Ready to print
To change the setting value you applied by pressing the <Eject/Set> button (the value followed by
“*”), you have to follow the setting procedure again.
To reset the setting to its default value
Display the setting item you want to reset, press the < > + < > buttons.
When the process to reset the setting completes, the factory default setting is
displayed. Press the <Eject/Set> button to apply the value.
158
5.1 Outline of Common Menu
Example: Changing the power saver mode settings
This section describes, as an example, how to set the time to switch the printer
to the power saver mode to [60Mins].
Procedure
Ready to print
(Printer is in the standby mode.)
(1) Press the <Menu> button.
Menu
Print Language
(The menu screen is displayed.)
(2) Press the <
> or <
> button several times.
(3) Press the <
> button.
Admin Menu
Network/Port
(The System Administrator Menu is displayed.)
(4) Press the <
> or <
> button several times to select [System Settings].
Admin Menu
System Settings
(5) Press the <
> button.
System Settings
Alert Tone
(6) Press the <
Mode].
Setting Control Panel
Menu
Admin Menu
([System Settings] is displayed.)
> or <
> button several times to select [Power Save
5
System Settings
Power Saver Mode
(7) Press the <
Power Saver Mode
Disable *
> button.
(The power saver mode setting screen is
displayed.)
(8) Press the < > or < > button several times to select whether to
use the power saver mode or not.
Power Saver Mode
Enable
(9) Press the <Ejece/Set> button (The setting for the power saver
mode is applied and * is displayed).
Power Saver Mode
Enable *
If you enable the power saver mode, proceed to step 10 to set
the time to switch the machine to the power saver mode. If not,
proceed to step 15.
(10 Press the < > button.
System Settings
([System Settings] is displayed.)
Power Saver Mode
(11) Press the < > or <
[Power Saver Timer].
> button several times to select
To the next page
159
5.1 Outline of Common Menu
Continued from the previous page
System Settings
Power Save Timer
(12) Press the <
Power Save Timer
15Mins *
> button.
(The time to switch the printer to the
power save timer is displayed.)
(13) Press the < > or < > button to set the time to switch
the printer to the power saver mode (in the range of 15
to 240 minutes, incremented by 1 minute).
Setting Control Panel
5
160
Power Save Timer
60Mins
(14) Press the <Eject/Set> button (The time to switch the
printer to the power saver mode is set, and * is
displayed).
Power Save Timer
60Mins *
(15) Press the <Menu> button.
Ready to print
(The printer can receive data any time.)
5.2
Description of Common
Menu
This section describes the items which you can set by [PDF], [PCL], [Admin Menu], and
[Display Language] under [Print Language] of the Common Menu.
●
●
●
●
For information about the operation to check the meter, refer to “7.7.1 Checking Total Number of Printed Pages
by Meter” (P.267).
For information about reports/lists, refer to “7.4.2 Printing Report/List” (P.254).
For information about the procedures to set all the other Common Menu items, refer to “5.1.2 Changing
Common Menu Settings” (P.158).
Embedded Web Server enables more detailed settings. For more information, refer to “1.4 Configuring from the
Computer (Embedded Web Server)” (P.39).
[Print Language] enables you to configure settings for HP-GL, HP-GL/2, PDF,
and PCL emulation mode, and settings related to the function to directly print
PDF files.
This setting is adjusted on the Mode Menu screen.
HP-GL, HP-GL/2
For information about setting items for HP-GL, and HP-GL/2 emulations, refer to
the HP-GL, HP-GL/2 Emulation Settings Guide.
Setting Control Panel
5.2.1 Print Language Setting
5
PDF
Enables you configure settings to directly send PDF files to the printer for
printing.
In [Process Mode], select whether to use the PostScript function to process print
jobs for PDF files.
The settings for [Quantity], [2 Sided Print], [Print Mode], [Password], [Collated],
[Output Size], and [Layout].
161
5.2 Description of Common Menu
Process Mode
Selects the mode in which print jobs for PDF files are processed.
●
The setting for [Layout] is disabled when [PS] is selected.
[PS]
Process PDF files using the functions of Adobe Post Script.
Quantity
Sets the number of copies in a range of 1 to 999. The default is [1 Sets].
This setting may be disabled depending on the protocol used to send files since settings on some protocols are
preferentially enabled.
Setting Control Panel
5
2 Sided Print
Set 2 sided print.
This item is available when the duplex unit (optional) is installed.
[Off] (default)
Disable 2-sided print.
[Long Edge Flip]
Enable 2-sided print with the correct orientation for documents bound on the long edge.
[Short Edge Flip]
Enable 2-sided print with the correct orientation for documents bound on the short edge.
Print Mode
Set whether to put the priority on image quality or printing speed.
[Normal] (default)
Print at standard speed and with standard image quality.
[High Quality]
Print at lower speed and with higher image quality.
[High Speed]
Print at high speed with lower image quality.
Password *4 Characters listed in No. 1, 3, 4, and 5 in can be used
If a password is set for the PDF file, set the password beforehand. Printing is enabled only when the
password set for the PDF file to be printed and the password set here match.
Up to 32 alphanumeric characters can be set.
162
5.2 Description of Common Menu
Collated
Set whether to collate the printed sheets by copy (1, 2, 3...1, 2, 3...) when printing more than one copy.
The default is [Off].
When [Process Mode] is set to [PS], the Hard Disk Drive (optional) is required to use the collating
function.
Output Size
Set the output paper size.
[A4] (default)
Print on A4 size paper.
Output Color
Set whether to print in color or black and white.
[Color (Auto)] (default)
Automatically detects if the document is color or black and white by each page. When any color is
used, the page is printed in color and, when the page is monochrome, it is printed in black and white.
[Black]
Print in black and white.
Setting Control Panel
[Auto]
Automatically selects the output paper size according to the document size and settings of the PDF
file to be printed.
5
163
5.2 Description of Common Menu
PCL
Paper Tray
Setting Control Panel
5
Sets the paper tray that supplies paper.
Candidate values are shown below.
[Auto] (default)
The printer searches for the paper tray that has the paper size set in [Output Size] and paper is fed
from that tray.
[Tray 1]
[Tray 2] (optional)
[Tray 3] (optional)
[Tray 4] (optional)
[Tray 5 (Bypass)]
●
When [Tray 1] to [Tray 4] are selected, the [Output size] item cannot be set because the paper loaded in these
trays become the output sizes.
When [Auto] is selected and the same size of paper is loaded in the same orientation in multiple trays, the
paper tray will be selected in the order of Tray 1, Tray 2 (option), Tray 3 (option), and then Tray 4 (option).
When the same size of paper is loaded in different orientations in multiple trays, the paper loaded in landscape
is given priority.
● When the optional trays are installed, [Tray 2] to [Tray 4] are appear in the display.
●
Output Size
Sets the size of printing paper. This setting can be made only when [Paper Tray] is set to [Auto]. This
setting can be made only for cut sheets.
Candidate values are shown below.
[A4] (default) [A3] [A5] [B4] [B5] [11×17] [8.5×14] [8.5×13] [8.5×11]
Bypass Size
Sets the size of printing paper. This setting can be made only when [Paper Tray] is set to [Tray 5
(Bypass)]. This setting can be made only for cut sheets.
Candidate values are shown below.
[A4] (default) [A3] [A5] [B4] [B5] [11×17] [8.5×14] [8.5×13] [8.5×11] [5.5×8.5] [8×10]
[7.25×10.5] [8K (267×388 mm)] [16K (194×267 mm)] [Monarch] [Env #10] [DL] [C5]
Output Tray
Specifies the tray to which the printed paper is ejected.
Set the tray to which printed jobs will be ejected.
[Center Tray] (default)
[Side Tray]
You can set [Side Tray] if the optional Face Up Tray is installed.
164
5.2 Description of Common Menu
Orientation
Sets the paper orientation for printing.
Candidate values are shown below.
[Portrait] (default)
[Landscape]
●
●
The values set are changeable by commands.
The setting takes on default value when the NVM is initialized.
2 Sided Print
Sets two-sided printing.
[On]
Two-sided printing is executed. Press the <Eject/Set> button to set the paper orientation.
Candidate values are shown below.
[Long Edge Flip] (default)
Printing is done from left to right.
[Short Edge Flip]
Printing is done from top to bottom.
●
[Long Edge Flip] and [Short Edge Flip] can be set when the Duplex Unit is installed.
Font
Setting Control Panel
[Off] (default)
Two-sided printing is not done.
5
Sets the font to be the default.
Candidate values are shown below.
[CG Times]
[CG Times Italic]
[CG Times Bold]
[CG Times Bold Italic]
[Univers Medium]
[Univers Medium Italic]
[Univers Bold]
Univers Bold Italic]
[Univers Medium Condensed]
[Univers Medium Condensed Italic]
[Univers Bold Condensed]
[Univers Bold Condensed Italic]
[Antique Olive]
[Antique Olive Italic]
[Antique Olive Bold]
[CG Omega]
[CG Omega Italic]
165
5.2 Description of Common Menu
[CG Omega Bold]
[CG Omega Bold Italic]
[Garamond Antiqua]
[Garamond Kursiv]
[Garamond Halbfett]
[Garamond Kursiv Halbfett]
[Courier] (default)
[Courier Italic]
[Courier Bold]
[Courier Bold Italic]
[Letter Gothic]
Setting Control Panel
5
[Letter Gothic Italic]
[Letter Gothic Bold]
[Albertus Meduim]
[Albertus Extra Bold]
[Clarendon Condenced]
[Coronet]
[Marigold]
[Arial]
[Arial Italic]
[Arial Bold]
[Arial Bold Italic]
[Times New]
[Times New Italic]
[Times New Bold]
[Times New Bold Italic]
[Symbol]
[Wingdings]
[Line Printer]
[Times Roman]
[Times Italic]
[Times Bold]
[Times Bold Italic]
[Helvetica]
[Helvetica Oblique]
[Helvetica Bold]
[Helvetica Bold Oblique]
[CourierPS]
[CourierPS Oblique]
[CourierPS Bold]
[CourierPS Bold Oblique]
166
5.2 Description of Common Menu
[SymbolPS]
[Palatino Roman]
[Palatino Italic]
[Palatino Bold]
[Palatino Bold Italic]
[ITC Bookman Light]
[ITC Bookman Light Italic]
[ITC Bookman Demi]
[ITC Bookman Demi Italic]
[Helvetica Narrow]
[Helvetica Narrow Oblique]
[Helvetica Narrow Bold Oblique]
[New Century Shoolbook Roman]
[New Century Shoolbook Italic]
[New Century Shoolbook Bold]
[New Century Shoolbook Bold Italic]
[ITC Avant Grade Book]
[ITC Avant Grade Book Oblique]
[ITC Avant Grade Demi]
[ITC Avant Grade Demi Oblique]
[ITC Zapf Chancery Medium Italic]
Setting Control Panel
[Helvetica Narrow Bold]
5
[ITC Zapf Dingbats]
Symbol Set
Sets the specific set of symbols provided by a font with each symbol set defined with a specific
application in mind.
Candidate values are shown below.
[ROMAN-8] (default)
[ISO-8859-1 Latin 1]
[ISO-8859-2 Latin 2]
[ISO-8859-9 Latin 5]
[ISO-8859-9 Latin 6]
[PC-8]
[PC-8 DN]
[PC-775]
[PC-850]
[PC-852]
[PC-1004(OS/2)]
[PC-8 Turkish]
[Windows 3.1 Latin 1]
167
5.2 Description of Common Menu
[Windows 3.1 Latin 2]
[Windows 3.1 Latin 5]
[DESKTOP]
[PS Text]
[MC Text]
[Microsoft Publishing]
[Math 8]
[PS Math]
[Pi Font]
[Legal]
[ISO 4 United Kingdom]
Setting Control Panel
[ISO 6 ASCII]
[ISO 11 Swedish:names]
[ISO 15 Italian]
[ISO 17 Spanish]
[ISO 21 German]
[ISO 60 Norwegian v1]
[ISO 69 French]
[Windows 3.0 Latin 1]
[Windows Baltic]
5
[Symbol]
[Wingdings]
Proper selection of Symbol Set is important in printing the required output.
Available only to all True Type typeface, and to the four Bistream Dutch 801 SWC (CG Times), the four
Bistream Swiss 742 SWC (Univers), the four Bistream Fixed Pitch 810 Courier SWC (Courier), and the three
Fixed Pitch 850 Letter Gothic 12 pitch/text SWC (Letter Gothic) typefaces.
Font Size
Sets the height of the font in points.
Set the font size from 4.00 to 50.00, in 0.25 increments. Default is [12.00].
The point size item available depends on the fonts source and font number selected.
The values set are changeable by commands.
● The setting takes on default value when the NVM is initialized.
●
This item is ignored in the selection of a fixed-space scalable font. It is saved and is available when a bitmap
font or a proportionately-spaced scalable font is selected.
●
●
168
5.2 Description of Common Menu
Font Pitch
Sets the pitch of the font in character per inch.
Set the font pitch from 6.00 to 24.00, in 0.01 increments. Default is [10.00].
Pitch is the horizontal spacing of a fixed-space (bitmap or scalable) font in terms of number of characters per
inch.
This characteristic is ignored when selecting a proportionately-spaced (bitmap or scalable) font but is saved in
the font select table and available when fixed spaced font is selected.
Form Lines
Sets the page length (printing area) of one page.
Set from 5 to 128, in 1 increments. Default is [64].
Quantity
Sets the number of output copy.
Set the quantity from 1 to 999, in 1 increments. Default is [1].
When there is a specific number of output from the host device, this value can be displayed and printed out.
Also, it can be changed on the setting of the operator panel. However, number of specified output from
Netware, LPD and AppleTalk cannot be changed to the operator panel.
● If there is instruction from the host device regarding the number of output copy, that value will be reflected and
printed. After printing, the setting of the control panel will be overwritten by that value.
● However, for number of output copy specified by Netware, LPD, AppleTalk port, the value of the control
panel will not be overwritten after printing.
●
Setting Control Panel
The values set are changeable by commands.
The setting takes on default value when the NVM is initialized.
5
Image Enhancement
Enables or disables image enhancement. Image enhancement is to raise the resolution and to produce
smooth print of sharp edges.
Candidate values are shown below.
[On] (default)
[Off]
●
●
The values set are changeable by commands.
The setting takes on default value when the NVM is initialized.
HexDump
Turns on/off the Hex(adecimal)Dump mode. Turning on the HexDump mode allows data that are
sent to the printer to be printed in plain ASCII format.
Candidate values are shown below.
[Disable] (default)
[Enable]
Turning on the HexDump mode allows data that are sent to the printer to be printed in plain ASCII format. It
will not be interpreted by the emulation. HexDump is used for troubleshooting.
●
HexDump is supported in the Parallel, LPD and Netware interfaces.
●
169
5.2 Description of Common Menu
Draft Mode
Turns the Draft Mode on and off.
Candidate values are shown below.
[Disable] (default)
[Enable]
Draft mode causes the printer to use lesser amount of toner. As a result, pages printed with Draft
mode turned on will be lighter than pages printed with it turned off.
Draft mode causes the printer to use lesser amount of toner. As a result, pages printed with Draft mode turned
on will be lighter than pages printed with it turned off.
● This feature can be used to print draft-quality documents so as to extend the life of your toner cartridge.
● Draft mode will not affect the speed or performance of your printer.
●
The setting takes on default value when the NVM is initialized.
●
Setting Control Panel
5
Color Mode
Sets the color mode.
[Auto] (default)
Automatically detects if the document is color or black and white by each page. When any color is
used, the page is printed in color and, when the page is monochrome, it is printed in black and white.
[Color]
Prints in color.
[Black]
Prints in black and white.
●
●
For PCL6, the printer driver specification has priority.
For PCL5, Auto operates in color.
Line Termination
Sets the line termination code as a processing code.
[Off] (default)
[Add-LF]
[Add-CR]
[CR-XX]
170
5.2 Description of Common Menu
5.2.2 The System Administrator Menu
The menu for configuring the settings for Network/Port, System Settings (such
as alert tone, power saver mode), Printer Settings, Allocate Memory, Image
Quality, initializing the printer’s settings or the hard disk, removal of form data.
Network/Port
The menu to configure necessary settings for the type of interface connected to
the computer and communication in the network.
Parallel
■ Port Status
Set the status to [Enable] or [Disable] in parallel interface when switching off the power. Default is
[Enable], which allows the use of the parallel interface.
Set the status of ports that are not used to [Disabled] or change the memory allocation capacity, in case of
insufficient memory.
■ Print Mode*1 (P.191)
Set the process method (targeted print language) of the print data.
[Auto] (default)
The proper process is automatically selected according to the language of the data received from the
computer.
Setting Control Panel
Set when using a parallel interface.
5
[PS] [HP-GL/2] [PCL] [TIFF]
■ PJL*2 (P.191)
You can use the PJL command with this printer, which does not depend on any print language. The
PJL command controls the print job, and is necessary when you use the printer driver. Setting the
status of the PJL command sent from the computer to enabled or disabled. By using the PJL
command, you can select the print language for the next data, even if the printer is under another
process in any print language. Set [Enable] for normal use. Default is [Enable].
171
5.2 Description of Common Menu
■ Adobe Protocol
Set the communication protocol for PostScript.
[Normal] (default)
Set when the communication protocol is ASCII format.
[Binary]
Set when the communication protocol is in Binary format. According to data, the processing of
printing in Binary format may be faster than that of [Normal].
[TBCP]
Set when both ASCII format and Binary format are installed in one communication protocol, and to
switch by a specified control code.
Set proper form according to data output by the printer driver in the computer.
Use this menu as a default, [Normal] for normal operation.
● These settings can be used only when printing with PostScript.
●
●
Setting Control Panel
5
■ Auto Eject Time*3 (P.191)
Set the time to output the remaining data in the printer, in case data transmission is interrupted.
You can select from 5 to 1275 seconds, per 5 seconds. Default is [30Secs]. When the next data is not
received during this time, it is recognized as the end of the job.
■ Bi-directional
Enable or disable bi-directional communications (IEEE1284) for the parallel interface. Default is
[Enable].
■ Input Prime
Set the INPUT_PRIME control system (the hardware re-set system) enabled or disabled. The re-set
operation is processed after the printer receives the INPUT_PRIME signals. Default is [Enable].
According to your computer system, the feature set in the operation panel may not be reflected in the printing
result, as the INPUT_PRIME signals are sent to re-set the process for every print job. In this case, the settings
on the menu screen can be reflected by specifying [Disable].
Use this setting with the Emulation.
172
5.2 Description of Common Menu
LPD
Set when using LPD.
■ Port Status
Set the status of the LPD port to [Enable] or [Disable] when switching off the power. Default is
[Enable], which allows the use of the LPD port.
When the port is set to [Enable], and if there is insufficient memory, the status of the port may automatically be
reset to [Disable]. Set unused port status to [Disable] or change the memory allocation capacity, in case of
insufficient memory.
To activate the LPD port, you will need to set the IP address.
[Auto] (default)
The proper process is automatically selected according to the language of the data received from the
computer.
[PS] [HP-GL/2] [PCL] [TIFF]
■ PJL*2 (P.191)
With this printer, you can use the [PJL] command, which does not depend on any print language. The
PJL command controls the print job, and is necessary when you use the printer driver. Setting the
status of the PJL command sent from the computer enables or disables it. By using the PJL
command, you can select the print language for the next data, even if the printer is under another
process in any print language. Set [Enable] for normal use. Default is [Enable].
Setting Control Panel
■ Print Mode*1 (P.191)
Set the process method (targeted print language) for the print data.
5
■ Connect Time-out *3 (P.191)
Set the time to cut the connection from 2 to 3600 seconds, in 1 second increments while receiving
data. Default is [16Secs].
■ TBCP Filter
Set the TBCP filter to enabled or disabled, while data from the PostScript is processed. Default is
[Disable].
■ Port No.
Specify the port number as 515 or select from 8000 to 9999. Default is [515].
173
5.2 Description of Common Menu
NetWare
Set when using NetWare.
■ Port Status
Set the status of the NetWare port to enabled or disabled when switching off the power. Default is
[Disable]. Set to [Enable] when you use NetWare.
When activating the port, the status of the port may be set to [Disable] due to insufficient memory. Set the
unused port status to [Disable] or change the memory allocation capacity, in case of insufficient memory.
■ Transpt Protocol
Set the Protocol of the transport layers of the NetWare. You can use either IPX/SPX or TCP/IP, or
both of them. Default is [TCP/IP, IPX/SPX].
Setting Control Panel
5
IP Address is needed on both the computer and the machine to use TCP/IP.
■ Print Mode*1 (P.191)
Set the process method (targeted print language) of the print data.
[Auto] (default)
The proper process is automatically selected according to the language of the data received from the
computer.
[PS] [HP-GL/2] [PCL] [TIFF]
■ PJL*2 (P.191)
You can use the PJL command with this printer, which does not depend on any print language. The
PJL command controls the print job, and is necessary when you use the printer driver. Setting the
status of the PJL command sent from the computer to enabled or disabled. By using the PJL
command, you can select the print language for the next data, even if the printer is under another
process in any print language. Set [Enable] for normal use. Default is [Enable].
■ No. of Search *3 (P.191)
Set the number of times to search for the file server.
You can set from 1 to 100 per 1 time, or limitless. The searching interval is at 1 minute increments.
Default is [No Limit].
■ TBCP Filter
Set the TBCP filter to enabled or disabled, while data from the PostScript is processed. Default is
[Disable].
174
5.2 Description of Common Menu
SMB
Set when using SMB.
■ Port Status
Set the status of the SMB port to enabled or disabled when the power is switched on. Default is
[Enable], to use SMB.
If memory becomes insufficient when the port is set to [Enable], the status of the port may be automatically set
to [Disable]. Set the unused port status to [Disable] or change the memory allocation capacity, in case of
insufficient memory.
■ Transpt Protocol
Set the protocol of the transport layers of the SMB. You can use either NetBEUI or TCP/IP or both
of them. Default is [TCP/IP, NetBEUI].
■ Print Mode*1 (P.191)
Set the process method (targeted print language) of the print data.
[Auto] (default)
The proper process is automatically selected according to the language of the data received from the
computer.
[PS] [HP-GL/2] [PCL] [TIFF]
■ PJL*2 (P.191)
You can use the PJL command with this printer, which does not depend on any print language. The
PJL command controls the print job, and is necessary when you use the printer driver. Set the status
of the PJL command sent from the computer to enabled or disabled. By using the PJL command, you
can select the print language for the next data, even if the machine is under another process in any
print language. Set [Enable] for normal use. Default is [Enable].
Setting Control Panel
IP Address is needed on both the computer and the printer to use TCP/IP.
5
■ TBCP Filter
Set the TBCP filter to enabled or disabled, while data from the PostScript is processed. Default is
[Disable].
175
5.2 Description of Common Menu
IPP
Set when using IPP.
■ Port Status
Set the status of IPP port to enabled or disabled when switching of the power. Default is [Disable].
Set to [Enable] when you use IPP.
If memory becomes insufficient when the port is set to [Enable], the status of the port may be automatically set
to [Disable]. Set the status of the unused port to [Disable], or change the memory allocation capacity, in case of
insufficient memory.
To activate the IPP port, you will need to set the IP address.
Setting Control Panel
5
■ Print Mode*1 (P.191)
Set the process method (targeted print language) of the print data.
[Auto] (default)
The proper process is automatically selected according to the language of the data received from the
computer.
[PS] [HP-GL/2] [PCL] [TIFF]
■ PJL*2 (P.191)
With this printer you can use the PJL command, which does not depend on any print language. The
PJL command controls the print job, and is necessary when you use the printer driver. Set the status
of the PJL command sent from the computer to enabled or disabled. By using the PJL command, you
can select the print language for the next data, even if the machine is under another process in any
print language. Set [Enable] for normal use. Default is [Enable].
■ Access Control
Set the access control to enabled or disabled when canceling, deleting, or pausing a print job. Default
is [Disable].
■ DNS
Set whether to use the name re-signed in the Domain Name System (DNS) as the printer is
recognized. Default is [Enable], which is used as the DNS name. When [Disable] is set, recognition
is processed under the IP Address.
■ Add Port No. *3 (P.191)
Set the additional port number 0, 80, or select from 8000 to 9999. Default is [80].
■ Connect Time-Out
While receiving print data, set the time from when the data is interrupted to when the connection is
cut, in the range of 0 to 65535 seconds, incremented by 1 second. Default is [60Secs].
■ TBCP Filter
Set the TBCP filter to enabled or disabled, while data from the PostScript is processed. Default is
[Disable].
176
5.2 Description of Common Menu
EtherTalk
Set when using EtherTalk.
■ Port Status
Set the status of EtherTalk port to enabled or disabled when the power is switched on. Default is
[Disable]. Set [Enable] when you use EtherTalk.
If memory becomes insufficient when the port is set to [Enable], the status of the port may be automatically set
to [Disable]. Set the status of the unused port to [Disable] or change the memory allocation capacity, in case of
insufficient memory.
USB Port
Set to use the USB port.
■ Port Status
Set the status of the USB port to enabled or disabled when switching off the power. Default is
[Disable]. Set [Enable] when you use the USB port.
Set the status of the unused port to [Disable] or change the memory allocation capacity, in case of insufficient
memory.
Setting Control Panel
■ PJL *2 (P.191)
You can use the PJL command with this printer, which does not depend on any print language. The
PJL command controls the print job, and is necessary when you use the printer driver. Set the status
of the PJL command sent from the computer to enabled or disabled. By using the PJL command, you
can select the print language for the next data, even if the printer is under another process in any print
language. Set [Enable] for normal use. Default is [Enable].
5
■ Print Mode*1 (P.191)
Set the process method (targeted print language) of the print data.
[Auto] (default)
The proper process is automatically selected according to the language of the data received from the
computer.
[PS] [HP-GL/2] [PCL] [TIFF]
■ PJL *2 (P.191)
You can use the PJL command with this machine, which does not depend on any print language. The
PJL command controls the print job, and is necessary when you use the printer driver. Set the status
of the PJL command sent from the computer to enabled or disabled. By using the PJL command, you
can select the print language for the next data, even if the printer is under another process in any print
language. Set [Enable] for normal use. Default is [Enable].
■ Auto Eject Time*3 (P.191)
Set the time to output remaining data in the printer, in case data transmission is interrupted.
You can select from 5 to 1275 seconds, in 5 second increments. Default is [30 Secs]. When the next
data is not received during this time, it is recognized as the end of job.
177
5.2 Description of Common Menu
■ Adobe Protocol
Set the communication protocol for PostScript.
[Normal] (default)
Set when the communication protocol is ASCII format.
[Binary]
Set when the communication protocol is Binary format. According to data, the processing speed of
printing in Binary format may be faster than that of [Normal].
[TBCP]
Set when both ASCII format and Binary format is installed in one communication protocol, and to
switch by a specified control code.
Set proper form according to data output by the printer driver in the computer.
Use this menu in default, [Normal] for normal operation.
● This settings can be used only when it is printed with PostScript.
●
●
Setting Control Panel
5
Port 9100
Set when using Port9100.
■ Port Status
Set the status of the Port9100 port to enabled or disabled when the power is switched on. Default is
[Disable]. Set [Enable] when you use Port9100.
If memory becomes insufficient when the port is set to [Enable], the status of the port may be automatically set
to [Disable]. Set the status of the unused port to [Disable], or change the memory allocation capacity, in case of
insufficient memory.
To activate the port9100 port, you will need to set the IP address.
■ Print Mode*1 (P.191)
Set the process method (targeted print language) of the print data.
[Auto] (default)
The proper process is automatically selected according to the language of the data received from the
computer.
[PS] [HP-GL/2] [PCL] [TIFF]
■ PJL *2 (P.191)
You can use the PJL command with this printer, which does not depend on any print language. The PJL
command controls the print job, and is necessary when you use the printer driver. Set the status of the PJL
command sent from the computer to enabled or disabled. By using the PJL command, you can select the print
language for the next data, even if the machine is under another process in any print language. Set [Enable] for
normal use. Default is [Enable].
■ Connect Time-Out *3 (P.191)
Set the time to cut the connection from 2 to 65535 seconds, in 1 second increments while receiving
data. Default is [60Secs].
■ Port No.
Specify the port number on 9100 or select from 8000 to 9999. Default is [9100].
■ TBCP Filter
Set the TBCP filter to enabled or disabled, while data from the PostScript is processed. Default is
[Disable].
178
5.2 Description of Common Menu
SNMP
Set when using SNMP. You need to set the SNMP server to use an application, which controls
printers remotely. Information from the printers is under control by the SNMP server, and the
application collects information on the printers from the SNMP server.
■ Port Status
Set the status of the SNMP port to enabled or disabled when the power is switched on. Default is
[Enable], to use SNMP.
If memory becomes insufficient when the port is set to [Enable], the status of the port may be automatically set
to [Disable]. Select the status of the unused port to [Disable] or change the memory allocation capacity, in case
of insufficient memory.
●
●
IP Address is needed on both the computer and the printer to use UDP.
Refer to the manual for the application software, to know which protocol to use.
■ Community (R) *4 Characters listed in No.1 to 3 (P.191) can be used.
Set a community name for reading the control information (MIB) on the printer. You can set 1-12
alphanumeric characters. Default is [Unregistered].
■ Community (R/W) *4 Characters listed in No.1 to 3 (P.191) can be used.
Set a community name for reading the control information (MIB) on the printer. You can set 1-12
alphanumeric characters. Default is [Unregistered].
■ Community (Trap) *4 Characters listed in No.1 to 3 (P.191) can be used.
Set a community name for the Trap using 1-12 alphanumeric characters. Default is [Unregistered].
Setting Control Panel
■ Transpt Protocol
Set the protocol of the transport layers of SNMP. You can use either IPX or UDP, or both of them.
Default is [UDP].
5
TCP/IP Setting
■ Get IP Address
Set to obtain necessary information in order to use TCP/IP (IP address, subnet mask, gateway
address) from the Dynamic Host Configuration (DHCP) server, the BOOTP server, or the RARP
server, automatically or manually. Contact the network administrator to set the IP address manually.
Default is [DHCP].
The setting screen will appear after specifying [Manual] from [DHCP], [BOOTP], or [RARP], then set the IP
address manually.
■ IP Address, Subnet Mask, Gateway Address *3 (P.191)
You can use these features to check the IP Address, which has been obtained automatically, and to
set the IP Address manually. Enter the IP address in a xxx.xxx.xxx.xxx format. xxx refer to the value
between 0 to 255.
A wrong IP address may cause trouble to the entire network.
By the settings on the subnet mask, the former setting value is indicated, even when the <Menu> button is pressed
after setting the value, in case a wrong value is entered (for example, when “0” has been set in the middle of the
bits). You cannot move to another setting feature until the right value is set on the registration screen.
● Set it only when you need to specify the gateway address. You may not need to set the gateway address, when
the environment can set it automatically.
●
●
179
5.2 Description of Common Menu
InternetServices
Set whether to use the Internet Services.
When [Enable] is set, you can check the printer and the job status and change the settings of the
printer on the web browser using Embedded Web Server. Default is [Enable].
To enable Internet services, you need to set the IP address on both the computer and this printer.
WINS Server
■ Get DHCP Address
Set to obtain the IP address, necessary for using the Windows Internet Service (WINS), from the
DHCP server, automatically or manually Check with the network system administrator to set the IP
address manually. Default is [On].
Setting Control Panel
5
The setting screen of the IP address will be indicated after changing to [Off] from [On], then set the settings
manually.
■ Primary IP Address, Secondary IP Address *3 (P.191)
You can use these features to check the IP Address, which has been obtained automatically, and to
set the IP Address manually. Enter the IP address in a xxx.xxx.xxx.xxx format. xxx refers to the
value between 0 to 255. In case the primary IP address is invalid, the secondary IP address will also
be invalid.
A wrong IP address may cause trouble to the entire network.
Ethernet
Set the communication speed and the type of the connector for the Ethernet interface.
[Auto] (default)
Switch 100BASE-TX and 10BASE-T automatically.
[100BASE-TX]
Select this if you decide to use 100BASE-TX.
[10BASE-T]
Select this if you decide to use 100BASE-TX.
IPX/SPXFrameType
Set the active frame type of IPX/SPX.
[Auto] (default)
Set the frame type automatically.
[Ethernet II]
Use the frame type specified for Ethernet.
[Ethernet 802.3]
Use the frame type specified for IEEE802.3.
[Ethernet 802.2]
Use the frame type specified for IEEE802.3/IEEE802.2.
[Ethernet SNAP]
Use the frame type specified for IEEE802.3/IEEE802.2/SNAP.
180
5.2 Description of Common Menu
Filter
■ IP Filter
Set whether to limit the reception IP address for printing . When [On] is set, a printing job cannot be
processed except from registered IP addresses. The default is [Off].
In case the registered IP address is all 000. 000. 000. 000, the command is disabled even if [On] is selected.
■ IP Address *3 (P.191)
To limit acceptable IP addresses, register the IP address from which to receive print jobs. Up to 10 IP
addresses can be registered. The address mask is set for the registered IP address. Enter the IP
address and the address mask in a xxx.xxx.xxx.xxx format. xxx refer to the value between 0 to 255.
For example, if you set the [IP Address]: [129.249.110.23], [IP Address Mask]: [255.255.255.0], the
accepted IP addresses are [129.249.110* (1254)].
Setting Control Panel
5
181
5.2 Description of Common Menu
System Settings
The menu for configuring the settings for functions such as alarm sound and the
power saver mode.
Alert Tone
Set whether to activate the alarm when there is something wrong with this machine. Default is [Off].
The volume cannot be controlled.
Panel Settings*3 (P.191)
■ Panel Lock
Set whether to limit operation on the menu control and mode menu by password. When [On] is set,
the password must be entered to operate the menu control and the mode menu. Default is [Off].
Setting Control Panel
5
When no password is set while [On] is specified, the setting screen for the password appears. Enter numbers of
4 figures as the password pressing the < > or < > button. Press the < > or < > button to move the
figures.
● [0000] cannot be used as a password.
●
■ Change Password
You can change the password when use of the control panel is limited. Enter the present password, 4
digits, the setting screen for the password appears. Set the new password.
Unless you set [On] for limitation of the control panel, you cannot change the password.
OfflineAutoClear*3 (P.191)
Set whether to release the offline mode automatically. You can set not to release, or set the time to
release in the range of 1 to 30 minutes incremented by 1 minute. Default is [Off].
Power Saver Mode
For automatically saving the power consumed by the machine, after a given period has passed. Set
whether to use the feature. Default is [Enable].
“2.3 Canceling Sleep Mode” (P.107)
Power Save Timer*3 (P.191)
Set the duration of time to switch the printer to the power saver mode in the range of 15 to 240
minutes incremented by 1 minute. While the power saver mode, the <Power Saver> button lights up.
Default is [15Mins].
“2.3 Canceling Sleep Mode” (P.107)
182
5.2 Description of Common Menu
Auto Job History
Set whether to print automatically the job history report, which is the information about finished
print data.
[Do not print] (default)
The job history report is not printed automatically.
[Print]
When the memory capacity is full, the job history of the print data is automatically printed in order of
the 50 oldest print jobs that have not been output. The data under action and waiting for action is not
recorded.
2 Sided Report
Set whether to print the report/list data 1 sided or 2 sided. This is available when the duplex unit
(optional) is installed.
[2 Sided]
Banner Sheet
■ Banner Output
Set whether to output the banner sheet. If output, select the output form. You can select any form
output on the top of the document, output on the end of the document, or output on each of them.
■ Banner Tray
Select the tray to output the banner sheet from the Trays 1 to 4.
Secure Print
Setting Control Panel
[1 Sided] (default)
5
Set whether to use the secure print feature.
[Enable] (default)
The secure print feature is on.
[Disable]
You cannot print secure print jobs.
This item is available when the Hard Disk Drive (optional) is installed.
Machine Clock*3 (P.191)
Set the date (year/month/day), and time (hour/minute) of the system clock in the machine in format
of A.D (4 figures from 2000 to 2099) and 24 hours. The date/time set here is printed on the report or
the list.
■ Set Date
2003 year 01 month 01 day, for example, set in the form of YYYY/MM/DD.
■ Set Time
12 hours 02 minutes, for example, set in the form HH/MM.
■ Date Format
Select the order of the date indication on the screen from YYYY/MM/DD (year/month/day), MM/
DD/YYYY (month/day/year), or DD/MM/YYYY (day/month/year).
183
5.2 Description of Common Menu
■ Time Format
Select the time display either 12-hour or 24-hour.
■ Time Zone
If necessary, set the time zone.
■ Daylight Savings, Start Date, End Date
If necessary, set summer time.
Drum Life End
Message is displayed when the drum cartridge is nearly empty. After the message is displayed, you
can normally print about 750 sheets.
Select whether to cancel print operation when replacing the drum cartridge.
Setting Control Panel
5
184
[Cancel Print] (default)
When the message is displayed, the printing job is cancelled until the drum cartridge is replaced with
a new one.
[Continue Print]
The printing job will be continued, even if the drum cartridge is empty. This may affect the printer’s
performance such as image printing quality. It is recommended to replace the drum cartridge.
5.2 Description of Common Menu
Printer Settings
The menu sets the auto tray switch and the paper tray.
Substitute Tray
Set whether to print using substitute paper when the tray selected by the auto paper switch runs out of
paper. When using this feature, select the paper size.
[Off] (default)
The message to load paper is indicated, instead of using substitute paper.
[Larger Size]
It is switched to print with equal magnification as the original document(s) on the second largest
sized paper from the selected paper size.
[Bypass Feed]
Printing on the paper loaded in the Tray 5 (bypass tray).
The instruction from the computer takes precedence, if any is specified from the computer.
Paper Type
Set the paper type to be loaded in the paper tray. Default is [Plain] for all paper trays. The name set in
[Paper Name] is displayed as [Custom 1] to [Custom 5].
■ Tray 1
Select from [Plain], [Recycled], [Bond], [Heavyweight 1], [Heavyweight 2], [Transparency],
[Coated 1], [Coated 2], [Envelope] or [Custom 1] to [Custom 5].
Setting Control Panel
[Nearest Size]
Printing on the closest matching paper size as the selected paper size. Images may automatically be
reduced if necessary.
5
Loading coated paper into the Tray 5 (bypass tray) is recommended.
■ Trays 2 to 4
Select from [Plain], [Recycled], [Bond], [Heavyweight 1], [Coated 1], or [Custom 1] to [Custom 5].
Loading coated paper into the Tray 5 (bypass tray) is recommended.
■ Tray 5 (bypass tray)
It can be selected from [Plain], [Plain S2], [Recycled], [Recycled S2], [Bond], [Bond S2],
[Heavyweight 1], [Heavywt 1 S2], [Heavyweight 2], [Heavywt 2 S2], [Transparency], [Coated 1],
[Coated 1 S2], [Coated 2], [Coated 2 S2], [Labels], [Envelope], or [Custom 1] to [Custom 5].
Paper Priority
Set the priority of paper type in each tray selected by the auto tray switch. The name set in [Paper
Name] is displayed as Custom 1 to 5.
■ Plain, Recycled, Bond, and Custom 1 to 5
Select the priority from [Not Selected] or [1] to [8] for each paper type.
You can select the same priority for different types of paper. The selection of a paper tray depends on
the [Tray Priority]. When [Not Selected] is selected, the paper tray may not be selected by the auto
tray switch. Default is [1] for [Plain], [2] for [Recycled], [3] for [Bond], and others are [Not Selected].
185
5.2 Description of Common Menu
Tray Priority
When the optional paper tray is installed, set the priority of the trays from 1 to 4, to be automatically
selected by the auto tray switch.
The paper tray 5 (bypass tray) is not included in the selection.
■ 1st to 3rd
Set the target tray to [1] to [3].
Same paper tray cannot be selected to each order. [2] tray can be selected from any tray except the one
which is chosen as [1] and [3] can be selected from any tray except [1] and [2]. Remaining paper tray
will be set to the 4th. By default, the order of the priority is set to the number of the paper trays 1 to 4.
Paper Size
Set the paper size to load into the paper tray.
Setting Control Panel
5
For information about suitable paper sizes, refer to “Appendix A Main Specifications” (P.288).
■ Trays 1 to 4
[Auto] (default)
Select when loading paper of standard size.
[Non-Std]
Select [Non-Std] when printing with non-standard paper size, and specify its long edge and short
edge by 1 mm.
Paper Image Qty
Specify printing image quality for user number 1 to 5 from B (plain paper), C (recycled paper), S (not
used), T (not used), A (high quality).
For example, if you use blue plain paper, specify the name [Plain Blue] on the [Paper Name], and
then set [Image Quality] of [Plain Blue] to [Plain].
After this setting, standard blue paper is not output, even if the plain paper has priority over others.
Paper is fed following the priority set on [Plain Blue] (Custom 1) in the [Paper Priority].
Paper Name
You can change the user 1 to 5 displayed on the screen such as [Paper Priority], [Image Quality] and
[Paper Type] to the optional name.
■ Custom 1 to 5 *4 Characters listed in No.1 to 4 in can be used.
You can use up to 12 alphanumeric characters.
Print ID
Printing user ID in a specified position.
Default is [Off].
186
5.2 Description of Common Menu
Allocate Memory*3 (P.191)
The menu for changing capacity of form memory and memory of interface.
Memory allocation for the machine is as follows. The memory types that can be
allocated may be different according to the optional products installed.
Memory type
Standard
PS
×
HPGL auto layout
×
Buffer size
{
Print page buffer
{
●
●
●
●
●
After changing the memory allocation capacity, all stored data in each memory may be erased due
to re-setting of the memory.
Memory exceeding total capacity cannot be allocated. If the value exceeds the capacity of the
internal memory when the power is switched on, the memory allocation will be automatically
adjusted by the computer system.
If setting the port to [Enable] leads to insufficient memory, the port status may be set to Disabled
automatically. In this case, either set the port to [Disable] when it is not used or change the memory
allocation capacity. However, the parallel port and the USB port are not automatically set to disabled.
Except for print page buffer, you can allocate memory of the other memory types either through the
touch panel display or in Embedded Web Server.
This is the area for drawing the actual print image. The area to be allocated to print page buffer
will be the remaining area after all other memory types have been allocated. As such, the capacity
of the print page buffer cannot be changed directly. The actual capacity allocated for the print page
buffer can be checked under Memory on the [System Settings List]. And you can check it also using
Embedded Web Server.
To print high-resolution documents, configure your settings to increase the capacity of the print
page buffer.
Setting Control Panel
{ : Supported
× : Not supported
U : Not supported when a Hard Disk Drive (optional) is installed.
5
PS
Specify the memory capacity for the Post Script.
Allocate the memory capacity in the range of 8.00 to 96.00 MB, incremented by 0.25 MB. Default is
[16.00M]. The maximum value which can be set varies depending on the available memory.
HPGL Auto Layout
Specify the memory capacity for auto layout in the HP-GL and HP-GL.
Allocate the memory capacity in the range of 64 to 5,120 MB, incremented by 32 KB. Default is
[64K]. The maximum value that can be set varies depending on the available memory.
When the Hard Disk Drive (optional) is installed, memory for the auto layout uses the Hard Disk
Drive. The capacity of memory cannot be changed. On the LCD, [Hard Disk] is indicated.
187
5.2 Description of Common Menu
Buffer Size
Set the memory capacity by each interface for reception buffer capacity, which is the area to store
transported data from the computer temporarily. Set the spool, setting area, and the memory capacity
for LPD, SMB, and IPP.
You can change the receiving buffer capacity to status and destination. As the receiving buffer
capacity is increased, the print data processed in this printer will be released quickly by the
application program. The maximum setting value varies depending on the available memory.
●
●
Setting Control Panel
5
When the port status is set to [Disable], no feature is indicated.
Depending on transferred data, it may not be released quickly if the memory capacity is increased.
■ Parallel, NetWare Memory, IPP Memory, EtherTalk Memory, USB Memory, Port9100
Memory
Allocate the memory capacity in the range of 64 to 1,024 KB, incremented by 32 KB. Default is
[64K] for Parallel and USB, [256K] for all other types of memory. The [EtherTalk Memory] is
indicated when the PostScript Software Kit is installed. If the memory is greater than 384 MB, the
EtherTalk memory is in a range of 1024 to 2048.
The [IPP Memory] is indicated only when a Hard Disk Drive (optional) is not installed.
■ LPD Spool and SMB Spool
[Off] (default)
Print data is not spooled. While the printer is under printing process in LPD and SMB from a
computer, any data with the same interface from other computer cannot be received.
Set the allocation of the memory capacity of the receiving buffer specified for LPD and SMB in the
range of 64 to 1024 KB, incremented by 32 KB. Default is [256K]. If the memory is greater than 384
MB, the LPD is in a range of 1024 to 2048.
[Hard Disk]
Spool processing is done. The receiving buffer for the spool process uses the Hard Disk Drive. This
item is available when the Hard Disk Drive (optional) is installed.
[Memory]
Spool process is done. The receiving buffer for the spool process uses the memory.
Set the memory capacity of the receiving buffer for the spool process in the range of 0.5 to 32.00
MB, incremented by 0.25 MB. Default is [1.00M]. Any print data larger than the memory capacity
specified cannot be received. In this case, select [Hard Disk] or [Off].
For Windows 2000, if the LPR bite count is set to disabled, when any print data larger than the memory capacity
specified in [Memory] is transmitted, the job may be transmitted to the printer repeatedly.
In this case, select the [Port] tab on the printer driver properties, and set the LPR bite count to enabled, or set the
capacity of the memory the spool to a larger value than the capacity of the document data.
■ IPP Spool
This item is displayed when the Hard Disk Drive (optional) is installed.
[Off] (default)
Print data is not spooled. While the printer is under printing process in LPD and SMB from a
computer, any data with the same interface from an other computer cannot be received.
Set the allocation of the memory capacity of the reception buffer specified for IPP in the range of 64
to 1,024 KB, incremented by 32 KB. Default is [256K].
[Hard Disk]
Spool processing is done. The receiving buffer for the spool process uses the Hard Disk Drive.
188
5.2 Description of Common Menu
Image Quality
When the color gradation or the color registration print result is incorrect, they
can be automatically adjusted.
Adjust Gradation
When the color gradation print result is incorrect, it can be automatically adjusted. Through this
gradation adjustment, the image quality of this printer can be consistently maintained. There are two
kinds of gradation adjustment giving priority to resolution or gradation.
“7.8 Adjusting Gradation” (P.271)
Adjust Color Regi
■ Color Regi Chart
Print the color registration adjustment chart to check if each Yellow (Y), Cyan (C), and Magenta (M)
toner is not out, and then check the adjusting value.
■ Fast Scan Adjust
Set the adjusting value.
Setting Control Panel
When the print image is out after transport of the printer or replacing the drum cartridge, print the
color registration chart to adjust the color registration of the printer.
“7.9 Adjusting Color Registration” (P.281)
5
Init/Del Data
You can initialize the value set in the printer features stored in the NV memory, the
internal Hard Disk Drive, and report data, and delete the data such as registered
forms in the printer.
Each value is set to a default by the initialization. For information about the default, refer to “5.3 List
of Common Menu” (P.192).
NVM
Initialize the NV memory. The NV memory is an nonvolatile memory, which can store the contents
set in the printer, if the power is once switched off.
Each value in all features is set to default by the initialization of the NV memory.
Hard Disk
Initialize the Hard Disk Drive (optional). The deleted data by the initialization are additional fonts,
each form in HP-GL (optional), HP-GL/2 (optional), the user defined data for the SMB folder.
Documents by the secure print and their logs will be saved. This item is available when the Hard
Disk Drive (optional) is installed.
189
5.2 Description of Common Menu
Print Meter
Initialize the meter report. After the initialization, the meter value is set to 0.
Stored Documents
Delete the document data stored as the secure print. If no document is available, the “No stored
documents” message is indicated on the LCD.
This item is available when the Hard Disk Drive (optional) is installed.
Setting Control Panel
5
190
5.2 Description of Common Menu
Engine Cleaning
You can clean the inside mechanism of the printer from this mode.
●
●
During the process of cleaning, never change any other features.
Never change the menu or switch the power off during the cleaning when “Cleaning in Progress”
is displayed on the LCD.
Standard Cleaning
Clean the printer engine.
Clean the printer engine if the printed material is continually stained with toner.
Special Cleaning
●
●
Special cleaning only starts if the printer detects a hot and humid environment.
If the printer does not detect that the environment is hot and humid, “Cleaning not required” is
displayed.
*1
When the [Auto] is specified, data may be deleted in case the automatically distinguished
language of the original document is not applicable to the internal print language, or the
language is not applicable to the target language.
*2
Data may be deleted when a print language, which is not available in the machine, is
specified from the PJL command.
*3
When changing the value with the < > or < > buttons, keep pressing the button to
change the display continuously. Also, pressing the < > and < > buttons at the same
time to display a default value.
*4
List of character strings
No.
Character type
Setting Control Panel
Clean the toner outlet and the printer engine.
If the printer is being used in a hot and humid area, clean the toner outlet and printer engine if toner
stains the front of the printed material reducing its quality.
5
Text
1
Space
Space
2
Alphabet
ABCDEFGHIJKLMNOPQRSTUVWXYZabcdefghijklmnopqrstuvwx
yz
3
Number
0123456789
4
Symbol
!"#$%&'()*+,-./:;@$=$@?@[\]^_`
191
5.3
List of Common Menu
Following is the configuration of the Common Menu.
■Remarks
Press
the
<
> The <
<
>
<
>
<
> button.
> or <
> button switches menus and features in
the same layer. Press the <
> button to shift one layer
down, and press the < > button to display the menu
and features in the next layer.
Press the < > or < > button to switch the layer in a menu,
or to scroll the cursor (_) to the right or left. Press the
<
> button in the menu screen to shift one layer back,
and press the <
s
Setting Control Panel
Optional Signs
192
Shift to the first layer down. Or configure the settings (the
configured value is indicated by the “*” sign).
These signs are indicated when an optional item is installed.
c: When the Hard Disk Drive is installed
d: When a Duplex Unit is installed
e: 1 Tray Module is installed
f: When the 3 Tray Module is installed
*
●
5
Press the <Eject/
Set> button.
> button to shift to the next layer.
●
Default value
Factory default value.
Select the setting value in each table with < > and <
To close the menu screen, press the <Menu> button.
> buttons.
5.3 List of Common Menu
Setting Control Panel
5
To the next page
193
5.3 List of Common Menu
Continued from the previous page
Setting Control Panel
5
To the next page
194
5.3 List of Common Menu
Continued from the previous page
Setting Control Panel
5
To the next page
195
5.3 List of Common Menu
Continued from the previous page
Setting Control Panel
5
To the next page
196
5.3 List of Common Menu
Continued from the previous page
Setting Control Panel
5
197
6
Troubleshooting
6.1
Type of Problem .................................................................................. 200
6.2
Clearning Paper Jams......................................................................... 201
6.3
Unusual Conditions ............................................................................. 213
6.4
Poor Print Quality ................................................................................ 217
6.5
List of Messages ................................................................................. 222
6.6
Network-Related Problems ................................................................. 236
6.7
Mail-Related Problems........................................................................ 239
6.8
Ejecting Remaining Data – When Printing Stops Halfway Through.... 240
6.1
Type of Problem
6.1.1 Course of action for troubleshooting
The course of action for troubleshooting is as follows.
Follow the steps below.
A problem
Check “6.3 Unusual Conditions” (P.213)
Is the print quality bad?
If the print quality is poor
“6.4 Poor Print Quality” (P.217)
Troubleshooting
6
Is a message displayed on the control panel display?
If a message is displayed
“6.5 List of Messages” (P.222)
Is the machine, that is your computer or server, set up
correctly for network environment use?
To check the settings
6.6 Section that describes settings
for each network environment
For a TCP/IP environment, refer to “6.6.1 Troubleshooting When Working
in a TCP/IP Environment” (P.236), and for other environments, refer to the
Network Print Environment Guide .
Notes and restrictions on the use of this machine may be applied
For more information, refer to “Appendix E Precautions/Limitations”.
If the problem still persists even after you have taken the appropriate action according to the steps
shown above, contact our Customer Support Center or your dealers.
200
6.2
Clearning Paper Jams
When a paper jam occurs, an error message appears on the control panel display indicating
where the paper is jammed, and printing stops. This printer stops and makes a beep sound.
Check the paper jam position with the indicator on the left side of the control panel, and
remove the jammed paper.
As soon as the paper jam is cleared, printing will automatically resume from the same point
where it stopped when the paper jam occurred.
cover B (Duplex unit cover)
front cover
Tray 5 (Bypass)
cover A (left cover)
power switch
cover C (lower left cover)
Tray 1 to 4
●
●
●
●
Troubleshooting
When removing jammed paper, make sure that no pieces of torn paper are left in
the printer. A piece of paper left in the printer can cause a fire. If a sheet of paper is
wrapped around the heat roller, or when clearing jammed paper that is difficult or
impossible to see, do not try to remove it by yourself. You may get injured or suffer
burns. Instead, switch off the printer immediately, and contact our Customer
Support Center or your dealers.
6
If you pull out the paper tray without checking the position of the paper jam, the jammed paper may be torn and
pieces of the paper may be left in the printer. Be sure to clear the jammed paper after checking the position of the
paper jam as otherwise it may cause the printer to break down.
If any pieces of paper are left in the printer, the paper jam message will not disappear.
Clear the jammed paper while the printer is switched on. If the printer is switched off, print data left in the printer
and information spooled in the memory will be erased.
Do not touch any parts inside this printer. Doing so may cause poor printing.
201
6.2 Clearning Paper Jams
6.2.1 Removing Jammed Paper in Trays 1 to 4
If a paper jam occurs in paper trays 1 to 4, check the tray that is indicated on the
display by the indicator on the left of the control panel, and remove the jammed
paper according to the steps below.
This section uses paper tray 1 for the explanation.
A paper jam message for trays 2 to 4 appears when the 3-Tray Module (optional) or 1 Tray Module
(optional) is installed.
Procedure
Troubleshooting
1
Pull out the tray with the paper jam that
is indicated on the display.
2
Remove the jammed paper.
3
Slowly push the paper tray right to the
end.
6
202
If the paper is torn, check whether any pieces of paper are
left inside the printer.
6.2 Clearning Paper Jams
6.2.2 Removing Jammed Paper in Tray 5
(Bypass Tray)
If a paper jam occurs in paper tray 5 (bypass tray), remove the jammed paper
according to the steps below.
Procedure
1
Check the back (behind the paper
supply section) of paper tray 5 (bypass
tray), and remove the jammed paper if
there is any.
It is recommended to load coated paper, labels, or envelopes one by one.
2
Adjust the sheets and insert them
carefully into the paper supply section
with the side that is to be printed on
facing down.
Troubleshooting
If multiple sheets of paper are loaded, remove all the
sheets at once.
6
203
6.2 Clearning Paper Jams
6.2.3 Removing Jammed Paper Inside Cover C
(Lower Left Cover)
When a paper jam occurs inside cover C (lower left cover) on the left side of the
tray module, remove the jammed paper according to the steps below.
A paper jam message for cover C (lower left cover) is displayed if a 3 Tray Module (optional) or 1
Tray Module (optional) is installed.
3 Tray Module
Procedure
Slowly open cover C (lower left cover)
while pulling the release lever.
2
Remove the jammed paper.
3
Slowly close cover C by pushing its
center part.
Troubleshooting
1
6
204
If the paper is torn, check whether any pieces of paper are
left inside the printer.
6.2 Clearning Paper Jams
Tray module
Procedure
1
Slowly open cover C (lower left cover)
while pulling the release lever.
2
Remove the jammed paper.
3
Slowly close cover C (lower left cover)
by pushing its center part.
If the paper is torn, check whether any pieces of paper are
left inside the printer.
Troubleshooting
6
205
6.2 Clearning Paper Jams
6.2.4 Removing Jammed Paper Inside Cover B
(Duplex Unit Cover)
If a paper jam occurs inside cover B (duplex unit cover), remove the jammed
paper according to the steps below.
A paper jam message for cover B (duplex unit cover) is displayed when the Duplex Unit (optional) is
installed.
Procedure
Troubleshooting
1
Open paper tray 5 (bypass tray) (1),
and slowly open cover B (duplex unit
cover) (2).
2
Push up the lever as shown in the
illustration (1), and remove the jammed
paper (2).
6
If the paper is torn, check whether any pieces of paper are
left inside the printer.
3
Return the lever to the original position
(1), and close cover B (duplex unit
cover) (2).
If necessary, fold tray 5 (bypass tray) (3).
206
6.2 Clearning Paper Jams
6.2.5 Removing Jammed Paper Inside Cover A
(Left Cover)
If a paper jam occurs inside cover A (left cover), remove the jammed paper
according to the steps below. If long-size paper is jammed, remove the jammed
paper according to the steps in “For long-size paper” (P.209), in order to prevent
damage to the paper/printer and to avoid injuries.
The image may be on the transfer rolls (black rubber rollers) of the BTR unit and the IDT unit. When
removing the jammed paper, do not touch these transfer rolls. Otherwise, the image quality may be
affected or the transfer roll may be damaged, requiring replacement.
transfer roll of
BTR unit
Procedure
1
Slowly open cover A (left cover) (1)
while pushing up the release lever (2).
2
Push down the green lever as shown in
the diagram.
transfer roll of
IDT unit
Troubleshooting
Remove the paper in the
Face Up Tray (optional),
if there is one, and then
clear the jammed paper.
6
Do not move the khaki lever.
207
6.2 Clearning Paper Jams
3
If the head of the jammed paper comes
out in the direction of the output tray, pull
out the paper in the direction of the
output tray.
Two or three printed sheets may get dirty immediately
after removing the jammed paper.
Troubleshooting
6
Never touch the area (the fuser unit
and surroundings) labelled “High
Temperature”. You may suffer burns. If
a sheet of paper is wrapped around the
fuser unit or the roller, do not try to
remove it by yourself. You may get
injured or suffer burns. Instead, switch
off the printer immediately, and contact
our Customer Support Center or your
dealers.
4
5
6
Remove the jammed paper.
Return the green lever to its original
position.
Slowly close cover A (left cover) by
pushing its center part (1).
If necessary, fold tray 5 (bypass tray) (2).
208
6.2 Clearning Paper Jams
For long-size paper
If long-size paper is jammed, remove it according to the steps below.
The image may be on the transfer rolls (black rubber rollers) of the BTR unit and IDT unit. When
removing the jammed paper, do not touch these transfer rolls. Otherwise, the image quality may be
affected or the transfer roll may be damaged, requiring replacement.
transfer roll of
BTR unit
transfer roll of
IDT unit
1
Slowly open cover A (left cover) (1)
while pushing up the release lever (2).
Troubleshooting
Procedure
6
If the Banner Tray (optional) is installed, pull it down as
shown in the diagram.
2
If you cannot see or reach the head of
the jammed paper when opening cover
A (left cover), pull it out in the direction
indicated by the arrow as shown in the
diagram.
209
6.2 Clearning Paper Jams
3
If the paper does not reach the BTR
unit, pull it out in the direction indicated
by the arrows as shown in the diagram.
Never touch the area (the fuser unit
and surroundings) labelled “High
Temperature”. You may suffer burns. If
a sheet of paper is wrapped around the
fuser unit or the roller, do not try to
remove it by yourself. You may get
injured or suffer burns. Instead, switch
off the printer immediately, and contact
our Customer Support Center or your
dealers.
Troubleshooting
Do not pull out the paper from the tray 5 (bypass tray)
side as shown in the diagram. Unfused toner may be on
a roller, staining the paper that is loaded next.
4
6
If the head of the paper stays in the
BTR unit, release the green lever as
shown in the diagram.
Do not move the khaki lever.
5
Pull the head of paper in the direction
indicated by the arrow as shown in the
diagram.
Chute
Make sure that the paper does not touch the chute.
210
6.2 Clearning Paper Jams
6
Hold the head of the paper with both
hands, and pull it out in the direction
indicated by the arrow as shown in the
diagram.
Never touch the area (the fuser unit
and surroundings) labelled “High
Temperature”. You may suffer burns. If
a sheet of paper is wrapped around the
fuser unit or the roller, do not try to
remove it by yourself. You may get
injured or suffer burns. Instead, switch
off the printer immediately, and contact
our Customer Support Center or your
dealers.
7
8
If the head of the paper comes out into
the output tray, hold it on both sides
and pull it back as shown in the
diagram.
Troubleshooting
Do not pull out the paper from the tray 5 (bypass tray)
side as shown in the diagram. Unfused toner may be on
a roller, staining the paper that is loaded next.
6
Then, hold the head of the paper with
both hands, and pull it out in the
direction indicated by the arrows as
shown in the diagram.
●
●
You may feel that the paper is slightly heavy when
pulling it out.
If you do not pull the paper out straight in the
direction indicated by the arrows, paper may be torn
and left inside the printer, causing it to break down.
211
6.2 Clearning Paper Jams
9
10
Return the green lever to its original
position.
Slowly close cover A (left cover) by
pushing its center part (1).
If necessary, fold tray 5 (bypass tray) (2).
If the Banner Tray (optional) is installed, raise against
the printer.
Troubleshooting
6
212
6.3
Unusual Conditions
If there is the possibility of a technical breakdown, check the printer’s status thoroughly.
If the problem still persists, proceed to “6.4 Poor Print Quality” (P.217), and “6.5 List of
Messages” (P.222) to take the appropriate action.
●
●
●
●
Never open or remove printer covers that are secured with screws unless
specifically instructed in the “User Guide”. A high voltage component can cause
electric shock.
Do not try to alter the printer configuration, or modify any parts. An unauthorized
modification can cause smoke or fire.
Information on unsuccessful print processing is saved in the [Job History Report]. If a print job is not processed,
print the [Job History Report] to check the print processing status. The print data may be discarded if not
processed correctly.
For how to print the [Job History Report], refer to “7.4 Printing Report/List” (P.253).
Symptom
Is the power switch turned off?
Action
Switch on the printer.
“2.2 Switching On/Off the Power”
(P.106)
Is the printer not plugged in?
Switch the power off, and connect the
power cord securely. Then, switch on
the printer.
“2.2 Switching On/Off the Power”
(P.106)
Is the power voltage correct?
Troubleshooting
The power is not
switched on.
Cause
6
Check that the power is 110 V and 15
A (ampere) or 220 V to 240 V and 7 A,
and that the power capacity
corresponding to the maximum power
consumption of this printer (999 W or
less) is secured.
“Safety Notes” (P.14)
213
6.3 Unusual Conditions
Symptom
Cannot print.
Cause
Is the <Standby> indicator off?
Action
This printer is in an off-line state or in a
menu setting mode. Take actions
depending on the indications below.
● [Off-line]
Press the <Off-line> button to exit
the off-line state.
● Others
Press the <Menu> button to exit the
menu setting mode.
“2.1.2 Control Panel” (P.104)
Is there a message displayed on the
control panel display?
Take actions according to the
message.
“6.5 List of Messages” (P.222)
Troubleshooting
6
Is your computer set up for bidirectional communication
(connection with a parallel interface
cable)?
By default, bi-directional
communication is set to [Enable]. You
cannot print unless your computer is
set up for bi-directional
communication. If that is the case, set
bi-directional communication to
[Disable] and then start printing.
“Parallel” (P.171)
Is the memory capacity insufficient?
Try to print again in the following way.
●
When [Print Mode] is set to [High
Resolution], set it to [High Quality]. If
the status is still not improved, set it
to [Standard].
● Use [Print Page Mode].
● Increase the print page buffer
capacity.
Or install Additional memory (optional)
to increase memory.
For information about [Print Mode], refer
to the On-line Help for the printer driver.
214
6.3 Unusual Conditions
Symptom
The <Standby>
indicator does not blink
or light up despite your
printing instruction.
Cause
Action
Is the interface cable not plugged
in?
Switch off the power, and check that
the interface cable is connected.
Is the interface that is to be used
set?
Check the port status of the interface.
“5.2 Description of Common Menu”
(P.161)
<Error> indicator is on.
Is the computer environment set up
correctly?
Check the computer environment, for
example the printer driver.
Is there a message displayed on the
control panel display?
Check the error message on the
control panel, and take the appropriate
actions.
“6.5.1 List of Messages (Alphabetical
Order)” (P.222)
An error that you cannot solve by
yourself occurs.
Write down the error message or error
code and unplug the power cord, and
then contact our Customer Support
Center or your dealers.
[Printing...] is displayed
even though you did
not give any printing
instructions (while
using the parallel
interface).
Did you switch on your computer
after switching on this printer?
Press the <Cancel Job> button to
cancel print.
Print quality is bad.
Image data may be damaged.
Make sure that the computer is switched
on before switching on this printer.
Refer to “Poor Print Quality” and take
appropriate actions.
Troubleshooting
<Error> indicator is
blinking.
6
“6.4 Poor Print Quality” (P.217)
The characters are not
printed correctly
(garbled).
You are using a font that is not
installed in this printer as part of the
standard set-up.
Check the settings for the application
or the printer driver. If you are using
PostScript (optional), download the
required font.
The display on the
screen does not match
the print result.
Did you configure the settings to
replace the TrueType font with a
printer font?
Change the printing method for the
TrueType font.
On-line Help for the printer driver
215
6.3 Unusual Conditions
Symptom
Paper is not output and
the <Standby>
indicator on or blinking.
Cause
Data remains in the printer.
Action
Stop printing, or eject the remaining
print data.
“2.4 Canceling/Checking Print Jobs”
(P.108) “6.8 Ejecting Remaining Data –
When Printing Stops Halfway Through”
(P.240)
Printing takes too long.
The reception buffer capacity may
possibly be insufficient.
Troubleshooting
In order to print high-resolution
documents, increase the print page
buffer capacity by decreasing the
memory capacity assigned to unused
items from [Allocate Memory] on the
control panel.
If the receive buffer capacity is
increased, print jobs can be processed
faster. Adjust the buffer capacity
according to the print data volume.
For ports that are not in use, it is
recommended to disable them and
allocate their memory for other uses.
Memory Settings (P.187)
Is [High Quality] or [High Resolution]
selected in [Print Mode]?
6
If the settings in [Print Mode] are
changed to [Standard], the printing
time might be shortened.
On-line Help for the printer driver
Printing time may be long
depending on the printing method
assigned to the TrueType font.
Change the printing method for the
TrueType font.
On-line Help for the printer driver
The paper tray cannot
be inserted/removed.
216
Did you open the cover or switch the
power off during printing?
Switch the power off instead of inserting/
removing the paper tray forcibly. Then,
turn on the power switch after a few
seconds. Insert/remove the paper tray
after checking that this printer is able to
receive the data.
6.4
Poor Print Quality
6.4.1 Printout Is Defective
If the print quality is bad, select the closest symptom from the following and take
appropriate actions.
If the problem still persists, contact our Customer Support Center or your
dealers.
Symptom
Print is too light
(blurred or out of
focus).
Cause
The paper is damp.
Action
Replace with new paper.
“4.2 Loading Paper” (P.151)
Drum cartridge has deteriorated or
is damaged.
Replace with new drum cartridge.
“7.2 Replacing Drum Cartridge” (P.245)
Replace with new toner cartridge.
“7.1 Replacing Toner Cartridge” (P.242)
Color dots are printed.
Drum cartridge has deteriorated or
is damaged.
Replace with new drum cartridge.
“7.2 Replacing Drum Cartridge” (P.245)
Troubleshooting
Toner cartridge is out of toner.
6
Color lines are printed.
Drum cartridge has deteriorated or
is damaged.
Replace with new drum cartridge.
“7.2 Replacing Drum Cartridge” (P.245)
217
6.4 Poor Print Quality
Symptom
Equally spaced bars
are printed.
Cause
Action
The drum cartridge is dirty.
Print a few sheets of paper.
Drum cartridge has deteriorated or
is damaged.
Replace with new drum cartridge.
“7.2 Replacing Drum Cartridge” (P.245)
White dots appear in
the colored section.
Unsuitable paper is being used.
Load suitable paper.
“4.2 Loading Paper” (P.151)
Drum cartridge has deteriorated or
is damaged.
Replace with new drum cartridge.
Troubleshooting
“7.2 Replacing Drum Cartridge” (P.245)
Print blurs when
smeared with finger.
Toner is not fused.
Paper is stained by
toner.
The Paper loaded in the tray is not
consistent with the paper type
specified on the control panel.
Specify the appropriate paper type for
the paper that is loaded in the paper
tray from the control panel.
“4.1 About Paper” (P.146)
6
The paper is damp.
Replace with new paper.
“4.2 Loading Paper” (P.151)
Unsuitable paper is being used.
Load suitable paper.
“4.2 Loading Paper” (P.151)
Paper is completely
covered in toner.
Drum cartridge has deteriorated or
is damaged.
Replace with new drum cartridge.
“7.2 Replacing Drum Cartridge” (P.245)
High-voltage power supply may be
faulty.
218
Contact our Customer Support Center
or your dealers.
6.4 Poor Print Quality
Symptom
Nothing is printed.
Cause
Multiple sheets are fed at one time
(double-feed).
Action
Fan sheets well before loading them
again.
“4.2 Loading Paper” (P.151)
Drum cartridge has deteriorated or
is damaged.
Replace with new drum cartridge.
“7.2 Replacing Drum Cartridge” (P.245)
White areas or colored
stripes appears.
High-voltage power supply may be
faulty.
Contact our Customer Support Center
or your dealers.
The paper is damp.
Replace with new paper.
“4.2 Loading Paper” (P.151)
Unsuitable paper is being used.
Load suitable paper.
Paper is wrinkled or
characters are blurred.
Unsuitable paper is being used.
Load suitable paper.
“4.2 Loading Paper” (P.151)
You added paper before the tray ran
out of paper.
Do not add paper before the tray has
run out of paper. Remove the paper
from the tray and fan it well before
loading it into the tray again. Add
paper after the paper tray runs out of
paper.
The paper is damp.
Replace with new paper.
Troubleshooting
“4.2 Loading Paper” (P.151)
6
“4.2 Loading Paper” (P.151)
Vertical blanks appear.
Drum cartridge is deteriorated or
damaged.
Replace with new drum cartridge.
“7.2 Replacing Drum Cartridge” (P.245)
Toner cartridge is out of toner.
Replace with new toner cartridge.
“7.1 Replacing Toner Cartridge” (P.242)
219
6.4 Poor Print Quality
Symptom
Diagonally printed.
Cause
The guides on the paper tray are not
set in the correct position.
Action
Set length and width guides to the
correct position.
“4.2 Loading Paper” (P.151)
Print-outs are too light.
The paper size selected on the
printer driver differs from the paper
that is loaded. Or, multiple sheets
are fed at the same time.
Load the correct size paper, or fan the
paper well.
“4.2 Loading Paper” (P.151)
Is the [Draft Mode] on?
Troubleshooting
6
220
Set the [Draft Mode] to off in the
[Detailed Settings] of the [Graphics]
tab of the printer driver.
On-line Help for the printer driver
6.4 Poor Print Quality
6.4.2 Defective Prints on Special Media
Symptom
Check items
Print-outs on
transparencies are
defective.
Are you using a suitable
type of transparency?
Action
Transparencies suitable for this printer are the
following.
● V516 (transparency)
● JE001 (transparency)
Transparenccies with white borders and full color
transparencies cannot be used.
Is the paper type set to
[Transparency]?
■If a transparency is loaded in tray 5 (bypass tray)
Set the paper type to [Transparency] in the
[Properties] dialog box of the printer driver.
“3.2.2 Printing Transparencies” (P.117)
Print-outs are
defective.
Is the Draft Mode
feature or resolution set
to low in the [Properties]
dialog box of the printer
driver?
Change the setting on the [Graphics] tab of the printer
driver.
Troubleshooting
■If a transparency is loaded in tray 1
Set the paper type to [Transparency] in the control
panel.
6
221
6.5
List of Messages
This section describes messages and error codes that appear on the display of this printer.
6.5.1 List of Messages (Alphabetical Order)
There are two types of messages, printer status messages and error messages.
For error messages, “Cause” and “Action” are described.
If an error message appears, the printing of data remaining in the printer and information spooled in
the memory will not be guaranteed.
“*” Indicates alphanumeric characters. “xxxx” indicates any one of the following; report/list being
printed, document number and document name of the document subject to secure print, input port, and
paper size or paper size/orientation. “XXXX” indicates paper type.
Message
Troubleshooting
6
Add paper
xxxx
XXXX
Cause/action
Cause: Paper tray * is out of the paper of size and orientation xxxx
and paper type XXXX.
Action: Load paper of size and orientation xxxx and paper type
XXXX in tray *.
“4.2 Loading Paper” (P.151)
All data
Canceling...
Status: Print data left in this printer is being discarded.
Print data cannot be received by the computer.
All data
Ejecting Tray*
Status: Print data left in this printer is being ejected. Print data
cannot be received from the computer.
Canceling
xxxx
Tray*
Status: Data in the printing process is being discarded. Print data
can be received from the computer.
Check Bypass
xxxx
XXXX
Cause: No suitable paper is loaded in tray 5 (bypass tray).
Check paper in
Tray
Cause: The size of the paper which is loaded in tray is not suitable.
Action: Add paper of size and direction xxxx and paper type XXXX
in tray 5 (bypass tray).
Action: Load suitable paper.
“4.2 Loading Paper” (P.151)
222
6.5 List of Messages
Message
Check transparency
type
Cause/action
Cause: A transparency with a white border is loaded.
Transparencies with white borders are not suitable for this
printer.
Action: Remove the jammed transparency, if there is one, and load
one of our recommended transparencies with no border
(such as V516 and JE001).
“4.2 Loading Paper” (P.151)
check Tray
xxxx
Cause: No suitable paper is loaded in tray *.
XXXX
Action: Load paper of size and orientation xxxx and paper type
XXXX in tray *.
“4.2 Loading Paper” (P.151)
Close Cover *
Cause: Cover * is open.
Action: Close cover *.
Close front door
Cause: Front cover is open.
Action: Close the front cover.
“2.1 Main Components and Their Functions” (P.102)
Corrupt HD file.
Use Set to Init
Cause: If the Hard Disk Drive (optional) is installed, data on the
Hard Disk Drive may be destroyed because the power goes
off due to a power failure while the printer is operating.
Troubleshooting
“2.1 Main Components and Their Functions” (P.102)
6
Action: Press the <Eject/Set> button. Hard Disk Drive will be
initialised.
When the Hard Disk Drive is initialized, registered forms/logos
and secure print data are deleted.
When the PostScript Software Kit (optional) is installed, the
PostScript download font is also deleted.
Corrupt Log file
Use Set to Init
Cause: If the Hard Disk Drive (optional) is installed, data on the
Hard Disk Drive may be destroyed because of a power
failure while the printer is operating.
Action: Press the <Eject/Set> button. Log file will be initialised.
Initialisation of a log file takes several tens of seconds. Do not
switch off this printer during initialisation.
Data wait
xxxx
Ejecting...
xxxx
Status: Waiting for print data. Print data can be received from the
computer.
Tray*
Status: Print data is being output. Print data can be received from
the computer.
223
6.5 List of Messages
Message
End with Error
***-***
Cause/action
Cause: An error occurred, and printing was not finished
successfully.
Action: Check the error code [***-***] on the display, and take
appropriate action.
“6.5.2 List of Error Codes” (P.230)
Insert Drum U2
Cause: Drum cartridge is not installed.
Action: Install a drum cartridge.
“7.2 Replacing Drum Cartridge” (P.245)
Insert Toner
Cartridge:*
Cause: Toner cartridge * is not installed.
Action: Install toner cartridge *.
“7.1 Replacing Toner Cartridge” (P.242)
Troubleshooting
Insert Waste
TonerContainerUI
Cause: Waste toner bottle is not installed.
Action: Install a waste toner bottle.
“7.3 Replacing Waste Toner Bottle” (P.250)
Load Tray *
xxxx
XXXX
Cause: Paper tray * is out of the paper of size and orientation xxxx
and paper type XXXX.
Action: Load paper of size and orientation xxxx and paper type
XXXX in tray *.
6
“4.2 Loading Paper” (P.151)
Off-line
Status: You pressed the <Online> button and the printer is in the
off-line state. To exit the off-line state, press the <Online>
button again.
In the off-line state, print data cannot be received by the
computer.
Offlne
Data exists
Status: You pressed the <Online> button during printing, and the
printer is in the off-line state. To exit the off-line state, press
the <Online> button again.
In the off-line state, print data cannot be received by the
computer.
Open Cover *
Clear jam
224
Cause: A paper jam has occurred within cover *.
Action: Open cover * to remove the jammed paper.
6.5 List of Messages
Message
Open Cover * and
Tray *-Clear jam
Cause/action
Cause: A paper jam has occurred inside cover * or tray *.
Action: Open cover * to check for jammed paper. If you cannot find
any paper inside cover *, draw out paper tray * to check for
jammed paper.
“6.2 Clearning Paper Jams” (P.201)
Open Cover A or B.
Clear jam
Cause: A paper jam has occurred inside cover A (duplex unit
cover) or cover B (left cover).
Action: Open cover A (duplex unit cover) or cover B (left cover) to
remove the jammed paper.
“6.2 Clearning Paper Jams” (P.201)
Paper Jam
Open Cover *
Cause: A Paper jam has occurred inside cover *.
Action: Check the position of the cover in the indicator, and remove
the jammed paper.
Paper Jam
Pull out Tray *
Cause: A paper jam has occurred in tray *.
Action: Remove the jammed paper from tray *.
“6.2 Clearning Paper Jams” (P.201)
Please reboot
printer
xxx-xxx
Cause: Some error occurred.
Please wait
Status:
Action: Switch the printer off and on again after the display on the
control panel is off. If the same message appears again,
switch it off and unplug the power cord after the display on
the control panel is off, and contact our Customer Support
Center or your dealers.
●
●
●
Status: Displayed during the warm-up phase before ejecting the
print data that is still in the printer. Print data can be
received by the computer.
Printing...
xxxx
Status: Print data is being processed. Print data can be received
from the computer.
Tray*
6
The system status of this printer is being diagnosed/
initialised. This message appears during power on or
system reset time. After a while, it will change to “Ready
to print”.
Displayed during the warm-up phase before ejecting the
print data that is still in the printer.
Print data cannot be received from the computer.
Please wait
xxxx
Printing...
xxxx
Troubleshooting
“6.2 Clearning Paper Jams” (P.201)
Status: Print function is being executed using tray *. Do not draw
out the tray in use. Print data can be received from the
computer.
225
6.5 List of Messages
Message
Pull out Tray * Clear jam
Cause/action
Cause: A paper jam has occurred in tray *.
Action: Remove jammed paper from tray *.
“6.2 Clearning Paper Jams” (P.201)
Push in Tray *
Cause: Tray is drawn out.
Action: Insert paper tray correctly.
“4.2 Loading Paper” (P.151)
Ready to print
Status: Print data can be received from the computer.
Ready to print
Add Toner:C
Status: Cyan toner cartridge has almost run out of toner. Prepare
new cyan toner cartridge. Print processing and print data
receiving from the computer are enabled.
“7.1 Replacing Toner Cartridge” (P.242)
Troubleshooting
Ready to print
Add Toner:K
Status: Black toner cartridge has almost run out of toner. Prepare a
new black toner cartridge. Print processing and print data
receiving from the computer are enabled.
“7.1 Replacing Toner Cartridge” (P.242)
Ready to print
Add Toner:M
6
Status: Magenta toner cartridge has almost run out of toner.
Prepare a new magenta toner cartridge. Print processing
and print data receiving from the computer are enabled.
“7.1 Replacing Toner Cartridge” (P.242)
Ready to print
Add Toner:Y
Status: Yellow toner cartridge has almost run out of toner. Prepare
a new yellow toner cartridge. Print processing and print
data receiving from the computer are enabled.
“7.1 Replacing Toner Cartridge” (P.242)
Ready to print
DNS Update Fail
Cause: The IP address cannot be obtained from DNS.
Action: Check the settings for DNS and the method of obtaining the
IP address.
Manual contained on the Software Pack CD-ROM
Ready to print
Get IP Add. Fail
Cause: Obtaining the IP address from the DHCP server failed.
Action: Set the IP address manually.
“1.3 Setting the IP Address” (P.33)
226
6.5 List of Messages
Message
Cause/action
Ready to print
Replace
xxx-xxx
Cause: Some parts need to be replaced soon.
Ready to print
Replace Drum U2
Cause: The drum cartridge needs to be replaced soon. Print
processing and print data receiving from the computer are
enabled.
Action: Inform our Customer Support Center or your dealers.
Action: Replace with a new drum cartridge.
“7.2 Replacing Drum Cartridge” (P.245)
Ready to print
Replace U1
Status: The waste toner bottle needs to be replaced very soon.
Prepare a new waste toner bottle.
Ready to print
Same IP Address
Cause: The IP address is already in use.
Action: Change the IP address.
“1.3 Setting the IP Address” (P.33)
Cause: The same SMB host name already exists.
Ready to print
***-***
Cause: Failure occurs in this printer.
Action: Change the host name.
Action: Switch the printer off and on again after the display on the
control panel has turned itself off. If this message appears
again, check error code [***-***] on the display, and take
appropriate actions.
“6.5.2 List of Error Codes” (P.230)
Replace
xxx-xxx
See User Guide
Cause: Some parts need to be replaced.
Replace Drum U2
Cause: The drum cartridge needs to be replaced.
Troubleshooting
Ready to print
Same SMB host
6
Action: Inform our Customer Support Center or your dealers.
Action: Replace it with a new drum cartridge.
“7.2 Replacing Drum Cartridge” (P.245)
Replace parts
Call for Service
Cause: Some parts need to be replaced.
Replace Toner
Cartridge:C
Cause: Cyan toner cartridge is out of toner.
Action: Inform our Customer Support Center or your dealers.
Action: Replace it with a new cyan toner cartridge.
“7.1 Replacing Toner Cartridge” (P.242)
227
6.5 List of Messages
Message
Replace Toner
Cartridge:K
Cause/action
Cause: Black toner cartridge is out of toner.
Action: Replace it with a new black toner cartridge.
“7.1 Replacing Toner Cartridge” (P.242)
Replace Toner
Cartridge:M
Cause: Magenta toner cartridge is out of toner.
Action: Replace it with a new magenta toner cartridge.
“7.1 Replacing Toner Cartridge” (P.242)
Replace Toner
Cartridge:Y
Cause: Yellow toner cartridge is out of toner.
Action: Replace it with a new yellow toner cartridge.
“7.1 Replacing Toner Cartridge” (P.242)
Replace Waste
TonerContainerUI
Cause: Waste toner bottle is full.
Action: Replace it with a new waste toner bottle.
Troubleshooting
“7.3 Replacing Waste Toner Bottle” (P.250)
SeeBypassSetKey
xxxx
XXXX
6
Cause: Your print instruction specified [Bypass-wait User].
Action: Load paper of size and orientation xxxx and paper size
XXXX in tray 5 (bypass tray), or check that this paper is
loaded in tray 5 (bypass tray). Then, press the <Eject/Set>
button on the control panel. Printing will start.
“4.2 Loading Paper” (P.151)
Storing image...
xxxx
HDD
Status: Secure print job is being saved. Print data can be received
from the computer.
Time to replace
TonerContainerU1
Status: The waste toner bottle needs to be replaced. Prepare a
new waste toner bottle. Print processing and print data
reception from the computer is enabled.
“7.3 Replacing Waste Toner Bottle” (P.250)
Tray * - Check
Transparency Type
Cause: A Transparency with a white border is loaded in tray *.
Transparencies with white borders are not suitable for this
printer.
Action: Remove the jammed transparency, if there is one, and load
one of our recommended transparencies (such as V516
and JE001).
“4.2 Loading Paper” (P.151)
228
6.5 List of Messages
Message
xxxx
Printing Tray*
Cause/action
Status: Report/List is being printed.
Print data cannot be received by the computer while a report/list
is being printed.
xxxx.xxxx
Printing Tray*
Status: Secure print job is being printed. Print data can be received
by the computer.
Troubleshooting
6
229
6.5 List of Messages
6.5.2 List of Error Codes
If a print job is not completed successfully due to an error or some failure that
has occurred in this printer, the following message with error code (***-***) is
displayed.
End with Error
***-***
Ready to print
***-***
Check the error code according to the table below, and take appropriate actions.
●
●
When the error code appears, the printing of data remaining in the printer and information spooled
in the memory will not be guaranteed.
When the power to the printer is switched off, print data remaining in the printer and information
spooled in the memory will be erased.
Error code
Troubleshooting
003-747
007-250
6
007-271
007-272
007-273
230
Cause/action
Cause:
Combination of print parameters is not correct, such that [Paper
Tray] for trays 1 to 4 is set to [Auto] on the control panel, [Paper
Source] is set to [Auto] on the printer driver, and [Custom Size] is
specified for the paper type.
Action:
Check the printing instruction.
Cause:
Communication error occurred between this machine and the
optional tray (tray 2 or trays 2 to 4).
Action:
Switch off the printer, and check if the connector cables of the
trays are connected correctly to the slots on the rear of the
printer.
If the problem still persists after switching on the printer again,
contact our Customer Support Center or your dealers. Tray 1 can
be used.
Cause:
Failure occurs in tray 2.
Action:
Switch the printer off and on. If the problem still persists, contact
our Customer Support Center or your dealers. Trays other than
tray 2 can be used.
Cause:
Failure occurs in tray 3.
Action:
Switch the printer off and on. If the problem still persists, contact
our Customer Support Center or your dealers. Trays other than
tray 3 can be used.
Cause:
Failure occurs in tray 4.
Action:
Switch the printer off and on. If the problem still persists, contact
our Customer Support Center or your dealers. Trays other than
tray 4 can be used.
6.5 List of Messages
Error code
Cause/action
009414 to 421,
438 to 441,
914 to 917,
919
010-420, 422,
906
Cause:
Some parts need to be replaced.
Action:
Inform our Customer Support Center or your dealers of the
contents of “***-***”.
Cause:
Some parts need to be replaced.
Action:
Inform our Customer Support Center or your dealers of the
contents of “***-***”.
016-500
Cause:
SMTP server name is not set correctly.
Action:
Check if the SMTP server is set up correctly with Embedded Web
Server. Also, check the settings for the DNS server.
“3.7.1 Setting up the Environment for E-mail Printing” (P.140)
Cause:
POP3 server name is not set correctly.
Action:
Check if the POP3 server is set up correctly with Embedded Web
Server. Also, check the settings for the DNS server.
“3.7.1 Setting up the Environment for E-mail Printing” (P.140)
016-502
Cause:
Log-in to POP3 server failed.
Action:
Check if the user name and password used by POP3 are correct
with Embedded Web Server.
Troubleshooting
016-501
6
“3.7.1 Setting up the Environment for E-mail Printing” (P.140)
016-503
Cause:
SMTP server name is not set correctly.
Action:
Check if the SMTP server is set up correctly with Embedded Web
Server. Also, check the settings of the DNS server.
“3.7.1 Setting up the Environment for E-mail Printing” (P.140)
016-504
Cause:
POP3 server name is not set correctly for [POP before SMTP]
that is performed when mail is sent.
Action:
Check if the POP3 server is set up correctly with Embedded Web
Server. Also, check the settings for the DNS server.
“3.7.1 Setting up the Environment for E-mail Printing” (P.140)
231
6.5 List of Messages
Error code
016-505
Cause/action
Cause:
Log-in to the POP3 server that failed in [POP before SMTP] that
is performed when mail is sent.
Action:
Check if the user name and password used by POP3 are correct
with Embedded Web Server.
“3.7.1 Setting up the Environment for E-mail Printing” (P.140)
016-701
016-702
Troubleshooting
Cause:
Print data cannot be processed because the necessary memory
is insufficient.
Action:
Increase available memory.
Cause:
PCL print data cannot be processed because the print page
buffer is insufficient.
Action:
Take one of the following actions.
● If [Print Mode] is set to [High Resolution], set it to [High Quality].
If the status is still not improved, set it to [Standard].
● Use Print Page Mode.
● Increase the print page buffer capacity.
● Add memory.
For information about [Print Mode], refer to the On-line Help for the
printer driver.
016-705
Cause:
Secure print document cannot be registered because no Hard
Disk Drive (optional) is installed.
Action:
To use the Secure Print feature, you need to install the Hard Disk
Drive (optional).
6
“3.5 Printing Confidential Documents – Secure Print” (P.130)
016-706
016-707
016-716
232
Cause:
The number of Secure/Sample Print users exceeds the upper
limit.
Action:
Delete unnecessary documents/registered secure print users that
are saved in the printer, and try to print again.
Cause:
Sample print document cannot be printed because no Hard Disk
Drive (optional) is installed or some failure occurred on the Hard
Disk Drive.
Action:
To use the Sample Print feature, you need to install a Hard Disk
Drive (optional).
Cause:
TIFF file cannot be spooled due to insufficient Hard Disk Drive
capacity.
Action:
Install a Hard Disk Drive (optional), or delete unnecessary data
on the Hard Disk Drive to free up space.
6.5 List of Messages
Error code
016-719
Cause/action
Cause:
PCL print data cannot be processed because the necessary
memory is insufficient.
Action:
If [Print Mode] is set to [High Resolution], change it to [High
Quality] and try to print again. If the status has still not improved,
set [Print Mode] to [Standard] and try to print.
On-line Help of the printer driver
016-720
016-721
Detected an unsupported command.
Action:
Check the print data for the command that caused the error then
eliminate it and print the job again.
Cause:
An error occurred during the print processing. It may be caused
by the following.
If [Paper Priority] of [Printer Settings] in the Common Menu is set
to [Not Selected] for all paper types, your print instructions
specified Auto Tray Switch.
Action:
Set [Paper Priority] to a setting other than [Not Selected] for any
desired paper type when you attempt to print with Auto Tray
Switch specified. Note that [Paper Priority] is automatically set to
[Not Selected] if [Custom Paper Size] is selected.
“Paper Priority” (P.185)
016-726
016-728
016-729
016-730
016-731
Cause:
Though Print Mode is set to [Auto], the print language cannot be
automatically selected.
It may be caused by the following.
PDF file is sent to this printer by using LPR when PostScript
Software Kit (optional) is installed but no Hard Disk Drive
(optional).
Action:
In thiis case, Hard Disk Drive (optional) is required.
Cause:
TIFF file contains an unsupported tag.
Action:
Check the print data.
Cause:
Cannot print because the number of colors and the resolution of
the TIFF data exceeds the upper allowable limit.
Action:
Change the number of colors and the resolution of the TIFF file,
and try to print again.
Cause:
Unsupported command is detected.
Action:
Check the print data and delete the error-causing command, and
then try to print again.
Cause:
Cannot print because the TIFF data sent to the printer is
incomplete.
Action:
Try to print again.
Troubleshooting
Cause:
6
233
6.5 List of Messages
Error code
016-748
016-749
016-755
016-760
Cause/action
Cause:
Print is disabled because of insufficient Hard Disk Drive space.
Action:
Decrease the number of pages to be printed by means such as
splitting the print data, or printing only one set at a time when
attempting to print multiple sets.
Cause:
A syntax error in the PJL command occurred.
Action:
Check the print settings or correct the PJL command.
Cause:
A PDF file cannot be printed unless printing is permitted.
Action:
Enable PDF file printing by using Adobe Acrobat, and try to print
again.
Cause:
An error occurred during PostScript processing.
Action:
Take one of the following actions.
●
If [Print Mode] is set to [High Resolution], set it to [High Quality].
If the status has still not improved, set it to [Standard].
●
Increase the print page buffer capacity.
●
Increase the memory used by PS.
Troubleshooting
For information about [Print Mode], refer to the On-line Help for the
printer driver.
016-761
Cause:
An error occurred during image processing.
Action:
If [Print Mode] is set to [High Resolution], change it to [High
Quality] and try to print again. If the problem still persists, set
[Print Page Mode] to [On] and try to print.
6
For information about [Print Mode] and [Print Page Mode], refer to
the On-line Help for the printer driver.
016-762
016-764
016-765
016-766
234
Cause:
A print language, which is not installed was specified.
Action:
This printer can process PCL,PSHP-GL/2, and PDF data as
standard. To send other print data, install the option for
processing the appropriate print language.
Cause:
Cannot connect to the SMTP server.
Action:
Consult administrator of the SMTP server.
Cause:
Mail cannot be sent because the Hard Disk Drive of the SMTP
server is full.
Action:
Consult the administrator of the SMTP server.
Cause:
An error occurred on the SMTP server.
Action:
Consult the administrator of the SMTP server.
6.5 List of Messages
Error code
016-767
Cause/action
Cause:
Mail cannot be sent because the incorrect destination mail
address is specified.
Action:
Check the destination mail address and send the mail again.
“3.7.1 Setting up the Environment for E-mail Printing” (P.140)
016-768
Cause:
Cannot connect to the SMTP server because the printer’s e-mail
address is not correct.
Action:
Check the printer’s e-mail address.
“3.7.1 Setting up the Environment for E-mail Printing” (P.140)
016-796
When you configure settings to print only the attached document,
an e-mail without an attached document is received and
discarded.
Action:
To print an e-mail itself and the e-mail header information as well,
change the setting on the [Properties] screen of Embedded Web
Server.
Cause:
Destination address of the mail sent to this printer by using the E-mail
Print feature is not correct.
Action:
Specify the correct destination address, and send the e-mail
again.
“3.7 Printing E-Mail – E-Mail Print” (P.140)
109-906
Cause:
The parts need to be replaced.
Action:
Inform our Customer Support Center or your dealers of “109-906”.
Troubleshooting
016-797
Cause:
6
235
6.6
Network-Related Problems
6.6.1 Troubleshooting When Working in a
TCP/IP Environment
This section describes the causes and verifications, and actions to be taken to
solve various problems that may occur in a TCP/IP environment. For information
about problems in other environments, refer to the Network Print Environment
Guide (network.pdf).
For Windows 95/Windows 98/Windows Me
■When Printing Is Disabled
The table below lists actions to be taken when you click [Printers] in [Settings] of
the [Start] menu, and the printer status appears as [Unable to print (Network
Error)] in the window displayed.
Cause
Troubleshooting
6
236
Verification
Action
The printer and host
device are connected to
different networks.
Check with the network system
administrator to verify that the
network connecting the host
device with this printer is linked
by a router or gateway.
Connect this printer
directly to the network by
connecting the host
device.
An error has occurred in
the network between the
host device and this
printer, and the connection
cannot be established.
[Unable to print (Network Error)]
is displayed.
Ask the network system
administrator to check the
network for errors.
Incorrect IP address for
this printer is entered.
[Unable to print (Network Error)]
is displayed. Select [Properties]
from the [File] menu of the
printer icon, and then select
[Port Settings] on the
[Advanced] tab. Compare the IP
address in the [FX TCP/IP
Direct Print Utility Port Settings]
dialog box with the IP address in
the [System Settings List] (for
how to print the [System
Settings List], refer to “7.4
Printing Report/List” (P.253)).
Enter the correct IP
address specified for this
printer in the [IP Address]
text box of the [FX TCP/IP
Direct Print Utility Port
Settings] dialog box.
This printer is switched off
after a print instruction is
sent from the computer, or
a print instruction is sent to
this printer while it is
switched off.
[Unable to print (Network Error)]
is displayed. Check if this printer
is switched on.
Switch on the printer.
6.6 Network-Related Problems
Cause
Verification
Action
Print requests from
multiple host devices are
sent to this machine at the
same time.
[Unable to print (Network Error)]
is displayed.
None (printing will be
reprocessed automatically).
Printing files cannot be
spooled due to insufficient
disk capacity of the host
device.
[Unable to print (SpoolError)] is
displayed. Open [My Computer]
and right-click the disk (e.g. Cdrive) installed with Windows 95,
Windows 98, or Windows Me.
Select [Properties] from the
menu displayed and then check
the free space available.
After deleting
unnecessary files to
increase the free disk
space, select [Pause
Printing] from the
[Document] menu of the
[Printer] window to enable
printing to restart.
For Windows NT 4.0/ Windows 2000/ Windows XP/
Windows Server 2003
■When Printing Is Disabled
Verification
Action
Incorrect IP address is
set.
Ask the network system
administrator to check if the IP
address of this machine is
correct.
Set the correct IP address for
this printer.
When [LPD Spool] is
set to [Memory], the
print data sent by the
host device in one print
request has exceeded
the upper limit of the
receiving capacity.
Check the memory capacity of
[LPD Spool], and then
compare it with the print data
that was sent in one print
request.
1. If the print data is a single
file and it exceeds the upper
limit of the memory capacity,
split the file into smaller
ones that do not exceed the
said upper limit, and then
send them to print.
Troubleshooting
Cause
6
2. If the print data consists of
multiple files that exceed the
upper limit of the receiving
capacity, reduce the number
of files to be sent to print at
one time.
An irrecoverable error
has occurred during
print processing.
Check if there are any errors
displayed on the printer
control panel.
Switch the printer off and on
again.
The transport protocol
is different from that of
the host device.
Check the selected transport
protocol.
Select the transport protocol
corresponding to that of the
host device.
237
6.6 Network-Related Problems
6.6.2 Troubleshooting When Using Embedded
Web Server
Symptom
Cannot connect to
Embedded Web Server.
Action
Is the printer working properly?
Check if the power supply of the printer is switched on.
Are Embedded Web Server activated?
Print out the [System Settings List] to check.
Is the correct Internet address entered?
Check the Internet address again. If connection cannot be
established, enter the IP address in order to connect.
Troubleshooting
6
238
Is the proxy server being used?
Depending on the proxy server, it may not be possible to
establish a connection.
Without using the proxy server, configure either the browser
setting to [Not using proxy server] or the address to be
connected to [Not using proxy server].
The “Please wait” message
is displayed
in the browser.
Wait for a while as instructed.
If nothing happens, try clicking the Refresh button of the
browser. If nothing happens, check if the printer is working
properly.
The [Refresh Status]
button is not working.
Are you using the specified OS and browser?
Refer to “1.4.1 About Embedded Web Server” (P.39) to
check if your OS and browser are compatible.
Selecting the menu in the
left frame does not change
the right frame contents.
The screen display is
distorted.
Change the window size of the browser.
The latest information is
not displayed.
Click the [Refresh] button.
Characters are not
correctly displayed.
Use Western European language code.
Clicking the [Apply New
Settings] button does not
change anything.
Is the entered value correct?
If the entered value is not a valid entry, it will change
automatically to an entry within the limit.
Clicking the [Apply New
Settings] button will display
browser messages like
“The server has returned
ineffective or
unrecognizable response.”
or “No data”.
Are the user name and password correct?
Enter the correct user name and password.
Reboot the printer.
6.7
Mail-Related Problems
This section describes troubleshooting for Mail Notice Service and the E-Mail Print feature.
Symptom
Unable to use the e-mail
Print feature.
Action
Is the printer’s e-mail address set?
Verify the setting with Embedded Web Server.
Is [Receive E-mail] set to on?
Verify the setting with Embedded Web Server.
Are the IP addresses of the SMTP server and the POP3
server (if POP3 is selected for receiving protocol) set
correctly?
Verify the setting with Embedded Web Server.
Are the correct POP user name and password set?
Verify the setting with Embedded Web Server.
Did you limit the domain from which mails can be received?
Verify if your domain is included in the domain from which
mails can be received with Embedded Web Server.
Are the SMTP server and the POP server working properly?
Check with your network administrator.
Insufficient memory capacity may disable files that are to be
printed. It is recommended to add memory if you intend to
print large files frequently.
The printer’s status is not
notified with the Mail
Notice Service.
Is the printer’s e-mail address set?
Verify the setting with Embedded Web Server.
Is [Mail Notice Service] set to on?
Verify the setting with Embedded Web Server.
Are the IP addresses of the SMTP server and the POP3
server (when POP3 is selected for receiving protocol) set
correctly?
Verify the setting with Embedded Web Server.
Troubleshooting
Unable to print attached
PDF files with the E-mail
Print feature.
6
Are the correct POP user name and password set?
Verify the setting with Embedded Web Server.
Is the notice item that is to be sent set correctly?
Verify the setting on the [Properties] screen of with
Embedded Web Server.
Is the correct destination mail address entered?
Enter the correct destination on the [Properties] screen of
Embedded Web Server.
Are the SMTP server and the POP server working properly?
Check with your network administrator.
239
6.8
Ejecting Remaining Data – When
Printing Stops Halfway Through
This section describes how to print all the print jobs spooled in the printer.
Ejecting print data from the control panel allows you to interrupt receiving print jobs and
empty the buffer.
You can also delete all the print jobs spooled in the printer. For how to delete all the print jobs spooled in the
machine, refer to “2.4 Canceling/Checking Print Jobs” (P.108).
Procedure
Printing...
Parallel
Tray1
(1) Press the <Off-line> button.
Off-line
Data exists
(Off-line status)
(2) Press the <Eject/Set> button.
Troubleshooting
All data
Ejecting...
(All the print jobs spooled in the printer are printed.)
Off-line
(3) Press the <Online> button.
6
Ready to print
●
●
●
240
Pressing the <Online> button automatically switches the printer to the off-line state in which data
receiving is disabled.
When you use parallel interfaces or a USB interface, the print data may be received during the
processing of the job depending on when you press the <Online> button in step (1). In this case, the
print data received after that is recognized as a new print job when you press the <Eject/Set>
button, and is processed as a new print job after exiting the off-line state in step (3).
When you use parallel interfaces or a USB interface, the print data processed as a new job after
exiting the off-line state may not be printed correctly.
7
Daily Control
7.1
Replacing Toner Cartridge ............................................................. 242
7.2
Replacing Drum Cartridge ............................................................. 245
7.3
Replacing Waste Toner Bottle........................................................ 250
7.4
Printing Report/List ........................................................................ 253
7.5
Checking Printer Status by Web Browser ...................................... 264
7.6
Checking Printer Status by E-Mail ................................................. 265
7.7
Check Meter................................................................................... 267
7.8
Adjusting Gradation ....................................................................... 271
7.9
Adjusting Color Registration .......................................................... 281
7.10 Moving the Printer.......................................................................... 285
7.1
Replacing Toner Cartridge
This machine is equipped with the cartridges containing four colors of toner; black (K), cyan
(C), magenta (M), and yellow (Y). When the replacement time of the toner cartridge is
coming close, a message “Ready to print AddToner : x” appears on the display. Even after
this message appears, you can print about 1250 pages normally. When the message
changes to “Replace Toner Cartridge : x” printing is disabled until you replace the old toner
cartridge with a new one.
Check the position of the appropriate toner cartridge in the indicator at the left side of the
control panel, and replace the cartridge of the color indicated in the message.
●
●
●
●
●
●
Daily Control
●
The above number of pages you can print after the message appears applies to the case when continuously
printing A4 -size paper with a ratio of 5%.
This number may vary depending on the print contents, paper size, environment in use, and frequency of
switching on/off the power of the printer.
On the display, the color of the toner cartridge appears as K, C, M, or Y. K means black, C cyan, M magenta, and
Y yellow.
When replacing the toner cartridge, toner may spill on the floor. It is recommended to spread a sheet of paper on
the opened front cover or floor beforehand.
Ready to print
AddToner : K
Replace Toner
Cartridge : K
Front cover
Toner cartridge
7
●
●
242
Bring the used toner cartridge to us/distributor or send it back to us according to the instructions on the sheet
included.
When the remaining amount of toner is getting low, this printer may stop during printing and the message that
prompts you to replace the toner cartridge will appear, without warning you that the replacement time is coming
close. If so, replace the toner cartridge of the color indicated in the message to continue printing.
Replace the toner cartridge with the power of this machine switched on. When the power of the printer is switched
off, print data remaining in the printer and information spooled in the memory will be erased.
Never put the toner cartridge into a fire. Toner dust may explode, resulting in
burns.
Never put toner, the toner recycle bottle, or the container containing toner in a
fire. Toner dust may explode, resulting in burns.
7.1 Replacing Toner Cartridge
Procedure
1
Check that the printer is not printing,
and open the front cover.
2
Turn the cartridge containing toner of
the color indicated in the message
counter-clockwise until it comes to the
key-mark ( mark) position.
K means black, C cyan, M magenta, and Y yellow.
Pull out the toner cartridge gently.
●
●
4
Pull out the toner cartridge slowly. Otherwise, toner
may spatter.
Bring the used toner cartridge to us/distributor or
send it back to us according to the instructions on the
sheet included.
Daily Control
3
7
Prepare the new cartridge containing
toner of the same color as cartridge
removed, and shake it from side to side
and up and down lightly 3 or 4 times as
shown in the figure.
243
7.1 Replacing Toner Cartridge
5
Adjust the arrow mark on the toner
cartridge to the key-mark ( -mark)
position, and push it in to the end.
6
Turn the toner cartridge clockwise until
it comes to the key-mark ( -mark)
position, and fix it.
The toner cartridge will not turn unless inserted to the
correct position.
7
Daily Control
7
244
Close the front cover.
“Ready to print” appears.
7.2
Replacing Drum Cartridge
When the replacement time of the drum cartridge is approaching, the message [Ready to
print Replace Drum U2] appears on the display. Even after this message appears, you can
print about 750 pages normally.
By default, when the message changes to [Ready to print Replace Drum U2], printing stops
until you replace the old drum cartridge with a new one.
You also need to replace the waste toner bottle when you replace the drum cartridge.
●
●
●
●
●
●
●
●
●
For the drum cartridge, the number of pages you can print after the replacement message appears applies to the
case when continuously printing A4 -size paper.
For waste toner bottle, the number of pages you can print after the replacement message appears applies to the
case when continuously printing A4 -size paper with a ratio of 5%.
This number may vary depending on the print contents, paper size, environment in use, and frequency of
switching on/off the power of the printer.
You can make the printer not stop printing even when the replacement time comes. For information about
settings, refer to “Drum Life End” (P.184).
If you continue printing without replacing the drum cartridge beyond the its life, performance of the printer such
as image quality may be affected. It is recommended to replace the old drum cartridge with a new one.
Do not expose the drum cartridge to direct sunlight or strong fluorescent light.
Do not touch or scratch the face of the drum. It may lower the print quality.
When replacing the waste toner bottle, toner may spill on the floor. It is recommended to spread a sheet of paper
on the opened front cover or floor beforehand.
■ When [Cancel Print] is set in [Drum Life End]
Ready to print
Replace Drum U2
Ready to print
Replace Drum U2
Printing stops
Even after this message
appears,
Daily Control
●
Bring the used drum cartridge to us/distributor or send it back to us according to the instructions on the sheet
included.
Replace the toner cartridge and waste toner bottle while the power to this printer is switched on. When the power
of the printer is switched off, print data remaining in the printer and information spooled in the memory will be
erased.
7
■ When [Continue Print] is set in [Drum Life End]
Ready to print
Replace Drum U2
Even after this message
appears,
Ready to print
Replace Drum U2
Front cover
Drum cartridge
Cover A (left cover)
Never put toner, the waste toner bottle, or the container containing toner in a fire.
Toner dust may explode, resulting in burns.
245
7.2 Replacing Drum Cartridge
Procedure
1
Check that the printer is not printing.
Push up the lever on cover A (at the left
side) (1), and open the cover (2).
Daily Control
2
Open the font cover.
3
Pull out the waste toner bottle as
shown in the diagram.
7
Toner will spill out if you tilt the removed waste toner
bottle. To prevent this, stand it as shown in the diagram.
Bring the used waste toner bottle to us/distributor or
send it back to us according to the instructions on the
sheet included.
246
7.2 Replacing Drum Cartridge
4
Turn the handle counter-clockwise to
the key-mark ( -mark) guideline
position while pulling the lever inside
the handle.
If it is difficult to pull the lever, pull the handle slightly
to the left, and then pull the lever.
5
Hold the handle of the IDT unit, and pull
it slowly until it no longer moves.
Do not touch the transfer roll of the IDT unit. It may
lower the print quality.
Transfer roll
of the IDT unit
6
Hold the handle of the drum cartridge,
and remove it by lifting it up slightly.
●
●
●
Lay the used drum cartridge as shown in the diagram
so that you do not carelessly touch it.
Bring the used drum cartridge to us/distributor or
send it back to us according to the instructions on the
sheet included.
7
Take out the new drum cartridge from
the box, and remove the packaging material.
8
Hold the handle of the drum cartridge
with the protective sheet attached and
fix tabs (1) and (2), and then fix the
inner tab (3) as shown in the diagram.
Daily Control
●
Be careful not to drop the drum cartridge on the floor
when removing it.
Be careful not to touch any toner stock to the drum
cartridge.
7
247
7.2 Replacing Drum Cartridge
9
Daily Control
7
Check that the 2 arrow-mark positions on
the printer and drum cartridge match.
10
Remove the tab from the protective
sheet on the drum cartridge.
11
Pull out the protective sheet as shown
in the diagram.
12
Push the IDT unit slowly in to the end.
Do not touch the transfer roll of the IDT unit or the drum
of the drum cartridge. It may lower the print quality.
When the IDT unit is installed correctly, the tab shown
in the diagram also returns to the original status.
248
7.2 Replacing Drum Cartridge
13
Turn the handle of the IDT unit to the
key-mark ( -mark) guideline position.
●
●
14
15
If it is difficult to turn the handle, pull out the IDT
unit again and push it firmly in to the end.
A handle is fixed when it is returned to the correct
position.
Get out a new waste toner bottle from
the bag.
Attach the waste toner bottle as shown in the diagram.
16
Press the center of cover A (left cover)
and close cover A slowly (1).
Daily Control
If the waste toner bottle is not correctly attached, the
front cover may not be closed or a message may appear
on the front panel. Attach a waste toner bottle in the
frame of this machine correctly as shown in the
diagram.
7
If necessary, fold Tray 5 (bypass tray) (2).
17
Close the front cover.
[Ready to print] appears.
249
7.3
Replacing Waste Toner
Bottle
When it is almost time to replace the waste toner bottle, the message [Ready to print
Replace UI] appears. Even after this message appears, you can print about 1,000 pages
normally. Check that a new waste toner bottle is in stock during this time.
You need to replace a waste toner bottle after printing about 24,000 pages. When the
message changes to [Replace Waste TonerContainerUI], printing stops until you replace
the old waste toner bottle with a new one.
●
●
●
●
●
Bring the used waste toner bottle to us/distributor or send it back to us according to the instructions on the sheet
included.
Replace the toner recycle bottle while the power to this printer is switched on. When the power of the printer is
switched off, print data remaining in the printer and information spooled in the memory will be erased.
The number of pages mentioned above, that you can print after the message appears applies to the case when
continuously printing A4 -size paper with a ratio of 5%.
This number may vary depending on the print contents, paper size, environment in use, and frequency of
switching on/off the power to the printer.
When replacing the toner recycle bottle, toner may spill on the floor. It is recommended to spread a sheet of paper
on the opened front cover or floor beforehand.
Ready to print
Replace U1
Replace Waste
TonerContainerU1
Daily Control
Front cover
Waste toner bottle
Cover A (left cover)
7
Never put toner, a waste toner bottle, or the container containing toner in a fire.
Toner dust may explode, resulting in burns.
250
7.3 Replacing Waste Toner Bottle
Procedure
1
Check that the printer is not printing,
and open the front cover.
2
Pull out the waste toner bottle as
shown in the diagram.
Bring the used waste toner bottle to us/distributor or
send it back to us according to the instructions on the
sheet included.
3
Attach a waste toner bottle as shown in
the diagram.
Daily Control
Toner will spill out if you tilt the removed waste toner
bottle. To prevent this, stand it as shown in the diagram.
7
251
7.3 Replacing Waste Toner Bottle
If a waste toner bottle is not correctly attached, the front
cover may not be closed or a message may appears on
the front panel. Attach a waste toner bottle to the frame
of this printer correctly as shown in the diagram.
4
Daily Control
7
252
Close the front cover.
[Ready to print] appears.
7.4
Printing Report/List
This section describes the type of reports/lists and how to print them.
7.4.1 Type of Reports/Lists
This machine has a feature that prints out the following reports/lists in addition to
printing the data from the computer.
●
System Settings List
●
●
Job History Report
●
●
Error History Report
Printer Meter Report
Fonts List
●
●
HP-GL/2® Settings List
●
●
PostScript® Fonts List
●
●
●
●
●
HP-GL/2® Logical Printers/Stored Jobs List
HP-GL/2® Palette List
TIFF Settings List
TIFF Logical Printers List
PDF Settings List
PCL Settigs List
PostScript® Logical Printers List
The following reports/lists can be printed when optional accessories are installed.
<When Hard Disk Drive is installed>
●
●
Use the control panel to print these reports and lists. For how to use the control panel, refer to
“7.4.2 Printing Report/List” (P.254).
For information about [HP-GL/2 Settings List], [HP-GL/2 Logical Printers/Stored Jobs List], and
[HP-GL/2 Pallet List], refer to HP-GL, HP-GL/2 Emulation Setting Guide.
Daily Control
●
Stored Documents List
7
253
7.4 Printing Report/List
7.4.2 Printing Report/List
Use the control panel to print reports/lists. Here, we describe how to print the [Fonts
List] as an example. Steps are the same when printing other reports/lists.
Procedure
Ready to print
(Printer is in the standby mode.)
(1) Press the <Menu> button.
Menu
Print Language
(2) Press the <
(The menu screen is displayed.)
> or <
> button several times.
Menu
Report/List
(3) Press the <
> button.
Report/List
Job History
Daily Control
7
(4) Press the <
(The Report/List menu is displayed.)
> or <
> button several times to select [Fonts List].
Report/List
Fonts List
(5) Press the <
> button.
Fonts List
Use Set to Print
(6) Press the <Eject/Set> button.
Fonts List
Printing...Tray*
([Fonts List] will be printed.)
Fonts List
Use Set to Print
(7) Press the <Menu> button.
Ready to print
254
(The printer returns to the standby mode. It can
receive data any time now.)
7.4 Printing Report/List
7.4.3 Items in Reports/Lists
System Settings List
Various settings such as the hardware configuration of this printer or network
information are printed. Detailed items and print result are as follows.
■ Contents of the List
●
Some items may not be displayed depending on the settings of this printer.
System Settings
Product Name, Serial Number, and Product Code.
ROM
ROM installed and its version No.
When PostScript Software Kit (optional) is installed, [Standard + XXX
ROM] (XXX is a name of option) is printed.
Machine
Configuration
Optional accessories installed such as a Hard Disk Drive, tray, output
device, duplex unit.
Maintenance
Current settings of automatic [Job History Report] print, beep sound,
power saver mode, date/time setting, reset offline automatically ID
printing function, drum life action and secure print operation. When
the Duplex Unit (optional) is installed, current settings of 2 sided
print of report/lists are also printed.
Print Mode Settings
General
The number of pages printed, Page Description Language, and the
status of fonts installed. The number of pages printed indicates the
respective number of color/black and white pages which have been
printed and total number of pages printed.
Page Description Language indicates the print language that can be
used. Fonts installed indicate the number of font types of Japanese/
European fonts which are currently installed.
Memory
Total capacity of memory plus value of the capacity of the print page
buffer, and receive buffer memory of each port. When PostScript
Software Kit (optional) is installed, the capacity of the memory used
by the kit is also printed.
Paper Tray
Attributes
Size and orientation of the paper in the tray, paper type set for the tray,
and priority of the tray.
Output Settings
Settings of paper replacement.
Paper Settings
Current settings of the name of custom paper sizes, priority of paper
type, and image quality processing for each paper type.
Banner Sheet
Settings
Setting of whether to output the banner sheet.
Daily Control
Machine
Information
7
255
7.4 Printing Report/List
Communication Settings
Whether each port is enabled or disabled is printed. When enabled, the following
items and values are printed.
Daily Control
7
Ethernet Settings
Connection type and MAC address.
TCP/IP
How to obtain the IP address, IP address, subnet mask, gateway address,
whether to limit receiving of printing by IP address, and status
information.
IPX/SPX
IPX/SPX operation frame type.
WINS
Settings of obtaining the address from the DHCP server, and settings of
Primary WINS server and Secondary WINS server.
DNS
Settings of obtaining the address from DHCP server, DNS preferred server
address, DNS alternative server address 1, DNS alternative server
address 2, domain name, dynamic update of DNS, and status
information.
SNMP
Port status and transport protocol.
Internet Services
Port status.
Parallel
Port status, Print Mode specified, PJL, Adobe communication protocol, auto
eject time, bi-directional communication, settings of input prime is
printed .
USB 1.1
Port status, Print Mode specified, PJL, Adobe communication protocol, and
auto eject time.
NetWare
Port status, Print Mode specified, PJL, transport protocol, TBCP filter,
operation mode, device name, network address, tree name (only for
directory mode), context name (only for directory mode), file server
name (only for bindery mode), notification language, queue search
interval, search times, active discovery, and status information.
LPD
Port status, Print Mode specified, PJL, TBCP filter, connection timeout, and
port No.
SMB
Port status, Print Mode specified, PJL, transport protocol, TBCP filter, work
group name, host name, auto driver download, auto master mode,
password encryption, maximum session number, Unicode support,
administrator name, and status information.
EtherTalk
Port status, Print Mode specified, PJL, printer name, and zone name.
IPP
Port status, Print Mode specified, PJL, TBCP filter, access authorization
control, use of DNS, port No., additional port No., and timeout.
Port9100
Port status, Print Mode specified, port No., PJL, TBCP filter, and timeout.
Mail Notice
Service
Port status.
E-mail
Sending/receiving mail, mail receiving port status, receiving protocol,
POP3 server address, POP user name, POP server check interval,
SMTP server address, machine e-mail address, mail address of this
machine, whether to print header and contents (mail), and whether to
receive only from the specified domain.
[Adobe communication protocol] of [Parallel] and [USB 1.1], [TBCP filter] of [NetWare], [LPD],
[SMB], [IPP], and [Port9100], and all items of [EtherTalk] are also printed.
256
7.4 Printing Report/List
Job History Report
Print job execution result is printed to notify if the print data sent from the computer is
printed correctly. Up to 50 latest print jobs are printed on the [Job History Report].
You can use the control panel to set whether to automatically print the [Job History
Report] every time the number of print jobs exceeds 50.
■ Print Example of Job History Report
TallyGenicom 8124
Job History Report
Date/Time : 2003/07/11 03:07 PM
Page : 1(Last Page)
Date
Time
Input Source
2003/07/11 10:48:20 AM Report/List
Output Destination
Job Info
Page Info
Pages Sheets Job Status
Center Output Tray
1 Sided
Black:A4:Plain
2
2
2003/07/11 03:04:59 PM LPD:KUROBE:Endo-Akira:Ginga_user_Guide.pdf
1 Up:PostScript
Completed
0
Completed with error(016-749):JCL Syntax Error
2003/07/11 03:06:30 PM LPD:KUROBE:Endo-Akira:Microsoft Word - Report.doc
Center Output Tray
1 Up:1 Sided:PCL
Black:A4:Plain
1
1
Completed
2003/07/11 03:06:54 PM LPD:KUROBE:Endo-Akira:Microsoft Word - Sample.doc
Center Output Tray
1 Up:1 Sided:PCL
Black:A4:Plain
1
1
Completed
Date
Date when print was instructed.
Time
Time when print ended.
Input Source
Port which received the print data.
Output Destination
Tray to which the printed paper was output.
Job Info
Setting of 1 sided print, 2 sided print, or N Up, and type the
printer driver used.
Page Info
Setting of whether color or black/white print, output paper
size, and paper type.
Pages
Number of pages printed.
Sheets
Number of sheets of paper printed.
Job Status
Whether print ended normally. Abnormal end message may
be displayed.
Daily Control
■ Contents of the List
The following items concerning up to the 50 latest print jobs are printed on the [Job
History Report].
7
257
7.4 Printing Report/List
■ Abnormal End of Job
[Job Processing Status] may indicate the following abnormal end message.
Error Message
Print Instruction Fail
Out of ART EX Memory
Out of Page Buffer
Cause and Action
Cause:
Combination of print parameters is incorrect such
that [Paper Source] is set to [Auto] though
[Custom Size] is specified.
Action:
Check the print data. If above case is applied, select
Tray 5 (bypass tray).
Cause:
Print data cannot be processed because the
necessary memory is insufficient.
Action:
Increase available memory.
Cause:
PCL print data cannot be processed because the
print page buffer is insufficient.
Action:
Take one of the following actions.
When [Print Mode] is set to [High Resolution], set
it to [High Quality]. If the status is still not
improved, set it to [Standard].
●
Use Print Page Mode.
●
Increase the capacity of print page buffer.
●
Add memory.
●
Daily Control
For information about [Print Mode] and [Print Page
Mode], refer to the On-line Help for the printer driver.
Other Error
7
Cause:
An error occurred during print processing. It may
be caused by the following.
When [Paper Priority] of [Print Settings] in the
Common Menu is set to [off] for all paper types,
print is instructed with the Auto Tray Switch
specified.
Action:
Set [Paper Priority] to other than [Off] for any
desired paper type when printing with the Auto
Tray Switch specified.
“Paper Priority” (P.185)
PDL Auto Switch Fail
258
Cause:
When Print Mode is set to [Auto], print language
cannot be automatically selected.
It may be caused by the following.
PDF file is sent to this printer by using LPR when
no Hard Disk Drive is installed.
Action:
In this case, Hard Disk Drive and memory of
384 MB or more is required.
7.4 Printing Report/List
Error Message
HD Full
PS Decompose ERR
Cause and Action
Cause:
Print is disabled because Hard Disk Drive space is
insufficient.
Action:
Decrease the number of pages to be printed by
means of such as dividing the print data, or
printing by one set when attempting to print
multiple sets.
Cause:
An error occurred during PostScript processing.
Action:
Take one of the following actions.
When [Print Mode] is set to [High Resolution], set
it to [High Quality]. If the status is not still
improved, set it to [Standard].
● Increase the capacity of print page buffer.
● Increase memory used by PS.
●
For information about [Print Mode], refer to the On-line
Help of the printer driver.
FIFO Empty ERR
Cause:
An error occurred during image processing.
Action:
Set [Print Mode] to [High Quality], and instruct print
again. If the problem still persists, print in Print
Page Mode.
PJL Syntax Error
Invalid Page Margin
HP-GL/2 Memory Overflow
Cause:
A syntax error of the PJL command occurred.
Action:
Check settings for print or correct the PJL
command.
Cause:
Page margin value is too large for valid coordinate
area of HP-GL or HP-GL/2.
Action:
Lower the page margin value and instruct print
again.
Cause:
Paper size may not be determined correctly
because the received data exceeds the HP-GL/
2 spool size.
Action:
●
●
Page without Image Draw
Data
Daily Control
For information about [Print Mode] and [Print Page
Mode], refer to the On-line Help for the printer driver.
7
Wait until processing of stored print data is
finished, and instruct print again.
It is recommended to assign more HP-GL or HP-GL/2
auto layout memory, or install a Hard Disk Drive.
Cause:
No drawing data exists in the HP-GL or HP-GL/2
print data.
Action:
Check the print data.
259
7.4 Printing Report/List
Error Message
Out of Memory-Duplex Fail
Cause:
2 sided printing cannot be performed because
memory is insufficient.
Action:
Increase the capacity of the print page buffer, and
instruct print again or increase available
memory.
PostScript LANG Interprete
ERR
Cause:
An error occurred in PostScript.
Action:
Check the print data, or click [Setting Spool] of the
[Advanced] tab on the printer driver to set
bidirectional communication to off.
Print with Substitute Font
Cause:
Alternative font is used.
Action:
Check the print data.
Cause:
A mathematical operation error occurred because
the value larger than the printer limit was used
in the print data.
Action:
Check the print data.
Cause:
An HP-GL/2 command error occurred.
Action:
Check the print data.
Cause:
Secure print document cannot be registered
because the Hard Disk Drive (optional) is not
installed.
Action:
For using the secure print feature, the Hard Disk
Drive (optional) is required.
Arithmetic Error
HP-GL/2 Command ERR
Secure Print Fail
Daily Control
7
Cause and Action
“3.5 Printing Confidential Documents – Secure Print”
(P.130)
Banner Sheet Cancelled
Attached Document Error
Cause:
Failure occurs in the banner sheet tray.
Action:
Set the banner sheet tray to the normal state. Or,
change the banner sheet tray on the control
panel.
Cause:
Problem exists in the attached document received
by this printer.
Action:
Check the attached document.
“3.7.2 Sending E-mail” (P.143)
260
7.4 Printing Report/List
Error History Report
This list contains information concerning up to the 50 latest errors which
occurred in this printer.
■ Contents of the List
Date
Date when an error occurred.
Time
Time when an error occurred.
Error Code
Error code is printed.
“6.5.2 List of Error Codes” (P.230)
Error Type
Brief explanation of error.
Printer Meter Report
You can check the total number of pages printed and the total number of sheets
used in this machine for each computer (job owner). The number of pages
printed is counted by color and black/white print. [Printer Meter Report] shows
the number that is counted from data initialization.
●
●
■ Contents of the List
Job Owner Name
Name of the user who instructed print.
Pages
(color size, total number of
color pages, total
number of black/white
pages)
For color print, the number of pages is counted for each
paper size (A3, A4, B4, B5, and others).
Total number of color print pages, [Color Total Pages], total
number of black/white print pages, [B/W Total Pages],
and sum of these two values, [Total Pages] are printed.
Sheets
(Total number of color
sheets, total number of
black/white sheets)
Total number of color printed sheets, [Color Total Sheets],
total number of black/white printed sheets, [B/W Total
Sheets], and the sum of these two values, [Total Sheets]
are printed.
Daily Control
For information about [Printer Meter Report], refer to “7.7.2 Checking Total Number of Printed
Pages by [Printer Meter Report]” (P.268).
[Printer Meter Report] data can be initialized. For more information, refer to “5.2 Description of
Common Menu” (P.161).
7
Fonts List
A list of fonts that can be used by PCL is printed.
■ Contents of the List
The fonts list shows the name of the font that can be used in the standard PCL and
optional emulation mode, together with a sample character string.
261
7.4 Printing Report/List
TIFF Settings List
Each setting in TIFF Print Mode is printed.
■ Contents of the List
Format
Settings of document size, paper size, tray, home position,
orientation of document, N Up, N Up print direction,
location correction, and color mode are printed.
Options
Output tray, whether to sort (by set), and whether to perform
2 sided print.
Zoom
Settings of Reduce/Enlarge mode, vertical%, and
horizontal%.
Print Control
Settings of the waiting of paper feeding confirmation for Tray 5
(bypass tray), image enhance, the priority specification of
print copies, print copies, and paper margin.
Stored Jobs List
Default value and settings of No. 1 to 20 which indicate logical
printer.
TIFF Logical Printers List
A list of logical printers which is created in TIFF Print Mode is printed.
Daily Control
7
Settings of PostScript logical printer are made through Embedded Web Server. For information about
each item, refer to On-line Help of Embedded Web Server .
■ Contents of the List
The [TIFF Logical Printers List] shows the settings of registered logical printers 1 to 20.
PDF Settings List
Settings on the control panel for direct print of PDF file are printed.
■ Contents of the List
The following items are printed on the [PDF Settings List].
Process Mode, Quantity, 2 Sided Print, Print Mode, Collated, Output Size, Layout, and
Output Color.
PCL Settings List
Setting on the control panel for PCL.
■ Contents of the List
The following items are printed on the [PCL Settings List].
Paper Tray, Output Size, Paper Size (Bypass Tray), Output Destination, Orientation, 2
Sided Print, Font, Symbol Set, Font Size, Font Pitch, FormLines, Quantity, Image
Enhancement, HexDump, Output Color, Line Termination, Draft Mode.
262
7.4 Printing Report/List
PostScript® Fonts List
Fonts that can be used by PostScript are printed on this list.
■ Contents of the List
The [PostScript® Fonts List] shows the font types and sample characters contained in
PostScript ROM.
PostScript® Logical Printers List
A list of logical printers created by PostScript are printed on this list. You can check the
settings of registered logical printers 1 to 20.
Settings for the PostScript logical printer are made through Embedded Web Server. For information
about each item, refer to the On-line Help of Embedded Web Server.
■ Contents of the List
Registration No. of logical printer.
Format
Settings of paper size, tray, paper type, and color mode.
Option
Settings for 2 sided print and output tray.
Print Control
Settings for the waiting of paper feeding confirmation for
Tray 5 (bypass tray), sort (by set), screen type, image
enhance, print mode, the priority specification of print
copies, and print copies.
Stored Documents List
A list of documents which are stored in this printer with the Secure Print/Sample/
Delayed Print feature.
●
●
“3.5 Printing Confidential Documents – Secure Print” (P.130)
“3.6 Printing after Checking Output Result – Sample Print” (P.135)
Daily Control
Printer Number
7
■ Contents of the List
Mailbox Size
Used space and free space on the additional Hard Disk
Drive.
Secure Print
Doc. No., User ID, Document Name, Doc. Size, Stored Date,
and Pages of the stored security print data.
Sample Print
Doc. No., User ID, Document Name, Doc. Size, Stored Date,
and Pages of the stored sample print data.
Delayed Print
Doc. No., User Name, Document Name, Stored Date and
Print Start Date/Time of the stored delayed print data.
263
7.5
Checking Printer Status by
Web Browser
When this printer is installed in the TCP/IP environment, you can check the printer status or
configure settings of the printer by using the Web browser in the computer connected to the
network.
This feature is called Embedded Web Server.
Embedded Web Server also allows you to check the remaining amount of consumables and
paper in this printer.
“1.4 Configuring from the Computer (Embedded Web Server)” (P.39)
Daily Control
7
264
Click the desired item
to see the status.
7.6
Checking Printer Status by
E-Mail
If this printer is connected to the network in the environment which enables mail sending/
receiving, you can configure this printer so that error status in this printer and the history that
this machine rejected the print/mail receive request can be notified to the specified e-mail
address.
This feature is called Mail Notice Service.
7.6.1 Information to Be Notified by Mail Notice
Service
The following information is notified by Mail Notice Service.
Type
Description
Notifies the user that an error occurred which requires some action
by the user.
Notice of IP address
rejection
Notifies that the print request is issued from an unauthorized user
when printing is allowed for only certain users. Notifies the IP
address of the client rejected by this machine, rejection times,
and the last rejected time for each client.
Notice of mail
receiving domain
rejection
Notifies that the mail from an unauthorized user is received when
mail receiving from the only a specified domain is allowed.
Notifies the address of the user rejected by this machine,
rejection times, and the last rejected time for each client.
Completion of Mail
Notice Service
registration
Notifies the contents of change when settings concerning Mail
Notice Service (mail notice conditions and notice destination
address) are changed.
7.6.2 Settings for Using Mail Notice Service
To use Mail Notice Service, you need to configure settings of the network and mail
environments. Check with your system administrator or network administrator on
whether these settings have been configured.
Daily Control
Regular notification
7
Network environment
●
Register the user account.
265
7.6 Checking Printer Status by E-Mail
Setting up the mail environment
Using Embedded Web Server, set the Port Status, Machine E-mail Address, TCP/IP
environment, and mail server settings.
Set the following items on the Properties screen depending on the mail environment.
●
●
Be sure to click [Apply New Settings] to reboot this machine after completing the settings.
[Mail Notice Settings] will be displayed when you set [Mail Notice] in [Port Status] to ON and
reboot this printer.
Item
Daily Control
7
266
Items to
be set
Description
Machine
Details
Administrator e-mail address (recommended), machine e-mail address
Refer to “Machine Details” of “3.7.1 Setting up the Environment for E-mail
Printing” (P.141).
Port Status
Mail notice
Service
Protocol
Settings →
TCP/IP
Specify host name, how to obtain DNS server address, DNS Server addresses 1
to 3, and DNS domain name.
Refer to “Protocol Settings >TCP/IP” of “3.7.1 Setting up the Environment for E-mail
Printing” (P.141).
Protocol
Settings →
E-Mail
Specifies receiving protocol, POP3 server address, POP3 server check interval,
POP user name , POP user password, authentication before SMTP sending,
and SMTP server address.
Refer to “Protocol Settings > E-Mail” of “3.7.1 Setting up the Environment for E-mail
Printing” (P.142).
Mail notice
settings
Mail notice
settings
Configure settings such as mail notice interval (optional).
Mail
Recipient
Settngs
Specify the destination mail address in up to 128 byte characters
available for mail addresses.
Click [OK].
Set to [Enable].
7.7
Check Meter
This section describes how to check the total number of printed pages.
There are two ways of counting the total number of printed pages, and how to check differs
individually. One way is checking the total number of printed pages for each meter which is
classified by color mode such as color print or black/white print. Another way is checking the
total number of printed pages for each computer.
7.7.1 Checking Total Number of Printed Pages
by Meter
You can check the total number of printed pages for each meter on the control panel
display.
Meter is classified by color mode.
Meter 1
Black/white print
Meter 2
Usually, not used.
Meter 3
Color print
When you print the print data which is applied to color conversion with an ICC profile on application
with [Auto (Color/Black)] selected, the document is printed in color even if it looks black/white on the
monitor. In this case, Meter 3 (color print) is counted.
Procedure
Ready to print
(Printer is in the standby mode.)
(1) Press the <Menu> button.
Menu
Print Language
(2) Press the <
(The menu screen is displayed.)
> or <
Daily Control
Steps for checking the meter are as follows.
7
> button several times.
Menu
Meter Reading
(3) Press the <
> button.
Meter 1
12345
(4) Press the <
(Meter displays)
> or <
> button to select the desired meter.
Meter 3
123
(5) Press the <Menu> button.
Ready to print
(The printer returns to the standby mode. It can receive
data any time now.)
267
7.7 Check Meter
7.7.2 Checking Total Number of Printed Pages
by [Printer Meter Report]
You can check the total number of pages printed and total number of sheets used in
this printer for each computer (job owner). The number of pages printed is counted by
color and black/white print. [Printer Meter Report] shows the number that is counted
from data initialization.
Print the [Printer Meter Report] by using the control panel.
Contents of the [Printer Meter Report]
The following items are printed on the [Printer Meter Report].
Date of Initialization
Date when the printer meter data was initialized.
Date/Time
Date when the [Printer Meter Report] was created.
The following items are printed for each job owner.
Daily Control
7
268
Job Owner Name
Names of up to 200 users are printed. Specify the user name
subject to control in [Specify Job Owner] of the printer driver.
The print job with no job owner specified or that performed by
the 201st and subsequent user is counted in second last
[UnkownUser] box. Print of the report/list is counted in last
[Report/List] box.
Number of color A3size pages
Number of pages printed to A3 or larger size paper in color.
Number of color A4size pages
Number of pages printed to A4-size paper in color.
Number of color B4size pages
Number of pages printed to B4-size paper in color.
Number of color B5size pages
Number of pages printed to B5-size paper in color.
Number of other size
pages in color
Number of pages printed to paper smaller than B5 size in color.
Color Total Pages
Total number of pages printed in color.
B/W Total Pages
Total number of pages printed in black and white.
Total Pages
Total number of pages printed. Counted every time one print job
is finished.
Color Total Sheets
Number of sheets of paper printed in color.
B/W Total Sheets
Number of sheets of paper printed in black and white.
Total Sheets
Total number of sheets of paper printed. Counted every time one
print job is finished.
7.7 Check Meter
[Printer Meter Report] data can be initialized. For more information on this feature, refer to “5.2
Description of Common Menu” (P.161). For information about steps, refer to “Initializing the Printer
Meter Data” (P.270).
How to print the Printer Meter Report
Procedure
Ready to print
(Printer is in the standby mode.)
(1) Press the <Menu> button.
Menu
Print Language
(2) Press the <
(The menu screen is displayed.)
> or <
> button several times.
Menu
Report/List
(3) Press the <
> button.
Report/List
Job History
(4) Press the <
(The Report/List menu is displayed.)
> or <
> button several times to select [Print Meter].
(5) Press the <
> button.
Print Meter
Use Set to Print
(6) Press the <Eject/Set> button.
Print Meter
Printing...Tray1
Daily Control
Report/List
Print Meter
7
(The [Printer Meter Report] is printed.)
Print Meter
Use Set to Print
(7) Press the <Menu> button.
Ready to print
(The printer returns to the standby mode. It can
receive data any time now.)
269
7.7 Check Meter
Initializing the Printer Meter Data
Procedure
Ready to print
(Printer is in the standby mode.)
(1) Press the <Menu> button.
Menu
Print Language
(The menu screen is displayed.)
(2) Press the <
> or <
> button several times.
Menu
Admin Menu
(3) Press the <
> button.
Admin Menu
Network/Port
(4) Press the <
(The System Administrator Menu is displayed.)
> or <
> button several times.
Admin Menu
Init/Del Data
(5) Press the <
Daily Control
7
> button.
Init/Del Data
NVM
(Initialization/Data deletion is displayed.)
(6) Press the <
> or <
> button several times.
Init/Del Data
Print Meter
(7) Press the <
> button.
Print Meter
Use Set to Init
(8) Press the <Eject/Set> button.
Print Meter
Initializing...
Print Meter
Use Set to Init
(9) Press the <Menu> button.
Ready to print
270
(The printer returns to the standby mode. It can
receive data any time now.)
7.8
Adjusting Gradation
7.8.1 Gradation Adjustment
When the color gradation of the printed image is incorrect, you can easily adjust it.
Through this gradation adjustment, the image quality of this machine can be
consistently maintained.
Gradation adjustment is divided into two types, resolution preferred and gradation
preferred.
To adjust the gradation of the High Resolution-conscious part like text, select
resolution preferred . To adjust the smoothness of gradation for graphics and photo
images, select gradation preferred.
When adjusting gradation, print the gradation adjustment chart and compare it with
“Color sample for halftone reproduction tuning” included with the printer to get the
value for [Lighter/Darker] settings, and set this value for the printer.
You can specify low density (Low)/middle density
(Mid)/high density (High) for C (cyan), M (magenta), Y (yellow), K (black).
To reset the value in [Lighter/Darker] to the default value after gradation adjustment,
set all values to [0]. If all values are set to [0], gradation adjustment is disabled.
●
Daily Control
●
If color gradation is often out even after gradation adjustment, contact our Customer Support
Center or your dealers.
Resetting values in [Lighter/Darker] to the default value (all [0]) does not mean that the image
quality returns to the quality that you could get first at installation time. Using the printer for a long
period, the image quality has differed from that at installation time under influence of aging,
change in the environment, and amount printed.
7
271
7.8 Adjusting Gradation
7.8.2 Performing Gradation Adjustment
Flow of Gradation Adjustment
Flow of gradation adjustment is as follows.
(Using CentreWare Internet Services)
Load A4 paper
into tray 5
(bypass tray).
4.2.2 Loading Paper into
Tray 5 (bypass tray)
(P.153)
Get the
Set the value in
Print the gradation
[Lighter/Darker]
the Web browser.
adjustment chart.
setting.
Printing Chart
(P.272)
How to get the
setting value
(P.274)
Press
Apply New Settings
Entering the Value from
How to enter the value
(P.277)
When the network
cannot be used
Set the value on
the control
panel.
How to enter the value.
Entering the Value on the
Control Panel (P.279)
Daily Control
7
Printing Chart
Print the gradation adjustment chart on A4 -size paper by using Tray 5 (bypass tray).
This section describes printing the gradation adjustment chart for Gradation preferred
as an example.
To print the gradation adjustment chart for resolution preferred, select [Photo] in step (7).
Procedure
Ready to print
(Printer is in the standby mode.)
(1) Press the <Menu> button.
Menu
Print Language
(2) Press the <
(The menu screen is displayed.)
> or <
> button several times.
Menu
Admin Menu
(3) Press the <
To the next page
272
> button.
7.8 Adjusting Gradation
Continued from the previous page
Admin Menu
Network/Port
(System administration menu appears.)
(4) Press the <
> or <
> button several times.
Admin Menu
Image Quality
(5) Press the <
> button.
Image Quality
Adjust Gradation
(6) Press the <
(Image quality adjustment menu appears.)
> button.
Adjust Gradation
Text
(7)Press the <
or [Photo]).
(Adjust Gradation menu appears.)
> or <
> button to select the desired chart ([Text]
Load paper in
orientation
Text
Gradation Chart
(8) Press the <
> button.
Load A4LEF in
Bypass-Press Set
Gradation Chart
Printing...
(Chart will be printed.)
Load A4LEF in
Bypass-Press Set
(10) Press the <Menu> button.
Ready to print
Daily Control
(9) Press the <Eject/
Set> button.
7
(The printer returns to the standby
mode. It can receive data any time
now.)
273
7.8 Adjusting Gradation
How to get the setting value
Get the value in [Lighter/Darker] by comparing the printed gradation adjustment chart
and “Color sample for halftone reproduction tuning” included with the printer.
Find the adjusting patch in gradation adjustment chart that is close to density of the
color sample. You can select the value from 13 levels in the range of [–6] to [+6].
Also, see the steps described on the gradation adjustment color sample.
The default values are all [0].
Procedure
1
Fold the printed gradation adjustment chart along the guide (dotted
line) for the desired color, as shown in the diagram.
Magenta
Cyan
C
Daily Control
7
2
M
Fold
-
Yellow
Fold
-
Y
Black
Fold
-
K
Process
Gray
-
CL
ML
YL
KL
Margin
Margin
Margin
Margin
Adjust the part of the chart with desired density to the part of the color
sample with the same position.
For adjustment of low density (L), adjust Low to Low.
Color sample for gray halftone reproduction tuning
Cyan
Cyan
C
Magenta
Fold
M
Fold
C
Cyan
Cyan
C
Magenta
Fold
M
Yellow
Fold
Y
Black
Fold
Process
Gray
B
C
Low
Low
CL
ML
YL
KL
Margin
Margin
Margin
Margin
CM
MM
YM
KM
Margin
Margin
Margin
Margin
CL
ML
Margin
Margin
YL
Marg
Gradation adjustment chart
274
7.8 Adjusting Gradation
3
Adjust the chart vertically so that the density on the chart matches that
of the area marked with [ ] in the color sample. When density on both
of the chart and color sample matches, get the difference between [ ]
on the chart and the [ ] mark on the color sample by reading the scale.
Pay attention to the minus (–) and plus (+) directions when reading the scale.
Cyan
C
C
-
CL
-2
Margin
●
If the color sample’s
density is between
A and B.
–2
–1
Color sample
for halftone
reproduction
tuning
4
Write the difference in the appropriate
[Margin] box.
5
6
For the remaining two densities, read the differences in the same way.
Daily Control
●
If the density of the color on color sample falls
between two colors of adjustment patch on gradation
adjustment chart, read the scale on the boundary (in
example shown at the right, –1).
If the difference exceeds the specified range (–6 to
+6), adjust gradation assuming that difference is –6
or +6, and then adjust the gradation again.
7
Also, repeat steps 1 to 5 for the remaining colors of C, M, Y, and K to
read the difference.
275
7.8 Adjusting Gradation
7
After writing down the density difference of all colors, transcribe it to the
appropriate [Margin] box in the [Computation Table] at the left the chart.
Here, we use cyan as example.
Daily Control
7
8
Obtain the value based on the expression in [Computation Table], and
write it down in [Adjustment Value].
The value entered at the previous adjustment is displayed in [Current Value].
276
7.8 Adjusting Gradation
How to enter the value
Enter the density value written in the [Adjustment Value] box on [Computation Table]
of the Gradation adjustment chart in this printer.
If your network has a TCP/IP environment, enter the value from Web browser through
Embedded Web Server. Otherwise, use the control panel.
■ Entering the Value from a Web Browser
“1.4 Configuring from the Computer (Embedded Web Server)” (P.39)
Procedure
1
2
Start the browser on the computer.
Enter the IP address or URL of this printer at the address column of the
Web browser, and then press the <Enter> key.
The Embedded Web Server screen will be displayed.
Daily Control
7
277
7.8 Adjusting Gradation
Daily Control
7
278
3
Click [Properties].
4
Click [Gradation Adjustment] in the area to the left.
5
Select the value from the density menu of the appropriate color.
The [Properties] tab will be displayed.
The following screen will be displayed in the area to the right .
7.8 Adjusting Gradation
6
7
8
Also, select the value from the other two density menus.
Select the value for the remaining C, M, Y, and K colors in the same way.
After entering density values of all colors, click [Apply New Settings].
■ Entering the Value on the Control Panel
Steps for entering the density values are as follows.
Here, we describe setting for middle density (M) of gradation preferred for cyan as an
example.
Procedure
Ready to print
(Printer is in the standby mode.)
(1) Press the <Menu> button.
Menu
Print Language
(The Menu is displayed.)
(2) Press the <
> or <
> button several times.
Menu
Admin Menu
(3) Press the <
> button.
(System administrator menu is displayed.)
(4) Press the<
> or <
> button to select desired mode.
Admin Menu
Image Quality
(5) Press the <
> button.
Image Quality
Adjust Gradation
(Image quality adjustment menu is displayed.)
(6) Press the <
Daily Control
Admin Menu
Network/Port
7
> button.
Adjust Gradation
Text
(7) Press the <
(Gradation adjustment menu is displayed.)
> or <
> button to select desired mode.
Adjust Gradation
Photo
(8) Press the <
> button.
Photo
Gradation Chart
(9) Press the <
> or <
> button several times.
To the next page
279
7.8 Adjusting Gradation
Continued from the previous page
Photo
Enter Value
(10) Press the <
> button.
Photo
Cyan
(Photo is displayed.)
(11) Press the <
> or <
> button to select desired color.
Photo
Cyan
(12) Press the <
> button.
Cyan Photo
L= 0,M= 0,H= 0 *
(13) Press the < > button to select desired density
(L-Low Density, M-Middle Density, H-High Density).
(Underline appears below the selected value. “*” is
displayed at the right edge until you change the
value.)
Daily Control
7
(16) To adjust
other colors,
press the
< > button
several times
until the
display
returns to
[Photo] and
repeat steps
(11) to (15).
Cyan Photo
L= 0,M= 0,H= 0 *
(14) Press the < > or < > button to enter the value of
[Adjustment Value] on the computation table of the
chart.
Cyan Photo
L= 0,M= 1,H= 0
(15) Press the <Eject/Set> button.
Cyan Photo
L= 0,M= 1,H= 0 *
(Density adjustment value is
determined.)
(17) Press the <Menu> button after adjustment of
desired color is finished.
Ready to print
(Returns to Power ON status. Data
receiving enabled.)
To check the adjustment result, refer to “Printing Chart” (P.272) and print the
appropriate chart.
If you cannot get a satisfactory result, do the adjustment again.
[Process Gray] is gray obtained from a combination of C, M, and Y. The process Gray
column shown on the Gradation Adjustment Chart printed by the printer is for reference
only. It will normally be possible to see a slight color cast in this gray even after
successfully adjusting the C Y M and K colors.
280
7.9
Adjusting Color
Registration
When the color print result is incorrect after replacing the drum cartridge, print the color
registration chart to check the value and adjust the color registration.
7.9.1 Printing Color Registration Chart
Print the chart on A4
-size paper by using Tray 5 (bypass tray).
Procedure
Ready to print
(Printer is in the standby mode.)
(1) Press the <Menu> button.
Menu
Print Language
(The Menu is displayed.)
(2) Press the <
> or <
> button several times.
Menu
Admin Menu
(3) Press the <
> button.
Admin Menu
Network/Port
(System administration menu is displayed.)
(4) Press the <
> or <
> button several times to select [Image Quality].
(5) Press the <
> button.
Image Quality
Adjust Gradation
(Image quality adjustment menu is displayed.)
(6) Press the <
> or <
> button several times.
7
Image Quality
Adjust ColorRegi
(7) Press the <
Daily Control
Admin Menu
Image Quality
> button.
Adjust ColorRegi
Color Regi Chart
(8) Press the <
Load paper in
orientation
> button.
Load A4LEF in
Bypass-Press Set
(9) Press the <Eject/Set> button.
Color Regi Chart
Printing...
(The color registration chart will be printed.)
To the next page
281
7.9 Adjusting Color Registration
Continued from the previous page
Load A4LEF in
Bypass-Press Set
(10) Press the <Menu> button.
Ready to print
(Returns to Power ON status. Data
receiving enabled.)
7.9.2 How to Get the Adjustment Value
Read the values of [Left], [Center], and [Right] from the printed color registration chart
according to the following steps [Center] is used as an example here.
Procedure
1
Read the most remarkable values of [CY], [CM], and [CC] in [Center]
from [Test-A].
Daily Control
Read values of [Left] and [Right] in the same way.
Center
CY CM CC
800
700
600
500
400
300
200
100
[0]
-100
-200
-300
7
●
Example: Test-A
CY = 0 CM = 100 CC = 0
If the value read is other than [0].
The value read is the adjustment value. Refer to “7.9.3 Entering the Adjustment Value” (P.283) and
set the adjustment value. After setting is finished, print the color registration chart to read the value
again.
●
If the value read is [0].
Proceed to step 2.
2
Read the most remarkable values of [CY], [CM], and [CC] in [Center]
from [Test-B].
Read values of [Left] and [Right] in the same way.
282
7.9 Adjusting Color Registration
4
LY LM LC
Reprint the Color Registration Chart.
Run Test A for visual confirmation and
Test B for adjustment.
CY CM CC
RY RM RC
Test B
100
90
80
70
60
50
40
30
20
10
[0]
-10
-20
-30
-40
-50
-60
-70
-80
-90
-100
1
From the shades of Y (Yellow), M (Magenta)
and C (Cyan), record the values of the
darkest shades for each color.
2
Record the value in increments of 5,
Example: LY=-15, LM=10, LC=-5
3
On the Control Panel, go to Adjust Color Regi
--> Fast Scan Adjust and enter the recorded values.
Go to Start Adjustment, then press Eject/Set.
100
90
80
70
60
50
40
30
20
10
[0]
-10
-20
-30
-40
-50
-60
-70
-80
-90
-100
Test B - Record values here
LY=
LM=
LC=
CY=
CM=
CC=
RY=
RM=
RC=
100
90
80
70
60
50
40
30
20
10
[0]
-10
-20
-30
-40
-50
-60
-70
-80
-90
-100
Example: Test-B
CY = 15 CM = 10 CC = -10
Note: Refer to User Guide for details.
The value read is the adjustment value. Refer to “7.9.3 Entering the Adjustment Value” (P.283) and
set the adjustment value.
7.9.3 Entering the Adjustment Value
Procedure
Ready to print
(Printer is in the standby mode)
Menu
Print Language
(Menu appears)
(2) Press the <
> or <
> button several times.
Menu
Admin Menu
(3) Press the <
7
> button.
Admin Menu
Network/Port
Daily Control
(1) Press the <Menu> button.
(System administration menu is displayed.)
(4) Press the <
> or <
> button several times.
Admin Menu
Image Quality
(5) Press the <
> button.
Image Quality
Adjust Gradation
(6) Press the <
(Image quality adjustment menu is displayed.)
> or <
> button several times.
To the next page
283
7.9 Adjusting Color Registration
Continued from the previous page
Image Quality
Adjust ColorRegi
(7) Press the <
> button.
Adjust ColorRegi
Color Regi Chart
(8) Press the <
> or <
> button several times.
Adjust ColorRegi
Fast Scan Adjust
(9) Press the <
> button.
Fast Scan Adjust
Enter LY,LM,LC
(10) Press the <
> or <
> button several times.
Fast Scan Adjust
Enter CY,CM,CC
(11) Press the <
> button.
Enter CY,CM,CC
000, 000, 000
(12) Press the <
Daily Control
7
> button to select desired field.
Enter CY,CM,CC
000, 000, 000
(15)To adjust
other main
scanning
direction,
repeat steps
(10) to (14).
(13) Press the <
> or <
> button several times.
Enter CY, CM, CC
000,+100, 000
(14) Press the <Eject/Set> button.
Fast Scan Adjust
Enter CY, CM, CC
(16) Press the <
> or <
> button several times.
Fast Scan Adjust
Start Adjustment
(17) Press the <
> button.
Fast Scan Adjust
Use Set to Start
(18) Press the <Eject/Set> button.
Fast Scan Adjust
Start Adjustment
(19) Press the <Menu> button.
Ready to print
284
(Returns to Power ON status.
Data receiving enabled.)
7.10
Moving the Printer
This section describes the steps to transport the printer with exposed to large vibration such
as doring long-distance transportation by truck.
●
●
●
●
The machine weighs 64 kg (without optional tray). Be sure to have more than three
persons move the printer. When moving the printer, be sure to remove the optional
tray.
When lifting the machine, get a firm footing and bend your knees to avoid
possible injuries to your back.
When lifting the machine, face the front and rear and firmly grip the recessed
areas provided on both sides and the bottom of the rear. Never try to lift the
printer by gripping any other areas.
When moving the printer, do not tilt it more than 10 degrees. If tilted excessively,
the printer may fall over and cause injuries.
1
2
Switch off and unplug the printer.
Remove any cords including power cord and interface cable.
Daily Control
Procedure
7
Never touch a power cord with wet hands. Danger of electric shock exists.
When unplugging the machine, grasp the plug instead of the cord.
Forcibly pulling on a cord can damage it and cause fire or electric shock.
3
Remove the paper from the tray, and store it in the place free from
moisture and dust.
4
If the Face Up Tray (optional) is installed, remove the tray.
Face Up Tray Installation Procedure Guide
285
5
Remove all 4 toner cartridges.
“7.1 Replacing Toner Cartridge” (P.242)
6
Remove the waste toner bottle and drum cartridge.
Once removed, the toner cartridge cannot be used again. Replace it with a new one.
“7.3 Replacing Waste Toner Bottle” (P.250), “7.2 Replacing Drum Cartridge” (P.245)
7
If the 1 tray module or 3 tray module is installed, remove it.
1 Tray Module/3 Tray Module Installation Procedure Guide
8
Pack this printer so that it can be prevented from damage when
transporting it.
1
Appendix
A
Main Specifications ........................................................................ 288
B
Optional Products and Consumables ........................................... 294
C
Service Life of Consumables and Regular Replacement Parts ..... 296
D
Obtaining Product Information ....................................................... 297
E
Precautions/Limitations.................................................................. 298
A
A.1
Main Specifications
Product Specifications
Main unit
Item
Description
Type
Desktop type
Printing system
Laser xerography
Warm-up time
Within 30 seconds
Continuous printing speed
Feeding paper from Tray 1 to 4
Plain paper
Printing speed is same for
both black and white and
color printing except when
printing on transparencies.
1 sided: 24 sheets/minute (A4
), 18 sheets/
minute (A4 ), 15 sheets/minute (B4), 13
sheets/minute (A3)
2 sided: 20 sheets/minute (A4
), 9.5 sheets/
minute (A4 ), 8.5 sheets/minute (B4),
7.8 sheets/minute (A3)
Heavyweight 1/Heavyweight 2
1 sided: 12 sheets/minute (A4
minute (A3)
), 6.5 sheets/
Feeding paper from Tray 5 (bypass tray)
Transparencies: 1 sided: 6 sheets/minute (A4
Resolution
Post cards (
): 12 sheets/minute
Envelopes (
): 12 sheets/minute
)
Output resolution: 1200 dpi (47.2 dots/mm), 600 dpi multi-value
(23.6 dots/mm)
Data resolution: 1200 dpi (47.2 dots/mm), 600 dpi multi-value (23.6
dots/mm)
Appendix
288
Installation environment
Temperature: 10 to 32 °C
Humidity: 15 to 85% (no condensation)
If the temperature is 32 °C, humidity must be 65% or lower, if
humidity is 85%, temperature must be 28 °C or less.
A Main Specifications
Item
Paper size
Description
Tray 1:
●
●
Standard size (which the printer can automatically detect)
A3, B4, A4, A4 , B5, B5 , A5 , 8.5 × 11” (Letter), 8.5 ×
11” (Letter) , 8.5 × 14” (Legal), 8.5 × 13” (Folio), 11 × 17”
(Ladger), COM-10, MONARCH
Non-standard sizes
Short edge: 182 to 297 mm, long edge: 148 to 431.8 mm
* However, except for sizes with a short edge less than
182 mm and a long edge exceeding 297 mm.
Tray 2 to 4
●
●
Standard size (which the printer can automatically detect)
A3, B4, A4, A4 , B5, B5 , 8.5 × 11” (Letter), 8.5 × 11”
(Letter) , 8.5 × 14” (Legal), 8.5 × 13” (Folio)
Non-standard sizes
Short edge: 182 to 297 mm, long edge: 182 to 431.8 mm
* However, except for sizes with a short edge less than
182 mm and long edge exceeding 297 mm.
Tray 5 (bypass tray):
C5, COM-10, DL, MONARCH
Short edge: 90 to 305 mm, long edge: 98 to 431.8 mm
Long size (long edge: 431.9 to 1200 mm)
Duplex Unit (optional)
●
●
Standard mode:
Tray 1 (500 sheets), Tray 5 (bypass tray) (180 sheets)
Standard + 1 tray module:
Appendix
Paper supply
(For A4 paper size, p paper)
Standard size
A3, B4, A4, A4 , B5, B5 , A5 , 8.5 × 11” (Letter), 8.5 ×
11” (Letter) , 8.5 × 14” (Legal), 8.5 × 13” (Folio), 11 × 17”
(Ladger), 8K (267 × 388 mm), 16K (194 × 267 mm)
Non-standard sizes
Short edge: 182 to 297 mm, long edge: 148 to 431.8 mm
* However, except for sizes with a short edge less than
182 mm and long edge exceeding 297 mm.
Tray 1, 2 (500 sheets/tray), Tray 5 (bypass tray) (180
sheets)
Standard + 3 tray module:
Tray 1 (500 sheets/tray), Tray 5 (bypass tray) (180 sheets)
Maximum paper supply
(For A4 paper size, p paper)
2,180 sheets (500 + 500 + 500 + 500 + 180)
* For standard + 3 tray module
Capacity and size of the
output tray
(For A4 paper size, p paper)
Standard output tray:
Capacity: about 500 sheets
Size:
All sizes which are available on this
printer
Optional face up tray:
Capacity: about 150 sheets
Size:
Exceeding 135 mm on its short edge.
However, envelopes and postcards
cannot be used.
289
A Main Specifications
Item
Description
2 sided print
Optional
CPU
PPC 603e-350 MHz
Memory capacity
384 MB for standard, maximum 640 MB
A minimum of 384MB is necessary to cover all requirements of
printing applications.
Optional:
Additional memory (256 MB, 512 MB)
Installed font
Standard: 81 European-language fonts, symbol 35 ets.
Optional (only for PostScript):
136 European-language fonts
PDL
Standard:
Emulation
HP-GL and HP-GL/2
Interface
Standard: Ethernet (100Base-TX/10Base-T) bi-directional parallel
(IEEE1284-B) and USB1.1
Supporting protocol
PCL5e, PCL6c, PDF, HP-GL & PostScript 3
Optional:
USB2.0
Centro:
Compatible. Nibble, and ECP
Ethernet:
Network protocol
TCP/IP, IPX/SPX, NetBEUI, and UDP/IP
Network services
LPD, SMB, NetWare, EtherTalk, SNMP, HTML/HTTP,
DHCP, WinsClient, DNS, IPP, and Port9100
Windows 95/Windows 98/Windows Me/Windows NT 4.0/Windows
2000/Windows XP/Windows Server 2003/Macintosh
Operating noise
In operation: 6.3 B (A), 51 dB (A)
In the standby mode: 4.0B (A), 25 dB (A)
Appendix
Driver supporting OS
Based on ISO7779 standards
Unit B (A): Sound power level
Unit dB (A): Emission sound pressure level (by-stander position)
Power
110 V, 15A (60Hz)
220-240 V, 7A (50/60Hz)
Power consumption
Maximum 999 W or less (For 110 V, 230 V model)
Average 400 W or less when operating
Power saver mode: 5.0 W or less
(This printer consumes no power while the power is off, even when
the plug is inserted.)
Dimensions
Standard:
678 (W) × 631 (D) × 473 (H) mm
Standard + tray module (1 tray):
678 (W) × 631 (D) × 588 (H) mm
Standard + 3-tray module:
678 (W) × 631 (D) × 830 (H) mm
290
A Main Specifications
Item
Description
Machine space required
Standard:
1128 (W) × 1656 (D) mm
Weight (including
consumables)
A.2
Standard: 59.4 kg
Standard + 1 tray module: 73.4 kg
Standard + 3 tray module: 91.4 kg
Printable Area
Standard printing area (for PCL printer driver)
The printable area using the PCL printer driver for printing command is as
follows: This may vary according to control language of each printer or plotter
used.
Top 4.1mm
Non printable area
Appendix
Printable area
Right 4.1mm
Left 4.1mm
Bottom 4.1mm
291
A Main Specifications
A.3
Internal Font
Following fonts can be used for normal operations.
Stroke fonts (only for HP-GL, HP-GL/2)
●
European stroke fonts
Outline fonts
The relationship between the internal outline fonts and the Page Description
Languages or emulation mode is as follows: In addition, the internal outline fonts
cannot be used for PostScript.
: Equipped
Name
Stroke fonts
CS Times Roman
CS Times Bold
CS Times Bold Italic
CS Times Italic
CS Courier Medium
CS Courier Bold
CS Courier Bold Oblique
CS Courier Oblique
Appendix
CS Triumvirate
CS Triumvirate Bold
CS Triumvirate Bold Italic
CS Triumvirate Italic
CS Symbol
ITC ZapfDingbats
Arial
Arial Bold
Arial Italic
Arial Bold Italic
Courier
Courier Bold
Courier Italic
Courier Bold Italic
292
PCL
HP-GL,
HP-GL/2
A Main Specifications
Name
PCL
HP-GL,
HP-GL/2
Times New Roman
Times New Roman Bold
Times New Roman Italic
Times New Roman Bold Italic
Century
Symbol
Wingdings
OCRB
Appendix
293
B
B.1
Optional Products and
Consumables
Optional Products
Main optional products for this machine are as follows. Contact our distributor for
purchase orders.
Product name
Appendix
294
Product
code
Remarks
Hard Disk Drive
043613
To use the secure print and the sample print functions.
For use, available memory of 384 MB or more is required.
512 MB Memory
043617
Additional memory is required for installation of Hard Disk
Drive, 2 sided printing module, and for print on long paper
size.
1 Tray Module
043609
The paper tray which can be loaded with up to 500 sheets of
plain paper (P paper).
3 Tray Module
043608
This cabinet consists of three paper trays each of which can
be loaded with up to 500 sheets of plain paper (P paper).
Duplex Unit
043610
This module enables 2 sided print. Available memory of 384
MB or more is required to use it.
Face Up Tray
043611
This tray outputs paper with the printed side facing up.
USB2.0 Kit
043614
For use of the USB2.0.
Banner Tray
043612
Up to 10 sheets of long paper size with up to 1200 mm long
can be loaded. For printing long paper size, available memory
of 384 MB or more is required.
B Optional Products and Consumables
B.2
Consumables
This section describes the types of the consumables and how to handle them.
The consumables for the printer are as follows: Use only consumables
exclusively made for the printer.
Using non-standardized consumables for the machine may cause trouble. Use proper consumables
recommended by us.
Types of consumables
Product name
Toner Cartridge HC [Black]
Toner Cartridge HC [Cyan]
Toner Cartridge HC [Magenta]
Toner Cartridge HC [Yellow]
Drum Cartridge (Including waste toner bottle)
Waste Toner Bottle
Transfer Unit (BTR)
Fuser (110 V)
Fuser (220 V)
Product
code
043621
043618
043619
043620
043622
043624
043623
043625
043626
Contents
1 unit/case
1 unit/case
1 unit/case
1 unit/case
1 drum cartridge,
1 waste toner bottle/case
1 unit/case
1 unit/case
1 unit/case
1 unit/case
Handling of the consumables
●
●
●
●
Appendix
●
Do not store the cases of consumables vertically.
Keep consumables/maintenance accessories unopened until you use them and avoid the
following:
●
Storing them in a location with high temperature and high humidity.
●
Storing them near a source of fire.
● Exposing consumables to direct sunlight.
●
Storing consumables in a dusty environment.
Before using consumables, carefully read the “Handling Instructions” provided in the
package or in their container.
It is recommended that you keep spare consumables.
For purchase orders, contact our Customer Support Center or your dealers or our
distributor with the item code.
295
C
Service Life of
Consumables and Regular
Replacement Parts
Service life of consumables
Product name
Toner Cartridge (Black) Starter pack
Toner Cartridge HC (Black)
Toner Cartridge (Cyan) Starter pack
Toner Cartridge HC (Cyan)
Toner Cartridge (Yellow) Starter pack
Toner Cartridge HC (Yellow)
Toner Cartridge (Magenta) Starter pack
The number of printable pages
About 7,500 pages
About 15,000 pages
About 6,000 pages
About 12,000 pages
About 6,000 pages
About 12,000 pages
About 6,000 pages
Toner Cartridge HC (Magenta)
About 12,000 pages
Drum Cartridge
About 30,000 pages
Waste Toner Bottle
About 24,000 pages
●
●
●
The number of printable pages of toner in the cartridge or space in the waste toner bottle is based
on continuous printing of A4
size paper with 5 % of print ratio.
The number of printable pages for a drum cartridge is based on continuous printing of A4
size paper.
The number of printable pages may differ according to contents of original documents, paper sizes,
paper type, environment and frequency of switching on/off the Printer.
Service life of regular replacement parts
Product name
Timing for replacing
Appendix
Fuser unit
About 100,000 pages
BTR unit
About 100,000 pages
IDT unit
About 100,000 pages
Developing Unit (Black)
About 300,000 pages
Developing Unit (Yellow)
About 300,000 pages
Developing Unit (Magenta)
About 300,000 pages
Developing Unit (Cyan)
About 300,000 pages
Maintenance Kit 300K
About 300,000 pages
Maintenance Kit 600K
About 600,000 pages
●
●
●
The number of sheets before parts need to be replaced is based on continuous printing of A4
size
paper.
The service life may differ according to contents of original documents, paper sizes, paper type,
environment and frequency of switching on/off the printer.
At replacement of the regular replace unit, contact our engineer for proper replacement.
Maintenance performance parts
We stock expendable accessories and the maintenance performance parts (parts
that are necessary for printer maintenance) for machines for 7 years after. The
machines become obsolete.
296
D
Obtaining Product
Information
The following information is provided on our internet home page:
●
Latest product information
● Latest software
●
Recommended applications
●
Limitations of applications
URL: http://www.tallygenicom.com
The company will not be responsible for any communications fee incurred.
Appendix
297
E
E.1
Precautions/Limitations
Precautions/Limitations
This section describes precautions/limitations for using the printer.
About additional Hard Disk Drive
●
●
●
When the printer has a Hard Disk Drive installed, the data in the Hard Disk
Drive may crash if the power to the printer is cut, for example, due to a power
outage, during printer operation.
When a Hard Disk Drive is installed, it can be specified as a destination to store
print data from 1pd, SMB and IPP. The storage destination of each forms of
HP-GL and HP-GL/2 will be fixed to the Hard Disk Drive. It cannot be changed
to another domain.
When the Hard Disk Drive is initialized, the following data will be deleted:
additional fonts, each form of HP-GL and HP-GL/2, and SMB folder. Secure/
sample print documents and logs will not be deleted.
When the print result is different from the settings
Insufficient capacity of the print page buffer may cause unexpected print results
such as the following: In this case, it is recommended to add memory capacity.
●
Printed only on one side of the paper when 2 sided print is specified.
● The job is cancelled (when the data cannot be stored in the print page buffer,
the job including the page is canceled)
The print result may be different from the settings, due to the principles of laser xerography, when one
dot or a line at 1200 dpi is set to print directly.
Appendix
About options
For using the secure/sample print feature and the Page Print mode, a built in
Hard Disk Drive is required.
About the meter count for 2 sided prints
For a 2 sided print, a sheet of plain paper may be inserted for adjusting pages
according to the specified number of copies, depending on the application in use.
In this case, blank sheets inserted by the application are counted as 1 page.
298
E Precautions/Limitations
About available paper for 2 sided print
Paper of 60 to 105 g/m2 can be used for 2 sided print. However, if you use paper
of 106 gm2 or more for a 2 sided print, the range of printed text on the reverse
side may be out of alignment. It is recommended to use Tray 5 (bypass tray) to
manually print both sides of the paper if you print paper of 106 g/m2 or more.
E.2
TCP/IP (lpd)
The precautions/limitations of using TCP/IP (LPD) are as follows:
Configuring the machine
●
●
●
●
Pay close attention when setting the IP address. The IP address is the address
maintained over the system. Consult your network administrator before
defining any address.
Depending on the network environment used, it may be necessary to set the
subnet mask and gateway. Consult your network administrator before defining
the needed item.
If setting the port to [Enable] leads to insufficient memory, the port status may
be set to [Disable] automatically. In this case, either set the port to [Disable]
when it is not used or change the memory allocation capacity.
Specify the size for the receiving buffer memory [LPD Spool] as required by the
environment in use. If the size of the receiving buffer memory [LPD Spool] is
smaller than the transmitted data, the data may not be received.
●
●
Pay close attention when setting the IP address. IP address is the address
maintained over the system. Consult your network administrator before
defining any address.
Consult the Network Information Service (NIS) administrator when setting the
network (such as the IP address) by a host being used under NIS.
Appendix
Configuration of the computer
299
E Precautions/Limitations
Switching off the power
Take note of the following points when switching off the power of this printer:
When [LPD Spool] is set to [Memory]
All print data spooled to the printer memory, including data in the process of
printing, will be deleted. When the power is turned on again, the print data will
not be found.
However, if the power switch is off immediately after the print data has been
sent, the print data may be stored in the computer. In this case, when the power
is turned on again, the stored print data will be printed first even if new print data
has been sent.
When [LPD Spool] is set to [Hard Disk]
All print data spooled to the Hard Disk Drive of this printer, including data in the
process of printing, will be saved. When the power is turned on again, the stored
print data will be printed first even if new print data has been sent.
When [LPD Spool] is set to [Off].
All print data spooled to the receive buffer of this printer, including data in the
process of printing, will be deleted. When switching on the power again, the print
data will not be found.
However, if the power is switched off immediately after the print data has been
sent, the print data may be stored in the computer. In this case, when switching
on the power again, the stored print data will be printed first even if new print
data has been sent.
Printing
Appendix
When [LPD Spool] is set to [Hard Disk], or [Memory]
If the print data is larger than the Hard Disk Drive or the remaining memory
capacity at the point of receiving print data, the data will not be received.
When the print data has exceeded the receiving capacity, some computers may re-send the data
immediately. When this occurs, the computer appears as if it had crashed. To rectify the situation, stop
the computer from sending print data.
When [LPD Spool] is set to [Off]
If the machine has accepted a print request from a computer, it cannot accept
any print request from an other computer.
300
Index
Numerics
100Base-TX 103
10Base-T 103
2 sided 162
2 sided print 165
2 sided report 183
A
about paper 146
about the auto tray switch 154
Adobe PS Printer Driver (Windows 2000/XP/
Server 2003) 72
AdobePS Printer Driver (Macintosh) 82
AdobePS Printer Driver (Windows 95/98/Me)
53
AdobePS Printer Driver (Windows NT) 62
Advanced Options Dialog Box 78
Advanced tab 68
alert tone 182
allocate memory 187
auto job history 183
B
D
Device settings tab 67, 77
document stopper 102
draft mode 170
drum cartridge 103
drum life end 184
duplex unit 102
duplex unit cover 102
E
ejecting remaining data 240
e-mail print 140
Embedded Web Server 39
emulation 290
engine cleaning 191
error history report 261
Ethernet 180
EtherTalk 99, 177
Example Connections 96
Index
banner sheet 183
basic operation 158
BTR unit 103
buffer size 188
bypass size 164
collated 163
color mode 170
Configuration tab 58
consumables 295
contents of the printer meter report 268
control panel 102, 104
cover A 102
cover B 102
cover C 102
cover for printer options 103
C
canceling print jobs 108
canceling sleep mode 107
capacity of output tray 289
caster 102
Embedded Web Server 39
checking total number of printed page by
meter 267
F
face up tray 102
filter 181
font 165, 292
font pitch 169
font size 168
fonts list 261
301
form lines 169
front cover 102
fuser unit 103
G
get information from printer 111
gradation adjustment 271
gradation adjustment chart 272
H
hard disk 189
HexDump 169
how to print reports/lists 253
how to print the printer meter report 269
HPGL auto layout 187
HP-GL/2® logical printers/stored jobs list 253
HP-GL/2® pallet list 253
HP-GL/2® settings list 253
I
Index
IDT unit 103
image enhancement 169
image quality 189
initializing the printer meter data 270
installation environment 288
installed font 290
interface 290
Internet printing 98
InternetServices 180
IP address 33
IPP 98, 176
IPX/SPXGFrameType 180
J
job history report 257
302
L
left cover 102
line termination 170
list of common menu 192
list of consumables 294
list of error codes 230
list of messages 222
list of optional products 294
lower left cover 102
low-power mode 107
LPD 173
M
machine clock 183
machine space required 291
mail notice service 265
main components and their functions 102
maintenance performance parts 296
maximum paper supply 289
memory capacity 290
N
NetWare 99, 174
Network Environments 96
network interface connector 103
network/port setting 171
NVM 189
O
OfflineAutoClear 182
operating noise 290
orientation 165
output color 163
output size 163, 164
output tray 102, 164
P
Q
quantity 162, 169
R
replacing toner cartridge 242
replacing waste toner bottle 250
S
sample print 135
secure print 130, 183
service life of consumables 296
service life of regular replacement parts 296
setting IP address 35
setting the gateway address 36
setting the subnet mask 36
settings for using mail notice service 265
sleep mode 107
SMB 96, 175
SNMP 179
special cleaning 191
specifications 288
speed 288
standard cleaning 191
stored documents 190
stored documents list 263
substitute tray 185
supporting protocol 290
switching off the power 106
switching on the power 106
symbol set 167
system settings 182
Index
panel settings 182
paper image Qty 186
paper jams 201
paper name 186
paper priority 185
paper size 186, 289
paper supply 289
paper tray 164
paper type 185
parallel 171
parallel interface connector 103
password 162
PCL Printer Driver 44
PCL settings list 262
PDF 161
PDF settings list 262
PDL 290
poor print quality 217
port 9100 178
PostScript® fonts list 263
PostScript® logical printers list 263
power 290
power consumption 290
power save timer 182
power saver mode 182
power switch 102
print ID 186
print language setting 161
print meter 190
print mode 162
print settings 185
printable area 291
Printer Driver (Macintosh) 82
printer meter report 261
Printer Specific Options Settings 91
printing list 254
printing long paper size 119
printing non-standard paper size 119
printing report 254
printing speed 288
printing transparencies 116
process mode 162
properties dialog box 115
PS 187
303
system settings list 255
T
TCP/IP setting 179
the system administrator menu 171
TIFF logical printers list 262
TIFF settings list 262
toner cartridge 103
tray priority 186
troubleshooting 199
U
USB 177
USB connector 103
W
warm-up time 288
waste toner bottle 103
weight 291
WINS server 180
Index
304
TALLYGENICOM REPRESENTATIVES
U.S.A.
TallyGenicom
4500 Daly Drive, Suite 100
Chantilly, VA 20151
U.S.A.
Phone: +1 703 633 8700
Fax: +1 703 222 7629
http://www.tallygenicom.com
FRANCE
TallyGenicom S.A.
19 avenue de L'lle Saint Martin
F-92237 Nanterre Cedex
France
Tél.: +33 1 41 30 11 00
Fax: +33 1 41 30 11 10
http://www.tallygenicom.fr
ITALY
TallyGenicom S.R.L.
Via Borsini 6
I-20094 Corsico (MI)
Italia
Tel.: +39 02 48608 1
Fax: +39 02 48601 141
http://www.tallygenicom.it
UNITED KINGDOM
TallyGenicom Limited
Rutherford Road
Basingstoke, Hampshire
RG24 8PD
England, U.K.
Phone: +44 870 872 2888
Fax: +44 870 872 2889
http://www.tallygenicom.co.uk
AUSTRIA
TallyGenicom Ges.m.b.H.
Eduard-Kittenberger-Gasse 95B
A-1232 Wien
Austria
Tel.: +43 1 863 40 0
Fax: +43 1 863 40 240
http://www.tallygenicom.co.at
SPAIN
TallyGenicom SRL
Joaquin Lorenzo 4, Local
28033 Madrid
España
Phone: +34 902 196 183
Fax: +34 913 739 943
http://www.tallygenicom.es
CANADA
TallyGenicom
125 Traders Boulevard, 9
Missisauga, Ontario L4Z 2E5
Canada
Phone: +1 905 8904646
Fax: +1 905 8904567
http://www.tallygenicom.com
SINGAPORE
TallyGenicom Pte. Ltd
63 Hillview Avenue
#08-22, Lam Soon Industrial Building
Singapore 669569
Phone: +65 6760 8833
Fax: +65 6760 1066
http://www.tallygenicom.com.sg
MALAYSIA
TallyGenicom Sdn. Bhd.
Wisma KT, Suite 3.02
No 14 Jalan 19/1
46300 Petaling Jaya
Selangor Darul Ehsan
Malaysia
Phone: +3 7625 1988
Fax: +3 7625 2688
http://www.tallygenicom.com.my
GERMANY
TallyGenicom
Computerdrucker GmbH
Postfach 2969
D-89019 Ulm
Deutschland
Tel.: +49 731 2075 0
Fax: +49 731 2075 100
http://www.tallygenicom.de
© January 2005 TallyGenicom Computerdrucker GmbH (pre-4)
Russian Federation and C.I.S.
TallyGenicom Representative
Park Place Moscow
Office D-206
Leninsky Prospekt 113/1
117198 Moscow
Russian Federation
Phone: +7 095 956 56 40
Fax: +7 095 956 55 41
http://www.tallygenicom.ru