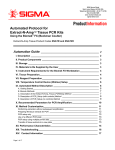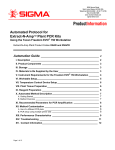
1
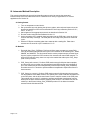
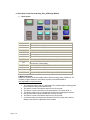
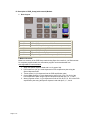
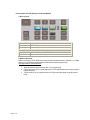
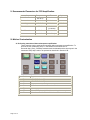
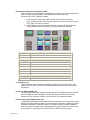
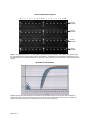
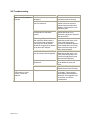
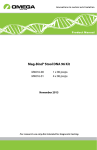
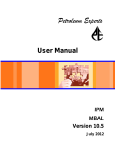
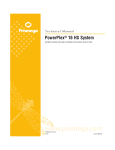
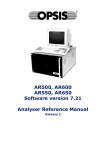
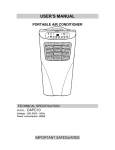
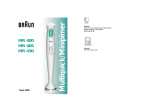
Automated Protocol for Extract-N-Amp Plant PCR Kits Using the Biomek FX Workstation (Beckman Coulter) Extract-N-Amp Plant Product Codes XNAR, XNAPR, and XNAPRG Automation Guide ______________________________________________ 2 I. Description ______________________________________________________ 2 II. Product Components _____________________________________________ 3 III. Storage ________________________________________________________ 3 IV. Materials to Be Supplied by the User ________________________________ 3 V. Instrument Requirements for the Biomek FX Workstation _______________ 4 VI. Temperature Control Device (Watlow) Setup _________________________ 4 VII. Plant Tissue Preparation _________________________________________ 5 VIII. Reagent Preparation ____________________________________________ 5 IX. Automated Method Description ____________________________________ A. Getting Started ____________________________________________________ B. Methods ________________________________________________________ C. Description of the Extract-N-Amp_Plant_PCRSetup Method ______________________ D. Description of PCR_Setup (with controls) Method _____________________________ E. Description of PCR_Setup (no controls) Method ______________________________ 6 6 6 7 8 9 X. Recommended Parameters for PCR Amplification:____________________ 10 XI. Method Customization___________________________________________ A. Performing extraction without subsequent amplification _________________________ B. Preparing 96 plant tissue extracts for PCR _________________________________ C. PCR setup only __________________________________________________ D. Use of a different PCR plate __________________________________________ E. PCR setup using multiple primer sets ____________________________________ 10 10 11 11 11 11 XII. Performance Characteristics _____________________________________ 12 XIII. Troubleshooting_______________________________________________ 14 XIV. Contact Information ___________________________________________ 15 Page 1 of 15 Automation Guide I. Description The Extract-N-Amp Plant PCR Kits (Product Codes XNAR, XNAPR, and XNAPRG) have been developed for use as a high-throughput system for the rapid extraction and subsequent amplification of genomic DNA from various plant leaves in a 96-well format. The Extract-N-Amp Plant PCR Kits provide a novel extraction system that eliminates the need for long enzymatic digestions and homogenization steps that are not amenable to automation. The XNAR Kit includes a specially formulated Extract-N-Amp PCR ReadyMix reagent that is a 2x reaction mixture of buffer, salts, dNTPs, and Taq polymerase. The ReadyMix reagent also contains Sigma’s antibody mediated hot start mechanism, JumpStart Taq polymerase, for highly specific amplification of genomic DNA directly from the extract. The XNAPR Kit includes the REDExtract-N-Amp PCR ReadyMix reagent containing an inert tracking dye for convenient direct loading of PCR reactions onto agarose gels for analysis. The XNAPRG Kit includes a SYBR Green Extract-N-Amp PCR ReadyMix reagent for real-time quantitative analysis of the amplified PCR products. The validated method created for use on the Biomek FX Liquid Handling Workstation provides a walk-away protocol for all aspects of the Extract-N-Amp Plant PCR Kits. Extraction and amplification of genomic DNA from plant leaves is accomplished in 4 easy steps: 1. The Extraction Solution is added to a piece of leaf tissue. 2. Extracts are incubated for 10 minutes at 85 °C. 3. The Dilution Solution is added to the extract. Extracts are now stable for at least 6 months if stored at 2−8 °C. 4. PCR reactions are set up using 4 µl of the extracts. In just 20 minutes, the Biomek FX can complete extraction and PCR reaction setup for 96 leaf tissue samples. Page 2 of 15 II. Product Components Product Code Extract-N-Amp Plant XNAR REDExtract-N-Amp Plant XNAPR SYBR Green Extract-N-Amp Plant XNAPRG Package Size 1,000 extractions 1,000 amplifications 1,000 extractions 1,000 amplifications 1,000 extractions 1,000 amplifications Extraction Solution E7526 120 ml 120 ml 120 ml Dilution Solution D5688 120 ml 120 ml 120 ml Extract-N-Amp PCR Ready Mix or SYBR Green Extract-N-Amp PCR Ready Mix E3004 (for XNAR) R4775 (for XNAPR) S4320 (for XNAPRG) 12 ml 12 ml 12 ml Reagents Provided III. Storage The Extract-N-Amp Plant PCR Kits can be stored at 2−8 °C for up to 3 weeks. For long-term storage, store at –20 °C. Do not store in a frost-free freezer. IV. Materials to Be Supplied by the User 1. 2. 3. 4. 5. 6. 7. 8. 9. 10. 11. 12. 13. 14. 15. 16. 17. 18. 19. 20. Plant leaf tissues Paper punch (standard one-hole) Forceps (small to medium in size) Primers for plant genes of interest (Optional) GenElute Plant Genomic DNA Miniprep Kit (Sigma, G2N10, G2N70, and G2N250) for use as genomic DNA control. Water, molecular biology reagent (Sigma, W4502) 96-well PCR plates, with full skirt (Sigma, P4616) 96-well PCR plates, with half skirt (ABgene, AB-1100) Lid, universal (Fisher, 07200694) Ultra clear cap strip (ABgene, AB-0866) Corning plate holder (Corning, 6525) Sealing film, SealPlate (Sigma, Z369659) Microcentrifuge tubes (1.5 ml, 2 ml screw cap) 24-position Eppendorf IsoTherm System (Fisher, 05-405-22) 12-column reagent reservoir with low profile (Innovative Microplates, S30028) 96 well reservoir with low profile and pyramidal bottom (Innovative Microplates, S30018) (Optional) 12-column reagent reservoir with high profile (Innovative Microplates, S30019) (Optional) 96-well reservoir with high profile and pyramidal bottom (Innovative Microplates, S30014) Thermal Cycler Thermometer (Fisher, 15-077-26) Page 3 of 15 V. Instrument Requirements for the Biomek FX Workstation Part Description Orbital Shaker Peltier ALP Multichannel Pod (96 Mandrel 200 µl Head) Span-8 Pod (1 ml Syringe) Gripper Tip Loader Span-8 Tip Trash Span-8 Tip Wash Standard Passive ALPs (One by Three) Standard Passive ALPs (One by One) AP96 P250 Barrier Tips, Sterile AP96 P20 Barrier Tips, Sterile Span-8 P250 Barrier Tips, Sterile Span-8 P20 Barrier Tips, Sterile Qty 1 1 1 1 1 1 1 1 4 3 2 1 1 1 Ordering Information Contact Beckman Coulter Contact Beckman Coulter Contact Beckman Coulter Contact Beckman Coulter Contact Beckman Coulter Contact Beckman Coulter Contact Beckman Coulter Contact Beckman Coulter Contact Beckman Coulter Contact Beckman Coulter BK717253 (Beckman Coulter) BK717256 (Beckman Coulter) BK379503 (Beckman Coulter) BK379506 (Beckman Coulter) VI. Temperature Control Device (Watlow) Setup Prior to the first run, verify the performance of the Peltier ALP. Manually set the temperature control device to the setting of 110 °C with an offset of –4 °C (refer to the Watlow Temperature Control device User’s Manual). Place a PCR plate containing 100 µl of water in each well on the Peltier ALP and measure the temperature inside the wells using thermometer probes. Verify that the temperature in the wells is at a minimum of 85 °C after 3 minutes. If well temperature does not reach a minimum of 85 °C, it will be necessary to adjust the offset. Refer to User’s Manual for directions on adjusting the offset. Approximately one hour prior to running the automated method, manually turn on the temperature control device and verify that the temperature display on the controller has reached the desired reading. Using the Biomek software set both the Initialize and End Run Temperature settings to 110 °C by selecting the Configuration Options for the Peltier ALP from the Device Editor menu as shown below: Page 4 of 15 VII. Plant Tissue Preparation 1. Rinse a paper punch and forceps in 70% ethanol prior to use and between different samples. Punch a 0.5−0.7 cm leaf tissue disk into a 96-well fully skirted PCR plate ensuring that each sample is centered down into the bottom of each well. 2. Chill the plate at 2−8 °C until needed or flash freeze the samples on dry ice/ethanol and keep at −70 °C. VIII. Reagent Preparation 1. Extraction Solution To process a single plate of 96 samples, add 15 ml of extraction solution to the 96-well reservoir (S30018) located at P4. If it is desired to process more than 12 plates of samples, the high-profile reservoir (S30014) is required. 2. Dilution Solution To process a single plate of 96 samples, add 15 ml of dilution solution to the 96-well reservoir (S30018) located at P8. If it is desired to process more than 12 plates of samples, the high-profile reservoir (S30014) is required. 3. PCR Master Mix All Extract-N-Amp Plant PCR ReadyMixes are formulated as a 2X reaction mixture containing buffer, salts, dNTPs, and Taq polymerase. To prepare a PCR Master mix, add water and the forward and reverse primers to the Extract-N-Amp Plant PCR ReadyMixes as described in the table below. Stock Water PCR ReadyMix (E3004, R4775 or S4320) Forward Primer (100 µM) Reverse Primer (100 µM) PCR Master Mix (2.4 ml) 0.9 ml 1.5 ml 12 µl 12 µl To set up 20 µl PCR reactions in one 96-well plate, a total of 2.4 ml of PCR master mix needs to be added to the first column of the 12-column low profile reservoir (S30028) located at P12. If setting up more than 3 plates of samples for PCR, it will be necessary to use the high profile reservoir (S30019). 4. No-template Control (optional) Add water into four 2 ml screw cap tubes and place in column 2 of the 24-position tube rack located at P16. 5. DNA Controls (optional) Prepare genomic DNA controls for quantification of the plant tissue DNA extracts. Genomic DNA from leaf tissues were prepared using GenElute Plant Genomic DNA Miniprep Kit and placed in column 1 of 24-position tube rack. Page 5 of 15 IX. Automated Method Description This overview describes the general liquid handling steps required to execute the automated Extract-N-Amp Plant PCR method and can be customized to a variety of applications. For custom applications see Section XI. A. Getting Started 1. Turn on temperature control device. 2. Set up the deck layout by placing the tip boxes, plates, tube racks and reservoirs at the appropriate positions on the deck as described in Deck Layout Section (Section IX.C.1, IX.D.1, or IX.E.1). 3. Add reagents to the appropriate reservoirs as described in Section VIII. 4. Run the method using Biomek Software Version 3.1. 5. At the completion of the method, place cap strips onto the PCR plate, vortex to mix the solution and briefly centrifuge. The PCR plate is now ready to be placed into a thermal cycler. 6. Seal the PCR plate containing plant tissue extracts with a sealing film. Plant tissue extracts can be stored for up to 6 months at 2−8 °C. B. Methods 1. Extract-N-Amp_Plant_PCRSetup: Performs all of the steps necessary to extract DNA from 96 plant tissue samples and sets up the PCR reactions for the following kits: XNAR, XNAPR, and XNAPRG. The 96-channel head is used to prepare extracts, and the Span8 pod is used to prepare the PCR reactions from extracts and control DNA samples. To perform PCR reaction setup, there is a step in the method that calls up the PCR_Setup (with controls) method. 2. PCR_Setup (with controls): Performs PCR reaction setup for 88 plant tissue samples and 8 controls using a master mix and transfers tissue DNA extracts using the Span-8 pod. This method may be used independently of the Extract-N-Amp_Plant_PCRSetup described above if it is desired to perform additional amplification experiments from the tissue extracts. 3. PCR_Setup (no controls): Performs PCR reaction setup for 96 samples using a master mix and transfers tissue DNA extracts. The Span-8 pod is used to transfer the master mix to the PCR plate, and the 96-channel head is used to transfer extracts to the PCR plate. This method may be used if it is desired to perform amplification experiments from the whole plate of tissue extracts without preparing PCR controls. This method can also be called up in the Extract-N-Amp_Plant_PCRSetup method if it is desired to transfer extracts with the 96-channel head. Page 6 of 15 C. Description of the Extract-N-Amp_Plant_PCRSetup Method 1. Deck Layout: Deck Position Equipment TL1 AP96 P250 Barrier Tips, Sterile P2 AP96 P250 Barrier Tips, Sterile P3 Swap P4 P6 96-well reservoir for the Extraction Solution Lid P7 96-well PCR plate with full skirt containing plant samples P8 96-well reservoir for Dilution Solution P11 96-well PCR plate with half skirt for PCR reaction setup (seated into a plate holder) P12 12-column reservoir for PCR master mix P14 Span-8 P250 Barrier Tips P15 Span-8 P20 Barrier Tips P16 24 position Eppendorf IsoTherm system (DNA Control) 2. Method Overview: Below is a summary of the automated method, Extract-N-Amp_Plant_PCRSetup. For complete program details the automation program can be downloaded at www.sigmaaldrich.com/automation. 1. The extraction solution (50 µl) is dispensed into a multiwell plate containing plant tissue samples using the 96 channel head. 2. The plate is moved to the shaker and mixed for 30 seconds. 3. The plate is moved to the Peltier ALP and heated for 10 minutes at 85 °C. 4. The dilution solution (50 µl) is dispensed into the plate containing the extracts. 5. Using the 96-channel head, samples are mixed for 8 cycles. 6. The plate is moved to the shaker and mixed for 30 seconds 7. A command calls up and performs all steps of the PCR_Setup (with controls) Method. See below for explanation of the method. Page 7 of 15 D. Description of PCR_Setup (with controls) Method 1. Deck Layout: Deck Position Equipment P7 96-well PCR plate with tissue DNA Extracts P11 96-well PCR amplification plate (seated into a plate holder) P12 12-column Reservoir for PCR master mix P14 Span-8 P250 Barrier Tips P15 Span-8 P20 Barrier Tips P16 24 position Eppendorf IsoThem system (DNA Control) 2. Method Overview: Below is a summary of the PCR Setup method using Span-8 to transfer 4 µl of DNA extracts. For complete program details, the automation program can be downloaded from www.sigmaaldrich.com/automation. 1. Wash the Span-8 dispense head with 2 ml of system fluid. 2. PCR master mix (16 µl) is multi-dispensed to PCR amplification plate using the Span-8 dispense head. 3. Tissue extract (4 µl) is dispensed into the PCR amplification plate. 4. Control DNA samples (4 µl) are dispensed to wells of A12, C12, E12, G12 of the PCR amplification plate using the Span-8 dispense head with tips 5, 6, 7, and 8. 5. Water (negative control, 4 µl) is dispensed to wells of B12, D12, F12, H12 of the PCR amplification plate using the Span-8 dispense head with tips 5, 6, 7, and 8. Page 8 of 15 E. Description of PCR_Setup (no controls) Method 1. Deck Layout: Deck Position Equipment P3 AP96 P20 Barrier Tips, Sterile P7 96-well PCR plate with tissue DNA Extracts P11 96-well PCR amplification plate (seated into a plate holder) P12 P14 12-column Reservoir for PCR master mix Span-8 P250 Barrier Tips 2. Method Overview: Below is a summary of the PCR Setup method using 96-channel head to transfer 4 µl of DNA extracts. For complete program details, download automation program from www.sigmaaldrich.com/automation. 1. Wash the Span-8 dispense head with 2 ml of system fluid. 2. PCR master mix (16 µl) is multi-dispensed to PCR amplification plate using the Span8 dispense head. 3. Tissue extract (4 µl) is dispensed into the PCR amplification plate using 96-channel head. Page 9 of 15 X. Recommended Parameters for PCR Amplification: Step Temperature Time Cycles Initial Denaturation 94−96 °C 3 minutes 1 Denaturation 94−96 °C 0.5−1 minute Annealing 45−68 °C 0.5−1 minute Extension 72 °C 1−2 minutes (~1 kb/min) Final Extension 72 °C 10 minutes Hold 4 °C Indefinitely 30−40 1 XI. Method Customization A. Performing extraction without subsequent amplification Tissue samples may be subjected to extraction without subsequent amplification. To account for this modification, step 7 in the Method Overview Section of Extract-N-Amp_Plant_PCRSetup method should be deleted and the deck layout in the Instrument Setup step needs to be updated as described in Section XI.B: Deck Position Page 10 of 15 Equipment TL1 AP96 P250 Barrier Tips P2 AP96 P250 Barrier Tips P3 Swap P4 96-well reservoir for the Extraction Solution P6 Lid P7 96-well PCR plate with full skirt containing tissue samples P8 96-well reservoir for Dilution Solution B. Preparing 96 plant tissue extracts for PCR It may be desired to extract DNA from 96 plant tissue samples and set up all samples for PCR in a single 96-well PCR plate. Two changes need to be made in the Extract-N-Amp_Plant_PCRSetup method. 1. Click on the Run PCR_Setup (with controls) step of the Extract-N-Amp Plant_PCRSetup method. Use the drop down arrow next to File Name to select PCR_Setup (no controls) method. 2. Update the deck layout in the Instrument Setup step of both Extract-N-Amp Plant_PCRSetup and PCR_Setup (no controls) methods as following: Deck Position TL1 Equipment AP96 P250 Barrier Tips, Sterile P2 AP96 P250 Barrier Tips, Sterile P3 AP96 P20 Barrier Tips, Sterile P4 96-well reservoir for the Extraction Solution P5 Swap P6 Lid P7 96-well PCR plate with full skirt containing tissue samples P8 96-well reservoir for Dilution Solution P11 96-well PCR amplification plate (seated into a plate holder) P12 12-column Reservoir for PCR master mix P14 Span-8 P250 Barrier Tips C. PCR setup only Tissue extracts may be subjected to additional amplifications. The PCR_Setup (with controls) or PCR_Setup (no controls) method described in Section IX may be used for this purpose. D. Use of a different PCR plate The automated method was created using the 96-well PCR amplification plates with half skirt from ABgene. Other PCR plates including 384-well plates may be used in this method, but may require the creation of a new labware in the Biomek software. E. PCR setup using multiple primer sets To amplify genomic DNA from the tissue extract with different primer sets, primers can be added to microfuge tubes and placed on the 24-position tube racks or added to the PCR ReadyMix and placed on different columns of 12-column reservoir S30028. Additional steps will need to be added to the corresponding PCR_Setup method to account for the primer addition or aspirating PCR master mix from a different column position. Page 11 of 15 XII. Performance Characteristics PCR Analysis of Tomato Leaf Tissue Samples M 1 2 3 4 5 6 7 8 9 10 11 + M 1 2 3 4 5 6 7 8 9 10 11 - M Universal Chloroplast Universal Chloroplast Universal Chloroplast Universal Chloroplast Figure 1. DNA was extracted from 88 Tomato leaf samples. The 96-well plate was processed using the automated Extract-N-Amp Plant PCR procedure on the Biomek FX. Amplification of the 438 bp fragment of universal chloroplast genomic DNA is indicated by the arrow. M: PCR marker. (+): Maize genomic DNA control. (-): No DNA template control. PCR Analysis of Different Plant Types M Maize + M Soybean - M Universal Chloroplast M Tobacco + M Tomato - M Universal Chloroplast Figure 2. DNA was extracted from maize, soybean, tobacco, and tomato leaves using the automated Extract-N-Amp Plant PCR procedure on the Biomek FX. Amplification of the 400−500 bp fragment of universal chloroplast genomic DNA is indicated by the arrow. M: PCR marker. (+): Maize genomic DNA control. (-): No DNA template control. Page 12 of 15 Cross-contamination Analysis M 1 2 3 4 5 6 7 8 9 10 11 12 M 1 2 3 4 5 6 7 8 9 10 11 12 M Universal Chloroplast Universal Chloroplast Universal Chloroplast Universal Chloroplast Figure 3. Tomato leaf disks (0.5−0.7 cm) were placed in alternating wells of a 96-well plate. The plate was then processed using the automated Extract-N-Amp Plant PCR procedure on the Biomek FX. All samples were then subjected to amplification and 6 µl of the resultant products were electrophoresed on a 2% Agarose gel. PCR products were not detected in the wells without plant tissue samples. Quantitative PCR Analysis Figure 4. Eighty-eight tomato leaf samples were extracted using the SYBR Green Extract-N-Amp Plant PCR Kit following the automated procedures. Reaction analyses were performed on an ABI Prism 7700 Sequence Detection System. The graph was plotted as the intensity of florescence in logarithms versus the value of cycle threshold (CT). Page 13 of 15 XIII. Troubleshooting Problem Cause Solution Little or no PCR product is detected. A PCR component is missing or degraded. Run a positive control to ensure components are functioning. No leaf tissue extract is added to the PCR reactions. Check the performance of liquid handler. Prime the system if needed. Adjust the aspiration distance of the pipettors in the extraction plate. PCR reaction is inhibited due to contaminants in leaf tissue extract. Use less extract or dilute the extract with 50:50 mix of Extraction and Dilution Solutions and repeat PCR. The mixing of Dilution Solution with leaf tissue DNA extract is not sufficient due to inefficient mixing by the Liquid Handler and/or the clogging of the pipette tip by the tissue samples. Increase the aspiration and dispensing speed and/or cycle times in the mixing steps. Increase the aspiration distance of the pipette tips in the mixing steps to avoid sucking up the tissue by the pipettors. Genomic DNA is sheared when mix the solution with the pipettor. Reduce the aspiration and dispensing speed and/or cycle times in the mixing steps. It is critical for amplifying the large genomic DNA fragments. Too few amplification cycles are performed. Increase the number of cycles (5-10 additional cycles at a time). Others Refer to the Technical Bulletin of Extract-N-Amp Plant PCR Kits. Reagents are contaminated. Use new labware and new batch of reagents. Test a reagent blank without DNA template to determine if the reagents used in extraction or PCR are contaminated. Negative control shows a PCR product or “false positive” results are obtained. Page 14 of 15 XIV. Contact Information Technical Service (800) 325-5832 email: [email protected] Customer Service (800) 325-3010 (800) 588-9160 www.sigma-aldrich.com/order This product is sold under license from Roche Molecular Systems, Inc. and Applied Biosystems. Taq Antibody licensed for in vitro research use under U.S. Patent No. 5,338,671 and 5,587,287, and corresponding patents in other countries. Biomek is a registered trademark of Beckman Coulter, Inc. Eppendorf is a registered trademark of Eppendorf-Netheler-Hinz GmbH JV,KTA 10/05-1 Sigma brand products are sold through Sigma-Aldrich, Inc. Sigma-Aldrich, Inc. warrants that its products conform to the information contained in this and other Sigma-Aldrich publications. Purchaser must determine the suitability of the product(s) for their particular use. Additional terms and conditions may apply. Please see reverse side of the invoice or packing slip. Page 15 of 15