1
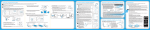
RPIC-1291
OWNER’S GUIDE
GUIDE DE L’UTILISATEUR
12-Volt
DIGITAL COMPASS
BOUSSOLE NUMÉRIQUE
Inside/Outside Temp Display
Affichage de la température intérieure/extérieure
This digital compass uses sophisticated electronics to compensate for the complex, magnetic environment of the
interior of a car. In addition to the magnetic influence of the iron and steel of the engine, bodywork and components,
there are numerous magnets used in electric motors, speakers, etc. A further complication arises from the magnetic
fields produced when electric currents flow through any of the wiring in the vehicle.
Consequently, it is essential that the calibration sequence is conducted with care, to ensure that the compass
provides accurate readings. If the compass is ever moved after calibration, including tilting the display, the calibration
sequence must be repeated. If the compass ever produces erratic or inaccurate readings, it must be recalibrated.
Cette boussole numérique utilise un système électronique sophistiqué pour compenser le magnétisme puissant que
l’on retrouve dans une voiture. En plus de l’influence magnétique du fer et de l’acier du moteur, de la carrosserie et
des pièces, beaucoup d’aimants sont utilisés dans les moteurs électriques, les haut-parleurs, etc. Une complication
supplémentaire se produit en raison du champ magnétique qui est produit lorsque des courants électriques circulent
dans tout le câblage du véhicule.
En conséquence, il est essentiel que la séquence d’étalonnage soit menée avec précaution pour garantir
que la boussole offre des lectures précises. Si jamais la boussole est déplacée après l’étalonnage, dont
l’inclinaison de l’écran d’affichage, la séquence d’étalonnage doit être effectuée à nouveau. Si jamais la
boussole produit des lectures erronées ou inexactes, elle doit être étalonnée à nouveau.
ONE-YEAR LIMITED WARRANTY
For warranty information visit our web site: www.roadproonthego.com
GARANTIE LIMITÉE DE UN AN
Pour des renseignements concernant la garantie,
visitez notre site Web au : www.roadproonthego.com
TECHNICAL SUPPORT / SOUTIEN TECHNIQUE
1-866-622-7979 Monday through Friday 9:00AM - 4:00PM, EST
1-866-622-7979, lundi à vendredi, 9 h - 16 h, HNE.
www.roadproonthego.com [email protected]
RPIC-1291_OG.indd 1
1/13/14 11:16 AM
MOUNTING
• For best results mount the outside sensor probe either under the front bumper or in the front door
frame 2 inches under the hinge.
• Mount the inside unit away from electronics, speakers, major magnetic influences and out of the sun.
• Do not mount the unit on or near an airbag compartment. Mount the unit horizontally on a
convenient position on the dashboard. Ensure that the chosen position does not interfere with the
driver’s view of the road.
• Clean the mounting surface, peel and apply the hook & loop tape on the base of the compass.
• Tilt the compass display for optimal visibility. The compass will only get an accurate reading when it is
placed horizontal. (Note: The display panel should be made from 70° to nearly vertical to horizontal plane
for obtaining optimal sensitivity. The screen should be straight up and straight across when mounted.)
CALIBRATION
• Find a location where it will be safe to make a U-turn (an empty parking lot is ideal) for your vehicle.
Park the vehicle away from other vehicles, leaving the engine running. Switch on all electrical
accessories that are normally used (heating fan, radio, etc.).
• Make sure the compass is fixed tightly on your dashboard. Press and hold the reset button for 3
seconds (cardinal points, numeric digits and the word “CAL” will flash); wait for 5 seconds to avoid
initial, unstable condition, then immediately begin driving the vehicle slowly in a circle.
• Complete at least one full 360˚ circle while the flashing “CAL” is displayed. After approximately
10 seconds the flashing “CAL” will disappear and the cardinal points and the numeric digits will
stop flashing.
The calibration of the compass is now completed. Check that the compass is providing readings that appear to be correct.
USING THE COMPASS
• When switched on, the circuitry of the compass continuously scans the magnetic field in the vehicle.
This can cause the display to fluctuate even when the vehicle is stationary.
• The compass will only get an accurate reading when it places horizontal. (Note: The display panel
should be made from 70˚ to nearly vertical to horizontal plane for obtaining optimal sensitivity.).
• The magnetic field produced by the use of any electrical equipment that was not in use during the
calibration sequence (windshield wipers, rear window defroster, etc.) may cause temporary errors in the
compass reading.
OPERATING INSTRUCTIONS
• THERMOMETERS
• IN/OUT TEMPERATURE
It shows the In/Out temperature at the same time.
• FREEZE ALERT
To activate FREEZE ALERT slide to “ALARM” to
alert you by both beep alarm and flashing LED’s
when the road is slippery due to black ice effect.
An “ALERT” sign will appear beside the temperature
readout on the display. Slide to “LED” to alert you
only by flashing LED’s when the road is slippery due
to black ice effect. An “ALERT” sign will appear
beside the temperature readout on the display.
• VOLTAGE METER
Digital Readout: It will show the actual voltage
of your car battery.
RPIC-1291_OG.indd 2
• SWITCH CELSIUS TO FAHRENHEIT
The switch to change from Celsius to
Fahrenheit is in the battery compartment
under the battery. To turn off FREEZE ALERT:
slide to ALERT OFF. Freeze Alert Intermittent
Flashing LED Lights and/or Beep Alarm per
minute.
• LED INDICATORS
These easy-to-read indicators help you
understand the car battery condition at a
glance.
• BATTERY METER
The LED indicators tell you the car battery
condition.
1/13/14 11:16 AM
MONTAGE
• Pour obtenir de meilleurs résultats, assemblez le capteur extérieur soit sous le pare-chocs avant ou
dans le dormant de porte avant, 5,1 cm (2 po) sous la charnière.
• Assemblez l’appareil allant à l’intérieur loin des dispositifs électroniques, des haut-parleurs, des
dispositifs ayant une grande influence magnétique et loin des rayons du soleil.
• Ne pas assembler l’appareil sur ou près du compartiment d’un coussin gonflable. Assemblez l’appareil
à l’horizontale dans une position pratique sur le tableau de bord. Assurez-vous que la position choisie
ne nuit pas à la vision du conducteur.
• Nettoyez la surface où vous désirez installer l’appareil, pelez et appliquez le ruban à fermeture par
crochets et boucles sur la base de la boussole.
• Inclinez l’écran d’affichage pour obtenir une visibilité optimale. La boussole offrira une lecture précise
uniquement lorsqu’elle est placée à l’horizontale. (Remarque : Pour obtenir une sensibilité optimale,
le tableau d’affichage devrait être placé de 70 degrés à un plan presque vertical et sur une surface
horizontale. L’écran devrait être à la verticale et bien droit lorsqu’installé.)
ÉTALONNAGE
• Trouvez un emplacement où il sera sûr d’effectuer un demi-tour (un parc de stationnement vide est
idéal) avec votre véhicule. Stationnez le véhicule loin des autres véhicules, tout en laissant le moteur
tourner. Allumez tous les accessoires électriques qui sont normalement utilisés (le ventilateur de
chauffage, la radio, etc.).
• Assurez-vous que la boussole est solidement fixée sur votre tableau de bord. Appuyez sur le bouton
de réinitialisation et tenez-le enfoncé pendant 3 secondes (les points cardinaux, les chiffres numériques
et le mot « CAL » clignoteront), attendez pendant 5 secondes pour éviter un état initial instable, puis
commencez immédiatement à conduire le véhicule en effectuant un lent mouvement circulaire.
• Complétez au moins un cercle complet de 360˚ lorsque le mot clignotant « CAL » est affiché. Après
environ 10 secondes, le mot clignotant « CAL » disparaîtra et les points cardinaux ainsi que les chiffres
numériques cesseront de clignoter.
L’étalonnage de la boussole est maintenant terminé. Vérifiez que la boussole fournie des lectures qui semblent exactes.
COMMENT UTILISER VOTRE BOUSSOLE
• Lorsqu’elle est en marche, la circuiterie de la boussole effectue le balayage du champ magnétique de
façon continue dans le véhicule. Ceci peut provoquer une fluctuation de l’affichage, et ce, même
lorsque le véhicule est immobile.
• La boussole offrira une lecture précise uniquement lorsqu’elle est placée à horizontale. (Remarque :
Pour obtenir une sensibilité optimale, le tableau d’affichage devrait être placé de 70˚ à un plan presque
vertical et sur une surface horizontale.)
• Le champ magnétique produit par l’utilisation de tout équipement électrique qui n’était pas utilisé lors
de la séquence d’étalonnage (les essuie-glace, le dégivreur de la lunette arrière, etc.) pourrait
provoquer des erreurs temporaires dans les lectures de la boussole.
RPIC-1291_OG.indd 3
1/13/14 11:16 AM
INSTRUCTIONS D´UTILISATION
• THERMOMÈTRES
• TEMPÉRATURE INTÉRIEURE/EXTÉRIEURE
La boussole indique simultanément la température
intérieure/extérieure.
• PASSER DE CELSIUS À FAHRENHEIT
Le commutateur pour passer de Celsius à
Fahrenheit se trouve dans le compartiment
de la batterie en dessous de la batterie.
Pour désactiver l’ALERTE DE GEL : faites
glisser le bouton à ALERT OFF (ALERTE
DÉSACTIVÉE). Voyants DEL à clignotement
intermittent et/ou alarme à signal sonore par
minute pour alerte de gel.
• ALERTE DE GEL
Pour activer la fonction d’ALERTE DE GEL, faites
glisser le bouton à « ALARM » (ALARME) afin d’être
alerté à la fois par une alerte sonore et un voyant DEL
clignotant lorsque la route est glissante en raison de la
glace noire. Un signal « ALERT » (ALERTE) apparaîtra • INDICATEURS DEL
Ces indicateurs faciles à lire vous aident à
à côté de la température affichée sur l’écran. Faites
comprendre l’état de la batterie de votre
glisser le bouton à « LED » (voyant DEL) afin d’être
voiture en un seul coup d’œil.
alerté uniquement par un voyant DEL clignotant
• INDICATEUR D’ÉTAT DE LA BATTERIE
lorsque la route est glissante en raison de la glace
Les indicateurs DEL indiquent l’état de la
noire. Un signal d’« ALERTE » apparaîtra à côté de la
batterie de votre voiture.
température affichée sur l’écran.
• VOLTMÈTRE
Affichage numérique : Indiquera la tension actuelle de
la batterie de votre voiture.
Distributed by / Distribué par
RoadPro 1875 Zeager Road
Elizabethtown, PA 17022
RoadPro® is a registered trademark of /
est une marque enregistrée de DAS Companies, Inc.
©2013 DAS Companies, Inc. and/or its affiliates.
©2013 DAS Companies, Inc. et/ou ses filiales.
RPIC-1291_OG.indd 4
1/13/14 11:16 AM