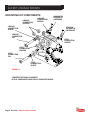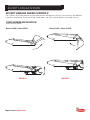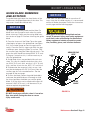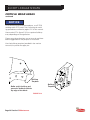
1
Safety, Operation & Maintenance Manual
Saber Series
Bucket Linkage
Shears (BLS)
Part Number 513108
INTELLECTUAL PROPERTY – PATENT INFORMATION
This product is covered by one or more of the following patents.
U.S. PATENT NUMBERS:
5,474,242
7,240,869
5,531,007
7,487,930
5,992,023
7,578,461
7,322,273
7,832,130
8,146,256
8,104,384
EPO Patent Numbers
435,702
737,107
1,682,299
1,789,225
PREFACE
This manual contains information for the safe and proper operation and
maintenance of Bucket Linkage Shears. Read the entire manual before the initial
start-up of the attachment. It is important to know the correct operating procedures
of the attachment and all safety precautions to prevent the possibility of property
damage and personal injury.
The LaBounty attachment has been designed and manufactured with high
quality materials and care in workmanship. The instructions in this manual have
been prepared to ensure that, when followed properly, the attachment will provide
efficient and reliable service. Continuing product development and improvement
may have caused changes in the attachment that are not reflected in this manual.
If a question arises regarding the operation or maintenance of the attachment,
contact a LaBounty dealer for the most current information available.
TABLE OF CONTENTS
SECTION 1 INTRODUCTION TO SAFETY
Introduction .................................................................................................................................. 1-2
Understand Signal Words ............................................................................................................. 1-2
Safety Summary ........................................................................................................................... 1-3
Attachment Decals ....................................................................................................................... 1-5
SECTION 2 ABOUT THE ATTACHMENT
Model Description ........................................................................................................................ 2-2
Features........................................................................................................................................ 2-2
Attachment Terms ........................................................................................................................ 2-3
Main Pivot Components ............................................................................................................... 2-4
Lower Jaw Components .............................................................................................................. 2-5
Upper Jaw Components .............................................................................................................. 2-5
Mounting Kit Components ........................................................................................................... 2-6
BLS Glossary ................................................................................................................................ 2-7
Label Locations ............................................................................................................................ 2-8
SECTION 3 INSTALLATION
Shear Mounting Procedure ...........................................................................................................3-2
Shear Removal ..............................................................................................................................3-4
Shear Storage ................................................................................................................................3-4
SECTION 4 OPERATION
Before You Start ............................................................................................................................ 4-2
First Things First ........................................................................................................................... 4-2
Safety Devices You’ll Need ........................................................................................................... 4-2
General Rules for Safe Operation ................................................................................................. 4-3
BLS Controls ................................................................................................................................ 4-4
Getting the Feel of the Attachment ............................................................................................. 4-5
Feathering the Controls ................................................................................................................ 4-5
SECTION 5 MAINTENANCE
Maintenance Safety Procedures ....................................................................................................5-2
General Rules for Maintenance ......................................................................................................5-2
Periodic Service Schedule ............................................................................................................. 5-3
8-Hour Service Required ............................................................................................................... 5-3
40-Hour Service Required.............................................................................................................. 5-3
Recommended Service Tools for Maintenance ..............................................................................5-4
8-Hour Inspection Checklist ...........................................................................................................5-5
40-Hour Inspection Checklist ........................................................................................................ 5-6
BLS Lubrication ..............................................................................................................................5-7
Bolt Torque Guidelines ................................................................................................................... 5-8
Metric Capscrew Size Guide ......................................................................................................... 5-8
Dry Bolt Torque Charts................................................................................................................... 5-9
Blade Removal...............................................................................................................................5-10
Guide Blade Shimming and Rotation.............................................................................................5-11
BLS Cutting Blade Rotation ...........................................................................................................5-13
Blade Shimming ............................................................................................................................5-17
Critical Wear Areas ....................................................................................................................... 5-18
General Guidelines for Build Up and Hardsurfacing ......................................................................5-21
Hardsurfacing and Build Up Guidelines .........................................................................................5-22
Upper Shear Jaw Build-up and Hardsurfacing .............................................................................. 5-23
Lower Shear Jaw Build-up and Hardsurfacing...............................................................................5-24
Lower Wear Plates Replacement ................................................................................................ 5-26
SECTION 6 TROUBLESHOOTING
General Troubleshooting Checklist .................................................................................................6-2
Cutting Performance Troubleshooting Guide ..................................................................................6-3
SECTION 7 MAIN PIVOT INSTALLATION
Safety Points................................................................................................................................. 7-2
Isometric Drawing of BLS Assembly............................................................................................ 7-3
Lower Jaw Preparation ................................................................................................................. 7-4
Upper Jaw Preparation ................................................................................................................. 7-4
BUCKET LINKAGE SHEARS
SECTION 1 INTRODUCTION TO SAFETY
Introduction .................................................................................................................................. 1-2
Understand Signal Words ............................................................................................................. 1-2
Safety Summary ........................................................................................................................... 1-3
Attachment Decals ....................................................................................................................... 1-5
Introduction to Safety Section 1 Page 1
BUCKET LINKAGE SHEARS
INTRODUCTION
Your safety and the safety of others is a direct result
of how you operate and maintain your equipment.
Read and understand this manual and other safety
information provided with the base machine and be
sure that you understand all controls and operating
instructions before attempting to operate this
equipment. Failure to follow the safety precautions
can result in personal injury, death or property
damage.
Carefully read all safety messages in this manual
and on your equipment safety signs. Keep safety
signs in good condition; replace missing or
damaged safety signs.
Because LaBounty cannot foresee all hazardous
circumstances, the precautions listed in this manual
and on the equipment are not all-inclusive. If a
procedure, method, tool or part is not specifically
recommended by LaBounty, determine whether it
is safe for you and others, and that the equipment
will not be damaged or made unsafe as a result of
your decision to implement it.
The basic rules are summarized in this section
of the manual. They also appear throughout the
manual along with additional specific rules for safety
and operation.
UNDERSTAND SIGNAL WORDS
When you see the following symbols and signal
words on your equipment or in this manual, be alert
to the potential for personal injury or equipment
or property damage. Follow recommended
precautions and safe operating practices.
Indicates immediate hazards that WILL result in
severe personal injury or death.
Indicates hazards or unsafe practices that CAN
result in severe personal injury or death.
Indicates hazards or unsafe practices that could
result in personal injury.
NOTICE
Indicates notes of importance to a procedure or
part.
Page 2 Section 1 Introduction to Safety
BUCKET LINKAGE SHEARS
SAFETY SUMMARY
IF THE ATTACHMENT IS NOT FUNCTIONING
PROPERLY, YOU MUST SHUT THE MACHINE
DOWN AND FOLLOW PROPER LOCKOUT, TAG,
AND REPAIR PROCEDURES.
Ensure that the cab is equipped with the proper
safety guards for LaBounty applications. In addition,
it is required that the cab be equipped with an
approved Falling Object Protection Structure
(FOPS) when processing materials. The FOPS must
meet the requirements of SAE standard J1356. A
transparent shatter-resistant shield covering the
front of the cab is also required. Contact your base
machine equipment dealer or manufacturer for
more information on the availability of FOPS. Lack
of proper FOPS may result in injury or death.
DO NOT process or handle material with the
attachment over the operator’s cab.
Clear all persons and equipment from the area of
operation and machine movement. NEVER move
loads over people or equipment. When viewing
the operation of the attachment, maintain a safe
distance of at least 75 feet (22.9 meters).
NEVER approach power lines with any part of the
machine. Keep clear at a minimum of 15 feet (5
meters).
Avoid tipping. The attachment will alter the lift
capacities of the base machine. DO NOT overload
the excavator or serious injury could result. Lift
capacities will vary if the base machine is not on
level ground. Carry loads in recommended positions
for maximum stability. Use the recommended
excavator counterweight. Use short slings and lift
the load only as high as necessary.
DO NOT allow riders on the machine.
DO NOT attempt to shear brittle materials such
as axles and railroad rail. Brittle material breaks or
shatters instead of shearing. The material being
processed could become a projectile and cause
injury or death. DO NOT process any material in any
position that may propel it toward operator, other
workers, buildings or equipment.
DO NOT close the attachment on a structure and
reverse the excavator in an attempt to pull down
material.
NEVER remove any pins unless the attachment
is on the ground and blocked up or serious injury
or death could result. Metal chips or debris may
fly when a connecting pin is struck. Use a brass
drift when striking pins and always wear protective
clothing and proper eye protection. Pins may fly
when struck with force to drive them in or out. Keep
people clear when removing or installing pins.
Introduction to Safety Section 1 Page 3
BUCKET LINKAGE SHEARS
SAFETY SUMMARY continued
NEVER operate equipment without the original
equipment safety guards in place. If the cab glass
is missing or damaged, check with your dealer or
manufacturer for proper replacement.
Under no circumstances should any modifications
be made to LaBounty equipment without factory
authorization.
ALWAYS lower the boom to the ground before
leaving the cab. If it is necessary to work on an
attachment off the ground, securely support the
machine and attachment. DO NOT support the
machine on cinder blocks, hollow tiles, or props that
may crumble under continuous load. DO NOT rely
on a cylinder to hold the attachment in the air. DO
NOT work under a machine that is supported only
by a jack.
DO NOT let hot hydraulic oil get in contact with the
skin as it could cause severe burns. Wear adequate
protective clothing and safety equipment. DO NOT
tamper with any hydraulic line or component while
it is pressurized. Escaping fluid under pressure can
penetrate the skin, causing serious injury. Relieve
pressure before unhooking hydraulic or other lines.
Tighten all connections before applying pressure.
Keep hands and body away from pinholes and
nozzles which eject fluids under high pressure. Use
a piece of cardboard to search for leaks. If ANY fluid
is injected into the skin, seek immediate medical
assistance.
DO NOT weld on any structural member
unless specifically authorized by LaBounty. Any
unauthorized welding or welding procedures will
void the warranty, and may result in personal injury.
Page 4 Section 1 Introduction to Safety
ALWAYS wear close-fitting clothing and safety
equipment appropriate to the job. Safety equipment
should be worn at all times when viewing,
operating, or maintaining the attachment to prevent
injury. Safety equipment includes eye protection,
hard hat, steel toe shoes, gloves, and hearing
protection.
Keep clear of all potential pinch points, including
the moving upper jaw, cylinder connections, bucket
linkages or other moving parts.
Before operating the attachment, read and
observe all safety instructions in the Operation
and Maintenance sections of this manual. If you
are unfamiliar with any operation or maintenance
procedure, seek instruction before proceeding.
BUCKET LINKAGE SHEARS
ATTACHMENT DECALS
STANLEY LABOUNTY BRAND DECALS
(REPLACEMENT DECALS AVAILABLE UPON REQUEST)
FIGURE 1-1
SAFETY FIRST DECAL PART NUMBER 503590
(INCLUDED WITH MANUALS)
FIGURE 1-2
Introduction to Safety Section 1 Page 5
BUCKET LINKAGE SHEARS
ATTACHMENT DECALS continued
1538 Highway 2
Two Harbors, MN 55616
tel: 1-800-522-5059
fax: 218-834-3879
www.stanleyhydraulic.com
GREASE DECAL
PART NUMBER 116338
FIGURE 1-3
Made in the U.S.A. with Global Materials
Attachment Model:
Serial Number:
Year of Manufacture:
Weight:
MODEL/SERIAL NUMBER PLATE
PART NUMBER 511045
FIGURE 1-6
SAFE VIEWING DISTANCE DECAL
PART NUMBER 116389
FIGURE 1-4
U.S. PATENT NUMBERS
5,474,242
7,240,869
5,531,007
7,487,930
5,992,023
7,578,461
7,322,273
7,832,130
8,146,256
8,104,384
EPO PATENT NUMBERS
435,702
737,107
1,682,299
1,789,225
STANLEY LABOUNTY
1538 Highway 2
1-800-522-5059
Two Harbors, MN 55616
www.stanleyhydraulic.com
FOREIGN PATENTS AND OTHER PATENTS PENDING
116404
PATENT PLATE
PART NUMBER 116404
FIGURE 1-7
SAFETY DECAL
PART NUMBER 503647
FIGURE 1-5
Page 6 Section 1 Introduction to Safety
BUCKET LINKAGE SHEARS
SECTION 2 ABOUT THE ATTACHMENT
Model Description ..................................................................................................................... 2-2
Features ..................................................................................................................................... 2-2
Attachment Terms ..................................................................................................................... 2-3
Main Pivot Components ............................................................................................................ 2-4
Lower Jaw Components............................................................................................................ 2-5
Upper Jaw Components ............................................................................................................ 2-5
Mounting Kit Components ........................................................................................................ 2-6
BLS Glossary ............................................................................................................................. 2-7
Label Locations.......................................................................................................................... 2-8
About the Attachment Section 2 Page 1
BUCKET LINKAGE SHEARS
MODEL DESCRIPTION
The BLS Bucket Linkage Shears are designed to mount directly to
the excavator stick, in place of the bucket. The shear is pinned to the
stick tip and bucket linkage and is opened and closed by activating the
excavator bucket circuit. The lower shear stick pins to a mounting pad
which is welded to the bottom of the excavator stick (the same type
of pad used with LaBounty Grapples and Concrete Pulverizers). Models are available for base machines from 40,000 to 100,000 pounds
(18,000 to 45,000 kg).
The BLS series is designed to be used as a simple shear to process
lighter gauge scrap than a comparable MSD series shear. It is ideal
for processing rebar, angle, “I” beams, pipe, and other ferrous and
non-ferrous scrap. Applications for this tool include auto salvage yards,
scrap yards, and light demolition work.
The BLS series features four equal-sized, four-way indexable cutting
blades. This means that the blades can be rotated to use all four edges.
The single guide blade in the lower jaw and the wear plate on the upper shear keep the jaw in alignment during the cutting process.
BLS shears are constructed of high tensile, abrasion-resistant steel
that assures long, uninterrupted service – even in the harshest conditions. The main pivot shaft of every model is manufactured for long life
and pivots on LaBounty’s specially designed bearings. The lever arm
of the upper shear is designed to maximize the cutting force for the
excavator on which it is mounted.
FIGURE 2-1
Page 2 Section 2 About the Attachment
FEATURES
•
•
•
•
•
•
Combines maximum cutting strength and reach
with minimal weight
Constructed of high
tensile, abrasion-resistant
steel for long life
Replaceable wear parts for
easy maintenance
Four-way indexable blades
Installs in as little as two
hours
At-factory upgrading and
rebuilding services available for extended life
BUCKET LINKAGE SHEARS
ATTACHMENT TERMS
EXCAVATOR BUCKET
CYLINDER
EXCAVATOR POWER LINK
EXCAVATOR GUIDE LINK
LINKAGE CONNECTION
UPPER SHEAR
SABER TIP BLADE
EXCAVATOR STICK
MOUNTING PAD
POSITION ARM
GUIDE BLADE
STICK CONNECTION
MAIN PIVOT
LOWER SHEAR
CUTTING BLADES
CROSS BLADE
FIGURE 2-2
About the Attachment Section 2 Page 3
BUCKET LINKAGE SHEARS
MAIN PIVOT SHIMS
MAIN PIVOT COMPONENTS
MAIN PIVOT SHIMS
LH MAIN PIVOT
ENDCAP
LH MAIN BEARING
INNER THRUST WASHER
RH MAIN BEARING
DOWEL
DOWEL
ENDCAP BOLTS
AND WASHERS
MAIN PIVOT SHIMS
RH MAIN PIVOT ENDCAP
FIGURE 2-3
UPPER JAW COMPONENTS
SABER TIP
BLADE
DOWEL
BLADE BOLTS
AND
WASHERS
UPPER SHEAR JAW
DOWEL
UPPER CUTTING
BLADES
FIGURE 2-4
Page 4 Section 2 About the Attachment
BLADE BOLTS
AND WASHERS
BUCKET LINKAGE SHEARS
LOWER JAW COMPONENTS
LOWER CUTTING
BLADE SHIMS
LOWER CUTTING BLADE
ADJUSTMENT PLATES
LOWER CUTTING BLADES
BLADE BOLTS
AND WASHERS
LOWER SHEAR
JAW - SHEAR STICK
GUIDE BLADE
SHIMS
BLADE BOLTS
AND WASHERS
GUIDE BLADE
CROSS BLADE
FIGURE 2-5
CROSS BLADE
DOWELS
MOUNTING COMPONENTS
UPPER POSITION ARM
PIN RETAINER CLIP
MOUNTING PAD
UPPER POSITION
ARM PIN
SLEEVE
LOWER POSITION
ARM PIN RETAINER
& HARDWARE
UPPER POSITION ARM
PIN RETAINER CLIP
LOWER POSITION
ARM PIN
FIGURE 2-6
About the Attachment Section 2 Page 5
BUCKET LINKAGE SHEARS
MOUNTING KIT COMPONENTS
LINKAGE
CONNECTION
SPACERS*
LINKAGE
CONNECTION
SLEEVE*
LINKAGE PIN
RETAINER &
HARDWARE
LINKAGE
CONNECTION
SLEEVE
STICK PIN
RETAINER &
HARDWARE
LINKAGE
CONNECTION
PIN
STICK
CONNECTION
SLEEVE*
STICK
CONNECTION
SPACERS
STICK
CONNECTION
PIN
STICK
CONNECTION
SLEEVE
FIGURE 2-7
* IDENTIFIES OPTIONAL EQUIPMENT
ACTUAL COMPONENTS MAY VARY BY EXCAVATOR MODEL.
Page 6 Section 2 About the Attachment
BUCKET LINKAGE SHEARS
ATTACHMENT GLOSSARY
Adjustment Custom-made plates that precisely adjust the lower cutting blades to the upper blades. These
Plates
plates make it possible to achieve a uniform blade gap on the shear.
Apex
The point where the primary and secondary cutting blades come together.
Blade Gap
The gap between the upper and lower cutting blades as the blades bypass. A very important
item that must be maintained regularly to prevent material from jamming in the blades.
Blade Shims Thin metal shims used to adjust the position of the lower cutting blades to maintain a proper
blade gap. Blades should never be shimmed out farther than 0.13" (3.3 mm).
Build Up
Welding process where worn off parent material is replaced with new metal. A very important
maintenance procedure that must be performed regularly throughout the life of the shear.
Cutting
Blades
The blades in the upper and lower shear jaws that shear materials as they bypass. The primary
blades are those in the upper and lower jaws that are nearest to the shear throat. The
secondary blades are those that are farthest from the shear throat.
End Cap
Protects and adjusts the main pivot group of the shear. The end cap is a vital component to the
adjustment of the main pivot group and must not be removed without first consulting the
LaBounty Customer Service Department.
Front Wear
Plate
A replaceable wear plate that is located on the opposite side of the upper shear weldment of
the cutting blades. It wears on the guide blade during shearing. this is a very important
maintenance item; it must be replaced when worn.
Grain of
Materials
The direction that the parent material was initially rolled at the steel mill. It is very important
when hardsurfacing any part of the shear to weld with the grain of the steel. Cross-grained
hardsurfacing has the tendency to start cracks in the base material.
Guide Blade A replaceable component located opposite the cutting blades in the lower shear. The main
purpose of the guide blade is to support the upper shear during the cutting cycle. This is a very
important maintenance item.
Guide Blade Thin metal shims used to adjust the guide blade out to maintain the proper guide blade gap.
Shims
Shims come in a designated set that determines when the guide blade will be indexed or
replaced.
Guide Blade The gap between the front wear plate and the guide blade as the upper shear is cycled into the
Gap
lower. This is an important maintenance item to ensure longevity of the shear’s structure.
Hardsurface Welding process for protecting the parent material of the shear jaws. The hardsurface acts as a
wear surface.
About the Attachment Section 2 Page 7
BUCKET LINKAGE SHEARS
ATTACHMENT GLOSSARY continued
Hub Shims
Thin metal, circular shims used in the main pivot group of LaBounty shears. Hub shims provide
factory adjustment of the upper shear for close blade tolerance.
Link
Connection
The mounting connection where the upper shear is pinned to the bucket linkage of the
excavator. A pin is provided with the shear to make this connection.
Lower
The frontal area of the lower shear through which the upper piercing tip passes. This area
Piercing Area contains the guide blade and the cross blade.
Lower Shear The lower stationary jaw of the shear. The lower shear contains the lower cutting blades, the
guide blade, and the cross blade.
Main
Bearing
Hardened bushings that the main shaft of the shear rotates on during operation. There are two
main bearings, bolted in on both sides of the main pivot group.
Main Pivot
Group
High tolerance area of the shear that contains the two main bearings, two thrust washers, main
shaft, hub shims, and two end caps.
Main Shaft
The shaft on which the upper shear pivots causing the shearing action of the attachment.
Nose Plate
Plate located at the front of the lower shear jaw that ties the two halves of the lower shear
together. This plate requires regular build-up and hardsurface.
Piercing Tip
Replaceable wear part that is welded into the tip of the upper shear.
Stick
The main body of the shear that includes the lower shear. The stick fastens to the mounting
pad on the excavator stick and must be regularly inspected for damage.
Stick
Connection
The mounting connection where the lower shear and stick are pinned to the end of the
excavator stick. A pin is provided with the shear to make this connection.
Throat
Area of both the upper and lower jaw near the main pivot where the primary blades are located.
The throat area is the optimum area for shearing material. The shear is most powerful on the
primary blades nearest the pivot point.
Upper Shear Movable jaw of the shear that contains cutting blades, the piercing tip, and the wear area for
the slide pucks. The shear cylinder articulates the upper shear into the lower shear to perform
the cutting action of the shear.
Page 8 Section 2 About the Attachment
BUCKET LINKAGE SHEARS
LABEL LOCATIONS
Be sure that all safety decals are installed and visible. If you require any replacement decals, please contact your
Stanley LaBounty dealer or the Stanley LaBounty Customer Service Department. Complete label installation kits
with dimensional location drawings are available upon request.
4
4
2
7 6
4
8
3
5
1
FIGURE 2-8
ITEM
1
2
3
4
PART NUMBER
503706
BY MODEL
510894
116388
5
6
7
503647
116404
511045
8
501593
DESCRIPTION
Danger 75’ Decal - one on each side of stick
Model Decal - one of each side of stick
Stanley LaBounty 6” Decal - one on each side of stick
Grease decal - one at each grease fitting
DANGER Cab Guarding - one on each side of stick
Patent Plate - one on top of stick near position arm connection
Model/Serial Number Plate - one on top of stick near position
arm connection
Weld-on “L” logo - one on each side of stick
About the Attachment Section 2 Page 9
BUCKET LINKAGE SHEARS
Page 10 Section 2 About the Attachment
BUCKET LINKAGE SHEARS
SECTION 3 INSTALLATION
BLS Shear Installation................................................................................................................... 2-2
BLS Shear Removal ...................................................................................................................... 2-4
BLS Storage .................................................................................................................................. 2-4
Installation Section 3 Page 1
BUCKET LINKAGE SHEARS
BLS SHEAR INSTALLATION
It is recommended that the mounting bracket not be
welded to the excavator stick until the BLS shear is
installed. Mount the attachment as follows:
1. Remove the bucket or other attachment from the
excavator following manufacturer’s recommended
procedure. Retract the bucket cylinder and linkage
2. Position the shear on a flat, level surface. Remove
the main pin and link pin from the BLS Shear.
3. Walk the excavator into position and line up the
excavator stick tip with the stick connection of the
shear as shown in figure 3-1.
To prevent serious injury or death, stay clear
of the shear at all times when the jaws are in
motion. Never place any part of your body near
the shear jaws unless they are absolutely secure
in a fixed position.
4. Install the stick pin through the stick connection
of the BLS Shear and the stick tip of the excavator.
Make sure to install the spacers or sleeves on
each side of the stick tip as you slide the stick pin
through the stick connection.
5. Install the locking collar with the retaining bolt
and nylon locking nut.
6. Extend the bucket cylinder and line up the power
link with the linkage connection of the BLS Shear
as shown in figure 3-2. Install the link pin. Place the
collar on the end of the link pin and secure it with
the bolt and nut provided.
7. With all personnel standing clear, fully curl the
excavator stick and extend the bucket cylinder to
position the lower jaw as shown in figure 3-3.
8. Place the mounting pad on the bottom of the
excavator stick and connect the position arm to the
lower jaw of the shear. Make sure the position arm
grease fittings will be accessible.
9. Connect the position arm to the mounting
bracket.
MAIN PIN
FIGURE 3-1
LINK PIN
FIGURE 3-2
POSITION ARM
PINS
FIGURE 3-3
Page 2 Section 3 Installation
BUCKET LINKAGE SHEARS
BLS SHEAR INSTALLATION continued
10. Use the bucket cylinder to position the mounting
pad along the bottom of the stick to obtain the proper
distance from the main pin to the center hole of the
mounting pad. This distance is shown in the Parts
Catalog. See Figure 3-4.
11. Use the mounting dimension provided in the parts
catalog to locate the mounting pad on the bottom
of the stick (see dimension “X” in figure 3-4). The
mounting pad should be centered and parallel with
the width of the stick.
12. Weld the pad in position using E7018 low
hydrogen welding rod. Make 1/2” (13 mm) fillet
welds 3.00” (76 mm) long and 6.00” (152 mm) on
center (see figure 3-5). Run out welds 1.50” (38 mm)
on the ends and grind to a taper in both the side view
(see figure 3-7) and the top view (see figure 3-6).
Note the direction of grinding marks.
1.50
X
FIGURE 3-4
NOTICE
Under no circumstances should the mounting
pad be welded around the ends. To do so may
create the possibility of cracking the stick on the
excavator.
6.00
3.00
E7018
0.5
3-6
GRINDING DIRECTION
MARKS
FIGURE 3-5
FIGURE 3-6
SIDE VIEW WELD DETAIL
FIGURE 3-7
TOP VIEW WELD DETAIL
Installation Section 3 Page 3
BUCKET LINKAGE SHEARS
BLS SHEAR REMOVAL
Fully close the BLS Shear and place it on a solid,
level surface in the position shown in figure 3-8.
1.Support the position arm while removing the pin
from the mounting pad. Leave the position arm
attached to the shear and rotate it away from the
mounting pad. Rest it on the ground as shown in
figure 3-9.
2. Remove the pin from linkage connection and fully
retract the bucket cylinder.
3. Lower the excavator stick until the BLS shear
rests flat on the ground as shown in figure 3-10.
4. Remove the pin from the stick connection. With
all personnel standing clear, carefully raise the
excavator stick away from the shear.
To prevent serious injury or death, stay clear
of the shear at all times when the jaws are in
motion. Never place any part of your body near
the shear jaws unless they are absolutely secure
in a fixed position.
FIGURE 3-8
FIGURE 3-9
BLS SHEAR STORAGE
1. Place the attachment on a solid, level surface.
2. Apply a coating of grease to the bores, pins, and
any other exposed, unpainted surfaces.
3. Replace all pin retainers, associated hardware and
pins in their appropriate bores to prevent misplacing
them.
4. Grease at all locations (refer to the lubrication
instructions in the maintenance section of this
manual).
FIGURE 3-10
Page 4 Section 3 Installation
BUCKET LINKAGE SHEARS
SECTION 4 OPERATION
Before You Start ............................................................................................................................ 4-2
First Things First ........................................................................................................................... 4-2
Safety Devices You’ll Need ........................................................................................................... 4-2
General Rules for Safe Operation ................................................................................................. 4-3
BLS Controls ................................................................................................................................ 4-4
Getting the Feel of the Attachment ............................................................................................. 4-5
Feathering the Controls ................................................................................................................ 4-5
Operation Section 4 Page 1
BUCKET LINKAGE SHEARS
BEFORE YOU START
FIRST THINGS FIRST
KNOW YOUR SAFETY PROGRAM
1. Ensure all safe viewing distance decals are
installed and legible; contact LaBounty for
replacements as required.
2. Have a DAILY Safety Dialog with all those with
whom you work. Inform them of any out-of-theordinary work that may be planned for the day.
Remind them of the safe working distance.
3. Clear the area; inspect. ALWAYS look out for
others. In any work area, people constitute a
serious safety hazard. Before operating, walk
completely around the machine to be sure there
are no workers next to, under or on it. Warn nearby
workers that you are starting up; DO NOT start up
until they are out of danger.
4. Each day before starting, visually inspect the
machine by walking around it entirely; check the
location of cables, gas lines, and water mains
before any operations. Make sure work site
footing has sufficient strength to firmly support
the machine. When working close to an excavation,
position machine with the propel motors at the rear.
5. Once started, keep bystanders clear, especially
before moving the boom, swinging the upper
structure, or traveling. ALWAYS be alert for
bystanders in or near the operating area.
1. Read and understand the safety section of this
manual and the base machine manual.
2. Know the employer’s safety rules for your job.
Consult your foreman for specific instructions and
safety equipment required.
3. Learn the traffic rules at the work site.
4. Know the hand signals used on the job and who
is responsible for signaling. Take signals from only
ONE person.
KNOW YOUR EQUIPMENT
•
•
•
•
Learn the location and function of all controls.
Test all controls to ensure proper operation. If
any malfunctions are found, shut the machine
down and report the malfunction for repair.
Be familiar with the safety devices on the
machine, indicators, warning devices and
caution instructions. They will alert you to
conditions that may make it hazardous to
continue operating.
Wear proper protective clothing including hard
hat, safety shoes, ear protectors, reflective
clothing, safety goggles and work gloves. Loose
clothing can get caught in machinery and
cause injury. Wrist watches, rings and other
accessories can be dangerous, as well.
Know the clearances in the work area. A
little time spent checking side and overhead
clearances, including power lines, can save a lot
of trouble.
Page 2 Section 4 Operation
SAFETY DEVICES YOU’LL NEED
SAFETY DEVICES
Seat belts
Canopies
Falling Objects Protective Structures (FOPS)
Shields and guards
Safety decals
Visual or audible warning devices
Flags and flares
Barricades
Signs and other markings
Warning lights
BUCKET LINKAGE SHEARS
GENERAL RULES FOR SAFE
OPERATION
1. Read the Operator’s Manual for the excavator
that the grapple is on. Know the control levers and
their functions. Also note ALL safety devices on the
machine and ensure that they are working properly.
2. KNOW the capacity of the excavator and its
attachments. DO NOT overload the machine or
serious injury could result.
3. It is required that a Falling Objects Protection
Structure be installed surrounding the excavator cab
for all material handling applications.
4. DO NOT use attachment for anything except
what it is intended for or warranty will be voided.
5. DO NOT operate a poorly maintained or damaged
attachment.
6. ALWAYS maintain a safe operating distance
between any material suspended and held by the
attachment and the cab of the machine.
7. NEVER leave a load suspended in the air, pass
it over people, occupied vehicles or buildings or
serious injury could result.
8. ALWAYS keep a watchful eye on exposed parts,
such as the position arm, so as to not damage them
when working in confined spaces.
9. ALWAYS maintain at least 15 feet (5 meters)
between the attachment and any nearby power
lines or serious injury could occur.
10. When leaving the machine for any reason,
ALWAYS lower the attachment to the ground.
11. DO NOT close the attachment on a structure
and reverse the excavator in an attempt to pull down
material.
12. AVOID collision of the boom or attachment,
especially when working with limited visibility or
inside buildings. Know the height and reach of the
processor during operation, travel and swinging
upper structure.
13. AVOID contacting machine with the attachment
or any material held by it.
14. Use machine swing for positioning only. DO
NOT use the attachment as a jack hammer or
wrecking ball.
15. AVOID contact between boom arm or
attachment and overhead obstacles when you
operate, move or haul the machine.
16. The attachment is not a dozer. DO NOT position
it on the ground and travel forward.
Determine the control for each movement of the
excavator before attempting to operate. Practice
the machine movements as described in “Getting
the Feel of the Attachment” on page 4-5.
Operation Section 4 Page 3
BUCKET LINKAGE SHEARS
BUCKET LINKAGE SHEAR CONTROLS
The LaBounty BLS shear replaces the excavator bucket and operates with the same controls. No additional
hydraulics are required. The bucket dump control opens the shear and the bucket curl control closes it.
THIRD MEMBER INSTALLATION
Shear replaces bucket
Bucket DUMP = Shear OPEN
FIGURE 4-1
Page 4 Section 4 Operation
Bucket CURL = Shear CLOSE
FIGURE 4-2
BUCKET LINKAGE SHEARS
GETTING THE FEEL OF THE ATTACHMENT
Every operating part of any machine has a slightly different “operating feel”—an individual machine response
to the movement of the controls. Before starting the first job with a new machine, it is suggested that the
operator find an open spot on firm, level ground that’s free of obstructions such as trees, buildings and other
equipment. This area must be free of people, too. Move the machine to this area – and spend some time just
getting to know the “operating feel” of the machine and the shear, which will allow the operator to become
familiar with the control levers and the shear before beginning work.
The machine is extremely powerful. Do not operate it carelessly; there is potential for personal injury and
equipment damage. Be concerned about safety when preparing to operate the new machine. Ensure
safe operation by inspecting the machine as stated in Getting Started Safely. This inspection amounts
to a common sense visual check of the machine at the beginning of every operation. Follow a preventive
maintenance program; such a procedure will reduce the possibility of costly downtime. Read the Getting
Started Safely section of this manual and understand it.
The “fluid” nature of hydraulic power requires a special operating approach to the shear that can be
described as a smooth, even technique. The control levers should be moved in a gradual, deliberate way
rather than with jerky, abrupt movements (see figure 4-3). Jerky operation can cause damage and early wear
to various parts on the machine, and can also overheat the hydraulic system.
For example, as each control lever is moved forward or backward from the center, or neutral position, the oil
flows to the cylinder or motor controlling a function. The component (boom, attachment, etc.) starts to move.
The component moves faster as the control lever is moved further forward or backward. Holding the lever in
the forward or backward position will hold that movement at a given rate of speed. To slow the movement
down, gradually move the lever toward the
neutral position. Movement is stopped at the
neutral position. The position is maintained
until the control lever is moved again.
FEATHERING THE
CONTROLS
FIGURE 4-3
Feathering the controls is a technique that
will increase output and make operating the
shear easier. When starting any motion of
the machine, move the control slightly from
neutral until it starts to move, then smoothly
move the control to increase motion to
desired speed. Do the same when stopping
a motion.
Operation Section 4 Page 5
BUCKET LINKAGE SHEARS
SECTION 5 MAINTENANCE
Maintenance Safety Procedures ..................................................................................................5-2
General Rules for Maintenance ...................................................................................................5-2
Periodic Service Schedule............................................................................................................5-3
8-Hour Service Required ..............................................................................................................5-3
40-Hour Service Required ............................................................................................................5-3
Recommended Service Tools for Maintenance ...........................................................................5-4
8-Hour Inspection Checklist ........................................................................................................5-5
40-Hour Inspection Checklist .......................................................................................................5-6
BLS Lubrication ...........................................................................................................................5-7
Bolt Torque Guidelines .................................................................................................................5-8
Metric Capscrew Size Guide .......................................................................................................5-8
Dry Bolt Torque Charts .................................................................................................................5-9
Blade Removal ............................................................................................................................5-10
Guide Blade Shimming and Rotation .......................................................................................... 5-11
BLS Cutting Blade Rotation ........................................................................................................5-13
Blade Shimming ......................................................................................................................... 5-17
Critical Wear Areas......................................................................................................................5-18
General Guidelines for Build Up and Hardsurfacing.................................................................... 5-21
Hardsurfacing and Build Up Guidelines ......................................................................................5-22
Upper Shear Jaw Build-up and Hardsurfacing ............................................................................5-23
Lower Shear Jaw Build-up and Hardsurfacing ............................................................................5-24
Lower Wear Plates Replacement...............................................................................................5-26
Maintenance Section 5 Page 1
BUCKET LINKAGE SHEARS
MAINTENANCE SAFETY
PROCEDURES
• Inspect the shear daily. DO NOT operate a poorly
maintained or damaged shear or major structural
damage could result.
•ALWAYS lower the shear to the ground before
leaving the cab. If it is necessary to work on a shear
off the ground, securely support the base machine
and shear. DO NOT support the shear on cinder
blocks, hollow tiles, or props that may crumble
under continuous load. DO NOT rely on the cylinder
to hold the shear in the air. If a control is moved or
hydraulic pressure is otherwise released, the shear
will drop. DO NOT work under a machine that is
supported solely by a jack.
• DO NOT attempt to alter or change the physical,
mechanical or hydraulic operation of the shear
during the warranty period without first consulting
Stanley LaBounty as this could invalidate the
Manufacturer’s Warranty.
• NEVER operate the machine if an unsafe
condition exists. Attach a “DO NOT OPERATE”
tag to the machine. If more than one person is
working on a machine, each must be familiar
with the controls and aware of what the others
are doing. Before working on a machine, BE
SURE TO TAG THE CONTROLS SO NO ONE ELSE
WILL START IT.
• ALWAYS use two people when making checks
with the engine running.
• Keep hands away from moving parts. NEVER
lubricate or work on a machine while it is moving.
• ALWAYS wear proper safety equipment when
maintaining the shear including safety glasses with
side shields, hard hat, steel toe shoes, gloves, and
hearing protection.
•DO
NOT
ATTEMPT REPAIRS
YOU it
DO
During
maintenance
of the shear,
is NOT
imperative
UNDERSTAND.
ASK
FOR
HELP
BEFORE
that the excavator is turned OFF to prevent injury.
STARTING IF YOU ARE UNSURE.
GENERAL MAINTENANCE
1. Read the maintenance manual. Be sure all
maintenance personnel read and understand all
maintenance procedures before they attempt them.
2. Use factory approved parts.
Page 2 Section 5 Maintenance
3. Lubricate every four hours; follow the lubrication
schedule as outlined on page 5-7.
4. Use the Inspection Checklists during shear
inspections to make sure all maintenance is
complete.
5. In extremely cold temperatures, work the shear
on lighter materials first before working up to
heavier materials. This allows the shear to warm up
and makes it less susceptible to damage. DO NOT
operate at temperatures below -10º F (-230ºC).
6. To get maximum life from the shear blades, they
can be rotated to utilize all four edges. Frequent
rotating allows the blades to wear evenly and will
increase their life.
7. DO NOT enter the pivot group of the shear
without first consulting your dealer or the Stanley
LaBounty Customer Service Department. Improper
adjustment could cause shear damage and may
void the shear warranty.
8. The machined adjustment plates that are behind
the cutting blades in the lower shear have been
custom machined for each shear. If they should
come loose, be sure to replace them properly.
9. DO NOT weld the guide blade into its blade seat.
The guide blade is needed for proper adjustment of
the shear. DO NOT allow excessive gap between
guide blade and upper wear plate.
10. DO NOT preheat piercing tip in excess of 400°
F (200° C) when welding on a new replacement tip.
It is recommended that the piercing tip not be built
up and hardsurfaced more than once.
11. DO NOT weld or hard surface across the grain of
the steel at any time. When hardsurfacing, DO NOT
exceed two passes of hardsurface rod.
12. DO NOT allow shear blades to wear
excessively. Rotate or replace the blades when
edges have rounded to approximately 1/4" (6 mm)
radius or after 80 hours, whichever comes first.
Regular blade rotation will keep blades square,
allowing for blade shimming.
13. DO NOT exceed bolt torque specifications (see
Dry Bolt Torque Chart on page 5-9).
14. DO NOT exert excavator weight on the jaws in
order to free them if they are jammed; consult your
LaBounty dealer or the LaBounty Customer Service
Department if this occurs.
BUCKET LINKAGE SHEARS
PERIODIC SERVICE
SCHEDULE
SERVICE THE SHEAR AT SPECIFIED
INTERVALS
Inspect, lubricate, make service checks and
adjustments according to the 8-hour and 40-hour
Inspection Checklists reproduced from this manual.
A program of regular service should be established,
using the machine hour meter to determine when
the shear should be serviced. Use the intervals on
the Service Schedule when operating in normal
conditions. Service the shear at shorter intervals
when operating in extreme environmental or
abrasive conditions. Use Correct Lubricants and
Bolt Torques—refer to the Lubrication and Bolt
Torque instructions in this manual when performing
maintenance on the shear.
40-HOUR SERVICE REQUIRED
Guide Blade: Rotate or replace the guide blade if
necessary. Shim the guide blade if the guide blade
gap exceeds 0.030" (0.75 mm).
Cutting Blades: Rotate the cutting blades or
replace if necessary. After blade rotation, shim
the lower blades to achieve the desired blade gap
between 0.010 and 0.020" (0.50 and 0.75 mm).
Upper Shear: Inspect the wear areas to determine
if build-up and hardsurfacing is needed. Pay special
attention to the surface adjacent to the cutting
blades where the upper shear stops on the lower
shear. Repair or replace the piercing tip and front
wear plate if necessary.
Lower Shear: Inspect the wear areas to determine
if build-up and hardsurfacing is needed.
8-HOUR SERVICE REQUIRED
Inspect Safety Devices: Make sure all decals are
installed and legible. Inspect the condition of the
cab protection and make sure visual and audible
warning devices are working properly. Make all
repairs before using the equipment.
Grease Fittings: Lubricate according to the
Lubrication section (page 5-7). Replace broken
fittings.
Connecting Pins and Pin Retainers: Inspect the
mounting bracket pins and shear cylinder pins for
looseness or damage. Check pinheads and pin
keepers.
Bolts: Check for looseness or damage. Refer to the
Dry Bolt Torque chart in this section if torquing is
necessary. Bolts may be retorqued only once and
then must be replaced.
Guide Blade Gap: Shim the guide blade if the gap
exceeds 0.030" (0.75 mm).
Cutting Blade Gap: For most applications, this gap
should be maintained between 0.010 and 0.020"
(0.25 and 0.50 mm). Shim the blades if the gap is
greater than 0.020” (0.50 mm).
Piercing Tip: Inspect for damage and check for a
square fit in the lower jaw. Maintain if necessary.
Lower Piercing Area: Inspect for damage and
check for a square fit with the piercing tip. Maintain
if necessary.
Maintenance Section 5 Page 3
BUCKET LINKAGE SHEARS
RECOMMENDED FOR MAINTENANCE OF BLS SHEARS
SAFETY EQUIPMENT
WELDING EQUIPMENT & TOOLS
Safety glasses with side shields
Face shield when grinding
Hearing protection
Steel toe boots
Hard hat
Leather work gloves
Welding hood
Approved welding respirator
Welder - minimum 250 amp rating (stick type
required, wire feed preferred)
Cutting torch set (including tanks & gauges)
Large rosebud torch tip
Air peener
Grinder
Die grinder
Temperature melt sticks
AWS E7018 weld rod/wire or equivalent for build up
Amalloy 814H weld rod or wire or equivalent for
hardsurfacing
Build-up templates from LaBounty
HAND TOOLS
POWER TOOLS
Grease gun
Wrenches (SAE and metric sizes)
Feeler gauges
Socket wrenches and sockets (SAE/metric sizes)
Impact wrench swivel socket (3/4" and 15/16")
Impact wrench swivel sockets (19mm and 24mm)
Micrometers: I.D. (2" to 12") and O.D. (1" to 6")
Snap gauge micrometer (1" to 2")
Torque wrenches (up to 600 ft.lbs.)
4-to-1 torque multiplier - 3/4" drive (up to 2000
ft.lbs.)
Sledge hammer
Lifting straps and chains
Air Compressor
Air Impact Wrenches & Sockets
Mobile Crane (optional)
Page 4 Section 5 Maintenance
BUCKET LINKAGE SHEARS
8-HOUR INSPECTION CHECKLIST
Shear Model _____________________Excavator Hour Meter________________________
Shear Serial Number ______________________________ Date______________________
_______ 1. Visually inspect shear for any damage
_______ 2. Inspect safety devices
_______ a. All safety decals in place and legible - seal decal and label maintenance section
_______ b. All cab protection in good condition
_______ c. All excavator warning systems working
_______ 3. Lubricate all points. Refer to shear lubrication in this section
_______ a. Each side of main pivot group (two each side)
_______ b. End of slide puck assemblies (each side)
_______ c. End of front cylinder pin
_______ d. End of rear cylinder pin
_______ e. Boom pivot connection of mounting bracket
_______ f. Cylinder connection of mounting bracket
_______ 4. Inspect connecting pins and pin retaining hardware
_______ a. Stick connection pin
_______ b. Linkage connection pin
_______ c. Pinheads, collars, and pin stops
_______ 5. Inspect all bolts
_______ a. Visually inspect all bolts and replace any that are loose or damaged
_______ 6. Check guide blade gap
_______ a. Refer to manual if gap exceeds 0.030” (0.75 mm)
_______ 7. Check cutting blade gap
_______ a. Refer to manual if gap exceeds 0.030” (0.75 mm)
_______ 8. Inspect piercing tip
_______ a. Edges are square
_______ b. Piercing tip passes squarely into lower shear
_______ 9. Inspect lower shear
_______ a. Inside shear surfaces are flush with the blades
_______ b. Upper piercing tip passes closely into lower shear on sides and in front
Inspected by: __________________________________________________________________________
Maintenance Section 5 Page 5
BUCKET LINKAGE SHEARS
40-HOUR INSPECTION CHECKLIST
Attachment Model _____________________Excavator Hour Meter________________________
Attachment Serial Number ______________________________ Date______________________
_______ 1. Inspect guide blade
_______ a. Rotate or replace if needed
_______ b. Shim if guide blade gap exceeds 0.030” (0.75 mm)
_______ 2. Inspect cutting blades
_______ a. Rotate or replace all blades
_______ b. Shim lower blades for proper blade gap of 0.010 to 0.020” (0.25 to 0.50 mm)
_______ 3. Inspect upper shear
_______ a. Replace or build up and hardsurface piercing tip if needed
_______ b. Replace wear plate if needed
_______ c. Build up and hardsurface upper shear if needed
_______ d. Check for wear adjacent to blades and build up if needed
_______ 4. Inspect lower shear
_______ a. Build up and hardsurface lower piercing area if needed
_______ b. Build up and hardsurface lower shear if needed
Inspected by: __________________________________________________________________________
Page 6 Section 5 Maintenance
BUCKET LINKAGE SHEARS
BLS LUBRICATION
Grease all points every 8 hours of attachment operation. Use premium grease No. 2EP or equivalent. Grease
fitting locations are indicated on the illustration (figure 5-1) and by GREASE decals on the attachment.
2
FIGURE 5-1
1
LOCATION ON SHEAR
1. Two in lower shear near main pivot on each side
2. Two in main pivot in end cap on each side
3. Stick and linkage connections (see excavator manual)
NUMBER OF SHOTS
6
6
6
Maintenance Section 5 Page 7
BUCKET LINKAGE SHEARS
BOLT TORQUE GUIDELINES
Proper bolt installation is critical to ensure the safe and efficient operation of the attachment. Carefully follow
the steps below to properly install bolts.
1. Always replace bolts and nuts with the same size and class of fastener. Replacement fasteners can be
ordered from the LaBounty Parts Department to ensure the correct part is used. Unless otherwise specified, use class 10.9 metric hex head capscrews, class 10.9 metric flat head capscrews, and class 12.9 metric
socket head capscrews.
2. Make sure bolts, nuts and bolt holes are free of dirt, oil, grease and other contaminants.
3. If necessary, use the Capscrew Size Guide on this page to determine the size of the bolt being installed.
4. Use the Dry Bolt Torque Chart on page 5-9 to find the proper torque. When possible, torque the nut rather
than the bolt head.
METRIC CAPSCREW SIZE GUIDE
CAPSCREW
SIZE
A
HEX HEAD
B
FLAT HEAD
C
SOCKET HEAD FIGURE 5-2
M10 x
1.50
M12 x
1.75
M14 x
2.00
M16 x
2.00
M20 x
2.50
M24 x
3.00
M30 x
3.50
A
HEX HEAD
B
FLAT HEAD
0.63" (16mm)
0.79"
(20mm)
0.71" (18mm) 0.94"
(24mm)
0.83"
1.06"
(21mm)
(27mm)
0.94"
1.18"
(23mm)
(30mm)
1.18"
1.42"
(30mm)
(36mm)
1.42 (36mm) N/A
1.81 (46mm) N/A
C
SOCKET
HEAD
0.63"
(16mm)
0.71"
(18mm)
0.83 (21mm)
0.94"
(24mm)
1.18"
(30mm)
1.42"
(36mm)
1.77"
(45mm)
Always replace bolts and nuts with the same size and class of fastener. Inferior fasteners can fail and
cause injury or death.
Page 8 Section 5 Maintenance
BUCKET LINKAGE SHEARS
DRY BOLT TORQUE CHARTS
For all bolts used in the Stanley LaBounty BLS Shear, use the generic torque tables below. These torque
values are for clean, dry threads with or without Loctite.
GENERIC TORQUE SPECIFICATIONS
COMMON METRIC FASTENERS
SIZE
CLASS 10.9
CLASS 12.9
M8 x 1.25
M10 x 1.50
M12 x 1.75
M16 x 2.00
M20 x 2.50
M24 x 3.00
M30 x 3.50
20 ft-lbs (28 N-m)
41 ft-lbs (55 N-m)
71 ft-lbs (96 N-m)
173 ft-lbs (235 N-m)
335 ft-lbs (454 N-m)
579 ft-lbs (785 N-m)
1164 ft-lbs (1579 N-m)
24 ft-lbs (33 N-m)
49 ft-lbs (67 N-m)
85 ft-lbs (116 N-m)
207 ft-lbs (281 N-m)
403 ft-lbs (547 N-m)
693 ft-lbs (939 N-m)
1391 ft-lbs (1887 N-m)
GENERIC TORQUE SPECIFICATIONS
COMMON SAE FASTENERS
Use only metric tools on metric hardware and SAE tools on
SAE hardware. Other tools may
not fit properly. They may slip
and cause injury.
Always replace bolts and nuts
with the same size and class of
fastener. Inferior fasteners can
fail and cause injury or death.
NOTICE
SIZE
GRADE 8
1/4" - 20 UNC
3/8" - 16 UNC
1/2" - 13 UNC
1/2" - 20 UNF
5/8" - 11 UNC
3/4" - 10 UNC
7/8" - 9 UNC
1” - 8 UNC
12 ft-lbs (17 N-m)
44 ft-lbs (60 N-m)
106 ft-lbs (144 N-m)
120 ft-lbs (163 N-m)
210 ft-lbs (285 N-m)
377 ft-lbs (511 N-m)
600 ft-lbs (813 N-m)
919 ft-lbs (1233 N-m)
It is preferred to torque the nut
rather than the bolt head wherever possible.
Maintenance Section 5 Page 9
BUCKET LINKAGE SHEARS
BLADE REMOVAL
Removing and handling shear blades can be hazardous if done incorrectly. To ensure your safety and to
prevent damaging the shear, please read the following warnings and instructions when removing a
blade from its seat.
1. Loosen all blade bolts but leave them partially
installed and threaded into the blade.
2. The blades may come loose from their seats
without much effort. If the blades are loose, make
sure they are well supported before removing the
blade bolts.
3. If the blades are not loose, tap on the blade face
with a soft-faced mallet to loosen the bond between
the blade and seat. Use a pry bar between the top
of the blade and the blade seat to loosen the blade.
Never strike against any blade with a hardened
steel tool of any kind. The blade may chip and
cause severe injury.
To prevent injury, wear safety equipment at
all times when maintaining the attachment.
Safety equipment includes eye protection, hard
hat, steel toe shoes, work gloves and hearing
protection.
NOTICE
DO NOT strike directly on the blade bolts with
a hammer or other hard object. This may cause
damage to the blade threads.
PRY HERE IF
NEEDED
ALL BOLTS
SLIGHTLY
UN-THREADED
BLADE
Make sure the blade is well supported before
removing the blade bolts. When the bolts are
removed, the blade may drop and cause severe
injury.
4. If the blade is still jammed in its seat, place a
wood block or similar object against the head of one
of the blade bolts and strike with mallet. The bolt being struck should be within ½" (13 mm) of being fully
threaded into the blade to prevent thread damage
(figure 5-3).
5. The cross blade can only be removed after the
lower cutting blades and the guide blade have been
removed. The holes in the cross plate may be used
to dislodge the cross blade and dowels. Use a brass
or similar soft metal drift and a mallet to remove the
cross blade. Insert the drift through each hole in the
cross plate hole and strike with the mallet.
Page 10 Section 5 Maintenance
WOOD BLOCK
CROSS PLATE &
CROSS BLADE
DOWEL HOLES
FIGURE 5-3
BUCKET LINKAGE SHEARS
GUIDE BLADE SHIMMING
AND ROTATION
The guide blade gap keeps the shear blades in line
and ensures the proper operation of the shear. This
adjustment should be checked daily.
NOTICE
If the shear has been operated for more than 40
hours since the last blade rotation, it is recommended that all blades be rotated. Follow the instructions
on this page and the following pages.
NOTICE
The upper and secondary blade and the Saber Tip
blade must seat flat against each other for proper
blade shimming. Please see the cutting blade rotation section on page 5-13 before shimming the guide
blade.
1. Close the shear until the Saber Tip on the upper
shear begins to bypass the guide blade (see figure
5-4). Use a feeler gauge to check the gap and record it. Close the shear in steps and check the gap
at different spots along the Saber Tip surface. Find
the smallest gap along the Saber tip and mark it. The
gap at the spot should not exceed 0.030" (0.76 mm).
If the gap is more than this, it will be necessary to
shim the guide blade.
2. Guide blade shims are provided with each new
shear. This shim kit should include four shims that
are 0.024" (0.61 mm) thick, one that is 0.12" (3 mm)
thick, and four shims that are .005" (.127 mm) thick.
3. To determine the amount of shims to use, subtract the desired gap of 0.010" (0.25 mm) from the
smallest gap that was recorded earlier. See the
example on the next page.
4. To shim the blade, loosen the guide blade bolts
and move the guide blade out far enough to slide
the shims between the blade seat and the guide
blade. If all five shims are installed and the gap still
exceeds 0.030" (0.76 mm), it will be necessary to
rotate or replace the guide blade.
Wear gloves at all times during blade maintenance. To prevent injury, wear safety equipment
at all times when maintaining the attachment.
Safety equipment includes eye and ear protection, hard hat, gloves, and steel toe footwear.
SABER
TIP
MEASURE GAP
HERE
GUIDE
BLADE
FIGURE 5-4
DO NOT check gaps while the shear is in motion.
Stay clear when closing the shear or severe
injury could result.
Maintenance Section 5 Page 11
BUCKET LINKAGE SHEARS
GUIDE BLADE SHIMMING
AND ROTATION continued
5. The guide blade can be rotated once so the whole
face of the blade can be used to increase its life.
When it is time to rotate the blade, remove it and
turn it end for end, and place it back in its seat. The
same face should be used for the entire life of the
blade. Use the steps above to shim the guide blade
to the correct gap. When the whole face of the
blade is worn and it cannot be shimmed any more,
replace it with a new one.
6. If a gap greater than 0.030" (0.76 mm) still exists
with a new guide blade and a full set of shims, the
Saber Tip will need to be replaced. Refer to the Cutting Blade Rotation procedure in this section.
7. When the gap is correct, apply the correct torque
to all of the guide blade bolts. Refer to the BLS
shear Blade Bolt Torque Chart of page 5-10 of this
manual for the proper torque values.
EXAMPLE
Recorded Gaps
0.035”
0.040”
0.045”
Smallest Gap
Minus Desired Gap
0.035”
0.010”
Shim Amount Needed
0.025”
For this example, one of the 0.024” (0.61 mm)
thick shim would be used achieve the desired
guide blade gap.
Page 12 Section 5 Maintenance
BUCKET LINKAGE SHEARS
BLS CUTTING BLADE
ROTATION
Proper rotation and adjustment of the BLS cutting
blades is very important for the best shear performance and longer shear life. It is recommended
that the BLS blades be rotated after every 80
hours of use or when edges are rounded ¼",
whichever comes first. Regular blade rotation keeps
the blades and blade gaps uniform, which allows
the blades to be shimmed properly. Regular blade
maintenance is especially important when processing thinner materials. It may be necessary to rotate
and adjust the BLS cutting blades more often when
processing thin or non-ferrous materials. Frequent
rotation and adjustment of the cutting blades is not
as critical when processing larger materials, but it will
extend the life of the blades.
REMOVE EACH BLADE
BLS CUTTING BLADES
FIRST & THIRD ROTATION
1. Use the Blade Removal instructions from this section to remove the upper BLS cutting blades including the Saber Tip blade. Take care to keep track of all
parts and their positions as you remove them. This
will be important when reinstalling.
2. Once the blades are removed, use a small grinder
to clean up the edges. Remove all sharp burrs and
smooth out deformations. Clean out the blade seats
thoroughly removing an debris or burrs.
3. Rotate the blades, flip them end-for-end, according
to figure 5-5. The Saber Tip blade may also need to be
flipped depending on wear.
4. Reinstall the upper shear blades. Make sure the
blades are seated properly and in their original blade
seats. Use a new set of blade bolts and torque according to the blade bolt torque chart on page 5-9
of this manual for the proper torque value.
TURN END-FOR-END
NOTICE
The Saber Tip blade rotation will vary by application
and may wear at a different rate than the cutting
blades. High piercing applications will require more
frequent Saber Tip blade rotation and replacement.
Rotate the Saber Tip blade when the edges have
rounded to ¼". The Saber Tip blade can be rotated
only once to extend its service life.
RE-INSTALL IN SAME SEAT
FIGURE 5-5
Maintenance Section 5 Page 13
BUCKET LINKAGE SHEARS
BLS CUTTING BLADES FIRST AND
THIRD ROTATION continued
5. Inspect the Saber Tip blade gap following reinstallation (figure 5-6).
6. Use the Blade Removal instructions from this
section to remove the lower blades, including the
cross blade and the guide blade.
7. Use a small grinder to clean up the blade edges.
Remove sharp burrs and smooth out deformations.
Clean out the blade seats thoroughly in the same
manner as step 2 of this procedure, removing all
debris and/or burrs.
8. The cross blade can be rotated three times to
increase its life. Turn it end-for-end and place it back
in its seat. The cross blade dowels maybe re-used.
Tap the face of the blade with a soft-faced mallet to
make sure that it seats firmly. If all four long edges
of the cross blade have been used, it will need to
be replaced.
9. Like the cross blade, the guide blade can be rotated one time to increase its life. Turn it end-for-end
and place it back in its seat without shims. Use a
new set of guide blade bolts and tighten them until
snug. Do not apply torque to the bolts yet. Make
sure the blade is seated snugly. Only use one face
of the guide blade before replacing it.
10. Rotate the lower cutting blades in the same
fashion as described in figure 5-5 on page 5-13.
11. Make sure the adjustment plate is reinstalled
properly and then place the blades into their proper
positions without shims. Use a new set of blade
bolts and tighten until snug. Do not apply torque
to the bolts yet. Make sure the blades are seated
snugly.
12. The guide blade and lower cutting blades are
now ready for shimming. When done with the guide
blade, shim the lower cutting blades. Do not operate the shear without first shimming the guide
blade and cutting blades to the proper blade
gaps.
Page 14 Section 5 Maintenance
ASSURE THAT NO BLADE GAP EXISTS
HERE BEFORE APPLYING TORQUE TO
BLADE AND SABER TIP™ BOLTS.
FIGURE 5-6
NOTCH TOWARD
SHEAR THROAT
ADJUSTMENT
PLATES
FIGURE 5-7
BUCKET LINKAGE SHEARS
BLS CUTTING BLADES SECOND
ROTATION
1. Use the blade removal instructions from this
section to remove the lower cutting blades including the cross bade and guide blade. Take care to
keep track of all parts and their positions as you
remove them.
2. Thoroughly clean all blade seats including the
cross blade and guide blade seats. Ensure the seats
are clean and free of any burrs or debris.
3. The cross blade can be rotated three times to increase its life. Turn it front-to-back and place it back
in its seat to use one of the remaining two unused
edges. The cross blade dowels maybe reused. Tap
the face of the blade with a soft-faced mallet to
make sure that it seats firmly. If all four long edges
of the cross blade have been used, it will need to
be replaced.
4. Replace the guide blade. Use a new set of guide
blade bolts as well as washers and tighten them
until snug. Do not apply torque to the bolts yet.
Make sure the blade is seated snugly. Only use
one face of the guide blade before replacing it.
5. Remove and discard the Saber Tip blade as well
as all tip blade bolts, washers and dowels.
6. Remove the upper secondary blade from the
shear jaw and discard the bolts and washers. Use
a small grinder to clean up the edges of the used
blade. Remove all sharp burrs and smooth out
deformations. Clean out the blade seats thoroughly,
removing any debris or burrs.
7. Make sure the adjustment plate is reinstalled
properly and then reinstall the used upper primary
blade into the lower secondary blade seat without shims. Place the two used edges against the
seat to use the remaining sharp edges of the blade.
Use a new set of blade bolts as well as washers and tighten them until snug. Do not apply
torque to the bolts yet but make sure the blades
are seated snugly.
8. Remove the used upper primary blade from
the shear jaw and discard the bolts and washers.
Use a small grinder to clean up the edges of the
used blade. Remove all sharp burrs and smooth out
deformations. Clean out the blade seats thoroughly
removing any debris or burrs.
REMOVE ALL LOWER
BLADES, BOLTS AND
WASHERS
FIGURE 5-8
ROTATE THE CROSS BLADE
THEN RE-INSTALL. INSTALL
A NEW GUIDE BLADE.
FIGURE 5-9
PLACE UPPER SECONDARY
BLADE INTO LOWER PRIMARY
BLADE SEAT. DISCARD
SABER TIP
FIGURE 5-10
Maintenance Section 5 Page 15
BUCKET LINKAGE SHEARS
BLS CUTTING BLADES SECOND
ROTATION continued
9. Make sure the adjustment plate is reinstalled
properly and the reinstall the upper primary blade
into the lower secondary blade seat without shims.
Place the two used edges against the seat to use
the remaining sharp edges of the blade. Use a new
set of blade bolts as well as washers and tighten
until snug. Do not apply torque to the bolts yet but
make sure the blades are seated snugly.
10. Reinstall the used lower secondary blade into
the upper primary blade seat. Place the two used
edges against the seat to use the remaining sharp
edges of the blade. Use a new set of blade bolts
and torque according to the blade bolt torque chart
on page 5-9 of this section.
11. Install a new Saber Tip blade using a new set
of tip blade bolts, dowels and washers. Torque the
bolts according to the blade bolt torque chart on
page 5-10 of this section.
12. Install a new upper secondary cutting blade. Use
a new set of blade bolts and torque according to the
blade bolt torque chart on page 5-10 of this manual.
13. The guide blade and lower cutting blades are
now ready for shimming. For instructions on shimming the guide blade, go to page 5-11.
NOTICE
The Saber Tip blade rotation will vary by application
and may wear at a different rate than the cutting
blades. High piercing applications will require more
frequent Saber Tip blade rotation and replacement.
Rotate the Saber Tip blade when the edges have
rounded to ¼". The Saber Tip blade can only be rotated once to extended its service life.
PLACE UPPER PRIMARY BLADE INTO LOWER
SECONDARY BLADE SEAT
FIGURE 5-11
PLACE LOWER SECONDARY BLADE INTO
UPPER PRIMARY BLADE SEAT
FIGURE 5-12
INSTALL A NEW BLADE INTO UPPER
SECONDARY BLADE SEAT. INSTALL NEW
SABER TIP BLADE.
FIGURE 5-13
Page 16 Section 5 Maintenance
BUCKET LINKAGE SHEARS
BLADE SHIMMING
After blade rotation, use the following instructions
to shim to the proper blade gap. Keep in mind that if
the blades are not rotated regularly, blade shimming
may become difficult due to uneven blade wear.
Shimming is necessary if the gap exceeds 0.030"
(0.75 mm). For most shearing applications, this gap
should be maintained at 0.010 to 0.020" (0.25 to
0.50 mm). As necessary, the gap may be shimmed
down to 0.005 (0.13 mm) if jamming becomes a
problem, especially when processing thin materials.
After the cutting blades are rotated and the guide
blade is shimmed, use the following instructions to
check and shim the cutting blade gap. Shim only the
lower blades.
1. To check for blade gap, close the shear until the
secondary blades in the upper and lower shear
begin to bypass (see figure 5-14). Start with the
thickest shims and check to see how many shims
can be slipped between the blades and record this
amount. Another method is to use a feeler gauge to
check the blade gap and record it.
2. The whole shim set adds up to 0.125" (3.2 mm). If
all shims can be slipped between the blades it will
be necessary to replace the blades. Do not shim the
lower blades out more than 0.125" (3.2 mm). This
may cause structural damage to the shear and void
the warranty.
3. Close the shear further until the primary blades
begin to bypass (see figure 5-15). Again, check to
see how many shims can be slipped between the
blades (or use the feeler gauge). Record this gap
also. If the blades have been rotated properly at the
correct intervals, the blade gap should be even over
the entire span of the blades. If the gap is not even,
contact your Stanley LaBounty dealer for assistance.
4. Once the blade gap is checked and recorded,
open the shear. Shim the lower blades by using the
same amount of shims that you were able to slip
between the blades in step 3.
5. To install the shims, loosen the lower blade bolts
and move the blades out slightly. Slide the shims
between the lower blades and the existing adjustment plate. Tighten the blade bolts until snug.
6. Cycle the shear slowly to the full-closed position.
NOTICE
Regular blade rotation and shimming will provide
maximum shearing efficiency, reduce jamming, and
extend blade life.
CHECK GAP
HERE
SECONDARY
BLADES
FIGURE 5-14
CHECK GAP
HERE
PRIMARY BLADES
FIGURE 5-15
Maintenance Section 5 Page 17
BUCKET LINKAGE SHEARS
Check the gap at different points to make sure it is
between 0.010" and 0.020" (0.25 and 0.50 mm). If it
is too tight, you may need to remove a shim.
7. When the gap is correct, apply the correct torque
to all of the lower blade bolts. Refer to the Blade
Bolt Torque Chart on page 5-9 for the correct torque
values.
CROSSHATCH
AREA
A
CRITICAL WEAR AREAS
Close attention must be paid to the “crosshatch”
hardsurfacing of the BLS. Inspect this area daily.
When the crosshatch is worn down almost to the
base metal surface, clean the surface by wire brushing, preheat to 400°, and apply new underlayment
beads to the pattern using E-7018 welding rod or
E-70 series wire. After the pattern has been established with underlayment beads, apply hardsurface
to the pattern. It is recommended that only one
pass (bead) of the hardsurfacing be applied. After
welding, wrap the upper in a heat blanket and allow
to cool slowly. Apply hardsurfacing on top of each of
the underlayment beads. DO NOT apply hardsurface DIRECTLY TO THE PARENT MATERIAL.
If, as a result of production considerations, the
crosshatch pattern has been worn down into the
base metal of the shear upper jaw, the Saber Tip can
be used as a guide for build up to proper profile prior
to applying new hardsurfacing.
If the edge of the Saber Tip has been worn, it will
be necessary to remove the tip, rotate the new
front edge, and bolt into place. The surface of the
upper shear face should be built up (using E-7018
welding rod or E-70 series wire following pre-heat
procedures) to conform in profile to the new Saber
Tip edge. Depending upon the model, this surface
should be flush with the Saber Tip edge, to 1/16"
above the edge.
Once the surface has been built up and ground to
profile, the crosshatch hardsurface pattern can be
applied. Use 1-½" spacing in the hardsurface pattern,
as shown in figure 5-16.
Page 18 Section 5 Maintenance
B
FIGURE 5-16
NOTICE
The area shown in figure 5-16 must be inspected
daily, and maintained whenever the crosshatch pattern is almost worn down to the base metal surface.
If you have any questions, please call the Stanley
LaBounty Service Department at 218-834-6901. The
two areas in figure 5-16 labeled A and B are very
critical wear areas. When inspecting and maintaining
the shear, special attention must be given to these
areas.
BUCKET LINKAGE SHEARS
CRITICAL WEAR AREAS
A
continued
See specific areas as defined in figure 5-17.
A. In some applications, this area can be built up
for added wear resistance. Taper and blend the top
edge of the build-up area. Use E-7018 or E-70 series
wire (following weld procedure on page 5-21 of this
manual).
B. Maintain build up in this critical area. Area to be
built up flush with the top edge of the blade. Use
E-7018 or E-70 series wire (following weld procedure on page 5-21 of this manual).
C. Maintain profile and build up in this area. Bled
the bottom edge. This area must be maintained to
prevent wear into the Saber Tip reverse edge, which
rests just behind it.
D. Use E-7018 or E-70 series wire (following weld
procedure on page 5-21 of this manual). Apply
hardsurface allowing 1/6" space in from the edge on
both sides.
E. Apply the crosshatch pattern using 1.50" spacing.
F. This area to be built up so that the bottom edge
protrudes 1/16" beyond the edge of the blade. Taper
and blend the top edge. Use E-7018 or E-70 series
wire (following weld procedure on page 5-21 of this
manual).
C
D
E
NOTICE
Apply hardsurfacing on top of the underlayment
beads. DO NOT apply hardsurface directly to the
parent material. It is important to use an air-operated
slag peener on each pass of weld.
B
FIGURE 5-17
F
Maintenance Section 5 Page 19
BUCKET LINKAGE SHEARS
CRITICAL WEAR AREAS
continued
NOTICE
For all build-up and welding procedures, use E-7018
welding rod or E-70 series wire, following the welding procedures outlined on pages 5-21 of this manual.
Area marked “A”in figure 5-18 is an optional build-up
area, depending on the application.
Please note these drawings are not to scale and have
been exaggerated for the purpose of illustration.
Use the build-up template (provided in the maintenance kit) to profile the upper jaw.
A
Build-up
Template
Build-up
Template
Buffer strip is built up and
ground to be flush with the
top edge of the blade.
FIGURE 5-18
Page 20 Section 5 Maintenance
BUCKET LINKAGE SHEARS
GENERAL GUIDELINES FOR
BUILD UP AND
HARDSURFACING
The steel used in Stanley LaBounty Saber Series
shears is stronger and more durable than ever.
However, this steel requires special attention during
maintenance. Pay special attention to the preheat
and post-heat instructions and follow them exactly.
Review the following guidelines for build-up and
hardsurfacing the shear. Detailed instructions on
maintaining specific areas of the shear are on the
following pages. Contact your Stanley LaBounty
dealer or the Stanley LaBounty Customer Service
Department for further information.
PREHEAT
Preheat the general surrounding area to at least
200°F (100°C) to remove moisture from the base
material. Before ANY thermal process is applied to
the shear steel, including welding, tack welding,
torch cutting, and air-arcing, preheat the area within
6" (150 mm) of the local area to a minimum of
400°F (200°C) and a maximum of 450°F (230°C).
This includes adding and removing lifting lugs!
Preheat must be uniform throughout the material
thickness and maintained until all welding has
been completed. Avoid cyclic heating and large
temperature swings. Preheating may be done by
localized gas torches, or thermal strip blankets.
HANDLING AND STORAGE OF WELD
MATERIALS
Follow the weld manufacturer’s handling and
storage instructions closely. Make sure the
electrodes or wire are free of moisture. Moisture
can cause cracks and porosity in the weld and
possibly the base metal beneath the weld.
WELD QUALITY
Quality and attention to detail in welding can
significantly affect the life of the shear. Stanley
LaBounty strongly recommends that only qualified
and certified welders perform this work.
Make sure the weld consumables and base material
are clean, dry, and free of grease, paint, dirt, or any
other foreign substance that may harm the weld.
NOTICE
Preheat and post-heat instructions must be followed
exactly. Failure to do so can compromise warranty
coverage.
POST-HEAT
If preheat has dropped below 400°F (200°C) within
6" (150 mm) of the weld area, post-heat to 400°
(200°C) and wrap with heat blanket to allow it to
cool slowly to the ambient temperature.
Plan to perform build-up and hardsurfacing at the
end of the day or when there will be adequate time
for the welded areas to cool before putting the
shear back into service.
Maintenance Section 5 Page 21
BUCKET LINKAGE SHEARS
HARDSURFACING BUILD-UP
RECOMMENDATIONS
Refer to the list of AWS classifications below
to select a suitable build-up material for Stanley
LaBounty shears. Weld products within these
classifications meet the combined requirements for
strength, toughness, and ductility that are essential
for Stanley LaBounty applications.
Shielded Metal Arc Welding - Stick Electrodes
• E7018
• E8018-C3
Gas Metal Arc Welding - Solid Wire Electrodes
• ER70S-6
Gas Metal Arc Welding - Flux Cored Electrodes
• E71T-1
• E71T-1M
• E80T1-Ni1
• E80T1-Ni1M
Gas Metal Arc Welding - Metal Powder Cored
Electrodes
• E70C-6M
• E80C-Ni1
Welding suppliers can assist in identifying products
that meet these AWS classifications.
NOTICE
Using improper build-up and hardsurfacing products
may result in premature wear or increased potential
for cracking and may compromise warranty
coverage.
DO NOT use stainless hardsurface rod. Is is too
brittle for Stanley LaBounty applications and has a
tendency to crack, weakening the base metal.
Page 22 Section 5 Maintenance
HARDSURFACING
RECOMMENDATIONS
For hardsurfacing, Stanley LaBounty recommends
Amalloy 814H rod or equivalent. It is important to
always use a hardsurfacing weld material with a
chromium content of less than 10% and a severe
impact-resistance rating to prevent cracking.
If in doubt about what hardsurface material to use,
please contact the Stanley LaBounty Customer
Service Department. Failure to adhere to Stanley
LaBounty hardsurfacing recommendations may
compromise the attachment warranty.
Hardsurfacing should be applied directly on top of
the build-up welds. The build-up acts as a bonding
or underlayment for the hardsurfacing. This reduces
the chances that the hardsurfacing will crack.
Contact Information for AmAlloy Welding and
Industrial Supply
Phone: 800-735-3040
Fax: 623-792-8706
Web site: www.amalloy.com
BUCKET LINKAGE SHEARS
UPPER SHEAR BUILD-UP AND HARDSURFACING
1. Apply a bead of hardsurface rod on top of each
of the underlayment beads. It is important to use
an air operated slag peener on each pass to relieve
weld stress.
2. To determine how much build-up is required along
the blade seats, place a straightedge across the
blades. Repeat steps 4 and 5 to build this area flush
with the blade (see figure 5-19).
3. If necessary, build-up along the top and front
edges of the secondary blade seat flush with the
blade (see figure 5-20). The blade should not stick
out beyond the edge of the seat in this area.
4. To hardsurface the area alongside the upper
blades, establish the pattern with 3 or 4 passes of
build-up. These beads should run parallel to the
blades from behind the Saber Tip to approximately
the midpoint of the primary blade (see figure 5-21).
5. Apply hardsurfacing on top of each of the
underlayment beads. Do not apply hardsurface
directly to the parent material. It is important to use
an air operated slag peener on each pass of weld to
relieve stress.
6. If the temperature within 6" (150 mm) of the weld
area has dropped below 400°F (200°C) during the
weld process, post heat this area to 400°F (200°C).
7. Wrap with a heat blanket and allow the welded
area to cool slowly to the ambient temperature. The
shear should not be put back into service until it has
cooled completely.
BUILD UP THESE AREAS
FLUSH WITH BLADES
FIGURE 5-19
STOP
SHORT OF
APEX
BUILD-UP AREA FLUSH
WITH BLADE
FIGURE 5-20
NOTICE
•
•
•
•
Keep the outside passes at least 1/4" (6 mm)
back from the blade seat and outer edges.
Stagger the ends of the welds and do not end a
weld adjacent to a blade bolt hole.
Use a grinder to taper the ends of each weld
down to the base material. Grind marks should
go with the grain.
Do not undercut the ends of the weld with the
grinder.
GRAIN
DIRECTION
STAGGER
WELDS
FIGURE 5-21
Maintenance Section 5 Page 23
BUCKET LINKAGE SHEARS
LOWER SHEAR JAW BUILD
UP AND HARDSURFACING
USE STRAIGHT EDGE ACROSS
SURFACES
For maximum performance and long life, all edges
on the lower shear should be kept square and flush
with the blades. Check the lower shear every 80
hours and maintain it when necessary.
NOTICE
•
•
All blade maintenance must be done before
building up and hardsurfacing the lower shear.
It is recommended that this maintenance be
done at the end of the working day to allow
adequate cooling time before putting the shear
back into service.
1. Remove all existing hard surfacing by grinding
down to the base metal. Do not weld on top of the
existing hard surfacing.
2. Clean all dirt and grease from area to be
maintained.
3. Use a straight edge to determine how much
build-up is required on the cross plate (see figure
5-22). If the lower wear plates on the nose plate
are worn, these should be replaced at this time (see
previous page for instructions).
4. Use the straight edge across the top of the
blades to find the build-up requirements on the top
side of the lower shear. All edges should be square.
5. Preheat the area surrounding the tip to about
200°F (100°C) to remove moisture. Preheat the
area within 6" (150 mm) of the weld location to
a minimum of 400°F (200°C) and a maximum of
450° (230°C). Maintain this temperature range
throughout the process.
The lower shear must be grounded when
welding on the lower shear to prevent the
possibility of electric shock and arcing through
the main pivot components.
Page 24 Section 5 Maintenance
FIGURE 5-22
BUILD UP
AREA FLUSH
WITH BLADE
STOP SHORT OF
APEX
FIGURE 5-23
BUCKET LINKAGE SHEARS
LOWER SHEAR JAW BUILD
UP AND HARDSURFACING
continued
6. Apply build-up to the worn areas in single passes,
side-by-side, running with the grain of the base
material. Peen each pass to relieve weld stress and
remove slag. Grind all edges to 90°.
7. If necessary, build up the area beneath the edge
of the secondary blade so it is flush with the blade
(see figure 5-24). The blade should not stick out
beyond the edge of the seat in this area. However,
do not weld in the apex area.
DO NOT
WELD IN
THROAT
NOTICE
DO NOT
WELD ON
EDGES
Check temperature regularly during this procedure.
Maintain 400-450°F (200-230°C). Do not exceed
450°F (230°C).
8. To hard surface the top sides of the lower shear,
establish the pattern with 3 or 4 passes of build-up.
These beads should run parallel to the blades from
the nose plate back to about the midpoint of the
primary blade. Do this on the guide blade side also.
This will establish the hard surfacing pattern and
serve as an underlayment.
9. Apply a bead of hard surface rod on top of each of
the underlayment beads. Do not apply hard surface
directly to the parent material. It is important to use
an air operated slag peener on each pass of weld to
relieve stress.
10. If the temperature within 6" (150 mm) of the
weld area has dropped below 400°F (200°C) during
the weld process, post heat this area to 400°F
(200°C).
11. Wrap with a heat blanket and allow the welded
area to cool slowly to the ambient temperature. The
shear should not be put back into service until it has
cooled completely.
STAGGER
WELDS
FIGURE 5-24
NOTICE
•
•
Keep the outside passes at least 1/4" (6 mm)
back from the blade seat and outer edges.
Stagger the ends of the welds and do not end a
weld adjacent to a blade bolt hole.
•
Do not weld into the throat area.
•
Use a grinder to taper the ends of each weld
down to the base material. Grind marks should
go with the grain.
•
Do not undercut the ends of the weld with the
grinder.
Maintenance Section 5 Page 25
BUCKET LINKAGE SHEARS
LOWER WEAR PLATES
REPLACEMENT
TOP WEAR
PLATE
Inspect plates every 80 hours and replace them before
the cross plate is in danger of being exposed to wear.
1. Preheat the surrounding area to about 200°F (100°C)
to remove moisture. Preheat the area within 6 inches
(150 mm) of the lower wear plates to a minimum
of 400°F (200°C) and a maximum of 450° (230°C).
Maintain this temperature range throughout the
process. Temperature/melt sticks are available from
Stanley LaBounty.
2. Air-arc the old wear plates to remove them
completely from the nose plate.
3. Use a grinder to make sure the surfaces are flat and
smooth with all weld and carbon residue removed. If
necessary, build up the edges of the cross plate before
installing the new wear plates. See the lower shear
build-up instructions in this chapter.
4. Position the new front wear plate so it is centered
across the width of the cross plate. The holes in the
wear plate should be aligned with the holes in the
nose plate to leave a gap between the top of the wear
plate and the top of the nose plate that will be filled
with weld later (see figure 5-25). Clamp the wear
plate into position, bring the preheat back up to 400°F
(200°C) and tack weld in place.
5. Position the new top wear plate so it is also
centered across the width of the cross plate. This
wear plate should overhang the front edge of the cross
plate to be flush with the face of the front wear plate.
Clamp the wear plate into position, bring the preheat
back up to 400°F (200°C) and tack weld in place.
6. Use the recommended build-up weld rod (see
page 5-22) to fill the area between the wear plates.
Then weld an approximate 3/8” (10 mm) fillet on all
remaining sides around the wear plates. Also weld a
fillet around the inside of the holes on the front. Stress
relieve each pass by peening. Grind welds smooth.
7. If the temperature within 6" (150 mm) of the weld
area has dropped below 400°F (200°C) during the weld
process, post-heat this area to 400°F (200°C).
8. Wrap with a heat blanket and allow the welded area
to cool slowly to the ambient temperature.
Page 26 Section 5 Maintenance
CROSS
PLATE
FRONT WEAR
PLATE
SIDE VIEW
FRONT VIEW
FIGURE 5-25
The lower shear must be grounded when
welding on the lower shear to prevent the
possibility of electric shock and arcing through
the main pivot components.
NOTICE
Check temperature regularly during this procedure.
Maintain 400-450°F (200-230°C). Do not exceed
450°F (230°C).
BUCKET LINKAGE SHEARS
SECTION 6 TROUBLESHOOTING
General Troubleshooting Checklist .................................................................................................6-2
Cutting Performance Troubleshooting Guide ..................................................................................6-3
Troubleshooting Section 6 Page 1
BUCKET LINKAGE SHEARS
GENERAL TROUBLESHOOTING CHECKLIST
The General Trouble Shooting Check List is provided as a guide in checking the general condition of the attachment. This check list should be incorporated in a periodical preventive maintenance program as part of the 80hour inspection.
UPPER WELDMENT
a. Throat Area
b. Apex
c. Bolt Holes
d. Blade Seats
LOWER WELDMENT
a. Nose Plate
b. Blade Seats
c. Guide Blade Seat
d. Lower Piercing Area
e. Bolt Holes
Inspect for cracks.
Inspect for cracks.
Inspect for cracks.
Inspect for material cracks, weld cracks and excessive wear.
Inspect for weld failure and excessive wear.
Inspect for material cracks, weld failure and excessive wear.
Inspect for material cracks, weld failure, excessive wear and broken structure.
Inspect for cracks and excessive wear.
Inspect for cracks.
GENERAL WEAR AND MAINTENANCE ITEMS
a. Blades
b. Blade Gap
c. Guide Blade Gap
d. Piercing Tip
Inspect for excessive wear, broken pieces, cracks.
Inspect to make sure the blade gap is 0.030” (0.75 mm) or less.
Inspect to make sure the gap is 0.030” (0.75 mm) or less.
Inspect for weld failure, excessive wear and damaged or missing component.
Page 2 Section 6 Troubleshooting
BUCKET LINKAGE SHEARS
CUTTING PERFORMANCE TROUBLESHOOTING GUIDE
The information contained in this guide provides for troubleshooting the LaBounty shear only. Any references to
the excavator will be made only to give some guidance as to where a problem may exist. Any specific maintenance and troubleshooting information will need to be provided by the Original Equipment Manufacturer of the
excavator or the authorized dealer. If a question arises regarding the operation or maintenance of the shear, contact your LaBounty dealer for the proper instruction.
SYMPTOM
1. Does not cut materials
2. Material jams in jaws
3. Blade bolts keep loosening
PROBABLE CAUSE
REMEDY
a. Wrong type of material for shear i. Check material size and type, then consult your
size
LaBounty dealer
b. Worn blades
i. Rotate blades per maintenance manual instructions
c. Excessive blade gap
i. Check blade gap per maintenance manual and add
shims (refer to blade shimming procedure)
ii. Replace with LaBounty approved blades
d. Insufficient hydraulic pressure
i. Check excavator specifications for pressure troubleshooting information
a. Excessive blade gap
i. Add blade shims (refer to blade shimming procedure)
ii. Replace worn blades
b. Worn piercing tip
i. Build up and hardsurface existing tip to maintenance
specifications
ii. Install replacement tip
c. Dull blades
i. Rotate blades
ii. If all four edges are worn, replace with LaBounty approved blades
d. Blades not within LaBounty
specifications
i. Replace blades with LaBounty approved blades
e. Excessive guide blade gap
i. Replace guide blade (refer to guide blade replacement
procedure
ii. Replace front wear plate (refer to front wear surface
procedure)
f. Worn lower, lack of build up and
hardsurfacing
i. Perform build up and hardsurfacing to lower (refer to
lower maintenance procedures)
a. Uneven or excessive blade gap
i. Shim or replace blades
b. Blade gap is too tight
i. Remove shims
c. Bolts have been torqued more
than twice
i. Replace bolts with same size and grade
Troubleshooting Section 6 Page 3
BUCKET LINKAGE SHEARS
CUTTING PERFORMANCE TROUBLESHOOTING GUIDE continued
SYMPTOM
4. Blade gap is uneven
PROBABLE CAUSE
a. Non-LaBounty blades being
used
i. Replace with LaBounty approved blades
b. Debris in blade seat behind
blades or adjustment plates
i. Remove blades and adjustment plates from blade
seats and clear all debris
c. Inconsistant amount of blade
shims between primary and secondary blades
5. Individual hyraulic function is slow
REMEDY
NOTE
Adjustment plates must be replaced exactly as they
were removed.
i. Reshim blades for consistency (refer to blade shimming procedure)
d. Upper weldment is bent
i. Consult the factory for repair
a. Pilot control hoses pinched
i. Inspect and correct
b. Jumpline connections leaking
i. Inspect and correct
c. Base machine hydraulic malfunction
i. Check base machine hydraulic system
d. Circuit relief valve for the function is set low or malfunctioning
i. See your base machine dealer
Page 4 Section 6 Troubleshooting
BUCKET LINKAGE SHEARS
SECTION 7 MAIN PIVOT INSTALLATION
Safety Points ...............................................................................................................................7-2
Isometric Drawing of BLS Assembly ..........................................................................................7-3
Lower Jaw Preparation ...............................................................................................................7-4
Upper Jaw Preparation ...............................................................................................................7-4
Main Pivot Installation Section 7 Page 1
BUCKET LINKAGE SHEARS
SAFETY POINTS
Wear proper protective clothing including hard
hat, safety shoes, ear protectors, reflective
clothing, safety goggles and work gloves. Loose
clothing can get caught in machinery and cause
injury. Wrist watches, rings and other accessories
can be dangerous, as well.
Heavy lifting is required for this operation. Any
item 30 lbs. and greater in weight requires the
use of a lifting device.
Manual movement of the shear’s cutting
surfaces and components is require for this
operation. Keep hands, fingers, and other
appendages clear.
Press-fit tolerances are required for this
operation. Keep hands, fingers, and other
appendages clear.
Page 2 Section 7 Main Pivot Installation
BUCKET LINKAGE SHEARS
ISOMETRIC DRAWING OF BUCKET LINKAGE SHEARS
PIVOT GROUP ASSEMBLY
UPPER
JAW
LH
ENDCAP
ENDCAP
BOLTS
LH
ENDCAP
SHIMS
LH
MAIN
BEARING
MAIN SHAFT
BEARING
DOWELS
RH
ENDCAP
ENDCAP
BOLTS
RH
ENDCAP
SHIMS
THRUSTWASHER
RH
MAIN
BEARING
FIGURE 7-1
Main Pivot Installation Section 7 Page 3
BUCKET LINKAGE SHEARS
LOWER JAW PREPARATION
1. With the lower jaw assembly in the upright
position, inspect all bolt holes and bores for debris or
machining burrs.
2. Using a hammer, drive the bearing dowel pin into
position on the lower jaw assembly’s main pivot bore
machined face. Aligning the dowel clearance hole on
the bearing with the pin on the lower jaw assembly,
perform a dry-fit check of the main pivot bearings in
the main pivot bore. This should be a slip fit and the
bearings should seat flush against the machined inner
surface of the lower jaw assembly main pivot. (Figure
7-2.)
3. If the bearing fit is snug, use the pneumatic die
grinder fitted with the abrasive flapper wheel to polish
the bores. Re-fit the main pivot bearings to ensure
a good fit is achieved following each polish. Use a
rubber mallet to lightly tap the bearings into the bores
if needed. (Figure 7-3.)
FIGURE 7-2
NOTICE
Ensure the correct bearing is pre-fit into each bore.
Left-hand bearings should be pre-fit into the left-hand
bore and right-hand bearings pre-fit into the right-hand
bore.
UPPER JAW PREPARATION
1. Lubricate the upper bore with LPS spray grease.
2. Dry-fit shaft into upper jaw: Using the overhead
hoist and main shaft hook, perform a dry-fit check of
the upper weldment on the main shaft. Position the
upper on the table as shown and lower the main shaft
into the upper bore. This should be a slip fit. If this fit
is tight, notify engineering if measurements are out of
tolerance. Make sure the shoulder of the shaft seats
properly with the counter-bore in the upper. If not,
look for interference areas and fix them. Make sure
chamfer on upper bore clears the shaft radius. (Figure
7-4.)
3. Hang upper jaw from the crane and place into the
lower jaw. “Eyeball” the bores to center them as best
as possible.
FIGURE 7-3
FIGURE 7-4
Page 4 Section 7 Main Pivot Installation
BUCKET LINKAGE SHEARS
UPPER JAW PREPARATION
continued
4. Ensure all required components are present and
quantities are correct prior to beginning assembly.
Consult the Bill of Materials (BOM) for correct
component part numbers.
5. Ensure main pivot bearings have been inspected
thoroughly. Bores should be void of burrs near the
grease passages and cleaned thoroughly. Clean all
debris and build up from the bores using a shop rage
if not sufficiently clean.
6. Using the large micrometer, measure the diameter
of the main shaft and record the data on the
inspection sheet. (Figure 7-5.)
7. Install the main shaft into the upper by going
through the lower bore (from the guide side). Next,
install the thrust washer between the upper and the
blade side of the lower jaw. (Figure 7-6.)
8. Slide the shaft through the blade side bore of the
lower jaw, making sure the shoulder on the shaft
seats in the counter bore of the upper.
9. Install two bolts into shaft on the guide side to act
as “handles” for maneuvering the shaft.
10. Partially install the left-hand side main bearing in
order to start centering the shaft and upper. (Figure
7-7.)
11. Fully install the right-hand side main bearing. This
may take some maneuvering with the crane in order
to center the upper in the lower.
FIGURE 7-5
FIGURE 7-6
FIGURE 7-7
Main Pivot Installation Section 7 Page 5
BUCKET LINKAGE SHEARS
UPPER JAW PREPARATION
continued
12. Fully install the left-hand side main bearing.
13. Wedge the upper over tight against the thrust
washer.
14. Mic the shaft stick out on the right-hand side.
Record Dimension A. (Figure 7-8.)
15. Mic the right-hand endcap depth, B. Record
Dimension B.
16. Install the right-hand endcap with shims onto the
main shaft.
17. Check to see how the upper moves from its own
weight. Using the crane, slowly lower the upper.
When the tip is about to go into the lower, the upper
should have a slight “drag.” If you need to slightly help
the upper move, that is about right. (Figure 7-9).
18. If the upper moves easily, remove .005" shims
from the right-hand side and repeat step 20.
19. When the proper amount of movement is
reached, torque all right-hand endcap bolts. Use
Permatex removable thread locker (#24225). Torque =
400 ft-lbs. (Figure 7-10.)
20. Repeat steps 15 -22 for the left-hand side.
B
A
FIGURE 7-8
NOTICE
All bolts with correct torque applied should be
identified by a white grease pen slash mark across the
bolt head.
FIGURE 7-9
FIGURE 7-10
Page 6 Section 7 Main Pivot Installation
LIMITED WARRANTY
NEW ATTACHMENT
Stanley LaBounty warrants its manufactured products against deficiency in material or workmanship for a
period of 12 months from the date of first use, rental or sale, or 1500 hours of operation, whichever occurs
first.
Limitations
• Remanufactured or used product or service repair are not warranted under this Limited Warranty.
• Product that is damaged by alteration, improper maintenance, unauthorized service, abuse, misuse,
or contamination by the base machine is not warranted.
• This Limited Warranty is the exclusive warranty. Stanley LaBounty makes no representations,
expressed or implied, of merchantability or fitness for a particular purpose.
• Agents of Stanley LaBounty have no authority to make representations beyond those contained
herein.
Exclusive Remedy
The exclusive remedy for a product Stanley LaBounty determines deficient in material or workmanship
is repair or replacement at Stanley LaBounty’s option. The following procedure governs a repair or
replacement warranty claim:
1. All warranty claims require a claim number provided by Stanley LaBounty Service Department.
2. A factory-issued Return Material Authorization tag (RMA) must accompany returned product.
3. Returned product found deficient by Stanley LaBounty will be replaced or repaired without charge
FOB Distributor/Customer or will be credited to account balance.
4. Authorized repair can occur at the Stanley LaBounty factory or authorized Stanley LaBounty Dealer.
Labor for warranty repair will be paid under a formula determined by Stanley LaBounty.
Stanley LaBounty is not liable for incidental or consequential costs or losses incurred by the product,
purchaser or user.
Limited Warranty
To validate the Limited Warranty, a completed warranty certificate and delivery inspection report must be
returned to Stanley LaBounty. Prohibited operation and/or unauthorized adjustment or assembly will void
this Limited Warranty. See the Operation, Maintenance and Safety Manual.
Contact Information
Contact your Stanley LaBounty Dealer or Stanley LaBounty regarding warranty questions. All requests
for information, service or spare parts should include model and serial numbers. For the nearest Stanley
LaBounty dealer contact:
Stanley LaBounty
1538 Highway 2
Two Harbors, MN 55616-8015 USA
Phone: (218) 834-2123 or (800) 522-5059
FAX: (218) 834-3879
E-mail: [email protected]
Website: www.stanleyhydraulic.com
513108 (2012)