1
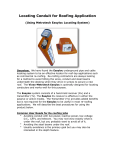
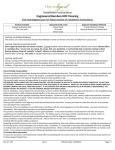
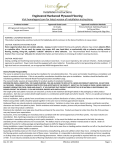
C e r t a i n Te e d
S h i n g l e
A p p l i c a t o r ’s
Three -Tab Shingles
ENGLISH DIMENSIONS
XT ™ 30, XT ™ 30 IR, XT™ 25, CT 20,
THE ROOF DECK* MUST BE AT LEAST: 3 ⁄8 " (9.5 mm) thick
plywood, or 7 ⁄16 " (11 mm) thick non-veneer, or nominal 1" (25 mm)
thick wood deck.
METRIC DIMENSIONS
CT 20, XT 25, XT 30
COLD WEATHER CLIMATES (ALL SLOPES): Application of
WinterGuard or its equivalent is strongly recommended whenever
there is a possibility of ice build-up. Follow manufacturer’s
application instructions.
All of these shingles are “good” or “better” quality roofing products.
This means that when offering a choice of “good,” “better” and “best”
products, these shingles would fall in the “good ”or “better” categories.
All CertainTeed three-tab shingles are made to have a
dimensional tolerance size of ± 1⁄16 ".
XT30 IR – the IR stands for impact resistant – is specially
manufactured with a reinforced fiberglass scrim to meet UL 2218
Class 4 impact resistance rating and is also algae-resistant.
NOTE: XT30 IR must be installed over a clean deck (no roofovers) to obtain the UL 2218 rating. It is strongly recommended that
impact resistant cap shingles made from XT 30 IR shingles be
installed on all hips and ridges. Some insurance carriers may not
consider the roof system as compliant to UL 2218 Class 4 without
impact resistant cap shingles
FLASHING: Corrosion-resistant flashing must be used to help prevent
leaks where a roof meets a wall, another roof, a chimney or other
objects that penetrate a roof.
SEALING: Shingle sealing may be delayed if shingles are applied
in cool weather and may be further delayed by airborne dust
accumulation. If any shingles have not sealed after a reasonable time
period, hand sealing may be necessary.
CAUTION: To prevent cracking, shingles must be sufficiently warm
to allow proper forming for hips, ridges and valleys.
WARRANTY: These shingles are warranted against manufacturing
defects and are covered by SureStart™ protection. See the warranty
itself for specific details and limitations.
90˚
60˚ (21/12)
STEEP
Slope Application
(over 21/12)
NOTE: Some roofers choose to apply shingles at 4" exposure
(vs. standard 5") at slopes less than 4/12 in order to increase the
wind-driven rain resistance. In some cases, this can be an acceptable
practice, but there are risks for which CertainTeed will not take
responsibility. A shortened exposure can harm the appearance of the
applied roofing, especially those with shadow lines, and it can reduce
shingle ability to resist wind blow-offs by shifting the adhesive seal line
away from the bottom edge of the shingles.
STANDARD
Slope Application
(4/12 up to 21/12)
18.5˚ (4/12)
9.5˚ (2/12)
0˚ (0/12)
Do Not Apply Shingles Below 2/12 Slope
*
Figure 10-1: Slope definitions.
STANDARD OR STEEP SLOPES: CertainTeed recommends
DiamondDeck™ Synthetic Underlayment, Roofers’ Select™ High
Performance Underlayment, or shingle underlayment meeting
ASTM D226, D4869 or D6757. Take care to ensure sufficient deck
ventilation when DiamondDeck or other synthetic underlayment
is installed.
92
10
LOW SLOPES: One layer of CertainTeed’s WinterGuard™
Waterproofing Shingle Underlayment (or equivalent, meeting
ASTM D1970) or two layers of 36" wide felt shingle underlayment
(Roofers’ Select or underlayment product meeting ASTM D226,
D4869 or D6757) lapped 19" must be applied over the entire roof;
ensure sufficient deck ventilation. When DiamondDeck or other
synthetic underlayment is installed, weather-lap at least 20" and
ensure sufficient deck ventilation.
YOUR OBJECTIVE:
To learn the correct procedures for installing
three-tab type strip shingles.
LOW
Slope Application
(below 4/12)
M a n u a l
▲
FASTENING
393/8''
131/8''
131/8''
▼
1'' (25 mm)
Shingle
131/8''
1'' (25 mm)
131/4''
Roof
Deck
6 1/8''
Proper
Nailing
Crooked
UnderDriven
5 5/8''
Exposure
OverDriven
Figure 10-2: Proper and improper nailing.
Figure 10-5: Six nails can be used for high wind applications.
IMPORTANT: For decks 3 ⁄4 " (19 mm) thick or thicker, nails must go
at least 3 ⁄4 " (19 mm) into the deck. On thinner decks, nails must go
at least 1 ⁄8 " (3.2 mm) through the deck.
Nails must be 11- or 12-gauge roofing nails, corrosion-resistant,
with at least 3 ⁄8 " (9.5 mm) heads, and at least 1" (25 mm) long.
▲
THREE CLEAN-DECK
APPLICATION METHODS
FOR ENGLISH DIMENSION SHINGLES
▼
LOW AND STANDARD SLOPE
ENGLISH
12''
(305 mm)
1'' (25 mm)
Install on new roofs and tear-offs using the following methods:
12''
(305 mm)
Sealant
12''
(305 mm)
1'' (25 mm)
5/8''
5
(145 mm)
5 1/2'' for Norwood
◆
The standard “Six-Course, Six-Inch, Stepped-Off Diagonal Method”;
◆
The alternate “Five-Inch, Stepped-Off Diagonal Method”; or
◆
The alternate “Six-Inch, Single-Column, Vertical Racking Method.”
(1) SIX-COURSE, SIX-INCH, STEPPED-OFF
DIAGONAL METHOD (“SIX UP, SIX OFF”)
Plant
131/8''
METRIC
1'' (25 mm)
131/8''
131/8''
Sealant
1'' (25 mm)
PREPARING THE DECK:
◆ Apply underlayment as required. CertainTeed suggests that a
layer of shingle underlayment be applied. For UL fire rating,
underlayment is generally required. Apply flat and unwrinkled.
◆
6 1/8''
Snap horizontal and vertical chalklines to assure shingles will be
correctly aligned. Expose all shingles 5'' (125 mm).
STARTER COURSE:
1. Use CertainTeed Swiftstart™ or Universal Starter or a starter course
consisting of the shingles from which the lower 5" tabs have been
removed (Figure 10-6). Remember, the sealant on starter courses
should lie as close as possible to the eaves edge of the roof.
Figure 10-3: Use four nails for every full shingle.
STEEP SLOPE
Use four nails and six spots of asphalt roofing cement* for every full
shingle (Figure 10-4). Asphalt roofing cement meeting ASTM D4586
Type II is suggested.
36'' (915 mm)
Full Length
Starter Shingle
R e m o v e
t h e s e
7'' (180 mm)
p o r t i o n s
Figure 10-6: Make starter shingles by removing the lower 5" tabs.
Roofing Cement
Figure 10-4: Use four nails and six spots of asphalt cement on steep slopes.
2. Next, cut 6" off the length of the first starter-course shingle. Install
this shingle on the lower left corner of the roof. Make sure there
is 1 ⁄2 " left overhanging both rakes and eaves if drip edge is being
used. If you are not using drip edge, make the overhang 3⁄4 ".
*CAUTION: Excessive use of roofing cement can cause shingles
to blister.
3. Continue with full-length starter course shingles along the eaves
(Figure 10-7).
HIGH WIND AREAS
1ST COURSE: Apply a full shingle at the lower left corner of the roof.
Make tabs lie flush with the edges of the starter course. In this way,
sealant on the starter strip will adhere to the first-course tabs and
help keep them from lifting in high winds (Figure 10-8).
Apply 1'' (25 mm) spots of asphalt roofing cement
under each tab corner.
DO NOT USE STAPLES.
“Storm nailing” is not required by CertainTeed; however, the installer
can use six nails to secure each shingle. In addition, the installer can
seal each shingle with four spots of asphalt roofing cement ASTM
D4586 Type II the size of a quarter, equally spaced, but it is not
required by CertainTeed.
C E R T A I N T E E D S H I N G L E A P P L I C A T O R’ S M A N U A L
Chapter 10
93
2ND THROUGH 6TH COURSES:
1. Cut 6" off the left side of a shingle and install this 30" piece over
and above the first-course shingle, in line with the left edge of the
starter course. Leave the 5" tabs of the first-course shingle exposed
(Figure 10-8).
2. Cut 12" off the first shingle of the third course, 18" off the first
shingle of the fourth course, 24" off the first shingle on the fifth
course, and 30" off the first shingle of the sixth course. Apply each
with its left edge in line with the previous course (Figure 10-8).
3. Install full shingles flush against the six applied courses
(Figure 10-10 – see A).
(2) FIVE-INCH, STEPPED-OFF DIAGONAL METHOD
(“TWELVE UP, FIVE OFF”)
Rake
31" off 12th
26" off
Deck
10th
9th
16" off
11" off
Section III 8th Course
30" off
7th
25" off
20" off
SUCCEEDING COURSES: As you go up the rake, repeat the same
pattern used to start the first six courses (Figure 10 -10 – see B).
Finish the courses with full shingles, working from the eaves up
the roof.
11th
21" off
15" off
Section II
6th
5th
4th
3rd
10" off
5" off
Section I
2nd
1st Course
0" off
5"
5"
7" Wide Starter
Eaves
Figure 10-9: Five-Inch, Stepped-Off Diagonal Method.
m)
50 m
2'' ( Lap
Side
Roo
t™
elec
rs' S ment
e
f
o
Ro erlay lent
Und quiva
or e
Rak
STARTER COURSE:
1. Use CertainTeed Swiftstart or Universal Starter or a starter course
consisting of the shingles from which the lower 5" tabs have been
removed (Figure 10-6). Remember, the sealant on starter courses
should lay as close as possible to the eaves edge of the roof.
ck
f de
2. Cut 5" off the length of the first starter strip and apply the resulting
31" piece at the lower left corner of the roof. This starter strip
should overhang the rakes and eaves 1⁄2 " when drip edge is used,
or 3⁄4 " when no drip edge is used (Figure 10-7).
al
Met dge
E
Drip
e
al
Met
Drip e
Edg
)
mm gle
(760 hin
30'' tarter S
tS
Firs
3. Continue with full-length starter-course shingles along the eaves.
Eave
s
1ST COURSE: Begin “Section I” by applying a full shingle at the
lower left corner of the roof, tabs flush with the starter course.
and s
rake edge i
e
h
t
p
ver ) if dri if no
es o
)
ingl (13 mm 19 mm
h
s
the t 1/2'' 3/4'' ( .
d
n
Exte es abou r about is used
eav sed, o p edge
u
dri
Figure 10-7: Standard slope underlayment and starter drip edge details.
2. Each succeeding course, up to and including the seventh course,
should start with a shingle 5" shorter (off the left end) than
the previous course. Expose each course 5". This completes
“Section I” and establishes the first seven courses of the
12-course repeating cycle.
R id g e
Roof De
ck
Unde
M e ta l
D r ip
Edge
Remo
se p
v e th e
r la
s
3. Install “Section II” as shown in Figure 10-9 using full shingles
against the seven courses in “Section I.” This must be done before
continuing with courses eight through 12 (“Section III”). These
“Section II” shingles are to be butted-up against the “Section I”
shingles that started courses one through seven. Fasten all
shingles in the normal fashion.
t
ymen
2 '' ( 5 0
o r ti o n
2ND TO 7TH COURSE:
1. Begin the second course by cutting 5" off the left end of a shingle
and applying the 31" piece over the first-course shingle, flush with
the left edge of the first-course shingle, and exposing the first
course 5" (Figure 10-9).
mm) S
6 '' ( 1
id e L a
p
mm)
4''
mm)
(100 Lap
End
50
mm)
(305
mm)
12''
(455
mm)
18''
(610
mm)
24''
(760
gle
30''
Shin
Full
urse
er Co
Start
rse
Cou
rse
Cou
5th
rse
Cou
4th
rse
Cou
3rd
m)
rse
25 m
Cou
5' ' (1
2nd
e
s
r
Cou
1st
6th
Figure 10-8: Applying the first 6 courses on a standard slope.
94
Chapter 10
C E R T A I N T E E D S H I N G L E A P P L I C A T O R’ S M A N U A L
▲
Here’s a Tip…Always try to use full shingles for the last shingles going into a closed valley. This will help avoid the problem
of nailing too close to the centerline. (Thanks for this tip go to Dave Mulholland of Ohio.)
▼
Figure 10-10: “Six Up, Six Off” installation schematic.
Ridge
g
ush to
Trim fl eck openin
d
roof
ent
rlaym
Unde
Vent
Air Flow
Through
Soffit
6''
(150
Provide adequate
ventilation under
the roof deck to
prevent harmful
condensation in
winter and heat
build-up in
summer.
mm)
C
L
t
men uard
G
erlay
Und Winter )
laps 50 mm
2 (
Line valley by centering
36 (915 mm) wide
CertainTeed WinterGuard
Waterproofing Shingle
Underlayment or
equivalent directly
to deck.
thin
il wi f
a
n
ot
)o
Do n(150 mm erline
6 ey cent
vall
Remove
L
C
Lay
s
on s hingles
mall
area
er ro
,
and across of
valle
onto
adjo
y
inin the
g ro
at le
ast 1 of ar
2 (3 ea
05 m
m).
Emb
2 ( ed each
asph 50 mm shing
alt r ) wid le in
oofi
ng c e strip o a
eme
nt. f
Cut
diag 2 (50
upp onally mm)
trim er corne off
med
r
shin of
gle.
Cut
2 ( shingle
5
bac 0 mm s
k fro )
vall
e m
cen y
terli
ne
Figure 10-11: Highlight of closed-cut valley details.
C E R T A I N T E E D S H I N G L E A P P L I C A T O R’ S M A N U A L
Chapter 10
95
▲
Here’s a Tip…Start racking installations in the middle of a roof plane. Snap (vertical) lines 6" apart for three-tab shingles.
This minimizes keyways getting out of alignment in the middle of the roof, and cut-offs are the same on both rakes.
(Thanks for this tip to Dave Daley of Alexandria, Virginia.)
▼
8TH THROUGH 12TH COURSES:
1. Begin the eighth course by cutting 11" off the left end of a shingle
and applying the 25" piece over the seventh-course shingle, flush
with the left edge of the seventh-course shingle, and exposing the
seventh course 5" (Figure 10-9).
1ST COURSE: Apply a full shingle at the lower left corner of the
roof, tabs flush with the starter course (Figure 10-12).
2ND COURSE: Cut 6" off the left end of a shingle and apply the
30" piece over the first-course shingle, flush with the left edge and
exposing the first course 5" (Figure 10-12).
2. Start each succeeding course, up to and including the twelfth
course, with a shingle 5" shorter (off the left end) than the
previous course. Expose each course 5".
SUCCEEDING COURSES:
1. Begin the application of the remaining courses by alternating the
use of full shingles and 30" (6" cut off the left end of a full shingle)
shingles all the way up the rake in a single column. Expose each
course 5".
3. Installation of the pieces for courses eight through twelve
completes “Section III” and establishes the final five courses of
the two-part (twelve-course) pattern.
4. Continue working away from the twelve courses just applied by
installing full shingles (not shown on the diagram).
2. Fasten the full shingles with three fasteners, leaving the right-hand
tab edge unfastened until later.
3. Fasten the 30" pieces of shingle using four fasteners.
SUCCEEDING COURSES:
1. Repeat the above two-part, twelve-course procedure, alternating
the seven- and five-course sections up the roof. Start each
subsequent seven-course section with a full shingle and start each
five-course section with a 25" shingle (11" cut off the left end).
4. This method will establish the Six-Inch Offset Vertical Racking pattern.
COMPLETING THE INSTALLATION:
1. Full shingles are to be butted against the right side of applied
shingles in each course. Work up the roof from the eaves, one
vertical column at a time, maintaining the 5" exposure.
2. Complete courses across the roof using full shingles.
2. In the courses where the right-hand shingle tab in the course
above was purposely left unfastened, carefully lift the loose shingle
tab so as not to cause damage by tearing or sharply bending,
especially at the top of the cutout tab “keyway,” and slip the next
shingle underneath to butt the hidden shingle edge.
(3) SIX-INCH, SINGLE-COLUMN,
VERTICAL RACKING METHOD (“RACKING”)
3. Apply all four fasteners to the newly placed shingle and one
fastener to the free end of the shingle tab above it.
4. In alternate courses where new shingles butt against the visible
shingle tabs, initially apply only three fasteners, leaving the right
edge free.
5. Repeat this procedure (applying one vertical column at a time) to
complete courses across the roof.
Figure 10-12: Vertical Racking Method.
CAUTION:
1. This “single column” method is approved for applying some types
of CertainTeed shingles. However, “double column” vertical racking
(in which two shingles are laid side by side up the roof) is NOT
recommended because it can result in unattractive patterns.
STARTER COURSE:
1. Use CertainTeed Swiftstart or Universal Starter or a starter course
consisting of the shingles from which the lower 5" tabs have been
removed (Figure 10-6).Remember, the sealant on starter courses
should lay as close as possible to the eaves edge of the roof.
2. It is very important to fasten the ends of shingles properly.
Nailing high or leaving nails out can result in an unattractive
rack-line pattern.
2. Cut 6" off the length of the first starter strip and apply the 30"
piece at the lower left corner of the roof. This starter strip should
overhang the rakes and eaves 1 ⁄2 " when drip edge is used, or 3⁄4 "
when no drip edge is used.
3. Continue with full-length starter-strip shingles along the eaves.
▲
Here’s a Tip…Use all the shingles from one bundle before using shingles from another bundle. This will result in
the most pleasing color blends on the finished roof.
▼
96
Chapter 10
C E R T A I N T E E D S H I N G L E A P P L I C A T O R’ S M A N U A L
▲
THREE CLEAN-DECK APPLICATION
METHODS FOR METRIC SHINGLES
▼
Install on new roofs and tear-offs using the following methods:
◆
◆
◆
The Seven-Course, 5 5 ⁄8 " Stepped-Off Diagonal Method
(“Random 5 5 ⁄8 " Method”;)
SUCCEEDING COURSES: As you go up the rake, repeat the same
pattern used to start the first seven courses. Finish the courses with
full shingles, working from the eaves up the roof.
IMPORTANT: Do not align end joints of a given course closer than
5 5 ⁄8 " from one another, and they must be at least 3" from the nails on
the underlaying course.
R id g e
The alternate “Eight-Course, Five-Inch, Stepped-Off Diagonal
Method”; or
Roof D
eck
The alternate “Half-Tab Method.”
SEVEN-COURSE, 55⁄8" STEPPED-OFF DIAGONAL METHOD
(RANDOM 55⁄8" METHOD)
PREPARING THE DECK:
◆ Apply underlayment as required. CertainTeed suggests that a
layer of shingle underlayment be applied. For UL fire rating,
underlayment is generally required. Apply flat and unwrinkled.
◆
Unde
l
Meta
D r ip
Edge
Remo
ve th
o r t io
ese p
39 3/8''(1000 mm)
0m
2 '' ( 5
5 /8' '
5
ns
ent
m) S
11
id e L
1 /4' '
16
ap
7 /8' '
22
rse
Cou
7th
e
rs
Cou
6th
urse
o
C
5th
rse
Cou
4th
rse
o
C u
3rd
rse
8''
Cou
55/
2nd
rse
Cou
t
s
1
Snap horizontal and vertical chalk lines to assure shingles will be
correctly aligned. Expose all shingles 5 5 ⁄8 " (141 mm).
STARTER COURSE:
1. Use CertainTeed Swiftstart or a starter course consisting of
the shingles from which the lower tabs have been removed
(Figure 10-13). Remember, the sealant on starter courses should
lay as close as possible to the eaves edge of the roof.
r la y m
4" m)
m
(100 d Lap
En
1 / 2' '
28
1 /8' '
33
3 /4' '
gle
Shin
e
Full
ours
ter C
Star
Figure 10-14: Applying the first 7 courses on a standard slope.
EIGHT-COURSE, FIVE-INCH, STEPPED-OFF DIAGONAL METHOD
Full Length
8th Course
Deck
Starter Shingle
35" off
30" off
R e m o v e
t h e s e
p o r t i o n s
25" off
20" off
Figure 10-13: Make starter shingles by removing the lower tabs.
2. Next, cut half of a tab off the length of the first starter-course
shingle. Install this shingle on the lower left corner of the roof.
Make sure there is 1 ⁄2 " left overhanging both rakes and eaves
if drip edge is being used. If you are not using drip edge, make
the overhang 3⁄4 ".
3. Continue with full-length starter-course shingles along the eaves.
(Figure 10-13).
1ST COURSE: Apply a full shingle at the lower left corner of the
roof. Make tabs lie flush with the edges of the starter course. In this
way, sealant on the starter strip will adhere to the first-course tabs
and help keep them from lifting in high winds (Figure 10-14).
2ND THROUGH 7TH COURSES:
1. Cut 5 5 ⁄8 " off the left side of a shingle and install this 33 3⁄4 " piece
over and above the first-course shingle, in line with the left edge
of the starter course (Figure 10-14).
2. Cut 111 ⁄4 " off the first shingle of the third course, 16 7 ⁄8 " off the
first shingle of the fourth course, 22 1 ⁄2 " off the first shingle on the
fifth course, 28 1 ⁄8 " off the first shingle of the sixth course, and
33 3⁄4 " off the first shingle of the seventh course. Apply each with
its left edge in line with the previous course (Figure 10-14).
3. Install full shingles flush against the seven applied courses.
C E R T A I N T E E D S H I N G L E A P P L I C A T O R’ S M A N U A L
15" off
7th
Section II
6th
5th
4th
3rd
10" off
5" off
Section I
2nd
1st Course
0" off
5 5/8"
5 5/8"
Starter
Eaves
Figure 10-15: Eight-Course, Five-Inch, Stepped-Off Diagonal Method.
STARTER COURSE:
1. Use CertainTeed Swiftstart or a starter course consisting of the
shingles from which the lower tabs have been removed
(Figure 10-13). Remember, the sealant on starter courses
should lay as close as possible to the eaves edge of the roof.
2. Cut 3" off the length of the first starter strip and apply at the lower left
corner of the roof. This starter strip should overhang the rakes and
eaves 1 ⁄2 " when drip edge is used, or 3⁄4 " when no drip edge is used.
3. Continue with full-length starter-course shingles along the eaves.
(Figure 10-15).
1ST COURSE: Begin “Section I” by applying a full shingle at the
lower left corner of the roof, tabs flush with the starter course.
2ND TO 8TH COURSE:
1. Begin the second course by cutting 5" off the left end of a shingle
and applying the 34 3⁄8 " piece over the first-course shingle, flush
with the left edge of the first-course shingle, and exposing the first
course 5 5 ⁄8 " (Figure 10-15).
Chapter 10
97
2. Each succeeding course, up to and including the eighth course, should
start with a shingle 5" shorter (off the left end) than the previous
course. Expose each course 5 5 ⁄8 ". This completes “Section I”.
3. Install “Section II” as shown in Figure 10-15 using full shingles
against the eighth courses in “Section I.” This must be done before
continuing with course nine. These “Section II” shingles are to be
butted-up against the “Section I” shingles.
69/16" (1/2 tab)
21/2 tabs off
6th
1911/16" (11/2 tabs)
5th
2 tabs off
261/4" (2 tabs)
4th
11/2 tabs off
2nd
1/2 tab off
1st Course
Full 3 tab
2. Complete courses across the roof using full shingles.
3213/16" (21/2 tabs)
3rd
1 tab off
SUCCEEDING COURSES:
1. Repeat the above two-part procedure up the roof.
Deck
131/8" (1 tab)
Starter
Figure 10-17: Half-Tab Method.
HALF-TAB METHOD
▲
CHIMNEY FLASHING
Deck
▼
6th
5th
Underlayment
4th
3rd
2nd
1st Course
7
(180 mm)
2 (50 mm)
Minimum
Starter
3 (75 mm)
Minimum
Figure 10-16: Half-Tab Method.
STARTER COURSE:
1. Use CertainTeed Swiftstart or a starter course consisting of
the shingles from which the lower tabs have been removed
(Figure 10-13). Remember, the sealant on starter courses should
lay as close as possible to the eaves edge of the roof.
Fold down
counter flashing
over step flashing
2. Cut half a tab off the length of the first starter strip and apply at the lower
left corner of the roof. This starter strip should overhang the rakes and
eaves 1 ⁄2 " when drip edge is used, or 3⁄4 " when no drip edge is used.
3. Continue with full-length starter-strip shingles along the eaves.
(Figure 10-16).
2 L ap
(5 0 m m )
m in im u m
Fasten
Flashing
To Roof
Counter
Flashing
1ST COURSE: Apply a full shingle at the lower left corner of the
roof, tabs flush with the starter course (Figure 10-16).
2ND COURSE: Cut 6 9 ⁄16 " (half of a tab) off the left end of a shingle
and apply the remaining piece over the first-course shingle, flush
with the left edge and exposing the first course 5 5 ⁄8 " (Figure 10-16).
Apron Fla
shing
3RD THROUGH 6TH COURSES: Each succeeding course, up to
and including the sixth course, should start with a shingle one-half of
a tab (6 9 ⁄16 ") shorter (cut-off from the left end) than the previous
course (Figure 10-16). Expose each course 5 5 ⁄8 ".
NOTE: Most CertainTeed 3-tab shingles have 3 aligning notches cut
into the headlap which can be used as a guide to line-up the cut-outs.
Figure 10-18: Flashing around a chimney.
98
Chapter 10
C E R T A I N T E E D S H I N G L E A P P L I C A T O R’ S M A N U A L
▲
Here’s a Tip…Stack all the pieces of shingles that you trimmed to step the shingles up the roof. Use these pieces to fill in at the
rakes or valley at the other end of the course. Never use pieces shorter than 4" at the rakes or 18" in the valley.
▼
▲
NESTING METHOD COMBINED WITH THE SIX-COURSE,
SIX-INCH, DIAGONAL METHOD (“SIX OFF, SIX UP”)
THREE ROOF-OVER METHODS
FOR ENGLISH DIMENSION SHINGLES
Cut old shingles back flush to rakes and eaves. Apply drip edge along
rakes and eaves if recommended.
The Six-Course, Six-Inch, Stepped-Off Diagonal Nesting method of
application described below is suggested for roofing over square-tab
asphalt roofing shingles of 5" ± 1 ⁄8 " (125 mm ± 3.2 mm) exposure.
▼
Reroofing over existing square-tab asphalt strip shingles with 5" tabs
using the following methods:
◆
The standard approach of “nesting,” sometimes called “butt and
run,” combined with the “Six-Course, Six-Inch, Stepped-Off
Diagonal Method”; or
◆
The alternate approach of “nesting,” combined with the
“Five-Inch, Stepped-Off Diagonal Method”; or
◆
The alternate approach of “nesting,” combined with the “Six-Inch,
Single-Column Vertical Racking Method.”
6th C
ours
5th C
NOTE: Nesting is preferred over “bridging” methods when reroofing
because nesting sheds water best and looks better. Nesting, as
described below, is an easy application process over square-tab
asphalt strip shingles with a 5" exposure. If you are covering a different type or size shingle, you may need to cut back the tabs so that
nesting is possible. To do this, simply cut off the leading edge of all
the old shingle tabs if they would be lapped less than 2 1 ⁄2 " by the
new shingles. This permits a flat nested application that avoids lifted
edges and slumps.
3rd
125
mm
3'' (
75 m
Old
10''
m)
(250
mm
)
Make the surface of the old roof as smooth as possible by
replacing missing shingles. Split and nail flat all buckled, raised
tabs and curling shingles.
f
rse
Cou
1st
Roo
e
Cou
2nd
)
e
ours
(125 5''
mm
PREPARING THE ROOF SURFACE FOR REROOFING
◆
ours
4th C
5'' (
e
rse
Cou
rse
) Start
er C
ours
e
Figure 10-20: Six Off, Six Up, Nested.
STARTER COURSE:
1. Use 5" by 36" shingles for the starter course. To make a starter
shingle, first cut the tabs off of a standard three-tab shingle, then
cut off a strip 2" across the top of the same shingle.
2. Cut 6" off either side of the first starter shingle and install it over
the first course of the old shingles, at the lower left corner
(Figure 10-20).
3. Remember, the sealant on this starter course must lie as close as
possible to the eaves edge of the roof. This will help hold the firstcourse shingles down and provide good protection against wind
blow-offs, which could start at the roof edge.
Figure 10-19: Preparing an old roof for reroofing.
◆
It's a good idea to cut old shingles back flush to the rakes
and eaves.
◆
We suggest that you apply corrosion-resistant drip edge along the
rakes and eaves, covering the edges of the old shingles. This will
provide a uniform and straight edge that will help prevent water
seepage under the shingle edges.
4. If you are using drip edge, let the starter shingle extend out over
the edge of the rake and eaves by 1 ⁄2 ". If you are not using drip
edge, let the starter shingle extend over the rake and eaves by 3 ⁄4 ".
5. Finish the course using similarly prepared starter strips.
SPECIAL NOTE: The instructions that follow assume that the
roof surface is dry and has been properly cleaned and prepared
before reroofing.
1ST COURSE:
1. The first course is made of 10" by 36" shingle strips made by
cutting 2" off the bottom of the tabs of regular shingles
(Figure 10-20).
2. Align the top edge of the strips so they butt up (nest) against the
tabs of the shingles in the old third course. Make the left edge
align with the starter course.
C E R T A I N T E E D S H I N G L E A P P L I C A T O R’ S M A N U A L
Chapter 10
99
2ND COURSE:
1. Cut 6" off the left end of a full shingle. Butt the top edge of this
12" by 30" piece of shingle up against the bottom edge of the
shingle in the old fourth course. Make the left edge align with the
first-course left edge (Figure 10-20).
1ST COURSE: The first course is made of 10" by 36" shingle strips
made by cutting 2" off the bottom of the tabs of regular shingles.
Align the top edge of the strips so they butt up against the tabs of the
shingles in the old third course (Figure 10-21).
2. Exposure of the first course (only) is 3". All succeeding course
exposures will duplicate exposures of the existing roof
(approximately 5").
2ND THROUGH 7TH COURSES:
1. Begin the second course by cutting 5" off the left end of a shingle
and aligning the top edge with the butt edge of the shingle in the
old fourth course (Figure 10-21).
3RD AND SUCCEEDING COURSES:
1. For the third course, cut 12" off the left side of a full shingle
(a whole tab).
2. Exposure of the first course (only) is 3". All succeeding course
exposures will duplicate the exposure of the existing roof
(approximately 5").
2. Apply this 24" piece of shingle over the second course, leaving the
5" tabs of the second course exposed. The top edge of the new
shingle in this course should butt up against the bottom of the fifth
course of old shingles (Figure 10-20).
3. Start each succeeding course, up to and including the seventh
course, with a shingle 5" shorter (off the left end) than the first
shingle of the previous course.
3. Cut an additional 6" off the first shingle of each higher course until
you have to start with a full shingle again on the seventh course. In
other words, cut 18" off the first shingle of course four, 24" off the
first shingle in course five, 30" off the first shingle in course six.
On course seven, start over with a full 36" shingle.
5. This completes “Section I” – the first seven courses of the
12-course repeating cycle.
4. Install full shingles against the six applied courses.
REMAINING COURSES:
1. As you go up the rake, repeat the pattern used to start courses one
through six.
2. Finish the courses with full shingles, working from the eaves up
the roof.
4. Align the top edges with butts of old shingles.
6. Install full shingles against these seven courses.
8TH THROUGH 12TH COURSES:
1. Begin the eighth course by cutting 11" off the left end of a shingle
and applying the 25" piece over the seventh course shingle,
aligned with the left edge of the seventh course (Figure 10-21).
2. Each succeeding course, up to and including the twelfth course, starts
with a shingle 5" shorter (off the left end) than the previous course.
3. Align all top edges with butts of old shingles. Exposure of each
course will duplicate the exposure of the existing roof.
4. Install full shingles against all 12 courses.
COMBINING THE “NESTING METHOD” WITH THE ALTERNATE
12-COURSE, FIVE-INCH, STEPPED-OFF DIAGONAL METHOD
(“FIVE OFF, TWELVE UP”)
SUCCEEDING COURSES: Going up the rake, repeat the 12-course
pattern, alternating Sections “I” and “III” up the roof. Complete courses
across the roof using full shingles working from the eaves up the roof.
Rake
31" off 12th
26" off
11th
9th
16" off
11" off
Section III 8th Course
30" off
7th
25" off
20" off
15" off
Section II
6th
5th
4th
3rd
10" off
5" off
0" off
COMBINING THE “NESTING METHOD” WITH THE
ALTERNATE SIX-INCH, SINGLE-COLUMN,
VERTICAL RACKING METHOD (“RACKING”)
Old Roof
10th
21" off
Section I
2nd
1st Course
5"
3"
5" Wide Starter
Eaves
Figure 10-21: Five Off, Twelve Up, Nested.
STARTER COURSE:
1. Use 5" by 36" shingles for the starter course. To make a starter
shingle, first cut the tabs off of a standard three-tab shingle, then cut
off a strip 2" across the top of the same shingle.
2. Cut 5" off the length of the first starter strip, and align the 31" piece
over the first course at the lower left corner of the existing roof.
3. This starter strip should overhang the rakes and eaves 1 ⁄2 " when
drip edge is used, or 3 ⁄4 " when no drip edge is used.
4. Continue with full lengths of starter strips along the eaves.
100
Chapter 10
Figure 10-22: Vertical Racking, Nested.
STARTER COURSE:
1. Use 5" by 36" shingles for the starter course, made by first cutting
the tabs off of a standard three-tab shingle, then cutting off a strip
2" across the top of the same shingle.
C E R T A I N T E E D S H I N G L E A P P L I C A T O R’ S M A N U A L
▲
Here’s a Tip…Save the tabs that you cut off starter shingles for use as a vertical front wall base flashing cover. (Thanks for this tip
go to both Darren L. Burke of Montclair, New Jersey, and Dave Mulholland of Ohio.)
▼
▲
2. Cut 6" off one side of the first starter shingle and install the 30"
piece over the first course of the old shingles, at the lower left
corner. This, and all other shingles, must nest with the butt edges
of the old shingles (Figure 10-22).
INSTALLING ENGLISH OVER METRIC
▼
Metric shingles are bigger by about 20 percent than standard size
shingles. In inches, they measure 131 ⁄4 " by 39 3 ⁄8 ". The main
advantage of metric shingles compared to standard shingles is the
possibility of covering a little more of the roof in a little less time.
The main disadvantage for reroofing is that the nesting method for
covering the common 12" by 36" shingles uses more material
because it does not take advantage of the full metric tab exposure.
The installation of an English-dimension shingle over a metric
shingle is a little more labor-intensive than the typical English-overEnglish reroofing job, but it’s not a very difficult process.
3. Remember, the sealant on this starter course must lay as close as
possible to the eaves edge of the roof. This will help hold the firstcourse shingles down and provide good protection against wind
blow-offs, which could start at the roof edge.
4. If you are using drip edge, let the starter shingle extend out over
the edge of the rake and eaves by 1 ⁄2 ". If you are not using drip
edge, let the starter shingle extend over the rake and eaves by 3 ⁄4 ".
5. Finish the starter course along the eaves using the prepared
starter strips.
Modified Bridging Method: English Over Metric
1ST COURSE:
1. The first course is made of 10" by 36" strips made by cutting 2"
off the bottom of the tabs of regular shingles.
Nail Placement
10
9
English Course
8
B
8
A
7
7
6
6
5
5
Metric Course
2ND COURSE:
1. Cut 6" off the left end of a full shingle. Nest the top edge of this
new 12" by 30" piece of shingle up against the bottom edge of the
shingles in the old fourth course (Figure 10-22).
4
4
3
3
2
2
2. Exposure of the first course (only) is 3". All succeeding course
exposures will duplicate exposures of the existing roof
(approximately 5").
1
1
3RD AND SUCCEEDING COURSES:
1. Begin the application of succeeding courses by alternating the use
of full shingles and 30" shingles (6" off the left end) up the rake
in a single column (Figure 10-22).
existing 5 5/8" exposure metric shingle
sealant
new English-dimension shingle
area where existing metric
roofing material is removed
Figure 10-23: Reroofing using standard 12" x 36"
shingles over metric shingles.
2. Fasten the full shingles with three fasteners, leaving the right-hand
tab edge unfastened until later.
3. Fasten the 30" pieces of shingle using four fasteners.
4. Align all top edges with butts of old shingles.
COMPLETING THE INSTALLATION:
1. Work up the roof from the eaves one vertical column at a time.
Butt full shingles against the right-hand side of applied shingles in
each course, maintaining the 5" exposure.
2. In courses where the right-hand shingle tab in the course above
was purposely left unfastened, carefully lift the loose shingle tab so
as not to cause damage by tearing or sharply bending, and slip the
next shingle underneath to butt the hidden shingle edge. Apply all
four fasteners to the newly placed shingle and one fastener to the
free end of the shingle tab above it.
3. In alternate courses where the new shingles butt against the visible
shingle tabs, initially apply only three fasteners, leaving the righthand edge free.
C E R T A I N T E E D S H I N G L E A P P L I C A T O R’ S M A N U A L
9
10
2. Align the top edge of the 10" strips so they butt up (nest) against
the tabs of the shingles in the old third course (Figure 10-22).
4. Repeat this procedure to complete columns and courses across
the roof.
11
A standard metric shingle is typically exposed 5 5 ⁄8 " to the weather.
The illustration (Figure 10-23) shows an idealized method used to
reroof with a 12" by 36" English-dimension shingle.
If the existing shingles have been cut back to the eaves, a 5 5 ⁄8 "
starter course is suggested. This enables the tabs of the first-course
shingles to be sealed, and also helps reduce unevenness. A starter
course is also helpful because the headlap of the first-course English
shingle will likely butt against the bottom edge of the third course of
the existing metric laminate. This provides a 3 ⁄4 " overhang at the eaves.
Apply succeeding courses (Nos. 2-8) with 5" exposures to the
weather, as is typical in English-dimension shingle installation. Notice
that each course gradually drops farther away from the leading edge of
the shingle above. The English-dimension shingle can bridge that gap.
But when you reach the metric shingle’s ninth course (the English
shingle’s eighth), the gap should not be bridged because the correct
nail placement would be below the leading edge of the metric shingle
underneath. Nailing in this area would draw down and warp the
shingle on top, causing a hump. To eliminate the problem, you must
cut and remove, at the metric shingle’s eighth course, approximately
2" of the leading edge of the next metric shingle up the roof, so that
the English-dimension shingle nests smoothly. Do the same for the
metric shingle’s ninth course; the 10th course may naturally meet the
butt edge of the shingle above (Figure 10-23).
Chapter 10
101
Repeat this method on every eighth and ninth metric course up the
roof. Counting from the first metric course, this means the 17th and
18th courses would also be cut back, as would the
25th and 26th, and so on.
NOTE: On an actual roof the course exposures will vary, so the
directions above may need to be modified. An important rule of
thumb is this: Each time the top edge of the English shingle overlaps
the bottom edge of a metric shingle course by less than 11 ⁄2 ", as
shown by shingles “A” and “B” in Figure 10-23, cut that metric
shingle back by 2" (or to fit) to allow the top edge of the English
shingle to nest smoothly below it.
▲
TIPS FOR ROOFING OVER SMOOTHOR DIMENSIONAL-BASE METRIC SHINGLES
▼
In an English-over-metric roof-over, there are two different cases
to consider: the smooth-surface base shingle and the dimensionalbase shingle.
In both cases the common problem is the presence of gaps
created between the new roof surface to be installed and the existing
roof surface. The gaps occur as a function of the shingles being different sizes; they don’t line up or “nest” exactly as they would in an
English-to-English or metric-to-metric roof-over. Bridging the gaps
over a thick, dimensional shingle is even more difficult than doing so
over a smooth-surface shingle because of the uneven dimensional
surface.
SOLVING BRIDGING PROBLEMS: TWO RULES TO REMEMBER
1. IN BRIDGING A GAP, A STIFFER SHINGLE ON TOP IS
ALWAYS BETTER THAN A SOFTER SHINGLE: Shingle stiffness
depends on the type of shingle. For example, fiber glass three-tab
shingles with a longer warranty duration are usually stiffer than those
with a shorter duration.
The stiffest shingles, are the heavyweight and super-heavyweight
premium shingles.
2. CHOOSE A DESIGN THAT MASKS UNEVENNESS: An uneven
shingle surface will tend to visually intrude through the shingle surface
above it, creating small humps in the new roof. So when you choose
a shingle for a roof-over, it is best to choose one with a design
that masks or disguises the uneven surface below. CertainTeed’s
Independence Shangle,® with its deep shadow lines and textured
look, makes an excellent choice.
If you’re installing over a smooth-surface metric strip shingle,
Classic Horizon Shangle® is an excellent choice. If you’re installing
over a dimensional shingle, Independence might be your best choice.
▲
ROOF-OVER METHODS
FOR METRIC DIMENSION SHINGLES
▼
The same methods used for clean-deck application of metric dimension
shingles are used for roof-overs. Application of metric dimension
shingles over English dimension shingles is not recommended — due
to the high cost of workmanship and greater risk of worker error.
▲
HIPS AND RIDGES
▼
1. First, apply the shingles up to the hip or ridge on both sides, then
trim flush.
2. Make the caps by cutting full-length shingles at the tab cutouts.
Trim the back end of the caps as shown in Figure 10-24.
1''
(25 mm)
Cap
Shingle
2'' (50 mm)
Remove
Cap
Shingle
Cap
Shingle
12''
(305 mm)
Figure 10-24: Cut tabs, then trim back to make cap shingles
(English dimensions shown).
3. Start installing the caps at the bottom of a hip or at either end of
a ridge.
5''
)
5
2
(1 mm
Fasten
Both
Sides mm)
1'' (25
m)
12'' (305 m
5 5 /8''
as
Trim wn
sho
)
nt
mm) orwood pla
(145
N
r
o
'' f
(5 1 /2
Figure 10-25: Installation of caps along the hips and ridges.
4. To prevent cracking, make sure the caps are warm enough to
permit proper forming over the ridge or hip.
5. Fasten each cap shingle with two nails installed at 5 5 ⁄8 " (5 1 ⁄2 " for
Norwood plant) from the bottom edge and 1" in from each side.
6. Leave only the 5" tab exposed to the weather. Do not expose
fasteners.
7. You can improve the appearance of the roof by applying two
layers. The thick double cap creates a richer-looking roof.
However, be sure double caps have been estimated into the job
price before you install them.
8. To add more definition and visual appeal to the rooflines, use
CertainTeed's ShadowRidge™ or one of CertainTeed’s enhanced
profile hip and ridge caps.
102
Chapter 10
C E R T A I N T E E D S H I N G L E A P P L I C A T O R’ S M A N U A L