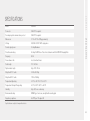
1
NOTICE TO ELECTRICIAN: Leave this User Guide with the EVSE-RS customer for future reference.
USER GUIDE
with Installation Instructions for Your Electrician
AeroVironment EV Solutions™ Charging Dock Model EVSE-RS
Face plate design may vary.
© 2011 AeroVironment, Inc. All rights reserved.
AeroVironment, EVSE-RS, EV Solutions, and the AeroVironment logo are trademarks of AeroVironment, Inc.
Corporate names, trademarks, registered trademarks, service marks, symbols, and logos stated herein are
property of their respective companies.
Specifications are subject to change without notice. Images of the Charging Dock Model EVSE-RS are
representative; production models may vary.
No portion of these materials may be duplicated, used or disclosed without prior written permission from
AeroVironment, Inc.
Disclaimer: This user guide includes the latest information available at the time of printing. AeroVironment,
Inc. reserves the right to make changes to this user guide and/or product without further notice. Changes
or modifications to this product not completed by an authorized service provider could void the product
warranty.
CUSTOMER SUPPORT
CORPORATE HEADQUARTERS
AeroVironment, Inc.
EV Solutions™
181 W. Huntington Drive, Suite 202
Monrovia, CA 91016
Phone: 626-357-9983 or 888-833-2148
Fax: 626-359-9628
Email: [email protected]
Website: www.evsolutions.com
CUSTOMER SUPPORT
OWNER’S RECORD
MODEL:
EVSE-RS
SERIAL NUMBER (S/N):
Before contacting Customer Support, write down the Serial Number of the Charging Dock.
As you stand facing the Charging Dock, look for the Serial Number on the left underside of
the enclosure.
Customer Support Phone: 1-888-833-2148
Customer Support email: [email protected]
On label on underside of Charging
Dock enclosure/housing
Serial number
PURCHASE DATE:
Document Number: EVSE-RS_UG_ENG_AVVER1.2
ii
9-24-2010
TABLE OF CONTENTS
CHAPTER 1: INTRODUCTION
To stop a charging cycle............................................ 22
Introduction.................................................................... 2
Method 1 (Preferred)................................................ 22
Electric vehicle compatibility....................................... 3
Method 2................................................................... 24
Features...................................................................... 3
Charge complete....................................................... 26
Important safety instructions...................................... 4
Return connector to Charging Dock......................... 27
Symbol usage.............................................................. 5
Auto-restart.................................................................. 29
High voltage warning................................................... 6
Power outage recovery................................................ 30
FCC information........................................................ 10
Time of use metering.................................................... 32
Safety features...........................................................11
Ventilation.................................................................. 13
CHAPTER 3: TROUBLESHOOTING
Charging Dock is not available......................................... 34
CHAPTER 2: USING YOUR CHARGING STATION
POWER PRESENT light does not turn ON...................... 37
Overview...................................................................... 16
READY TO CHARGE, VEHICLE CHARGING
and TROUBLE lights do not turn ON............................... 37
Key features................................................................. 17
Charging your vehicle................................................... 18
Check lights on front panel....................................... 18
Remove the connector.............................................. 19
Connect to vehicle.................................................... 20
Automatic charge starts............................................ 21
VEHICLE CONNECTED light does not turn ON
when the Charging Dock is connected to the vehicle..... 38
VEHICLE CHARGING light does not turn ON................ 39
TROUBLE light is ON solid.............................................. 40
TROUBLE light blinks two times...................................... 43
TROUBLE light blinks three times................................... 43
iii
TROUBLE light blinks four times and repeats................. 44
Attach Charging Dock to mounting plate.................. 64
TROUBLE light is rapidly blinking..................................... 44
Prepare Charging Dock......................................... 64
CHAPTER 4: STEP-BY-STEP INSTALLATION
(for electricians only)
Upper mounting hole.............................................. 66
Introduction.................................................................. 48
Lower mounting hole.............................................. 67
Safety instructions....................................................... 49
Connect conduit to enclosure................................... 68
Personal protection equipment (PPE).......................... 51
Turn power OFF......................................................... 68
Package contents......................................................... 52
Connect utility wires and conduit.............................. 69
Front panel and enclosure............................................ 54
Final assembly........................................................... 70
Installing the Charging Dock........................................ 55
Obtain permits........................................................... 55
Mount cable hanger to wall stud or dry wall
and hang cable.......................................................... 73
Verify building codes................................................. 55
Install a 40 amp circuit breaker................................. 75
CC&Rs........................................................................ ?
Turn the power ON.................................................... 75
Check parts in the package...................................... 57
Self test..................................................................... 77
Prepare tools required for installation....................... 58
Inspection.................................................................. 78
Choose location........................................................ 59
Return warranty information card............................. 78
Drill hole for wire entry (rear or underside)............... 60
To re-open the charging dock
(electrician only)........................................................ 79
Route wiring and/or conduit...................................... 61
Use mounting plate as template
and drill screw holes.................................................. 61
Install mounting plate to wall and torque bolts.......... 62
Pull wires out of wall and plate.................................. 63
iv
Remove front panel and hang on rim of
Charging Dock....................................................... 65
CHAPTER 5: FOR YOUR RECORDS
Specifications.............................................................83
Warranty....................................................................84
Index..........................................................................85
CHAPTER 1
INTRODUCTION
1
CHAPTER 1
l
INTRODUCTION
2
INTRODUCTION
Thank you for purchasing the AeroVironment (AV) Charging Dock Model EVSE-RS for
use with your plug-in electric vehicle. This user guide shows how to use the Charging
Dock and contains installation instructions for the electrician.
It is recommended that your Charging Dock be installed by a licensed, qualified electrician.
To avoid serious injury or death, installation must be in accordance with the manufacturer’s
installation instructions and must comply with the provisions of the National Electric Code
(NEC) and all local codes. In cases of conflict between local codes and the NEC, local
codes shall take precedence.
WARNING
INTRODUCTION
The Charging Dock requires either a 240VAC split phase and neutral grounded, or a
208VAC 2 phases and neutral grounded 40-amp dedicated circuit. This circuit must be
routed directly from the power distribution panel to the Charging Dock location.
l
The Charging Dock is designed to charge all SAE J1772 compliant vehicles including
Electric Vehicles (EVs) and plug-in hybrid electric vehicles (PHEVs). SAE J1772 is
an electric vehicle charging standard that has been developed by the Society of
Automotive Engineers (SAE), the governing body of Automotive Standards in the USA.
CHAPTER 1
ELECTRIC VEHICLE COMPATIBILITY
FEATURES
•SAE J1772 Compliant
• Underwriters Laboratory (UL) compliant
• Auto-restart in event of power outage or
ground fault
• Breakaway safety cable
• Integrated cable stowage with cable hanger
• Quick read status indicators
• Optional pedestal mount
3
CHAPTER 1
IMPORTANT SAFETY INSTRUCTIONS
l
INTRODUCTION
Please read these Important Safety Instructions and the charging instructions in your
vehicle owner’s manual before charging your electric vehicle. Failure to do so can
result in death or serious injury. Save this user guide for future reference.
There are many safety features built into the Charging Dock. Read all the safety
information and warnings in this guide to be aware of any hazards and risks
associated with installing and using the Charging Dock.
NOTE any missing parts and contact AV Customer Support for assistance on obtaining
replacement parts.
4
NOTE
CHAPTER 1
Take special note of all information marked with the following symbols:
l
DANGER indicates information about safety practices which, if not followed, may result in
serious injury or death.
WARNING
NOTE
INTRODUCTION
DANGER
SYMBOL USAGE
WARNING indicates information about safety practices which, if not followed, could result
in personal injury or are necessary to prevent fire or equipment overheating.
NOTE indicates helpful information for installation or usage, but does not contain personal
injury or equipment safety related information.
5
CHAPTER 1
HIGH VOLTAGE WARNING
l
INTRODUCTION
High voltage is present in your electric meter housing and power distribution service panel.
Contact with high voltage can cause death or serious personal injury.
WARNING
To clean the Charging Dock, wipe the Charging Dock with a clean cloth dampened
with water or a mild detergent solution suitable for use on automobile paint. Do not use
chemicals or solvents. Do not submerge the Charging Dock. Turn off the power to the
Charging Dock at the circuit breaker and disconnect switch (if applicable) before cleaning it.
NOTE
6
l
INTRODUCTION
DANGER
If, at any time, you think the equipment is unsafe, shut off the electricity at the circuit breaker
or disconnect switch (if applicable) and immediately contact Customer Support for service.
DO NOT use your Charging Dock until the problem is identified and corrected.
CHAPTER 1
DANGER
Do not operate your Charging Dock with a visibly damaged output cable or housing. Visually
inspect the output cable (including the connector) and housing for damage
before each use. If you detect any damage, stop using the Charging Dock and contact
Customer Support for service.
7
CHAPTER 1
l
INTRODUCTION
8
ALWAYS position the Charging Dock output cable so that it will not be driven over, stepped
on, tripped over, or otherwise damaged or stressed while in use. To prevent personal injury
and damage to the Charging Dock and cable, ALWAYS stow the output cable after use.
WARNING
The Charging Dock is intended to be used by licensed drivers only. Children should not be
allowed to use this Charging Dock. DO NOT allow children to play in or around the Charging
Dock. Close supervision of children is necessary when the Charging Dock is used.
WARNING
Use this Charging Dock to supply power to Electric Vehicles equipped with a compatible
vehicle receptacle only. For more information, see the vehicle owner’s manual.
WARNING
CHAPTER 1
• This product contains a chemical known to the State of California to cause cancer.
• This product contains a chemical known to the State of California to cause birth defects or other
reproductive harm.
INTRODUCTION
WARNING
l
State of California Proposition 65 Warnings:
9
CHAPTER 1
FCC INFORMATION
This device complies with Part 15 of the FCC Rules. Operation is subject to the
following two conditions:
l
INTRODUCTION
• This device may not cause harmful interference.
• This device must accept any interference received, including interference that may cause
undesired operation.
This product has been designed to protect against Radio Frequency Interference (RFI).
However, there are some instances where high powered radio signals or nearby RF
producing equipment (i.e. digital phones, RF communications equipment, etc.) could
affect operation.
If you suspect your Charging Dock is receiving interference, take the following steps
before contacting Customer Support for service.
1. Relocate nearby electrical appliances or equipment during charging.
1. Turn off nearby electrical appliances or equipment during charging.
10
Important! Changes or
modifications to this
product by anyone other
than an authorized service
provider will void FCC
compliance.
• The Charging Dock constantly checks for the presence of a service ground connection.
If the service ground ever fails, the Charging Dock TROUBLE light turns ON and shuts
power OFF to the vehicle.
INTRODUCTION
• The Charging Dock is designed with a permanent grounding system for personal safety.
l
The Charging Dock is designed with your safety as the highest priority and includes the
following convenient safety features to protect against the risk of electric shock:
CHAPTER 1
SAFETY FEATURES
• The Charging Dock is equipped with a Ground Fault Circuit Interruption (GFCI) reaction
system to protect against electric shock. If the system detects an output ground fault, it
will shut off power to the output cable and illuminate the TROUBLE light.
• The Charging Dock enclosure and cable assembly are completely insulated (no exposed
live parts) to protect against electric shock.
• The Charging Dock connector and EV coupler are designed to minimize unintentional
disconnection and to prevent exposing the user to live power if an unintentional
disconnection occurs.
11
CHAPTER 1
• Pilot wires in the cable and connector eliminate the possibility of electric shock when not
connected to a vehicle or if an unintended disconnect occurs during a charge.
• When the Charging Dock connector is properly connected to the vehicle receptacle, the
l
vehicle drive system is disabled. The output cable has a safety break-away feature in case
INTRODUCTION
the vehicle is moved or unintentionally rolls away from the parking location with the cable
connected to the vehicle. The safety break-away feature will allow safe cable separation
from the Charging Dock if the output cable is yanked or pulled with excessive force.
• The Charging Dock cable should be coiled up on the hanger when not in use to minimize
potential cable damage and to eliminate the possibility of tripping over the cable.
If the cable becomes separated from the Charging Dock. DO NOT attempt to repair or
service the Charging Dock and cable assembly yourself. There are no user serviceable
components inside.
12
DANGER
Only an authorized service technician can perform repair or service on the Charging Dock
or the Charging Dock Warranty may be invalidated. Contact Customer Support for service.
CHAPTER 1
NOTE
l
The AV Charging Dock will not work with Electric Vehicles (EVs) that require an external
ventilation system. If the Charging Dock is connected to this type of EV, the Charging
Dock will illuminate the “TROUBLE” light and not provide power to the vehicle. Contact
Customer Support for additional information.
INTRODUCTION
VENTILATION
13
CHAPTER 1
l
INTRODUCTION
14
CHAPTER 2
USING YOUR CHARGING
STATION
15
CHAPTER 2
OVERVIEW
All the lights on the front panel are green when they turn on except the TROUBLE light which is red.
l
U S I N G YO U R C H A R G I N G S TAT I O N
POWER PRESENT
Light turns on when power from your
local utility is at the Charging Dock.
This light should always be on if the
circuit breaker and disconnect switch
are both ON. (disconnect switch may be
required by local permitting authority but
may not always be present.)
VEHICLE CONNECTED
This light turns on when the Charging Dock
is communicating with your vehicle and the
connection was made properly.
TROUBLE
This light turns on when the Charging
Dock has detected an error and
requires you to take action. See the
Troubleshooting chapter on page 33.
16
READY TO CHARGE
This light turns on when the Charging Dock is
ready to be connected to your vehicle.
VEHICLE CHARGING
This light turns on when power from
the utility company is being provided
to your vehicle. The light may stay on solid in the
early stage of the charging cycle (if vehicle battery
is low), then blinks later in the charging cycle, then
finally goes out when charging is complete.
START (RESUME)
l
STOP (PAUSE)
FRONT PANEL
LATCH RELEASE
STORAGE DOCK
CONNECTOR
Connector inserts into Charging Dock here and
stays in place for storage when not in use.
CONNECTOR
Communicates between Charging Dock and
vehicle and delivers power to vehicle.
LATCH RELEASE
CABLE HANGER
When cable is not being used, coil the cable
over the cable hanger.
Press to release connector. Then remove
connector from Charging Dock or vehicle.
The connector will not disengage unless you
depress the latch.
CABLE HANGER
U S I N G YO U R C H A R G I N G S TAT I O N
Interrupts the charging cycle at any time. If
vehicle is connected to the Charging Dock,
press START to resume charging.
To resume charging after the STOP button was
pressed. Also, to override a random time delay
after a utility power outage.
CHAPTER 2
KEY FEATURES
CABLE
17
CHAPTER 2
CHARGING YOUR VEHICLE
1. CHECK LIGHTS ON FRONT PANEL
l
U S I N G YO U R C H A R G I N G S TAT I O N
First, make sure the POWER PRESENT and READY TO CHARGE lights are ON as
shown below. This means that the Charging Dock is ready to charge your vehicle.
NOTE
POWER PRESENT
and READY TO CHARGE
VEHICLE CONNECTED
lights are not ON, please
VEHICLE CHARGING
see the Troubleshooting
TROUBLE
18
If the POWER PRESENT
READY TO CHARGE
chapter beginning on page
33 for possible solutions.
CHAPTER 2
2. REMOVE THE CONNECTOR
U S I N G YO U R C H A R G I N G S TAT I O N
LATCH RELEASE
l
Press the latch release and remove the connector from the Charging Dock.
19
CHAPTER 2
3. CONNECT TO VEHICLE
l
U S I N G YO U R C H A R G I N G S TAT I O N
Plug the connector into your vehicles’s charging receptacle and let go of the connector
allowing the latch release to click and pop up into the “latched” condition to achieve
a proper connection. When letting go of the connector, the latch release must click
and come back up into position when connected to make a proper connection. The
connector does not disconnect without pressing the latch release. The VEHICLE
CONNECTED light turns ON when a proper connection is made.
LATCH
RELEASE
POWER PRESENT
READY TO CHARGE
VEHICLE CONNECTED
VEHICLE CHARGING
CHARGING
RECEPTACLE
20
TROUBLE
The vehicle automatically starts charging and the Charging Dock supplies power as
needed.
• VEHICLE CHARGING light blinks when the vehicle is approaching the end of the
charging cycle
• VEHICLE CHARGING light goes out when vehicle is fully charged.
Look for a gauge on the vehicle that verifies the vehicle
is fully charged. See the owner’s manual that came
with the vehicle to find out where the gauge is located.
POWER PRESENT
READY TO CHARGE
U S I N G YO U R C H A R G I N G S TAT I O N
on when charging
l
• POWER PRESENT, VEHICLE CONNECTED, and the VEHICLE CHARGING lights stay
CHAPTER 2
4. AUTOMATIC CHARGE STARTS
VEHICLE CONNECTED
VEHICLE CHARGING
TROUBLE
21
CHAPTER 2
TO STOP A CHARGING CYCLE
You can interrupt charging at any time using one of the two following methods:
l
U S I N G YO U R C H A R G I N G S TAT I O N
METHOD 1 (Preferred)
Press the STOP button. After pressing STOP, the POWER PRESENT, READY TO
CHARGE, and VEHICLE CONNECTED lights appear as shown below. The VEHICLE
CHARGING light goes OFF. Press the START button to resume charging.
POWER PRESENT
BLINKING
READY TO CHARGE
VEHICLE CONNECTED
OFF
VEHICLE CHARGING
TROUBLE
22
STOP
(PAUSE)
START
(RESUME)
CHAPTER 2
Once charging has resumed, the POWER PRESENT, VEHICLE CONNECTED, and
VEHICLE CHARGING lights are ON as shown below:
l
OFF
READY TO CHARGE
VEHICLE CONNECTED
ON
U S I N G YO U R C H A R G I N G S TAT I O N
POWER PRESENT
VEHICLE CHARGING
TROUBLE
23
CHAPTER 2
l
U S I N G YO U R C H A R G I N G S TAT I O N
24
METHOD 2
Press the latch release on the connector and remove from the vehicle as shown below.
Charging stops and power stops flowing in the cable before the connector is fully
withdrawn from the vehicle inlet receptacle.
LATCH RELEASE
CHAPTER 2
The POWER PRESENT and READY TO CHARGE lights are ON as shown below.
l
READY TO CHARGE
VEHICLE CONNECTED
VEHICLE CHARGING
U S I N G YO U R C H A R G I N G S TAT I O N
POWER PRESENT
TROUBLE
25
CHAPTER 2
5. CHARGE COMPLETE
l
When the vehicle has completed charging, the VEHICLE CHARGING light turns OFF,
the POWER PRESENT, READY TO CHARGE, and VEHICLE CONNECTED lights turn
ON as shown below.
U S I N G YO U R C H A R G I N G S TAT I O N
POWER PRESENT
READY TO CHARGE
VEHICLE CONNECTED
VEHICLE CHARGING
TROUBLE
26
LATCH
RELEASE
POWER PRESENT
READY TO CHARGE
U S I N G YO U R C H A R G I N G S TAT I O N
The POWER PRESENT and READY TO CHARGE lights are ON as shown below.
l
When the charge cycle is complete, press the latch release and remove the connector
from your vehicle. Return the connector to the Charging Dock. The VEHICLE
CHARGING light will be OFF.
CHAPTER 2
6. RETURN CONNECTOR TO CHARGING DOCK
VEHICLE CONNECTED
VEHICLE CHARGING
TROUBLE
27
CHAPTER 2
l
U S I N G YO U R C H A R G I N G S TAT I O N
CABLE HANGER
CABLE
28
ALWAYS position the Charging Dock output cable
so that it will not be driven over, stepped on, tripped
over, or otherwise damaged or stressed while in
use. To prevent personal injury and damage to the
Charging Dock and cable, ALWAYS stow the output
cable after use.
WARNING
STRANGULATION HAZARD. Small children
could become entangled in the output cable and
be strangled. Keep small children away from the
Charging Dock, and ALWAYS stow
the output cable after use.
WARNING
U S I N G YO U R C H A R G I N G S TAT I O N
The exception to immediate Auto-Restart is when the interrupt is due to a GFCI event. To allow charging
after GFCI events caused by line surges or other disturbances, the Charging Dock will restart
15 minutes after a GFCI event, assuming the event did not occur immediately upon
connecting power to the vehicle. The Charging
Dock is limited to four automatic restarts after a
POWER PRESENT
GFCI event during a charge cycle. After the fourth
READY TO CHARGE
attempt, the Charging Dock will shut down and
VEHICLE CONNECTED
the TROUBLE light will be ON. Contact Customer
VEHICLE CHARGING
Support for service.
l
The Auto-Restart feature helps ensure that your vehicle will be charged and ready for use when needed.
If a charge is interrupted due to a temporary error condition, the Charging Dock automatically clears any
error codes when the cause of the temporary error condition returns to normal and then attempts to restart
the charge. The TROUBLE light remains lit while the cause of the temporary error condition is active or
awaiting a time-out delay.
CHAPTER 2
AUTO-RESTART
TROUBLE
THIS LIGHT GOES OUT WHEN
AUTO-RESTART IS SUCCESSFUL
29
CHAPTER 2
POWER OUTAGE RECOVERY
l
U S I N G YO U R C H A R G I N G S TAT I O N
If there is a power outage, the utility grid might experience a large surge from multiple
Charging Docks in your area attempting to resume charging simultaneously when power
is restored. This would cause additional stress to the utility grid. The “Power Outage
Recovery” feature avoids this scenario by resuming charge with an automatic delay
after restoration of power. Power Outage Recovery ensures that Charging Dock users
in your area will resume charging in a staggered fashion to avoid stressing the grid.
If a utility power outage occurs while your vehicle is being charged, the Charging
Dock will automatically resume charging once power is resumed.
The VEHICLE CHARGING light blinks and
charging will re-start automatically after
POWER PRESENT
a randomly assigned time ranging
READY TO CHARGE
from 0 to 20 seconds.
VEHICLE CONNECTED
BLINKS
AFTER POWER
IS RESTORED
30
VEHICLE CHARGING
TROUBLE
CHAPTER 2
To override the automatic (random) delay after utility power is restored, press the
START button on the Charging Dock to resume charging.
l
VEHICLE CONNECTED
START (RESUME)
U S I N G YO U R C H A R G I N G S TAT I O N
POWER PRESENT
READY TO CHARGE
VEHICLE CHARGING
TROUBLE
31
CHAPTER 2
l
U S I N G YO U R C H A R G I N G S TAT I O N
32
TIME OF USE METERING
Many electric utilities have been actively promoting the use of EVs and have developed
specific utility rates to promote off-peak charging of these vehicles. This approach
typically requires a second meter to separately monitor the electrical use of the
Charging Dock. This allows the utility to charge rates on a ‘Time of Use” (TOU)
basis, typically providing savings for overnight (off peak) charging and penalties for
daytime (on peak) charging. Consult your local electric utility to determine Time of Use
availability and cost.
CHAPTER 3
TROUBLESHOOTING
33
CHAPTER 3
l
TROUBLESHOOTING
34
CHARGING DOCK IS NOT AVAILABLE
If you experience difficulty with your Charging Dock or your vehicle battery does not
charge properly, please read this Troubleshooting section for possible solutions before
contacting Customer Support for service.
Do not attempt to repair or service the Charging Dock yourself. There are no user
serviceable parts inside.
NOTE
Only an authorized service technician can perform repair or service on the Charging Dock
or the Charging Dock Warranty may be invalidated. Contact Customer Support for service.
NOTE
CHAPTER 3
If the Charging Dock is not available, use the Emergency Portable Cord Set that came
with the vehicle as follows:
l
Use of an Emergency Portable Cord Set will charge your vehicle at a much slower rate than
the Charging Dock.
TROUBLESHOOTING
NOTE
35
CHAPTER 3
Connect the Emergency Portable Cord Set from a dedicated 120 Volt wall outlet with
Ground Fault Circuit Interrupt (GFCI) protection to the vehicle as shown below. The
battery charger in the vehicle automatically detects low or high voltage inputs.
WARNING
Use only an Emergency
l
TROUBLESHOOTING
Portable Cord Set that is
approved by the vehicle
manufacturer or you could
WALL
OUTLET
WITH GFCI
damage the charger in the
vehicle or the vehicle might
not charge.
WARNING
EMERGENCY
POTABLE CORD SET
Use only the approved
receptacle for the
Emergency Portable
Cord Set.
36
1. Turn the circuit breaker in your power distribution panel OFF and then back ON.
2. Make sure the disconnect switch is ON (if present).
CHAPTER 3
POWER PRESENT LIGHT DOES NOT TURN ON
l
READY TO CHARGE, VEHICLE CHARGING, AND TROUBLE LIGHTS DO
NOT TURN ON
1. Turn the circuit breaker in your power distribution panel OFF and then back ON.
TROUBLESHOOTING
3. If the problem persists, contact Customer Support for service.
2. If the problem persists, contact Customer Support for service.
37
CHAPTER 3
l
TROUBLESHOOTING
38
VEHICLE CONNECTED LIGHT DOES NOT TURN ON WHEN THE CHARGING
DOCK IS CONNECTED TO THE VEHICLE
1. Unplug the Charging Dock connector and reinsert it fully into the electric vehicle
receptacle. Make sure the connector latch engages in the receptacle.
2. Inspect the Charging Dock cable and connector terminals for damage. If damaged,
discontinue using immediately and contact Customer Support for service.
3. Inspect vehicle receptacle for damage. If damaged, discontinue using immediately
and report the problem to your nearest service dealership.
1. If this occurs when the vehicle is connected and is charging, contact Customer Support
for service.
as shown on page 36 in the Troubleshooting section of this user guide.
»» If a charge cycle starts, contact Customer Support for service.
»» If a charge cycle does not start, report the problem to your nearest vehicle service
dealership.
TROUBLESHOOTING
»» Attempt to charge using the Emergency Portable Cord Set that came with the vehicle
l
2. If this occurs when the vehicle is connected but is not charging:
CHAPTER 3
VEHICLE CHARGING LIGHT DOES NOT TURN ON
39
CHAPTER 3
l
TROUBLESHOOTING
40
TROUBLE LIGHT IS ON SOLID
The Charging Dock is one part of the Electric Vehicle’s charging system. A charger
on-board the vehicle is the other part. TROUBLE light may be triggered by several sources
including the Charging Dock, the utility service, the vehicle, or temperature extremes.
See Troubleshooting tips below.
The TROUBLE light turns on when the Charging Dock detects an error whether the
vehicle is connected or not. With the Trouble light on, the Charging Dock will not deliver
power to the vehicle. The error must be corrected before charging starts or resumes.
There are two scenarios for a solid TROUBLE light.
NOTE
CHAPTER 3
SCENARIO 1
l
VEHICLE IS
NOT CONNECTED
TROUBLESHOOTING
POWER PRESENT
READY TO CHARGE
VEHICLE CONNECTED
VEHICLE CHARGING
TROUBLE
41
CHAPTER 3
SCENARIO 2
l
VEHICLE IS CONNECTED
TROUBLESHOOTING
POWER PRESENT
READY TO CHARGE
VEHICLE CONNECTED
VEHICLE CHARGING
TROUBLE
42
2. If the fault persists, DO NOT USE the Charging Dock! Contact Customer Support for
service.
CHAPTER 3
1. Turn power OFF, then ON at circuit breaker and disconnect switch (if applicable).
l
3. Caused by an error having to do with your electric vehicle.
4. Turn the circuit breaker and the disconnect switch (if installed) OFF then ON.
5. If the fault persists, contact Customer Support for service.
TROUBLESHOOTING
TROUBLE LIGHT BLINKS TWO TIMES AND REPEATS
TROUBLE LIGHT BLINKS THREE TIMES AND REPEATS
1. Caused by a utility problem.
2. Turn the circuit breaker or the disconnect switch (if installed) OFF then ON.
3. If the fault persists, report issue to utility company.
43
CHAPTER 3
TROUBLE LIGHT BLINKS FOUR TIMES AND REPEATS
1. Caused by the Charging Dock mounted near an external heat source (furnace, water
heater, etc.) or in direct sunlight.
l
2. Remove the heat source.
TROUBLESHOOTING
3. Provide shade from direct sunlight.
4. If the fault persists, contact Customer Support for service.
TROUBLE LIGHT IS RAPIDLY BLINKING
Press STOP.
A. TROUBLE light goes OFF
1. Press START.
2. TROUBLE light OFF - Charging Resumes.
44
a. Turn power OFF at circuit breaker and disconnect switch (if applicable).
CHAPTER 3
3. If TROUBLE light turns ON
l
c. Contact Customer Support for service.
B. TROUBLE light stays ON
1. Turn power OFF at the circuit breaker or disconnect switch (if applicable).
TROUBLESHOOTING
b. Disconnect from vehicle.
2. Disconnect cable from vehicle.
3. Contact Customer Support for service.
45
CHAPTER 3
l
TROUBLESHOOTING
46
CHAPTER 4
STEP-BY-STEP
INSTALLATION
(FOR ELECTRICIANS ONLY)
47
CHAPTER 4
l
S T E P - B Y- S T E P I N S TA L L AT I O N
(for elc trician s only)
48
INTRODUCTION
Read these installation instructions completely and carefully. They will save you time and
effort and help to ensure optimum performance. Be sure to observe all listed dangers
and warnings. Use only the screws, nuts, bolts, and washers included in the package.
AeroVironment recommends that your Charging Dock be installed by a licensed, qualified
electrician. To avoid serious injury or death, installation must be in accordance with the
manufacturer’s installation instructions and must comply with the provisions of the National
Electric Code (NEC) and all local codes. In cases of conflict between local codes and the
NEC, local codes shall take precedence.
WARNING
SHOCK CAN KILL!
l
Touching live electrical parts can cause fatal shocks or severe burns.
The input power circuitry and internal circuits are live whenever input power is on.
An incorrectly installed or improperly grounded unit is a hazard.
Read all instructions and cautionary markings on the Charging Dock assembly.
Warranty is void if the Charging Dock is wired improperly.
(for elc trician s only)
ELECTRICAL CAPACITY REQUIREMENTS
The Charging Dock requires either a 240 VAC split phase and neutral grounded or a
208 VAC 2 phases and neutral dedicated grounded circuit.
S T E P - B Y- S T E P I N S TA L L AT I O N
DANGER
CHAPTER 4
DANGER
SAFETY INSTRUCTIONS
49
CHAPTER 4
l
S T E P - B Y- S T E P I N S TA L L AT I O N
(for elc trician s only)
50
GROUNDING INSTRUCTIONS
This unit is to be connected to a grounded, metal, permanent wiring system; or an
equipment-grounding conductor is to be run with the power circuit conductors and
connected to an equipment grounding terminal or lead on Charging Dock ground strip.
Connections to the Charging Dock shall comply with all local codes and ordinances.
This is a single phase device. Do not connect all three phases of a three phase feed.
WARNING
WARNING
The installer/service technician must wear Personal Protection Equipment (PPE) that meets
current ANSI, ASTM, and OSHA safety standards. For this section, PPE is defined as:
CHAPTER 4
PERSONAL PROTECTION EQUIPMENT (PPE)
l
• Safety Shoes designed to:
»» Prevent an electrical path to earth ground in the event of accidental contact
with high voltages
»» Protect the feet from injury due to falling objects
(for elc trician s only)
During the installation procedure, the installer should also wear a hard hat for areas with low
overhead clearances or confined spaces and gloves for areas where potential for exposure
to unfinished lumber exists.
S T E P - B Y- S T E P I N S TA L L AT I O N
• Safety Glasses or Goggles to prevent eye injury
51
l
Note any missing parts and contact AV customer Support for assistance with obtaining
replacement parts.
S T E P - B Y- S T E P I N S TA L L AT I O N
CHAPTER 4
PACKAGE CONTENTS
(for elc trician s only)
52
Save all packaging materials in case of service or repair needs in the future. Please use
the screws, nuts, bolts, and washers that came in the package.
Check all the parts in the package to ensure that nothing appears to be broken,
damaged, or missing. Save the shipping cartons and packing materials in case the
Charging Dock or cable was damaged in shipping. File a claim with the freight carrier
and/or insurance company in the event of shipping damage.
NOTE
CHARGING DOCK
USER GUIDE
HARDWARE KIT
WITH SCREWS,
NUTS, BOLTS,
WASHERS
(for elc trician s only)
CABLE HANGER
S T E P - B Y- S T E P I N S TA L L AT I O N
OUTER
TRIM RING FOR
FRONT PANEL
l
Mounting plate assembly
M10 - 1.5 x 25mm socket head screw
22 mm flat washer
3/8” x 21/2” lag bolts
13/32” flat washers
Stainless steel cover screws
#8 x 21/2” painted head wood screws
CHAPTER 4
HARDWARE KIT CONTENTS:
1
2
2
2
2
9
2
53
CHAPTER 4
l
ENCLOSURE/HOUSING
S T E P - B Y- S T E P I N S TA L L AT I O N
FRONT PANEL/COVER
(for elc trician s only)
54
FRONT PANEL AND ENCLOSURE
1. OBTAIN PERMITS
For more information on temperature ranges, see the Specifications section on page 83.
In addition to local building codes and ordinances, certain neighborhood, community,
and homeowners’ associations have or are implementing Covenants, Conditions
and Restrictions (CC&Rs) which may affect or prohibit external device installations.
Review any CC&Rs to ensure compliance and avoid any potential conflicts.
Wall stud
(for elc trician s only)
A representative Charging Dock installation as shown on the right is connected to
the residential utility power distribution panel with a circuit breaker and a disconnect
switch (if required by local permitting authority). The Charging Dock is designed for
a permanently wired installation indoors in a garage or outdoors (in a carport or on a
pedestal). While the Charging Dock is designed to be weatherproof, the customer may
wish to consider adding personal protection from wet weather for his/her convenience.
Charging Dock
S T E P - B Y- S T E P I N S TA L L AT I O N
2. BUILDING CODES
Disconnect switch
(if applicable)
l
Obtain all required permits from your local permitting authority before installing the
Charging Dock.
Power
distribution
panel
CHAPTER 4
INSTALLING THE CHARGING DOCK
55
CHAPTER 4
WARNING
AV recommends that the Charging Dock not be installed in a location that exceeds the
operating temperature.
NOTE
l
Do not use the Charging Dock with a Class A circuit breaker.
S T E P - B Y- S T E P I N S TA L L AT I O N
(for elc trician s only)
56
Have the following tools ready to use:
Utility Tape
Electrician Screwdriver
Multimeter
Torpedo Level
Torque Screwdriver
Torque Wrench
Small Hammer
Ratchet Set
Duct Tape
Channel Lock Pliers
M8 Allen Head Adapter
Wire Stripping Pliers
1.25" Hole Saw
Cutting Pliers
3
#10 Torx Drive Screwdriver
/8" Electric Drill
(for elc trician s only)
Phillips Screwdriver
S T E P - B Y- S T E P I N S TA L L AT I O N
Measuring Tape
l
Standard Screwdriver
CHAPTER 4
3. PREPARE TOOLS REQUIRED FOR INSTALLATION
57
CHAPTER 4
l
S T E P - B Y- S T E P I N S TA L L AT I O N
(for elc trician s only)
58
4. CHOOSE LOCATION
Choose a location to install the Charging Dock. Find the vertical stud in a wood-frame
wall, suitable masonry wall, or optional post-mounting, to drill holes to attach the
mounting plate for the Charging Dock.
The Charging Dock is supplied with lag bolts for stud mounting. Suitable fasteners may be
needed for other mounting types.
NOTE
Only one service wiring entry point into the Charging Dock is permitted: from the rear
or the underside.
S T E P - B Y- S T E P I N S TA L L AT I O N
Identify the preferred wiring entry location in the Charging Dock and drill a hole at the
preferred location dimple for the wiring entry. Do not exceed the maximum limit on
conduit size.
l
The hole in the rear allows rear wiring entry and the hole on the underside allows for
lower wiring entry.
CHAPTER 4
5. DRILL HOLE FOR WIRE ENTRY (REAR OR UNDERSIDE)
(for elc trician s only)
59
CHAPTER 4
HOLE IN REAR OF
CHARGING DOCK
l
S T E P - B Y- S T E P I N S TA L L AT I O N
HOLE ON UNDERSIDE OF
CHARGING DOCK
(for elc trician s only)
60
Rear View
Bottom View
Mounting plate
Large hole for conduit utility wires
Small holes for
mounting plate
to wall stud
Charging Dock mounting holes
Hold the mounting plate up against the wall with the two
small holes over a wall stud as shown below. Ensure that
the mounting plate straight edges are plumb. Use the
mounting plate as a template to mark lag bolt locations.
48”
(for elc trician s only)
Example of wood frame construction installation:
Wall stud
S T E P - B Y- S T E P I N S TA L L AT I O N
7. USE MOUNTING PLATE AS A TEMPLATE AND
DRILL SCREW HOLES
l
Route wiring and/or conduit between the power distribution
panel and the Charging Dock as required. Do not install a
circuit breaker in the power distribution panel at this time.
This will be done later.
CHAPTER 4
6. ROUTE WIRING AND/OR CONDUIT
61
CHAPTER 4
l
S T E P - B Y- S T E P I N S TA L L AT I O N
(for elc trician s only)
62
8. INSTALL MOUNTING PLATE TO WALL AND TORQUE BOLTS
Drill pilot holes and mount the plate to the wall with the supplied lag bolts and flat
washers as shown below. Torque the lag bolts until the mounting plate is securely
fastened. Use appropriate anchors for masonry wall installation.
Flat washer
Wall stud
Lag bolt
l
Pull utility wires out of the wall (if rear hole of Charging Dock is
used for wire entry) and through the mounting plate.
CHAPTER 4
9. PULL WIRES OUT OF WALL AND PLATE
(REAR CHARGING DOCK ENTRY ONLY)
S T E P - B Y- S T E P I N S TA L L AT I O N
(for elc trician s only)
Utility wire
63
CHAPTER 4
l
S T E P - B Y- S T E P I N S TA L L AT I O N
(for elc trician s only)
64
10. PREPARE TO ATTACH CHARGING DOCK TO
MOUNTING PLATE
Prepare to attach the Charging Dock to the mounting
plate as follows:
Lay the enclosure on a flat surface for the time being.
ENCLOSURE/HOUSING
Remove the front panel from the enclosure.
FRONT PANEL/COVER
CHAPTER 4
11. HANG FRONT PANEL ON RIM OF CHARGING DOCK
Gently hook the front panel into the two slots on the lower
rim of the Charging Dock.
l
S T E P - B Y- S T E P I N S TA L L AT I O N
The front cover hangs safely
with the cable out of the way
for the next step.
(for elc trician s only)
Hook on back of cover
65
CHAPTER 4
l
S T E P - B Y- S T E P I N S TA L L AT I O N
(for elc trician s only)
66
12. UPPER MOUNTING HOLE
Attach the Charging Dock through the upper mounting hole as follows. Insert the
supplied socket head screw and flat washer through the upper hole in the back of the
Charging Dock into the upper hole of the mounting plate.
Upper mounting hole
Flat washer
Socket head screw
l
Insert the supplied socket head screw and flat washer through the lower hole in the back
of the Charging Dock into the lower mounting hole of the mounting plate. Tighten both
screws to 50 in-lb (5.65Nm).
CHAPTER 4
13. LOWER MOUNTING HOLE
S T E P - B Y- S T E P I N S TA L L AT I O N
(for elc trician s only)
Lower mounting hole
67
CHAPTER 4
l
S T E P - B Y- S T E P I N S TA L L AT I O N
(for elc trician s only)
68
14. CONNECT CONDUIT TO ENCLOSURE
Connect conduit and/or cord grip to enclosure using appropriate hardware.
15. TURN POWER OFF
Turn AC power OFF at the main distribution panel.
Turn the power OFF at the Charging Dock dedicated circuit breaker at the power distribution
panel to avoid electric shock. Observe all safety precautions.
DANGER
Connect utility wires and conduit to the internal connections and to the Charging Dock
enclosure as follows:
Phase Wire screws to 20 in-lb. (2.2 Nm).
2. Connect green Ground Utility wire to the Ground Strip. Torque the ground strip
screw to 20 in-lb. (2.2 Nm).
Upper Ground Terminal Strip
Note: 240VAC delta connection with “high-C” may be
used as long as ground to black (outside) input wire measures
120VAC.
Terminal Block
Line 1 black (outside wire)
Line 2 white (inside wire)
Service Ground Wire
Power Phase Wires
Line 1, EVSE Terminal Block
black wire (outside).
Line 2, EVSE Terminal Block
white wire (inside)
(for elc trician s only)
Lower Ground Terminal Strip
S T E P - B Y- S T E P I N S TA L L AT I O N
locations matching the labeled wires inside the Charging Dock. Torque the AC Power
l
1. Connect AC Power Phase wires Line 1 and Line 2 to the respective Terminal Block
CHAPTER 4
16. CONNECT UTILITY WIRES AND CONDUIT
69
CHAPTER 4
17. FINAL ASSEMBLY
1. Complete inspection
l
S T E P - B Y- S T E P I N S TA L L AT I O N
(for elc trician s only)
70
To avoid having to reopen the Charging Dock panel, it is recommended to have the electrical
inspector complete inspection of the Charging Dock wiring before closing the Charging
Dock and power distribution panel.
NOTE
2. Install the Charging Dock cover and torque all nine screws to 12 ±1 in-lb. (1.36 Nm).
Do not over or under torque screws. Use calibrated torque wrench.
WARNING
CHAPTER 4
l
NOTE
Verify that the wires from the front panel circuit board are routed to prevent pinching
between the housing and front panel during assembly.
Tighten front panel screws by hand within torque range. Do not use power screw
driving equipment.
S T E P - B Y- S T E P I N S TA L L AT I O N
WARNING
(for elc trician s only)
71
CHAPTER 4
Outer trim ring
goes here
l
S T E P - B Y- S T E P I N S TA L L AT I O N
(for elc trician s only)
72
Screw holes
nine (9) total
Outer trim ring
Front panel
3. Install the outer trim ring by snapping it into the groove in the Charging Dock front panel.
To remove the trim ring, insert a flat head screw driver into the opening at location as
shown on page 80.
The hanger is supplied with screws for a wall stud mounting. Suitable fasteners may be
required for other mounting types.
NOTE
Select and drill mounting holes through as required from the rear of the hanger.
S T E P - B Y- S T E P I N S TA L L AT I O N
WARNING
l
Using two painted head provided fasteners, attach the output cable hanger to the wall
stud, dry wall, masonry wall surface, or pedestal 12 inches (31 cm) below the Charging
Dock so that it is in line with the Charging Dock mounting location.
CHAPTER 4
18. MOUNT CABLE HANGER TO WALL STUD OR DRY WALL AND HANG CABLE
(for elc trician s only)
73
CHAPTER 4
CHARGING DOCK
l
S T E P - B Y- S T E P I N S TA L L AT I O N
(for elc trician s only)
74
CABLE HANGER
Mounting holes
NOTE
Use only an Emergency
Portable Cord Set that is
approved by the vehicle
manufacturer or you could
damage the charger in the
Front view
Back view
vehicle or the vehicle might
not charge.
Install a 40 amp circuit breaker in the power distribution panel.
DANGER
Turn the power ON at the Charging Dock dedicated circuit breaker at the power
distribution panel to avoid electric shock. Observe all safety precautions.
S T E P - B Y- S T E P I N S TA L L AT I O N
Turn the power ON at the circuit breaker and at the disconnect switch (if applicable).
l
20. TURN THE POWER ON
CHAPTER 4
19. INSTALL A 40 AMP CIRCUIT BREAKER
(for elc trician s only)
75
CHAPTER 4
Notice the POWER PRESENT and READY TO CHARGE lights are ON. VEHICLE
CONNECTED, VEHICLE CHARGING, and TROUBLE lights are OFF.
l
S T E P - B Y- S T E P I N S TA L L AT I O N
(for elc trician s only)
76
POWER PRESENT
READY TO CHARGE
VEHICLE CONNECTED
OFF
VEHICLE CHARGING
TROUBLE
Check to see that each light turns ON as follows:
1. Press and hold the START and STOP buttons at the same time for three seconds.
CHAPTER 4
21. SELF TEST*
l
3. The READY TO CHARGE light goes out.
4. The VEHICLE CONNECTED, VEHICLE CHARGING, and TROUBLE lights turn ON
and OFF one at a time going down. Then, they turn ON and OFF going back up. (They
NOTE
If all lights do not turn
Support for assistance.
5. When the test completes, the READY TO CHARGE light turns ON.
*Service Tool testing
It is highly recommended that AV Service Tool is used to test installation of Charging Dock. An authorized AV technician
will have access to the Service Tool.
(for elc trician s only)
ON, contact Customer
cascade going down then up).
S T E P - B Y- S T E P I N S TA L L AT I O N
2. The POWER PRESENT light stays ON.
77
CHAPTER 4
l
S T E P - B Y- S T E P I N S TA L L AT I O N
(for elc trician s only)
78
22. INSPECTION
Schedule an appointment with an electrical inspector for your local permitting authority.
23. RETURN WARRANTY INFORMATION CARD
Installation is complete. Return the enclosed Warranty Information Card.
(ELECTRICIAN ONLY)
CHAPTER 4
TO RE-OPEN THE CHARGING DOCK
l
DO this procedure AFTER the Charging dock was installed only if the inspector requires it.
DANGER
Turn the power OFF at the Charging Dock dedicated circuit breaker to avoid electric shock.
Observe all safety precautions.
S T E P - B Y- S T E P I N S TA L L AT I O N
WARNING
(for elc trician s only)
79
CHAPTER 4
1. Remove the Outer Trim Ring by pushing a flat blade screwdriver into the access slot at
the bottom tunnel of the enclosure. Gently remove the outer ring all the way around the
front panel.
l
2. Remove all nine (9) screws from the outer perimeter of the cover.
S T E P - B Y- S T E P I N S TA L L AT I O N
3. Pull the front panel off the enclosure.
4. Hang front panel as shown in the pictures on page 64.
5. Put the front panel back on the
Charging Dock after inspection is
complete as shown in the “Final
assembly” on page 70.
6. Replace outer trim ring.
(for elc trician s only)
Access hole
80
Outer ring
CHAPTER 4
l
S T E P - B Y- S T E P I N S TA L L AT I O N
(for elc trician s only)
81
CHAPTER 5
FOR YOUR RECORDS
SAE J1772 compliant
Car charging dock communication protocol
SAE J1772 compliant
Dimensions
12” H x 12” W x 8” D approximately
Voltage
208/240 Volt AC (VAC) single-phase
Current output power
30 Amp Maximum
Circuit breaker rating
40 Amp. Do NOT use a Class A circuit breaker with the EVSE-RS Charging Dock
Frequency
60Hz
Power draw on idle
Less than 5 watt-hours
Cable length
15 ft. (4.57 m)
Optional cable length
Up to 25 ft. (7.6 m)
Weight with 15 ft. cable
14.0 lbs (6.35 kg)
Weight with 25 ft. cable
17.5 lbs (7.94 kg)
Temperature-Operating
-22°F to +122°F (-30°C to +50°C)
Temperature-Storing & Transporting
-40°F to 140°F (-40°C to +60°C)
Humidity
Up to 90% non-condensing
Environmental rating
NEMA Type 3 enclosure, rain-tight with mounting plate
Regulatory compliance
UL, FCC part 15 subpart B
S P E C I F I C AT I O N S
EVSE-RS
Connector
l
Model
CHAPTER 5
SPECIFICATIONS
Specifications are subject to change without notice.
83
CHAPTER 5
HOME CHARGING DOCK MODEL EVSE-RS LIMITED WARRANTY
l
WARRANTY
The AeroVironment, Inc. (AV) Home Charging Dock Model EVSE-RS
(Charging Dock) is warranted to be free of defects in material and
workmanship for a period of thirty-six (36) months from the date of original
installation. In addition, if a Charging Dock is installed by AV or a certified
member of AV’s licensed independent electrical contractor installation
network, AV warrants that the original installation of the Charging Dock
shall be free of defects in workmanship for a period of thirty-six (36)
months from the date of installation.
or its AV-certified installation as applicable to a warranty claim; (b) AV’s
liability under this warranty shall be limited to the repair or replacement, at
AV’s option, of defective Charging Docks, defective component parts or
defective installation workmanship, together with any service call required
to make repairs or replacements covered by this warranty; and (c) AV
will not be liable for repair, replacement or service call costs for Charging
Docks or installation workmanship not covered by this warranty, which
shall be the responsibility of the purchaser.
THIS IS THE SOLE AND EXCLUSIVE WARRANTY GIVEN BY AV WITH
RESPECT TO THE CHARGING DOCK AND INSTALLATION THEREOF.
AV UNDERTAKES NO RESPONSIBILITY FOR THE QUALITY OF THE
CHARGING DOCK AND INSTALLATION SERVICES EXCEPT AS
OTHERWISE PROVIDED IN THE PURCHASE CONTRACT AND THIS
WARRANTY. OTHER THAN EXPRESS AND/OR IMPLIED WARRANTIES
REQUIRED BY APPLICABLE LAWS OR WHICH ARE REQUIRED TO
EXTEND FOR A LONGER PERIOD, THERE ARE NO WARRANTIES THAT
EXTEND BEYOND THIS LIMITED WARRANTY AND ANY REQUIRED
WARRANTIES ARE LIMITED IN DURATION TO THE WARRANTY
PERIOD.
This warranty shall be voided by damage or excessive wear to the
Charging Dock caused by abnormal operating or environmental
conditions (including exposure to acid, chemical fumes, metallic dust or
extreme temperatures), accident, abuse, damage, misuse, vandalism,
unauthorized alteration or repair, utility surges, or if the Charging Dock
was not operated, serviced or maintained in strict compliance with the
Home Charging Dock Model EVSE-RS User’s Manual and other printed
instructions provided by AV. No installation services warranty applies if
the Charging Dock is not installed by AV or a certified member of AV’s
licensed independent electrical contractor installation network. Any
evidence of an attempt to disassemble or reverse engineer the Charging
Dock will void this warranty.
To the extent permitted by applicable laws: (a) AV’s total warranty expense
with respect to any Charging Dock and/or its installation is limited to
a maximum of the original purchase price of that Charging Dock and/
84
A
auto-restart 29
D
damaged parts 52
document number ii
E
electric shock 11, 12, 68, 75, 79
emergency portable cord set 35,
36, 39
enclosure 11, 54, 64, 68, 69, 80, 83
environmental rating 83
G
GFCI 11, 29, 36
ground fault circuit 11, 36
P
pilot wires 12
power outage recovery 30
power phase wires 69
power present 16, 18
PPE 51
proposition 9
H
high voltage 6, 36, 51
hook 65
O
owner’s record ii
I
installation 47, 55
insulated 11
R
regulatory compliance 83
re-open the Charging Dock 79
repair 12, 13, 34, 52
L
latch release 17, 19, 20, 24, 27
S
SAE J1772 compliant 3, 83
self test 77
serial number ii
single-phase 83
specifications 83
start (resume) 17, 22, 31
M
missing parts 4, 52
model ii, 83
stop (pause) 17, 22
stop a charging cycle 22
storage 17
storage dock 17
T
temperature 40, 55, 56, 83
template 61
tools 57
trouble 11, 13, 16, 29, 40-45
trouble light 11, 13, 16, 29, 40-45
troubleshooting 33
INDEX
C
cable 3, 7, 8, 11, 12, 17, 28, 38, 45, 52,
53, 65, 73, 83
cable hanger 3, 17, 28, 53, 73, 74
CC&Rs 55
children 8, 28
cleaning 6, 20
connector 7, 11, 12, 17, 19, 20, 24,
27, 38,
customer support ii
N
NEMA 83
l
B
broken part 52
F
features 3, 17
front panel 16, 17, 18, 54, 64, 65, 71,
72, 80
front panel / cover 54, 64
CHAPTER 5
INDEX
U
utility wires 61, 63, 69
V
vehicle charging 3, 16, 21, 23, 26, 30,
31, 39
ventilation 13
W
warranty 13, 34, 49, 78, 84
warranty information card 78
85
CORPORATE HEADQUARTERS
AeroVironment, Inc.
EV Solutions™
181 W. Huntington Drive, Suite 202
Monrovia, CA 91016
Corporate phone: 626-357-9983
or 888-833-2148
[email protected]
www.avinc.com/evsolutions
PN 17315-03 Rev A