1
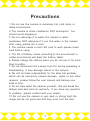
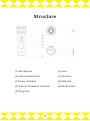
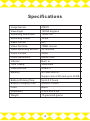
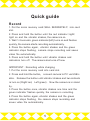
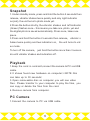
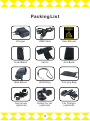
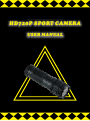
HD720P SPORT CAMERA
USER MANUAL
Content
Precautions……………………………… 1
Structure …………………………………2
Features ………………………………… 3
Specifications…………………………… 4
Quick Guide………………………………5
Trouble Shooting…………………………8
Packing List………………………………9
Precautions
1.Do not use the camera in extremely hot,cold,dusty or
damp environment.
2.The camera is shock resistance,NOT shockproof. You
should avoid dropping it
3.Do not submerge it in water.the camera is water
resistance,NOT waterproof.if you find water in the camera
after using,please dry it soon.
4.The camera needs a micro SD card to work,please insert
card before using.
5.The life of battery varies according to the environment,a
colder environment will drain the battery faster.
6.Please charge the camera when you do not use it for more
than 3 months.
7.Do not disconnect the camera from PC during uploading or
downloading, it may damage videos or the camera.
8.We will not take responsibility for the data lost problem,
which can be caused by camera damage, repair or any other
reasons, please follow the user manual and backup your
data in time.
9.Do not take apart the camera yourself, this will break the
tamper seal and void our warranty. If you have any question
or problem, please contact with your dealer.
10.Do not use the camera in very dark or strong light,the
image will be not good and that may even hurt the lens.
1
Structure
(1) Microphone
(6) Lens
(2) Record/stop button
(7) Card slot
(3)Power indicator
(8) USB jack
(4) Record/Snapshot indicator
(9) Reset button
(5) Ring hole
2
Features
1.Professional hands-free 2 Mega Pixels HD Sport Camera.
2.Alloyed appearance, can even work in high temperature.
3.Fashion cool pattern design mini camera, skid-proof,water
resistance,shock resistance.
4.Video/Photo mode are optional
5.Vibrator built-in
6.Data stamp can be set up.
7.The simplest mini sport camera, only one button, plug and
play.
8.Easy to install on helmet, bike and shotgun.
9.Suitable for biking, skiing, skating, boating, and hunting.
3
Specifications
Image Sensor
CMOS
View Angle
120/60 degrees
Recording Resolution
1280X720
Recording Frame
30 fps
Video Format
AVI
Video File Size
75MB/minute
Video Recording Section
20 minutes
Photo Format
JPEG
Photo Resolution
2560X1440
Vibrator
Built-in
Time Stamp
Selectable
USB Interface
USB 2.0
Memory
No flash built-in.
Battery Working Time
Up to 2.5 hours
Support micro SD card up to 32GB
Battery Charging Time
Around 3 hours
Color
Black
Dimension
9.5X2.8X2.8 cm
Weight
70 grams/64 grams
4
Quick guide
Record
1.Put the micro memory card(SELL SEPARATELY) into card
slot.
2.Press and hold the button until the red indicator(right)
light on and the vibrator shakes, the camera is on.
3.Wait 1-2 seconds, green indicator(left) turns on and flashes
quickly, the camera starts recording automatically.
4.Press the button again, vibrator shakes and the green
indicator stops flashing, camera stops recording and saves
video file automatically.
5.Press and hold the button until vibrator shakes and
indicators turn off. The camera also turns off now.
IMPORTANT: Recording while charging
1.Put the micro memory card into card slot.
2.Press and hold the button, connect camera to PC via USB c
able. Release the button until vibrator shakes and two indicato
rs turn on (Right:red, Left:green). Now the camera is in stand
by.
3.Press the button once,vibrator shakes one time and the
green indicator flashes quickly,the camera is recording.
4.Press the button again,vibrator shakes and the green
indicator stops flashing, the camera stops recording and
saves video file automatically.
5
Snapshot
1.Under standby mode, press and hold the button 2 seconds then
release, vibrator shakes twice quickly and only right indicator
on(red), the unit turns to photo mode yet.
2.Press the button shortly, the vibrator shakes and left indicator
(Green) flashes once – this means you take one photo yet and
the digital photo is saved automatically. Press once, takes one
piece.
3.Press and hold the button 2 seconds then release, vibrator s
hakes twice quickly and two indicators on, the unit turns to vid
eo mode.
To turn off the camera, just hold the button more than 3 sencon
ds until vibrator shakes and indicators off.
Playback
1.Keep the card in card solt,connect the camera to PC via USB
cable.
2.It shows found new hardware on computer(*NOTE:this
can take up to 30 seconds)
3.Open removeable disc on computer,you will see video
files. Please transfer to your computer to play the files, you
can copy or delete the files from the card.
4.Remove camera from computer.
PC Camera
1.Connect the camera to PC via USB cable.
6
2.Press the button shortly,the driver will be installed
automatically generally,you will find new hardware on computer.
Find the PC camera icon and use it.
3.Remove camera from computer.
Charging
1.Connect the Camera to your PC / Laptop or USB Charger by
USB cable provided.
2.Once connected ,the right indicator on Camera will turn red
and flash, the unit is now charging.
3.After approximately two hours, the Red LED may stop flashing
and remain on – keep charging one hour more to ensure the
battery is completely re-charged.
4.Remove it from your PC / Laptop or charger.
Set Date/Time
1.Create a new “.txt” file, name it as “time.txt” .
2.Put the correct date and time into the file according below
format. l.e.
2014-01-02 04:05:00 Y (or N)
TIPS:
2014 is the year, 01 is the month, 02 is the day
04 is the hour, 05 is the minute, 00 is the second
Y = with Date/Time watermark
N = without Date/Time watermark
3. Save file, and copy it into micro SD card.
4. Remove camera from computer, restart then record, the date
and time are set up successfully.
7
Trouble Shooting
Q1:It does not work, what shall I do?
A1: Check if you insert card yet.
Try to change another card or reset it.
Charge the camera,try again.
Q2: It is not able to charge,what should I do?
A2: Try to change another USB cable or AC adapter.
Try to reset it.
Q3: No file in card after recording, what should I do?
A3: Format or change the card ,try to record again
according to the user manual step by step.
Q4: Why the video is not clear enough?
A4 : Check if the lens clean enough and ensure that do not
shake strongly while recording.
Q5:The video and audio is out of step when play on PC,
why?
A5:Try to play videos by other player, such as VLC Media
Player, Storm Player. Copy the videos to computer and play
again.
8
Packing List
HD720P SPORT CAMERA
USER MANUAL
Charger
USB Cable
User Manual
Head Band
Velcro
Arm Band
Bike Mount
Wrist Ring
Carrying Bag
Gun mount
(optional)
Holder for car
(optional)
Car Charger
(optional)
9
HD720P SPORT CAMERA
USER MANUAL