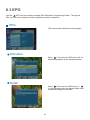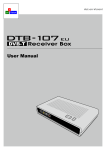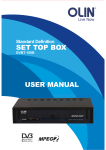
1
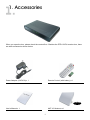
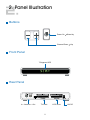
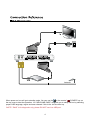
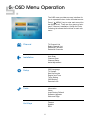
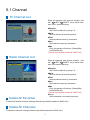
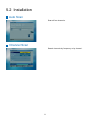
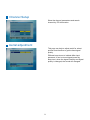
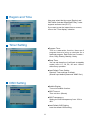
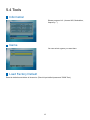
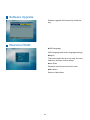
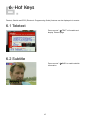
DVB-T Receiver Box
User Manual
DVB-T Receiver Box
User Manual
Index
1.
2.
3.
4.
5.
Accessories
Panel Illustration
Cable Connection
Remote Control
OSD Menu Operation
5.1
5.2
5.3
5.4
Channel
Installation
Setup
Tools
6. Hot Keys
1
2
3
5
6
7
8
10
13
15
1. Accessories
When you open the box, please check the content first. Besides the DTB-131EU receiver box, there
are other accessories shown below.
Power Adapter (12VDC/A) x 1
Remote Control (with battery) x 1
Option
User’s Manual x 1
ANT-101 Antenna x 1
2. Panel Illustration
Buttons
Power On
Stand by
Channel Down
Up
Front Panel
7-Segment LED
Rear Panel
In – Antenna – Out
TV Scart
VCR Scart
12V DC
3. Cable Connection
This receiver box provides TV and VCR SCART with CVBS and RGB video output for TV and VCR.
There is one ANT IN to receive RF signal from the air and forward it to ANT OUT for VCR or TV RF
input.
Following procedure describe cable connection on the rear cover of the receiver:
1. Connect the antenna output to "ANT IN".
2. You can use the "ANT OUT" connector to provide analog RF signal to TV, VCR and digital RF
signal to another DVB-T receiver box. (Refer to figure "TV&VCR Connection" below.)
3. Connect the "TV SCART" connector of the receiver box and TV scart input via SCART cable.
4. Connect the "VCR SCART" connector of the receiver box and VCR scart input via SCART cable.
(Refer to figure “TV&VCR Connection” below.)
5. Plug the power adapter to the “12V DC IN” jack.
Antenna
Antenna
When power on, box will go to standby mode. You can use the
or the remote "
POWER" key on
the top cover to start the operation. An "WELCOME PAGE" will guide you to setup the box by selecting
proper OSD language, region and scan channel if this is the 1st time boot up.
*NOTE: “DIAG” is for diagnostic only, please DO NOT use it as USB port.
4. Remote Control
POWER
Power On or Stand by
TV/RADIO
Select TV or Radio programs
FAV
Display Favorite Group
LIST
Display Channel List
MENU
EPG
Turn on OSD main menu or exit current menu
Display EPG table
Move highlight to up or channel up
Move highlight to down or channel down
Move highlight to left or turn down volume
Move highlight to right or turn up volume
Confirm or Enter
INFO
AUDIO
Show program information
Toggle audio language options
Page down
Page up
VOL
CH
Adjust volume
Change channel
RECALL
Jump to previous viewing channel
MUTE
Toggle volume on/off
0~9
SUB
TEXT
M/P
PAUSE
ZOOM
Show program subtitle
Show Teletext page
Enter multi-picture mode
Stop video to current picture
Magnify certain area of the video
5. OSD Menu Operation
The OSD menu provides an easy interface for
you to operate the box via the included remote.
Press [
MENU ] key to enter main menu like
the figure at left. There are four groups of submenu: Channel, Installation, Setup and Tools.
Following list shows the functions in each submenu.
Channel
TV Channel List
Radio Channel List
Delete All Favorites
Delete All Channels
Installation
Auto Scan
Channel Scan
Channel Setup
Aerial Adjustment
Setup
OSD Language
TV System
Start up Service
Region and Time
Timer Setting
OSD Setting
Parental Lock
Tools
Information
Game
Load Factory Default
Software Upgrade
Welcome Page
Hot Keys
Teletext
Subtitle
EPG
5.1 Channel
TV Channel List
Show all channels with preview window. Use
the "
LEFT/
RIGHT" key to show channels in the same frequency.
■Favorite
Set Favorite channel to group 1~8.
■Move
Move a channel to another position.
■Find
Search channel name by characters.
■Sort
Sort channel names by characters.
■Edit
Entry into advance functions. (Delete/Skip/
Lock/Edit/Del All)
(*Should input default password "0000" first.)
Radio Channel List
Show all channels with preview window. Use
the "
LEFT/
RIGHT" key to show channels in the same frequency.
■Favorite
Set Favorite channel to group 1~8.
■Move
Move a channel to another position.
■Find
Search channel name by characters.
■Sort
Sort channel names by characters.
■Edit
Entry into advance functions. (Delete/Skip/
Lock/Edit/Del All)
(*Should input default password "0000" first.)
■Group
Show channels in the same frequency.
Delete All Favorites
To delete all favorite channels settings.(Should input default password "0000" first.)
Delete All Channels
To delete all channels settings.(Should input default password "0000" first.)
5.2 Installation
Auto Scan
Scan all free channels.
Channel Scan
Search channels by frequency or by channel.
Channel Setup
Show the channel parameters and search
channel by PID information.
Aerial adjustment
This page can help to adjust aerial for a best
position and direction to get the best signal
quality.
Different beep tones to indicate After input
password, it can be tuned signal power by
beep tone; when the signal intensity and signal
quality is changed, the sound will changed.
5.3 Setup
OSD Language
OSD Language and preferred Audio Language
settings.
TV System
■Display Mode
To select output TV video format (NTSC,
PAL).
■Aspect Ratio
To switch video aspect ration among 4:3LB,
4:3PS, and 16:9.
■Video Output
Select Video output format.
■LCN Mode
If LCN function is supported at your area, you
can turn on this selection.
■Audio Mode
Select stereo, Left, Right, Mono.
Start up Service
Set your booting source (radio/TV) and starting
channel.
10
Region and Time
User may select the time zone (Region) and
GMT Mode (Include Offset/Date/Time), it also
supports summer time (D.S.T.).
If you want to see the instant time on screen,
turn on the "Time display" selection.
Timer Setting
■Program Timer
This is a reservation function; there are 8
program timers to bring up reminder for a
reserved program. Each timer has 5 modes –
Once, Daily, Weekly, Monthly, Yearly.
■Sleep Timer
You can set sleep time (it will back to standby
mode) after 10, 30, 60, 90 and 120min
without any operation.
■Load Default Timer Setting
Reset all Timer settings to default.
(Should input default password "0000" first.)
OSD Setting
■Subtitle Display
Turn on/off subtitle function.
■OSD Time out
Time out time. (Minute)
■OSD Transparency Setting the OSD transparency from 10% to
40%.
■Load Default OSD Setting
Load the default OSD setting.
11
Parental Lock
You can lock Menu/Channel and set the new
password here.
12
5.4 Tools
Information
Shows program info. (channel NO, Modulation,
frequency…)
Game
You can select a game you want here.
Load Factory Default
Reset to defaults and delete all channels. (Should input default password "0000" first.)
13
Software Upgrade
Software upgrade will be done by technician
only.
Welcome PAGE
■OSD Language
OSD Language and Audio Language settings.
■Region
This should select the area you stay, the scan
frequency will base on this setting.
■Auto Scan
Delete all channels and do the full scan.
■Main Menu
Return to Main Menu.
14
6. Hot Keys
Teletext, Subtitle and EPG (Electronic Programming Guide) features can be displayed via remote.
6.1 Teletext
Press remote "
TEXT" will enable and
display Teletext page.
6.2 Subtitle
Press remote "
information.
15
SUB" to enable subtitle
6.3 EPG
Use the "
EPG" key from remote to display EPG (Electronic Programming Guide). Through the
EPG, you can know present and future programs and their introduction.
EPG
This menu shows present and next program.
Schedule
Press "
1" from previous EPG menu will list
scheduled programs of the selected channel.
Detail
Press "
2" from previous EPG menu or "
1" from Schedule menu will display Detail menu
that shows program introduction.
16
Memo
TEL: 886-3-666-1586 FAX: 886-3-666-1585
2F, No. 58, Park 2nd Ave., Science-Based Industrial Park,
Hsinchu, 300 Taiwan, R.O.C.
www.aonvision.com
[email protected]