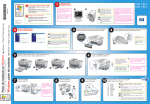
1
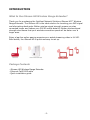
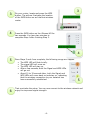
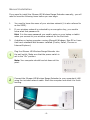
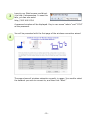
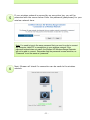
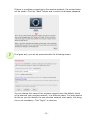
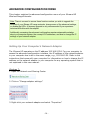
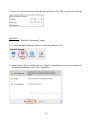
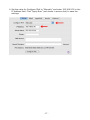
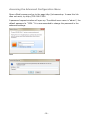
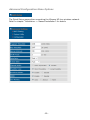
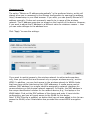
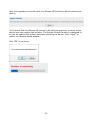
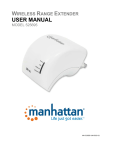
ISTREAM HD Wireless Range Extender USER MANUAL MODEL 525657 INT-525657-UM-0614-01 TABLE OF CONTENTS INTRODUCTION .........................................................................................3 What Is the iStream HD Wireless Range Extender?........................................ 3 Package Contents ..................................................................................... 3 HARDWARE OVERVIEW ............................................................................. 4 Device Status LEDs ................................................................................... 5 RJ45 Network Port .................................................................................... 6 WPS Push-Button ..................................................................................... 6 Power On / Off Switch ............................................................................... 6 Power Outlet Connector ............................................................................. 6 INSTALLATION ..........................................................................................7 Installation Using WPS .............................................................................. 7 Manual Installation ................................................................................... 9 ADVANCED CONFIGURATION MENU......................................................... 14 Setting Up Your Computer’s Network Adapter ............................................. 14 Accessing the Advanced Configuration Menu .............................................. 18 Advanced Configuration Menu Options ....................................................... 20 TROUBLESHOOTING ................................................................................ 27 SPECIFICATIONS .....................................................................................29 SAFETY AND REGULATORY NOTICES........................................................ 30 WARRANTY INFORMATION ...................................................................... 31 -2- INTRODUCTION What Is the iStream HD Wireless Range Extender? Thank you for purchasing the Intellinet Network Solutions iStream HD™ Wireless Range Extender. The iStream HD is the ideal solution for boosting your WiFi signal and eliminating dead spots. Better wireless signal strength means you stay connected longer and reduce your 3G/4G mobile data bill. Better wireless signal strength also means that your wireless connection speed will be faster over a larger area. Enjoy a lag-free online gaming experience or watch streaming video in full HD. Even better, the iStream HD is quick and easy to set up. Package Contents - iStream HD Wireless Range Extender - Ethernet Cat5 RJ45 cable - Quick installation guide -3- HARDWARE OVERVIEW -4- Device Status LEDs The iStream range extender allows disabling the LEDs completely via the configuration interface. See “Advanced Configuration Menu Options” for details. So, if the LEDs do not light up there is no need to panic; it may be because they have been disabled. Signal: This LED indicates the status of the current wireless connection. Steady on: Good signal reception (better than 50%). Flashing slowly: Low signal reception. The quality of the wireless signal is so low that the connection is subject to slowdowns and lag. If you want to stream media or play online games, then this represents a problem. Flashing quickly: Poor signal reception. The signal quality is too low. The iStream range extender cannot properly communicate with your wireless network. If there is any communication at all, it will be intermittent at best. Off: The iStream isn’t connected to any wireless network. WLAN: When this LED flashes, it means that the wireless radio of the iStream range extender is operating normally. The LED will flash, regardless of whether or not the iStream range extender is connected to a network. Power: The Power LED is on during normal operation. When you perform a hardware reset, the Power LED starts flashing briefly. WPS: If this LED is lit, it means that the iStream range extender is connected to a wireless network via WPS (Wi-Fi Protected Setup. Read more on this below). LAN: This LED must light up when the iStream range extender is connected to the network port of a Web-ready TV, Blu-ray player or gaming console. -5- RJ45 Network Port The iStream range extender is equipped with a high-speed network port, to which you can connect your computer for the initial setup, in case your wireless router does not support WPS - for example Verizon FIOS® wireless routers. You can use the included network cable for that purpose, but it is no problem to use any standard Ethernet network cable that meets or exceeds the Cat5 specification. If you are not sure about this, don’t worry. Any standard network cable purchased from various retailers or online shops will work just fine. WPS Push-Button Wi-Fi Protected Setup (WPS) is a computing standard that attempts to allow easy establishment of secure wireless home-network connections. Created by the Wi-Fi Alliance and introduced in 2007, the goal of the protocol is to allow home users who know little of wireless security and may be intimidated by the available security options to set up the encryption method WPA2, as well as making it easy to add new devices to an existing network without entering long passphrases. So, what does this all mean for you? If your wireless router is a newer device, there is a good chance that it is equipped with a WPS push-button, in which case you are in luck, because adding the iStream range extender to your network will just be a matter of a couple of minutes. If the router is a little bit older and does not support WPS, it will take a little bit longer. Power On / Off Switch When it’s not in use, you can power down the iStream range extender to save energy. Since the connection to your wireless network is re-established in less than a minute after startup, there are no downsides to powering down the iStream range extender when it is not in use. Power Outlet Connector The iStream range extender plugs directly into a power wall outlet. It supports 110V 60 Hz for U.S. and 230V 50 Hz for European power outlets. The plug type will vary, depending on your location. The illustration below depicts the U.S. version of the iStream adapter. -6- INSTALLATION The iStream HD Wireless Range Extender can be installed in one of two ways. The first way involves the aforementioned WPS, while the second (we call it the manual method) uses a more traditional setup process. Both ways lead to the same result, and it is only a matter of convenience as to why you would use WPS over the manual method, provided your router supports WPS. Installation Using WPS If your wireless router is equipped with a WPS button (sometimes referred to as N-connect), then you can connect the iStream HD to your network literally just by pushing two buttons. 1 2 Plug the iStream range extender into the wall outlet. The position of the wall outlet must be chosen carefully: Make sure that it's close enough to your wireless router that the wireless signal is still relatively strong. If you move too far away from the wireless router and the wireless signal is already quite weak in that location, you will not be able to achieve good results. Use a wireless device and check the signal strength in the location where you plan to install the iStream HD. If the signal strength is below 50%, you should move closer to the wireless router. 1 2 Set the power switch to the “On” position, and wait for about one minute. -7- 3 4 On your router, locate and press the WPS button. The picture illustrates the location of the WPS button on an Intellinet wireless router. 3 Press the WPS button on the iStream HD for two seconds. You have two minutes to complete Step 4 after finishing Step 3. 4 5 6 Steps 3 and 4 are complete, the following things will happen. The WPS LED will flash briefly. The signal LED will come on. The WPS LED will stay on. After a few seconds, both the Signal and WPS LEDs will go out. About 10 to 15 seconds later, both the Signal and WPS LEDs will come back on and stay on, indicating that the wireless connection to your network has been successfully established. Once 5 That concludes the setup. You can now connect to the wireless network and enjoy the improved signal strength. -8- Manual Installation If you need to install the iStream HD Wireless Range Extender manually, you will need to have the following items before you can begin. 1. You need to know the name of your wireless network (it is also referred to as the SSID). 2. If your wireless network is protected by an encryption key, you need to know what that password is. Hint: It is the same password you need to enter on your laptop or tablet when you connect to your wireless network for the first time. 3. A desktop or laptop computer running Microsoft Windows, Mac OS or Linux that has a standard Web browser installed (Firefox, Safari, Chrome or Internet Explorer). 1 Plug the iStream HD Wireless Range Extender into the wall outlet. Make sure that the power switch is set to the “On” position. Note: Your computer should be shut down at this point. 2 Connect the iStream HD Wireless Range Extender to your computer’s LAN using the included network cable. Start the computer and allow it to finish booting. -9- 3 Launch your Web browser and direct it to http://istreamsetup. In case this fails, you can also enter http://192.168.2.254. A password window will be displayed. Key in user name “admin” and “1234” as the password. You will be presented with the first page of the wireless connection wizard. 4 The page shows all wireless networks currently in range. You need to select the network you wish to connect to, and then click “Next.” - 10 - 5 If your wireless network is secured by an encryption key, you will be presented with the screen below. Enter the password (passphrase) for your wireless network here. Note: You need to type in the same password that you need in order to connect any computer, tablet PC or smartphone to your wireless network. If the password entered does not match, the iStream HD Wireless Range Extender will not be able to connect. Remember that the password is case-sensitive, so “Password” is not the same as “password.” 6 Next, iStream will check if a connection can be made to the wireless network. - 11 - If there is a problem connecting to the wireless network, the screen below will be shown. Click the “Back” button and re-enter the wireless password. 7 If all goes well, you will be presented with the following screen: You can change the name of the wireless network from the default, which is the same as your wireless network, to a different name. You may want to do this so you can identify the new wireless network more easily, but doing this is not mandatory. Click “Apply” to continue. - 12 - 8 9 The iStream HD will now restart with the new settings. Once completed, the Signal LED will light up, indicating an active wireless connection. This concludes the manual setup procedure. You can now remove the network cable from your computer’s LAN port and the iStream HD, and connect to the new wireless network. - 13 - ADVANCED CONFIGURATION MENU This chapter explains the advanced configuration menu of your iStream HD Wireless Range Extender. Note: There is no need to access these functions unless you wish to upgrade the firmware of your iStream HD range extender, change some of the advanced settings, or disable the LEDs. A firmware upgrade is only recommended if you experience technical difficulties with the adapter. Additionally, accessing the advanced configuration requires advanced knowledge about your computer system, the concept of IP addresses, and how to change the IP settings of your network adapter. Setting Up Your Computer’s Network Adapter The iStream HD operates on the IP address 192.168.2.254. For your computer to access the advanced configuration interface, the IP address of the network adapter in your computer has to be in the same range; e.g., 192.168.2.50. Refer to the instructions that came with your computer for information on how to change the IP address on the network adapter in your computer for any operating system that is not explained in this user manual. Windows 7: 1. Open the Network and Sharing Center. 2. Click on “Change adapter settings.” 3. Right-click your network adapter and select “Properties.” - 14 - 4. Select “Internet Protocol Version 4” from the list and click “Properties.” 5. Enter the information as shown below, and then click “OK” to save the settings. Windows XP: 1. Double-click the “Network Connections” icon in the control panel. 2. Right-click the connection (e.g., Local Area Connection) and select “Properties.” 3. Select “Internet Protocol (TCP/IP)” from the list and click “Properties.” - 15 - 4. Enter the information as shown below, and then click “OK” to save the settings. Mac OS X: 1. Open the “System Preferences” page. 2. In the Internet & Network section, click the Network icon. 3. Select either “Built-in Ethernet” or “Airport,” depending on how you connect to the iStream adapter, then click “Configure… .” - 16 - 4. Set the value for Configure IPv4 to “Manually” and enter 192.168.2.50 in the IP Address field. Click “Apply Now” (not shown in screen shot) to save the settings. - 17 - Accessing the Advanced Configuration Menu Open a Web browser and go to the page http://istreamsetup. In case this link does not work, try http://192.168.2.254. A password request window will open up. The default user name is “admin”; the default password is “1234.” It is recommended to change the password in the advanced settings. MSIE Firefox - 18 - Next, you’ll be looking at the main screen of the iStream HD interface. This page provides information about the operational status of the device. It shows to which wireless network the iStream HD Wireless Range Extender is currently connected, which firmware or runtime code is installed and other information. The page also allows you to check to see if a new firmware version is available for your iStream HD Wireless Range Extender. Simply click on the “check for new version” link to do that. Note that your computer must be connected to the Internet for this function to work properly. - 19 - Advanced Configuration Menu Options The Quick Setup pages allow connecting the iStream HD to a wireless network. Refer to chapter “Installation -> Manual Installation” for details. - 20 - Item Fragment Threshold RTS Threshold Beacon Interval DTIM Period Data / N Data Rate Channel Width Preamble Type Broadcast ESSID WMM CTS Protect Description The fragmentation threshold is used to set the maximum size of a packet that a client will send. The smaller the maximum size, the better the reliability of the wireless connection — but the performance is likely to decrease. Leave this value as 2346 unless you have a very poor wireless signal. Lowering the value can help improve the connection in such cases. In case you experience poor wireless performance, you can try using values between 1200 and 500, and below 500 in severe cases. The default value is 2347, and that should normally not be modified. A beacon is a packet broadcast by the router to synchronize the wireless network. 50 is recommended in areas with poor reception. According to the 802.11 standards, a Delivery Traffic Indication Message (DTIM) period value is a number that determines how often a beacon frame includes a Delivery Traffic Indication Message. The higher the DTIM period, the longer a client device may sleep and, therefore, the more power that particular client device may potentially save. Higher values may save battery life of connected WLAN devices, but they reduce the performance of the WLAN connection. If you want to force your WLAN devices to connect only at a certain speed, then you can set the data rate here; otherwise, you should leave this as “Auto.” Select the wireless channel width. 40 MHz provides better network speed for 802.11n wireless clients. “Auto 20/40 MHz” is the recommended value. Select “Long Preamble” if you need to support old wireless devices (think late 1990s or early 2000s), but if your network consists of wireless G and wireless N devices, you can go with “Short Preamble” to improve the wireless performance. If you disable this option, the iStream HD will no longer broadcast the name of the wireless network, and any station that wishes to connect to it must enter the network name manually since it is no longer shown. Disabling the broadcast is a weak security measure that can easily be circumvented, so if you think that you do not need to set up proper WPA2 encryption because you hide the ESSID, think again – you are doing it wrong. Enable or disable Wireless Multi-Media. When enabled, this device will give priority to multimedia-related network applications so they will have better performance. It is recommended to leave this option enabled. In busy WLAN networks with many stations communicating at the same time, CTS Protect should be set to “Auto.” In networks that are extremely busy, you can even activate “Always.” In a typical home network, however, with only a handful of WLAN devices, you can set this to “None” to gain a little better WLAN performance. - 21 - If you want to deactivate the LEDs of the iStream HD, you can do so here. You have the choice of either turning off all LEDs or all but the Power LED. Password settings: The default administrator password is 1234. To prevent someone from overwriting your settings, you can — and should — enter a new password here. Current Password: Enter the current password (default = 1234) here. New Password: Type in the new password. Re-Enter Password: Type in the new password again. - 22 - Management IP: The option “Obtain an IP address automatically” is the preferred choice, as this will always allow you to reconnect to the iStream configuration by opening the address http://istreamsetup in your Web browser. If you wish, you can specify iStream’s IP address manually: It does not necessarily need to be in range of the wireless network. The IP address range has no impact on the function of the device. However, if you want to adjust the IP address to a different value for whatever reason — then you can make changes to the address here. Click “Apply” to save the settings. If you want to restrict access to the wireless network to authorized computers, only, then you should first and foremost rely on proper wireless security, such as WPA2. In addition, you can limit access to the wireless network to WLAN clients that have been white-listed using their MAC addresses. A media access control address (MAC address) is a unique identifier assigned to network interfaces for communications on the physical network segment. In English, the MAC address is the unique identification number for the network device; e.g., the laptop or the WLAN tablet. Find out the MAC address of the device and enter it here into the configuration, and you will grant access to the WLAN for this device. Note: If MAC filtering is enabled, no station that has not been added to this list can access the WLAN, even if that station has provided the correct WPA2 encryption key. - 23 - The Restore to Factory Default function should be used if you wish to overwrite the entire configuration with the original factory default values. Click the “Reset” button to start the process and confirm your decision by clicking “OK” when you see this dialog: From time to time there may be new firmware available for the iStream HD. In order to install new firmware, proceed as follows: 1. Click “Browse…” to locate the firmware (.BIN file). 2. Click “Apply.” 3. Confirm the message “Do you wish to begin the firmware upgrade?” 4. Confirm the second message shown below: 5. The upgrade will begin now. During the process the iStream HD will display several messages for you. - 24 - After the upgrade you should reset the iStream HD to factory default values (see above). In the event that the iStream HD seems to be performing poorly, a reboot of the device may help resolve the problem. The System Restart function is designed to let you do exactly that without physically touching the device. Click “Apply” to restart the iStream media adapter. Click “OK” to continue. - 25 - FACTORY RESET The iStream HD Wireless Range Extender can be reset to the original factory default settings two ways. Option 1: Factory reset via advanced configuration menu. See chapter “Advanced Configuration Menu Options” for details. Option 2: Hardware reset The iStream HD Wireless Range Extender must be powered on. Push the WPS button for 15 seconds, then release it. The iStream HD will reboot and will have reverted to the original factory default settings. Factory default values: IP address: 192.168.2.254 Administrator user name: admin Administrator password: 1234 Wireless: disconnected - 26 - TROUBLESHOOTING Symptom How to address The Power LED is not lit. Make sure that the power switch on the iStream HD is set to the “On” position. In addition, check and make sure that the power outlet provides power. Check the network connection between the iStream HD and the Ethernet port of the device you’re connecting. The network cable must be inserted properly and the Ethernet device must be turned on. Try using a different network cable, if available. The WPS LED lights only if an existing wireless connection was established by means of WPS. If you created the connection manually, or if no wireless connection has been set up, the WPS LED will stay off. The WLAN LED should always light, whether a wireless connection has been established or not. It essentially indicates that the wireless module has started successfully. If the LED is off, yet you have a working wireless connection, the LED may simply have failed. If you cannot connect to any wireless network, the iStream HD needs to be replaced through your dealer (place of purchase). Whenever the iStream HD is connected to a wireless network, or is in the process of connecting, the Signal LED will light. If the Signal LED is off, it means that the iStream HD has not been configured to access any network. The WPS button needs to be pressed firmly for 15 seconds while the iStream HD is powered on. If it still does not work, it either means that the WPS button is malfunctioning or that you are doing it wrong. WPS may be disabled in the router settings, or you have not pressed the WPS button on the iStream HD within 120 seconds of pushing the button on the router. Refer to the section “Manual Installation.” If the wireless network is password-protected, then you can either connect the iStream HD via WPS (should your wireless router support it) or manually by entering the wireless passphrase. If you have forgotten the password, there is no way of connecting the iStream HD to your wireless network. Your only way out is to set up your wireless network with a new password. The LAN LED does not light up. The WPS LED does not light up. The WLAN LED is not lit. The Signal LED is off. The hardware reset is not working. My router has a WPS button, but the WPS setup does not work as described in this manual. I don’t know the password of my wireless network and cannot connect the iStream HD Wireless Range Extender to my network. - 27 - Symptom How to address Can I use the iStream HD as a wireless adapter for my computer? The signal LED flashes rapidly and there is no wireless connection for my Web-ready TV or gaming console. I experience more lag when playing online games compared to before, when my gaming console was connected with a network cable. No, you can’t. iStream will only provide network connectivity for devices that are connected wirelessly. The flashing LED means that the signal strength is too weak to create a reliable wireless connection. Try relocating or repositioning the iStream HD. As long as the LED keeps flashing at a rapid pace, you won’t be able to use the iStream HD Wireless Range Extender in any reasonable fashion. It is not out of the ordinary for ping times to increase ever so slightly when you switch from a wired to a wireless connection. The effects become more pronounced if the wireless connection is poor. Typically, though, online gaming will not be affected in a negative way. If you require best possible ping times and lowest possible lag without any compromises, then a wireless connection for your gaming console may not be the right choice for you. A 500 Mbps Powerline AV starter kit may serve you better in this case. - 28 - SPECIFICATIONS • IEEE 802.11b (11 Mbps Wireless LAN) • IEEE 802.11g (54 Mbps Wireless LAN) • IEEE 802.11e (QoS Enhancement WMM) • IEEE 802.11n (300 Mbps Wireless LAN) General • LAN port: RJ45 10/100 Mbps data port • LAN port with Auto MDI/MDI-X • Flash: 2 MB • Memory: 16 MB SDRAM • Certifications: FCC Class B, CE, RoHS Wireless • Wireless frequency range: 2.400 – 2.483 GHz • Modulation technologies - 802.11b: Direct Sequence Spread Spectrum (DSSS): DBPSK, DQPSK, CCK - 802.11g: Orthogonal Frequency Division Multiplexing (OFDM): BPSK, QPSK, 16QAM, 64QAM - 802.11n: Orthogonal Frequency Division Multiplexing (OFDM): BPSK, QPSK, 16QAM, 64QAM • Data rates - IEEE 802.11b (11 Mbps, 5.5 Mbps, 2 Mbps, 1 Mbps) - IEEE 802.11g (54 Mbps, 48 Mbps, 36 Mbps, 24 Mbps, 18 Mbps, 12 Mbps, 9 Mbps, 6 Mbps) - IEEE 802.11n (MCS0-15: up to 300 Mbps) • Output power - OFDM: 13 dBm +/- 1.5 dBm (300 Mbps, 20 mW max.) - OFDM: 14 dBm +/- 1.5 dBm (54 Mbps, 25 mW max.) - CCK: 17 dBm +/- 1 dBm (11 Mbps, 63 mW max.) • Receiver sensitivity - 11n (300 Mbps) MCS0-15: 20 MHz: -67 dBm; 40 MHz: -63 dB (+/- 2 dBm) - 11g (54 Mbps) OFDM: -70 dBm (+/- 2 dBm) - 11b (11 Mbps) CCK: -85 dBm (+/- 2 dBm) • Wireless security - WEP encryption (64/128 bit) - WPA TKIP - WPA2 AES - WPA2 mixed • Antennas - 2 internal printed antennas with 3 dBi gain each - 2T2R MIMO mode (2 transmitters, 2 receivers) Power • Internal power adapter: 5 VDC, 1.0 A • Power consumption: 4 watts max. Environmental • Dimensions: 46.5 (W) x 73 (H) x 41 (D) mm (1.8 x 2.9 x 1.6 in.) • Weight: 0.45 kg (1.0 lb.) • Operating temperature: 0 – 40°C (32 – 104°F) • Operating humidity: 10 – 90% RH, non-condensing • Storage temperature: -20 – 60°C (4 – 149°F) Package Contents • iStream HD Wireless Range Extender • Quick install guide • Ethernet Cat5 RJ45 cable: 1.0 m (3 ft.) - 29 - SAFETY AND REGULATORY NOTICES This equipment has been tested and found to comply with the limits for a Class B computing device pursuant to Subpart B of Part 15 of FCC rules, which are designed to provide reasonable protection against such interference when operated in a commercial environment. Operation of this equipment in a residential area is likely to cause interference, in which case the user, at his own expense, will be required to take whatever measures may be required to correct the interference. This digital equipment fulfills the requirements for radiated emission according to limit B of EN55022/1998, and the requirements for immunity according to EN55024/1998 residential, commercial and light industry. R&TTE Compliance Statement This equipment complies with all the requirements of DIRECTIVE 1999/5/EC OF THE EUROPEAN PARLIAMENT AND THE COUNCIL of March 9, 1999, on radio equipment and telecommunication terminal equipment and the mutual recognition of their conformity (R&TTE). The R&TTE Directive repeals and replaces Directive 98/13/EEC (Telecommunications Terminal Equipment and Satellite Earth Station Equipment) as of April 8, 2000. Waste Electrical & Electronic Equipment Disposal of Electric and Electronic Equipment (Applicable in the European Union and other European countries with separate collection systems) This symbol on the product or its packaging indicates that this product shall not be treated as household waste. Instead, it should be taken to an applicable collection point for the recycling of electrical and electronic equipment. By ensuring this product is disposed of correctly, you will help prevent potential negative consequences to the environment and human health, which could otherwise be caused by inappropriate waste handling of this product. If your equipment contains easily removable batteries or accumulators, dispose of these separately according to your local requirements. The recycling of materials will help to conserve natural resources. For more detailed information about recycling of this product, contact your local city office, your household waste disposal service or the shop where you purchased this product. In countries outside of the EU: If you wish to discard this product, contact your local authorities and ask for the correct manner of disposal. - 30 - WARRANTY INFORMATION Deutsch Garantieinformationen finden Sie hier unter www.intellinet-network.com/warranty. English For warranty information, go to www.intellinet-network.com/warranty. Español Si desea obtener información sobre la garantía, visite www.intellinet-network.com/warranty. Français Pour consulter les informations sur la garantie, rendezvous à l’adresse www.intellinet-network.com/warranty. Italiano Per informazioni sulla garanzia, accedere a www.intellinet-network.com/warranty. Polski Informacje dotyczące gwarancji znajdują się na stronie www.intellinet-network.com/warranty. México Póliza de Garantía Intellinet — Datos del importador y responsable ante el consumidor IC Intracom México, S.A.P.I. de C.V. • Av. Interceptor Poniente # 73, Col. Parque Industrial La Joya, Cuautitlan Izcalli, Estado de México, C.P. 54730, México. • Tel. (55)1500-4500 La presente garantía cubre los siguientes productos contra cualquier defecto de fabricación en sus materiales y mano de obra. A. Garantizamos cámaras IP y productos con partes móviles por 3 años. B. Garantizamos los demás productos por 5 años (productos sin partes móviles), bajo las siguientes condiciones: 1. Todos los productos a que se refiere esta garantía, ampara su cambio físico, sin ningún cargo para el consumidor. 2. El comercializador no tiene talleres de servicio, debido a que los productos que se garantizan no cuentan con reparaciones, ni refacciones, ya que su garantía es de cambio físico. 3. La garantía cubre exclusivamente aquellas partes, equipos o sub-ensambles que hayan sido instaladas de fábrica y no incluye en ningún caso el equipo adicional o cualesquiera que hayan sido adicionados al mismo por el usuario o distribuidor. Para hacer efectiva esta garantía bastará con presentar el producto al distribuidor en el domicilio donde ue adquirido o en el domicilio de IC Intracom México, S.A.P.I. de C.V., junto con los accesorios contenidos en su empaque, acompañado de su póliza debidamente llenada y sellada por la casa vendedora indispensable el sello y fecha de compra) donde lo adquirió, o bien, la factura o ticket de compra original donde se mencione claramente el modelo, numero de serie (cuando aplique) y fecha de adquisición. Esta garantía no es válida en los siguientes casos: Si el producto se hubiese tilizado en condiciones distintas a las normales; si el producto no ha sido operado conforme a los instructivos de uso; o si el producto ha sido alterado o tratado de ser reparado por el consumidor o terceras personas. - 31 - © IC Intracom. All rights reserved. Intellinet is a trademark of IC Intracom, registered in the U.S. and other countries.